Update: See how our counters have held up after one year and after four years.
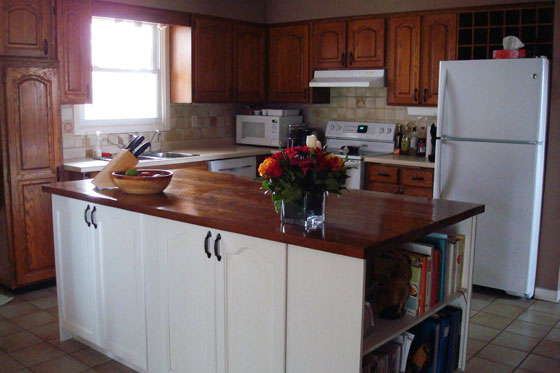
With our new kitchen island, we decided to do an inside out colour scheme. By that I mean that we reversed the existing finishes that were already in the kitchen.
Around the perimeter of the kitchen, we kept the natural wood cabinets and the light countertop. On the new island that we added in the middle, we chose white cabinets with a wood countertop.
I wanted to keep the wood tones consistent, so when it came to finishing our DIY wood countertop, the usual methods–wax, oil–were out, as they would have left the countertop too light in colour. I sampled lots of stain until I found one that matched the existing cabinets as closely as possible–Early American from Minwax.
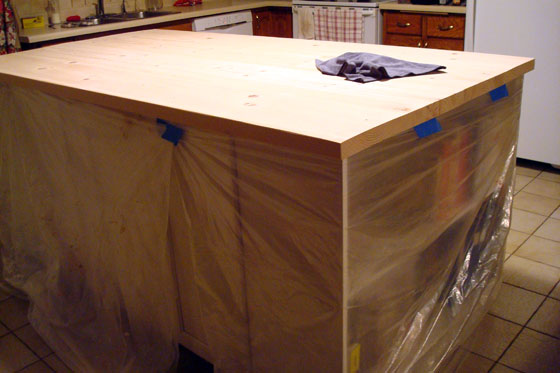
To prepare to stain the countertop, I wrapped the island in plastic drop cloths to protect our nice white cabinets and went over the wood with a tack cloth to pick up any dust and bits that might interfere with the finish.
For staining, I used the standard technique of brush it on, let it sit, wipe it off.

After letting the stain cure, it was on to the waterproofing stage. Given that I was working on a countertop, I wanted something very durable and of course food safe. I chose to go with Waterlox after reading positive reviews online.
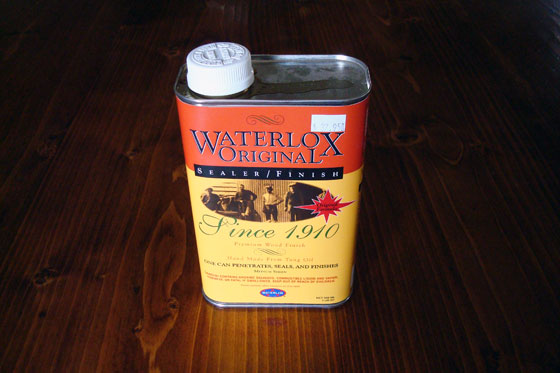
I followed their very detailed how-to guide on their web site to make sure I got the finish I was looking for. Waterlox was pretty easy to use.
I did four coats, brushing it on liberally with a natural bristle brush and letting it dry for 24 hours between each application.
Here’s some of the pros, cons and lessons learned.
First, Waterlox stinks when it’s wet. After the first coat, we developed a routine of putting the Waterlox on right before going to bed. We opened the windows, turned on fans, switched off the heat (since we had windows open) and closed the bedroom door. Given that it was March, it wasn’t necessarily the best weather to have windows open, but it was necessary both for the odor and for the cross ventilation needed to dry and cure the finish. The worst of the odor did ease after a couple of hours, thankfully.
Second, sanding between coats is not recommended with Waterlox. Instead, the guide tells you to wipe down the countertop with mineral oil before each coat to get rid of any dust. I did this, but I still feel the finish isn’t quite as smooth as I would like. I’m used to using Varathane where I sand between each coat and get a super smooth finish. The Waterlox guide recommended using a very fine steel wool between the second-to-last and last coat of finish to sand out any rough spots, which I did, but it’s still not perfectly smooth.
Third, the finished surface is very shiny. I used Waterlox Original Sealer/Finish, which is recommended for the first few coats (or all coats, if you choose) and is listed as having a medium sheen. A satin finish is available, but honestly I was too cheap to buy another can, so I did all four coats with the Original.

After the final coat of Waterlox, we let the island top cure for a full week without putting anything on it.
Now that we’re using the island, the finish seems to be both waterproof and durable.
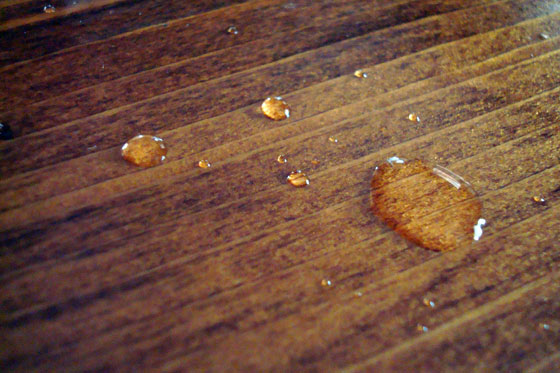
Given that it is a wood counter, we use a cutting board if we’re chopping and cork pads for any hot dishes. However, there are still occasions to put the finish to the test. If we spill (which of course never happens), liquids bead up on top of the surface. When we slide dishes across the counter, we don’t have to worry about scratching the finish. The wood wipes down really easily and looks fresh.
Finishing our homemade wooden countertop was a question of both form and function. I wanted to match the wood tones we had in the kitchen, and I also needed it to stand up to actual kitchen prep work. Done and done.
Update: See how our counters have held up after one year and after four years.

It all really looks nice. Well done.
Thanks, Diane!
I love the way it looks. We have wood countertops that will shortly need refinishing. Not looking forward to it..
I feel for you. Refinishing is more involved than my scenario of starting from fresh wood.
Julia,
It looks beautiful, I am very impressed!!
Well done, as always.
Auntie Anne
Thank you, as always!
I know I’m suppose to comment on the counters, and they look lovely but dammit if I don’t love your haircut. I’ve been debating on hacking mine off super short over the last few days due and this photo did not help that desire haha. I’ve been trying to get it to a certain length for a while and it’s in this weird in-between phase. The same phase just below collarbone length that I ALWAYS cut it before it gets longer.
I will not cut. I will stare at the counters instead of your hair. Dammit it’s cute.
Oh, I’m not going to help you, Heather. I love my short hair. It was really short in the fall when I cut it for a birthday present to myself. I loved it, but now that it’s grown out a little bit I’m loving it even more.
It’s so easy to succumb in the in between phase. I had a pixie cut a few years ago, and grew it out. The stage where it caught on the collars of my shirts and tickled the back of my neck was so annoying.
I was thinking the same thing. That cut really suits you! I recently also got mine short, for the first time since I was a kid, I think. I love it! I think I’ll keep it this way for the rest of my life.
And the counter does look great. Is it still as shiny and impervious now that it’s a few months old?
The countertop has held up really well. It’s perhaps not quite as shiny, but still pretty glossy. The wood wipes down really easily with a wet cloth. There are a couple of spots that seem to have absorbed some dye from bags or other things that have been set on top. Some of it rubs out, but not all of them. With the dark stain, they’re not very noticeable though. There’s one scratch from where I slid a dish across the counter. The finish is still in good shape overall, IMO. I try not to fuss about my counters too much… probably a good illustration why I shouldn’t give in to my love for marble.
Thank you so much for the compliment. Enjoy your short hairdo.
Yeah, I’m of the opinion that things like counters are supposed to be there to work for us, not us for them. Though I must say, I have a marble countertop, and it seems to be durable as all heck! I can’t imagine what I could do to it to wreck it.
Oooh… that’s encouraging to hear.
Julie,
What wood was used for your cabinets?
Hi Annie,
The cabinet boxes are made out of white melamine. The doors and gables are oak. I had bought the doors at the Habitat Restore, and so my cabinetmaker made panels to match them. Thanks for your question.
Hi Julia,
Another question – perhaps I overlooked it – What color stain did you use? It is lovely.
It’s called Early American from Minwax. It was the one that matched our existing cabinets the best.
I found it – Early American from Minwax.
What type of wood did you use for the countertop?
I chose spruce–the cheapest option at my local lumber mill. It’s definitely a soft wood and we see a few dents, but overall it’s held up really well.
Thanks!
So after all this time how is the counter holding up?
I have marble and marble is great as long as you don’t choose a white marble because over time it will turn and not be bright white and the grey veining dulls a little but the main problem is if you really cook cook (as my grandmother use to say) which I do, any white marble is hard to keep stain free. Tomatoes, wine and a whole host of other ingredients can and will stain it. Most of those beautiful designer kitchens are in homes that don’t really cook cook. They are entertaining homes. I love the new marble look a likes that are made from stone and I have some of that product in my home. I can set a hot cast iron skillet on it and nothing happens. It is durable but I would never do that to any white marble never ever!
The reason I ask is we live on 190 acres give or take farm and my house is very well there’s no way to say it except say it but sort fancy on the inside….not farm house or country at all. But we are going to build a new home soon hopefully and I love the look of wood counters and I know people say teak but teak if you get bored with them well they are extremely expensive. So I would love to know how yours has held up. I love the color and the look. I am going for an upscale farm house style. I want a more laid back style in our next home because it will be so much easier to keep clean on a farm.
When I saw your first photo I thought wow love that countertop and then I thought I would have to paint the rest of your kitchen cabinets white, add clear glass knobs and a crystal french country chandlier, lol because I just love a white kitchen with with wood counters and I would have to add reclaimed wood floors! Lol I have an addiction to white and old wood sorry. My husband says there is no cure but he likes it too.
Hope you are still enjoying your farm. Thanks for any information you can give.
Thanks for asking, Jacqueline. We are very happy with our counters, but I’m not sure I’d recommend them for a long-term renovation. For us, they were a stop-gap until we can redo the kitchen properly (including new cabinets and floors!)
We’re hard on our counters–as in don’t wipe up immediately, so we see some “etching” or watermarks where things have set for a little while. Most things wipe up fairly easily even if they’ve been left for awhile. There are just a few spots that haven’t come out.
Wood is soft, so there are some dents. I’m not sure there’s any way around that. They don’t bug me.
Staining the countertops with wood stain opened up one issue in that we have a couple of chips along the edge. The stain didn’t sink too deeply into the wood, so the lighter wood shows at these chips. If you just used a clear sealer rather than a tinted stain, the chips probably wouldn’t be as noticeable.
In terms of the good points, the Waterlox sealer does keep the wood waterproof. The joints between the boards are still tight. The wood hasn’t warped. Plus we obviously have so much more prep space which was much-needed. For the work and money we put into this counter, it’s definitely worth it for us. I would recommend them as a temporary fix.
I hope that this info is helpful for you.
Thanks for answering so fast!
I don’t mind some dents either. I have a 180 year old table that has some dents I think it makes it more charming. We are going to use it in our new house as part of our kitchen. I don’t want built in cabinets we are doing the European kitchen thing of using antique furniture pieces as kitchen cabinets. So if I wanted to add a new wood top to a piece of furniture instead of marble I would use a harder wood than you used but I was really interested in the water proofing. Seems the product you used has held up really well. I am researching stainless steel with no directly finish because it isn’t shiny. So many options.
I appreciate you answering so super fast. I just read a lot of your blog hope your still loving farm life. Love you make your own maple syrup! Thanks again and continued happiness and farm blessings.
Your plans sound beautiful… and your 180-year-old table too. Much happiness to you too.
I am laughing at myself I meant directional finish! Clearly not enough sleep this week.
🙂
I love your table. One question, why would you not lightly brush some of your stain into your exposed, chipped wood to make them less obvious?
🙂 Why indeed. Purely laziness. They honestly don’t bug me enough to cause me to get out the stain.
Beautiful project! And great detailed info. Thank you so much for sharing.
I am updating my 70s kitchen on a strict budget. Using pallet boards for countertops and floors. I have been studying the Waterlox.
You have been extremely helpful!
Glad it was helpful, Terry. Good luck with your updates.
Did you use polyurethane at all or did you go from staining to the waterlox?
Stain then waterlox. No urethane.
Pingback: 7 Creative Ways To Waterproof Your Kitchen • A Moment With Franca