So July’s project was my biggest failure yet. Remember that dirty bumpy stippled ceiling in the guest room/soon-to-be master bedroom?

Yeah. It’s still there.
The week that I was planning to start operation popcorn, Kate posted about removing the stipple ceiling in the flip she and her husband are working on. She mentioned doing an asbestos test before she started. Our house is built the era where asbestos might have been used, so I thought a test sounded like a good idea.
However, finding a test kit was harder than expected. It seems home tests are an American thing. I ended up finding one online. So the extent of my progress this month is a credit card charge and my Dad’s drywall sander sitting in a corner of the guest room. 😦 (Please note as well the light switches behind the door. Really convenient.)

Wanna see some actual progress? Let’s look at some other doors instead.
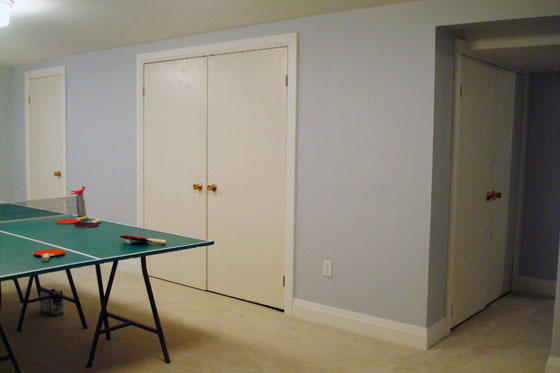
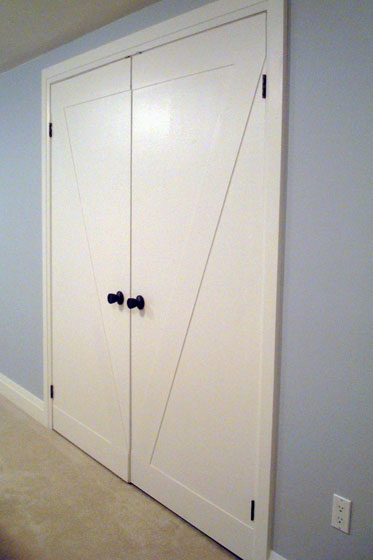
Hello basement barn doors.

Here’s the before picture just for reference.
Yes, redoing the doors was June’s project, but the painting was left until July. It must have been something about this month because, like with the stippled ceiling, the final stages of painting and hanging the doors didn’t go smoothly.
For painting, I planned to use my Dad’s sprayer… or rather I planned to have Matt use my Dad’s sprayer. Well, the air compressor conked out, so spraying was a no go. So much for all of the time we spent tarping the driveshed.
Our mechanical difficulties are totally on me. I was the one who set up the air compressor. Earlier the same day I’d killed the push mower, so I obviously had a hex working when it came to mechanical objects.
Painting became a team effort as Matt rolled and I brushed. Soooooo sloooooow.

Installing the doors turned out to be another headache. Only five out of the nine doors that we made over fit smoothly back in place. Somehow, two doors grew so that they were too fat for their openings. The closet door that we’d accidentally put the trim on the wrong side wouldn’t close because the trim hit the doorstop (I don’t know why I didn’t realize this would be a problem). The best one was discovering another door where I’d put the Z on the backside. No idea how I missed this. My mistake left the completely flat slab door facing out into the room–exactly the situation I was trying to correct.
Ugh. I was very frustrated.
It took a few hours of work spread over a few days to fix my mess ups, including repainting. Double ugh.
Matt was very patient, installing and removing the doors multiple times as I tested the fit.
Finally, all of the doors fit, swung smoothly and closed properly.
I installed the old hardware that I’d ORBed, and I called this one done.

The Z detail is subtle–the strips are only about an eighth of an inch thick–but I think it’s a really nice touch. Our barn doors are absolutely a lot more interesting than the flat slab doors. Plus they fit really well in our farm setting.

Issues aside, this is a pretty easy update–and much, much more affordable than buying nine new doors. It would have been even cheaper if I hadn’t bought all new hinges. All in, this makeover cost less than $200 (although I did use glue and nails that I already had):
Panels (two sheets of hardboard cut into 6-inch strips): $18.53
Hinges (Stanley Home Designs in Egyptian bronze-I couldn’t find the exact version online, but this one is close although a little more expense): $96.39
Paint (Benjamin Moore Cloud White in the pearl finish): $59.67
Spray paint (Rustoleum Oil Rubbed Bronze): $11.28
Total: $185.87 (just over $20 per door)
Our master bedroom makeover may not have started, but our basement makeover came a lot closer to finally being finished.
Let’s just not discuss that the basement was summer 2012’s project.

Really like these doors…great job!
Thank you!
Brilliant! It looks wonderful. I love the black door nobs too. Well worth the wait and your troubles.
I know you’ve been waiting to see them. Glad it was worth it.
One option if you’re having trouble with the asbestos test is just to assume that it does contain asbestos and use the appropriate procedures (like taking it off wet) either way.
Thanks for the tip. I consider asbestos something for the professionals so I probably will never tackle it on my own. Unless the test comes back asbestos free.
I’m glad you’re doing the asbestos test. Our asbestos was a nightmare, and very worrying, knowing that we’d been exposed. The doors look great! What a marathon.
Asbestos is definitely worrisome.