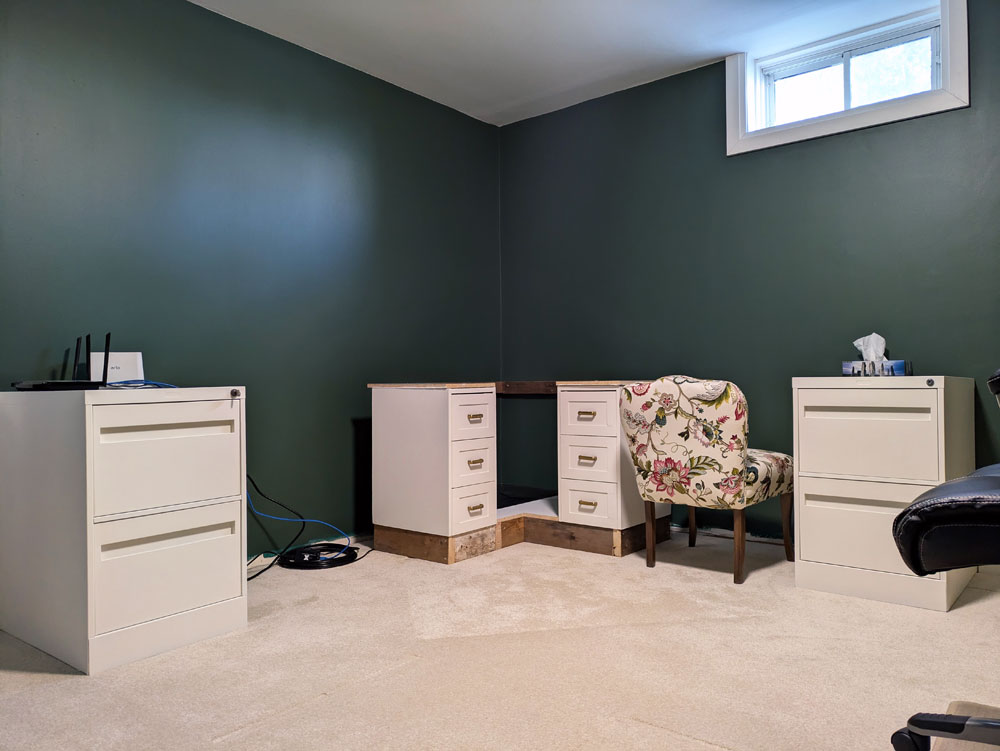
Take one old desk, two file cabinets, a bookshelf, a countertop and a dream and what do you get? The desk in my new office.
My vision for the desk was pretty clear right from the start. I knew I wanted two work stations. I knew I wanted file storage. And I knew I was cheap.
Fortunately, I also knew I was handy.
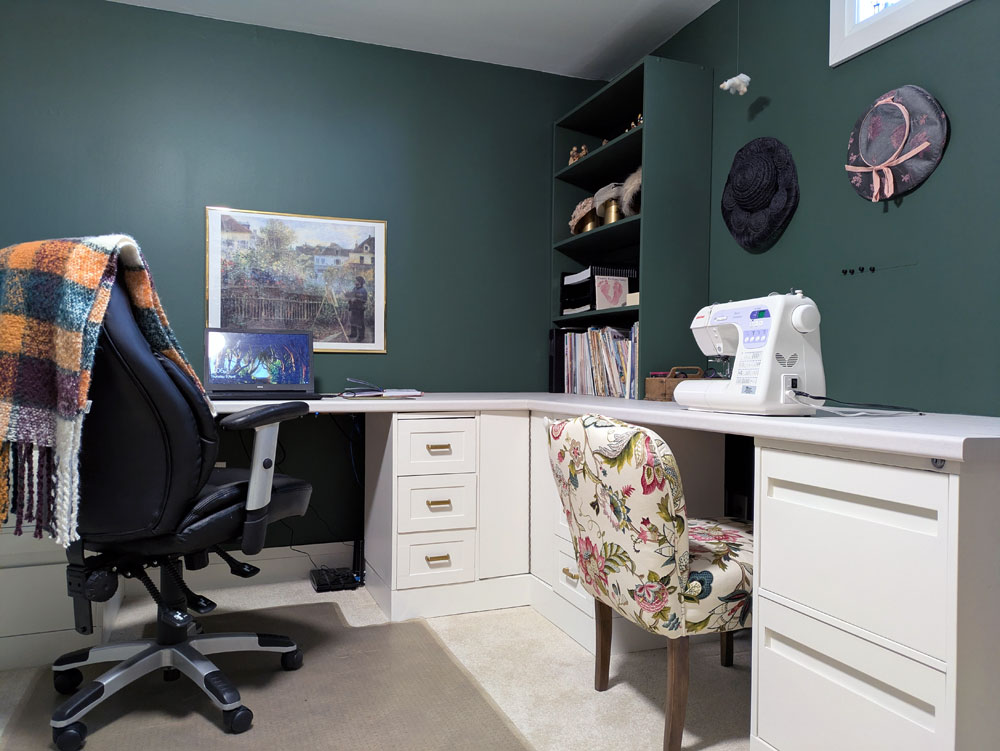
I came up with the idea of a long counter that wrapped around the corner. Underneath there would be regular desk drawers and file drawers. In the corner on top there would be open shelves for storage and display.
I knew what I wanted. Now I had to make it happen.
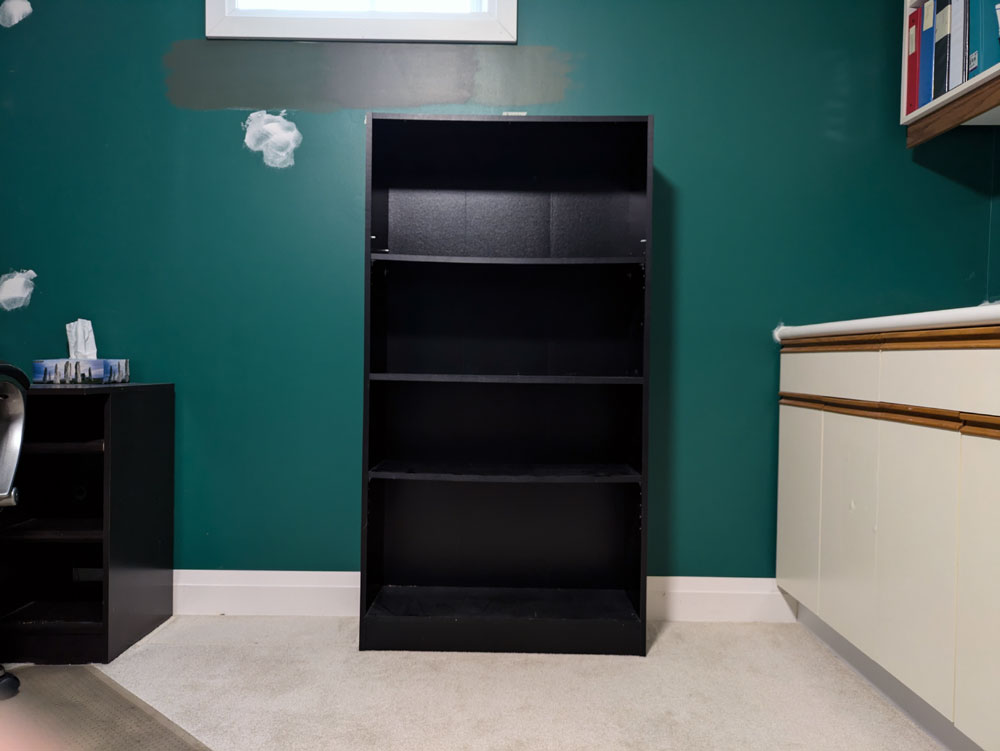
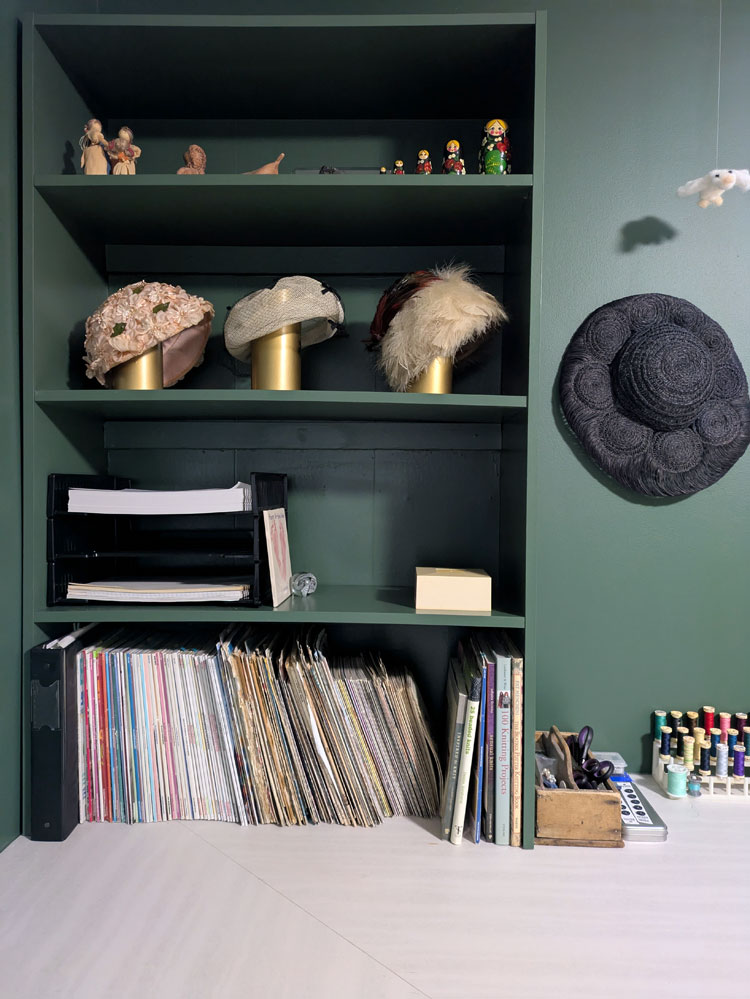
When we cleaned out Matt’s office, I left one bookshelf behind with the plan to use it for the hutch on top of the desk. One component, check.
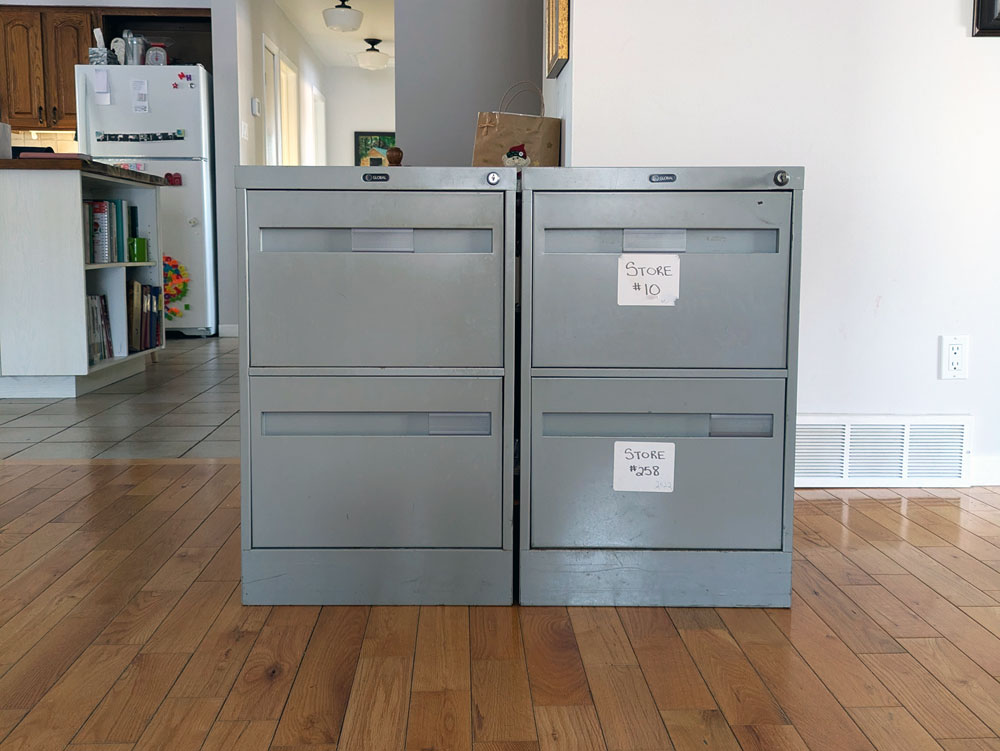
Then I moved on to the file cabinets. I wanted cabinets with a decent amount of storage that were the right height to support a counter. I found a matching pair at a used office supply surplus store.
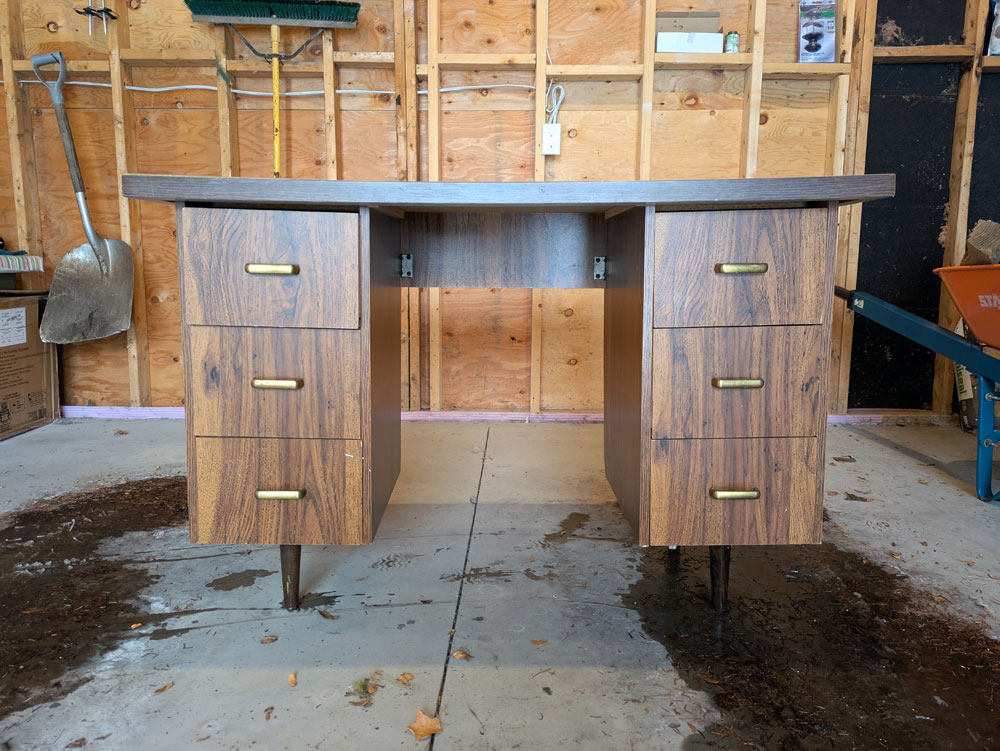
Next came the drawers. I considered building them and really didn’t like that idea. A search on kijiji netted me an old desk with two towers of simple drawers.
When we picked up the desk, the seller asked Ellie, “Is this going to be your desk?”
She said, “No it’s my Mom’s.”
The seller was a bit horrified. (The desk was pretty rough.) He said, “I have a nicer one in the house.”
I said, “No. This is exactly what I’m looking for.” And in my head, “You’ll never recognize it when it’s done.”
Elements procured, it was time to put them together. Or take them apart and then put them together.
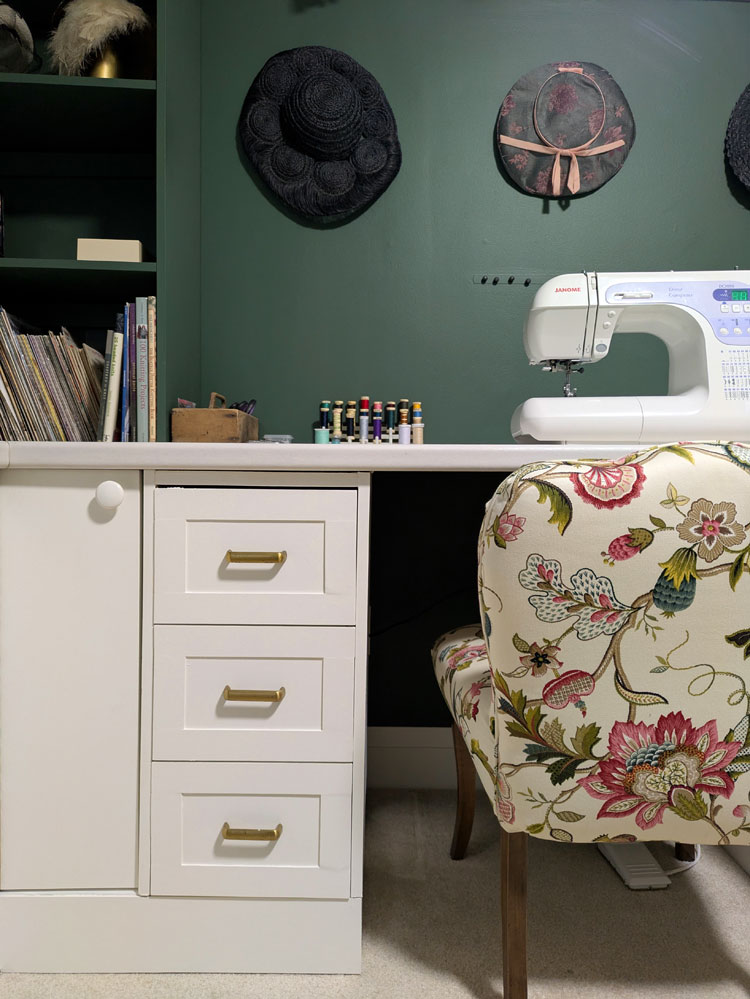
I removed the legs from the desk then cut the top so that I had just the two towers of drawers. Then I revisited the fake shaker technique I used in our laundry room and added strips around the edges of the drawers to give them the recessed panel profile. This is always the stage where I’m questioning my life choices and wondering how this is ever going to look good.
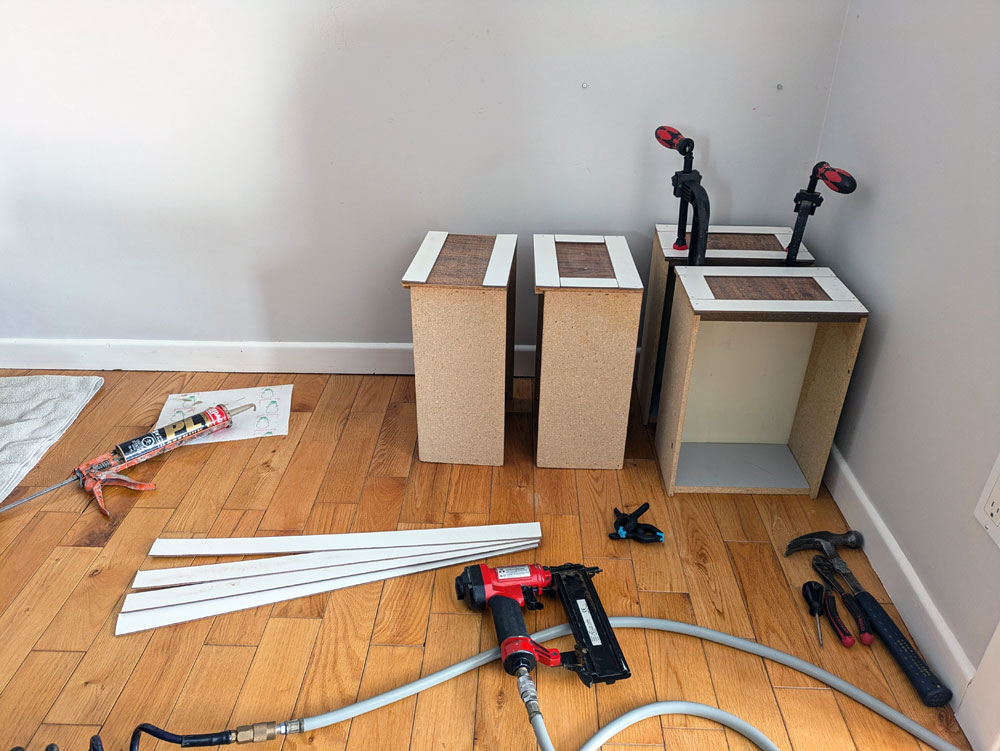
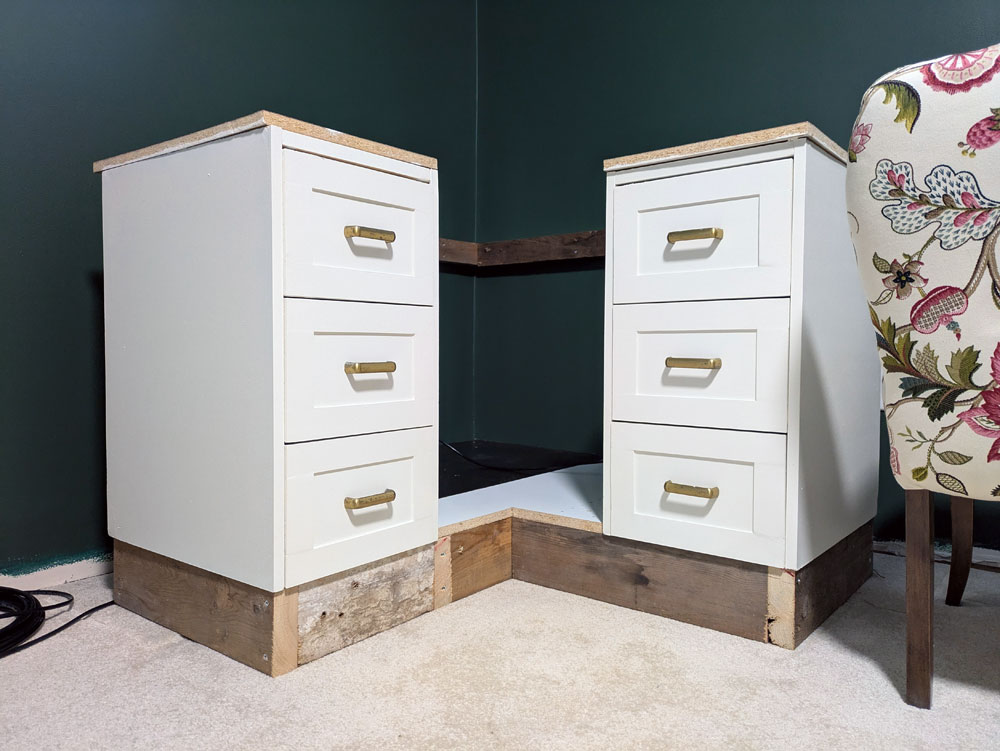
Wood filler, sanding and paint make everything better. I also painted the file cabinets my go-to furniture colour, Benjamin Moore Cloud White.
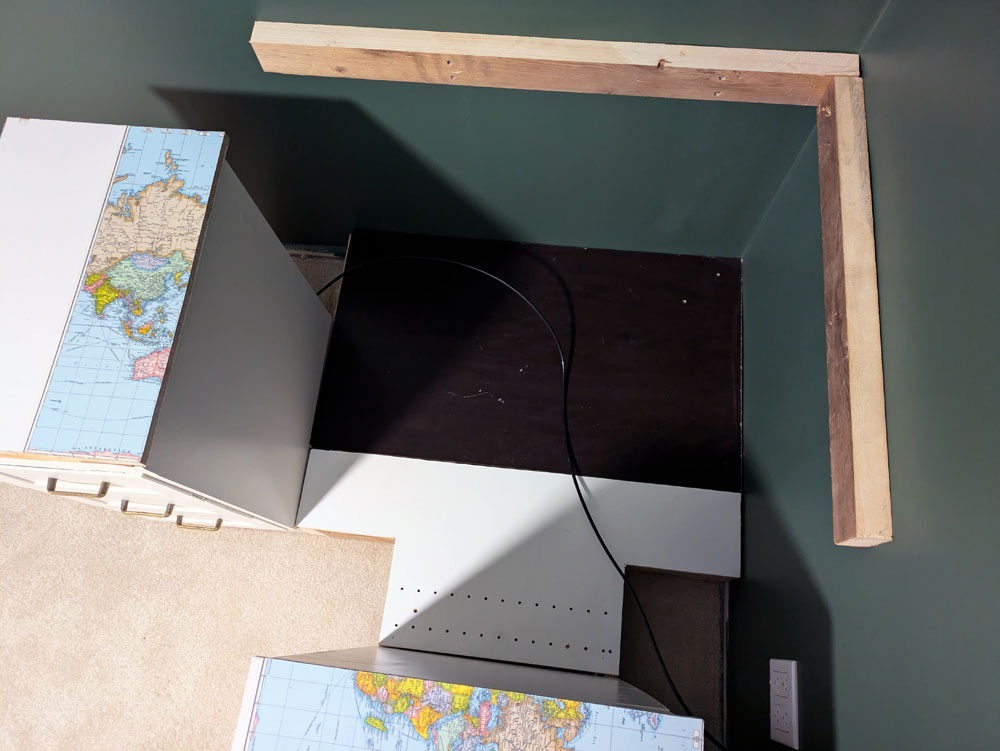
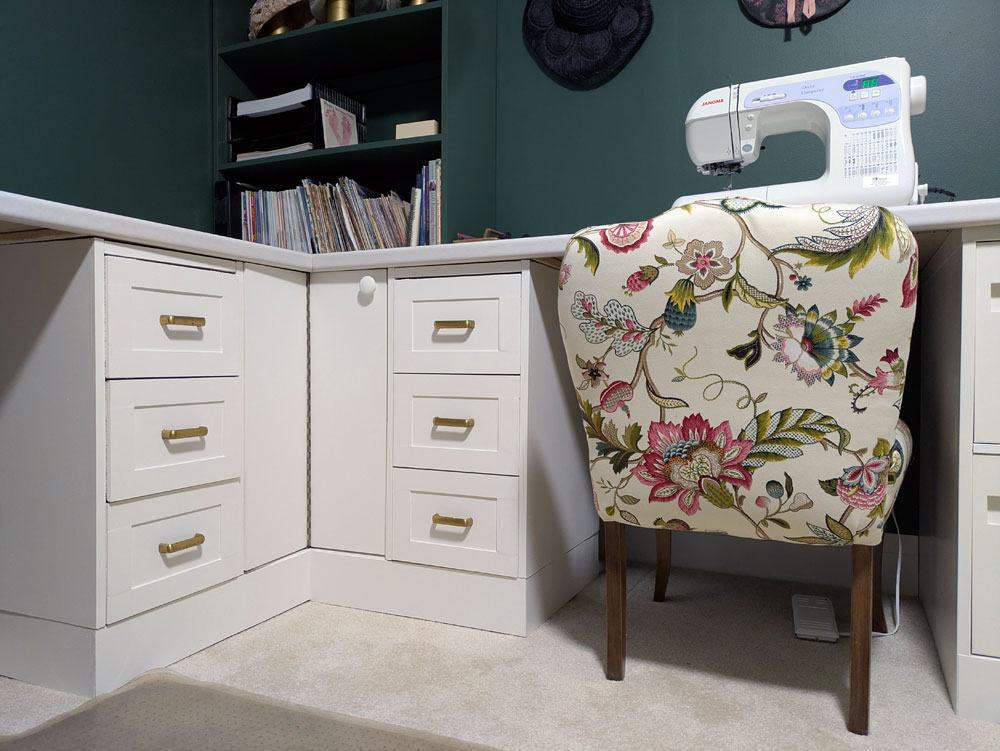
I was finally at the reconstruction stage. I set the file cabinets at either end of my L-desk. The drawers were going to go in the corner of the L, but they were a bit short.
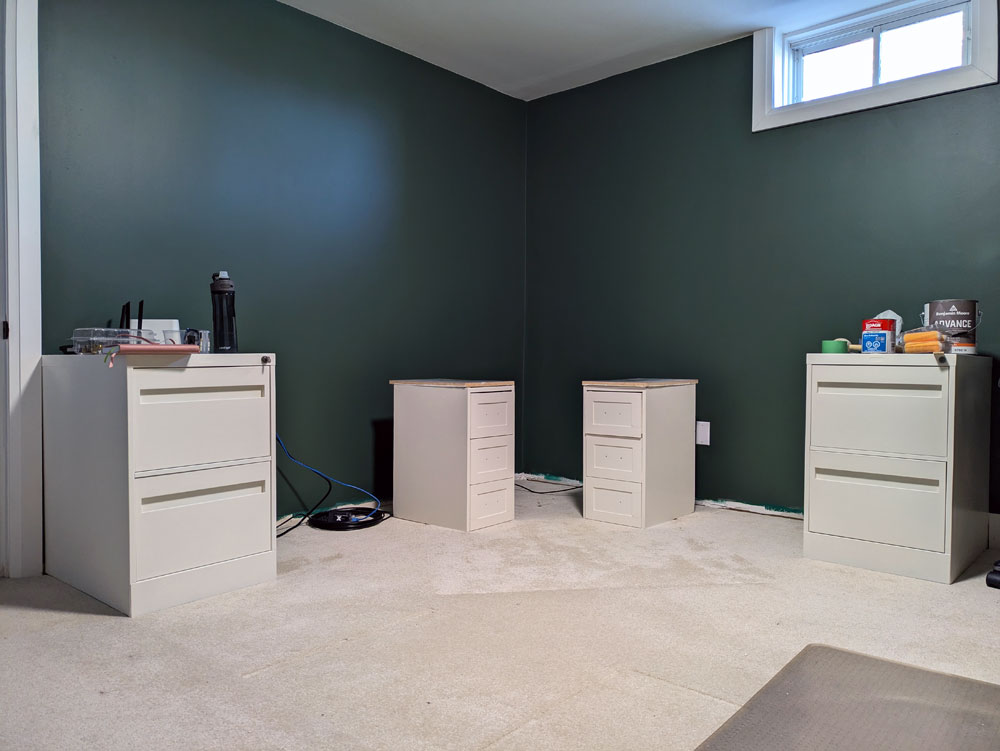
I built a little platform in the corner that raised the drawers up to be even with the file cabinets. The drawers are shallower than the file cabinets and I had to make sure I had access to some electrical outlets, so the platform appears to be oddly shaped.
After debating spacing and dimensions a bit, I decided to make the corner into a functional cupboard, albeit with a very small doorway and a patchwork floor. This is the spot for memorabilia and rarely used things.
With the drawers in place, I threw a piece of plywood on top and took the desk for a test drive.

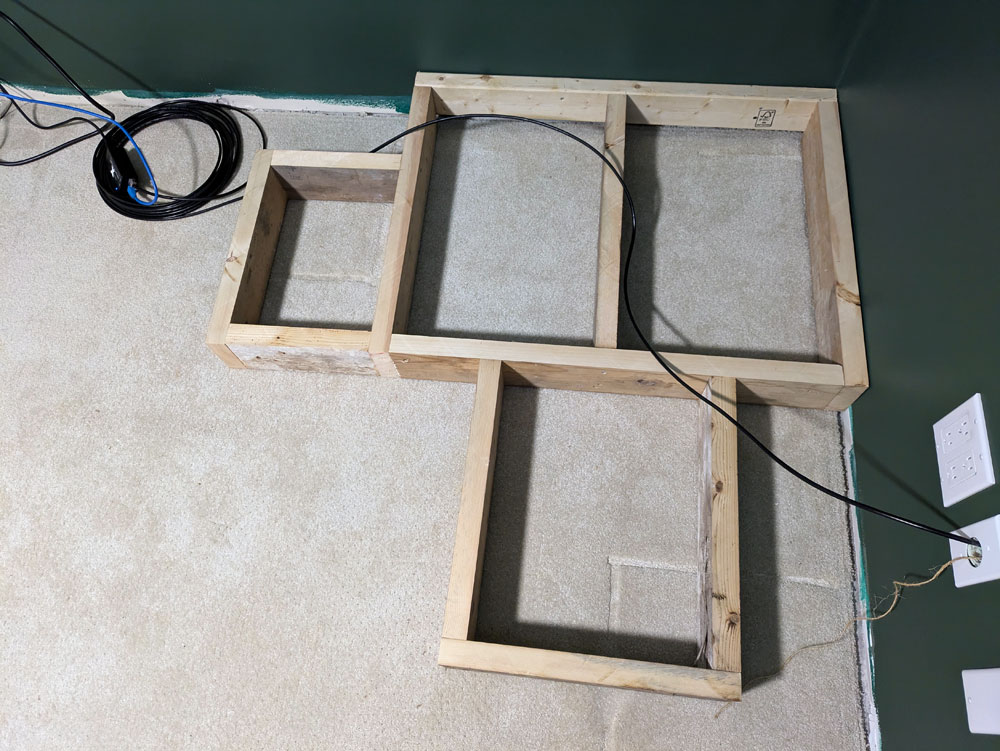
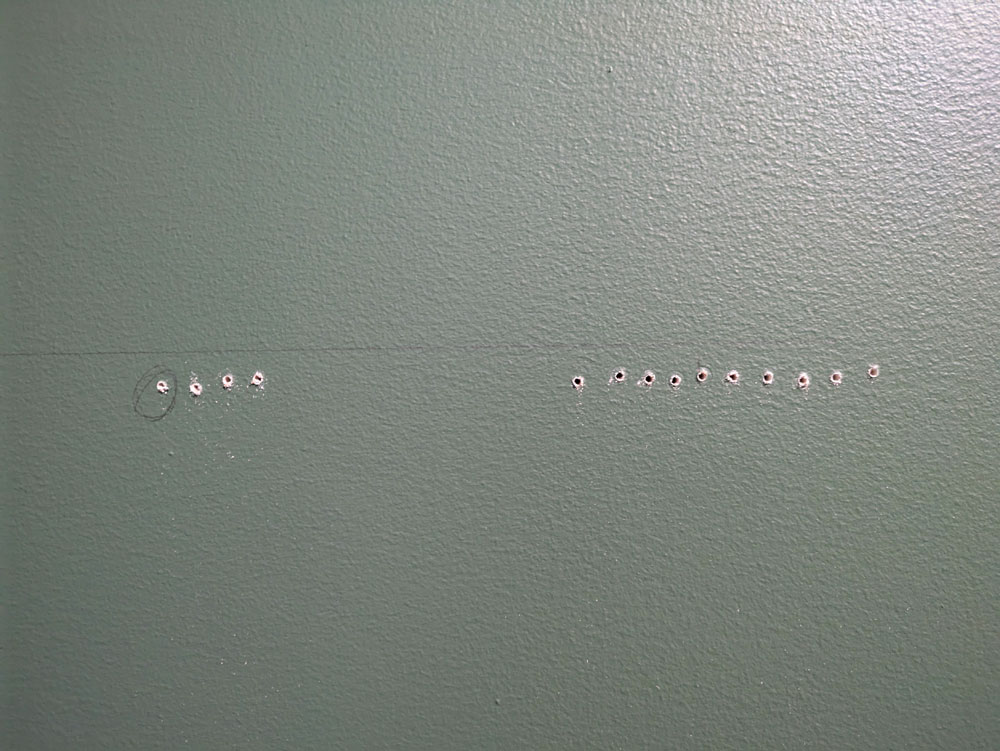
Everything was level and felt good, so I placed my order for a countertop. I went with a simple laminate counter. I added some ledger boards on the walls for additional support (after drilling just a few holes to find a stud).
The counter also rests on all the drawers. Thanks to the size of my file cabinets, the desktop is extremely deep. Lots of space to spread out.
Bottom half done. Onto the hutch.
I cut Matt’s bookcase so it was the height I wanted and then I positioned all of the shelves and fastened them in place. I added extra bracing along the back as well.
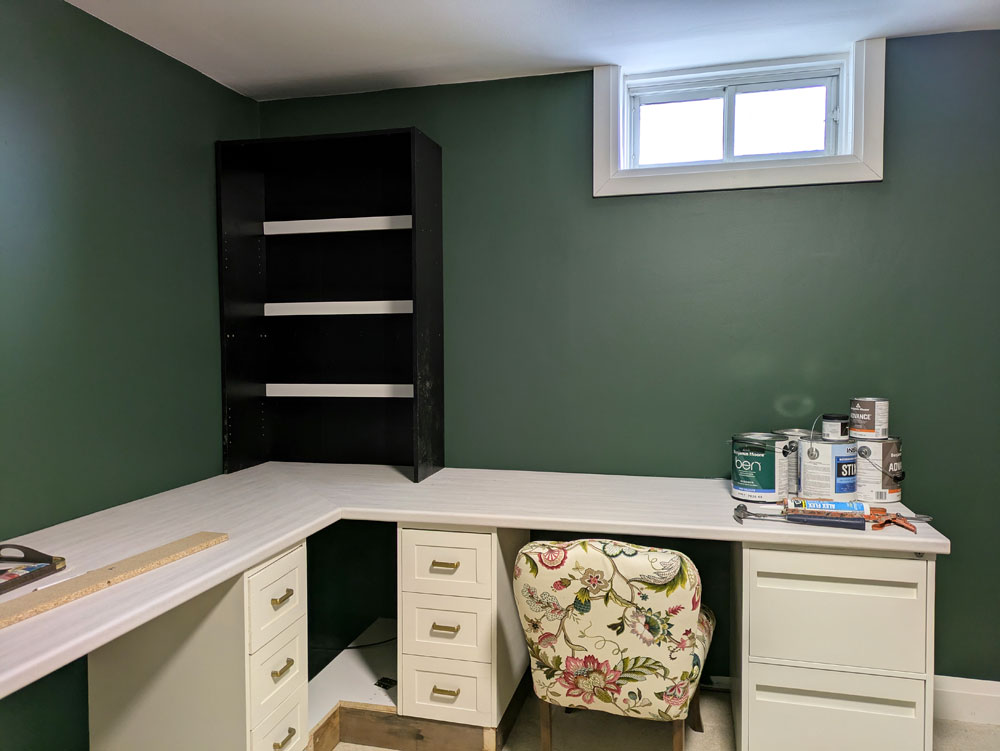
I debated what colour to paint the shelves and ended up deciding on the same green as the walls, rather than white. After few coats of paint, I lifted it onto the desk, set it in place and screwed it to the wall. Some wood filler and paint touch-ups finished it off.
The final step was a door for the corner cupboard–and we just happened to have a corner cabinet in the barn. I removed the door, cut it down to the size I needed (carefully preserving the hinges), gave it a coat of paint and… couldn’t figure out how to fit it in place. Fortunately, I live with a small person who is keen to help, so she climbed into the cupboard with a flashlight and pencil and marked the hinges for me. (Throughout the construction process, she liked the idea that the corner was a hidden fort just for her, so she had no problem climbing in when asked.)
I was then able to drill the holes and screw in the hinges. A wooden knob, some painted hardboard for the toe kick and reinstalling the baseboard were the final touches. The desk was done.
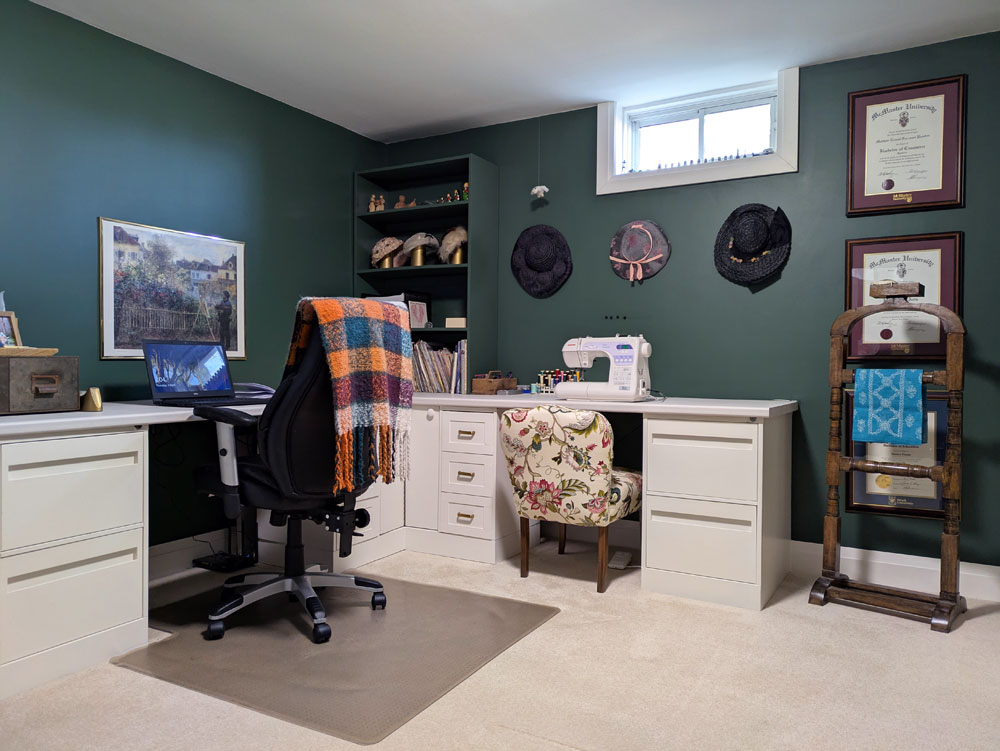
I am not a cabinet builder and fine carpentry is not my strength. I am really proud of how the desk turned out. I was able to take an idea, a bunch of furniture pieces, put them together and create an awesome, functional, attractive result.

Hi Julia,
Looks great ! What a fantastic job you did. 👏
The corner desk I use in the basement, has the computer monitor in the centre, printer on one side with two short filing cabinets side by side on the other side of the desk. It was a purchase I made from Office Depot years ago. It serves me well, however, not nearly as aesthetically pleasing as yours.
Enjoy your new office and sewing space.
Pam
Your corner desk sounds very similar to the one that was in this office originally. It was left by past owners and it served Matt well as well.
Function is a bigger consideration with desks than appearance. I’m glad I’ve been able to get both with mine.
I just love this! What beautiful creativity and workmanship, I am sure that you are eager to spend time in your new space.
Thank you. The new space definitely makes it easier to go to work.
Lots of work and it turned out great. I have refinished old furniture and like the idea of refurbishing furniture. We’ve only had to do this once. My husband took the drawers from his and his sister’s childhood desks and made a large corner desk. When we sold the we left it and he made it to fit that house.
Sounds like a very similar project. I think it’s really nice to make furniture exactly fit your space and function.
It was but a smaller one.
WOW! You’re my kinda builder!! I love how you made everything work!
Wow, what high praise. Thanks so much.
(❁´◡`❁)
What a wonderful project! It looks beautiful. I love a really big desk like this.
The closest I came to this was “building” a desk in the second bedroom of our two bedroom suite when we first moved into it from our six bedroom house. Space was at a premium, and I really wanted a nice big desk but also needed the room to function as a guest room and crafting space. I got a hollow core door, put a 2×4 horizontally on the wall at the height to hold it up, and big door hinges to fasten it on. Then I had two pipe legs cut for the front half, that could screw on and off. I painted the desk white, and the pipe legs were black. When it wasn’t in use, the desk just folded down and hung against the wall. It was great, and so nice and big! It so happened there was a foundation ledge about a foot higher than the desk that ran the length of the wall, and that was handy to store things and put some decorative piecees. Very useful indeed. It’s a good feeling to come up with your own solutions.