It’s time for the first progress report in my One Room Challenge laundry room makeover.

Today’s update focuses on the most striking transformation in the laundry room: the cabinets.
You saw in the first post that the laundry room cabinets are basic flat doors. You also saw that my inspiration was a shaker style.

Fortunately, transforming flat doors into shaker doors is a pretty easy process. However, there was one door and one drawer that weren’t basic flat panels. I don’t know what this style is called officially, but I believe it was popular in the nineties. The distinctive feature of these cabinets was a built in wood stained “handle” along the edge of the white melamine flat door or drawer. Look familiar?
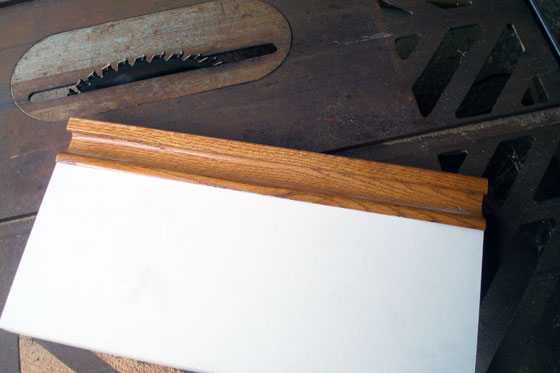
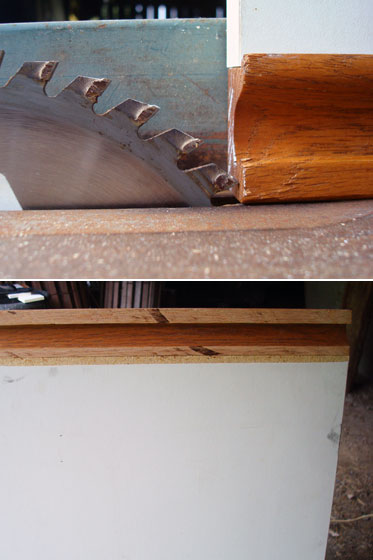
Before I could shaker-fy these cabinets, I needed to get rid of the ridge part of the handle. I enlisted my new-to-me, but extremely old table saw. I set the fence and the blade at the precise width and height I needed to slice off the handle, and then I very carefully ran the door and the drawer through the saw.
Once the handle was removed, I could work with these cabinets exactly like the rest of the ones in the laundry room.
Using my table saw again, my Dad and I cut 2 inch wide strips out of a sheet of hardboard that I had left over from my bookshelf project. I then affixed the strips to the cabinets to make the raised shaker detail.
Easy peasy.
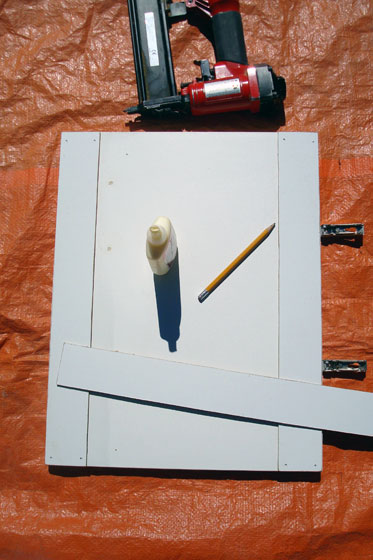
I used a smear of carpenters glue on the back of the strips and then I tacked them in place with my Dad’s nail gun. A bit of wood filler evened out the joints and an all over sanding smoothed everything out. I chose to have the vertical pieces run edge to edge on the drawers and doors, and then the horizontals ran between the two vertical strips.
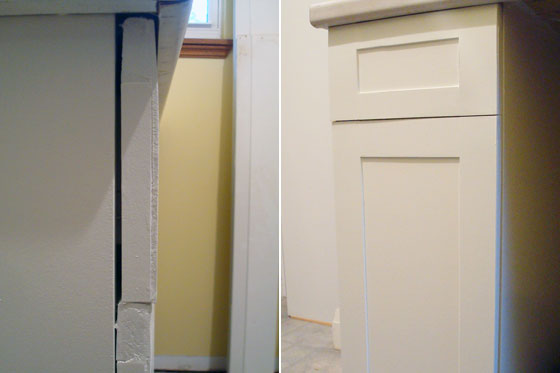
For the drawer and the door that I’d trimmed earlier, the shaker strips covered most of the original handle. At the edges a good daub of wood filler took care of the hole. Here’s a sneak peek of how they look after painting. Not perfect, but good enough for me.
Anyways, before I get too far ahead of myself, how about a few more details on the painting? After I painted the kitchen cabinets at our first house, I swore I’d never do it again. Maybe my tolerance for DIY has improved because painting these cabinets was much less torturous.
A few things were different this time around.
- After priming I used the Advance paint formula from Benjamin Moore as opposed to a stinky heavy duty oil paint. I’ve been super impressed by the finish I get from Advance, and clean up is a breeze.
- I painted just the fronts of the doors. Sure it’s a shortcut, but I didn’t feel the need to flip them over and paint the insides too.
- I split the painting into two stages because I chose two different colours. The uppers and two blocks of lower cabinets are all BM Cloud White (the same colour as we’ve used on the trim elsewhere in the house). The lowers on the sink section are BM Wrought Iron (the same colour as Matt’s bathroom). One coat of one colour took just 30-45 minutes–much better than the week of 16 hour days I spent in our last kitchen.
As soon as the drawers and doors were dry, I put them all back in place.

The room may still need to be painted, cleaned and decorated, but it’s already looking 100 times better. Since installing the doors and drawers, I’ve found myself making special trips downstairs to the laundry room just to admire the cabinets.
That’s not weird, is it?
This is a super cheap, easy way to makeover basic cabinets. I highly recommend it.
And because this is a progress report, here’s where the rest of the makeover stands:
Add shaker style trim to the cabinetsPaint the cabinetsInstall doors and drawersRemove ceiling rack – By Oct. 3Patch ceiling and walls – By Oct. 3- Prime walls and paint ceiling – By Oct. 10
- Paint and install baseboard and paint window trim – By Oct. 10
- Deep clean (sink, counter, floor, machines) – Oct. 13 (Happy Thanksgiving Monday!)
- Paint walls – By Oct. 17
- Level washing machine – By Oct. 19
- Build and install ceiling rack – By Oct. 24
- Build and install towel bar – By Oct. 24
- Install cabinet hardware – By Oct. 24
- Build and install light fixture – By Oct. 26
- Decorate – By Oct. 31
I knocked off steps 4 and 5 in the past week, but added one new step (#10). I don’t know how I forgot that the washing machine shakes like it’s going to take flight every time it goes into the spin cycle. We have to fix that.
So week one of the One Room Challenge is over. Five (or hopefully less) to go. If you haven’t had a chance, I highly recommend checking out the link-ups on Calling it Home. The 20 participating bloggers post on Wednesday and then the linking participants (like me) share our progress on Thursday. There’s an impressive range of projects and lots of inspiration. Exactly what this challenge is all about.
Have you ever made over cabinets with trim or another add-on? How about painting cabinets? Have you ever taken on that fun task? What’s your favourite cabinet style? Anyone know what that nineties built-in handle style is called?

We bought some brand new cabinets for our bathroom from a cabinet outlet. We tackled painting them and like you, I vowed I would never paint cabinets again. But I am sure like you again, I will try it again. There is just something about saving so much money on new cabinets, that I HAVE to try to paint them!
I love the Shaker addition to your cabinets, they look great!
I know what you mean. To save some pennies I’m willing to entertain the idea of going through the torture of painting them again. I’m so glad it wasn’t as bad this time around.
They look great! That was very ingenious to trim off the wood on those old handle doors. I think those oldies are called ‘ugly’, or perhaps even ‘fugly’, haha. I restained the cupboards and put on new hardware in our last home in order to sell. It was pretty much a huge pain. But I would do it again if the savings and potential improvement were big enough.
That’s a good name for this cabinet style. Very clever!
absolutely INGENIOUS!! We have these white/wood cabinets in the kitchen of a rental property we just renovated and now I know what we will do to them if we ever sell it! AMAZING. This is looking so good, I can’t wait to see what comes next! xoxo.
It worked out really well, Tara. I recommend it!
The cabinets look so much better. Congrats:)
Thanks, Tiffany. Your foyer is looking amazing!
Wow! You made a HUGE difference in a week. I love the dark lowers with white uppers. Also, it’s totally not weird that you go to visit the new cabinets. Every time I get water out of the fridge, I have to turn on the pantry light and gaze lovingly at the new paint in my pantry.
Isn’t it wonderful to see the progress!
Wow! Great job on the cabinets! Looks like everything is coming together nicely. Can’t wait to see next week’s progress 🙂
Thanks for the encouragement. That’s the best part of this challenge!
I am clapping very loud for you! What an amazing transformation. Great job on the doors.
Thank you! And thank you for hosting the challenge.
Boy are you handy! I wish I knew my way around power tools like that! Awesome.
I’m still a little intimidated by the table saw. It takes a bit of time and practice to get comfortable.
They look great! We did this same thing to our kitchen and mud room…what a process! I love the shaker look though, so worth it.
It’s a pretty easy update all in all. I checked out your den makeover and the charcoal colour is awesome. The pops of gold are a great accent.
I don’t know how I missed this post, but this is absolutely amazing. Julia, you are seriously skilled!!! And good for you for painting cabinet doors again after doing your kitchen. I also painted my kitchen cabinets and I’m not sure I could endure that again!
Another person who shares my pain! Isn’t it funny how the memory fades though and all your left with is beautiful cabinets?