See an update on our counters after four years.
A year ago, I wrote about how we DIYed our own wood countertop. Since then, this post has become far and away the most popular on the blog. Given that we’ve been living with our homemade counter for a year now, I thought a good topic for today’s post would be an update on how our DIY counter has worked for us.
The simple answer is the counter has worked great. Here’s what it looks like today.

Just a reminder, here’s how the counter looked a year ago.

Here are a few more details on how the counter performed.
The biggest measure of this counter’s success is the joints. After a year of use, they’re still nice and tight. Squaring off the edges of the boards, gluing the seams before screwing them together with my Kreg Jig, cramming every joint full of wood filler and sanding everything perfectly smooth have ensured that the counter has held up really well for us.
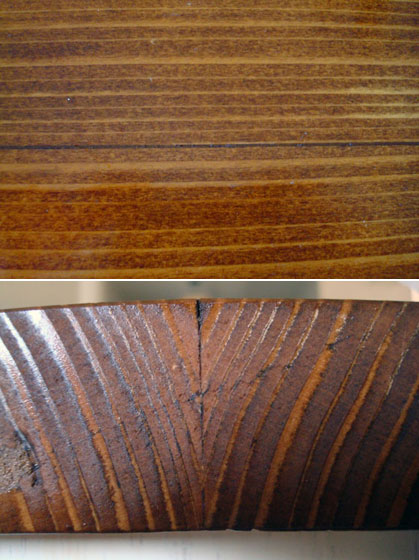
The finish has held up as well. The tone of the wood has stayed constant, and the Waterlox sealer has been a great protector. Originally, the finish was pretty shiny. It has dulled a little bit over the past year. We’re not the best at wiping down the counter religiously, but no matter what we spill or how long something sits on the counter (ahem), it wipes up easily.
We have one spot that has stained, but it wasn’t from food. Of all things, it was from a plastic bag. We had set a regular grocery store bag on the counter. The bag had some red writing on the outside, and that dye somehow transferred onto the counter. No matter how much I scrub, this dye will not come out.

It’s well known that wood is softer than the other countertop materials that are out there. It dents pretty easily. After a year of use, there are some imperfections in our counter. Most are the size of a quarter or smaller, and this one’s about the deepest.
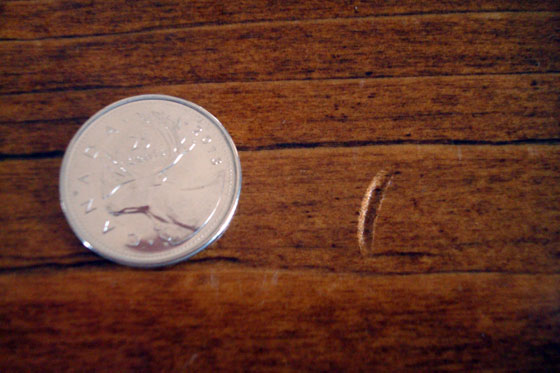
The dents don’t worry me at all. We use a cutting board when we’re chopping, but if something leaves a mark, I don’t get upset.
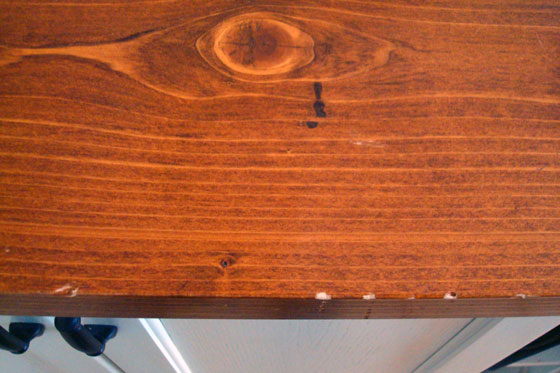
Along one edge of the counter, we have some small chips. These were from a unique incident that had absolutely nothing to do with cooking. The night that we picked up our dining room table, Baxter got a little upset at being left alone in the house. To make himself feel better, he ate the pan of brownies that had been left on the counter. When he reached for the pan, his toenails left some marks on the edge of the counter. These marks are particularly noticeable because they go down below the stained surface. (The dark marks near the middle of the image are features of the board and aren’t a stain or damage that we’ve inflicted).
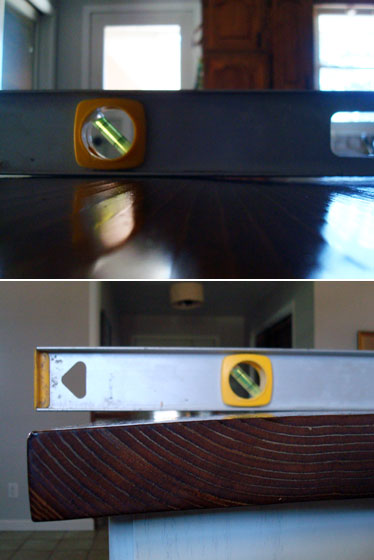
In my post a year ago, I talked about how the counter had warped a little bit and how we were able to flatten it by trimming the end and carefully screwing it to the cabinets. The boards have warped a little bit more over the past year. If you run your hand over the surface, you can feel a bit of a wave. The middles have curved up and the edges have curved down. The warp isn’t severe enough to impact the usability of the countertop and it’s not noticeable to the eye, unless I pull out the level to show you the gaps.
We don’t coddle the counter, and a year later it’s obvious that it’s had some use. I am really pleased with all of the choices we’ve made a year ago: going with wood, the colour of the stain, the Waterlox sealer, and especially making it ourselves. Everything has worked out really well.
The counters are still going strong four years later–although there are a few provisos.

We too installed wood countertops in our new home’s kitchen when we moved and I just love the warmth! We have not sealed them yet as I am nervous to use something that’s not food safe. Are you happy with the waterlox?
We are happy with Waterlox. I’m pretty sure it’s food safe (it’s been a year since I did all of my research on it), and it’s really durable. The finish that we used is a little shinier than I would have liked, but as I said in my post it’s dulled quite a bit. The one warning I would share is that it is incredibly noxious when you’re first applying it. Doing four coats is not the most fun because you’re basically surrounded by fumes for a week. The smell is the worst for the first few hours when it’s wet. More details on my experience with Waterlox is in this post: https://homeon129acres.wordpress.com/2013/04/16/how-to-stain-and-waterproof-a-wood-countertop/. There are lots of options out there for sealing wood countertops. Let me know what you end up with. Good luck!
It still looks great. We’re thinking of doing this to a chest of drawers we have around the corner from our tiny kitchen, as well as raising them to counter height with casters in order to extend our counter space. We might get butcher block if we can afford it, and cut right on it. It’s great to have access to this kind of information before we invest into it. Thanks!
That sounds like a really good way to extend your kitchen area.
Oh that Baxter 🙂
The counter looks really nice a year later. I’m glad it has held up so well. Based on the two photos, I think it looks even nicer now that the finish is not quite as shiny. Great work!
Matt baked brownies today, and you should see him. He’s such a chocaholic… not a good thing for a dog!
Looks really nice! We agree – counter tops are for use, not for show.
Endorsement from the wood gurus! Thanks! 🙂
One way to prevent cupping of the countertop is to alternate the end-grain on each board. Looking at the end of each board, place the first board with the grain rings up, the next board with the rings down, etc. Also, you really should breadboard the ends.
Thanks for your advice, Jack. I just looked up breadboard ends and can see how that would be very helpful to keep things level.
Great post, thanks for reviews as well as comment. Yup wood top will show distress that creates memories, and character as you have noted. I built one island top from maple works great, using biscuit joinery. And marine spar varnish. So far so good. This time I’m building 3 -8 ft countertops sections using kreg.(a first for me) But this time to reduce cupping and shrinkage even more I’m again using maple, but requested quarter sawn from mill 6-8” wide 1-1/4” thick and plained 4s.
That wood sounds lovely. The quarter sawn should make a difference. Thanks for sharing your experience.