Musing about kitchen floors

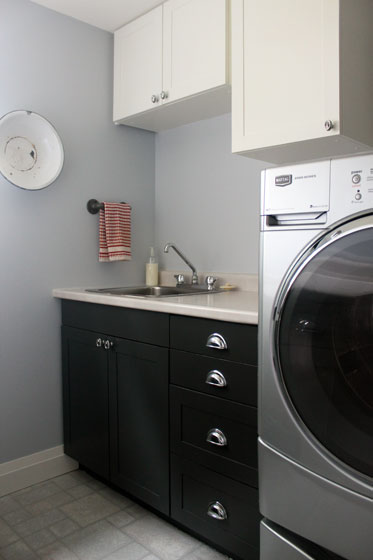
The scene plays out most nights at our house. After dinner, I go to the sink, turn on the water, squirt in the soap and start washing the dishes. Ellie comes running. “Ellie help! Ellie do dishes!”

She collects various play cups, we drag her step stool over to the sink and we switch the faucet back and forth between her sink and mine as we do the dishes. I feel like the “we” and “do this dishes” each deserve their own quotation marks there.

Every few minutes, I swipe the counter, the floor, the toddler with the towel and try to stem the flood.

And I think to myself, we can never have wood floors in the kitchen.

Now I realize I will not always have a two year old who loves to play in the water. But I still don’t think wood floors in the kitchen are for me. I am not that tidy of a cook or diligent of a housekeeper.

I feel lucky to have wood floors in our living, dining and bed rooms and plan to extend them through much of the main floor someday. But I don’t think I’ll be extending them into the kitchen.

A rule of interior design seems to be have one consistent flooring throughout your house (or at least the main floor). It makes your house seem larger, and, especially in an open concept plan, it allows spaces to flow together. And wood is the go-to flooring choice.

But when we (someday) renovate the kitchen, I’m going to be looking for something other than wood that works with wood elsewhere. And I’m going to have to figure out how to transition from wood to whatever floor I use in the kitchen.

I took a little tour around the internet to get some ideas, so I thought I’d share some of them with you today. I’d also appreciate your advice. Have you seen any flooring transitions that you like? How do you mix flooring? What flooring do you like best for a kitchen?

Stops and starts

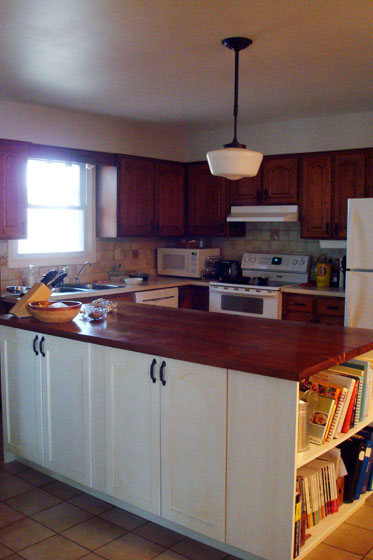
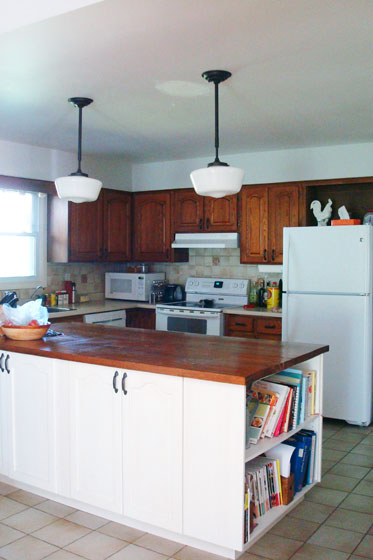
Room boundaries are the most common points where flooring changes. Right now our wood stops and our tile starts at the large archway between the kitchen and the living room.

This house is open concept, but you can see they’ve defined the kitchen and dining area with different flooring.
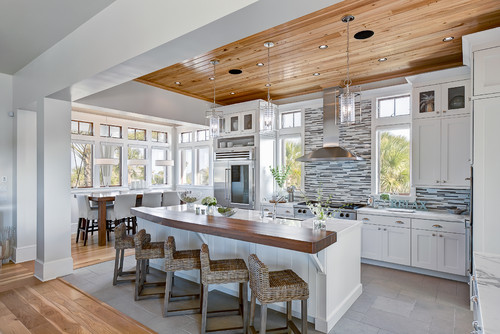
This kitchen uses the boundary between the living area and kitchen as a rough guide, but it plays up the division in an artistic, creative way. I’m looking for something more subtle, but I feel like this look works in this cool, colourful kitchen.
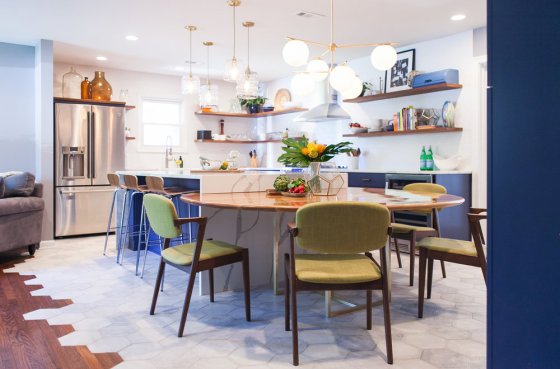
I felt like I’d had a major breakthrough the other week when I realized I could choose another landmark other than the “line” between the living room and the kitchen. A landmark like the island. What if I made the island the boundary of the kitchen and used my durable, non-wood flooring on the kitchen side of the island and wood everywhere else?

Sarah Richardson kind of did this in her farmhouse. She put a tile section in the main work area between the sink and the stove. The rest of the kitchen (and the main floor) is wood.
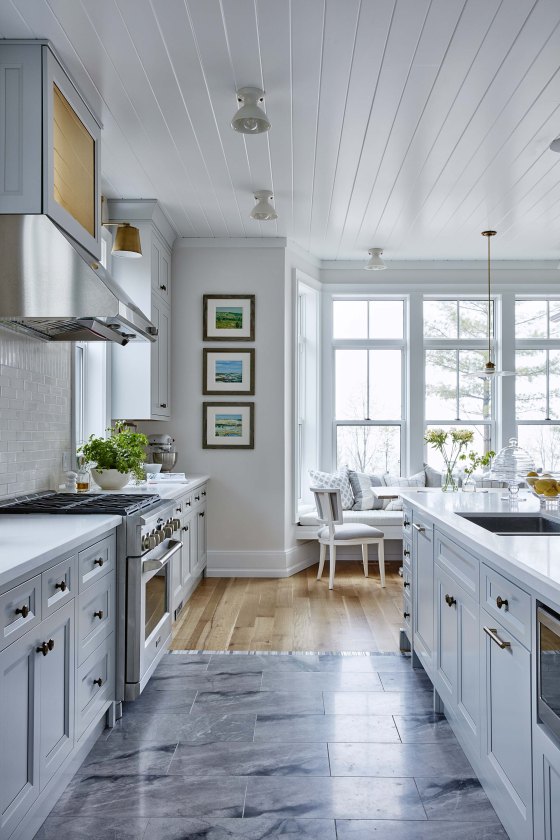
You can see in this picture that the tile is barely visible from the other side of the island, so the feeling of consistency and openness is maintained.
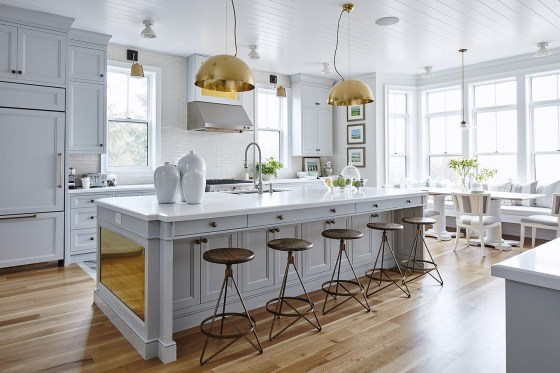
Now I’m mulling over what kind of floor would work. I know there are wood look-a-likes out there, but given the real wood we have elsewhere, I don’t want to mix. And I’d like to stay away from tile or stone, as I find it too hard to stand on during long cooking sessions.

The kitchen reno is a long way off, likely, but thinking about it is part of the fun for me. Want to join me in a little day-dreaming?

What would you do?


Don’t buy a Samsung stove with flex duo oven

Update: Tasco worked with Samsung and I got the okay to return the stove. I have picked out a new stove, which should be delivered shortly. I am so, so thankful to have this resolution. The team at Tasco exhibited the care and compassion I was hoping for. Fingers crossed I picked a better stove this time around!

On Oct. 22, our oven died. We had had a long day at the hospital for a chemo treatment, but it seemed like we were going to make it home for dinner with Ellie and be able to put her to bed at her regular time.

I had prepped the food before we left, so we called my Mom who was watching Ellie and told her to start the oven. When we got home, dinner was still sitting on the counter because the oven was not heating. I whipped up some eggs, we all ate and Ellie went to bed late.

The next day, Matt and I went out and bought a new stove.

A different company, Tasco, was in the building where our go-to appliance store had been. We went in and found a Samsung stove with a flex duo oven–a feature that we really like. We bought it on the spot, and Tasco delivered it the next day.

Yes, we rushed, but Matt could only be out for so long and I needed to be able to feed him and Ellie.

Samsung flex duo stove

The first time I cooked with the new stove, it didn’t seem right. Everything took a long time, and the oven didn’t seem hot enough.

But on Nov. 2, Matt went into the hospital and on Nov. 9 he died, so the stove was the least of my problems.

However, the problems with the stove continued. Despite setting the oven hotter and cooking things longer, food was still coming out cold.

I cranked the oven to 500 to make pizza with my friends. After 10 minutes in the oven–my normal cooking time–the pizzas were still raw. When I reset the oven, the temperature reading was down to 300. Eventually, we ate our very unevenly cooked pizzas.

I baked a cake that came out dark brown on top and crunchy around the edges, but soggy and fallen in the middle. Macaroni was burnt on top but still cold in the centre.

Unevenly cooked cake from Samsung oven

Burnt macaroni from malfunctioning Samsung oven

By December, I was finally ready to deal with this stove. I called our salesperson at Tasco, and he referred me to their service department, which I called on Dec. 18. They said they would reach out to Samsung to arrange a service call.

Christmas came and went, and no one called me back.

I called Tasco again on Jan. 3. Then again on the 13th and again on the 20th.

I asked to return the stove, but Tasco had a 30-day return window and that deadline passed during the week of Matt’s memorial, and there didn’t seem to be any willingness to make an exception due to our circumstances.

Finally I was able to figure out that there was confusion because the name I gave over the phone was different than the name on the invoice–I had taken Matt’s last name because I wanted to carry that part of him with me. Rather than call me back to sort out the confusion, Samsung had done nothing.

On Jan. 24, a technician finally came to look at the stove.

He took readings and replaced one part, but said everything seemed to be working fine.

I gave the stove another try, and still had the same issues of food not being hot or cooking unevenly.

On Feb. 4 I called Samsung again. A few days later Samsung sent an email telling me that my stove was working properly. I reached out to my salesperson at Tasco, and he arranged a second service call for Feb. 20. Again, the tech who came to the house said that according to his measurements, the stove was working properly–I begged to differ–and on Feb. 25 I received another message from Samsung that my service ticket was closed.

I followed up again with Tasco. A representative called me back right away and was very understanding. She asked me to follow up again with Samsung.

The telephone call with Samsung did not go well. The person on the phone said that my stove was working properly and they have to “trust their technicians.” I said that felt like a lack of respect and trust for their customers and a lack of integrity in standing behind their products.

The next day I received another email that said, “unit is working fine.”

I followed up with my salesperson at Tasco again, asking “Can you please just take it back, so that I can buy a stove that works?”

So far I have not received an answer.

I am writing this post today because I am so disappointed and beyond frustrated. I am hoping that I may get some accommodation from Tasco or Samsung by sharing my story publicly.

I have tried to follow their procedures and work within their policies, and I have gotten nowhere.

I realize it is not their problem that my husband died and I missed the return deadline. But I hope that even large companies can be understanding and flexible and compassionate and act with integrity when there are problems with their products.

Renovation regrets in Illinois

One of my former bosses used the phrase “even better if.” As in, “We just finished this big project, and it went really well. But what are our even-better-ifs?” It was a great way of looking positively at areas for improvement.

Last week I posted one of my renovation regrets and asked other people to share theirs. Sarah in Illinois immediately thought of one at her house. But instead of calling it a regret, I’m going to call it an even-better-if. Because she and her husband Steve did make lots of improvements to their kitchen. There’s just one little spot that could be even better.

Early when Steve and I first started dating he made the decision to renovate his kitchen. Both of us worked on expanding his small galley kitchen into an existing dining room. We removed a wall, relocated all plumbing and electrical and more than doubled the counter area.

However, it wasn’t until we were really using the newly expanded kitchen that we realized we had a design flaw.

We made a small walkway to enter and exit the kitchen and although this is plenty large enough to walk in and out, we did not realize until much later that this opening was the prime “hanging out” spot. There is always someone standing at this opening.

This is the ideal section of counter top to do meal prep because it is so close to the refrigerator. If you need to enter or exit the kitchen or reach the refrigerator, you will have no choice but to squeeze by someone standing right in that spot.

We have considered re-configuring the kitchen but since we laid all of the floor tile in the room around the cabinets, this is a much much larger project than we want to tackle at this time.

This is an instance where we really should have lived and worked in the space before making final decisions. We learned our lesson and hope we have fewer renovation regrets in the future.

Argh. I’m sure that’s frustrating, Sarah. Matt gets super bugged when people are in his way when he’s cooking. Most of the family has learned to steer clear! Hopefully you can enjoy the other fixes that you did make. More counter space is always good.

How to live with your kitchen until you’re ready to renovate

Ugh, our kitchen. Our poor, poor kitchen. I’m so excited for the day that we finally renovate this room. However, I’m a bit scared too because I feel like we’re going to uncover so many issues when we pull everything apart.

One of the hinges on our cabinet doors had come loose (not unusual, all of our cabinets are falling apart).

Cabinet hinge with stripped screws

Repairing a stripped screw hole with toothpicks and glue

As I was putting it back together last week (wood glue + toothpicks = repaired), I was thinking about how we’ve lived with this kitchen for 5 years and will continue to do so for awhile yet.

Kitchens are important rooms. We spend a lot of time in them, so we want them to look nice and work well. But they’re also expensive and disruptive to renovate.

As a result, many of us live with lackluster kitchens, waiting until that magical day when we pull out the sledgehammer and start to forge the kitchen of our dreams.

For me, I hate to invest time or money into a space that I know I’m going to gut, even if that gut isn’t going to happen for 5 years or more. However, there are a few things that we’ve done in our kitchen that have made it more liveable, more functional and more attractive.

I thought I’d share them today in case they help someone else living in a similar kitchen situation. And I’d love to hear your ideas too for making a less than ideal kitchen work for you.

Paint

Between cabinets and appliances, wall space in a kitchen is often minimal, so giving your walls a fresh coat of paint is quick and inexpensive. With our open concept main floor, painting the kitchen, living room and hall the same colour made the spaces cohesive and the light colour that we chose brightened up the rooms a bit.

Painting cabinets is another update that can have a big impact. I did this in our first house and it was a great transformation. However, it was also a bigger job than I expected, so I was in no hurry to do it again–especially since our cabinets are falling apart and I feel like paint will not help the situation.

Hardware

Updating cabinet hardware can be another quick way to inject some style and personality into your kitchen. I spray painted our hardware for a mini update. The results have been mixed. The paint has chipped off some of the handles, but others have held up pretty well.

What is this?

The nice thing about a hardware update is if you truly love the handles or knobs that you choose, you can easily reinstall them in a new kitchen down the road.

Lighting

Just because you don’t have your dream kitchen doesn’t mean you can’t have your dream lights. I loved the idea of a pair of schoolhouse style pendants over the island, so I went and bought them.

We only had one light fixture in the kitchen and it wasn’t positioned quite right, but I didn’t let that stop me. I put up one of the lights anyway. Maybe a single, randomly located pendant looked a bit weird, but it made me happier than the boob light that was there before.

A year or so later when we had an electrician in for some other work, I had him move the first light and install a second. The electrician’s labour was relatively inexpensive.

School house pendant lights over the kitchen island

Even if you’re planning on reconfiguring your kitchen down the road and will need to move lights again, the investment in an electrician is not that significant. And assuming you still love your lights, you can reuse them.

Island

The biggest addition to our kitchen has been the island. I bought the doors at Habitat for Humanity and we DIYed the countertop. Having a cabinet maker build the boxes was still a bit of an investment, but worth it for us for the storage and prep space we gained.

Kitchen island painted white with wood countertop

I can’t imagine working in the kitchen without having this extra space. And I’m hoping that we can reuse the island in our future kitchen.

Accessories

Just because a kitchen is a utilitarian space doesn’t mean you can’t decorate it. Accessories can add function to the room as well as style. A long towel bar on the end of the island gives us a space to hang oven mitts and towels within easy reach. Plus pretty towels inject some personality and colour. We also removed a wine rack that was above the fridge (we don’t drink much wine and I can’t reach the space anyways) and put a fun country rooster and our kitchen scale on display.

Organization

No matter what your kitchen looks like or how large it is, keeping things organized can dramatically improve how you feel about the space.

In adding the island we were able to add storage for a few key things: cookie sheets, cutting boards and cookbooks. Our kitchen is lacking in drawers, so we also added hidden drawer to the island.

The few drawers that we do have are too small for most organizers, but I found a plastic organizer that I could cut to size with a utility knife, so I was able to keep our cutlery sorted.

Narrow cookie sheet shelves in island

Making a kitchen work until you can do a full reno is about trade offs. What can you live with and what can’t you? How many repairs are you willing to do? How much money are you comfortable spending, knowing that whatever you add may end up in a dumpster? For us DIYers, how much time and effort are you willing to invest knowing that you may be ripping out your hard work down the road?

For me, I think I’ve found a balance that is tolerable.

What are your tips for holding a kitchen together? How do you feel about mini renovations to tide you over until the big one? Have you made any improvements to your kitchen that have made a difference in how it works or looks?

Denise at Happy Haute Home (who often comments on my posts) recently renovated her kitchen for the One Room Challenge. While it’s a much grander space than ours, she embraced a very similar philosophy to mine. She shared her tips for how to update a kitchen on various budgets in her reveal post.

How to organize all those bags of spices

Spice organization? What blog are you reading?

Yeah. I know. Not my usual topic.

I wanted to add my 2 cents to the spice organization conundrum though. My solution is not particularly fancy or photogenic. However, it’s quick, practical, easy, useable and maintainable.

Matt and I both enjoy cooking, and my husband (who’s also chief grocery shopper) doesn’t hesitate to stock up when he’s buying a particular ingredient. That’s how we end up with a spice cabinet that looks like this. Particularly, all of those bags of spices crammed on the top shelf.

Disorganized spice cabinet

How to organize bags of spices

It was next to impossible to quickly put my hands on the spice that I needed, and as a shorter person I usually had to pull out a step stool to dig to the back of the cabinet and find what I was looking for.

Also, because we didn’t know what we had, we often ended up buying more or opening another packet. That (along with Matt’s Indian kick) is how we end up with eight (!) bags of curry powder, four of which are open.

Bags of curry powder

The situation was all round annoying.

When I was organizing my office, I found some great bins at Solutions (the Canadian version of The Container Store). They have straight sides so they fit tightly into a drawer or cabinet and are clear so that the contents are easily visible. Plus they were the right size for the spices and the cupboard.

Bin to organize spices

I bought two and started sorting (and combining bags where I could).

My technique was alphabetical. First half of the alphabet in one bin, second half in another. I didn’t bother labeling the bins, because I think it’s pretty easy to figure out what bin you need based on the packet at the front.

Bags of spices organized in a bin

Two bins fit perfectly side by side in the cabinet.

How to organize bags of spices

I did a quick pass through the rest of the cabinet too, putting all of our bottles and tins of spices together, and grouping like foods together. Thanks to the reorganization, I was able to move a couple of items off the counter and into the cabinet, which felt like a major win.

Better organized spice cabinet

Obviously, I’m not Martha Stewart, but while it may not look like much, this simple system makes a big difference in how easily we can find the ingredients we’re looking for.

What’s your organizing nemesis in your kitchen? Do you have any tips to share for organizing spices? Please tell me someone else out there also has multiples of a certain ingredient?

DIY wood countertops four years later

It’s been four years since we added the island to our kitchen and made our own wood countertop. The post about our DIY wood countertops is by far the most popular post on my blog, so I thought it would be helpful to share how our counter is holding up.

I will preface this by saying we are not gentle on our counters. We don’t always wipe up right away. We drop things, spill things and bang things. The island is our main prep space, so it sees a lot of action.

However, we do use cutting boards for chopping and don’t set hot pans directly on the wood.

DIY wood countertops

After four years of steady use, the counter has held up very well, and I definitely recommend making your own wood countertops if you’re looking for a cheap, functional, durable solution.

The construction

We used the Kreg Jig and wood glue to join our 2x12s together and then filled the joints with wood filler. All of the joints are still tight. We’ve not seen any gaps between the boards and the wood filler has not cracked or chipped.

My big concern when we first made the counter was that it warped. However, it leveled out once we trimmed it to the right length and screwed it to the cabinets. Since then, the counter has stayed pretty flat. One board is still has a slight arc–my cutting board rocks a bit when I’m chopping–but it hasn’t worsened over the years.

Wood is soft, so there are some dents in the surface from where we’ve dropped a heavy can or jar. I’m not sure it’s possible to have a wood counter and not have some dents in it, especially after four years. If you want a pristine counter, wood may not be the choice for you.

The finish

We chose to stain our counter to match the existing cabinets in the kitchen, and then sealed it with Waterlox. Staining opened up one issue that I did not expect. We have a couple of chips along the edge. The stain didn’t sink too deeply into the wood, so the lighter wood shows at these chips. If we had used a clear sealer rather than a tinted stain, the chips probably wouldn’t be as noticeable.

Chips in the edge of a wood countertop

The Waterlox finish seems to protect the wood fairly well. Water or other spills bead up on the surface and doesn’t soak into the wood. Most things rub out fairly easily even if they’ve been left for a little while.

Initially, I was a bit surprised by how shiny Waterlox was. This seems to be a common concern with the Original Finish that I chose. It appears to have dulled a little bit–or I’ve just gotten used to it.

There are a few spots that have dulled a little more than others. I’d characterize it as “etching” or watermarks where stains have set before we wiped them up. As obvious as the mark looks in the picture below, in real life you actually have to look pretty closely to see it. It just doesn’t reflect as much light as the rest of the counter.

Stain etched on a wood countertop

The verdict

The counter looks and works really, really well. I’m a bit amazed that we made our own countertop and it worked–and four years later it’s still working.

For us, the wood counter was a temporary solution–temporary around here being 5 to 10 years. I’m not sure I’d recommend them for a long-term renovation, but I expect we will easily get another few years out of this counter. We know we’ll do a full gut renovation of the kitchen someday. But until then, we needed more prep space. The island and our DIY counter definitely gave us that.

For the work and money we put into this counter and the function it’s added to our kitchen, we are very happy with the choice to use wood and to make it ourselves.

If you have any questions about our counters, I’m happy to answer them in the comments.

How I organize recipes

Open shelving in the kitchen for cookbooks

One of my favourite features of the island we added to the kitchen is the open shelving on the end that holds our cookbooks.

The books add a splash of colour to the wood and white of the kitchen. The shelves keep them organized and easily accessible. Plus I love cookbooks. I will sit and read them like a magazine or novel. (And, yes, you’re not imagining. The upper shelf is sagging a bit under the weight of all of our cookbooks).

However, not all of my recipes reside in cookbooks. I have a bunch of printouts from recipes I’ve found online (I haven’t progressed to a tablet yet), clippings from the newspaper or magazines, even a few hand-written recipes from family and friends.

To keep these recipes organized, I returned to the lessons learned in school–binders, dividers and page protectors.

A couple of weeks ago, I added a bunch of new recipes to my collection, so I thought I’d share my organization method with you.

How to organize recipes

First are the binders. I have three major categories which each get their own binder: Appetizers and Sides, Entrees, Desserts and Sweets. Entrees outgrew its single binder and is now split into two books. I use different colours for each grouping.

How to organize recipes

Within each binder, I’ve divided the recipes into subcategories.

In appetizers, the sections are appetizers, soups, salads, sides, snacks, breads and drinks. For entrees, I divided them into pork, pasta, sandwiches, beef, fish, vegetarian, poultry, other meats (venison, lamb), breakfast. Desserts starts with the most important, chocolate, and then goes to cookies, “buns” and bars (including muffins), cakes, pies, fruit, custards and Christmas.

How to organize recipes

The recipes themselves are stored in plastic page protectors. I’m not the tidiest cook, so the plastic sleeves protect the paper from spills and splashes.

However, it’s easy to slide the recipe out of the plastic and add notes about what worked, what didn’t or what adjustments I made.

How to organize recipes

Beyond the binders, I also use magazine holders to organize the smaller pamphlets and cookbooks I’ve collected over the years. I got two wooden holders from Ikea and stained them to match the countertop and cabinets.

Wood magazine holder

I love having my recipes organized.

In fact, I was so inspired that I flipped through the dessert binder and whipped up one of my favourite fall recipes, spiced apple muffins, using the apples my friend gave me from her own tree.

Apple spice muffins

With my recipes all organized, I feel ready to move on from fall baking on to Christmas baking.

Are you doing any baking, either fall or Christmas? How do you organize your recipes?

Hardboard and six favourite projects

There’s one material that I go to over and over for DIY projects: hardboard.

Hardboard

Hardboard is an engineered wood product also known as high-density fibreboard. Wikipedia says that it’s “made out of exploded wood fibers that have been highly compressed.” I’m not sure what exploded wood fibres are. By the time hardboard gets to the store, it has little resemblance to wood. It’s more like a super heavy-duty, super smooth cardboard. The main resemblance to typical construction materials is that hardboard comes in 4×8-foot sheets.

It’s less than a quarter inch thick, fairly light-weight, and cuts and bends easily. Sometimes it’s cut to other sizes than 4×8, finished with white on one side, or it’s also the material for pegboards.

Pegboard

Here are some of my favourite projects with hardboard:

Living room bookshelves – Hardboard makes a very sturdy back for shelves and bookcases. But it’s thin and fairly lightweight, so it doesn’t add bulk to furniture.

Monograms – Letters and words are popular decor trends. Hardboard is easy to cut with a jigsaw, won’t break or crack like solid wood, and is light enough to hang on a wall or sit on a shelf. I’ve found a quick pass of fine sandpaper can be helpful to smooth cut edges.

Ampersand monogram made out of hardboard

Ampersand monogram made out of hardboard

Doors and cabinet makeovers – Faced with boring slab doors in the basement and on the laundry room cabinets, I used strips of hardboard to transform them into barn doors and shaker-style cabinets. I was blown away by how successful the transformation was. I still love these doors. Plus the makeover saved us from spending money on new doors.

Making slab doors into barn doors

Score-keeping chalkboard – Hardboard is super smooth, and with a good primer and a foam roller, it takes paint very well. So I gave a sheet of hardboard a coat of chalkboard paint for a 6-foot tall, but very lightweight and easy to move chalkboard. Much lighter than actual chalkboard.

Cabinet door repair – Our kitchen needs a renovation, but until that day, we’re trying to hold things together however we can. Hardboard to the rescue once again. The cabinet door under the sink was separating from its frame. Backing it with hardboard has seen us through the last three years.

Holding a kitchen cabinet together with hardboard

Nightstand to dresser makeover – This dresser is one of my all-time favourite projects. Combining two nightstands into one dresser worked very well, but the join was very ugly. A panel of hardboard covered the seam and didn’t add much bulk to my narrow dresser.

I continue to find more uses for hardboard. And I’d love to hear if you’ve used it yourself. Any projects to share? What’s your go-to construction material?

Wonky wiring and a pair of pendant lights

At some point today, an electrical inspector will knock on my door. (Hopefully. It’s one of those “sometime between 8 and 5 things”). It’s been awhile since our electrician was here, but I’ve been putting off the inspection because my day job was requiring me to be in the office. I finally got a break at work and am working at home today, so the inspection can happen. I also finally got my fingers in gear to tell you about this update.

Matt and I had upgraded from the boob light in the kitchen to a school-house pendant some time ago. The fixture wasn’t in the right spot, though. It was off centre with the island and a single pendant didn’t look quite right.

Single school-house pendant over the kitchen island

I had ordered a second pendant back when we installed the first one (February 2014), but I didn’t want to tackle adding it on my own.

When we had the electrician here to move the light switch in the master bedroom, I had him relocate the existing kitchen light and add the second.

The wiring in this house is wonky. When the electrician took down the first pendant, I remembered exactly how wonky. There was no box to house the wiring. Instead, the fixture was attached to a couple of plates that were screwed to the drywall, and the wires–which wasn’t the right type either–just stuck out from a hole in the ceiling.

How not to wire a light

Obviously, it wasn’t right, but Matt and I had installed our new light anyways, knowing that we’d hire a professional to fix it soon. Well, soon turned out to be more than a year, but better late than never, right?

I was surprised when the electrician hypothesized that there was another light somewhere else in the ceiling. A close look at the drywall showed us a patch that I had never noticed. When he climbed up into the attic, he discovered the light (disconnected, thank goodness). This one had a junction box. It also still had the socket lamp holder attached to it. The light had just been turned so it pointed into the attic and not through the ceiling. What were they thinking???

Light fixture in the attic

The electrician drilled two new holes, inserted two new boxes and ran the new wires–and did all of it properly.

Wiring pendant lights over the island

I was happy to have a professional electrician fixing all of the mistakes. I was also happy that he was the one crawling around in the attic, not me. I like my DIY, but I’ve learned where to draw the line. Things that are beyond my skills or just plain unpleasant (and this hit both of them) are a clear time to call in professional help.

If you’re in the Guelph, Hamilton or tri-city area, I highly recommend Agentis Electric.

Electrician going into the attic

I did patch the hole in the ceiling on my own though (but I haven’t painted it yet). And here’s the finished product: pair of pendants, properly positioned–and properly wired–over the island.

School house pendant lights over the kitchen island

How do you decide when to bring in professional help? What’s the wiring like at your house? Do you have any light fixtures lying around just waiting to be installed? How do you handle lighting in your kitchen?

DIY wood countertops one year later

See an update on our counters after four years.

A year ago, I wrote about how we DIYed our own wood countertop. Since then, this post has become far and away the most popular on the blog. Given that we’ve been living with our homemade counter for a year now, I thought a good topic for today’s post would be an update on how our DIY counter has worked for us.

The simple answer is the counter has worked great. Here’s what it looks like today.

DIY wood countertop 1 year later

Just a reminder, here’s how the counter looked a year ago.

How to make a wood countertop

Here are a few more details on how the counter performed.

The biggest measure of this counter’s success is the joints. After a year of use, they’re still nice and tight. Squaring off the edges of the boards, gluing the seams before screwing them together with my Kreg Jig, cramming every joint full of wood filler and sanding everything perfectly smooth have ensured that the counter has held up really well for us.

Joints in a homemade wood countertop

The finish has held up as well. The tone of the wood has stayed constant, and the Waterlox sealer has been a great protector. Originally, the finish was pretty shiny. It has dulled a little bit over the past year. We’re not the best at wiping down the counter religiously, but no matter what we spill or how long something sits on the counter (ahem), it wipes up easily.

We have one spot that has stained, but it wasn’t from food. Of all things, it was from a plastic bag. We had set a regular grocery store bag on the counter. The bag had some red writing on the outside, and that dye somehow transferred onto the counter. No matter how much I scrub, this dye will not come out.

Red dye on wood counter

It’s well known that wood is softer than the other countertop materials that are out there. It dents pretty easily. After a year of use, there are some imperfections in our counter. Most are the size of a quarter or smaller, and this one’s about the deepest.

Dent in a wood countertop

The dents don’t worry me at all. We use a cutting board when we’re chopping, but if something leaves a mark, I don’t get upset.

Along one edge of the counter, we have some small chips. These were from a unique incident that had absolutely nothing to do with cooking. The night that we picked up our dining room table, Baxter got a little upset at being left alone in the house. To make himself feel better, he ate the pan of brownies that had been left on the counter. When he reached for the pan, his toenails left some marks on the edge of the counter. These marks are particularly noticeable because they go down below the stained surface. (The dark marks near the middle of the image are features of the board and aren’t a stain or damage that we’ve inflicted).

Chips in the edge of a wood counter

In my post a year ago, I talked about how the counter had warped a little bit and how we were able to flatten it by trimming the end and carefully screwing it to the cabinets. The boards have warped a little bit more over the past year. If you run your hand over the surface, you can feel a bit of a wave. The middles have curved up and the edges have curved down. The warp isn’t severe enough to impact the usability of the countertop and it’s not noticeable to the eye, unless I pull out the level to show you the gaps.

Warp in a DIY wood countertop

We don’t coddle the counter, and a year later it’s obvious that it’s had some use. I am really pleased with all of the choices we’ve made a year ago: going with wood, the colour of the stain, the Waterlox sealer, and especially making it ourselves. Everything has worked out really well.

The counters are still going strong four years later–although there are a few provisos.