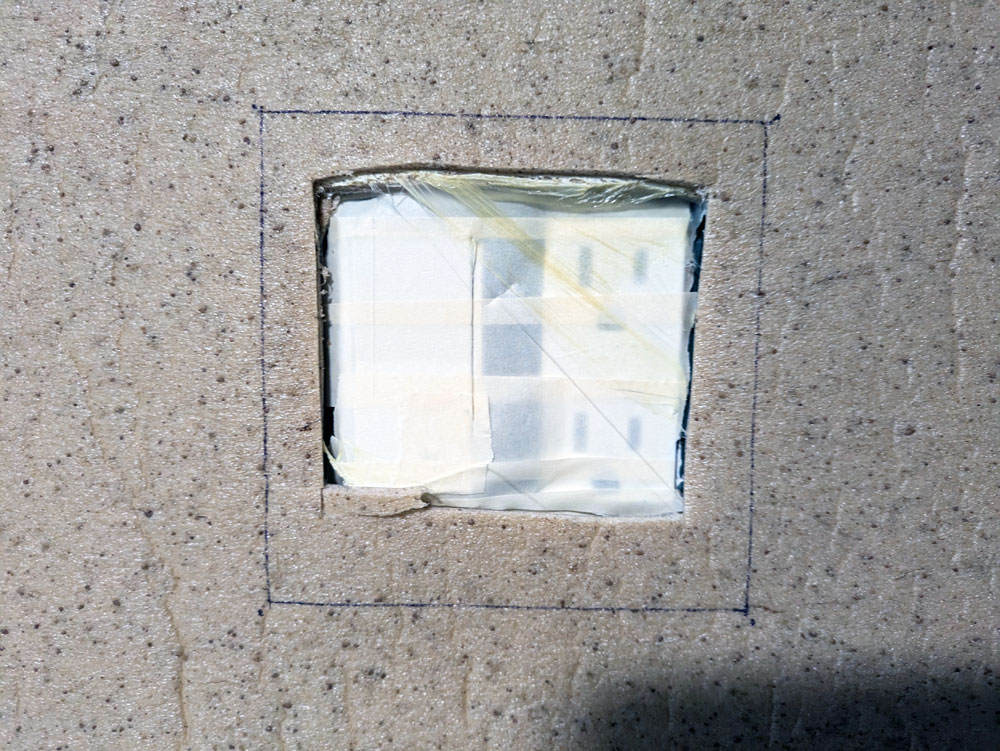
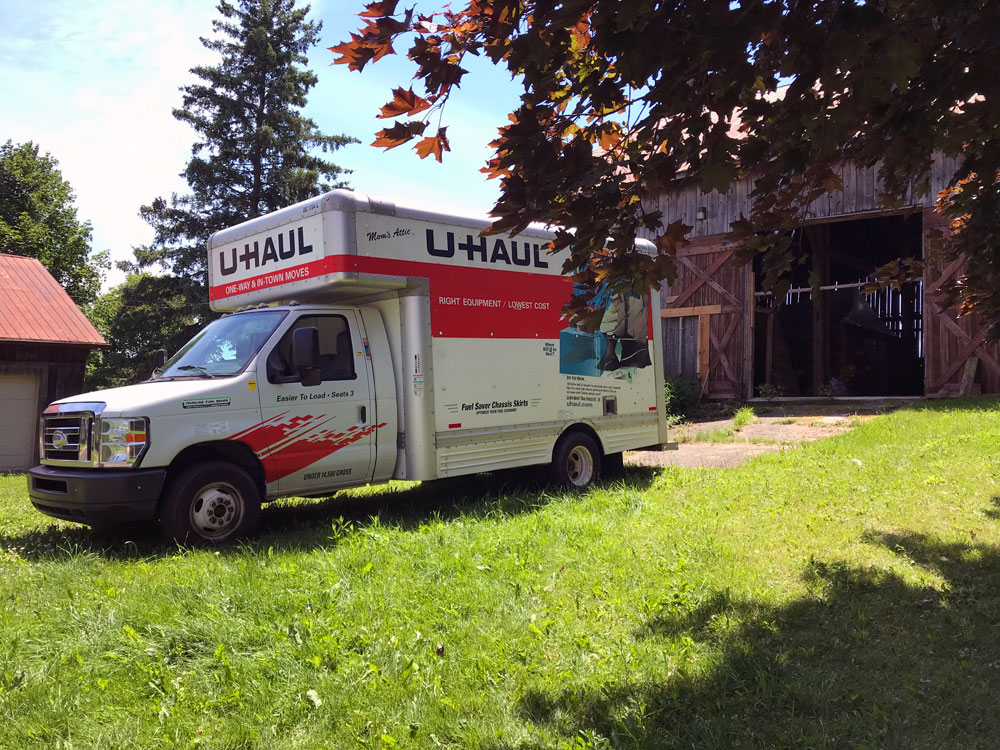
The bathroom is slowly approaching the finish line. Another big piece arrived a little while ago. And it is literally big.
Our new storage hutch.
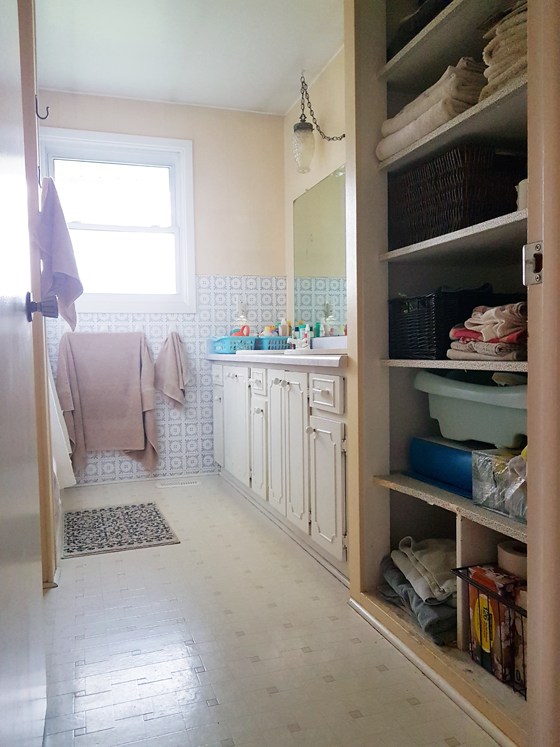
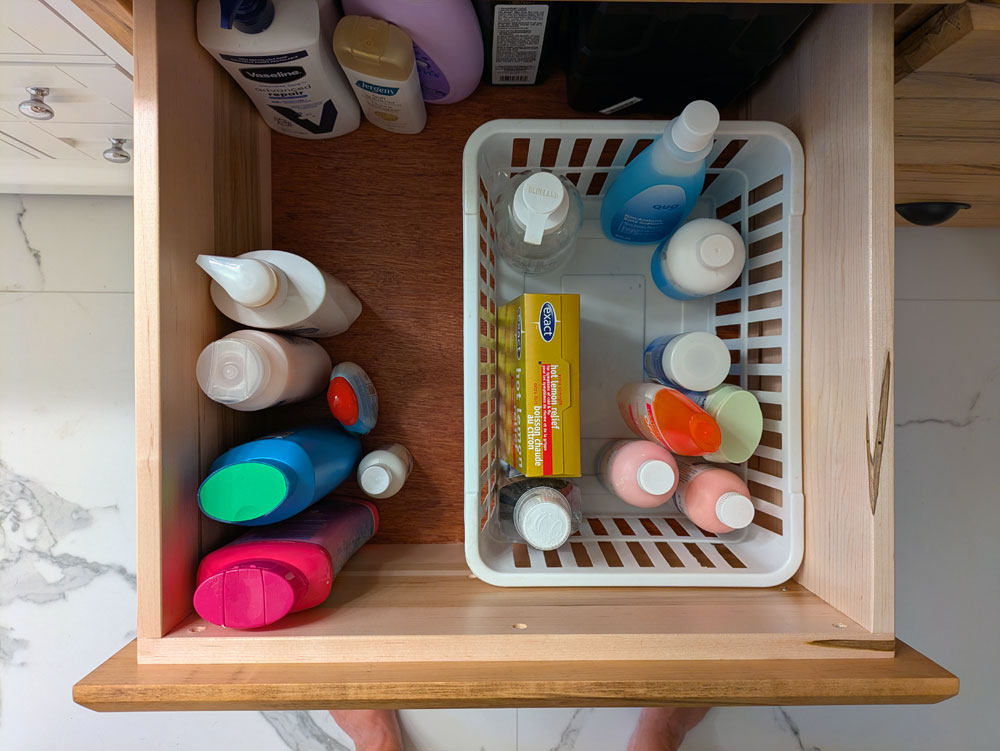
The bathroom is a good size, and it had a large linen closet. But the closet lacked both style and function. I tried to stack things neatly and used baskets to conceal less attractive things. The shelves could store a lot, but they were just one type of storage. With this renovation I was eager for an upgrade.
I decided I wanted a wood cabinet with a mix of drawers and shelves. I was envisioning an antique pine piece, something like might have been in an old farmhouse. I spent some time looking online and in antique shops and didn’t find anything the size I wanted, let alone with the storage configuration I was looking for.
Next I tried cabinet makers, but I struck out there too. Then one day I was driving by a local Mennonite furniture store and I pulled in. Maybe they did custom work?
They did.
They took my drawing and measurements, showed me wood options, and gave me a quote. It was $3,400, including finishing, delivery and set up. For a fully custom piece this size, that felt like a very reasonable price. I paid my deposit and carpentry began.
And finally it’s here.
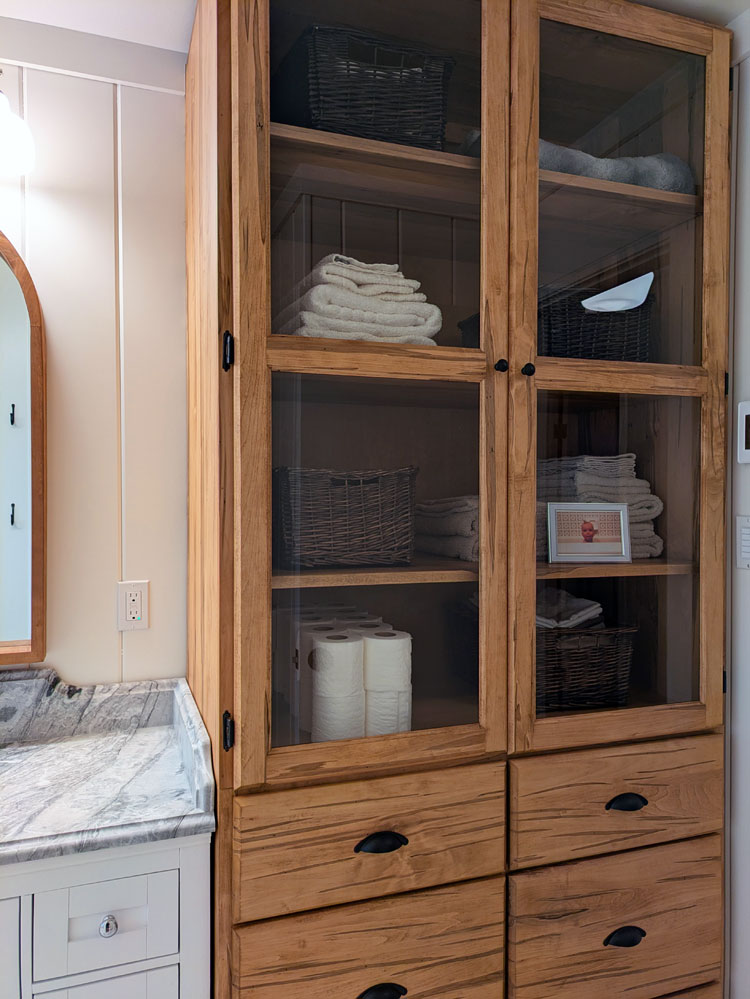
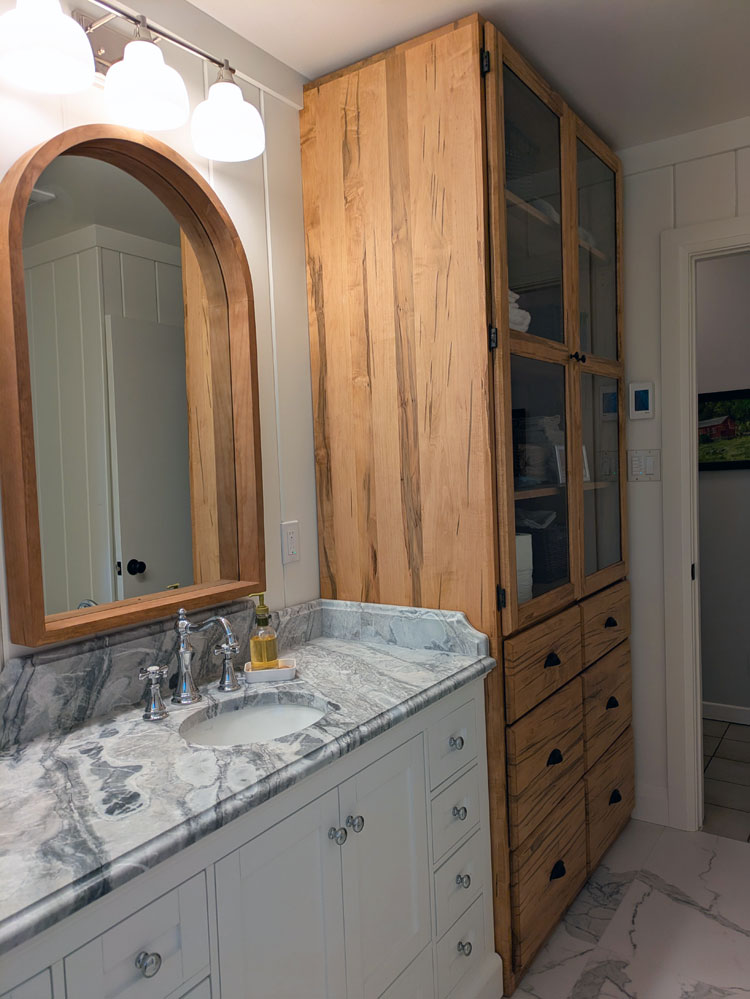
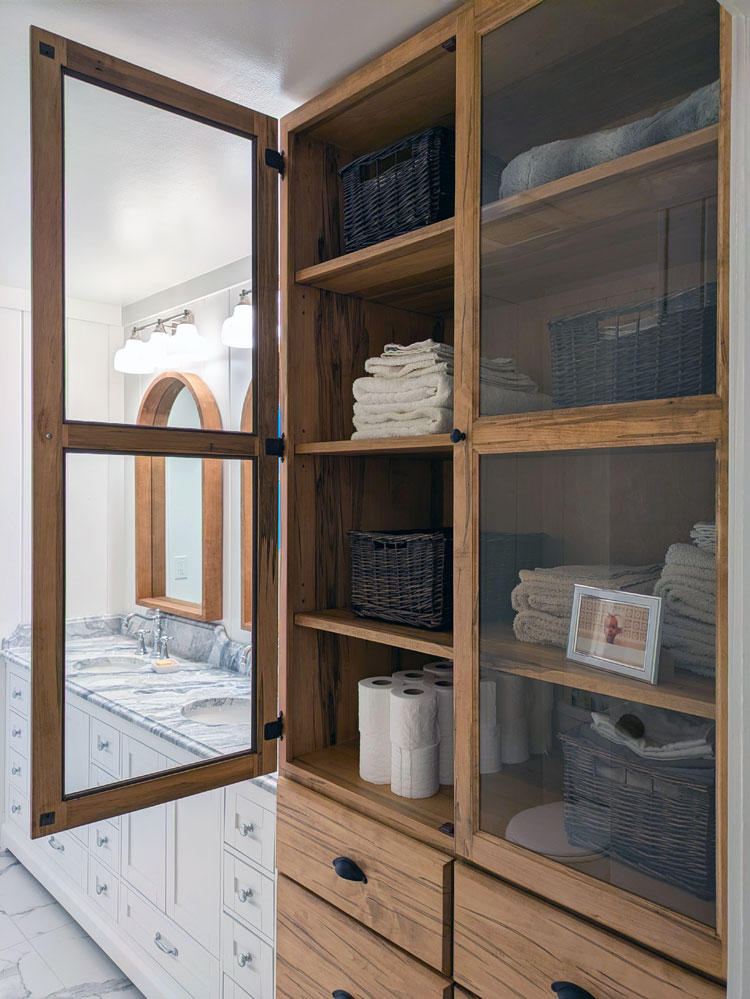
The whole cabinet is 22 inches deep (the same as the vanity counter), 42 inches wide and 8 feet tall. It is huge. It fits perfectly at the end of the vanity. Thank goodness (says she who did all the measurements).
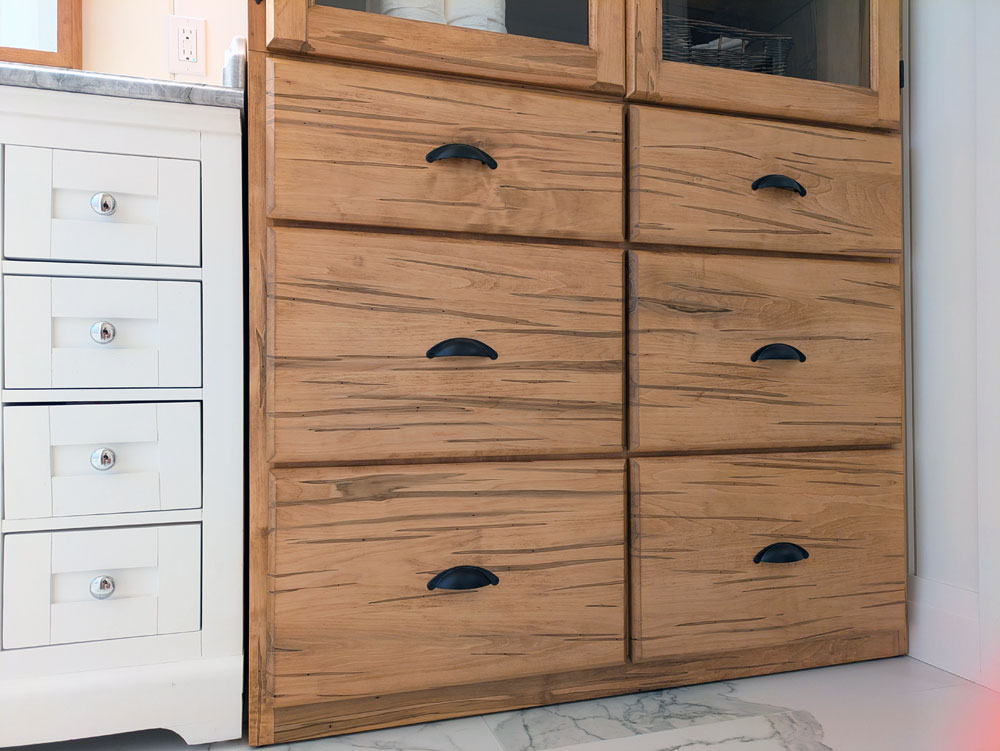
The cabinet has six drawers on the bottom. After living with the open linen closet, I wanted some closed storage. I was very specific about the measurements for the drawers, as I planned to store shampoo and other bottles standing up. So the four bottom drawers are 12 inches high. The top two are 8 inches. They hold so much.
The top of the cabinet has four shelves behind glass doors. I liked the idea of some more open storage, rather than closing off this corner entirely. The shelves are where I’m putting towels and toilet paper (stacked neatly, of course). The baskets from the previous linen closet (which are actually from our previous house) work well here too and hold things like sheets, Christmas towels and other less coordinated items.
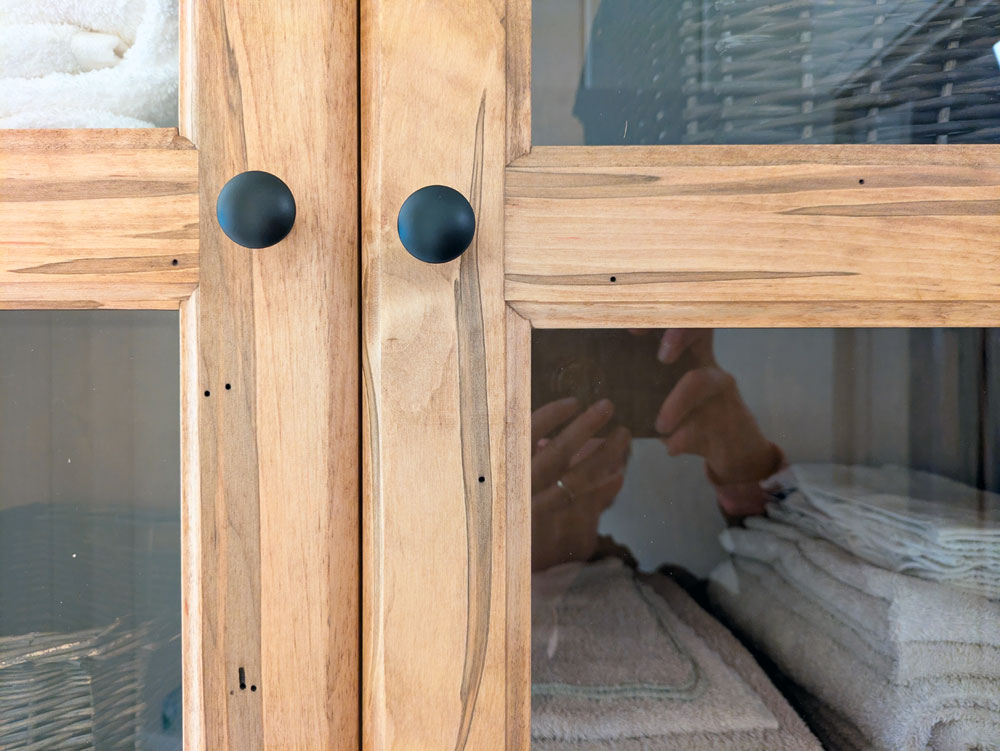
I chose black hardware to contrast with all of the polished chrome we have elsewhere in the bathroom. There are bin pulls on each drawer and small knobs on the doors.
The wood is wormy maple. It has lots of character with darker sections and actual worm holes. For the stain, I chose a finish that matched the wood frames on our mirrors. I feel like it has a bit of the warm antique tones I was going for.
The wormy maple is the one thing I’m questioning on the hutch. The drawer fronts are a little stripey, which I don’t love. I’m wondering about going back to the builder and asking for plain maple fronts.
But overall I love the hutch. It holds so, so much. Plus the beautiful wood tones add so much warmth. The vision that I had for our new bathroom is coming together.
Have you ever had custom furniture made? How do you mix wood tones into your house? What do you think about the wormy maple?
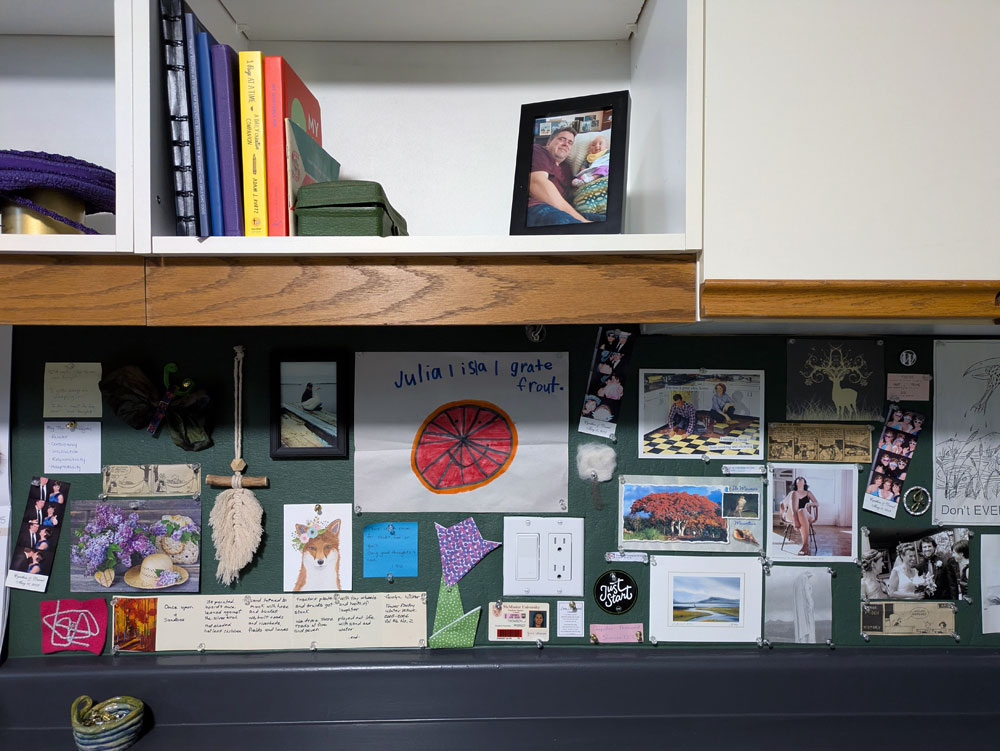
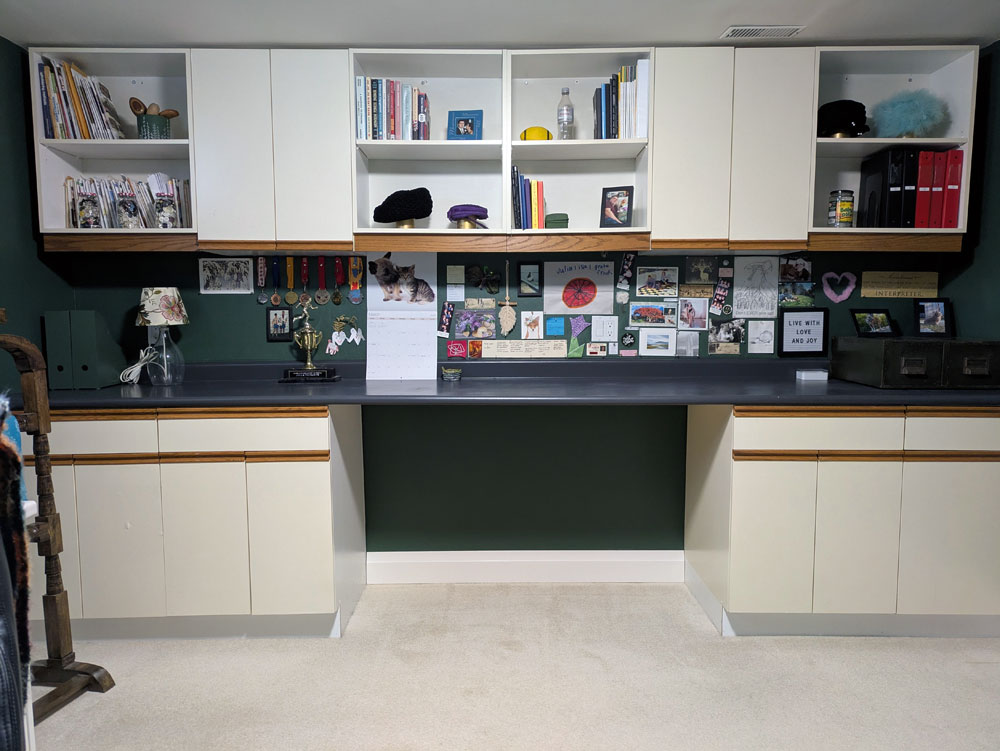
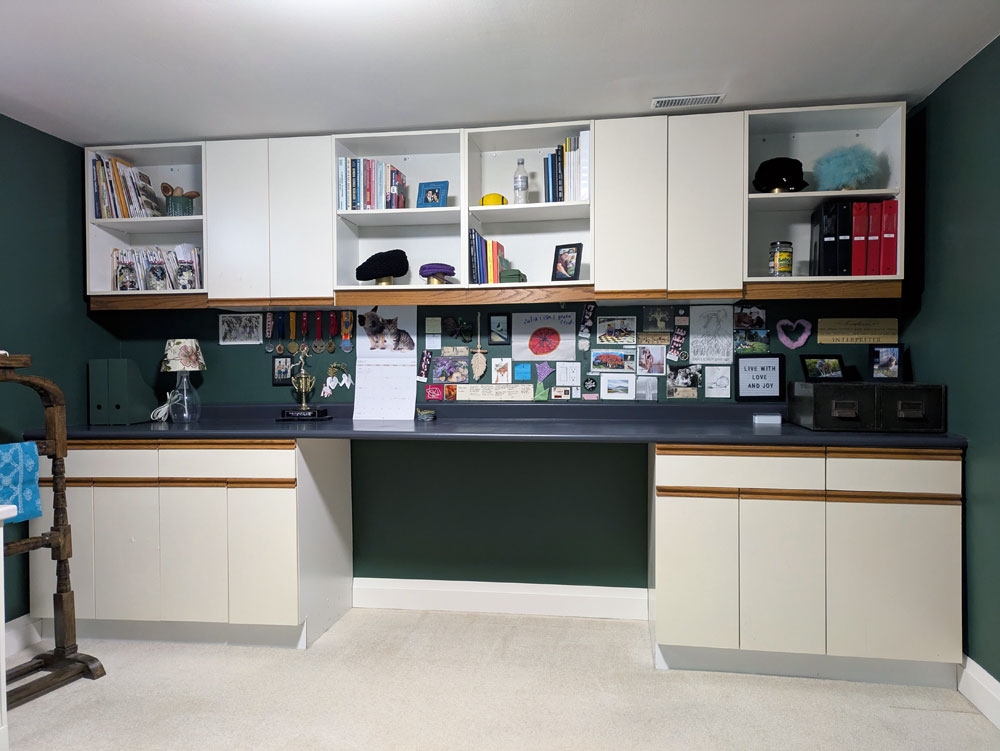
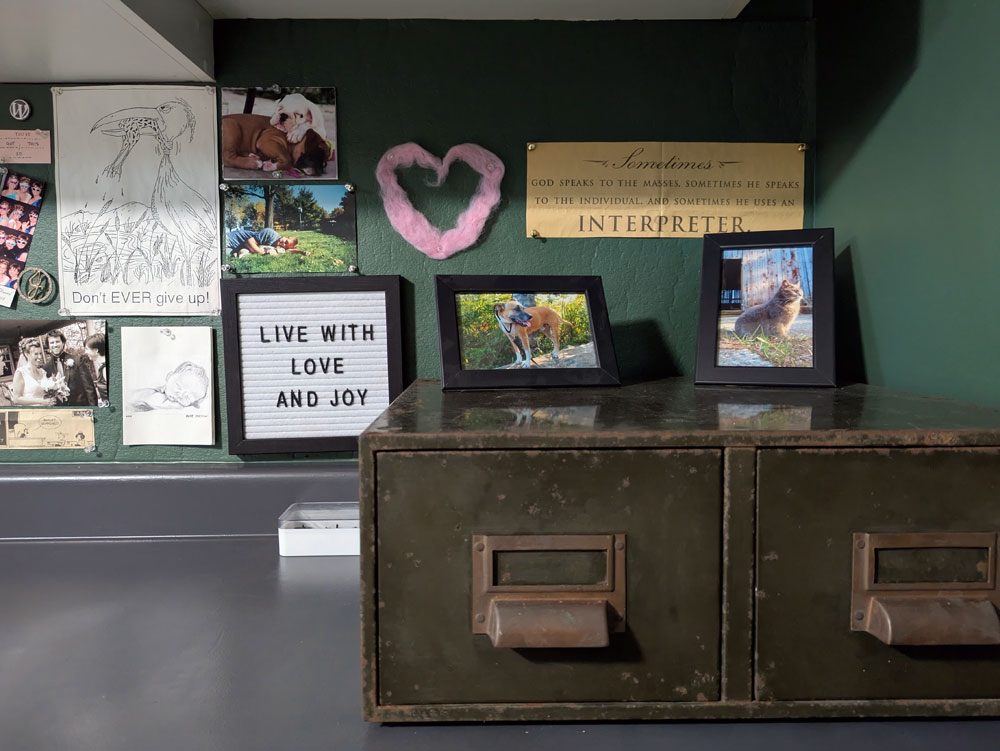
I love a bulletin board. I collect pictures, sayings, mementos–things that inspire me. There are also reminders that I jot down and Ellie’s many art creations. They all need a place to live, and my preferred home is a bulletin board.
In my new office, I debated where that bulletin board should go. Matt had one on the wall above his computer. I could do the same and even reuse the same board. But I really liked the idea of hanging some nice art above my computer instead.
Then I thought of the cabinets on the other side of the room. What if I made the “backsplash” a giant, long bulletin board?
I had used cork shelf liner at our first house to make a bulletin board over my desk and it worked pretty well (a couple of layers were needed as this cork is very, very thin).
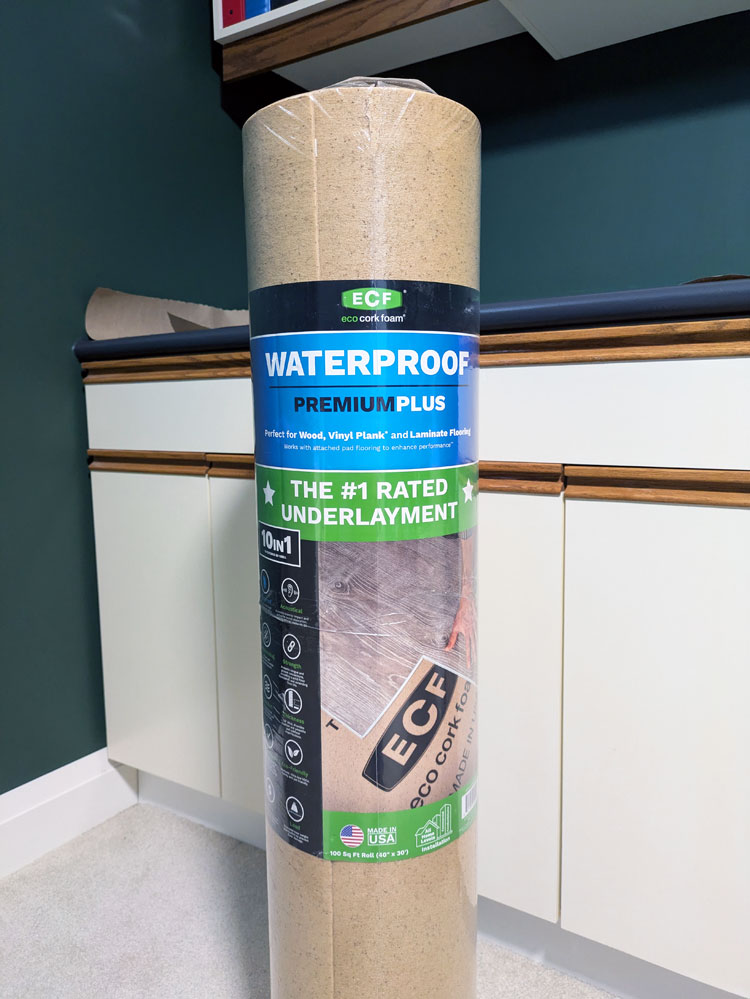
A quick tour of Home Depot showed me that I would need many, many packages of cork and it wasn’t the dimensions I needed. Then I thought about cork flooring underlayment. I had put a strip on the cold cellar door where we have our dart board. Maybe it would work for the office?
I decided to give it a try.
The underlayment comes in a roll 40 inches wide by 30 feet long. Plenty for what I needed.
I did a quick test. I put a couple of layers together and stuck a pin in it. It was nice and squishy and seemed to hold well.
I decided to go for it.
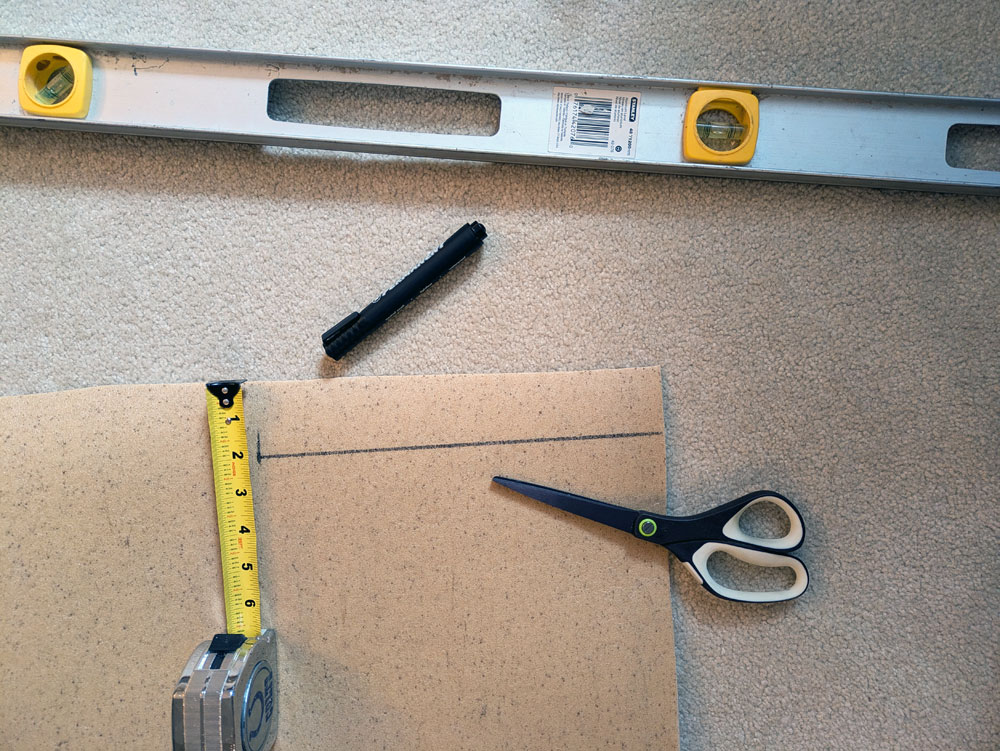
I rolled out the cork. My first step was to cut off the plastic “fringe” that’s along the one edge. Then I measured the space between my cabinets. There were a few ups and downs as a couple of the cupboards are fitted for under cabinet lights. I very carefully plotted everything out with a marker and cut along the lines with my scissors. The cork cut super cleanly and easily.
Then I took my first layer for a test fit. I had a few gaps that were bigger than I wanted, but overall it was a pretty good fit. I was ready to put it on the wall.
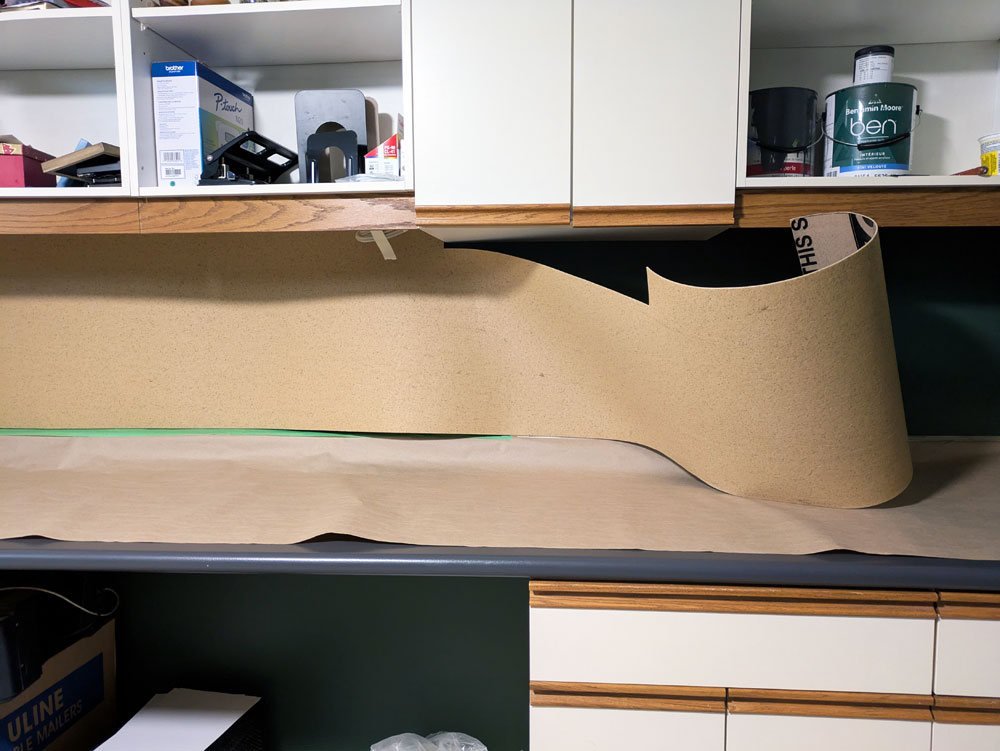
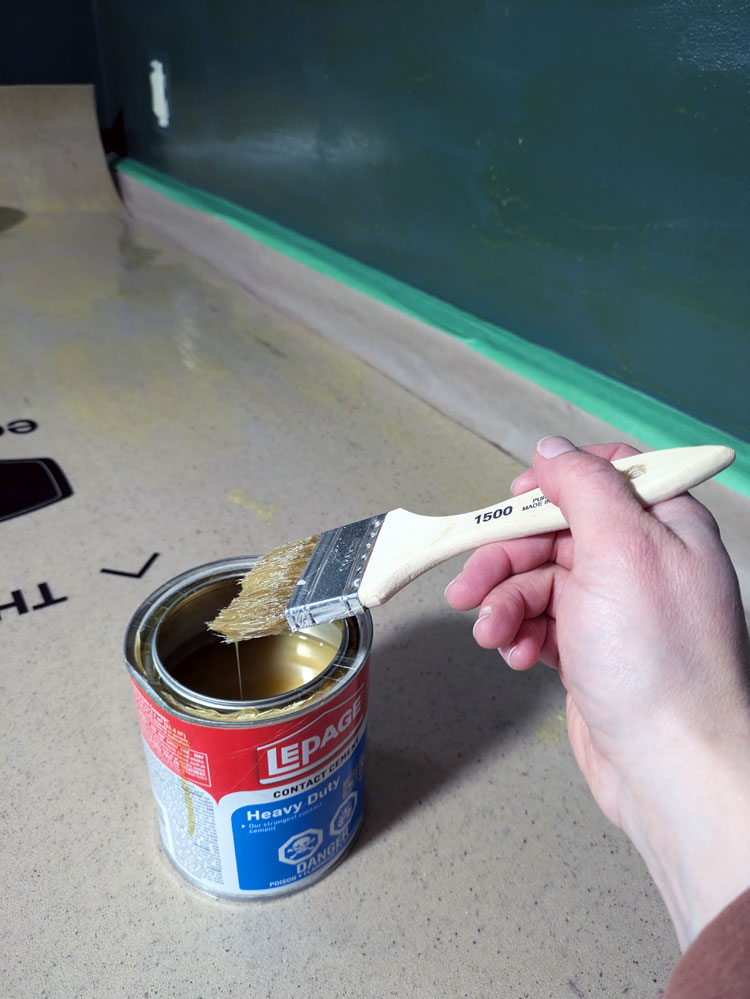
I removed cover plates from the outlets and covered the plugs with tape. I taped off the edge of my counter and covered the whole surface with paper to protect it from the adhesive. Then I laid the cork facedown on the counter and coated the back of it with Contact Cement. I also put a layer of CC on the wall. (Cheap chip brushes are good for this, as you will be throwing them out after gluing.)
Warning about Contact Cement. The fumes are super strong. I had the window wide open (in January) and the door closed.
I recommend following the application directions for CC exactly. Put on a generous, even layer. Let it dry for 30 minutes. Have an extra can of CC to make sure you can fully cover your wall and cork.
The issue I ran into in this project (more on that in a moment) was all because of the Contact Cement. I went through CC much faster than I expected, so some areas didn’t get that “generous” coating. (A 946mL can covers 25-33 square feet. My backsplash was about 20 square feet, so ideally I would have had two cans for each layer of cork.) I also was impatient (and it felt wrong to let glue dry), so I only let it set for about 20 minutes before putting the cork on the wall (still within the guidelines, but on the low side).
So after that foreshadowing, let’s proceed with the install.
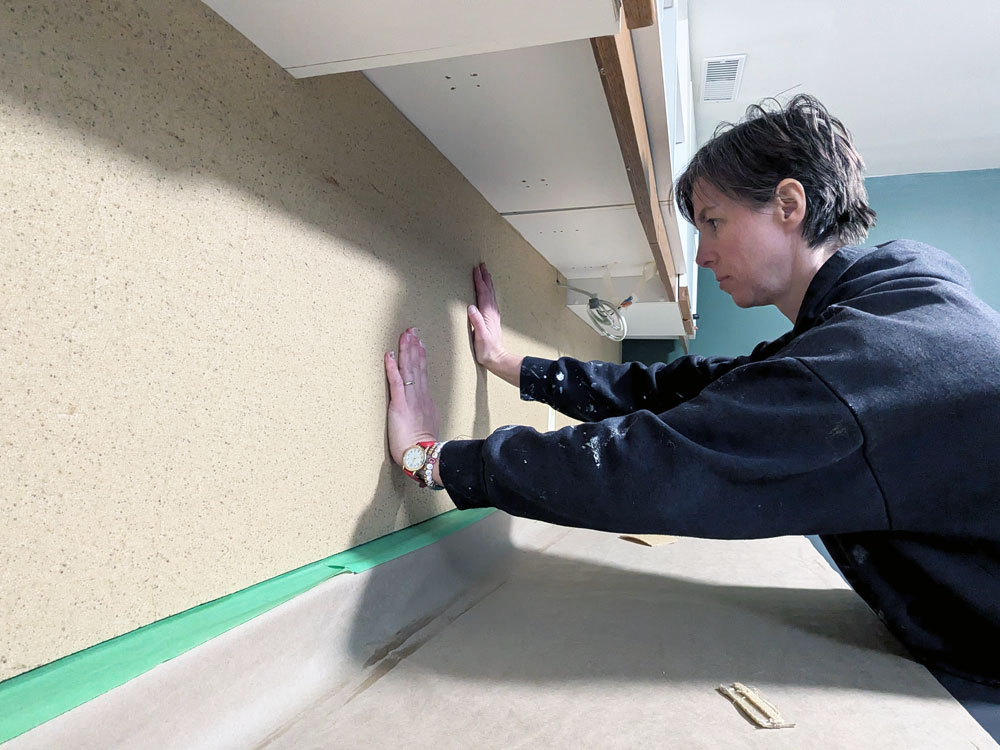
Once the Contact Cement had dried (kind of), it was time to put up the underlayment. I started at one end, got everything lined up as best I could and worked my way down to the other end. Depending on the size of your bulletin board, having an extra person would be helpful for this step. The Contact Cement on the cork sticks as soon as it touches the CC on the wall. You don’t have any wiggle room. With a long, floppy piece of cork, getting it smooth and aligned on my own was a bit awkward.
Once the underlayment was in place, I went over the whole length of cork and pushed it firmly into the wall. I went back and forth, up and down several times.
Then, I did it all again for a second layer. I was able to make some adjustments to my measurements to compensate for the little gaps I had in the first layer. I also cut out the plugs between each layer, just a rough cut around the outlets for now.
Two layers likely would have been enough, but I could still feel the wall when I pushed in a pin, so I decided to add a third layer of cork. However, I was out of Contact Cement, so the third layer had to wait until a trip to the hardware store.
When I came back the next day, I was dismayed to discover a huge bubble at the end of the bulletin board where I’d done a thinner coat of CC. This was also the spot that had cured for the shortest amount of time. The other end was smooth, flat and securely adhered.
I decided to slit the cork with my utility knife, peel it back and repaste it on the wall with my fresh Contact Cement. Then I proceeded with my third layer of cork, which I knew would cover the repair.
The next day, though, was deja vu. There was another bubble at the same end, and this one seemed even larger. My initial reaction was, “Well, I guess I know where I’m hanging the calendar.” But as I looked at the bubble, it seemed too large to leave. It was a significant bulge and would have been noticeable even behind a calendar.
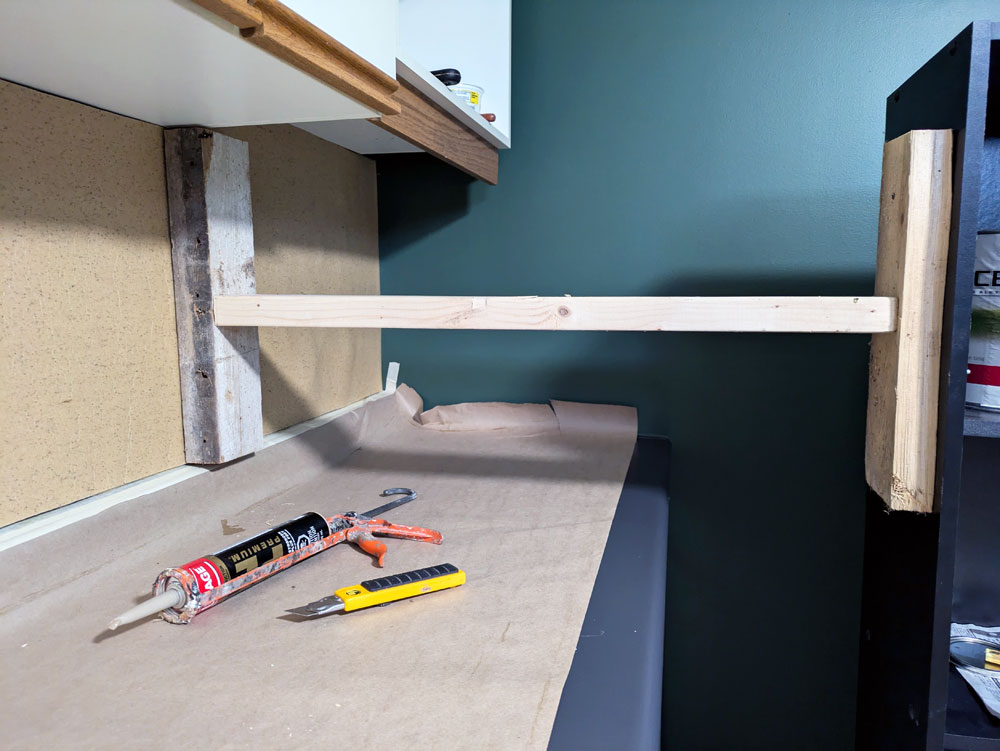
So I came up with a plan. I would cut a small slit in the cork. Then I would fill the bubble with construction adhesive. I would brace a 2×4 against the cork to push it into the wall while the adhesive set.
So I went to work. My small slit became quite large, as I cut open the whole bubble. But I was able to squirt construction adhesive into the whole area. Then I put my brace in place and not so patiently waited the prescribed 24 hours.
When I took the brace out, the bubble was gone. The cork was perfectly flat and securely stuck to the wall. The cut wasn’t super noticeable, and I hoped it would disappear even more with a coat of paint. Worst case, it was still a spot to hang my calendar. (Spoiler alert: the calendar ended up elsewhere.)
I decided to paint the bulletin board because I didn’t love the colour of the underlayment. It’s a bit yellow and not a true brown cork. Plus I liked the idea of the bulletin board blending in with the rest of the walls a bit more.
Before painting, I did my final cut around the two outlets. I traced the coverplates and very carefully cut the cork back. The outlets are recessed now into bulletin board.
I primed the cork with my go-to Stix primer and then did two coats of green paint. The cork took the paint really well, and I really like how it matches the walls.
After painting, I took all the masking off the outlets and countertop. That’s when I found the gap between the bulletin board and the counter was more noticeable than I liked. I decided to caulk the edge of the cork where it meets the counter. Then I went over the caulk with another coat of paint. This made a really clean edge.
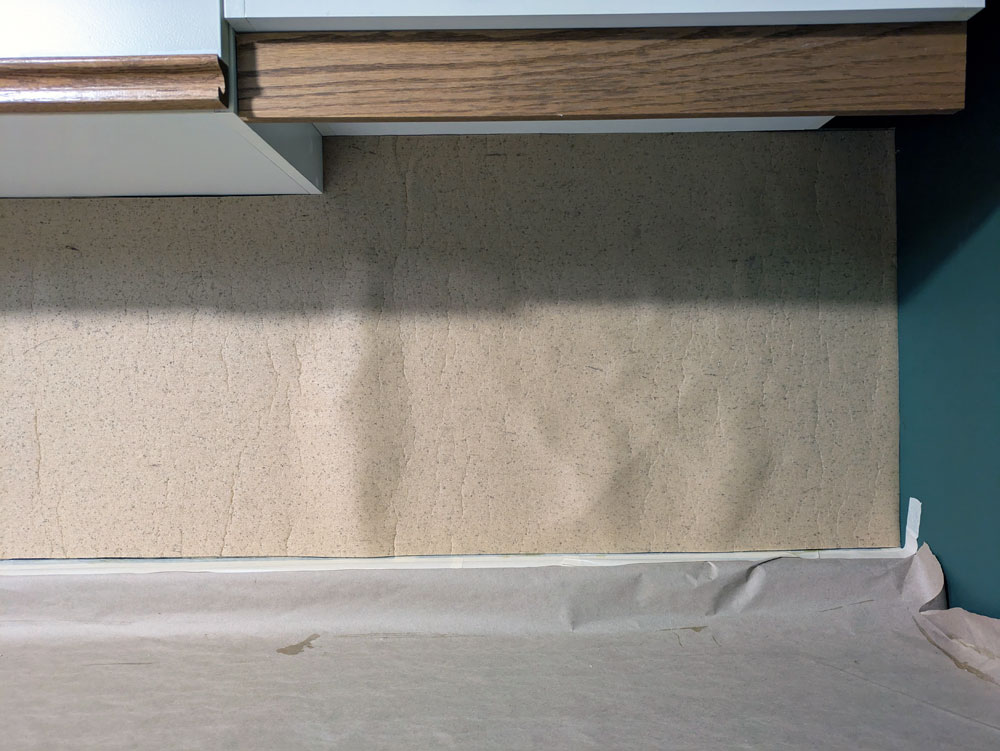
My third layer of cork was a bit more “wrinkly” than the earlier layers. This layer was closer to the centre of the roll of underlayment, so it was wrapped more tightly and had some creases in it. The creases were a bit visible on the wall, but they mostly smoothed out as the cork relaxed.
Once I started to load up the bulletin board, all of the flaws disappeared. I love how this project turned out. The wall is full of things that make me feel inspired, happy and loved. And I have plenty of room to grow.
I also love the trial and error–and ultimate success–with this project. I felt like I was returning to some of my old DIY days. I’m still that scrappy, creative, hard-working, cheap, make-it-happen person, and I like tapping into that.
Who else likes a bulletin board? Do you have a place to display creations and inspiration? Has anyone else had to adjust mid-project when things aren’t working out as you planned?
Last year was a “get back on track” year in terms of home projects, and I feel like I did pretty well. It wasn’t always easy. It wasn’t always fun. It wasn’t always the most “bloggable” content. But I feel like I made progress, which for me is very satisfying.
Also satisfying? This annual look back at how I did on home goals 2024.
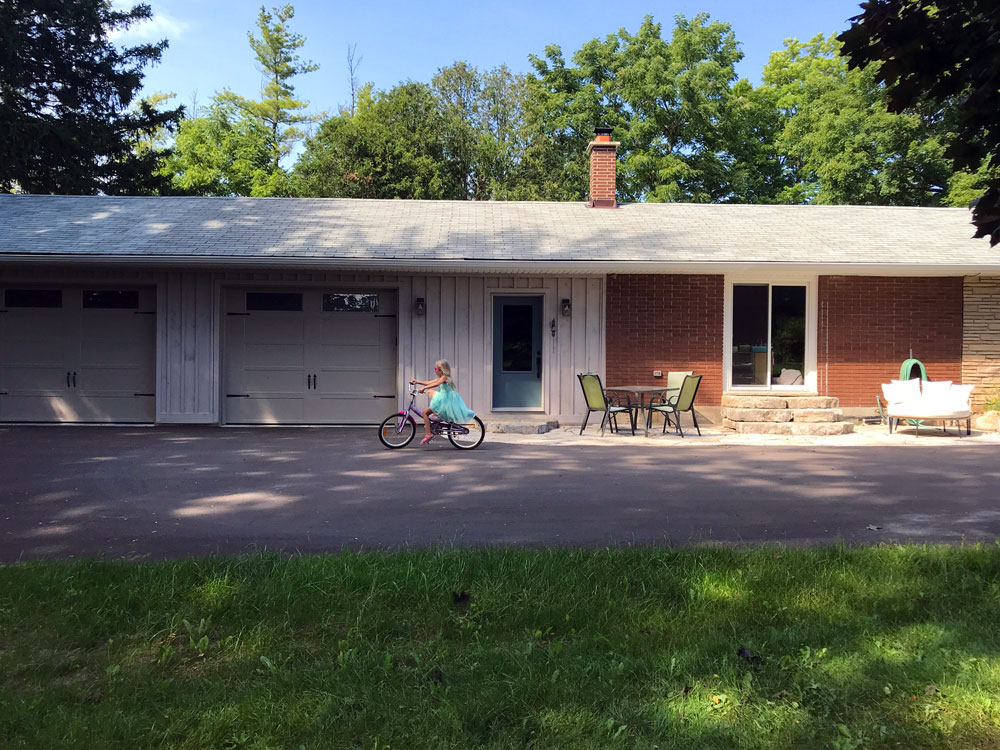
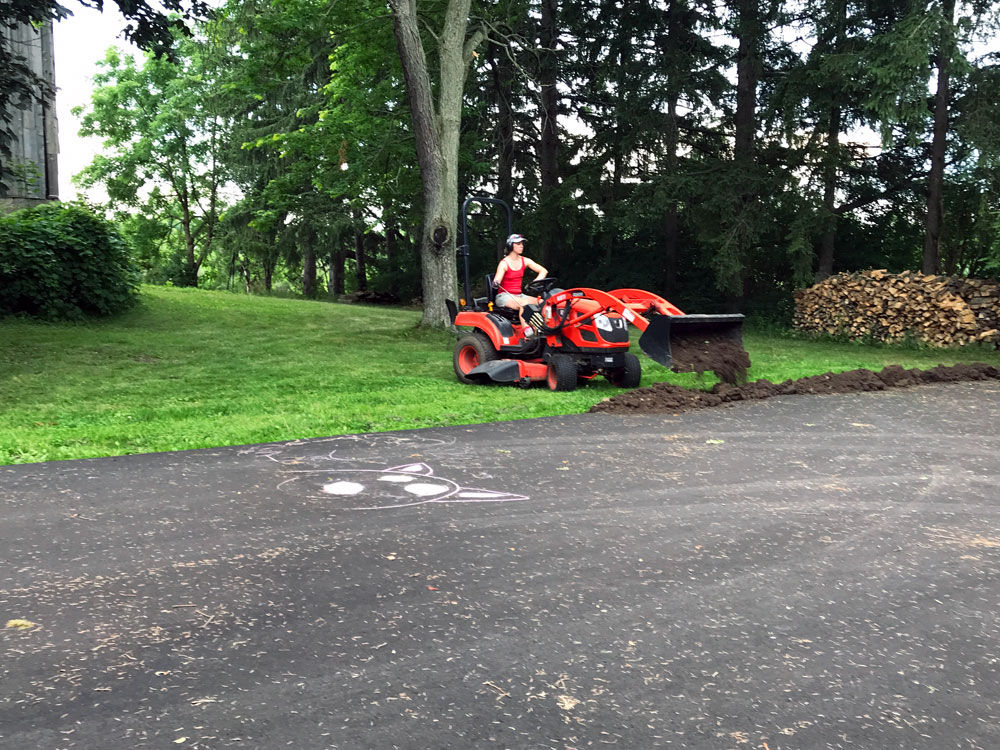
Driveway
Paving the driveway was the final step in our garage/mudroom/patio makeover. It feels like a big accomplishment to have this project completely done. The south side of our house has had a huge transformation, and I love the result. Plus, clearing the snow this winter has been much easier.
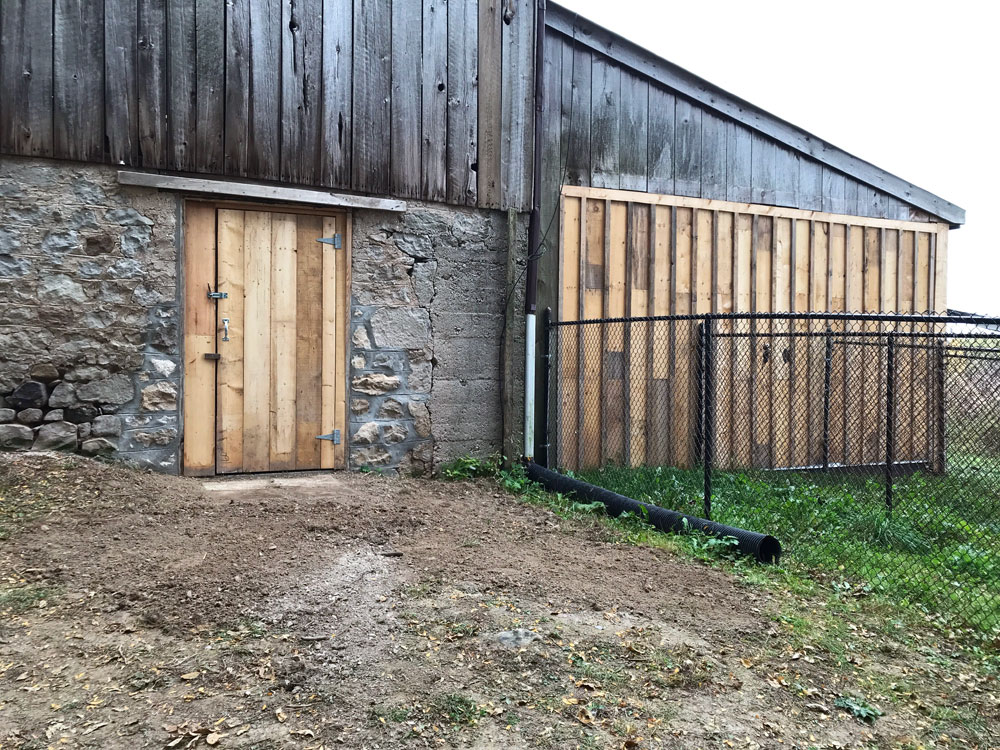
Coop
The coop ended last year in pretty good shape (I have updates to share). It’s not done, but we’re closer and getting birds this spring seems possible. I’m very proud of how my plans are coming together and that I’ve done most of the work myself.
Vegetable garden
As you saw in my Home Goals 2024 mid-year report, I decided to let the vegetable garden go last year. It was the right choice for me at the time, and looking back I don’t regret crossing it off the list.
Clean-up inside
Last year I wrote that “anything will be progress.” So, on the goal of tweaking, organizing, purging our house, I can say that I made progress. Fully finishing Ellie’s room was a big step. There’s still a lot more to do, so I feel like I’m still in the middle of a game of dominoes. Fixing one space will fix another which will lead to the space after that (which will lead us to Home Goals 2025, so stay tuned).
Clean-up outside
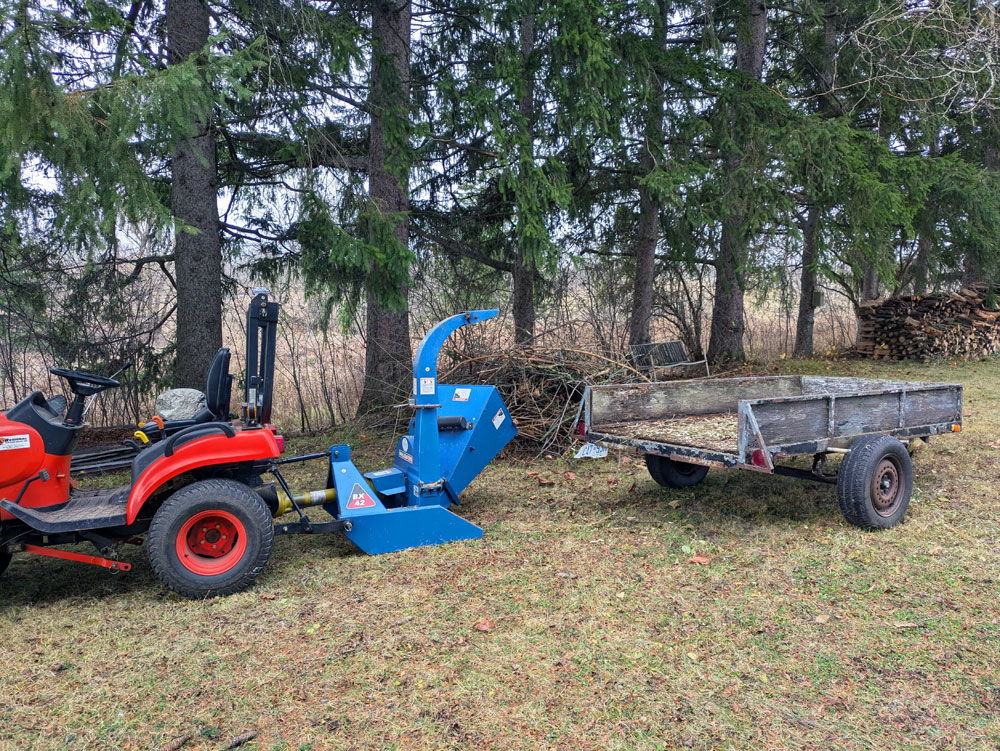
Our chipper and rotary cutter were both in action last year, and I was able to maintain all of the areas I had cleaned up previously. I also cleaned up a few new areas around the coop, so we are mowing all the way around the barn for the first time since we moved to the farm. My other big clean up, both inside and out, was a large quantity of Matt’s stuff. This project fell into the not easy, not fun and not bloggable category. But now it also falls into the done category.
Personal goals
I also had some personal goals last year that were about some of the other things that are important in my life.
Walking: 469.5km (39km per month. The same as last year and a bit shy of this year’s goal of 42km per month–though I still don’t track on-farm field walks, which I do at least once a day with Cigo)
Monkey bars: I still do them every week.
Reading: 37 books (didn’t hit my goal of 50 books)
1,000 Hours Outside: 939.5 (close, but this is a challenge that even if you lose you win)
Family albums: I completed 2020 and 2024, so that leaves 2021 and 2022 to catch up on.
Rest: Still my hardest challenge. I’m more conscious of my need to rest and I feel like I’m doing a better job of listening to my body. Though I still need to go to bed earlier.
Looking back at 2024, I’m proud of what I accomplished. Everything I did set us up for what I want to do this year, and I’m really excited for what’s ahead for 2025. Stay tuned for Home Goals 2025 coming up.
Did you have any home goals last year? How did you do on projects around your house? What was your big accomplishment for the year?
We are halfway through the year, and it’s time to check in on how I’m doing with this year’s home goals. At the start of the year, I said that I needed a reset, and I planned my projects with that in mind. As I review the list, I feel like I’m doing pretty good. I’ve made progress in most areas. It’s nice to feel like I’m more organized and getting through things.
I also feel like this update might be a bit premature as I have two reveal posts coming soon.
Read on to see how I’ve done so far.
Driveway
Guess what? I can finally say that the garage and mudroom renovation (begun in 2021) is done. Yup. We have a paved driveway. All the details and photos coming soon.
Coop
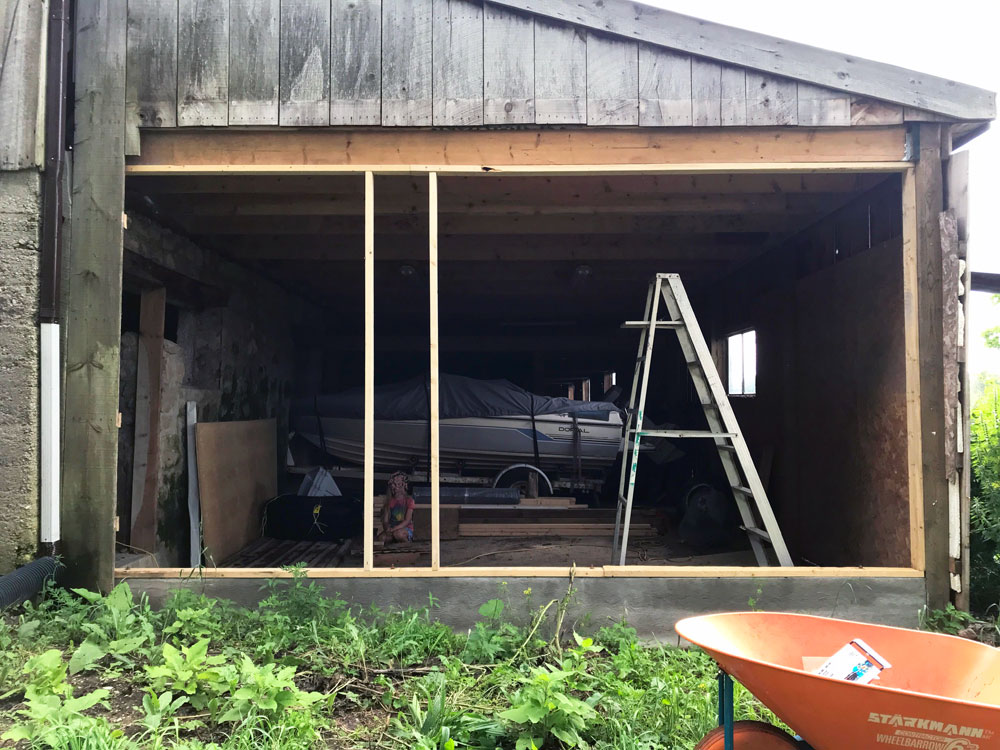
Slowly but surely the coop is moving forward. We’ve had a new foundation wall built and I’ve started framing the exterior wall. I’ve also been working on clearing some of the “yard” around the coop. This long-awaited project is happening.
Vegetable garden
The vegetable garden has been crossed off the list for 2024. I’m a bit disappointed, but I know it was the right decision. We are working off and on in the other gardens, and I’m seeing progress there which feels really good. And despite our neglect, we have had some good harvests. One and a half pounds of asparagus–our best ever–and raspberries, which are starting now.
Clean-up inside
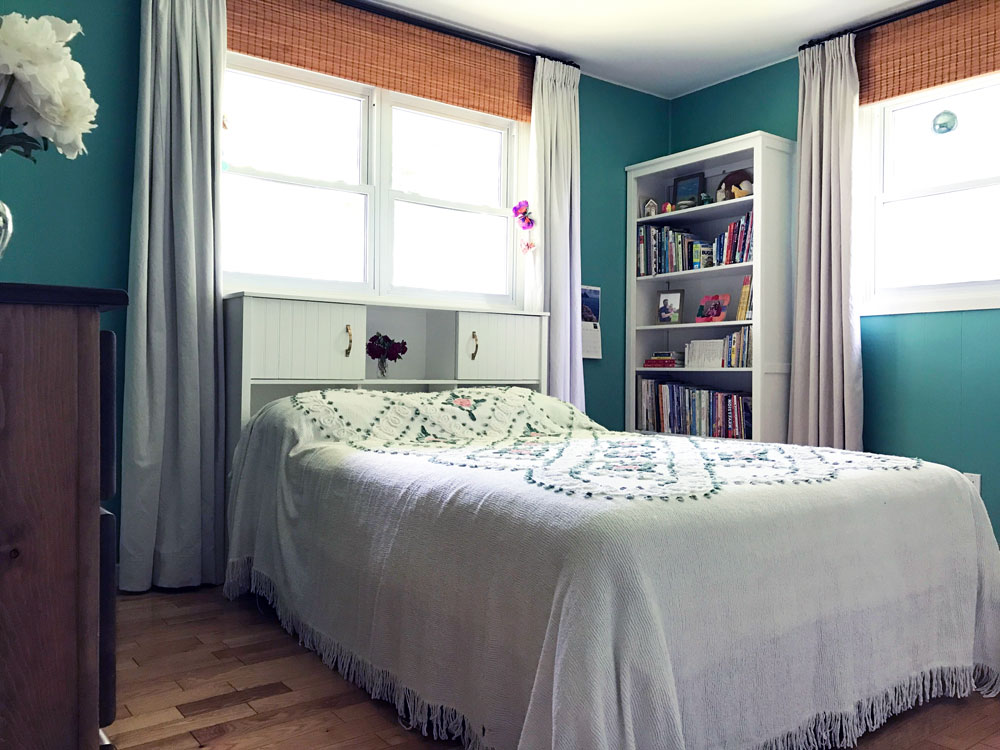
I made a few tweaks to my bedroom, added a craft shelf to Ellie’s soon-to-be playroom, cleaned out a few other spaces and finished off the final details for Ellie’s bedroom (another reveal that is coming soon). I still have a lot to work through, but we’ve made some progress and I can see the future.
Clean-up outside
I’ve chipped, I’ve mowed, I’ve pruned, trimmed, picked up rocks, tarped. Our new chipper has been a great addition. I’ve already started rebuilding brush piles, but they’re more contained, and I know I can clean them up again before they become gargantuan. I’ve run the rotary cutter over the septic bed and along the edge of the front field, and I’m confident I can continue to maintain these areas. I’ve “groomed” a few new sections of the property, and getting each of them cleaned up feels like a good accomplishment. I also had a milestone last week when the first big load of Matt’s stuff left the barn.
Personal goals
Earlier this year I also shared some personal goals. Here’s how I’m doing on them:
Walking: 290km (48km per month–ahead of my goal of 42km per month)
Monkey bars: I still do them every week and whenever Ellie and I visit a playground. I haven’t mastered a chin-up yet, but I’m working on it. I definitely feel that my grip strength has improved.
Reading: 19 books (not quite on track for my goal of 50 books this year)
1,000 Hours Outside: 644 (in pretty good shape to hit our goal, I hope)
Family albums: I’ve completed 2020 and am hoping to finish 2021 as well. That would leave me with just 2022 to catch up on (and ’24, of course).
Rest: Still my hardest challenge. I’m more conscious of my need to rest and I feel like I’m doing a better job of listening to my body. Though I still need to go to bed earlier.
These personal goals are less about making big changes (aside from rest) and more about maintaining a balance for myself. They’re a good reminder of some of the other things that are important to me.
Overall, I feel like I’m making good progress, and that feels good. This mid-year review makes me proud of what we’ve accomplished so far and gives me motivation to keep going.
How have you been doing on your projects so far this year? Is anyone else doing a reset? What are your big goals for 2024 (home or otherwise)?
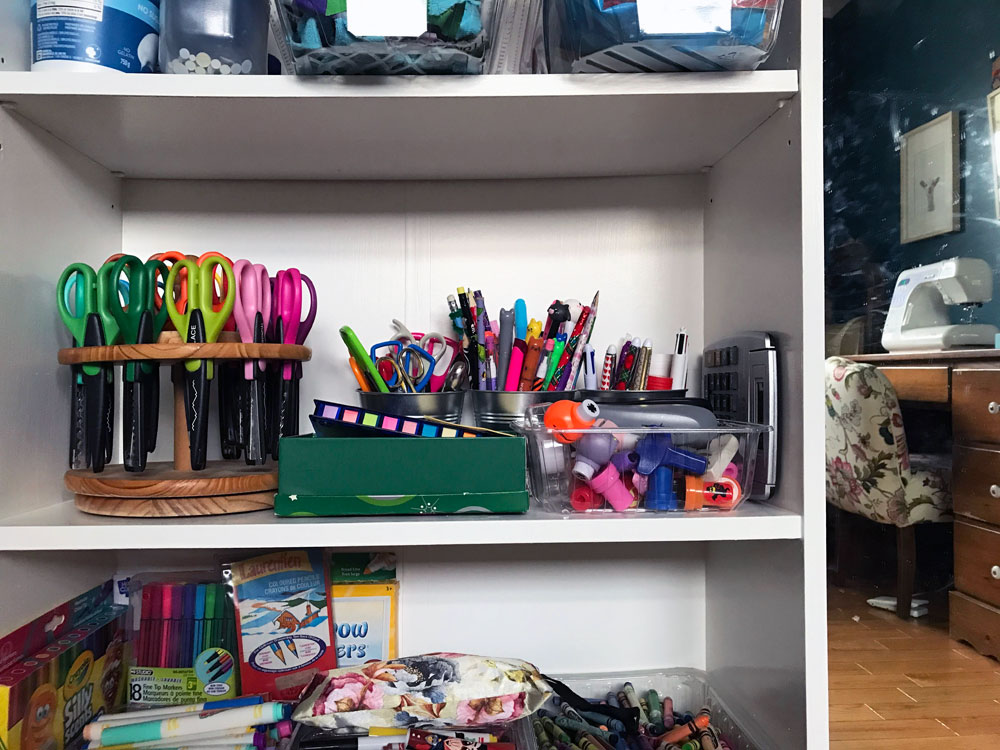
It was the scissors that did it. They tipped the balance from crowded into chaos. To be fair, it’s a whole carousel of scissors. And the living room has been maxed out for a while.
The journey to move Ellie’s play zone out of the living room and into her old bedroom has begun. While I had a vision of it being a one and done undertaking, I’ve come to terms with this being a more gradual process.
We started with the crafts.
Ellie is a prolific and varied crafter. Paper, fabric, stickers, glue, beads, wool, she loves it all. We’ve managed the crafting process and supplies with a small table in the corner of the living room and storage in the coffee table and sideboard. For a while it’s been a tight squeeze.
Then Matt’s aunt arrived for Easter lunch with an assortment of provisions, including a carousel of scissors (she knows what our girl likes). This, just weeks after Ellie’s birthday where she received rolls of colouring sheets, cases of beads, and sacks of needle felting, meant we were overrun with craft stuff.
I had the idea to shuffle some things around. As I said in my home goals post at the start of this year, this shuffle becomes like a row of dominoes. I reorganized and relocated some of Matt’s things. That freed up a cabinet and a bookshelf in the basement. More of Matt’s things moved into the cabinet and the bookshelf came upstairs.
After a quick coat of paint, the bookshelf moved into the playroom and became craft supply central. The first item to move in? The carousel of scissors.
While we were stocking the bookshelf, we made a few other changes to the room. (Though we obviously did not clean the mirror.)
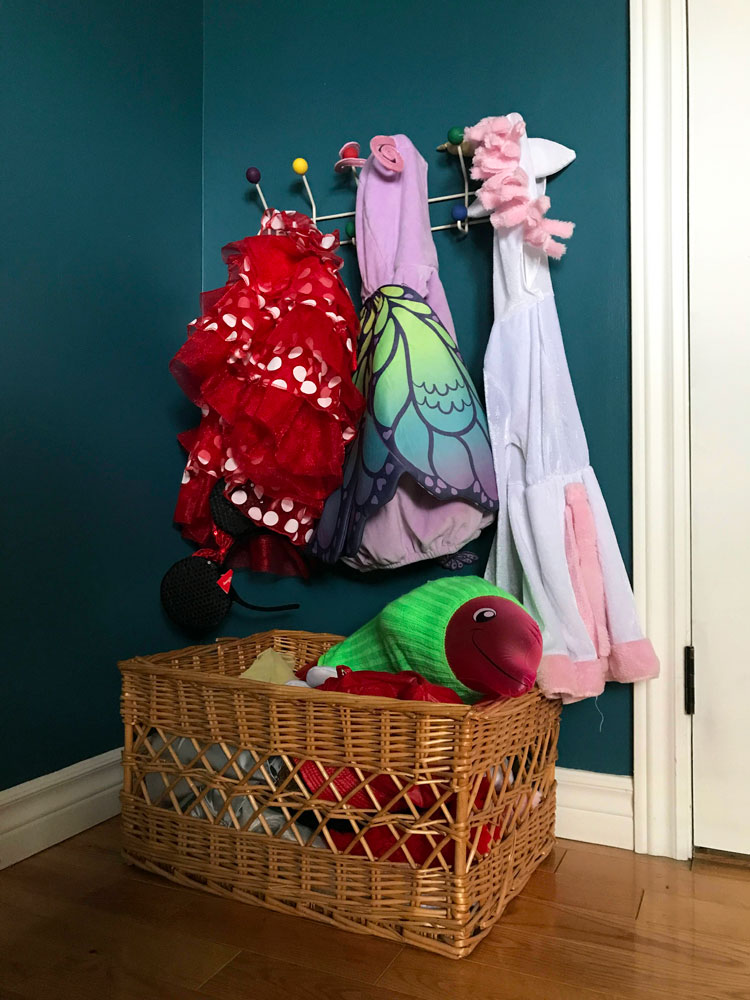
Her little table and chairs moved from the living room to the new (soon-to-be) playroom. I also used my knock-off DIY Eames hang-it-all to arrange a little dress-up area for her with all of her costumes and a bin for accessories such as hats, crowns, scarves, Minnie Mouse hands, or an inflated pink dolphin wearing a fluourescent green legwarmer (???).
This is just the start (and it’s definitely not Pinterest-perfect), but now Ellie has most of her craft supplies in one spot, clearly visible and easily accessible.
Anyone else have a crafty house? How do you handle craft supplies? Who else feels like home tweaks are like dominoes?
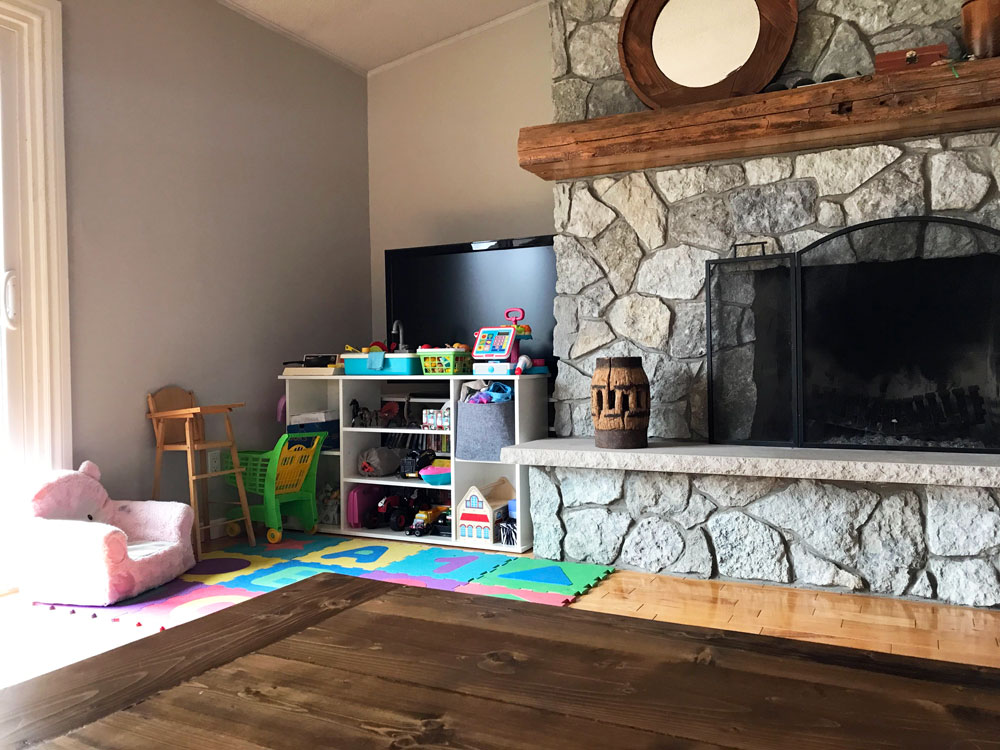
The living room is still most definitely the playroom. My campaign to convince Ellie that her room should become a playroom has not yet been successful. But I have successfully reclaimed part of the living room.
I started thinking about how I could better deal with the toys and the mess.
My first idea was moving the television farther out into the room. There was already an empty corner behind the TV. I could make that whole corner a play zone. Tucked behind the TV, it would be her own little secret spot.
But then I realized she wouldn’t like being tucked away. Part of the appeal of playing in the living room is that she can spread out and be close to the kitchen or wherever I am.
I also realized the toys are used much more often than the TV. So I decided to tuck the TV away. I pushed it back into the corner and made a play zone in front of it.
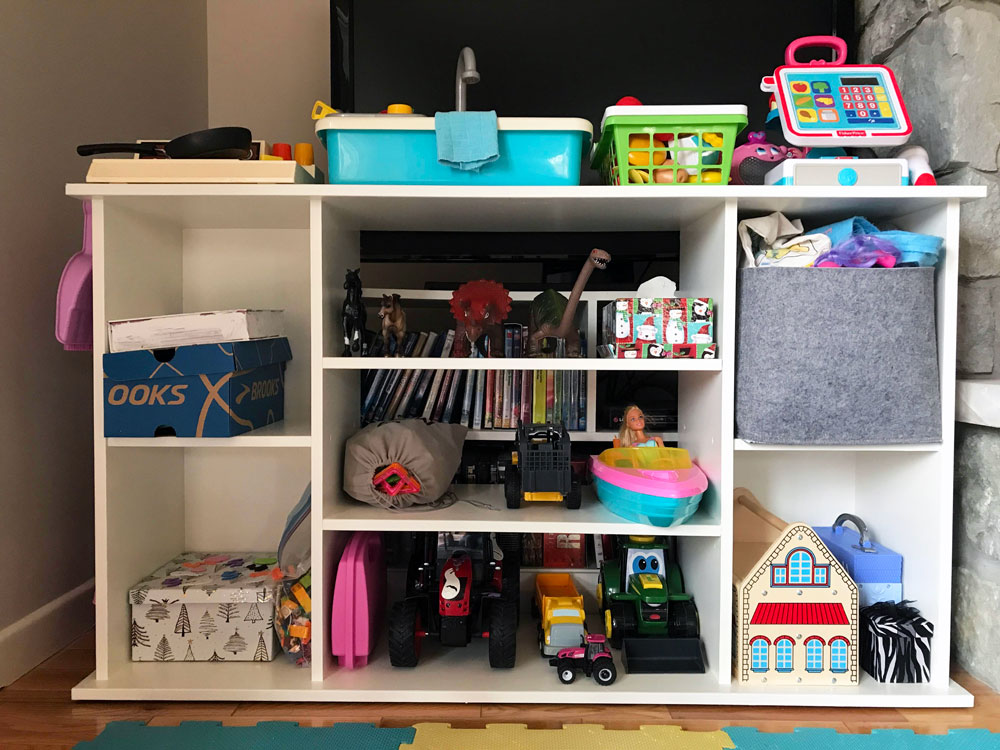
I grabbed a shelf that had been dumped at the side of the road. After adding some more shelves and giving it a coat of paint, it is perfect for holding a whole bunch of things. (Some bins would help it hold even more.) All of her kitchen and grocery toys sit on top of the shelf, instead on on top of the coffee table.
The TV isn’t useable now. But we can slide things around pretty easily if we ever want to watch it. And if we really find we miss the TV, I can mount it on one of those extending, swinging arms. We also have the basement TV.
The coffee table still gets covered regularly with crafts and colouring, but now there’s usually a spot to set down our afternoon snack or a book. Progress.
The toys still win, but so do Ellie and I.
Who else’s living room does double duty? How do you handle toys at your house? Do you have a TV in your living room?
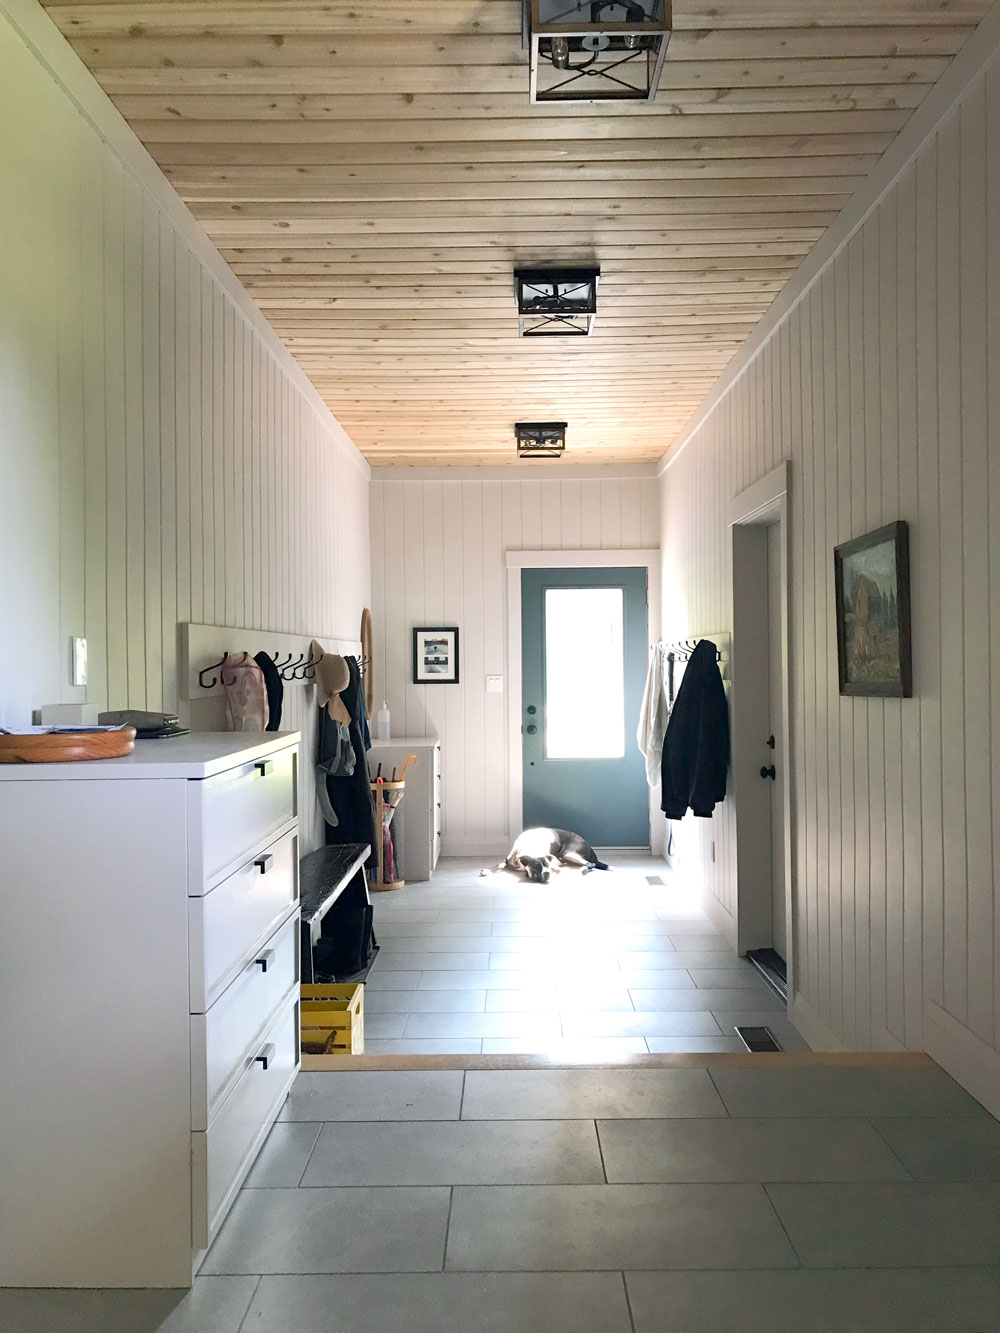
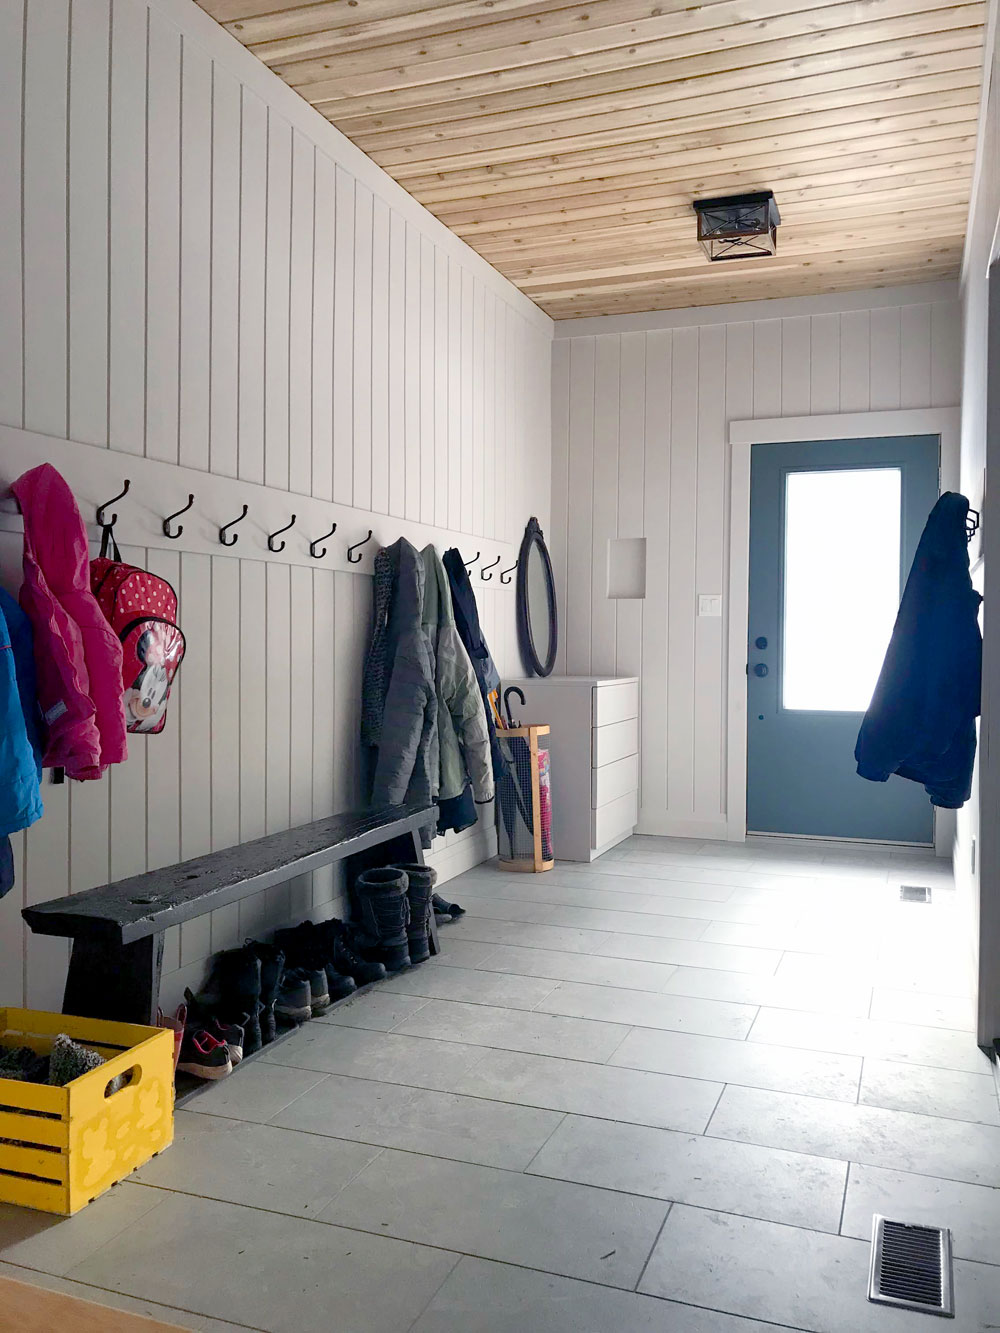
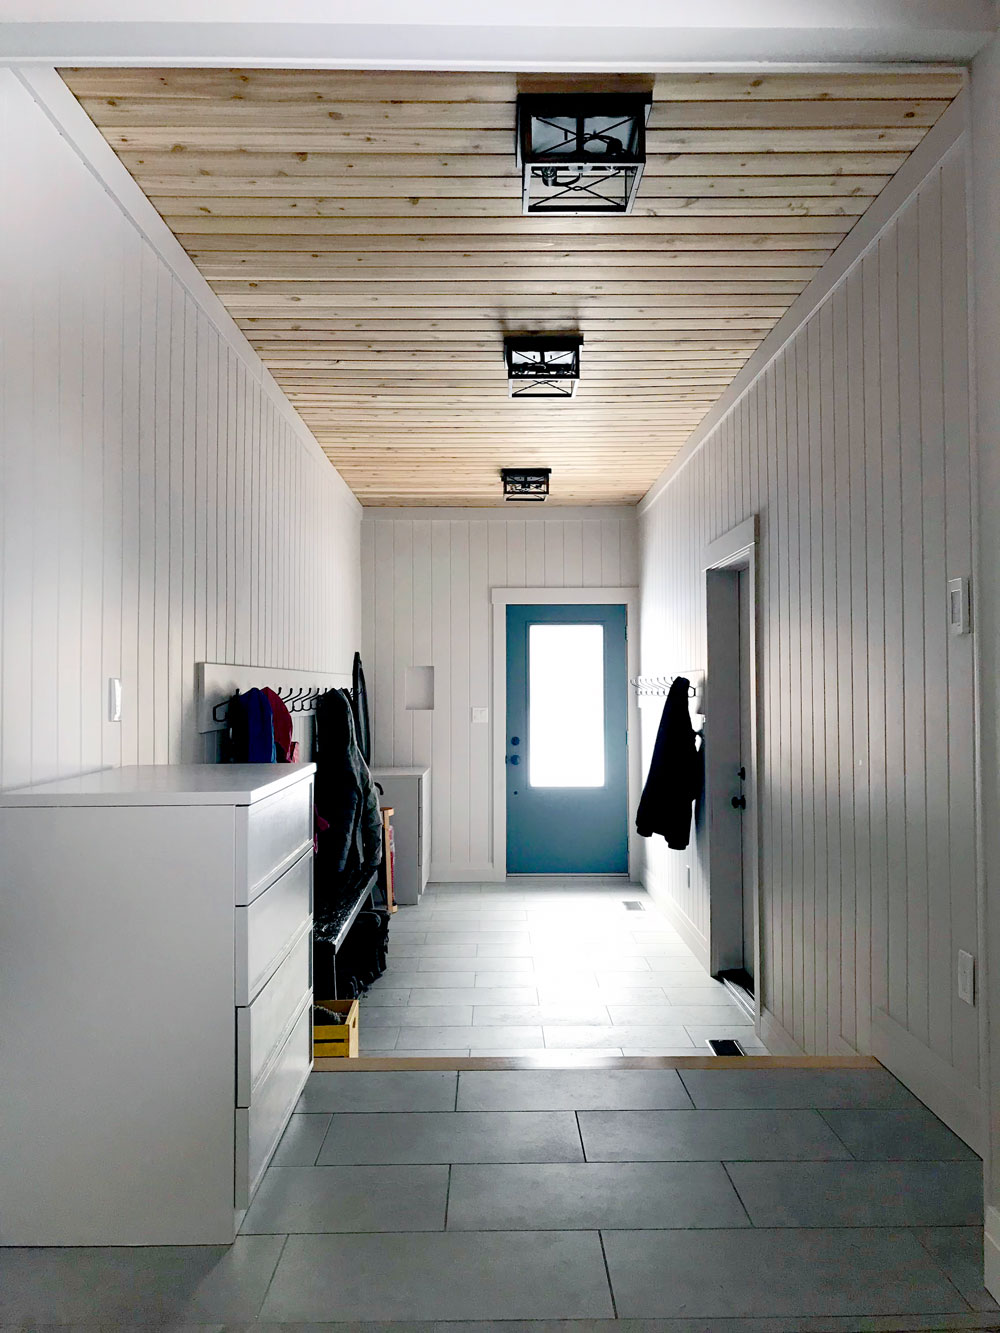
Our mudroom is done–for now. This room was the first on my home goals list for this year. I had just five small tasks to do, and they are finally finished.
Today, I’m giving a tour of the space and highlighting some of my favourite features.
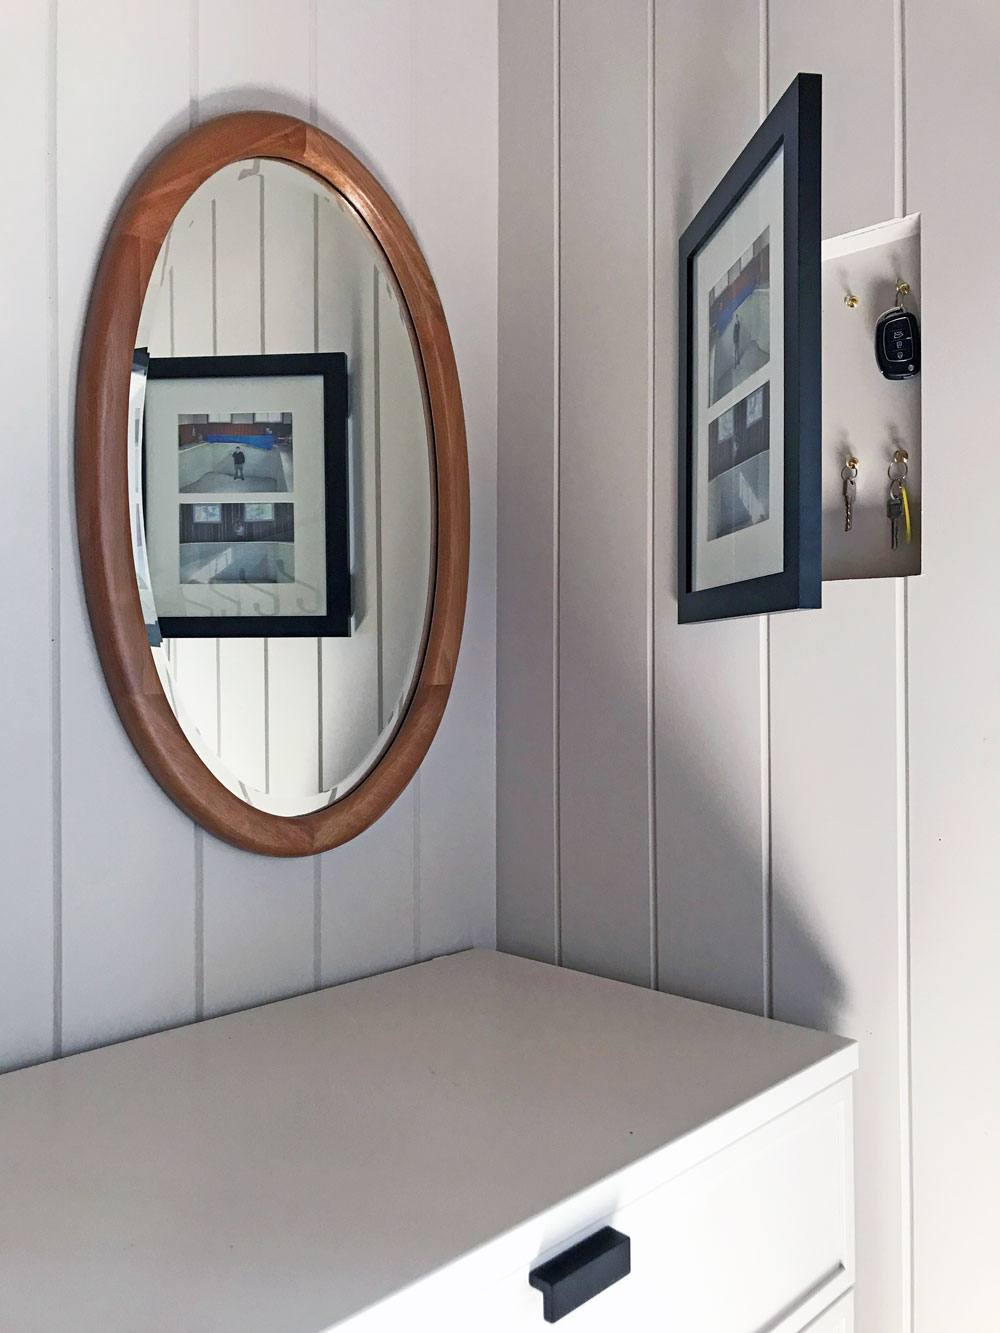
The secret behind the picture
Let’s start with the hidden (literally) gem. I’m particularly proud of how this secret cupboard turned out.
One weekend, I built a little box. When our contractors arrived, I asked one of them to install it in the wall next to the door. Then I attached hinges to a picture frame and installed it over the box. Inside the box, I screwed two rows of little cup hooks. Voila, hidden key cupboard.
I like having our keys hung up, rather than jumbled together in a basket in the drawer. Originally I’d planned to find a farmy painting for the door. But when I couldn’t find the right size, I decided to go with photos. I chose a picture of Matt in the pool during our home inspection, and then I selected another photo of Ellie and me in the pool during demolition. A literal snapshot of the history of the mudroom, and our little family together in this space we dreamed about.
Figure it out furniture
Someday the mudroom may have beautiful built-ins. But for now, we’re making it work with free hand-me-down dressers, our homemade bench and other DIYs. And honestly, they’re working great.
The dressers look fresh after a coat of paint to match the walls. Spraying the hardware to match the black hooks that we used in the room was the finishing touch. The dressers are likely not going to be here forever (the one on the landing is too small and the one by the door is too big), but they’re doing everything we need.
The upper one holds puzzles, colouring books and games for Ellie. Plus cards, flyers, coupons. It’s also our mail drop, wallet and phone charging station. The lower one holds sunglasses, sunscreen, bug spray, masks and some outdoor toys and tools. In the winter it stashes hats, mitts and scarves. Both dressers have empty drawers, so we have more than enough storage for now.
Matt’s nephew and I made the bench almost nine years ago. I’ve been surprised by how much I like having the free-standing shorter bench. It gives space for my longer coats to hang freely, instead of puddling on the seat. Ellie is still a bit short to reach too high, so having her hats or other gear in a dresser drawer or a bin on the floor works best for her, rather than putting them on a too high shelf.
Living with the space as it is now gives me an idea of what we need and what works best.
A little bit country
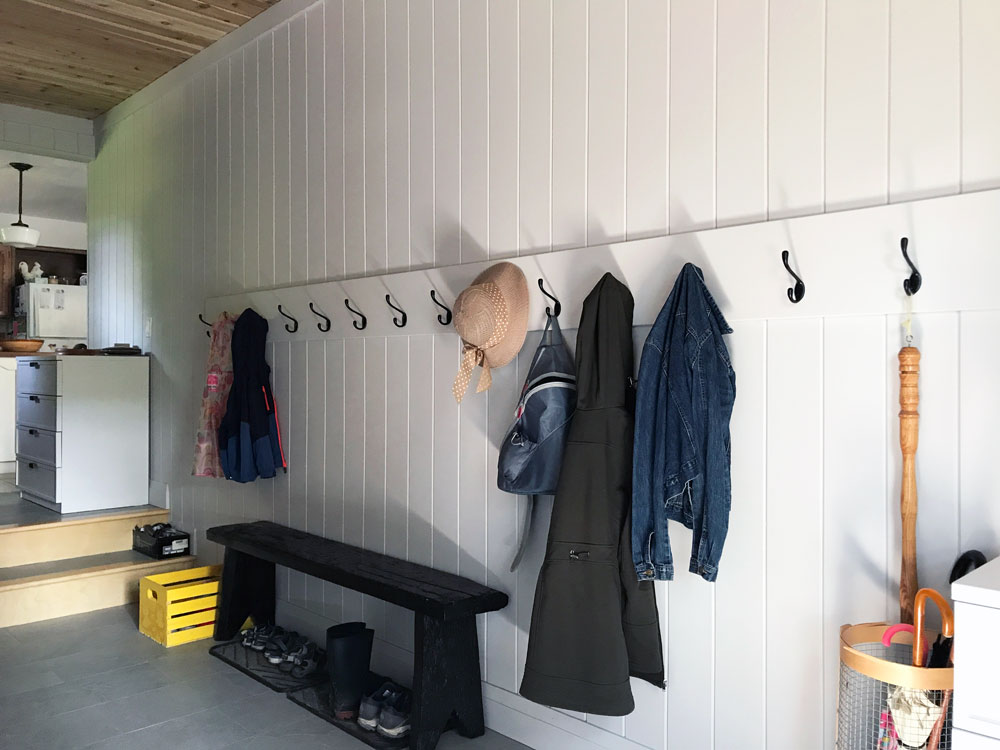
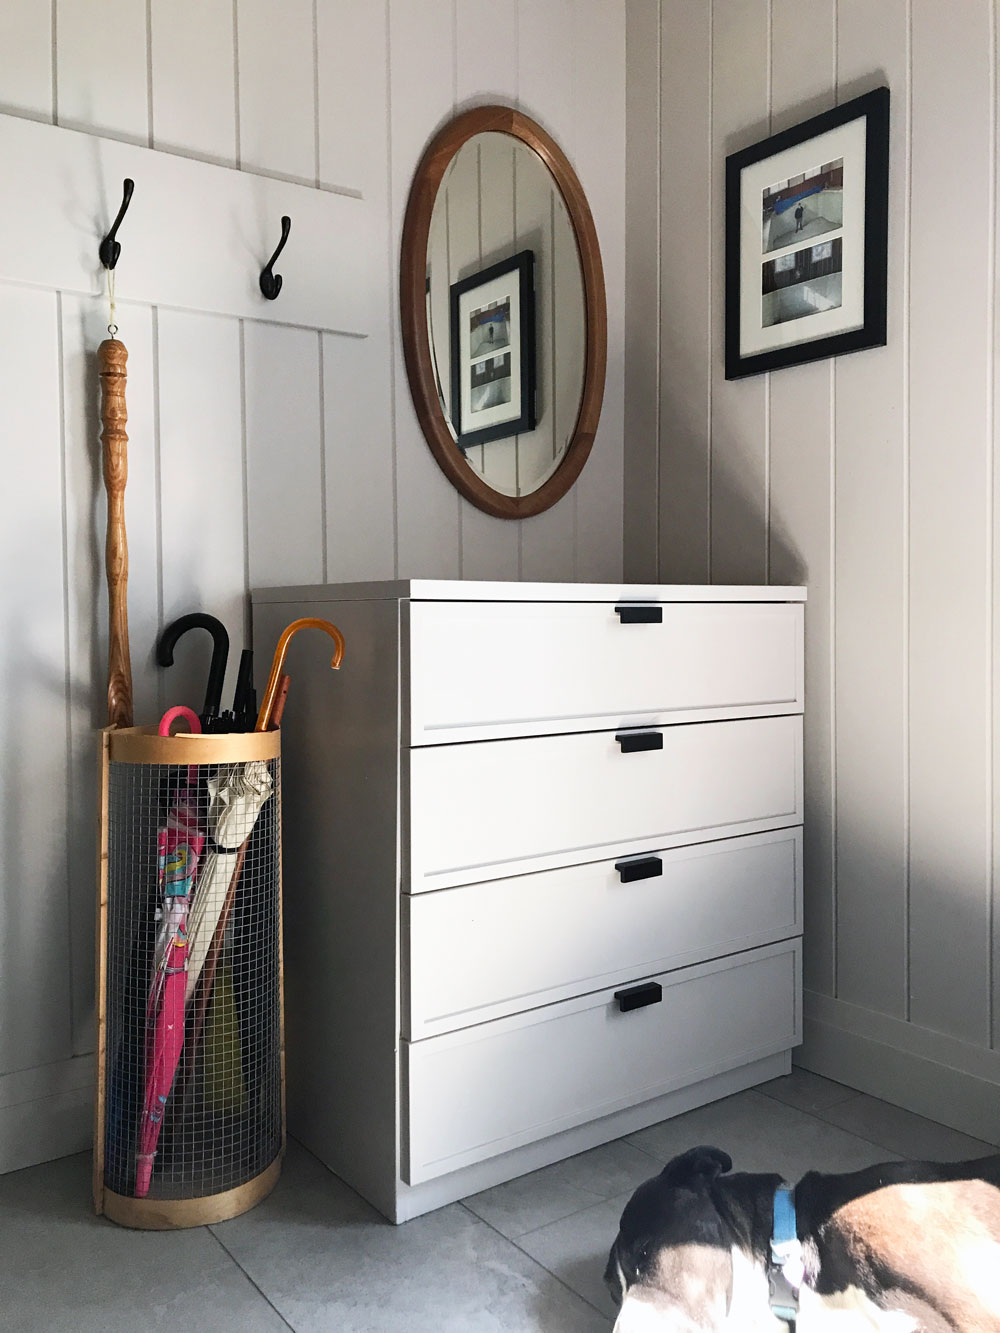
We live on a farm, but we don’t have a farmhouse. With every tweak we make, I try to inject more country character. The V-groove paneling on the walls, cedar on the ceiling and simple black hooks are all examples of that.
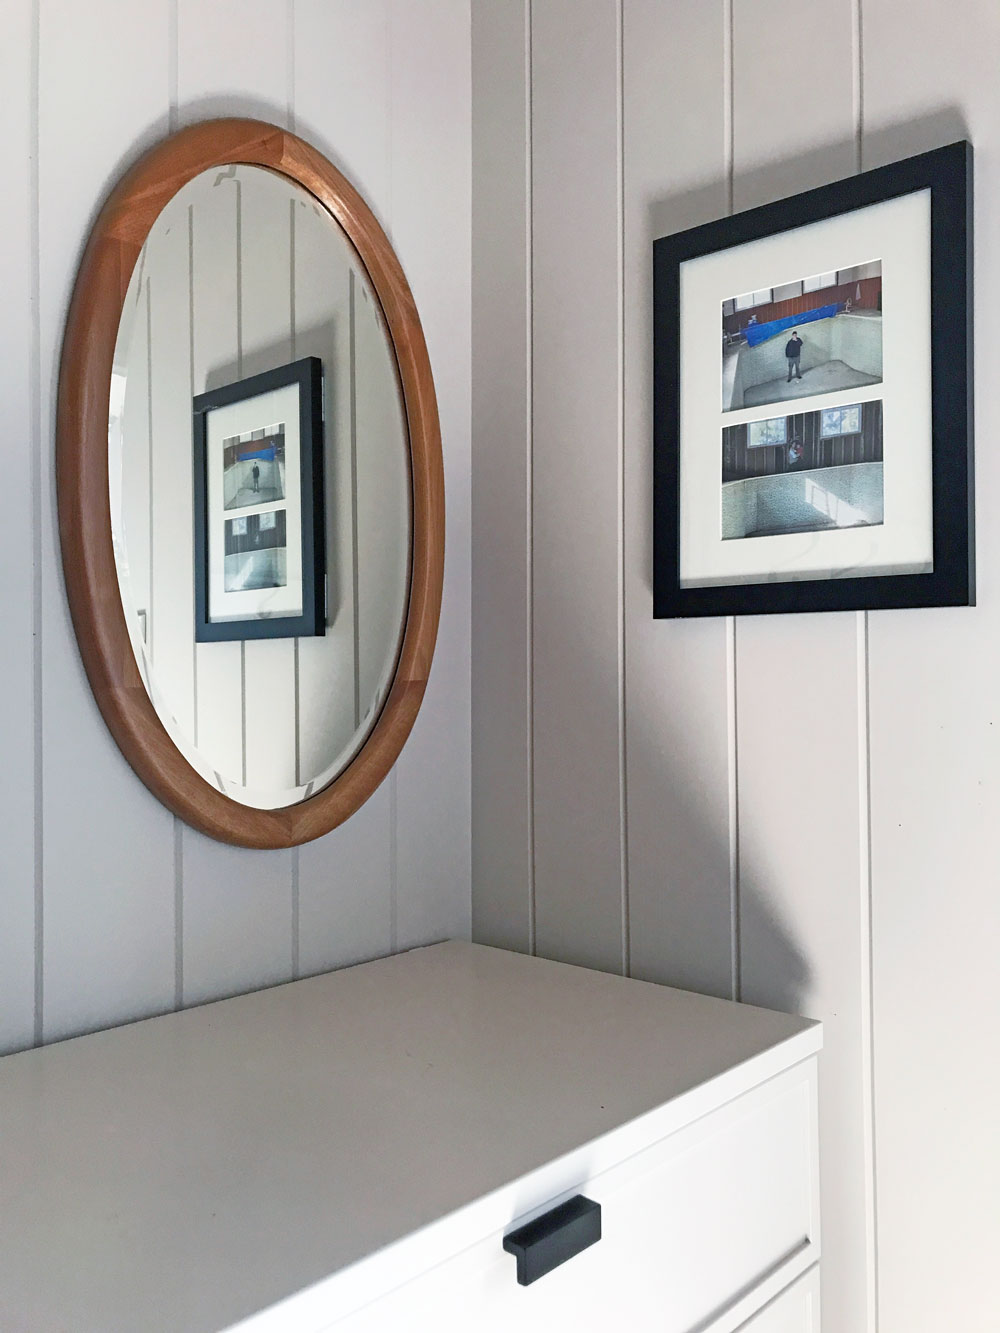
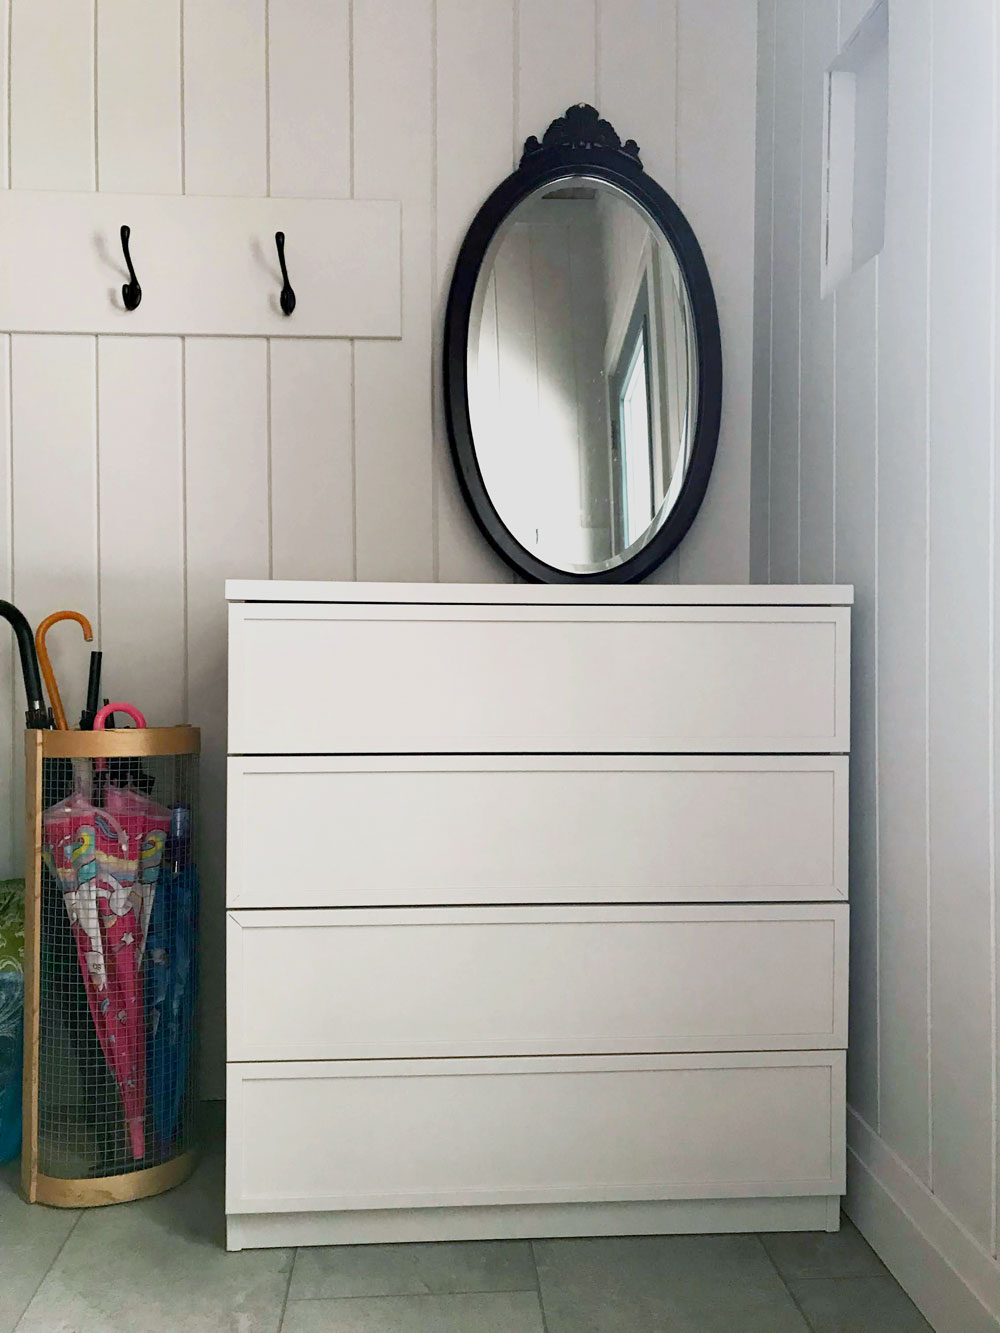
The mirror is another. It was a bit ornate when I found it in the thrift store. Removing the decorative top piece and the cherry-esque finish countrified it a lot. The factory finish was so hard and thick, but patience and a lot of sandpaper prevailed. Finding the right way to refinish it took a bit. Everything I put on the wood turned red. Finally, I went with simply varathane. That countrified it the rest of the way.
The mirror bounces a bit more light into the room (enhancing Cigo’s sunbeam), and its round shape contrasts with all of the straight lines from the paneling and other elements in the room.
Designed for us
Installing an LED nightlight cover plate on the landing (I was influenced by Young House Love) was probably the easiest task on my to-do list. It gives a perfect glow for the stairs. The location of this plug–and all of the other switches, outlets, light fixtures, heated floor control panel–was very carefully mapped out by me. The electrician and the tiler didn’t completely agree with my choices, but I’m the one that lives here, so I got my way.
The dimension and height of the landing, the way the doors swing, where the openings were located, and the height of the archway into the kitchen were other areas where I pushed for what I wanted. Sometimes I felt guilty asking for a change, but I knew I would regret it if I didn’t make the mudroom exactly the way I wanted.
Now everything is so convenient and it works for how we live.
Make it personal
Like all spaces in our house, the mudroom is personal to us. Matt’s nephew and I made the bench and I made the umbrella stand for our last mudroom. My sister-in-law made the yellow crate for Ellie. My Dad made the wooden shoehorn that’s hanging from the hook and the large wood plate on the dresser that we use for mail. There’s even a box on the stairs to hold stones, sticks, pinecones, feathers and other treasures that Ellie collects.
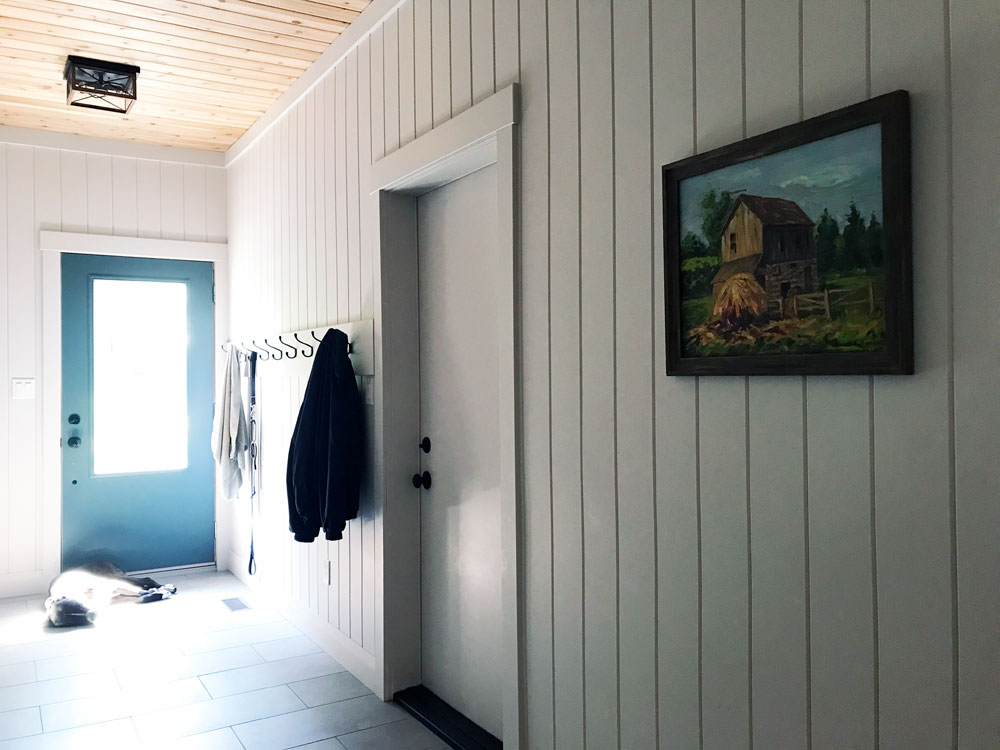
Matt’s winter coat which I wear to take the dog out hangs beside the door. Having a whole section dedicated for Cigo has been a game-changer. In the old mudroom, towels were draped over the bench, leashes were piled on top of each other. Now we have ample hooks for everything. I even stash his nail clippers and a bottle of dog shampoo in the dresser by the door, for those moments when he smells a bit too farmy to allow in the house.
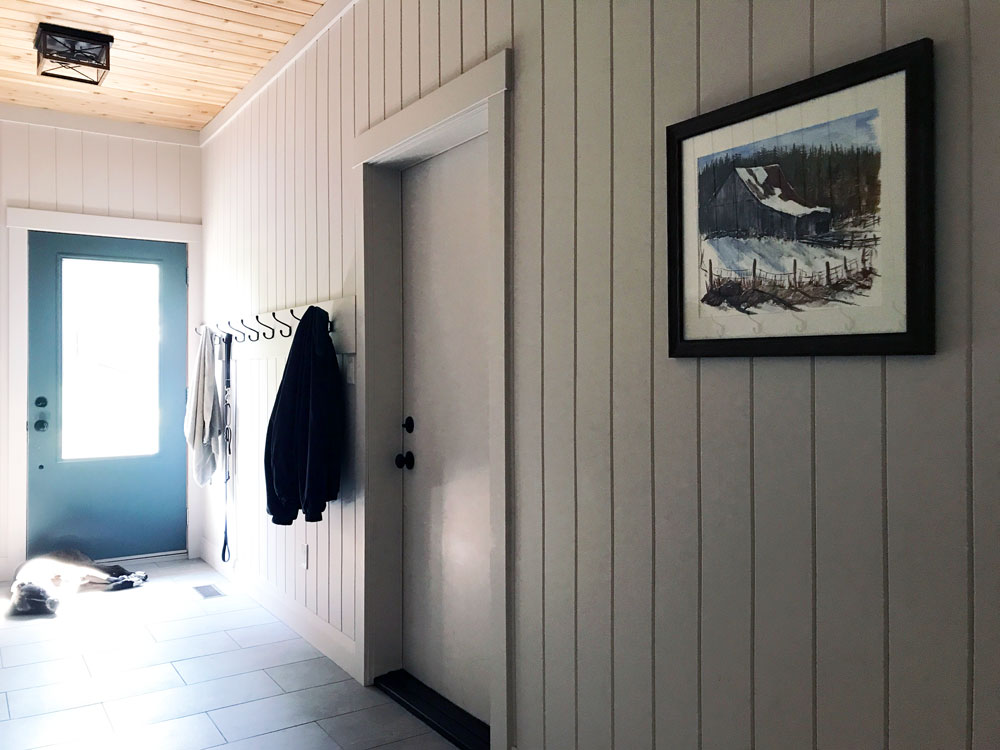
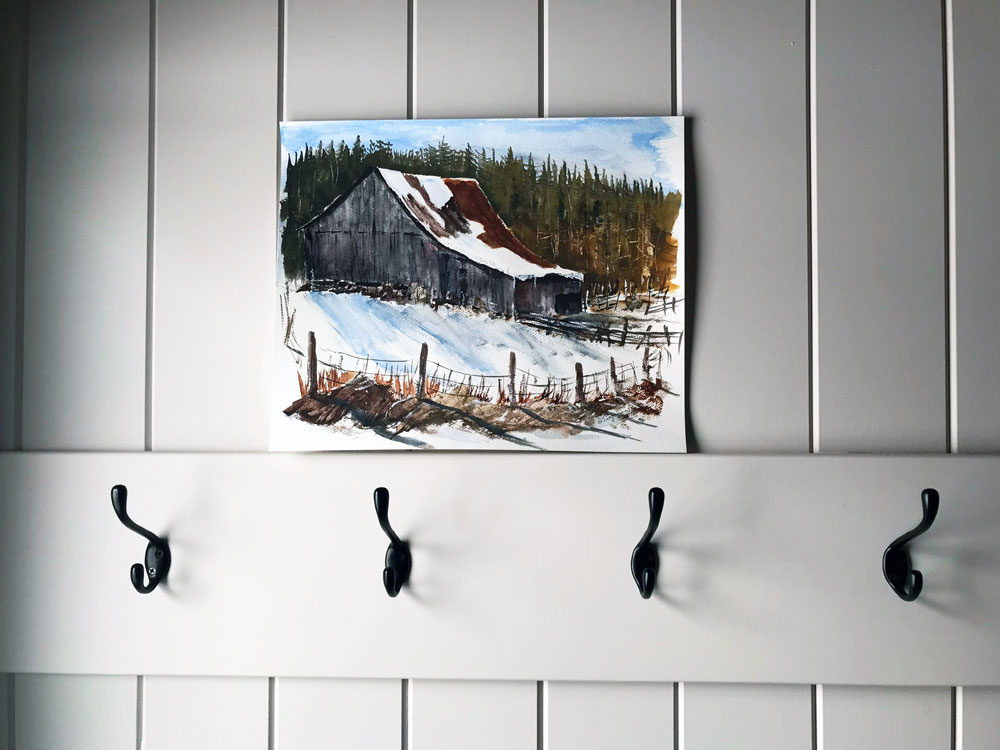
The painting on the wall is another special, personal touch. Like so much of the art in our house, this too was painted by Matt’s grandpa. When I shared art options for the mudroom a long-time reader had a brilliant suggestion: switch between paintings. So I had two framed. One summer scene (by Matt’s grandpa) and one winter (by my Mom’s friend). They’re roughly the same size, so they can hang on the same hook.
The mudroom has been a great addition–literally–to our house. This is a space that we live in every day, and that I enjoy every day. I am very proud that we dreamt it and we built it. It’s much more than a mudroom.
Do you have a room that’s more than a room? What is your must-have for an entry? Do you have any secret storage at your house? Who else switches art seasonally? Anyone else have a sunbathing dog?
We also added two dressers, which I painted last week.
They give us eight big drawers of storage, so I finally have a place to put my hats and mitts. As well as car keys, sunglasses, reusable bags, pens, notepads, phone charger, masks (who thought we’d need mask storage?) and so much more stuff.
One dresser is by the door–keys, outerwear, sunscreen, bug spray, etc. will live here. One dresser is on the landing by the kitchen. My vision is that it will become a kind of command centre for mail, papers, household stuff, and even some of Ellie’s toys.
Part of my goal with not adding built-ins right away is to discover exactly what kind of storage we need.
The dressers aren’t quite the style I’m looking for in our eventual built-ins and they’re not quite the right size for their spots, but they do the job for now. And the price was right. Matt’s Dad picked them up years ago and they lived first in his shed and then in our barn. After some repairs, a cleaning and a coat of paint, they are a great interim solution.
Here are some of the other things I’m planning to do in the mudroom.
Install dresser hardware
The dressers don’t have a lot of space to screw on drawer pulls. The centre recessed panel is actually glass, so I can’t drill through it. I’m likely going to reuse the old pulls, but I’m going to spray paint them black first.
Refinish mirror
I found a big oval mirror at a thrift store this fall. The rounded shape will be a nice contrast to all the straight lines in the room. I’m going to remove the decorative piece on the top and refinish the wood frame, aiming for a rustic finish that will go with our cedar ceiling.
Install nightlight cover plate
I remembered last week that I had one LED cover plate left from a three-pack I bought a few years ago (I was influenced by Young House Love). The mudroom would be a perfect place for a nightlight, so I dug it out. Bonus, the cover plate also has a USB port, so it will be going at my new phone charging station on the landing dresser.
Build key cupboard
During construction I had our contractors insert a little wood box that I made into the wall beside the door. This box is going to become a hidden key cupboard. A few rows of cup hooks will give us plenty of space to hang keys. For the cupboard door, I’m going to use a picture attached to hinges. Storage. ✓ Art. ✓ Function. ✓ Form. ✓
Hang art
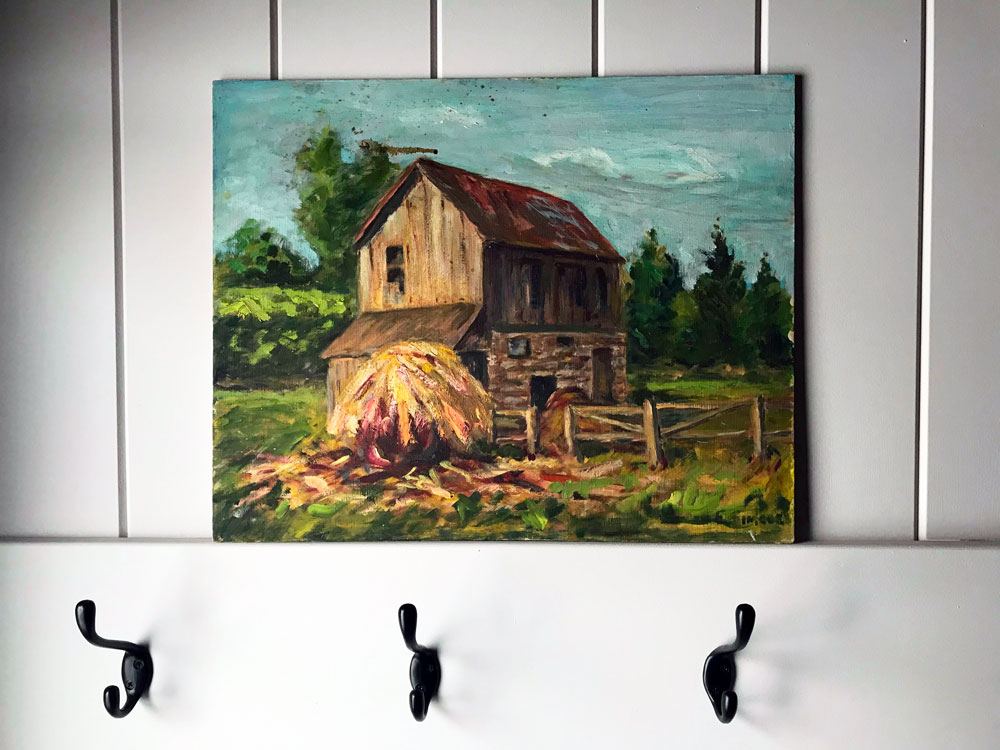
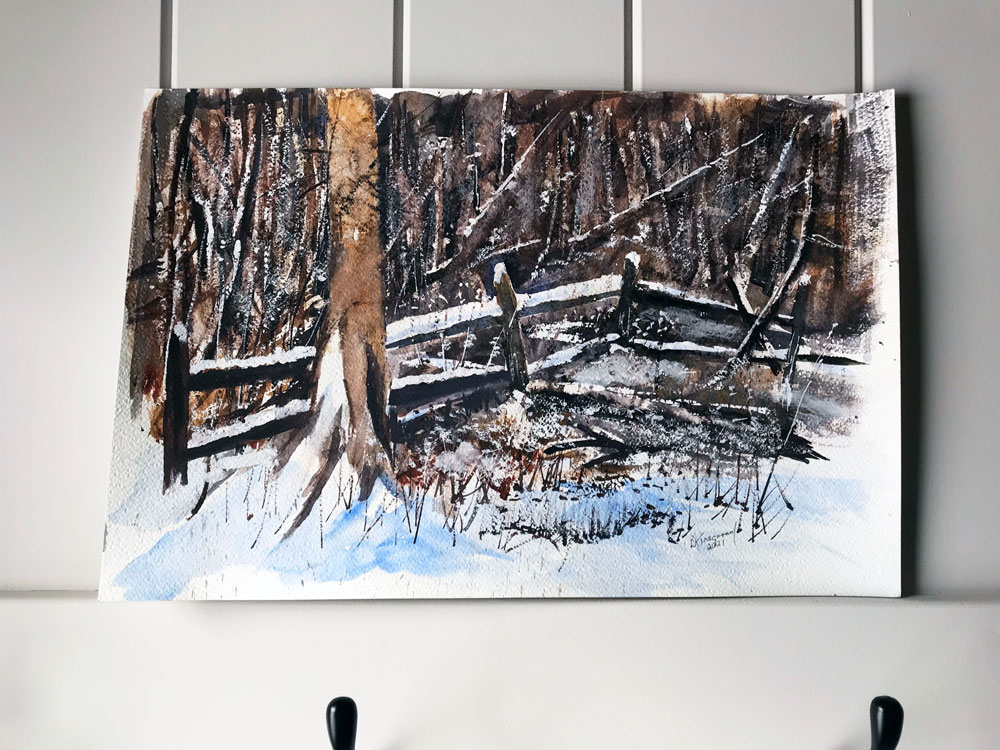
We don’t have a lot of wall space for pictures (and I don’t want to put too many holes in the paneling). I’m planning on hanging one painting. Matt’s Mom and my Mom have both sourced art for me. Matt’s Mom gave us a painting by Matt’s Grandpa. My Mom’s friend gave her two water colours that he painted. They’re all great farm scenes, and I really like how the blue and green tones contrast with the beige paneling. (Note that despite the photo differences below they’re all close to the same size.) Which would you pick?
We are definitely at the fun stage of the mudroom. These are pretty quick, inexpensive, easy projects. All of these little details make the room function the way we need it to and personalize the space for us.
What’s your first project of 2022? How do you handle storage at your entry? How many hooks is enough?
Thank you everyone for your kind comments on the last few posts. It has felt like a big step to return to blogging and find my voice again, and I appreciate your warm welcome and patience very much.
Keeping busy has helped me get through the last few months, and one of my projects is a new play zone for Ellie. I think I love it just as much as she does.
We had already amassed what felt like a large collection of toys. Then Christmas arrived and I felt overwhelmed by all of the new additions every time I walked into the living room.
Baby, you’re movin’ to the basement.
It was time to get organized.
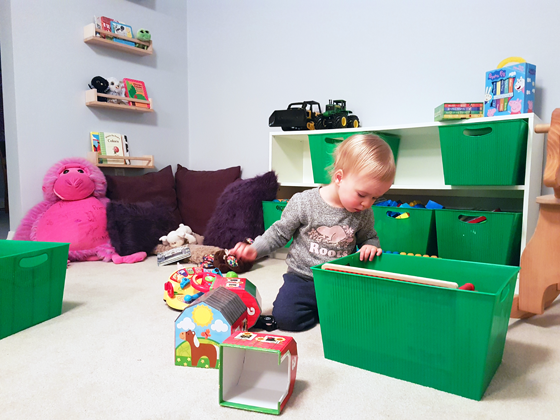
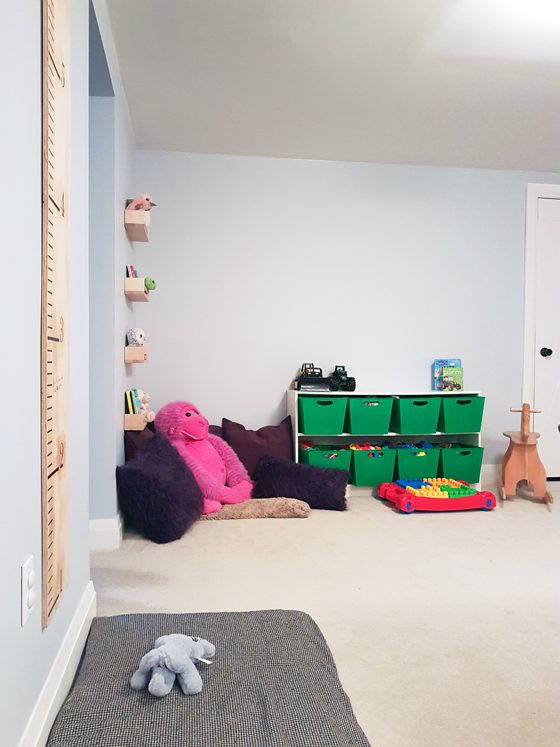
Bring on the bins!
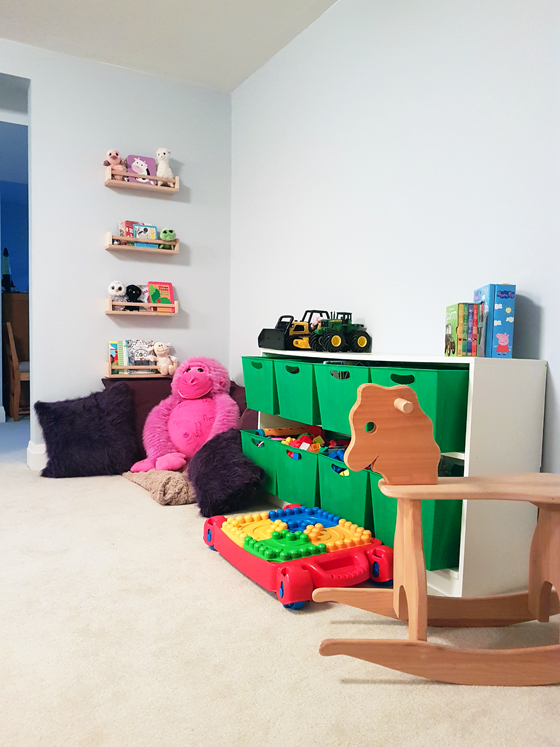
Well, before I could get to the bins, I first had to find the shelf to store them. I reused a shelf that I had built for the office in our first house. It had a brief life in the main area of our basement here, but has been tucked away for a few years.
I hauled it out and gave it a fresh coat of white paint. A trip to the dollar store found bins that fit pretty much perfectly (they’re a bit long, but that makes them easier to grab). Initially, I was not in love with their bright green colour and planned to spray paint them, but once they were in place, the colour worked with the our DIY refurbished ding pong table and felt fun and fitting for our basement.
I’ve organized toys by category: cars, stuffed animals, farm, food, lego, balls & blocks, music. I may label the bins with pictures at some point, but for now I do the clean-up most of the time so labels aren’t needed.
The top of the shelf holds some of Ellie’s extensive tractor collection and a few books and everything is within Ellie’s reach.
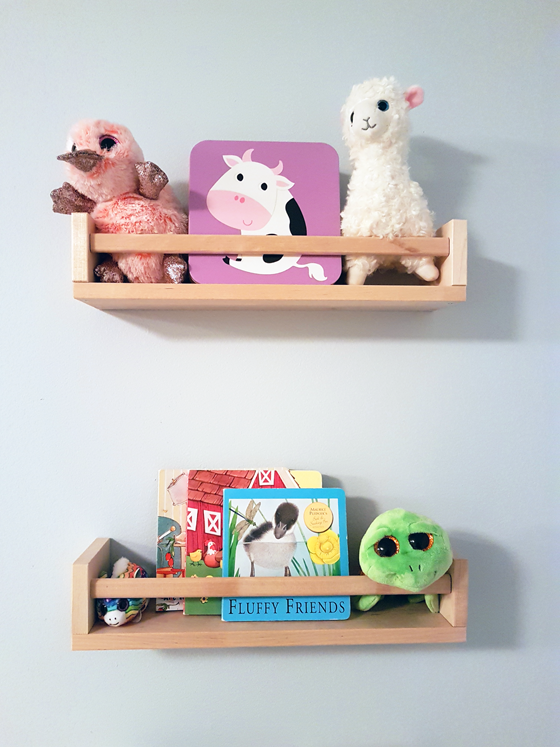
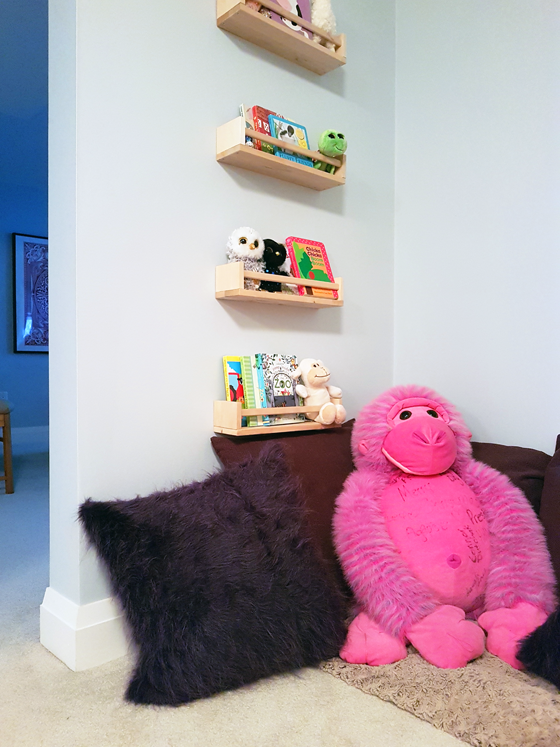
By far Ellie’s favourite thing to play with are books, so I knew I had to have a library of some kind. I’ve loved the idea of book ledges, so off to Ikea we went for some spice racks. I picked a small selection of books from the main bookshelf in her room and tucked in some small stuffed animals for extra fun.
A collection of pillows under the shelves make a cozy spot to read.
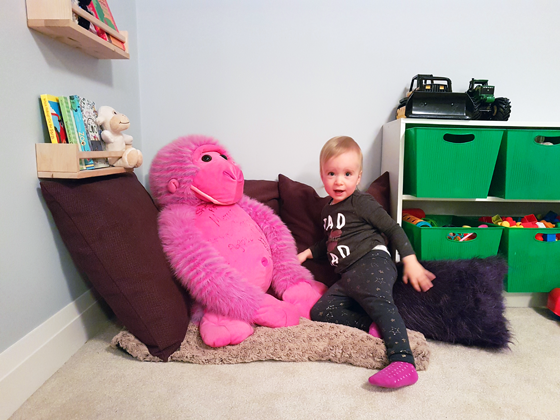
Purple is the one pop of colour that we’ve not used elsewhere in the basement. I’ve been trying to incorporate it for awhile, but I’ve never found the right spot. When I decided that the pink and purple ape would be a regular resident of Ellie’s play space, I knew it was time for the purple.
This ape was a class mascot that came home from school with Matt years ago. He has been wearing a T-shirt that had a nerdy saying about history on it and sitting in a corner of the basement all this time. When I took off the T-shirt, I was shocked to see that Matt’s students had written “Merry Christmas” and then all signed their names on the ape’s belly. This will be something nice for Ellie to see when she’s a little older and help her understand how special her Dad is.
The ape is lounging on some purple pillows. I already had the purple upholstery fabric, pillow forms and even zippers, so these were a quick project. But when I spotted a rare Purple People Eater pelt at a local fabric store, I knew some faux fur was just what this little nook needed.
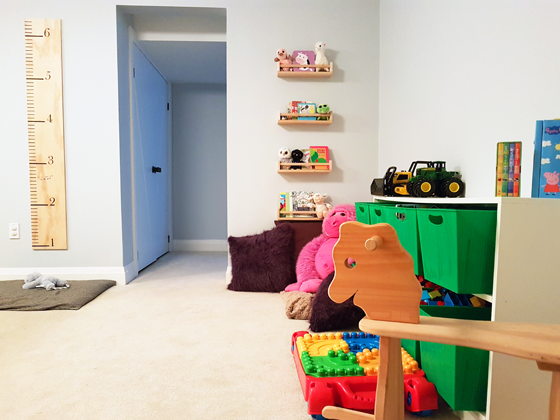
While the shelf and the nook and the books are the main play area, the rest of this room is also very much about Ellie. Bigger toys line up along the wall, her growth chart hangs in here. There’s even a spot for Baxter, who likes to keep an eye on his little sister.
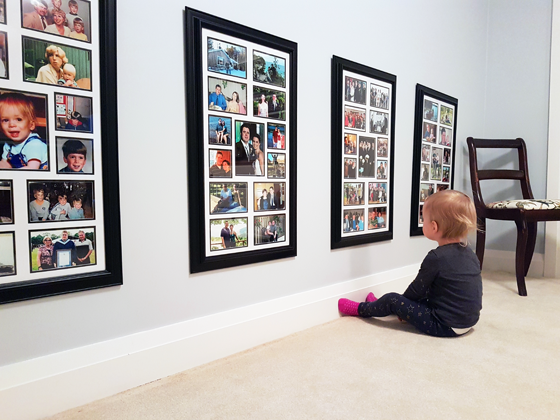
And at the far end of the room, I added a special gallery of photos.
Matt’s brother made these photo collages for Matt’s memorial. Ellie loves looking at pictures of Daddy, and it’s important to me that he has as much of a presence in her life as possible. So hanging these photos where Ellie can see them easily was an easy decision.
Having a little DIY, organizing, decorating project felt really good. It was a distraction, but also a reconnection to who I am and a reminder of what I like to do.
I also feel really good every time Ellie asks to go downstairs to play, which is often now.
I am one of those people who loves my “nice” dishes. I picked out a china pattern when we got married and I was grateful to receive crystal wine glasses as a wedding gift. I love pulling them out when we have a family dinner.
Some day, I hope I’m able to add a set of silver cutlery to my “nice” collection.
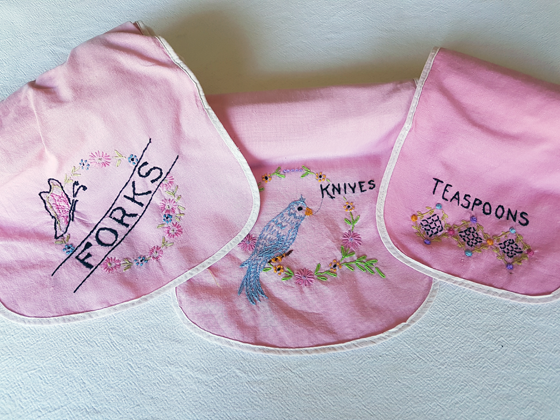
Even if I don’t have the silver yet, I have a place to keep them.
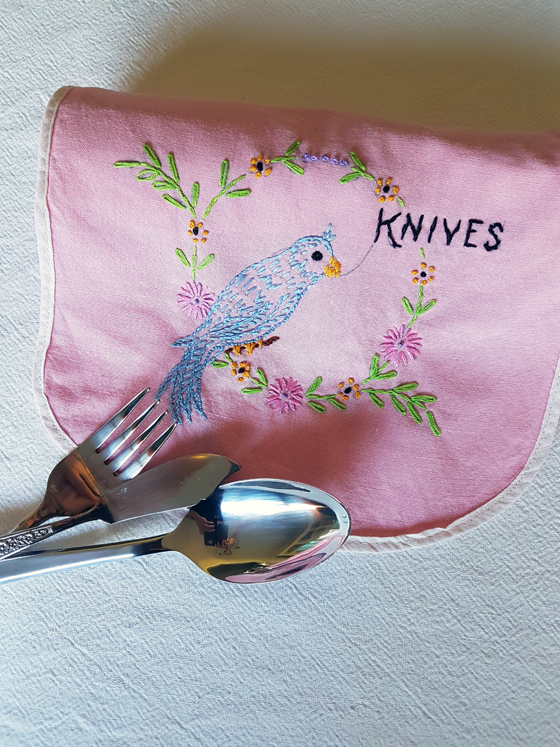
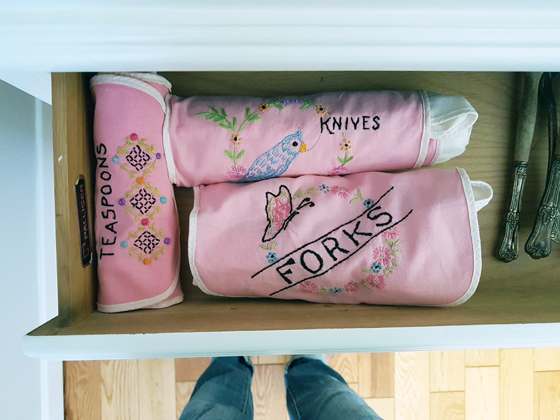
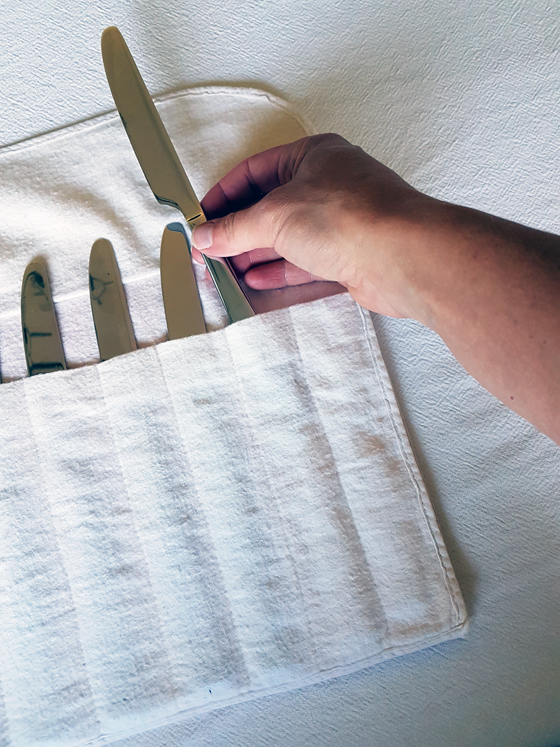
I’m not sure what these are called. They have little sleeves for the various utensils, and then they roll up to tuck in the drawer. They protect the cutlery from scratches and keep them organized.
These holders were made by my great-grandmother and me, which I think is so, so cool. (My great-grandmother died before I was born.)
A few years ago I was helping my Mom organize some things in her sewing room, and we found these holders. The spoon and fork ones were done, but the knives was barely started.
I haven’t done embroidery in years, but I liked the idea of finishing the set. I also liked the idea of having a place to store extra cutlery. While we don’t have a silver set, we do have lots of cutlery for those family dinners, and my storage technique was not ideal.
I especially liked the family heritage.
I tried to pick colours similar to the ones my great-grandmother chose and mimic her stitch patterns, and I’m really happy with how the set turned out.
Do you have a silver, china or crystal set? How do you store extra dishes? Any other embroiderers out there? What craft or organizing projects have you been up to?