I firmly believe you can never have too many hooks. Bedrooms, bathrooms, kitchens. Hooks are good.
So when I was putting the baby’s room together, hooks were on my list. We have a relatively large empty corner behind the door, which was going to be the perfect spot.
Originally, I planned to make simple hookboards similar to what I did in our master bedroom.
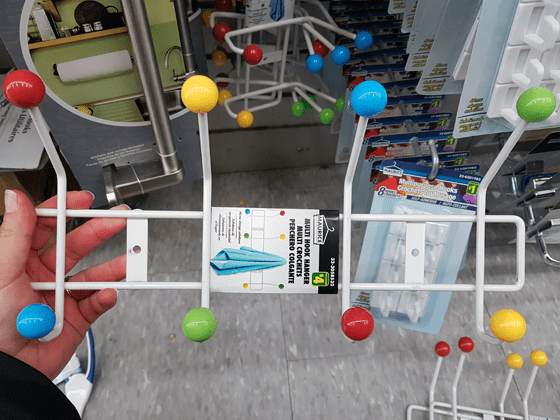
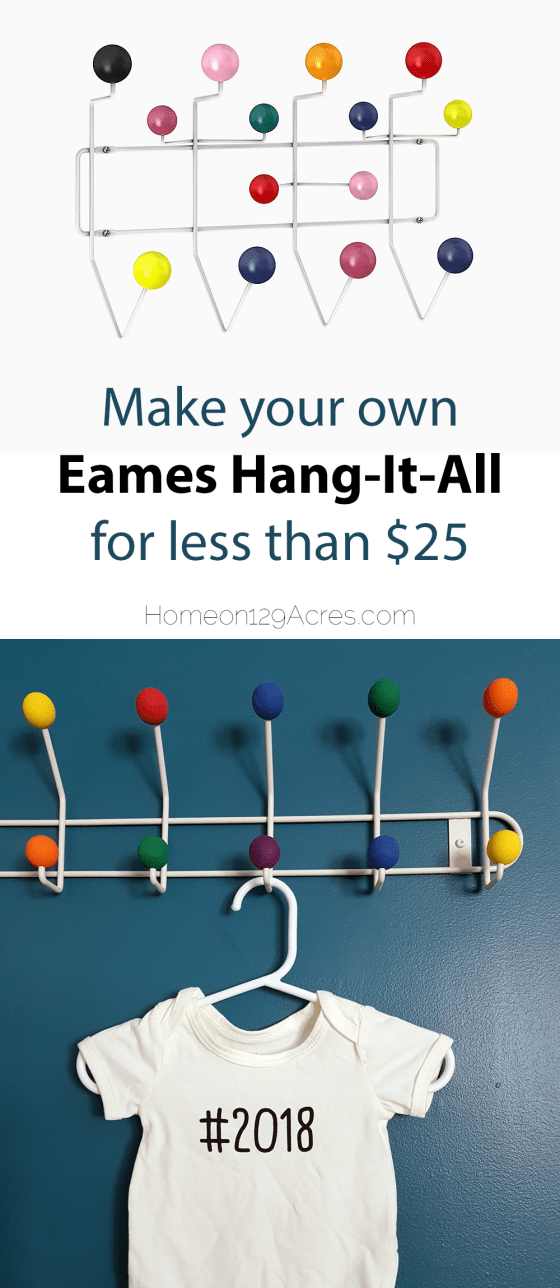
But then I had a brainwave. What about the Hang-It-All by Eames? It’s definitely not farmy or rustic. But it’s colourful and fun, which were some of the other qualities I was looking to incorporate into the nursery.
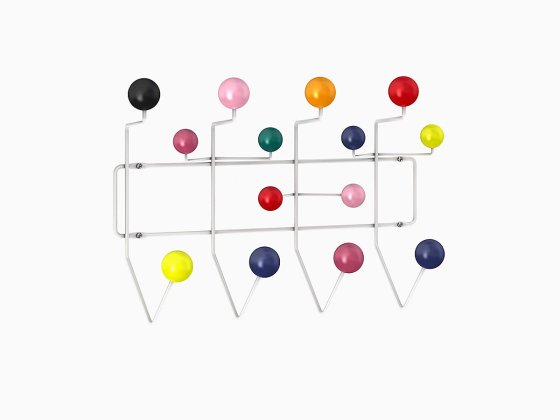
The Hang-It-All is not at all in my price range ($200+ for a coat hook?). I did find a mini version for $4 at the Dollarstore of all places, but it was much too small for what I was looking for.
I decided my best bet was to make my own. Here is my tutorial.
Materials
- Wire hook rack (mine are 20 inches wide and sport 12 hooks each)
- Wood balls (1 inch, one for each hook)*
- Craft paint or stain in your preferred colours (depending on what version of the Hang-It-All you’re making)
- Scrap 2×4 and 3 inch finishing nails (for drying rack)
- Glue (optional)
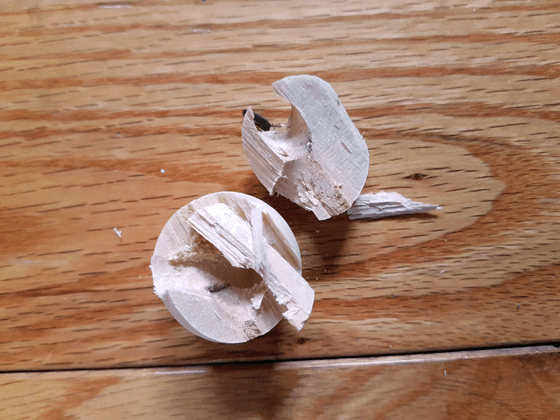
* You can buy wood beads, but I found that they were flat on two sides, rather than perfect spheres. Also, since the hole goes all the way through, you’ll have to patch one end with wood filler. If you go with the balls, you’ll have to drill holes in them yourself. Buy a few extra as they may split when you drill them.

Tools
- Small paint brush
- Drill and appropriately sized bit(s)
- Hammer
- Adjustable pliers or vice
I liked the look of the version that is white wire with colourful balls. But of course, I couldn’t find a rack in white (there are some good sources online). I bought a grey version and hit it with white spray paint in a very makeshift paint studio, also known as our utility room. (I really need the temperature outside to warm up again. This was beyond awkward.)
Then I was able to begin assembling my homemade Hang-It-All. Here are my steps.
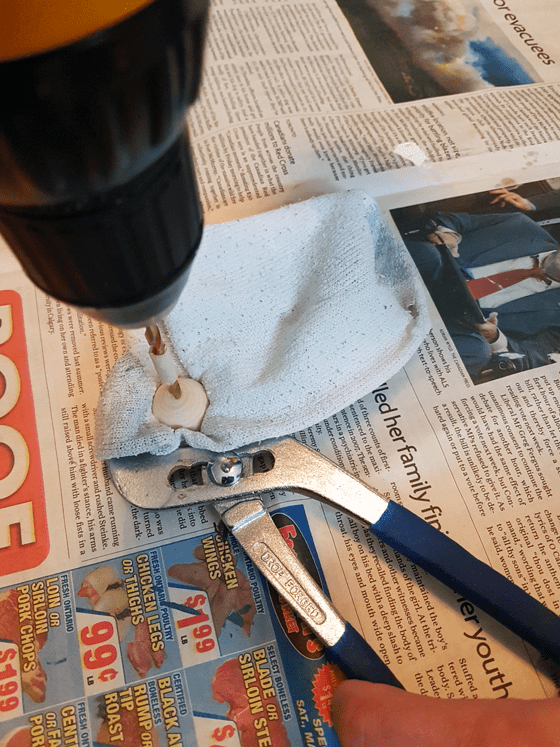
1. Remove rubber tips from your hooks. This is optional, but I found I was able to get a better fit on the wire itself.
2. Determine what size holes you need to drill in your balls. This took a bit of trial and error and a few balls were sacrificed in the process.
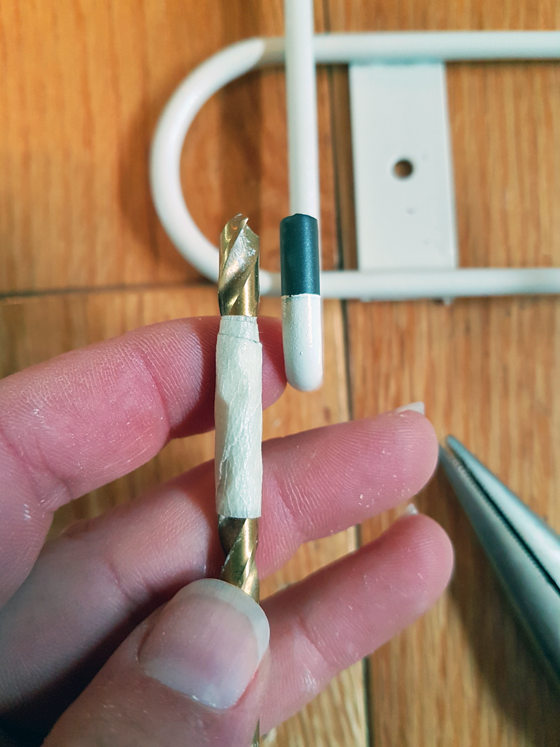
Drilling smaller pilot holes with a 1/8 inch bit helped to keep the balls from splitting. For the final holes, I ended up going with a 3/16 inch drill bit. It was a tight fit, but the balls slid onto the hooks with a bit of muscle.
3. Determine how deep to drill your holes. I measured the length of the rubber sleeves that were originally on each hook and then marked my drill bits with a bit of tape so I knew when to stop drilling.
4. Drill your balls. (What a terrible sentence.) Use a vice or pliers to hold the balls. I found my adjustable pliers worked fine. I used an old sock as a cushion so that the teeth on the pliers didn’t mark the balls. Remember to stop when you reach the edge of the tape on your bit.
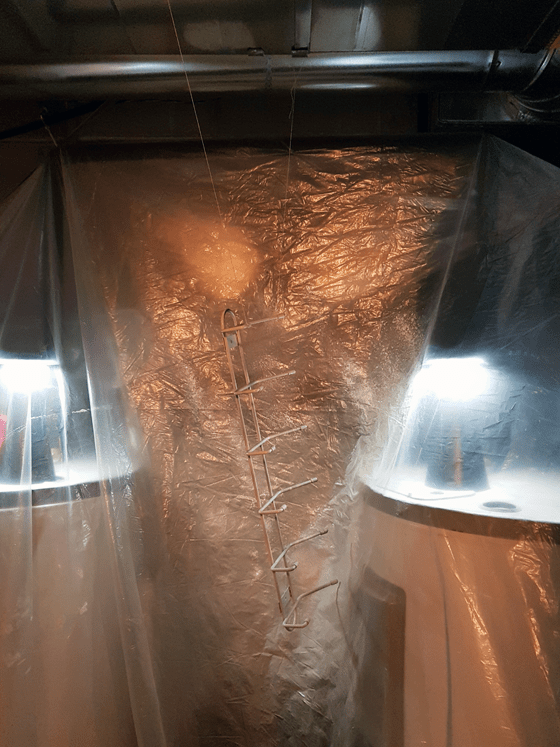
5. Assemble your drying rack. Hang-It-Alls come in a variety of finishes. Whether you’re painting or staining your balls, a drying rack will be helpful to get a nice finish. I tapped a bunch of nails into a scrap 2×4, which worked very well. I could slip the balls over the head of each nail so they dried cleanly. Tip: Tilt your nails in alternate directions so you can fit more balls into one piece of wood.
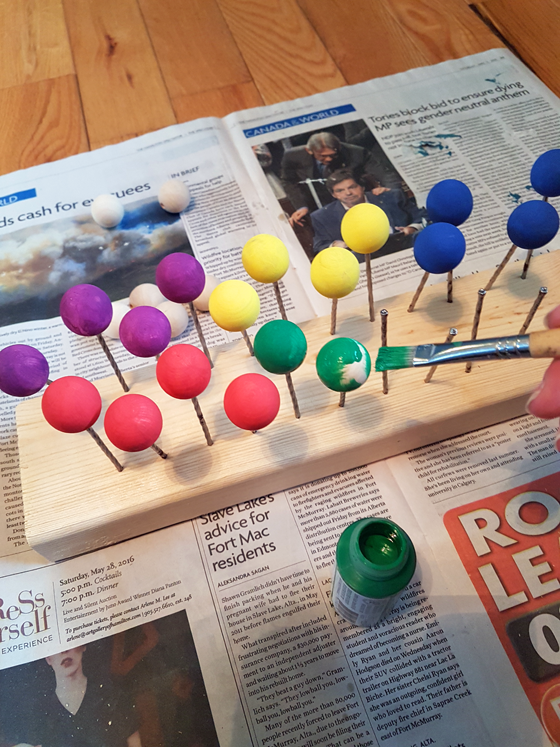
6. Paint or stain your balls. A small craft brush will be helpful here. I tried to match Eames’ colours, but then decided to keep it simple with the primary and secondary colours. I was doing 24 hooks, so that meant 4 balls in each colour. Tip: If you’re staining your balls, watch out for different wood tones. I found between the two packages of balls that I bought, one was darker than the other.
I did two coats of paint. The finish with the craft paint is a bit dull, so if you like the glossy finish of the authentic Hang-It-All consider using a glossier paint or adding a final coat of a clear sealer.
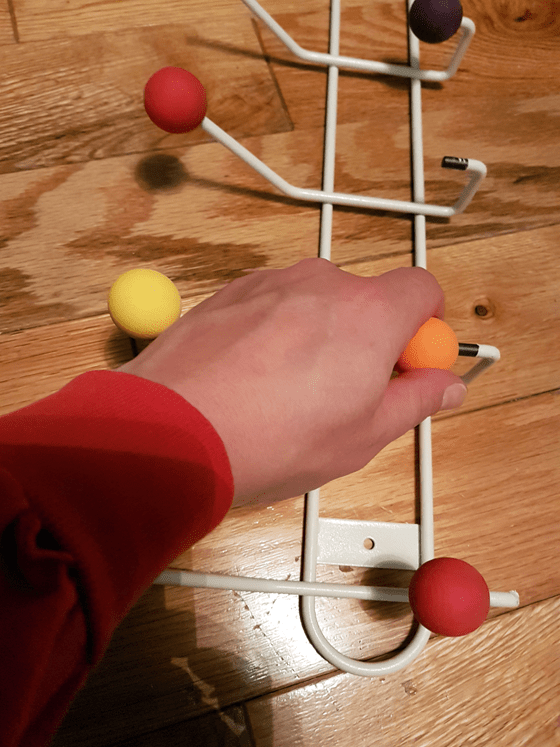
7. Stick your balls on your hooks. My 3/16 inch holes were a very tight fit, so I didn’t use glue or any other adhesive. I simply twisted each ball until it covered up the dark grey unpainted tip of each hook.
8. Install your rack on the wall. Admire your handiwork and pat yourself on the back for being so thrifty.
Cost (for one DIY Hang-It-All)
- Hook rack $11.28
- Wood balls $5.99
- Craft paint $7.14 (6 bottles at $1.19 per bottle)
- Total $24.41
Much less than $200.
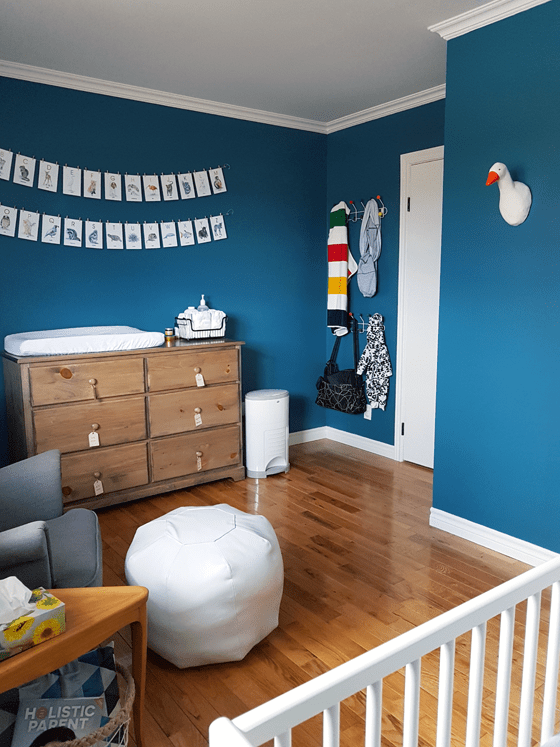
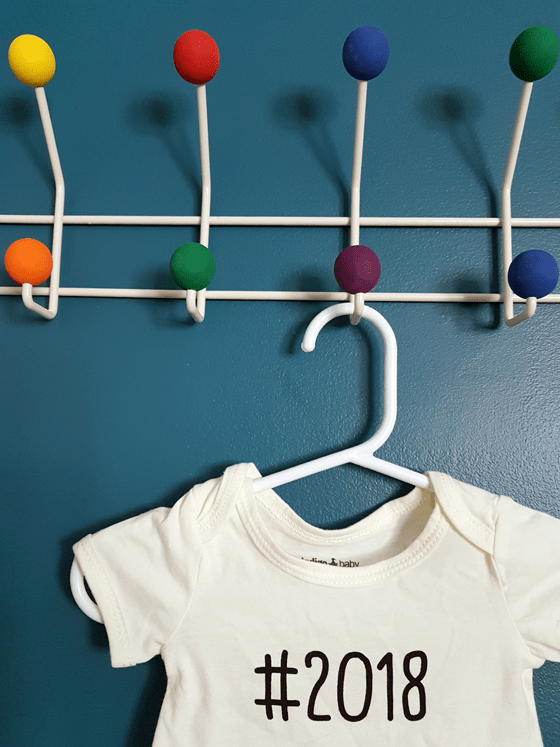
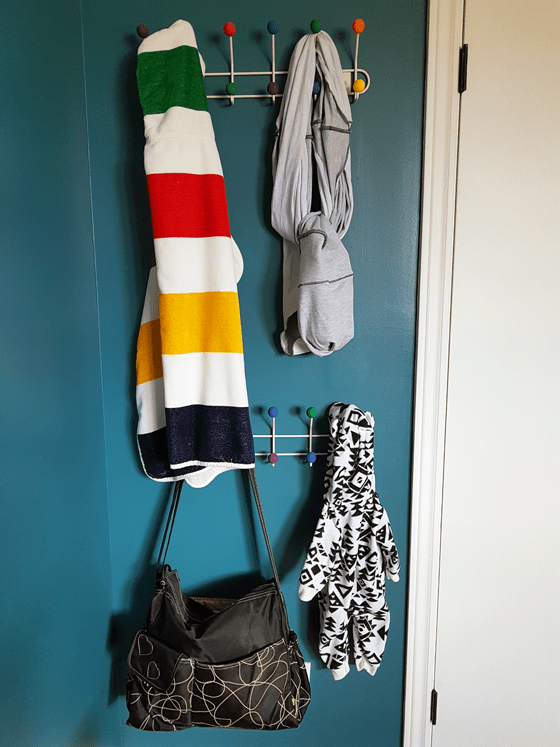
Right now, these hooks hold the diaper bag, our carrier, her warm outdoor outfit and a bath towel, and they’re a fun surprise when you look behind the door in the baby’s room. In the future, I can see these being useful for more tiny clothes and eventually dress-up costumes or backpacks.
For more about the Hang-It-All, check out this post by White Cabana.

These hooks look great in the nursery. I like that you chose to DIY them.
That’s one awesome baby towel. Where is it from?
Also, what kind of baby carrier do you use and why did you choose it? Do you and Ellie like it? I’m looking for a new soft carrier (an alternative to the Ergo360 that we already have).
The baby towel is from The Bay (thebay.com). It’s their iconic stripe pattern that you see on the popular point blankets. Ellie’s great aunt works for The Bay, so she has a great collection of point blanket inspired items.
For the carrier, I chose the Huggaloops (huggaloopsbaby.com), and I definitely recommend it. It’s soft like a wrap, but doesn’t tie. So I don’t have to worry about getting it tight enough or dealing with a big knot at my back. In fact, I’m sitting on the couch wearing her right now. Ellie and I both love this carrier. She invariably falls asleep in it. It’s maybe a bit spendy for three loops of fabric, but we use it at least twice a day for our walks with Bax, and often more. It was definitely worth it for me. I can wear her and work around the house or on the computer or even eat a meal. Plus if the carrier gets dirty, it’s easy to throw it into the washing machine. I admit I wish it supported her head a bit better, but I can turn her head to the side and tuck it under one of the shoulder straps and that holds her securely. It keeps her close to me, so it comforts her and also keeps her warm for our walks. I can easily wear a coat over it. I like that it works even when she’s small. It fits easily in the diaper bag, and I tend to bring it everywhere with us, just in case I need to calm her. It makes it easy to walk her if she’s fussy once my arms give out! It’s not adjustable, so you have to buy the right size. I ended up choosing a size 1 and it works perfectly for us. It stretches a bit with use, but washing tends to shrink it back again. I feel very secure when I’m wearing it. It can seem a bit complicated to sort out all the loops (I practiced a few times with a teddy bear), but now I can pop her in and out in seconds–and even do it out and about when we’re hiking. One warning, the shipping was super slow once I ordered it, so order well in advance and pack your patience. Happy to chat more about this carrier if you have other questions.
Thanks for the extra info! I’ll look into it some more.
Nice work! I love that you DIYed it. I can’t believe the price on the original…who pays those prices?? O_O Chance would be a fine thing, haha.
How are things going? It sounds from your comments on the carrier that you’re settling in to the work and the pleasures of being a parent. Is it hard to imagine life without her? I was amazed at how quickly that happened!
Things are going really well, Jan. Ellie takes it easy on us for the most part. It’s definitely like she’s always been here. This is just how we do things now, and it’s not been a hard adjustment, fortunately.