Ugh, our kitchen. Our poor, poor kitchen. I’m so excited for the day that we finally renovate this room. However, I’m a bit scared too because I feel like we’re going to uncover so many issues when we pull everything apart.
One of the hinges on our cabinet doors had come loose (not unusual, all of our cabinets are falling apart).
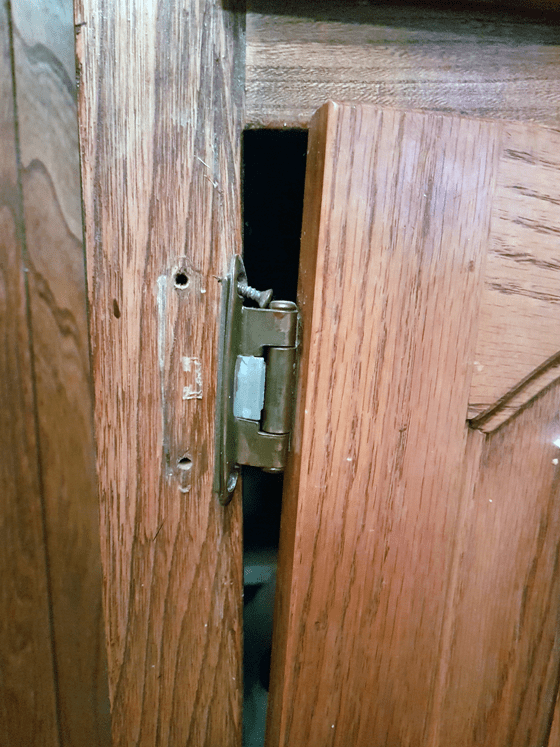
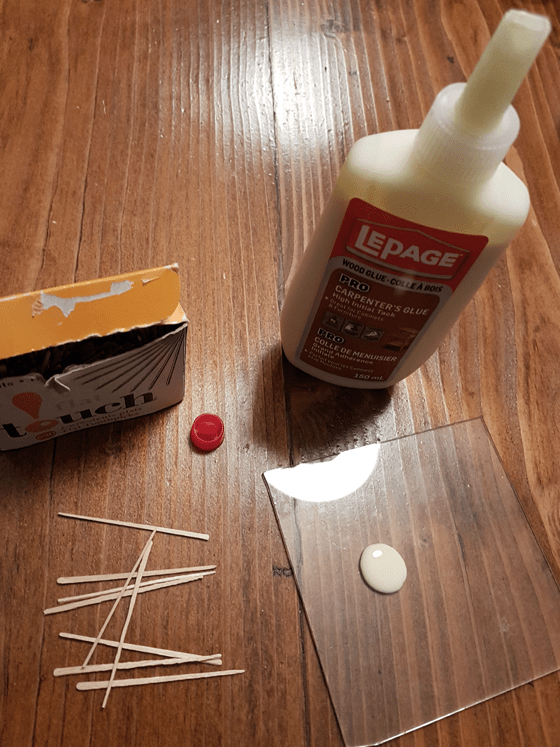
As I was putting it back together last week (wood glue + toothpicks = repaired), I was thinking about how we’ve lived with this kitchen for 5 years and will continue to do so for awhile yet.
Kitchens are important rooms. We spend a lot of time in them, so we want them to look nice and work well. But they’re also expensive and disruptive to renovate.
As a result, many of us live with lackluster kitchens, waiting until that magical day when we pull out the sledgehammer and start to forge the kitchen of our dreams.
For me, I hate to invest time or money into a space that I know I’m going to gut, even if that gut isn’t going to happen for 5 years or more. However, there are a few things that we’ve done in our kitchen that have made it more liveable, more functional and more attractive.
I thought I’d share them today in case they help someone else living in a similar kitchen situation. And I’d love to hear your ideas too for making a less than ideal kitchen work for you.
Paint
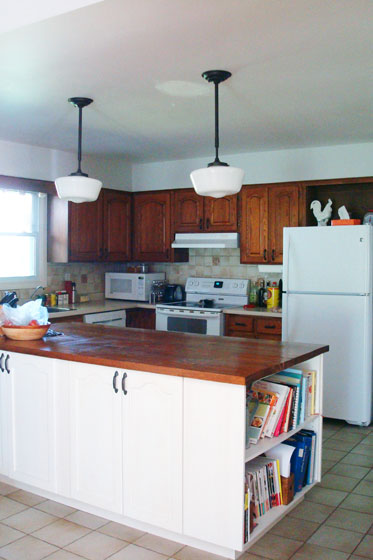
Between cabinets and appliances, wall space in a kitchen is often minimal, so giving your walls a fresh coat of paint is quick and inexpensive. With our open concept main floor, painting the kitchen, living room and hall the same colour made the spaces cohesive and the light colour that we chose brightened up the rooms a bit.
Painting cabinets is another update that can have a big impact. I did this in our first house and it was a great transformation. However, it was also a bigger job than I expected, so I was in no hurry to do it again–especially since our cabinets are falling apart and I feel like paint will not help the situation.
Hardware
Updating cabinet hardware can be another quick way to inject some style and personality into your kitchen. I spray painted our hardware for a mini update. The results have been mixed. The paint has chipped off some of the handles, but others have held up pretty well.
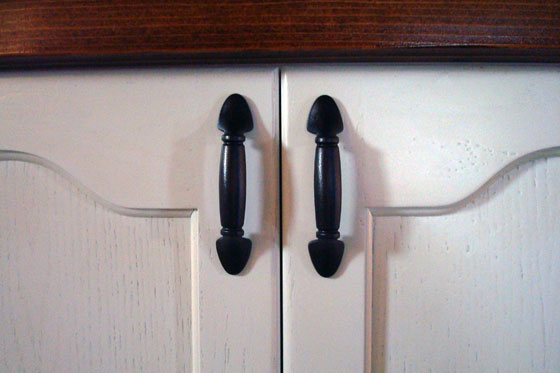
The nice thing about a hardware update is if you truly love the handles or knobs that you choose, you can easily reinstall them in a new kitchen down the road.
Lighting
Just because you don’t have your dream kitchen doesn’t mean you can’t have your dream lights. I loved the idea of a pair of schoolhouse style pendants over the island, so I went and bought them.
We only had one light fixture in the kitchen and it wasn’t positioned quite right, but I didn’t let that stop me. I put up one of the lights anyway. Maybe a single, randomly located pendant looked a bit weird, but it made me happier than the boob light that was there before.
A year or so later when we had an electrician in for some other work, I had him move the first light and install a second. The electrician’s labour was relatively inexpensive.
Even if you’re planning on reconfiguring your kitchen down the road and will need to move lights again, the investment in an electrician is not that significant. And assuming you still love your lights, you can reuse them.
Island
The biggest addition to our kitchen has been the island. I bought the doors at Habitat for Humanity and we DIYed the countertop. Having a cabinet maker build the boxes was still a bit of an investment, but worth it for us for the storage and prep space we gained.

I can’t imagine working in the kitchen without having this extra space. And I’m hoping that we can reuse the island in our future kitchen.
Accessories
Just because a kitchen is a utilitarian space doesn’t mean you can’t decorate it. Accessories can add function to the room as well as style. A long towel bar on the end of the island gives us a space to hang oven mitts and towels within easy reach. Plus pretty towels inject some personality and colour. We also removed a wine rack that was above the fridge (we don’t drink much wine and I can’t reach the space anyways) and put a fun country rooster and our kitchen scale on display.
Organization
No matter what your kitchen looks like or how large it is, keeping things organized can dramatically improve how you feel about the space.
In adding the island we were able to add storage for a few key things: cookie sheets, cutting boards and cookbooks. Our kitchen is lacking in drawers, so we also added hidden drawer to the island.
The few drawers that we do have are too small for most organizers, but I found a plastic organizer that I could cut to size with a utility knife, so I was able to keep our cutlery sorted.

Making a kitchen work until you can do a full reno is about trade offs. What can you live with and what can’t you? How many repairs are you willing to do? How much money are you comfortable spending, knowing that whatever you add may end up in a dumpster? For us DIYers, how much time and effort are you willing to invest knowing that you may be ripping out your hard work down the road?
For me, I think I’ve found a balance that is tolerable.
What are your tips for holding a kitchen together? How do you feel about mini renovations to tide you over until the big one? Have you made any improvements to your kitchen that have made a difference in how it works or looks?
Denise at Happy Haute Home (who often comments on my posts) recently renovated her kitchen for the One Room Challenge. While it’s a much grander space than ours, she embraced a very similar philosophy to mine. She shared her tips for how to update a kitchen on various budgets in her reveal post.

I wasn’t able to leave my existing kitchen in place or temporarily reinstall the old cabinets, so IKEA cabinet frames with no doors was a good way to defer costs, even if later getting the doors did not go well.
My parents on the other hand kept theirs for 9 years. They bought new knobs, polished brass, after the porcelain knobs with colorful butterflies painted on them popped off one time too many. They didn’t match them to the antique brass hinges and drawer pulls, but then they didn’t reuse them anyway. My mom used to use a liquid wax on the floor every week to hide how worn out it was.
The butterflies sound lovely–for a particular time and place. Waxing the floor every week is definitely a commitment.
They went oddly with the hunter green 80s microfloral wallpaper and the 70s mustard yellow countertops. The white porcelain also clashed with the cream painted cabinets. But you’re right they might have been cuter than I remember them in a different space.
Oh that sounds like a look. Holy moly.
I’ve heard a lot of good things about Ikea’s kitchens. I’d love to hear your thoughts on durability and sturdiness (door issues aside).
It’s hard to comment on durability since I’ve only had the cabinets for about a year and a half – the upper cabinets were in and holding tools a bit before that. The cabinets my parents removed in 2004 were from 1951 and still in fine shape, and that’s the bar I’d set to call something durable. As much as painting my cabinet doors sucked, there’s something to be said about painted wood that can be repainted basically until the end of time.
I had a bottle of bleach leaking under my sink and it damaged part of the melamine veneer on the bottom of the cabinet. Not a huge deal – I thought about painting the damaged area or gluing a piece of Formica laminate down onto the whole cabinet, but instead ignored the problem. Other than that, I’ve had no problems with the cabinets yet. They are made to sit off the floor on plastic legs, and the toe kicks are plastic. Apparently this is helpful if you like to mop your floors with a lot of water as particle board and MDF will swell if they get wet. The Irishman has an IKEA kitchen and also has an electric kettle that he leaves unattended all the time, and the cabinet doors near it haven’t held up well. They are I think thermofoil on MDF. But some of the doors are made with more wood or with a very high gloss lacquer (not that I could see you going with that) that might be more durable. I would assume that the higher priced ones are more durable but that is just a guess. The hinges and Maximera drawers are great. I don’t mind that the drawers are metal, and it hopefully means they’ll hold up well.
Things that are not related to durability and sturdiness:
You mount these tracks to the walls and then hang the cabinets from them. This makes them really easy to work with. The base cabinets can be mounted either with the tracks and legs at the front or on 4 legs. I loved being able to use the tracks because the floors aren’t level, so the cabinets were at the right height right away and I just had to fill the gaps under them with shims.
Because they don’t have face frames, the drawers are a lot bigger. You can also add pullouts behind doors wherever you want and can change your mind and go back for more later. If they had it to do over again, my parents would have done drawers in every base cabinet where they could.
The sizes are more limited than other makes although you can get around that a bit by cutting them down and then ordering after-market Semihandmade doors like I had intended to.
I read very good things about Barker Cabinets being similar to IKEA but with more flexibility and higher end materials. You might need to have them shipped to Illinois if you went that route.
Thanks for all of this detail, Chad!
It’s extremely frustrating to have to wait to do a proper reno in the kitchen. We did a minor reno a few years back and one thing we learned was the type of layout we chose doesn’t work very well in some areas. So I am thankful we figured that out before spending the big bucks!
You are right, painting cabinets makes a big impact but it is a LOT of work!
I like your suggestion of painting your hardware. Not too expensive, but refreshing!
That is a hugely important item to figure out. As much as I’d love to do a reno rightthisminute, I do feel strongly that there are benefits to living with a kitchen for a little while to figure out exactly what your biggest issues are and how best to fix them.
In my last house, we did a DIY kitchen Reno to try and sell. We restained the cabinets darker and got new hardware,and put down new linoleum. It looked a lot better, but as the configuration wasn’t good, it still was a tiny kitchen area with a lot of wasted space. Basically one half of the room was cabinet and the other half was empty – meant for a table and chairs, I think? But there was a table and chairs right next door in the dining room, so it was a huge waste of space. Anyway, the house didn’t sell, so the next time we tried our realtor told us we should bite the bullet and fully renovate. We did, and it was awesome! But cost tens of thousands, and we got to live with it for less than a year. (At least the house finally did sell.)
I can see the benefit in doing it both ways. If I was in that situation now (but not trying to sell) I would consider doing bits at a time. It’s inconvenient for sure, but more manageable financially.
The coolest DIY kitchen makeover I’ve seen, and it was done on an absolute dime, was this one, at Frou Frugal
Sorry, my comment decided to post itself, mid-writing, for some reason. Anyway, she did her reno on an absolute dime, truly a remarkably small amount of money, and she did it almost all herself. It was a pretty ugly space before, so it’s a satisfying and very creative process to see!
In your kitchen, the lights and the island make a huge difference. Very smart choices, and you should be able to reuse them when you do your makeover if that’s what you want. It will be exciting when that time comes!
That’s quite a makeover. A lot of work, but it looks like she achieved what she wanted.
For us, the island is our biggest game changer. I think the original intention of the kitchen was similar to your old one–an eat-in area. However, we are quite happy to eat in the dining room (no need to let that space go to waste), and the prep and storage in the island make more sense for us.
Oh that’s frustrating. I see those makeovers to sell shows on TV, and I often think how people would have enjoyed their renovated spaces themselves. But there are lots of reasons to defer–finances, inconvenience, etc. I’m glad the house sold in the end.
We built our house so got to start with a blank slate. I did incremental changes to the temporary set up – stand-alone shelving units, plywood for the island top, moving the butcher block multiple times, reconfiguring drawer/cupboard/open spaces – until I finally found the layout that worked best for me. This resulted in a lot of confidence when it came time to actually build the permanent cabinetry. If there is any way you can test out the layout before spending money, I really recommend it, even if it means gutting and living with camp-kitchen conditions for a time. We’re finally in the home stretch on ours and I’m excited to start emptying boxes and filling drawers. Maybe after the holidays though…
I feel like that would take discipline not to throw something up or embark on a new kitchen as you’re building the house around it. But I’m totally with you on taking time to uncover the best layout for yourself. I hope the home stretch keeps getting closer for you!
Thanks Julia for the shout out!
You’re very welcome. I really like how you broke your suggestions into tiers.