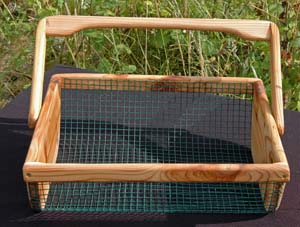
Sarah in Illinois is still looking ahead to garden season. In fact, she’s looking far ahead to harvest time. She’s made a super cute harvest basket. I’ve admired these on other blogs, and I love the special twist Sarah added to hers (read on to find out what it is).
I have several projects pinned on Pinterest that I have wanted to work on, but making a harvest basket has been at the top of my list for a while. I have a few images pinned.

Source: The RunnerDuck
Source: Rainshadow Connections
I did not click on any of the pins to know what kind of instructions they give. I just used the images as a guideline to make my own.

I started with cutting two boards for the sides and two boards for the uprights that would hold the handle. I took no measurements. I just “eyeballed” what I thought would be a good width and what I thought would be a good height. I am sure there are much more precise directions on Pinterest.

I wanted the bottom to be rounded so that it was easier to attach the hardware cloth. So I used whatever I could find (which happened to be a can of spray paint) and drew my rounded corners.
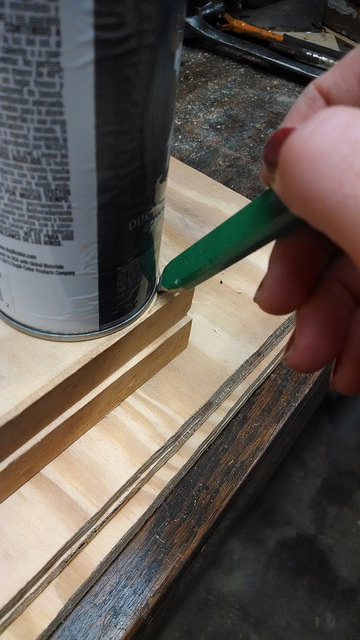
I wanted the sides to match so I clamped both boards together and cut the rounded corners with a jigsaw.

I also needed to notch out the corners for the side rails. I did this the same way as the rounded corners, by clamping the two together and using the jigsaw.

It was at this point that I attached everything together. The frame work was fairly flimsy, so I used both wood glue and screws.

I could have used just a dowel rod for the handle, but in my barn are several branches. Someone took the time to find very straight ones and remove all of the limbs. And those branches have been out there since way before we moved here. So I thought they would make a nice handle.
I used a paddle bit to cut a hole in the top part of each upright. Since the limb was not a perfect fit, I used a nail to secure the limbs in the holes.

Then I spread a quick coat of stain over the whole thing.

The final step was to attach the hardware cloth. It is very sharp so I was sure to wear gloves and used metal snips to cut a piece to size. Then I stapled it to the frame.

This was not a difficult project. It took me about two hours and now that I have done it once, I think that I could do the next one even faster.
And I am thinking I know of a few people with gardens that might like one as a gift!
I hope that we put this one to good use this year. I can’t wait to take it out to our garden and fill it with fresh vegetables for supper.
Isn’t that a great basket? I love the twig handle so much. Clamping the wood together and cutting it as one is such a smart way to get precisely identical pieces. Oh, and I think I know at least one person with a garden who would absolutely like a harvest basket like this! 😉

I LOVE the basket Sarah! The branch for the handle is a nice touch!
Thank you Jamie! I have some more branches, I need to get back to the wood shop!
That absolutely is a nice basket! Nice work figuring it out without a pattern. I agree, that’s brilliant to cut both pieces at once. The branch handle is a nice touch, too. Donna at Funky Junk Interiors uses those on her toolboxes, and then fills them with all manner of things, including massive bunches of hydrangeas. You could do that with this one when you’re not using it for the harvest – so pretty!
OOOoooohh, I like the idea of filling it with branches of hydrangeas! I was wondering where to store it until something is ripe!