Stone moving party

I was super happy when our stone supplier was able to source a single piece of stone for our hearth. No seams! Score. 🙂 However, now we’re at the point of installing the hearth. Moving a who-knows-how-heavy stone! Not so score. 😦

The stone is 10 feet long by 18 inches wide by 2 1/2 inches thick. Every time it has moved up to now has involved a forklift. However, we face two problems:

  1. We do not possess or have access to a forklift.
  2. A forklift will not fit into our house.

We are relying on people power. Pure brute strength.

I do not have good photos to illustrate the scale of this task because, you see, I really didn’t think ahead to consider the scale of this task.

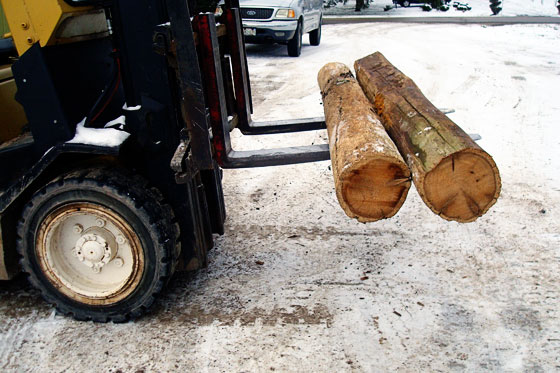
So here’s the hearth at the far right peeking out from behind the skids of stone back when they were first delivered two and half weeks ago.

Stone for the fireplace

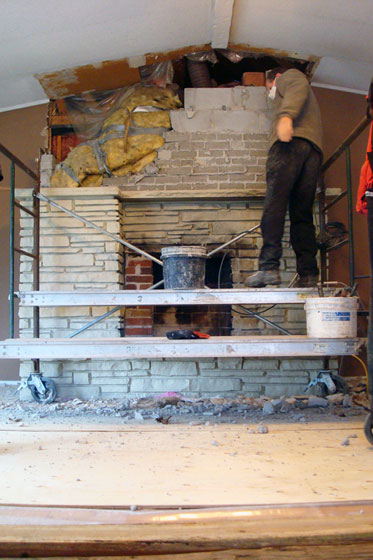
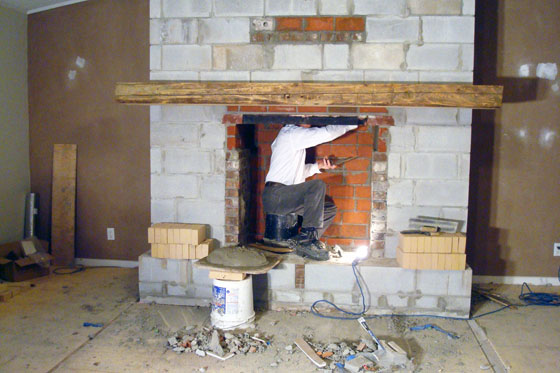
And here’s our mason sitting inside the fireplace, just to give you an idea of the size that we’re working with.

Mason building a fireplace

The plan was that Matt and I would get home from work a bit early last night and together with our contractor we’d move the hearth into place. Well, I made it home, but Matt got caught in a snowstorm and spent two hours on the road. Our mason and I tested moving the stone on our own. Not gonna happen.

New plan. The three of us would reconvene this morning at 6am before Matt left for work.

Matt and I did a test last night when he finally made it home. His verdict? “Woman, I don’t know if this is gonna happen, even with three of us.”

So we did what you always do in this situation: call Dad.

So the new, new plan is a stone moving party at our house this morning at 6am. There will be Matt’s Dad, the mason, Matt and me. Baxter will be here too, though he probably will not be very much help.

Wanna join us? It’ll be a special way to start your day. 😉

I realize most of you will be reading this after the stone moving party has ended. However, we’d still appreciate if you could send your good wishes. Heck, send levitation charms. Send muscle enhancing drugs. We’ll take all the help we can get!

Update: The stone is in place and is still in one piece. Yay! Full fireplace update to come on Monday.

Fireplace update – Week 1

It’s time for the first official update on the fireplace project. You got little tidbits last week, but today you get details and photos.

For a reminder, here’s what the fireplace looked like originally.

1970s fireplace

And here was the plan.

Fireplace fixes

To make this plan happen, we had to start over.

There was no liner or flue in the chimney, so if I wanted a true–and safe–wood burning open hearth, we had to build a proper chimney. That meant starting on the roof and taking everything down.

Demolishing the chimney

Wiley was very helpful during demo. I pulled him up to the edge of the roof and raised the front-end loader so that I could throw the bricks into the bucket and then drive them around to our rock pile.

Demolishing the chimney

Of course, even tractors get tired. All was going well until Wiley decided that one load was too heavy. No tractors or drivers were harmed, but it was definitely an anxious moment.

Wheelie in the tractor

Once we made it inside, it was more of the same: jackhammer, rubble and dust… lots and lots of dust. I’ve concluded that masonry dust is the worst kind of dust. Worse even than drywall dust. My hair has never been as stiff as it was on Monday night (no picture of that, sorry).

Demolishing the fireplace

It turns out there’s a reason for everything. The fireplace is where it is and is the size it is because it’s a chase for pretty much everything you could think of. There were two chimneys to vent the old furnaces that we used to have. There was the fireplace insert and its wonky chimney. And then on the far left, there was a heating duct and cold air return for the pool room.

The bump-out that I hated so much was actually there for a reason. It wasn’t just decorative. It was concealing the heat run to the pool room. Since we’re not using the pool room yet and don’t need to heat it, we just capped off the duct. When it comes time to redo the pool room, we’ll run heat some other way.

Capped heating duct inside the fireplace

After demo came rebuilding, which started a bit slowly. The wall behind the fireplace had to be insulated and then drywalled for fire protection, the duct had to be capped, the hearth had to be expanded, the base had to be laid. But by the end of the week some really good progress had been made. This fireplace is huge, so it takes a lot of time to put it all together.

Building the fireplace

Here’s how the fireplace progressed day by day.

Fireplace demo and rebuilding

We made some really good progress on the mantel yesterday, and we should be able to mount it by the middle of the week likely. I’m not sure that we’ll have everything finished this week, but we’re still on track to have fires by Christmas.

Milling the mantel

The fireplace is progressing. It’s still just cinder block, but it’s almost up to mantel height. You’re going to have wait a little while longer to see a picture. In the meantime, let’s take a little detour into the making of the mantel.

We started with some big barn beams. These have been lying outside the barn as long as we’ve owned the farm. You can see them beside Matt in this picture from our first summer.

Barn beams

They are huge, heavy hunks of wood. They were more than 12 feet long, and it took my Dad, Matt, his Dad and me to move them, even after Matt cut them down with his chainsaw.

When I came up with my plan to use our barn beams for the mantel on the new fireplace, I hadn’t examined them very closely. I expected the beams to resemble beams. Instead, they were very round.

Barn beams on the forklift

To be a mantel, I was looking for something with some corners. One of the beams had one flat side, but that was it. My Dad found a local sawmill that would cut the beams square for me.

I love finding spots like the sawmill. They’re treasures of unique services and products. The variety of wood they had in their yard was amazing–trees, slabs, boards, logs, crosscuts, exotics, domestics. They mill custom flooring and trim. And of course they have cool equipment. I have to confess I’m looking for an excuse to go back.

After our logs went through the sawmill a few times, we ended up with two beautiful cedar beams 6 inches by 6 inches square. We’re going to sandwich them together to make one big 12 by 6 mantel. We were able to preserve the original flat side on the one beam. That’s going to end up facing into the room where its hand hewn face, complete with marks from the adze that originally shaped it, will be visible.

Attaching these two pieces and mounting them on the fireplace is a whole other issue–and tomorrow’s project. I think we’ve figured out our plan. Fingers crossed everything works out.

Anyone have any tips for installing the mantel? Have you ever custom-milled any of your own wood? Have you ever used reclaimed wood for a project?

Getting fired up

So remember back in November when I said, “No more projects until 2015”?

And remember before that when I talked about the living room fireplace? And before that when I posted my Home Goals 2014? (And 2013?)

Ummm, yeah. So we’re doing the fireplace.

Right now.

The stone–six skids of it–was delivered a week ago. Ralph signed off after a careful inspection.

Ralph inspecting the chimney pieces for our new fireplace

Yes, I believe Santa will fit down this chimney.

We gathered the various barn beams we have lying around (yeah, we’re lucky like that) and picked out a couple of contenders for the mantel. Since they were closer to tree trunks than lumber, on Saturday my Dad and I took them to a local sawmill and had them squared off.

Barn beams on the forklift

Matt and I removed the extremely heavy metal insert yesterday. We emptied the living room to get ready for demo and taped off all of the openings with plastic in a (probably vain) attempt to contain the dust and soot.

I should be clear that this is not a DIY project for us. We do not possess the expertise to build a fireplace. However, a close family friend does. He’s a professional mason, and he did all of the brickwork on my parents’ house, including their fireplace, and worked with my Dad for years. We’ve hired him. So when I say we’re doing the fireplace, I have a loose definition of we and doing.

I’m off work today to help with the take down, and I’m planning to work from home a couple of days this week, but my involvement will be very limited.

Regardless of my minimal contributions, we should have a new fireplace by Christmas.

Now that’s what I call a present.

Dreaming in front of a crackling fire

A couple of Saturdays ago, while my father-in-law and Matt assembled some deer stands with Baxter’s help…

Baxter "helping"

I took advantage of the log splitter my FIL had brought with him and cleaned up some firewood that had been lying around.

Never mind that we still don’t have a working fireplace. Tree management is ongoing here.

Splitting wood

In the category of wishful thinking, let’s take a minute and talk about this fireplace, though, shall we?

1970s fireplace

I have always wanted a wood burning fireplace. When we moved to our little house in the city, the fireplace in my parents’ family room was one of the things I missed most. Redoing our fireplace has been on my list since we moved in. But it’s been delayed due to finances.

We discovered quickly that making the fireplace what I envisioned wasn’t going to be as easy as we thought. I wanted to pop out the insert so that we had a beautiful open hearth. And I wanted to reface the whole thing with fieldstone.

Unfortunately, the chimney won’t accommodate an open hearth. I don’t understand exactly what’s wrong with it, but it’s not entirely right, even for the insert that’s there.

Fixing the chimney means rebuilding the whole fireplace as though we were starting new. Great for getting exactly what I want. Not so great for the wallet.

Matt, my wonderful, accommodating, frugal husband, thinks that we will be able to scrape together enough money to do the fireplace this year. I’m a little more skeptical.

But let’s not let a little thing like the budget derail this post. Let’s talk about what needs to be done.

Fireplace fixes

The biggest question is the location of the fireplace. You’ll notice in the picture above that it’s off centre (look at the beam at the apex of the ceiling). This actually isn’t a bad thing, in my opinion. By centring the furniture arrangement on the fireplace, we have room to walk around the edge of the living room to the dining room. If we shift the fireplace so it’s centred, passage to the dining room will be a little tight.

What do you think? Should we centre the fireplace?

My plan for the new fireplace is roughly the same location, roughly the same dimensions. The biggest change will be to make the fireplace itself symmetrical. One continuous wide hearth across the bottom. No weird bump out on the left side. A rustic wood mantel (I have some great old beams in the barn) at one continuous depth. Fieldstone face. Open hearth.

I know the insert is more efficient and is a great way to heat the house. However, we are not going to heat this house with wood. Our geothermal system works really well and costs us very little. This fireplace is more about ambiance and appearance than function.

What would you do with the fireplace if it was yours? Are you a fan of the ’70s asymmetry? What would you face it with? Brick? Tile? Stone? Plaster? Would you keep the insert? Or would you get rid of the fireplace altogether? What’s your opinion on centring the fireplace versus leaving it where it is?