Christmas card display

It’s Thanksgiving this week for my American readers, but as she celebrates Sarah in Illinois is already looking ahead to Christmas. Timely, as we’re exactly one month away from Christmas. Yipes! Sarah is back today to share a cute DIY for displaying Christmas cards.

One of my favorite parts of Christmas is checking the mail box for Christmas cards. I love sending and receiving cards and putting them on display. However, I have never really had a way to display them that looked nice.

This year I decided to turn to Pinterest to come up with a plan. There were so many cute ideas, but I did not use one specific image as my inspiration. I searched for “Christmas card holder” and used an idea from here and a feature from there, and this is what I came up with:

Christmas card display

I started by making a frame out of simple 1×2. I decided I wanted the inside of my frame to be about 16×20 inches, but that measurement could easily be adjusted to any size.

I cut my 1×2 at a 45 degree angle making sure that the right and left side were exactly the same length and did the same for the top and bottom. That way the frame would be square.

Cutting 1x2s on a mitre saw

The trickiest part of the whole project was nailing the frame together. Because I am stubborn, I didn’t ask for help. But having someone to help hold the pieces would be easier. Using screws would also have been easier, but I didn’t want the screw heads to show.

At this point, I grabbed some stain that we had sitting around and gave it a good coat and wiped off the excess. Many of the inspiration pictures that I was looking at used chicken wire as the background, but I felt the chicken wire was too “country” for my taste so I planned to use hardware cloth.

I found these little bitty clothes pins to use to hang the cards on the wire.

Mini clothespins

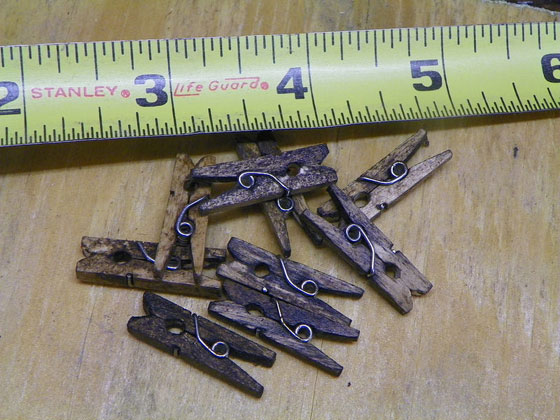
They came as bare wood, so I used the same stain as I did for the frame to give them a little interest. I used tin snips to cut the hardware cloth to size and then stapled it to the back of the frame.

Hardware cloth stapled to a wood frame

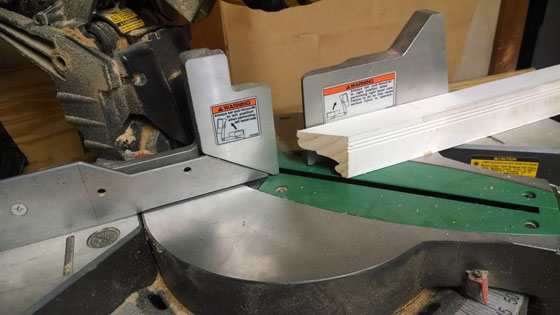
For the pennants, I had to do some experimenting. I used quarter-inch plywood and cut it in a strip 2.5 inches wide. Then I had to cut it into the pennant shape. But I didn’t know what angle that should be. So I just tried until I liked the way it looked.

I set my miter at 45 degrees, and I didn’t like that angle, so I changed it to 30 degrees. That was better, but I still felt it wasn’t exactly what I wanted. The next pre-marked measurement on my saw was 22.5 degrees, so I tried that and thought it looked just right!

Cutting penants on a mitre saw

After I cut several pennants, I used a little drill bit to put holes in the top to string some jute through.

Drilling holes

But before I strung them up I painted with a little craft acrylic paint. All that was left was to hang them at the top of the frame. I did that by tying the string to the back of the frame on the hardware cloth.

My frame is now hung on the wall and ready for the first card to come in the mail!

Christmas card display

What a cute display, Sarah. It’s just country enough, in my opinion. To see what else is inspiring Sarah, follow her on Pinterest.

I hope that Sarah and all my other American readers have a great Thanksgiving.

Brody and Treu

I’m starting off the week with a post from Sarah in Illinois. Today, she’s introducing us to her two dogs. You all know how much I love our Baxter, so I’m very happy to get to know Sarah’s two furry fellows.

Treu and Brody looking out the window

I have really struggled with coming up with something to write about this week. I feel like we are in the eye of the storm here. The hustle and bustle of harvest is over. Steve comes home at regular hours again since all the crops are in, and he has all of his ground work done. But I am fully aware of how busy we will be in just a couple weeks. Between both of our families, my work party and the kids’ schedules we will have something to do every weekend in December.

This weekend we took advantage of the fact that we still have great weather here. We mowed the yard for the last time, brought in all outdoor decor, the grill and garden hoses so they don’t get damaged when it starts to freeze. We even hung Christmas lights on the house. However we won’t light them for a couple weeks.

I don’t want to rush the holidays at all, so we are just relaxing and enjoying the calm. Of course, that doesn’t make a very interesting blog post. When I said aloud that I didn’t know what to write, Steve’s daughter said that I should write about our pets. So this week I will introduce our dogs.

Brody the chocolate lab

Brody

Brody is Steve’s 10 year old chocolate lab. Brody has a very interesting background. He is retired from the US Air Force! We don’t know a lot about his time in the Armed Forces, but we know he was stationed in Alaska.

Brody has multiple health issues, and it makes us wonder what he has seen and what type of things he has been exposed to. About two years ago he started losing his eyesight and he is now completely blind. But that doesn’t stop him from getting around the house and finding his chew toy to bring to us.

He is very talkative. I think because he is blind he struggles with not knowing exactly where we are sometimes and he “yells” at us, which is a harsh bark. We laugh because he doesn’t seem to need anything; I think he just wants to know where we are.

Treu the German Shepherd

Treu

Treu is my 12 year old German Shepherd. I got Treu when he was 6 weeks old. He is an outside dog, but there were many times when I lived alone that I would bring him in with me to keep me company or to make me feel safe.

When we moved in with Steve, Treu got a really expansive pen with shade trees and access to his own section of a barn. Besides his foam bed and heated water bowl he has a “deck” that Steve built and he spends a lot of time laying out on it.

And of course any time we are out in the yard where we can watch him, he has free reign.

Treu is starting to show some hip problems that are slowing him down. However, I don’t think he knows that his hips are failing. He still tries to run and chase the cats. It’s just his legs don’t always get the message.

Both of our dogs are getting up there in age. We joke about how high maintenance they are. We are constantly buying special food, medicine, supplements, and vet visits. But they are a part of our family. They are waiting on us when we get home with smiling faces and a wagging tail. And we treasure every moment that we have with them.

I know exactly where you’re coming from, Sarah. I can tell Brody and Treu are well-loved. Brody’s history is so neat. I had no idea you could adopt a dog after his tour of duty.

Enjoying fall

‘Tis the season. The season of fall that is. Sarah in Illinois is back today, sharing some of the ways she’s marking fall at her house.

Jack o'lanterns lit up at night

When I was younger my parents told me that as you get older time seems to fly by faster and faster. I am sure at the time I thought, “Yeah, whatever, it is so long until my next birthday, or… until I get my license, or… until I graduate.”

Okay parents, here is what you have been waiting for: YOU WERE RIGHT. Every year time flies by faster and faster. The snow on the ground melts, a minute goes by and it is summer. In the next breath school starts, and then we prepare for the holidays and winter weather again.

I can’t believe that this weekend is Hallowe’en. Because it seems like time blurs between Hallowe’en and Thanksgiving (for us in the States), then Christmas and New Year’s. In no time this year will be over!

Since the kids are only here every other weekend, this was our weekend to celebrate Hallowe’en/fall activities. I try to keep a balance between incorporating traditions and relaxing and actually enjoying what we are doing.

One thing we try to always do is carve/paint pumpkins. For the past few years I have wanted to grow my own pumpkins for carving and also ornamental small gourds. I even went as far as buying the seed, and then time gets away, and I realize I never put them in the ground. This year was no different, so we went to a local pumpkin patch and picked out some pumpkins and gourds. The owner said that the pumpkins had ripened early this year so there were not many left to choose from. That was probably true, but there were still enough for us.

I chose to paint one:

W painted pumpkin

I found a script font on the internet and looked at it as I freehanded the “W” on the pumpkin with a pencil. Then I neatened up the pencil with a marker so that it was easier to see. It was at that point that I used acrylic craft paint to paint the letter and the vine on the sides. When I was happy with my design I sprayed a heavy coat of clear matte spraypaint over my design. This will keep the acrylic paint from washing off during fall rains.

Painting pumpkins is so much easier and less messy. And also the pumpkins last longer on display since they are not cut open. Of course, the kids wanted to carve theirs, so we all carved pumpkins too. We each carved a jack o’lantern face and Steve’s daughter is a WNBA LA Sparks fan so she carved an extra one to support her team!

Carved pumpkins

Another decorating tradition of mine is Indian corn. A local farmer and his son have been growing the corn the past two years and set up a little stand to sell it. So I stopped by and bought a few ears last week and tied them together with some ribbon I had laying around and hung them on our doors.

Indian corn

I have been trying to really look at the trees this past week. We live in an area that the leaves on the trees are simply stunning this time of year. But if you don’t pay attention, they can be gone in just a few days.

I took a picture one morning before I left for work and the next morning at the same time I looked at the same tree and I was shocked at how many leaves had fallen in 24 hours. And since we are expecting rain in the next few days, our leaf display is almost over!

24 hours of fall

My goal in the next month is to plan ahead and follow a schedule to prepare for the upcoming holidays. I don’t want to rush things, but I want to make sure I don’t leave everything until the last minute and then the season becomes stressed.

I want to enjoy it like I have been enjoying fall!

It looks like Sarah has had a lot going on this season. I love that she’s taking the time to savour it.

How are you celebrating Hallowe’en at your house? What does fall look like where you are? Have you ever tried painting pumpkins? Did you notice the one pumpkin was carved on his side? I never would have thought to do that, but I love his happy goofy face.

Farming questions never end

Since moving to the farm, I’ve realized how incredibly hard farmers work and how little I knew–and know–about farming. I’m learning more because I now live here and I see farming up close, but I still have a lot of questions. Sarah in Illinois is back today to share some of her experience living with a farmer and some of the lessons she’s learned so far.

Corn cobs in the field

Growing up in a farming community, I have always been familiar with some aspects of farming. I could always identify a corn field from a soybean field and a tractor from a combine. I knew that farmers put seeds in the ground in the spring and harvested crops in the fall. But what else did they do all year?

Why did they always seem so stressed about the rainfall, the wind, and the temperature when there was nothing they could do about it? What were all those other pieces of equipment that traveled up and down the roads and slowed me down?

When Steve and I started dating he was working for a company that sold seed and chemicals and applied chemicals to fields. And I was fascinated with what he did. I asked questions, and more questions, and more questions. And after 6 years, I realize that I still know so little.

What else do farmers do all year? They watch their fields for weeds, fungus, and insects and then treat accordingly. They maintain their equipment, they keep the ditches mowed, they clean out grain bins to prep them for harvest, and I am not even talking about the farmers that also have livestock.

Why are they so stressed about the weather? Well, there are some obvious reasons, but they also have to be concerned whether the root system of the plant is strong enough to hold up against a bad windstorm. Did they plant the seed too deep? Not deep enough? Did they apply the right chemical, fertilizer and at the right time? And all of those pieces of equipment? I am still learning their names and what they are used for.

Now that Steve is finishing his second season working for himself, and we have crops of our own, my questions have only multiplied.

Every one of those decisions, every single factor affects the quality and the quantity of the harvest. Should we have put on more fertilizer? It may make more bushel, but will it be worth the cost? How much damage have wild turkeys and deer done to our field? (This year, we had a fair amount of damage.) And now that Steve has harvested, should we sell right away? Or store it and hope prices go up? And if we store it, since we don’t own any bins, will the price go up high enough to offset the cost of storing it?

Ear of corn

I saved our first ear of corn!

But even with all of those scary decisions and all of those risks, all of the evenings I spend home alone because Steve is in the fields, all of the stress wondering if we are making the right decisions, I still love that we are taking a leap into farming.

We are growing crops that feed people, feed animals and produce fuel. There is so much to learn. My questions to Steve will only increase.

I never tire of watching a tractor driving through the field turning over the ground or the combine cutting beans and unloading them into a waiting truck.

I hope that we are able to grow our business, rent more acres and even buy some when possible. And I hope to continue to learn all I can about farming!

Thanks so much for sharing your questions (and some of the answers), Sarah. I learned some new things. When it comes to farming, I find there are lots of things I’ve never thought about before–like root systems.

What about you? What questions do you have about farming? Or any surprising lessons you’ve learned?

Finishing up the deck

I’m pleased to welcome Sarah in Illinois back to the blog. Today’s post is full of the things I love: a big doggie, country views and a great DIY transformation. Take it away, Sarah.

One of Steve and my favorite places to relax is on our deck. The summer of 2013 we drew up plans and built a large deck off the back of our house. There are some things about the deck that we wish we had done differently, but overall we are very happy with it. (Hello, Treu!)

Deck with Treu

We had done a little research on how to protect it. One thing that we had read was to wait a year to put any sealant on it.

We chose to wait even longer. The boards we used were very green. That is, they had a lot of moisture in them. This was obvious when we installed it, but it also showed up over time as the boards warped more than we had liked as they dried.

This year I decided that it was time to get at least one coat of sealant on it. The thing was, after two years, the deck was very dirty and stained. I believe this was a combination of normal use, stains from the grill, mold from moisture and just pollution in the air.

Deck railing before

So I chose to clean it first. It took just a little bit of prep work. I have two unbelievable huge and beautiful mums, so I made sure to drape plastic drop cloths over them to keep the cleaner off of them. The deck wash I purchased was a bleach base and it worked like a charm for cleaning the deck.

Cleaning the deck

I bought what I believed to be enough based on the square footage that it said it covered. This was way off. I ended up needing double the amount. I think that part of the reason was that maybe the square footage listed did not take in account the railings. But I am sure it also had to do with how heavy I sprayed it on the wood.

I used a hand held pump sprayer to apply the cleaner, then I used a broom to lightly scrub trouble spots, and finally I sprayed it off with a garden hose. This was easily a one person job and if I had had enough cleaner would have taken just one afternoon.

Then I let the deck dry for a couple weeks. I wanted to make sure not to trap any moisture in with the sealant.

Deck before and after cleaning

When it was time to seal the deck, it took more prep work and took two people. Steve and I used the same hand pump sprayer to apply the sealant. We found the method that worked for us was for Steve to spray the railings, then the floor and for me to follow up with a brush and smooth any drips and puddles. We wanted to make sure we put a heavy coat on, but we wanted it to be fairly even.

Applying sealer to the deck

The sealant was much messier than the cleaner. It got everywhere–on us, on the siding, and even oversprayed to my nearby herb garden. We are planning to reside the house in the next year when our addition is finished, so I was not too upset by the overspray on the siding, but I sure wish I had harvested my basil and oregano before we got started.

We feel the deck needs at least one more coat of sealant for us to be happy with it. But since harvest has started, it looks like it is going to be next spring before that gets done.

In the meantime, I am so happy to have the first layer of protection on it. The cooler weather is just begging us to come out of the house and relax!

Deck with mums

What a great outdoor space, Sarah. Those mums are amazing. I’m always so impressed by how wood can be restored with a good cleaning and a bit of work. Good job. I hope you get to relax outside and enjoy it.

Anyone else have tips to share about restoring wood? Have you ever stained a deck? Who else has had a project that’s taken a bit longer to complete than planned?

My favourite tool: Heather in Heels

Today, I’m thrilled to welcome Heather of Heather in Heels to the blog for the final installment in the “My Favourite Tool” series. If you’re just joining us, this series came about when I was thinking about what I should put on my tool wishlist. To help me make up my mind, I reached out to a few bloggers and asked them to share their favourite tools.

I was thrilled when Heather said yes to my email. Heather is a woman after my own heart–she’s all about all kinds of DIY, good food, lots of love for her pups, oh, and she’s Canadian too. She blogs at Heather in Heels. I especially love that her favourite tool is one that I love as well. Take it away Heather.

When it comes to my DIY habit, nothing helps me feed the monster like having the right tools for the job. I realized many moons ago the one critical tool for all the painting and refinishing projects I wanted to tackle was a sander. So I stole one from my mom and step dad’s basement. It took my step dad 20 years to realize it was missing. (I won’t the list the other items I’ve taken yet – they still don’t know they’re missing… he he).

It was old and made your whole body vibrate when using it, but it did the job. It did the job until it didn’t any more. I almost had a funeral for it. That sander and I did many wonderful things together.

We’ve transformed doors and we’ve taken a super-drab-free-on-the-side-of-the-road find and made it beyond fabulous. But I had to say goodbye to it.

Interior door painted blue

White credenza

And then I promptly got over my loss when my new sander arrived. And together we’re already busy making new memories! I’ve just finished refinishing a bar cart and while the paint dries I’m already busy with my biggest furniture project yet – a huge dining room buffet server. (Spoiler alert. Since writing this post, Heather’s finished the buffet. No surprise, it’s fabulous).

Ryobi sander

Why a power sander? Well, for one thing it saves your manicure. (This is an essential in my books). It also greatly increases the speed of any project requiring sanding. I’m not sure I would even contemplate some of the projects I’ve done (or am in the process of doing) if I had to sand by hand. I don’t even pumice my own feet for goodness sake!

The power sander, followed closely by my trusty staple gun, is definitely my favourite tool in my tool box. It saves me time, increases my productivity, saves my manicures, and it’s the best way to remove old and ugly to make room for new and fabulous.

Removing old and ugly to make way for new and fabulous. That definitely sums up Heather’s approach to home reno and decor–and life in general. Thanks for being part of the “My Favourite Tool” series, Heather. Be sure to check out Heather in Heels to see more of Heather’s quest to add more fabulous to daily life.

The Porch Jacking: Chad’s Crooked House

I’m happy to welcome Chad of Chad’s Crooked House to the blog today for the third installment in the “My Favourite Tool” series. If you’re just joining us, this series came about when I was thinking about what I should put on my tool wishlist. To help me make up my mind, I reached out to a few bloggers and asked them to share their favourite tools.

I’ve been following Chad’s adventures in restoring and updating his Philadelphia row house for awhile now. It seems like he might be finally heading into the homestretch on his reno (or at least, Phase 1). I’m glad he could take some time away from painting, lighting, closets, kitchen cabinets (!) and other work to share a project from the past here today.

Julia asked me to write about my favorite tool. Usually picking favorites is the hardest thing in the world for me, but this time I have one with a perfect combination of weirdness and a good back story. We’re going back about 8 years to when I was in college for this project.

My parents have a screen porch on the side of their house. It was always a favorite spot even though it was kind of in sorry shape. The columns were wrapped in finished wood that was visibly rotting away and the screen frames were patched up with corner braces that were rusted all over. It was time to give it a face lift. My dad called me to get my approval to use aluminum capping. He’s not dumb, so he had to have known he would never get it. Especially for a spot where people would be sitting 2 feet away and really see the fakeness. I told him that capping over rotting would be flirting with disaster (see how practical I am?), and that we should re-wrap the columns with new wood. And then I took my final.

Fast forward a week or two, and I was home to investigate. The screens were down, and I started hammering a crowbar into the most rotten column, at one of the corners. The first thing I saw was bad – like 6 million bugs scurrying out and tunnels all through the wood. But the second was even worse – nothing inside! I was ripping apart a column that was holding up the porch roof!

I called my dad in a panic. He said no big deal, we’ll just put in new pressure treated 6×6 posts. I was half crying. “What about the temporary bracing? It’ll be so much work!”

He replied in a high pitched mocking tone pretending he thought I was crazy. Not that he actually thought this, but he likes to mess with us.

“What? We’ll just use the railroad jack!”

“The what?”

“Come on, Chad. You know we have a 30 ton jack in the garage.”

I never did know that, but it sure was good news. Here it is. I always thought this giant bar was for heavy digging in the garden, but actually it’s the lever for the jack. The whole thing is cast iron and weighs 67 pounds.

30 ton railroad jack

So he found a 4×6 in his hoard, cut it down to fit on the jack, and set it up next to the first column. Up went the porch roof and out came the column. We cut the new 6×6 to match the height of the old column, stuck it in place, let the porch down and moved on to the next one. All 7 new columns were in place in a day! Here it is 7 years later.

Screened porch

Good job, Chad (and Chad’s Dad). That porch looks like a beautiful spot to spend time in the nice weather. Thanks so much for sharing your favourite tool, Chad. If you’re interested in reading more about Chad’s adventures in Philadelphia, check him out at Chad’s Crooked House.

Yard tool maintenance tips

Sarah in Illinois is back today with another post. She has some very helpful tips for taking care of our yard tools–timely as we wrap up outdoors season and prepare to tuck our tools away for winter. (Yes, I did say the “w” word.)

One thing I am trying to do more of is take better care of things around my house so that they last longer. I know that should be an obvious habit, but we seem to live in such a disposable world that it often gets overlooked. Instead of just throwing away and buying new, we should be extending the life of items we already have.

Not long ago I noticed that my wheelbarrow looked terrible. It was getting such a thick coat of rust, and it wouldn’t be long before it rusted right through.

Rusty wheelbarrow

Flakes of rust in the bottom of the wheelbarrow

The first thing I did was to remove as much rust as I could. This could have been done by hand with a wire brush, but I had this handy attachment for my drill, so I tried it out. It worked like a charm!

Drill attachment for removing rust

After I had all of the loose rust removed, I sprayed it off with the hose and let it thoroughly dry in the sun. And I was correct; I already had two pin holes in the metal.

The next thing I did was to try to prevent any further rust.

I used a rust treatment that we sell at work, but I am sure is available at any home improvement store. I made one mistake though. I did not read all of the directions.

I knew from selling the product that when it reacted with the rust it was supposed to turn black. I waited an hour with it sitting in the sun, and it never turned black. I went on with the next step of painting with spray paint in a color close to the original. And it really does look great.

The mistake I found later was that the can clearly says to wait 24 hours to paint. During those 24 hours, it turns black.

In the long run, I don’t know that I will have any issue with not following the directions completely. Since it is just a wheelbarrow, I am not too worried, but in the future I will be better prepared.

I also put a coat of deck sealant on the handles. We had some sitting around, and it took me just minutes to do. It will help protect the handles from rot.

Green painted wheelbarrow

I also decided to do something similar to our garden tools. I started by spraying them off with the hose and using a nylon brush to remove any caked on dirt, and then let them dry. I used the same method as I did with the wheelbarrow to remove the rust.

Garden tools before cleaning and sharpening

Using a hoe in the garden is not my favorite chore but I have learned that having a sharp edge makes it so much easier. My dad is very skilled at putting a sharp edge on with a hand file, but when I need to do it myself I use our electric grinder and this grinding wheel.

Sharpening a hoe with a hand grinder

Just a couple of passes and it is sharp as a razor blade!

Sharp hoe

I didn’t see the need for rust treatment or paint for the tools, so I just finished by spraying a light coat of WD40. Any type of oil based spray would have worked. I have even heard of using motor oil. The goal is to coat the bare metal to keep it from moisture.

Oiling and sharpening garden tools

It took me just a couple hours one afternoon to finish the wheelbarrow and only about 30 minutes to prepare the tools. Hopefully in that short time I have considerably lengthened the life of my garden tools.

Thanks so much for the helpful tips, Sarah. The transformation of that wheelbarrow is amazing! And I love that it’s already dirty and in use. My fingers are crossed that the finish lasts for you.

How do you put your tools away for winter? Any tips for dealing with rust? Have you ever painted a wheelbarrow?

Linking up to Think and Make Thursday at the Heathered Nest.

My favourite tool: white dog vintage

It’s time for another installment in the “My Favourite Tool” series. If you’re just joining us, this series came about when I was thinking about what I should put on my tool wishlist. To help me make up my mind, I reached out to a few bloggers and asked them to share their favourite tools.

Today’s post comes from Brittany at white dog vintage. Brittany and I connected during last fall’s One Room Challenge. She made over her kitchen–so ambitious and such a great result. I really like her style–her makeovers are colourful, full of DIY and  super personal. And I was thrilled when she said she’d be happy to share her favourite tool with all of you. Over to you, Brittany.

Hello Home on 129 Acres readers, and thank you so much to Julia for inviting me to be part of this series! Just a few words about myself: I’m Brittany from white dog vintage. I live in Springfield, Missouri (plumb in the middle of the US) with my husband, Justin, and three chihuahuas. Justin and I love old homes and especially love working on them. In January of this year, we moved into a 1921 bungalow, and we’ve been spending our nights and weekends fixin’ her up ever since.

When it come to Number 1 All-Time Favorite tool, in truth, I have to go with a caulk gun. There’s very little in the world of home improvement as simple and satisfying as applying a bead of caulk. However, that’s all I really have to say about a caulk gun, and one sentence seems like a pretty lazy contribution to this series. So I decided to go with some a little louder. A little flashier. Something that requires electricity. A POWER TOOL. And in that vein, I chose the thing that powers some of my favorite tools to work with–an air compressor.

I love my air compressor (white dog vintage)

An air compressor is a support tool. On its own, it generates compressed air in a little tank, which sounds nice but isn’t too helpful until you connect it with the tool that’s doing the actual work. There are a variety of air-powered guns of different sizes and purposes. Over the course of different jobs, we’ve ended up with four.

Air compressor attachments (white dog vintage)

Staple gun – I use this for upholstering furniture, primarily with 3/8″ heavy duty staples, though occasionally I use up to 9/16″ staples if several layers of fabric need to be attached.

Pin, Brad, and Finish Nailers – These are all used for attaching trim and molding, but each is generally designed to handle a different length of weight of nail. Pin nailers shoot extremely skinny nails and are used for small, light-weight trim, brad nailers have a similar purpose but shoot slightly heavier nails (depending on the gun, they may also be able to shoot staples), and finish nailers shoot larger nails necessary for applying heavier duty trim like baseboards or crown molding.

I first started using an air compressor when I decided to try my hand at upholstery. A staple gun is a necessary upholstery tool, and when it comes to staple guns, pneumatic is the only way to go. I remember once, before I had done much upholstery, helping a friend recover her dining chairs with about a $7 manual staple gun I bought at some generic hardware store. I believe our strategy was for her to pull and hold the fabric while I put a knee on the seat bottom to hold it in place and, at the same time, used all the strength I could muster in two hands to squeeze the trigger of the staple gun. If only I’d have known how easy the whole thing is with a little air behind it. Here’s a little action shot from an ottoman I made recently.

Upholstering with white dog vintage

We’ve also been replacing all the trim in our new house, so I think you can imagine how handy the air compressor has been for attaching baseboards and molding. Justin recently started constructing capital style moldings for the tops of our doors and windows, and he reports he used all three nail guns to put them together. I got into the action a bit when it came to attaching the baseboards to the wall.

Installing trim with white dog vintage

The truth of the matter is that using a pneumatic gun or nailer is just plain fun. There’s a little bit of a thrill in the pop of the nail hitting the wood, and it’s a really easy and safe tool to use (the tip of basically any nailer must be compressed before the gun is capable of firing–eg, it’s impossible to shoot a nail into the air). I can be kind of absent minded, so I tend to stay away from saws and other potentially dangerous instruments, but thanks to my trusty air compressor, I don’t have to miss out on all the fun. 🙂

Thanks again for reading!

Thanks for sharing, Brittany. An air compressor (and its various attachments) moved up my wishlist as I was reading. Be sure to check out white dog vintage to see more of Brittany’s and Justin’s projects.

My favourite tool: Sarah in Illinois

To kick off the “My Favourite Tool” series, I’m pleased to welcome Sarah in Illinois back to the blog.

When I tried to think of my favorite tool, my first thought was my cordless drill/driver. But that is not necessarily my favorite, it is really just the one I use the most. So I thought of our wood shop and what tool I really enjoy, and I decided it would be the compound miter saw.

Compound mitre saw

A few years ago Steve and I decided we could use a compound miter to install some baseboard. So we went to one of those discount tool stores that buys by the pallet and is known for low prices but also low quality. We bought a very cheap saw, and it got us by for a while.

But Steve started dabbling in cabinet making, and we discovered that you truly get what you pay for. Steve was so frustrated with trying to make precise cuts for the corners on the cabinet and announced that we were buying a nice saw. In fact, I am surprised I didn’t find our old saw out in the driveway when I got home! Ha!

We did a little research and decided on this one:

Hitachi compound mitre saw

We are very happy with our decision. The quality of our cuts improved greatly. We have used it to cut baseboard, crown molding, door and window trim and laminate flooring. Steve has been so happy with it when making cabinets. I feel so comfortable using it for almost every cut I need.

Compound mitre saw

Homemade cabinets

We are still debating the design we want to use for the doors so that is why they are all open right now. I am so proud of his craftsmanship.

We have a long list of tools that we want to add to our line up (a Kreg Jig is the first one that comes to mind), but the compound miter saw has to be our best purchase so far.

I think I am supposed to say that I am in no way sponsored for this post, which I am not. But if Hitachi wants to contact us, Steve will volunteer to sing its praises! He loves that brand of tools! 😉

Thanks, Sarah. I’m feeling very justified in including a quality compound mitre saw on my wish list! If you want to keep up with what Sarah and Steve–and their saw–are up to, follow Sarah on Instagram. And if you missed Sarah’s last post, here’s her introduction.

Stay tuned later this month. More “My Favourite Tools” entries are coming up.