Caulking within the lines

Growing up, a pristine colouring book was a treasure. I carefully chose my colours and then filled in the drawings making sure to always stay within the lines. I started at the beginning of the book and worked through it page by page.

My younger sister on the other hand went through all of our colouring books putting blush, lipstick and eye shadow on all of the people–men, women and children. It was always a disappointing moment when I opened a book and found the characters covered with red, pink and sometimes even purple splotches.

Staying within the lines is still important to me, especially when it came to caulking the new shower. However, I am not a tidy caulker, so to ensure I had perfectly straight and even seams, I employed a technique I found courtesy of This Old House.

Caulking with painters tape

I laid two strips of painters tape on either side of the joint, squirted my caulking in between the strips, smoothed the bead with my finger and peeled off the tape.

The result was perfectly straight lines.

Caulking with painters tape

It’s definitely not a quick process to put on all of the tape, especially when the shower stall includes a niche and bench that all needed to be sealed, but the results satisfied my childhood hang up for staying within the lines.

Even my sister was impressed.

My Christmas cold may have knocked me out, but at least my tile are grouted

For the second year in a row I have been struck down by a doozy of a Christmas cold.

The fatigue, fever, headache and muscle aches are not conducive to writing… or thought, so for today’s post, all I have for you is a low quality picture of our grouted tile.

Tiled shower stall with bench and niche

You’re not tired of hearing about tile, are you?

The tile are grouted, the bench top is in place, the fixtures are all installed, and we even have running water.

Germs aside, it’s a merry Christmas in the basement.

How tiling is like reality TV

I should have known. It was like a scene out of reality TV where someone says, “I completely trust my alliance. That million dollars is mine.” You just know that they’re going to be the next person voted off.

A month after  I naively wrote “I actually enjoy [tiling]. It’s not hard work.” the reno gods were still chuckling at me as I glowered at the untiled walls of the basement shower.

I decided I really do mind tiling, and I did everything I could think of to avoid it. I delayed, I procrastinated, I spent my time on other things (important things like baseboards and tractors and carpet, and less important things like parties and first snowfalls). However, none of these were tiling and none were enough to distract me from the ugly cement board, the cartons of tile and the need to bring the two together.

So I appealed to my alliance.

I negotiated with the reno gods: “I don’t need the whole Lotto Max jackpot. Just a little bit will be enough to finish the tile!” I bargained with Matt: “I don’t think I’ll do a good enough job. What if it ends up crooked and we hate it?” I pleaded with my Dad: “Please call your tile guy!”

The reno gods were silent. Matt was supportive: “You’ll do a great job. I have confidence in you.” My Dad was befuddled: “You, the woman who drywalled her own basement, are now intimidated by a shower stall?” But because he’s my Dad, he called his tile guy.

The tile guy said it would be $900.

$900? Just for tiling? With materials I already own?

$900 for professionals versus $0 for me. Ummm… “I guess I’m tiling a shower.”

So I booked a day off work. I booked my Dad. Just like the challenge part of the episode, I threw myself into the mud pit (mortar bucket?), and we got to work.

The first step was to figure out our starting point. Between the bench, the niche, the accent band and the vanity, there were lots of spots that I wanted to line up. However, the most critical was the top of the vanity, so we drew our level line from there.

Level line for tiling

Despite any appearances, the line is actually in line with the top of the vanity, and it is level.

Once we got going with our tile, the most important objective was keeping everything level and even. For me the solution was using spacers. I wanted fairly narrow joints, and every single one had to be the same. I may have gone a bit overboard.
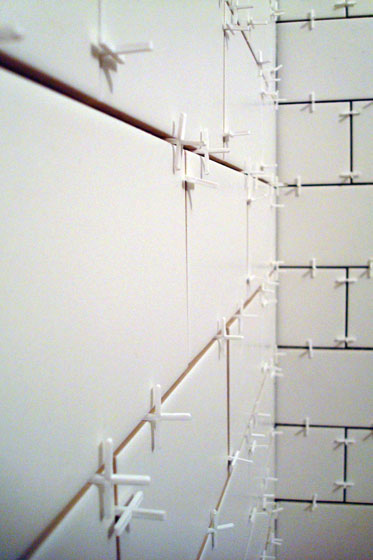
Tile spacers

Too many spacers?

I had two bags of spacers, but those were quickly emptied. As I progressed around the shower, I kept going back to areas that had already set up and removing the spacers so that I could reuse them.

The other spacing issue I ran into was with the accent band. I’d chosen a marble mosaic tile that was slightly thicker than the white subway tile I was using the rest of the shower. I could have camouflaged the difference with a chair rail or another type of tile, but I really wanted a flat, clean, simple look. My tile supplier suggested putting a little extra mortar on the subway tiles to build them out to the same depth as the mosaic.

Back buttering the subway tile

Back buttering the subway tile

I back buttered for two rows on either side of the accent band. Because I only did it in this one spot, the walls have a very slight curve. I’m hoping it’s imperceptible unless you know it’s there (obviously, all of you will be diplomatic enough to not point it out when you come to visit, please).

Carrera marble tile accent band

Everything looks pretty even between the carrera marble accent tile and the subway tile. Doesn’t it?

The back buttering was tedious, but not particularly difficult. The trickiest area–and the point that I started to go slightly insane–was the niche.

When we were building the shower, I thought the niche was a great idea. No bars of soap and bottles of shampoo set on the bench or the floor. No caddy hanging from the shower head. Just a convenient built-in shelf.

It turns out niche functionality, good. Niche tiling, bad.

Because I’m a glutton for punishment, I wanted the pattern to continue from the walls right through the niche. That meant dozens and dozens of cuts. In the whole niche, there is only one full tile. Ugh. But, I have to say, the result was worth all of the extra figuring and cutting. And yes, the next photo is completely bragging.

Tiled shower niche

Look at that brick pattern marching right along!

We used a small piece of marble we picked up at Home Depot for the base of the niche, as I wanted a single solid piece on any horizontal surface. It’s slightly sloped so that the water, but hopefully not the soap, will run off.

In the end, tiling the shower is not as fun as sitting on the couch all weekend watching a reality TV marathon, but my early fears proved unfounded. I did do a good enough job, I think. Everything is nice and straight–and it will look even better when it’s grouted.

I may not have won the million dollars, but I didn’t get voted off the island.

Comatose

No post today. I’m in a tile coma.

Tiled shower

The result of three days of labour

Obviously, I still have to put the seat on the bench and the top on the threshold, take out all of the spacers and grout everything, but the hard part is done.

Finally.

Thank goodness.

Sorry for the brevity today. Full breakdown… project breakdown, not personal sanity (already had my “I’m going crazy” moment at the end of my 12-hour second day)… will come later.

How did you spend your weekend?

William Wallace by way of a wet saw

Saturday morning, Matt’s bathroom looked like this.

Shower with cement board

It’s not just Saturday. The bathroom has looked like this for the past several months while our attention has been on finishing the drywall in the rest of the basement.

By Saturday evening it looked like this.

Tiled bathroom and shower floor

Beautiful tile. Finally progress!

I’ve tiled before, and I actually enjoy doing it. It’s not hard work, but it does require planning.

My Dad and I spent several hours in the morning laying out the shower floor, carefully fitting and figuring. When we finally spread out the mortar, we had a really good idea of how everything should go.

The marble mosaic hexagon tiles that we used on the shower floor are all on a mesh backing that basically makes them into 12×12 tiles. It’s important to  pay close attention when you join the sheets to make sure the gaps between the tiles are consistent. Despite our best efforts, I did still have a bit of difficulty keeping everything perfectly straight all the way across the floor, but I was able to adjust the spacing on the individual hexagons, and I think it will all look okay once it’s grouted.

Here are two lessons I learned about how to work with mosaic tile:

  1. Don’t start with your first sheet tight to the wall. Keep it off an eighth or even a quarter of an inch. This will give you more room to make adjustments on your other sheets as you progress across the floor.
  2. For areas like the drain, remove all of the tiles that come into contact with the drain. Lay your (mostly) full sheet as you usually would, and then insert individual tiles (or pieces of tiles) into the gaps as necessary.

On the main area of the floor we used actual 12×12 tiles, which were a piece of cake to install. The biggest piece of figuring we had to do was determine where the middle of the floor was and then centre our tile along that line.

The only sour bite in our cake was cutting out for the toilet. I know other people have used dremels or other tools to get nice round circles. We used the wet saw, which only cuts in a straight line. With lots of patience, lots of back and forth and even trading off cutting duties between my dad and me, we got the tile cut on the first try.

Tile cut around toilet flange

The cut of the day

It’s not as smooth as it would have been with another tool, but it will all be hidden under the toilet. That works for me.

What didn’t work for me was the William Wallace/Gene Simmons makeup I had going on after using the wet saw all day. All of the tile dust mixes with the water from the saw and from my waist to my hairline I had a dusty grey stripe in line with where the saw blade had sprayed me all day long–attractively along only the right side of my face.

Cutting tile on a wet saw

Thank goodness for safety glasses

Next step is grout and then I can move onto the walls. Who knows, someday we might even move on to installing the actual fixtures and using this bathroom.

What’s your tiling experience? Any tips for keeping things straight and even? Or cutting a curved line with a straight saw?

A peek of pretty

Amidst the dust and the upheaval and the tired muscles and the very, very, very long to-do list, I need a little reminder of what we’re working towards. The stack of tile piled in Matt’s future office provides some good encouragement right now.

Here is a little sneak peek at the various pieces that will eventually make up the basement bathroom.

Marble mosaic tiles

I think the white balance is a little off in this photo, as there is much more white than grey in real life

The white subway tile in the centre is going to be the main feature in the room. It will cover the three walls of the shower from floor to ceiling and the bottom half of the wall behind the toilet up to the height of the vanity. I chose a 4 inch by 8 inch tile, rather than the standard 3 by 6. It’s going to take a lot of tiles to cover the walls, and I’m hoping there will be slightly less labour with the larger tiles.

The white tiles will be accented by a narrow band (probably a strip 3 or 4 tiles high) of the grey and white marble mosaic mini subway tiles at the right. These will run at about eye level in the shower area only. Not an original design feature these days, I know, but hopefully a pretty timeless look.

The marble mosaic hexagon on the left is the shower floor. And the square (pseudo marble) tile at the bottom is the floor in the main area of the bathroom. They’re all sitting on the piece of marble, which you’ve seen already. This slab will top the bench in the shower.

Not pictured here are two more pieces of marble that we’ll be using for the top of the shower curb and the base of the niche.

As a reminder, the inspiration for the basement bathroom is Aubrey + Lindsay’s beautiful bath.

We managed to find tiles that were very similar to theirs. Although there were times that I joked that tile sourcing was going to break my enthusiasm for renovating.

The original tile that I picked for the accent band were back ordered until the end of August. They were another beautiful white and grey marble, but longer and more irregular lengths rather than an even subway shape. I really liked the irregular lengths for the contrast with the regularity of the white subway tiles. At the rate we’re moving now, August might have worked, but at the time I didn’t want to delay the project, so I found another option. Ultimately the colour is what will be most noticeable, and the overall feel of the bathroom will likely be pretty much the same with the tile that we ended up choosing.

For the main floor area, my original vision was to have large format white subway-ish shaped tiles. These were incredibly hard to find. Floor tiles seem to be square for the most part. And the ones that I was able to find were more creamy than I wanted. I nearly placed the order for the off-white tiles, but decided to take one more look at other options and found the square tile in the grey and white tones that work well with the colour palette that I’d established.

Ultimately, we ended up sourcing tiles from three different suppliers plus Home Depot for the marble sills and plus our stone supplier for the bench top. Fortunately, everything works very well together and it looks beautiful, even when it’s just sitting in a pile on the floor.

The bathroom is actually ready for tiling, but a couple of other projects (okay, slightly more than a couple) and the universe’s dogged persistence in only putting 24 hours in the day continue to delay installation.

For now, ogling the cases of tile–and remembering how far we’ve come already (psycho shower, anyone?)–keeps me going on this renovation.

Where do you find your motivation?

Mystery marble

Thanks to everyone who weighed in on what they thought was the answer to Friday’s mystery photo. Most people recognized pretty quickly that it was stone of some kind and guessed they were looking at tile or a countertop maybe. Close, but not quite.

Dave got it right: this is in fact marble for Matt’s bathroom shower. More specifically, it’s the slab that will go on the top of the bench in the shower.

Marble slab for shower seat

It’s a beautiful piece of white and grey marble.

This was my first time buying marble, and finding the perfect piece was not as easy as I expected. We needed one solid surface for the top of the bench. No seams or joints minimizes our risk of leaks. However, none of the tile or home improvement stores that we visited dealt in large (but smaller than counter-size) pieces of marble. The top of the bench had to be 18″ x 32 1/4″, and the best I found was 18″ square tile. That would have meant a seam, so that was a no-go.

As well, I was picky about the colour and veining on the marble. I wanted something mostly white with smooth grey veining (not too speckled). Granite suppliers are common in our area, but in my experience they tended to have a very limited selection of marble. Plus, understandably none of them wanted to cut into a countertop-size slab and end up with a leftover that was too small to use on another project.

Finally, we found a granite supplier that had a larger selection of marble and a good collection of remnants. They let us go through their warehouse and pulled out many pieces for me to examine. In the end, we found a piece that was just the right size and just the right colour. They gave us a good deal on the price and cut and polished it to my exact specifications.

Here’s a sneak peak of how it looks with the marble mosaic we’re going to be using for the shower floor.

Marble slab with hexagon marble mosaic tiles

The slab is a great match to the hexagon tiles.

I love marble over any other stone, and I’m really happy that we’re going to be able to use some in Matt’s new bathroom.

Our tile order should be arriving shortly, so stay tuned for more updates.

Any other marble fans out there? Anyone have tips for sourcing natural stone? And looking ahead to the next stage, any advice for installation?