When I was working on my office, I knew I wanted to find a way to display two collections. One was my Red Rose Tea figurines and the second was china thimbles my MIL has brought back from various trips she’s taken.
The thing about both of these collections is that they’re small. I had the shelves of the china cabinet where I could tuck in a few thimbles or figures, but they’d be lost amongst the bigger items on display. I also didn’t want them on a tabletop where they took up space that could be a work surface.
I decided to do two small shelves.
First was a small floating shelf for the thimbles. This shelf was so small and the thimbles are so light that I knew it wouldn’t need much support and I could screw it right to the wall.
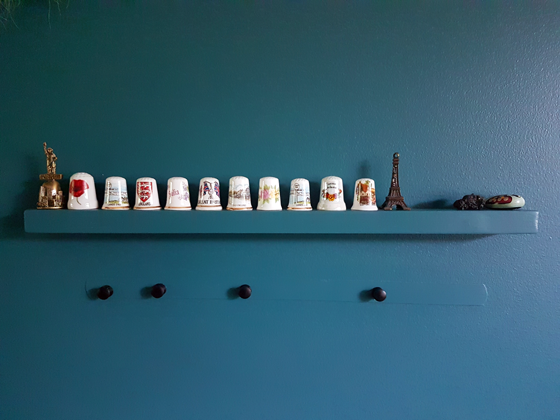
I cut a piece of 1×2 to the length I wanted and then drilled two holes through the face of it. The holes served two purposes. The first was to make sure the shelf didn’t split when I screwed it to the wall. The second was to recess the heads of the screws. I made the holes slightly bigger on the front so that the screws would go into the shelf by about a quarter of an inch.
I painted the shelf the same colour as the wall and then screwed it into place. Then I filled the holes with woodfiller and painted over them. The shelf blends into the wall very well, so that it (almost) looks like the thimbles are floating.
The second shelf is ingenious, but I can’t take credit for it. I found the idea on The DIY Mommy. This shelf started its life as a cutlery tray. I lopped off the one segment that ran perpendicular to the others on my Dad’s tablesaw. Then I painted it white, and simply screwed it to the wall. It is exactly the right size for my collection of nursery rhyme tea figurines.

I love having different things hanging on the wall, rather than the usual pictures and paintings. These two collections have a lot of meaning for me. Memories of the tea figurines that lived in my grandmother’s china cabinet, appreciation for my mother-in-law thinking of me and my love of sewing when she’s traveling.
Do you have any small collections? How do you display “smalls”? Have you built any tiny shelves?

I love that tiny thimble shelf. It is so cute! I have a thing for miniatures, and small things tucked away.
Obviously I do too. But I like them best when I can actually see them, so that’s where small shelves like this come in handy.
As a little girl I was passionate about miniatures and always had a couple of shelves with rectangle spaces for them (dividers that went up and down as well as sideways). Since moving into this home I have not put them up, and have let some of them go, as well as the shelves. (The endless downsizing journey…nothing is too small to be considered!) One of these days I’ll figure out a new shelf and get them up again. It will be nice to see them after all this time! That cutlery tray is a great idea. I don’t see any marks where you “lopped” it off – how did you do it so neatly? Filler again?
I considered the cubbie look for this shelf, but decided I preferred the openness of the shelves. I used my Dad’s tablesaw for the cut, and I was able to set the guides exactly right to get the cut exactly where it needed to be. No filler was used in the making of this shelf!
That’s impressive!
I have an old wooden soda crate that has the dividers in it. I keep thinking it would be cute hanging on the wall with small stuff on display, but I haven’t done that yet. I don’t really have a miniature collection but I am sure I could find something to fill it!
I love the idea of a rustic crate like that as a display piece.
I do love your tiny shelves!! and your collections. What a great idea — the cutlery drawer. You did good! 👏🏻👏🏻👏🏻
Lynn
The cutlery tray is a great solution. Thinking about making a small shelf like this made me feel like it would be so fiddly and fussy. I did not want to tackle that. The cost of the tray was worth saving myself some inconvenience.
I just bought three cutlery trays to do this in Piper’s bedroom for all her tiny stuff (Shopkins, Twozies, and mini hatchimals) – I am so looking forward to getting them painted and hung! Thanks for the idea – and the link back to the original blog with it (as I will be painting mine to match that one). Can’t wait to finally be done Piper’s bedroom redesign!
Yay! I love hearing this so much. I’ll be looking for a photo on IG on how it looks a the end!