Chickens by the numbers

It’s been more than a year and half since Sarah in Illinois welcomed her first chickens. She is here today with an update on her flock.

7 – Number of chickens still happy and healthy.

2 – Number of breeds of chickens still on my wish list (Leghorns and Ameraucana).

4 – Number of chickens my stepdaughter put charm bracelets on.

5 – Average number of eggs I still collect every day.

3 – Number of weeks a 50 pound bag of feed lasts.

1 – Number of wheelbarrows of corn I still have left to crack

0 – Number of chickens that will leave the coop if there is any snow on the ground.

100 percent – How happy I am that I decided to take on this adventure.

Between their bracelets, disdain for snow and hand-cracked corn, I think you have some pampered hens, Sarah. (Although I think aversion to snow is fairly common in chickens.) It’s great that you’ve been able to keep them healthy and happy and keep receiving eggs from them. Your enjoyment of them is obvious.

5 ways to decorate with family photos

Today we’re enjoying Family Day here in Ontario, so I thought I’d mark the occasion by sharing some of the ways we feature our family when we’re decorating the house. (Happy President’s Day to my American readers.)

I recently updated the display of family photos on the sofa table in our living room. My brother and sister-in-law gifted us with a new family picture from their fall wedding, so that went in the centre. Then there was a pair of photos of my Mom and me when we were both six years old. I finally printed my favourite photo of our newest nephew. And best of all I dug out this blond cutie in a mini RCMP uniform (Matt was the ring bearer at his uncle’s wedding, who is a Mountie).

How to decorate with family photos

You all know that when it comes to decorating, I’m all about keeping it personal and affordable. One of the best ways to do both of those things is with family photos.

Here are five ways to decorate with family photos, including some favourites from our house.

1. Go for quantity – Don’t limit yourself to just a few pictures. You have lots of memories–and possibly lots of family members. Pick out your favourite photos and print them all. Get a variety of frames–thrift stores, the dollar store or Ikea are good sources–and display all of your photos at once. Display the photos in a gallery wall, on picture ledges, or set them on a table, as I did on the sideboard behind our couch.

Family photo display

2. Go back in time – Family photo displays don’t have to be limited to the current generation. Dig through your family archives to find pictures of your ancestors. In our guestroom, I have two photos that I love: one of my great grandfather driving a team of horses pulling a sleigh full of huge logs, the other of Matt’s great grandfather with his own team of horses in front of a wagon loaded with hay. They fit in perfectly with our farm setting, celebrate our ancestors, and–with scanning at home, printing at Walmart and framing from Ikea–they’re super affordable as well. So dig out those old albums and see what treasures await you.

Vintage family photos displayed in the guest room

3. Go big – The family photo shoot has come a long way since the stiff studio portraits. (Did anyone else get dressed up and pose with their parents and siblings?) How you display your photos should be upgraded as well. Technology means that pretty much any image can be printed on canvas or you can run off a large scale print at your local copy centre. A large picture makes a great statement and celebrates your family at the same time.

4. Go beyond the frame – Just like photo shoots have come a long way, so have albums. Customized, personalized photobooks are the upgraded version of albums . These can be great art on your coffee table, or propped on a bookshelf–like our wedding album–can be a photo display on their own. There’s something really special about flipping through a book of photos, rather than clicking through a hard drive.

Custom photobook

5. Go offline – Instagram has taken off as the place where we “publish” our digital photos. Part of the beauty of those Instagram shots is that they capture everything from special occasions to everyday life (sometimes… let’s not get into perfectly curated feeds that are more about branding than they are about life). Don’t limit those great memories to just online. There are lots of services for printing Instagrams–even Walmart is in the game. Print them as mini-prints and use washi tape to affix them to the wall. Or string a piece of twine between some pushpins and use mini paperclips or clothespins to attach your pics. Or check out one of the many online services that offer cute magnets and stickers (and lots of other options).

Family photos are one of my favourite go-tos when I’m looking for special art. How about you? Do you display family photos around your house? What’s your favourite way to decorate? How do you balance between digital and print?

Growing fruit in a cold climate

Apples frozen on an ice covered tree in the winter

While our gardens may be buried in snow–and after freezing rain yesterday, ice–many of us are still planning, dreaming and thinking about what we’ll be growing this coming season (see Sarah in Illinois’ plans that she shared last week).

I recently wrote an article for The Canadian Organic Grower, sharing some tips for growing fruit in cold climates.

As hard as the snow, cold, ice and wind can be on humans, the climate can be equally harsh for plants.

Despite the challenges, many Canadian gardeners want to grow and enjoy fresh tender fruit right in their own backyards. Fortunately, a growing number of nurseries, breeders and researchers are cultivating trees, vines and bushes that can thrive in Canada.

Frost covered raspberry cane

In our own garden, I am excited by the prospect of hopefully picking our first crop of grapes this year and seeing our blueberries and blackberries return. These fruits are all cold hardy varieties that I specifically selected to ensure they survive (and hopefully thrive) at our farm.

You can read the whole article here.

For my fellow cold climate dwellers, do you have any recommendations of particular varieties that you grow at your garden? Or tips to help plants survive cold weather? What climate and growing challenges do you face in your garden?

Seed starting plan from Sarah in Illinois

Sarah in Illinois is being very methodical in her garden planning this year. She’s here today sharing how she’s mapping out what she’s going to grow and when she’s going to start planting.

We’d love to hear your tips for starting your garden. What works for you? How do you  plan what you do when?

We still have below freezing temperatures down here, but it hasn’t stopped me from daydreaming about being out in the garden. One way to fill that void is to make a to-do list or game plan for the spring. Here are a few things that I have planned for the upcoming weeks.

1. Make a list of what I want to grow in the garden this year and divide them up into 3 categories: start indoors from seed, sow seed directly into the garden and purchase as established plant.

2. Place order for any seeds purchased through mail order.

3. For seeds started indoors, plan what day I should start them.

To do that I searched online for last frost date for my zip code. One source said April 17 and another said April 14. I decided to just use April 15 since it is an easy date to remember (tax day for us Americans). So for example I want to start my Black Krim tomato seeds indoors. The packet says to start 6-8 weeks before planting outdoors. So I should start it indoors sometime in between Feb. 18 and March 4.

4. Set up indoor seed starting area.

I have mentioned before that I have a lot of trouble starting seeds indoors and transferring them to the garden. So this year I am going to take it more seriously than just throwing some seeds in the dirt. I purchased a seedling heat mat and I am going to set up a grow light. I plan to post about it as I go along both to help others and to get advice.

Do you place seed orders through mail order? Or do you have another source for your seeds and plants? Do you start your seeds indoors? Do you have any advice for me on transferring them outside?

You seem very organized, Sarah. Well done. It’s been great to see your garden evolve through the years. I love how you learn and adjust each season and keep working to improve your approach. I’ll be interested to hear how your plan works out this year.

Two gender neutral nursery designs

There are just a few finishing touches left before the baby’s room is finished and ready to share with all of you. Before the official reveal, I thought I’d share two alternate nursery plans that I considered–one colourful and one neutral.

There were a couple of things that both plans had in common.

We knew we weren’t finding out if we were having a boy or a girl, so no matter what the room looked like it needed to be gender neutral. (Sorry, no gender reveal post coming until baby arrives.)

The second thing was that I wanted an Ikea Strandmon wing chair and Animal Print Shop photos in the room. The Strandmon is a super comfortable chair. I knew the high back, wings, arms and generous seat would be good support for a tired nursing Mama. The Animal Print Shop images are super fun and would be a friendly addition to a baby’s space.

I’ve really enjoyed pulling the baby’s room together and thinking about what feel I wanted and what made the most sense for us and our baby.

Here are the two ideas that I started with.

Neutral

The neutral design came when I considered using the guest room as the nursery. This room has faux wood paneling on the walls, which I thought would look great in white. The dropcloth curtains that I made for the guest room were a soft non-colour that would contrast just enough with the walls. The rest would be wood, leather and natural tones like brown, white and grey. Something like this room from Cheetah is the New Black or this one from design dump.

I’ve learned that light colours are very calming for me, so I felt like this would be a zen space, even if I’m not always feeling zen.

I also felt like this scheme would work really well with our farm–all of the natural materials and neutral colours would be a fit for the country setting.

Here’s a moodboard with some of the items I was considering.

Colourful

The colourful scheme was the one that had been in my head the longest. I had originally planned on using my office for a baby’s room. The walls were turquoise, and I liked the idea of that inspiring, high energy colour for a baby. This pillow from Anthropologie (which is no longer available) inspired the rest of the decor.

Lindi Fringe Euro Sham from Anthropologie

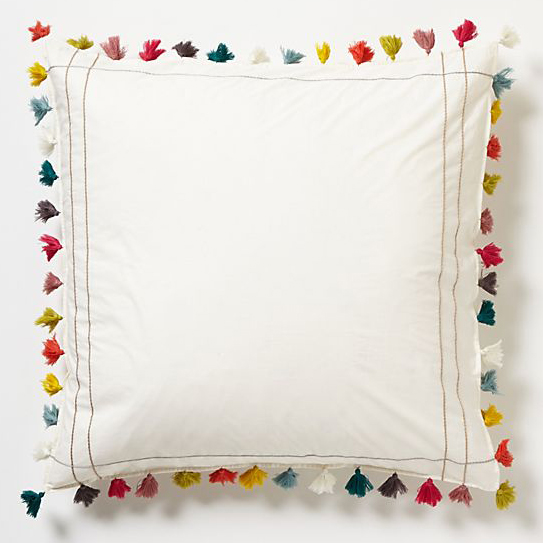
I felt like white would be important to temper the turquoise. At the same time, I liked the colourful tassels, and they inspired me to think about other colours that would mix with the turquoise.

Here’s the moodboard for the colourful nursery.

The final space ended up being a bit of a combination of the two plans, and I’m excited to show it to you.

What design appeals to you most?