Floorplan #2 – Private master suite overlooking the pond

This month, I’m sharing some of the floorplans I’ve worked through in the four years since we’ve owned the farm.

Last week you saw my first idea, which I eventually realized was more house than we needed.

The second floorplan is the one that’s been in my head the longest. Really, this floorplan preceded my decision not to add a second storey. I realized I could get pretty much everything I wanted almost within the bounds of the current house.

And just a reminder, here’s the plan for the current house.

Current floorplan

Plan #2 was about the master suite, the attached garage and the front porch. So there are some similarities and some differences between this plan and the one you saw last week.

Floorplan #2

Highlights:

  • Like in the last plan, the current mudroom comes off and the front entrance shifts so that my office becomes the front foyer. Yes, this means the view as you come in is of the bathroom, but I think I can deal with that.
  • The back door in the kitchen is closed in, the window is expanded and the wall pushes out about 5 feet, just to give us a wee bit more space.
  • The mudroom and garage follow the same layout as Plan #1 on the south side of the house.
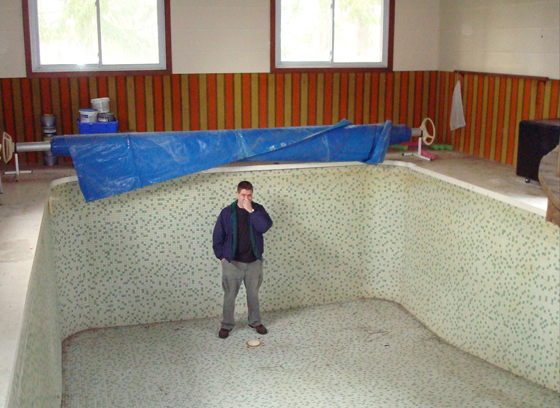
  • The bulk of the indoor pool area becomes the master suite.
  • A modest addition behind the garage houses our walk-in closet and ensuite bathroom.
  • The mudroom and master bedroom are still about 6 steps down from the kitchen.
  • We would still upgrade all of the doors and trim and add a metal roof.

Pros:

  • Most of the renovation is confined to one area of the house. The two bedrooms on the north side of the house are pretty much undisturbed.
  • The utility room is under the fireplace, making running HVAC, electrical and plumbing to the master bedroom easier–and likely less expensive.
  • The kitchen expansion gives us a bigger window for more natural light, a better view of the pond (I’m all about my view), a bit more counter space and room for bigger appliances.
  • We get our garage and the little nook I love at the person entrance (as opposed to the car entrance). It may sound silly, but the space behind the garage would also be good for the firewood pile, and I even love how the back door of the garage would be a convenient path to the (future) chicken coop.
  • I get my mudroom and the long uninterrupted wall up against the master bedroom gives lots of space for benches, cubbies and hooks.
  • The master bedroom would be a beautiful room with lots of windows and my favourite view down to the pond. The steps down to the doorway could be cute.

Cons:

  • The steps down to the master bedroom could be weird.
  • The master bedroom is separated from the other bedrooms, which I don’t love.
  • Like in plan #1, the garage would take over the lawn south of the house, one of the best lawn areas we have.

Losing the south lawn was a sticking point for me. With the way our property is configured, the garage would stretch nearly to the bank of the barn. Our largest southern exposure would be blocked by garage–not the best way to increase the sunlight that comes into our house. And our best lawn would be taken over.

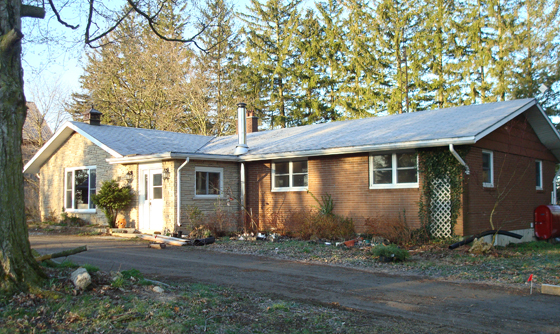
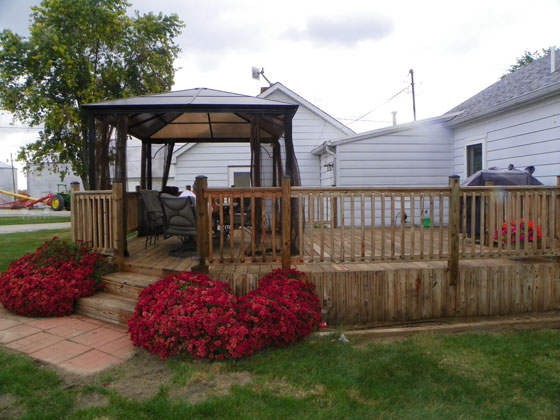
Here’s a photo of the south side of the house taken last summer. The garage would extend from the same area as the sunroom. It would stretch to the tree that overhangs the left side of the picture. The driveway would be where the clump of bushes is in the middle ground. The weedy patio to the left of the sunroom would be the closet and bathroom.

South lawn

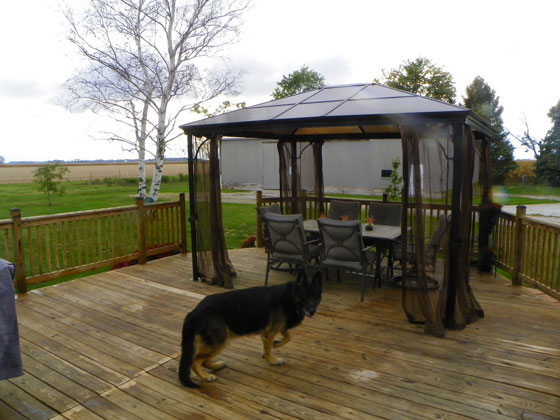
Here’s the view of what would be the back of the garage to give you an idea of how much space there is between the house and the barn. (The barn’s at the right edge of the photo. The driveshed is in the middle. The tree would have to come out as it’s inside the future garage.)

South lawn

I really didn’t like the idea of losing the lawn. So I continued to work on floorplans to come up with an option that preserved the lawn.

All along, Matt has advocated for the pool room becoming the garage. I could stomach the south lawn being a driveway better than I could handle it being garage. So that became the basis for floorplan #3, which is coming up next.

In the meantime, what do you think about plan #2? What would be your priority if the house was yours? Are you all about the garage, the master suite, the porch or something else entirely?

Looking back at Home Goals 2015

There are all kinds of retrospectives and reflections happening in the blogosphere right now. My look back will not be nearly as emotional or deep as some of the ones going around.

I feel like 2015 was a pretty good year for this blog and our projects at the farm. Last January, I said I wanted to be flexible and not knock myself out renovating all the time. I definitely feel like I managed that. I also had a few more personal posts mixed in over the course of the year, and I’ve made some progress on that front too.

For now, it’s time for the annual report on how we did on Home Goals 2015.

1. Master bedroom Check!

Thanks to the One Room Challenge, we have a beautiful master bedroom. I love having another room completely done.

Dropcloth curtains in a navy master bedroom

2. Basement art No check.

The smallest task on the list–and the one I was most enthused about at the start of last year–was the one where I made no progress. This one will carry over to 2016.

3. Furniture Partial check.

Looking back over the year, I was a bit surprised at how much furniture we bought, made or made-over. We did better than I thought. However, there’s always more on the list, hence the partial check.

  • Found 2 bookcases that I’m going to make into a china cabinet for the dining room. They still need their makeover, but they’re working okay for now.
  • Found a set of 8 dining room chairs that match our table nearly perfectly. They’ll need to be reupholstered and refinished someday, but once again, they’ll do for now.
  • Found a ladder/step-stool/chair that reminded me of my grandmother–and a lot of you of yours.
  • Made a headboard and painted a dresser as part of the master bedroom makeover.

Dining chairs and table

4. Vegetable garden Big fat check.

My one and only outdoor goal for the year was a huge success. It started when I decided to build the garden in Matt’s “goat ring.” To get rid of the weeds, our nephew and I lit it on fire, I spread out the world’s biggest tarp, and then Matt rototilled the whole thing. We planted and watered and then we harvested… and harvested… and harvested. Along the way, I built a gate, and Matt and I put up chainlink all the way around. And then at the end of the season, I spread manure over the whole thing.

Tomatoes ripening in the garden

There’s still more work to be done. It’s a garden, which I’ve learned is synonymous with work. However, it’s established. It produced food. We’re still eating our harvest. And I’m so enthused about this year’s plans.

But that’s the stuff of home goals 2016. Those will be coming up next week.

How did you do on your goals in 2015? What was your big accomplishment?

Floorplan #1 – Go big

This month, I’m going to be sharing some of the floorplans I’ve worked through in the four years since we’ve owned the farm.

To start, I have to share my original vision–the one that popped into my head right after we saw the farm.

My original vision was based largely on achieving the exterior that I wanted. Namely, something that looked like a farmhouse. That meant dormers. That meant wrap-around porch. That meant two stories.

Someday farmhouse

Source: FamilyHomePlans.com (I made a few edits)

Can’t you see how that country farmhouse could come from our little bungalow?

Our house

But the outside is obviously just part of the puzzle. The inside was where we would be spending at least half of our time, so it had to work too.

Let’s start with remembering the original (current) floorplan of the house.

Current floorplan

Because I was planning on adding a second storey–which would house all of the bedrooms–my plan was to blow out the main floor. There would be a huge kitchen, a dedicated library/office, a new main entrance, a large sewing/laundry/craft room, a big mudroom, my coveted attached garage, and of course the porch. (And just a reminder, this plan isn’t at all to scale).

Floorplan #1

Highlights:

  • Current unheated, flat-roofed mudroom at the front of the house comes off, improving the balance of the front facade.
  • Main entry moves to the middle of the house, and my office becomes a generous front foyer.
  • The garage is added on the south side of the house.
  • The pool room is about 6 steps lower than the rest of the house, hence the steps down into the mudroom.
  • We also upgrade the doors and trim throughout and put on a steel roof.

Pros:

  • Wrap-around porch. Do I need to say more? Alright, I will. From the porch you enter into a large front foyer. The entry we currently have at the top of the basement stairs is waaaaay too tight. And all kinds of farmy bits–pine needles, leaves, dirt–get tracked down the (carpeted) stairs.
  • Powder room right inside the side door, so if you’re outside and you have to pee, you can slip inside without tramping through the house with your boots on.
  • Main floor laundry room with plenty of space for a big sewing area. Windows on three sides and a great view to the pond would make this a beautiful bright room.
  • Big kitchen with lots of storage and prep space, plus a walk-in butler’s pantry. Oh, I really want a pantry. Plus I added a much bigger window along the back wall above the sink to improve our dim main floor.
  • Mudroom. Essential at a farm. Bonus, this one would be heated!
  • I love the little entry nook at the front of the garage. A bit of shelter as you’re coming in or going out.
  • The stairs to the second floor would be really cute with a turn and a landing at the top and a pretty railing all the way along.
  • On the second floor lots of bedrooms and a huge master suite with walk-in closet and private bathroom. (Although I never did get the layout of the second floor completely worked out in my mind).

Cons:

  • Adding a second storey would eliminate the vaulted ceiling in the living and dining rooms. At first, I didn’t see this as a big deal, but I’ve come to really like the tall angled ceilings.
  • Big kitchen means more cleaning.
  • We’d probably not use the library a whole lot… but it would sure look nice.
  • I’ve come to like my basement laundry room. We tend to watch TV downstairs, and it’s convenient to throw a load in while we’re relaxing in the evenings. Running up and down the stairs doesn’t sound like as much fun.
  • The garage would take over the lawn south of the house, which is one of the best lawn areas we have.
  • This reno would be expen$$$ive.
  • This is way more house than we need.

After living at the farm, I quickly realized that we did not need a second storey. If we ever win the lotto, this plan may come back on the table. I would not only need money to build the addition, but also to pay someone to clean it regularly.

But the reality is, our house at its current size is pretty close to enough space for us. I went back to the philosophies of the Not So Big House books and thought about what we actually need… and also what I want, ’cause I’m not pretending that’s not an important factor here. No one really needs a private master suite. But I sure want one.

So Floorplan #1 was a no-go. Onto plan B. Next week, I’ll share Floorplan #2.

For now, I’d love to hear your thoughts on Floorplan #1. What’s your favourite part? What could you live without? Are you a fan of vaulted ceilings? If you won the lotto, what would your dream house be?

Four years of floorplans

Hello. Happy New Year.

The start of the year is always special for us because it marks the anniversary of when we found the farm.

Four years ago today, we submitted our offer on the farm. Our search had lasted a year and a half. We’d seen lots of farms and a few that we actually liked.

With any farm that we thought might have potential, my usual routine was to return home and work up a floorplan of how I would reconfigure the house to make it my dream home.

The house was usually the least important factor when we were looking at a farm. Location, quality of property, whether there was a barn. Those mattered to us. The house, I figured I could work on that.

My floorplans were not to scale and usually more dream than reality, but they were a regular part of my process.

Except on this farm.

I never drew a floorplan. It wasn’t that the house was perfect. Lots of things were missing: master suite, garage, front porch. And there was a big thing that I wished was missing: it had an indoor pool, and there was no way I was keeping that.

Matt in the indoor pool

I definitely had the floorplan in my head.

However, I never sat down at my computer and mocked it up.

But now I have. In fact, I’ve mocked up three different plans.

I’m a big believer that living in a space helps me make the best decisions about how to renovate it. My vision for this house has changed over the past four years.

Before we get to the vision, let’s start with the reality. Here’s the main floor as it exists today (in fact, pretty much as it existed when we saw it four years ago).

Current floorplan

And here’s the front of the house as it looked last June.

Front of the house

Over the next few weeks, I’m going to share some different floorplans with you, and you can see how my vision has progressed over the years.

There are still lots of questions to work out, and I hope that you’ll share your opinions as we go.

Finishing up the deck

I’m pleased to welcome Sarah in Illinois back to the blog. Today’s post is full of the things I love: a big doggie, country views and a great DIY transformation. Take it away, Sarah.

One of Steve and my favorite places to relax is on our deck. The summer of 2013 we drew up plans and built a large deck off the back of our house. There are some things about the deck that we wish we had done differently, but overall we are very happy with it. (Hello, Treu!)

Deck with Treu

We had done a little research on how to protect it. One thing that we had read was to wait a year to put any sealant on it.

We chose to wait even longer. The boards we used were very green. That is, they had a lot of moisture in them. This was obvious when we installed it, but it also showed up over time as the boards warped more than we had liked as they dried.

This year I decided that it was time to get at least one coat of sealant on it. The thing was, after two years, the deck was very dirty and stained. I believe this was a combination of normal use, stains from the grill, mold from moisture and just pollution in the air.

Deck railing before

So I chose to clean it first. It took just a little bit of prep work. I have two unbelievable huge and beautiful mums, so I made sure to drape plastic drop cloths over them to keep the cleaner off of them. The deck wash I purchased was a bleach base and it worked like a charm for cleaning the deck.

Cleaning the deck

I bought what I believed to be enough based on the square footage that it said it covered. This was way off. I ended up needing double the amount. I think that part of the reason was that maybe the square footage listed did not take in account the railings. But I am sure it also had to do with how heavy I sprayed it on the wood.

I used a hand held pump sprayer to apply the cleaner, then I used a broom to lightly scrub trouble spots, and finally I sprayed it off with a garden hose. This was easily a one person job and if I had had enough cleaner would have taken just one afternoon.

Then I let the deck dry for a couple weeks. I wanted to make sure not to trap any moisture in with the sealant.

Deck before and after cleaning

When it was time to seal the deck, it took more prep work and took two people. Steve and I used the same hand pump sprayer to apply the sealant. We found the method that worked for us was for Steve to spray the railings, then the floor and for me to follow up with a brush and smooth any drips and puddles. We wanted to make sure we put a heavy coat on, but we wanted it to be fairly even.

Applying sealer to the deck

The sealant was much messier than the cleaner. It got everywhere–on us, on the siding, and even oversprayed to my nearby herb garden. We are planning to reside the house in the next year when our addition is finished, so I was not too upset by the overspray on the siding, but I sure wish I had harvested my basil and oregano before we got started.

We feel the deck needs at least one more coat of sealant for us to be happy with it. But since harvest has started, it looks like it is going to be next spring before that gets done.

In the meantime, I am so happy to have the first layer of protection on it. The cooler weather is just begging us to come out of the house and relax!

Deck with mums

What a great outdoor space, Sarah. Those mums are amazing. I’m always so impressed by how wood can be restored with a good cleaning and a bit of work. Good job. I hope you get to relax outside and enjoy it.

Anyone else have tips to share about restoring wood? Have you ever stained a deck? Who else has had a project that’s taken a bit longer to complete than planned?

My favourite tool: Heather in Heels

Today, I’m thrilled to welcome Heather of Heather in Heels to the blog for the final installment in the “My Favourite Tool” series. If you’re just joining us, this series came about when I was thinking about what I should put on my tool wishlist. To help me make up my mind, I reached out to a few bloggers and asked them to share their favourite tools.

I was thrilled when Heather said yes to my email. Heather is a woman after my own heart–she’s all about all kinds of DIY, good food, lots of love for her pups, oh, and she’s Canadian too. She blogs at Heather in Heels. I especially love that her favourite tool is one that I love as well. Take it away Heather.

When it comes to my DIY habit, nothing helps me feed the monster like having the right tools for the job. I realized many moons ago the one critical tool for all the painting and refinishing projects I wanted to tackle was a sander. So I stole one from my mom and step dad’s basement. It took my step dad 20 years to realize it was missing. (I won’t the list the other items I’ve taken yet – they still don’t know they’re missing… he he).

It was old and made your whole body vibrate when using it, but it did the job. It did the job until it didn’t any more. I almost had a funeral for it. That sander and I did many wonderful things together.

We’ve transformed doors and we’ve taken a super-drab-free-on-the-side-of-the-road find and made it beyond fabulous. But I had to say goodbye to it.

Interior door painted blue

White credenza

And then I promptly got over my loss when my new sander arrived. And together we’re already busy making new memories! I’ve just finished refinishing a bar cart and while the paint dries I’m already busy with my biggest furniture project yet – a huge dining room buffet server. (Spoiler alert. Since writing this post, Heather’s finished the buffet. No surprise, it’s fabulous).

Ryobi sander

Why a power sander? Well, for one thing it saves your manicure. (This is an essential in my books). It also greatly increases the speed of any project requiring sanding. I’m not sure I would even contemplate some of the projects I’ve done (or am in the process of doing) if I had to sand by hand. I don’t even pumice my own feet for goodness sake!

The power sander, followed closely by my trusty staple gun, is definitely my favourite tool in my tool box. It saves me time, increases my productivity, saves my manicures, and it’s the best way to remove old and ugly to make room for new and fabulous.

Removing old and ugly to make way for new and fabulous. That definitely sums up Heather’s approach to home reno and decor–and life in general. Thanks for being part of the “My Favourite Tool” series, Heather. Be sure to check out Heather in Heels to see more of Heather’s quest to add more fabulous to daily life.

The Porch Jacking: Chad’s Crooked House

I’m happy to welcome Chad of Chad’s Crooked House to the blog today for the third installment in the “My Favourite Tool” series. If you’re just joining us, this series came about when I was thinking about what I should put on my tool wishlist. To help me make up my mind, I reached out to a few bloggers and asked them to share their favourite tools.

I’ve been following Chad’s adventures in restoring and updating his Philadelphia row house for awhile now. It seems like he might be finally heading into the homestretch on his reno (or at least, Phase 1). I’m glad he could take some time away from painting, lighting, closets, kitchen cabinets (!) and other work to share a project from the past here today.

Julia asked me to write about my favorite tool. Usually picking favorites is the hardest thing in the world for me, but this time I have one with a perfect combination of weirdness and a good back story. We’re going back about 8 years to when I was in college for this project.

My parents have a screen porch on the side of their house. It was always a favorite spot even though it was kind of in sorry shape. The columns were wrapped in finished wood that was visibly rotting away and the screen frames were patched up with corner braces that were rusted all over. It was time to give it a face lift. My dad called me to get my approval to use aluminum capping. He’s not dumb, so he had to have known he would never get it. Especially for a spot where people would be sitting 2 feet away and really see the fakeness. I told him that capping over rotting would be flirting with disaster (see how practical I am?), and that we should re-wrap the columns with new wood. And then I took my final.

Fast forward a week or two, and I was home to investigate. The screens were down, and I started hammering a crowbar into the most rotten column, at one of the corners. The first thing I saw was bad – like 6 million bugs scurrying out and tunnels all through the wood. But the second was even worse – nothing inside! I was ripping apart a column that was holding up the porch roof!

I called my dad in a panic. He said no big deal, we’ll just put in new pressure treated 6×6 posts. I was half crying. “What about the temporary bracing? It’ll be so much work!”

He replied in a high pitched mocking tone pretending he thought I was crazy. Not that he actually thought this, but he likes to mess with us.

“What? We’ll just use the railroad jack!”

“The what?”

“Come on, Chad. You know we have a 30 ton jack in the garage.”

I never did know that, but it sure was good news. Here it is. I always thought this giant bar was for heavy digging in the garden, but actually it’s the lever for the jack. The whole thing is cast iron and weighs 67 pounds.

30 ton railroad jack

So he found a 4×6 in his hoard, cut it down to fit on the jack, and set it up next to the first column. Up went the porch roof and out came the column. We cut the new 6×6 to match the height of the old column, stuck it in place, let the porch down and moved on to the next one. All 7 new columns were in place in a day! Here it is 7 years later.

Screened porch

Good job, Chad (and Chad’s Dad). That porch looks like a beautiful spot to spend time in the nice weather. Thanks so much for sharing your favourite tool, Chad. If you’re interested in reading more about Chad’s adventures in Philadelphia, check him out at Chad’s Crooked House.

My favourite tool: white dog vintage

It’s time for another installment in the “My Favourite Tool” series. If you’re just joining us, this series came about when I was thinking about what I should put on my tool wishlist. To help me make up my mind, I reached out to a few bloggers and asked them to share their favourite tools.

Today’s post comes from Brittany at white dog vintage. Brittany and I connected during last fall’s One Room Challenge. She made over her kitchen–so ambitious and such a great result. I really like her style–her makeovers are colourful, full of DIY and  super personal. And I was thrilled when she said she’d be happy to share her favourite tool with all of you. Over to you, Brittany.

Hello Home on 129 Acres readers, and thank you so much to Julia for inviting me to be part of this series! Just a few words about myself: I’m Brittany from white dog vintage. I live in Springfield, Missouri (plumb in the middle of the US) with my husband, Justin, and three chihuahuas. Justin and I love old homes and especially love working on them. In January of this year, we moved into a 1921 bungalow, and we’ve been spending our nights and weekends fixin’ her up ever since.

When it come to Number 1 All-Time Favorite tool, in truth, I have to go with a caulk gun. There’s very little in the world of home improvement as simple and satisfying as applying a bead of caulk. However, that’s all I really have to say about a caulk gun, and one sentence seems like a pretty lazy contribution to this series. So I decided to go with some a little louder. A little flashier. Something that requires electricity. A POWER TOOL. And in that vein, I chose the thing that powers some of my favorite tools to work with–an air compressor.

I love my air compressor (white dog vintage)

An air compressor is a support tool. On its own, it generates compressed air in a little tank, which sounds nice but isn’t too helpful until you connect it with the tool that’s doing the actual work. There are a variety of air-powered guns of different sizes and purposes. Over the course of different jobs, we’ve ended up with four.

Air compressor attachments (white dog vintage)

Staple gun – I use this for upholstering furniture, primarily with 3/8″ heavy duty staples, though occasionally I use up to 9/16″ staples if several layers of fabric need to be attached.

Pin, Brad, and Finish Nailers – These are all used for attaching trim and molding, but each is generally designed to handle a different length of weight of nail. Pin nailers shoot extremely skinny nails and are used for small, light-weight trim, brad nailers have a similar purpose but shoot slightly heavier nails (depending on the gun, they may also be able to shoot staples), and finish nailers shoot larger nails necessary for applying heavier duty trim like baseboards or crown molding.

I first started using an air compressor when I decided to try my hand at upholstery. A staple gun is a necessary upholstery tool, and when it comes to staple guns, pneumatic is the only way to go. I remember once, before I had done much upholstery, helping a friend recover her dining chairs with about a $7 manual staple gun I bought at some generic hardware store. I believe our strategy was for her to pull and hold the fabric while I put a knee on the seat bottom to hold it in place and, at the same time, used all the strength I could muster in two hands to squeeze the trigger of the staple gun. If only I’d have known how easy the whole thing is with a little air behind it. Here’s a little action shot from an ottoman I made recently.

Upholstering with white dog vintage

We’ve also been replacing all the trim in our new house, so I think you can imagine how handy the air compressor has been for attaching baseboards and molding. Justin recently started constructing capital style moldings for the tops of our doors and windows, and he reports he used all three nail guns to put them together. I got into the action a bit when it came to attaching the baseboards to the wall.

Installing trim with white dog vintage

The truth of the matter is that using a pneumatic gun or nailer is just plain fun. There’s a little bit of a thrill in the pop of the nail hitting the wood, and it’s a really easy and safe tool to use (the tip of basically any nailer must be compressed before the gun is capable of firing–eg, it’s impossible to shoot a nail into the air). I can be kind of absent minded, so I tend to stay away from saws and other potentially dangerous instruments, but thanks to my trusty air compressor, I don’t have to miss out on all the fun. 🙂

Thanks again for reading!

Thanks for sharing, Brittany. An air compressor (and its various attachments) moved up my wishlist as I was reading. Be sure to check out white dog vintage to see more of Brittany’s and Justin’s projects.

My favourite tool: Sarah in Illinois

To kick off the “My Favourite Tool” series, I’m pleased to welcome Sarah in Illinois back to the blog.

When I tried to think of my favorite tool, my first thought was my cordless drill/driver. But that is not necessarily my favorite, it is really just the one I use the most. So I thought of our wood shop and what tool I really enjoy, and I decided it would be the compound miter saw.

Compound mitre saw

A few years ago Steve and I decided we could use a compound miter to install some baseboard. So we went to one of those discount tool stores that buys by the pallet and is known for low prices but also low quality. We bought a very cheap saw, and it got us by for a while.

But Steve started dabbling in cabinet making, and we discovered that you truly get what you pay for. Steve was so frustrated with trying to make precise cuts for the corners on the cabinet and announced that we were buying a nice saw. In fact, I am surprised I didn’t find our old saw out in the driveway when I got home! Ha!

We did a little research and decided on this one:

Hitachi compound mitre saw

We are very happy with our decision. The quality of our cuts improved greatly. We have used it to cut baseboard, crown molding, door and window trim and laminate flooring. Steve has been so happy with it when making cabinets. I feel so comfortable using it for almost every cut I need.

Compound mitre saw

Homemade cabinets

We are still debating the design we want to use for the doors so that is why they are all open right now. I am so proud of his craftsmanship.

We have a long list of tools that we want to add to our line up (a Kreg Jig is the first one that comes to mind), but the compound miter saw has to be our best purchase so far.

I think I am supposed to say that I am in no way sponsored for this post, which I am not. But if Hitachi wants to contact us, Steve will volunteer to sing its praises! He loves that brand of tools! 😉

Thanks, Sarah. I’m feeling very justified in including a quality compound mitre saw on my wish list! If you want to keep up with what Sarah and Steve–and their saw–are up to, follow Sarah on Instagram. And if you missed Sarah’s last post, here’s her introduction.

Stay tuned later this month. More “My Favourite Tools” entries are coming up.

Tool wishlist

Last year, I finally bought myself an official carpenter’s square (also known as a speed square). Now to most people, I’m sure this doesn’t seem like a big deal. Once I had it in my toolbox, though, I felt so much more official. Marking right angles and 45 degree angles is a piece of cake. I can even do more official carpenter-y things if I am so inclined.

Swanson speed square

I’ve had an informal tool wishlist bumping around in my head for awhile. It was time to finally write it down (especially since September is my birthday month–ahem, family). I thought the blog would be a good place to share it–and get input from all of you.

In fact, I’ve also reached out to a few other bloggers and asked them to share their favourite tools. So over the next few weeks, you’re going to get to hear from some other people, see some inspiring projects and maybe even find some tools to add to your own wishlist.

Some of the items on my list are like the carpenter’s square–relatively minor and decently attainable. Other things are a little more–shall we say–involved (as in I’ll need to save up for a little while).

I’d really love to hear your suggestions and feedback. What are your favourite tools? Any can’t live without gadgets? What should I add to my list?

Simple tools

  • Heavy duty extension cord
  • Heavy duty, long handle clippers (for trimming trees and shrubs)
  • Dremil (is this useful?)
  • Small, basic electric weedeater (our big gas powered version is overkill for me, and it rarely works well)

Power tools

  • Router
  • Upgraded compound mitre saw (I have one thanks to my Dad, but it only does so many angles)
  • Soldering iron (since my hand-me-down iron from my Grandpa popped–literally–and died)
  • Paint sprayer
  • Sawzall (since our hand-me-down saw from my Dad recently also died)

Heavy duty tools (and tractor attachments)

  • Air compressor
  • Bush hog
  • Auger

Matt and I are fortunate that most times that we need a tool, we’re usually able to borrow it from one of our Dads (wood splitter, air compressor, nailer, hammer drill, tile saw, sturdy extension ladder).

Over the years, our Dads have also passed along a lot of their tools to us (skillsaw, table saw, socket set, drywall tools). Of course, we’ve also bought some of our own equipment too (sander, Kreg jig, quality drill, favourite hammer, chainsaw, tractor–and all of its attachment$). It would just be a bit handier to have some of our own tools on hand.

What’s on your tool wishlist? Any tools that you’ve bought, but wish you hadn’t? For those tractor owners out there, I’m really interested to hear what’s your favourite attachment?

And be sure to tune in for more inspiration from other bloggers coming up.