How to make a fabric-covered bulletin board

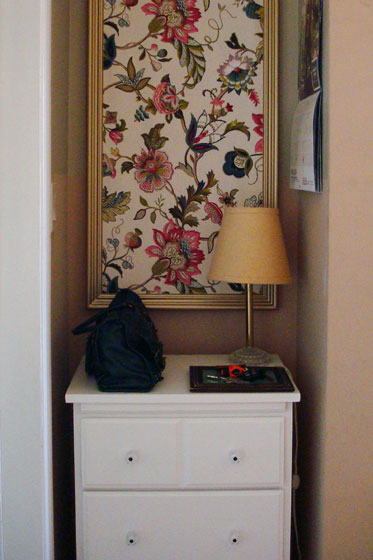
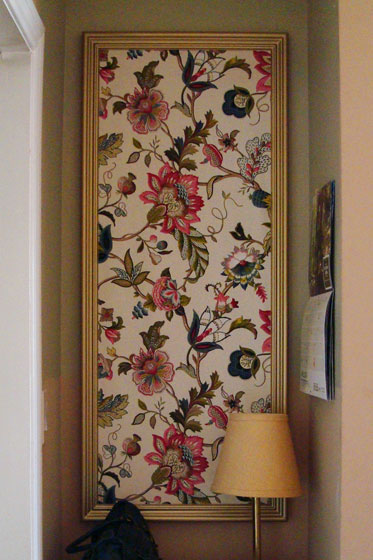
While the dresser may be the workhorse of my new office nook, the beauty queen is definitely the fabric-covered bulletin board that hangs above it.

Pretty home command centre

Since I was working with such specific measurements in this tiny space, I decided that my best option was to make my own bulletin board.

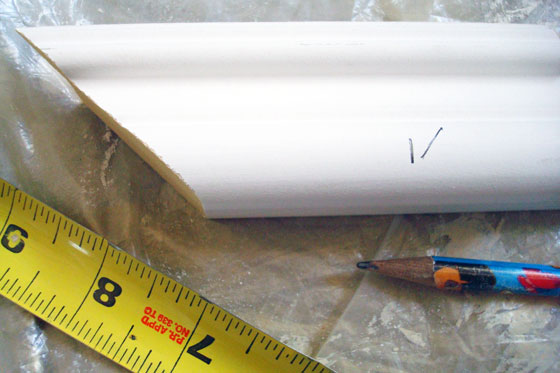
Home Depot sells prefab cork panels that are 48 inches by 24 inches, very close to the dimensions I needed, so I started with that. Then I found a piece of decorative molding to build my frame. I considered some of the very fancy crown moldings, but a lot of those are very wide. Given that I only had about 20 inches total to work with, I didn’t want to take up too much space just with the frame. I wanted as much pin-up space as possible.

For the back of the frame, I bought some 5/8 inch by 2 inch strips. After ripping them in half, they were about half an inch narrower than my molding. By attaching them to the back of the molding with some glue and little nails, I was able to make a recessed area for the cork to sit.

How to make a bulletin board

I used my mitre saw to cut each side of the frame to the right length at a perfect forty-five degree angle. Tip: When you’re cutting pieces on an angle, mark your desired length as you usually would at 90 degrees. Add a tick mark to the left or right to remind yourself which way you’ll need to angle your cut your.

Cutting decorative molding on an angle

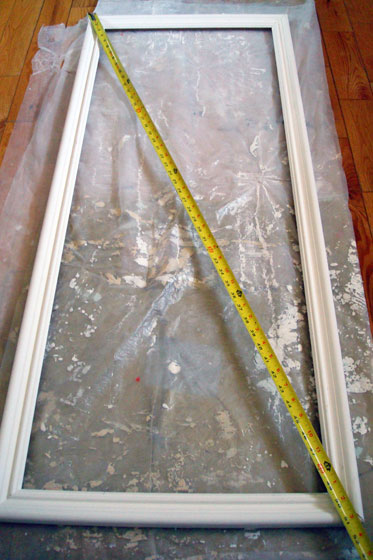
Each corner got a few dabs of glue, and then I nailed them together with my Dad’s nail gun. Tip: To check that your frame is square, measure diagonally from corner to corner. The dimensions should be the same between each diagonal pair. Twist your frame a bit to the left or right until your measurements match exactly.

Checking for square

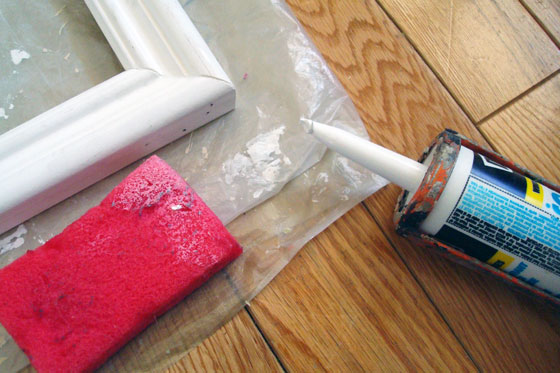
Once my frame was perfectly square, I caulked all of the nail holes and corner joints. Tip: Keep a damp sponge on hand as you’re caulking. Wetting your finger before smoothing out the caulk gives a nice even finish. Plus the sponge gives you a spot to wipe any excess caulk off your hands before you get it all over yourself. Not that I’m speaking from past experience, or anything. Oh, and make sure you choose paintable caulk.

Wet your finger before smoothing out caulking

I let everything dry and then it was time for paint. I knew I wanted a bit of glitz, so I decided to go with gold. A few light coats of spray paint did the job.

With the frame done, I moved on to the cork. The prefab piece was close, but just a bit too wide. It cut easily with a knife, and then a quick rub with fine sandpaper smoothed any ragged edges. Tip: Cut the the cork about 1/8 inch to 1/4 inch smaller than the frame. A little bit too loose is better than too tight. Plus any gap will be hidden by the recessed channel behind the frame.

Cutting cork with a knife

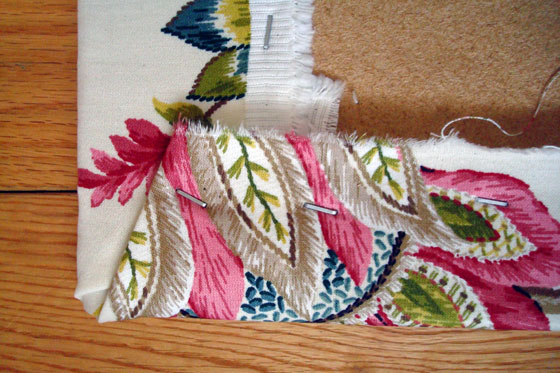
Covering the cork in fabric was no more complicated than wrapping a present. I cut the fabric about 6 to 7 inches bigger than the cork panel, so that I had plenty to wrap around the back. I pulled it taunt and stapled it in place. The corners got a bit of extra pleating and a few extra staples.

Staple the corners on the backside of the cork

I slipped the cork into the frame. To hold it in place, I tacked staples part way into the frame at four different points around the back side of the frame. I can easily pull these out if I ever want to change the fabric.

Use staples to hold the bulletin board in the frame

I flipped it over and was dazzled. Pretty! Pink! Flowers! Colour! Gold!

Fabric covered bulletin board

I was so dazzled that I didn’t spend too much time coming up with a technical solution to hang it on the wall. I just wanted it up. My solution was two finishing nails hammered into the drywall on the same level. Their small heads fit easily between the edge of the frame and the cork, and the board is light enough that that’s all the support it needs.

Anchoring securely might be more important if you have small children or other things you don’t want bulletin boards falling on, although we’ve had no issue with the board shifting or falling since I installed it.

Fabric covered bulletin boards are a pretty easy and popular DIY. Have you ever made one? How do you bring beauty to functional pieces like bulletin boards? Are you a floral sparkle fan?

How to make a tall narrow dresser

When I reorganized the tiny nook in my office, I knew that I had to add some kind of storage. A dresser was the ideal solution. Drawers would allow me to tuck things away, and the surface would give me a spot to write notes and set my purse and keys.

So I had some pretty specific requirements: drawers, about counter top height, oh, and it had to fit in the nook, which was 16 inches deep by 24 inches wide. Of course, it also had to be cheap.

Well, I had no luck finding a piece of furniture that met those standards. However, I soon realized that nightstands often have drawers and are usually small enough to fit this little space. While nightstands are much shorter than countertop height, they usually come in pairs. Couldn’t I just stack them one on top of another?

It turns out, yep, I can.

Here’s what I started with. Two little nightstands I found at the Salvation Army thrift store for $12 each.

Two vintage night stands

First step of any furniture makeover: remove the drawers and the hardware. It turned out that one of the drawers contained a plastic hardhat, so I got distracted by that for a little while. Consider this your PSA to always wear safety equipment (hardhat, safety glasses and ear protection) while DIYing.

Geeky safety equipment

Anyways, back to work. I started taking apart the dressers. I popped the backs off of each of them. Then I took the top off one and the bottom off another. The nightstands came apart really easily. The backs were just stapled in place. The top was attached to corner blocks that were screwed in place. The decorative trim at the bottom was tacked with some little nails. I needed a few different tools, and I was thankful for my stubby screwdrivers that fit in some of the tighter nooks and crannies, but dismantling these pieces of furniture was not a taxing task.

Dismantled night stands

Once they were apart, it was time for something that was a little more taxing: cutting. The nightstand that was going on the bottom had to be trimmed along the top, and the one that was becoming the top half had to be cut down along the bottom. Clear? I measured the spacing between the drawers to figure out exactly where to make my cut and marked the line with painters tape.

Marking a cut line with painters tape

Four quick slices with my circular saw, and the dressers were the right height. I set them on top of each other and was super excited. It was looking like I envisioned.

Making a dresser out of two night stands

Now I just had to figure out how to actually attach the two halves. When I’d taken apart the dressers, I’d removed some side braces. I was able to reuse those pieces on the inside of the dresser. I ran them half on the bottom and half on the top and screwed right through the side into the brace. My dresser was now all one piece and it was solid, but it was ugly. No amount of wood filler was going to fix that joint.

Attaching two night stands to make a dresser

The solution was overlaying a very thin panel along the whole side. I had 1/8 inch MDF, which I cut down to the exact dimensions of the side of the dresser. I tacked it in place with small finishing nails, and it covered up the gap completely.

Tacking a board in place with small brass finishing nail

A bit of wood filler camouflaged the joint on the front of the dresser. While I had the wood filler out, I filled the holes on the drawers where the original pulls had been and a few other spots on the dresser where the veneer was chipped.

Filling holes with wood filler

After a light sanding all over, I primed the dresser and drawers, and then they all got a coat of creamy white paint–Cloud White in Benjamin Moore’s Advance formula. This was my first time using Advance, and I really like it. The finish is nice and smooth (I used a foam roller), it has none of the stickiness that you sometimes get with latex after it dries, and it has been very durable. In the past, I’ve used heavy duty oil paints on furniture or cabinets. The clean up is a pain and the stench is noxious. None of that is an issue with Advance, and in my opinion it’s held up just as well as an oil finish.

Painting a dresser with a foam roller

The finishing touch for the dresser was new crystal (plastic) nobs. This is one area where I got a bit neurotic. The nobs that I chose had a metal post that went through the middle. The posts were brushed nickel. I’m not a fan. Plus, I already had oil-rubbed bronze and gold/brass elsewhere in the office. I’m not good with mixing metals, so I spray painted all of the metal pins with oil-rubbed bronze spray paint. It was easy, but probably not entirely necessary.

Crystal drawer nobs

As you saw last week, the dresser fits perfectly in the nook. It ended up being the exact right height, and I’m loving having all of the drawers to keep me organized.

Tall and narrow DIY dresser

What second hand furniture have you made over? Have you ever made two pieces into one? How do you handle hard-to-furnish spots with specific dimensions?

Office nook details

Thanks everyone for your very kind comments on the nook in my office. Today I’m going to go into more detail on the particulars of this little corner.

Starting at the top, there is the bulletin board. I’ve always been a bulletin board kind of girl. Whiteboards just don’t work as well for me. For this tiny nook, I needed something tall and narrow, which meant custom. I’ll share the details of how I made this bulletin board next week. It’s a simple wood frame that I spray painted gold, and the cork is covered in one of my favourite fabrics, Brissac Jewel by P Kaufmann Fabric. I’ve had this piece of fabric for close to five years. I’m really glad that I decided to use it here. Its beautiful colours make me happy.

Fabric covered bulletin board

Our calendar hangs beside the bulletin board. It’s just a freebie wall calendar hanging from a simple cup hook. It’s basic, but it’s so helpful to get things out of my head and organized on paper where both Matt and I can see them. (Ignore the unpatched screw hole and the two-tone paint).

Wall calendar

Continuing our way down, we come to the top of the dresser. This was always meant to be a place to set my purse and keys when I come home from work. My dear friend made me a handy little tray that’s perfect for my keys. She took a picture frame, removed the back, added cork feet to the underside and put a pretty piece of sparkly paper inside. I love the blend of the slightly rustic wood frame with the sparkle of the paper.

Home command centre

I’ve had the little lamp for pretty much as long as I can remember. My grandpa rewired it when I was little, and it’s been with me ever since. Growing up in my childhood bedroom it had a pretty pink shade. This newest shade is a second hand burlap one that I picked up at Value Village. The burlap is a nice contrast with the glass base. I’ve gotten into the habit of turning on the lamp at night before we head down to the basement to watch TV. It casts such a nice glow in the hallway when I come back upstairs to go to bed. Definitely my favourite look for this nook.

Nook at night

The anchor of the nook is obviously the dresser. Since I was working with such specific dimensions in this spot, finding the right piece of furniture was a bit of a challenge. As usual, DIY is the best solution. I’ll be sharing the tutorial of how I made the dresser next week.

Tall and narrow DIY dresser

This piece is small but mighty. Four drawers give me lots of space to tuck away everything: pens, paper, tape, chargers, receipts waiting to be filed, coupons, bits of paper, even extra tools and flashlights. In the top drawer, a cutlery organizer that I picked up at Value Village fits perfectly. In the other three drawers, I used IHeart Organizing’s Cereal Box Drawer Organizers to keep everything neat and tidy. (Yes, even my hammer now lives in a box wrapped in flowered pink paper).

Drawer organizers

The elements of this nook have come together slowly over the past few months. With each new addition, I feel more organized. I’ve spent the time to think about what I need and what makes sense to include in this corner. Even better, it’s not just functional. It’s pretty too.

What makes you feel organized? Are you a fan of bulletin boards or white boards? How do you blend pretty and functional?


Office nook before and after

My office is a room of many issues, but there’s one corner that gets the award for most-improved.

Office nook

It’s a wee tiny alcove just inside the door. The space measures 16 inches deep by 24 inches wide. When we moved in, and for the first year and a half of living here, this space was fitted with some ridiculous built in shelving. The fact that it started at about five feet in the air and went up to the ceiling made it basically unusable.

Nook before

Not that you’d want to use it anyway. It was filthy.

Can I just ask why things in this house have to be both weird and gross? I mean, shelving that’s over your head out of reach isn’t enough? It also has to be disgusting?

Dirty white melamine shelving

One night, I snapped and decided that the shelving had to come down. Of course, it turned out it wasn’t that simple. The shelving had been installed all in one piece before the door casing was put on, and even once I unscrewed it from the wall, it wasn’t going anywhere. Smushing the shelving into a parallelogram allowed me to slide it past the casing and get it out of the nook. Then a set of Allen keys allowed me to take it apart into its composite melamine pieces. There were a few dings in the wall, but otherwise it was a victory. The nook was empty.

Painting the office will happen all at once sometime in the future. So for now I wasn’t worried about patching the drywall or dealing with the two tone paint that removing the shelf had uncovered. I did want to make the space more functional, though, and I didn’t want to wait.

The office is right off the kitchen, so I decided that this was a perfect spot to build a bit of a command centre. A place for the grocery list, a calendar, important numbers, even a spot to put my purse and keys when I come home at the end of the day.

I needed some storage, some display and lots of organization. Here’s what I came up with.

Pretty home command centre

It may be a weird tiny space, but I’ve packed a lot of function into this little corner. In the next post, I’ll share the details of exactly what went into my organized nook.

Has anyone else transformed a very small area? Do you have a command centre at your house? What are your tips for dealing with a small space?

Office organization progress report

Last week when I shared the progress I’ve made on my March projects, I was all about timelines and staying on schedule. This week, things ran off schedule a little bit… or the schedule got rescheduled.

I had two tasks left for the second half of the month: get my home office under control and pretty up my work office.

I made zero progress on my work office.

My excuse is that I made outstanding progress on my home office.

Remember this really embarrassing picture that I so reluctantly shared with you at the start of the month?

Messy office

Well, I don’t mind sharing it with you this time because now the view from the doorway looks like this. (And the poor quality of this photo in no way reflects the warm feelings I now have for this room. I was losing light. What can I say?)

VIew from my office doorway

Here’s the order of how I originally planned to tackle the to-dos in my office:

  • Sort and file the mountain of paperwork that’s built up on top of the filing cabinet – By March 16
  • Add organizers to the new dresser and start filling the drawers – By March 22
  • Make a bulletin board – By March 22
  • Pull together all of the forms that we need for our taxes this year – By March 30
  • Figure out how to make better use (temporarily) of the closet – By March 30
  • Unpack a few boxes, repack some of the boxes, repile the boxes – By March 30

Last weekend, I found myself more enthused about the last two items on this list than I was with some of the items higher up, so I decided to be flexible and follow my motivation.

When we moved into the house, my office became the dumping ground for things that we didn’t have a place for.  Since I didn’t have any furniture aside from a desk that was left by the past owners and a small bookshelf that Matt had from his childhood bedroom, everything was left in its packing boxes and piled against the wall. Even though it’s been two years since we moved in, everything was still piled.

After my organizing binge, I still have a pile of boxes, but it’s about half a dozen boxes less than it was before. That’s major progress for me.

Moving boxes stacked in my office

There were two things that allowed me to unpack some of my boxes:

1. Matt gave me a small cabinet that used to be in his office. Filling that cabinet with craft supplies, sewing patterns and some sewing tools meant that I could use Matt’s childhood bookshelf as an actual bookshelf. Even though this shelf is small, it holds all of my knitting and sewing books, magazines and patterns. I even have room for a bunch of decorating magazines. It’s so nice to have these accessible again.

Small bookshelf

2. In the category of making better use of the closet, I finally filled some storage caddies that had been left behind by the past owners. This seems like a really obvious solution, and you’re probably asking why I didn’t do this long ago. The simple answer is that the caddies were disgusting. Really, really dirty.

Dirty plastic storage caddy

It was easier to just tuck them away–empty–in the closet, rather than scrubbing them out. However, there comes a point when clutter is more annoying than cleaning, so I threw the caddies in the bathtub and scoured them inside and out. The result was 11 drawers for everything from yarn to fabric to wrapping supplies. Some of the drawers are still empty. Yay for room to grow!

Plastic storage caddies

I realize my office still isn’t pretty or even super functional. I have big plans to repaint, add more furniture, and style it into a really, really useful and really, really attractive space. However, there’s no timeline on when this is going to happen. In the meantime, I’m working with what I have and trying to make the space as organized and useable as I can.

The trick now is to avoid it turning back into a dumping ground.

Anyone have any tips to share on organizing a temporary space (one that you know you’re going to redo down the road)? What’s your “room of shame” (please tell me you have one)? How do you store craft supplies? Any recommendations for furniture I should look for when I redo my office?

Barn board hook board

It could have been the paint fumes, the sleep deprivation or four hours spent in the two by nine foot front hall closet, but once the brainwave hit, I couldn’t get it out of my head. “What this closet really needs is some barn board!”

Barnboard hook board

So I made my way out of the closet, out of the paint fumes and out to the barn… where surprisingly it’s more difficult than you might expect to find barn board. Don’t get me wrong. We have plenty of barn board. It’s just that most of it is attached to the barn.

I found one piece that was just lying there waiting for a woman on a mission. He was close to the right length, beautifully weathered, lovely tones of grey, knots and a ragged edge. I told him he was a contender.

And then, on the far side of the barn, stacked amongst some giant planks and a very long log, I saw it. Perhaps not quite as weathered as his predecessor, slightly more brown than grey, the exact right length, not too many knots but a couple of rusty nails, one ragged edge that even had a few worm holes… a truly authentic barn board… right down to the… is that? … yep… it is… manure that was caked on the one side.

And that is how I found myself standing in the driveway on Sunday afternoon in November, brush in hand, cleanser close by, hose spewing frigid water, scrubbing a piece of wood as I frantically rehearsed responses in my mind for what I would say when Matt came out to ask me “What the heck are you doing?”

I didn’t think my new-found philosophy of interior design that every room–closets included–needs an element of something rustic would be met with the same enthusiasm I was currently experiencing.

I picked up my dripping–but now clean–board and strolled as nonchalantly as possible back to the house. I studiously avoided looking at the dining room window where I knew my husband was sitting at the table working.

I carefully propped my board by the front door to dry while I returned to my closet, preparing my hooks for hanging, sweeping the floor, killing time until the husband disappeared somewhere, and I quickly scuttled outside and retrieved my still damp board.

I held it up to the wall and it was perfect. It was going to make the closet.

I screwed it in place, attached the hooks and felt completely validated in my new decorating philosophy. My enthusiasm was so great that despite its dampness I started grabbing coats and hanging them up.

Wrought iron hooks on a barn board backer

It was at about this time that Matt reappeared and peaked around the corner to check out the closet.

I shifted my feet. I avoided direct eye contact. I did not say anything.

And he said, “It looks good, woman. But what about that board up there?”

I followed the direction of his gaze.

He was looking not at my beautiful barn board, but instead at a plywood support I had screwed together to hold up the eight foot shelf that couldn’t quite span the whole nine foot length of the closet. He was concerned that it wasn’t painted the same as the rest of the wood in the closet.

He didn’t even seem to notice the barn board. There was no admiration. There was no disgust. I feel a bit gypped by the lack of reaction.

Sigh.

I am consoled by the fact that every time I open the closet doors, I know exactly what the best part of the closet is.

Closet makeover after

When thinking about options for increasing the functionality of the front hall closet, I strongly considered converting it to an open nook with built-in bench like Shelley and Cason did over at House of Smiths.

House of Smiths entryway closet makerover

However, the closet is right off the kitchen, and I knew our coats and shoes and outerwear would not always look tidy. Being able to close the doors on any mess appealed to me. Plus, I had a lot of other things I wanted a home for, so a variety of storage options was important, and I felt I could do that better behind closed doors.

Because the closet is behind closed doors, it’s not as pretty as some of the spaces you see on other blogs. And definitely not as pretty as the Smith’s nook. However, it is exactly what we need.

At the top, we have one long shelf that stretches the full nine feet of the closet. It holds mitts, hats, scarves at one end, and light bulbs, plastic bags and pest control (mouse traps, ant traps, bug spray) at the other. The shallower shelves at the one end (made with white melamine, of course) hold flashlights and rags, Baxter items, cleaning supplies and reusable and plastic bags. Cleaning buckets tuck underneath the bottom shelf. The broom and the mop hang from nails tacked into the wall, and a hook board hangs along the back.

Closet with different storage options

At the other end, a short hanging rod goes perpendicular across the closet to hold dress coats. A bin of extra cold weather gear sits on the floor along with my backpack.

Closet with different storage options

Behind the rod, there’s a hanging caddy that holds (some of) my dress shoes. It’s a vintage caddy that my Mom had before she was married. How cool is that?

Hanging shoe caddy

A row of cup hooks screwed into the shelf/rod support hold extra keys and flyswatters.

Key storage in a closet

If I was truly a blogger, I’d have a lot more pretty baskets to hold all of the hats and mitts and scarves that currently are just folded on the shelf. However, the shelf is taller than I am–too tall for me to see into a basket–so stacks of clothing work best.

Hats and mitts on a closet shelf

Obviously, this was not an intense makeover. Patching the walls, a fresh coat of white paint, a few 1x3s and some white melamine to make some shelves, reusing the closet rod, a handful of cup hooks, a hook board made out of barn board all add up to an organized, functional space that accommodates everything that was on my original list. Even better, we still have room to grow with more space on the shelves and some hooks to spare.

How do you organize your front hall closet? What items do you find hardest to store? Any tips for making sure there’s a place for everything and everything’s in its place?

Closet makeover before

Along with the mudroom, updating the front hall closet was also on last year’s fall to-do list. Now that the mudroom makeover has been revealed, it’s time to share the closet as well.

But not today.

As with any makeover, there is of course a before.

Here’s the closet just inside the front door. The mudroom is just outside the front door.

Front hall closet

This closet is the scene of the first injury we had at the house, which occurred on day one when the shelving that was in here collapsed on my sister. All of the shelves had just been propped against each other and weren’t actually attached to anything. When my sister and brother were cleaning them out and wiping them off, everything came crashing down. Fortunately, the injury was only a pinched finger with minimal blood and was easily solved with a bandage. (I’m still sorry, Jenn).

In the photo collage below, the white strip in the centre (and it is supposed to be white on both halves) is where the shelving was originally. In its absence, we had piled cleaning supplies and everything else on the closet floor–not the most efficient storage method.

Messy front hall closet

The closet’s other issues are illustrated below: chipped baseboard cut out for the extremely flimsy shelving (plus a paint job that went around the shelving and a strip cut out of the ceramic tile for some long ago storage arrangement), wire shelving jammed into the drywall rather than installed properly, a hole in the ceiling likely belonging to a critter (plus a beautiful paint job) and an old non-functioning electrical box of some kind (perhaps an alarm?).

Closet problems

As I mentioned previously, the mudroom is not heated, so this closet was the spot for all of our outerwear–coats, hats, scarves, mitts. I needed both a rod and hooks because I want to be able to hang my nice coats on hangers, and Matt will never ever use a hanger.

While boots and running shoes live in the cooler climate of the mudroom, some of my dress shoes were going to move into the more temperate zone of the front hall closet.

Along with the coats, jackets and shoes traditionally stored in a closet, I had a few special additions that I wanted to accommodate:

  • Broom, mop, dustpan, mop bucket, rags, cleansers
  • Plastic and reusable bags
  • Light bulbs, flashlights and timers
  • Pest control, including fly swatters and mouse traps
  • Keys
  • Dog paraphernalia

Obviously, the space needed some help to accommodate any of those items. Through a variety of storage solutions, we managed to fit everything in.

Tune in next to find out how.

What do you keep in your closet? Are there any items that you find difficult to store? Who else has suffered a shelving injury?

How to build simple closet shelves

When I first asked everyone’s advice on what we should do in our mudroom makeover, the most frequent suggestion was to pull off the closet doors and make built-in storage with a bench, cubbies, shelves and hooks. While I love that look, I knew I needed places to put things more than I needed to be able to sit down. The biggest improvement I could make to how the mudroom functioned was to build more storage in the closet.

As you saw in the reveal, I split the closet in half, putting floor to ceiling shelves at one end and a single shelf over top of a hanging rod at the other.

Closet storage

To build these simple shelves, I went with my go-to shelving material: white melamine. It may not be the fanciest, but this stuff is easy. It comes in 12-inch or 16-inch widths (I chose the 16) and 8 foot lengths. One long edge is pre-finished. There is no painting (although you can), no sanding, no special tools.

To support the shelves, I screwed 1x2s (which I did paint) into the wall studs with 3 inch screws. The shelves simply sit on top.

White melamine shelving on 1x2s

For the top shelf, I used 1×3 as I wanted a wider board to attach the rod.

How to attach a closet rod

The divider in the middle is a piece of melamine run vertically. There was a cut-out in the ceramic tile floor for some long-ago shelving system, so I filled that with a 2×4 and cut a channel to hold the melamine in place.

Supporting a closet divider

The melamine comes in 8 foot lengths, so for my 9 1/2 foot closet, I had to splice a few of the shelves. My technique was to tack a piece of melamine underneath. It’s perhaps not the most attractive solution, but tucked inside the mudroom closet I wasn’t super concerned about appearances. It’s sturdy and will easily hold a golf ball collection or anything else you want to put on it.

Joining melamine shelves together

The sturdiness of melamine is its best feature in my opinion. As long as it’s properly supported, it can hold a decent amount of weight and won’t sag. To prevent any droopiness, it’s important to put the 1×2 supports along all three sides of the shelf, not just at either end.

I know there are much more attractive storage systems out there, but, for a behind closed doors solution, this simple set up of melamine and 1x2s works for us. Even better, it’s completely custom and accommodates exactly what we need.

How do you handle closet organization? Has anyone else built a custom storage system? Any other melamine fans out there?

Mudroom reveal

This post has been a long time coming, and I’m not meaning just this week. Fixing up the mudroom was on the fall to do list last year. I started the project but never quite finished it. However, I am now declaring the mudroom done, and today is the day for the reveal–the first room reveal on the blog.

Aren’t you just so excited?

I know I am!

Just a reminder, here’s where we started.

Mudroom before

And here’s where we are today.

Simple bright country mudroom

Better?

As I said at the beginning of the week, this was a cheap and cheerful update, so paint was the most important weapon in my arsenal. I took down the hooks on the walls and the old shelving in the closet, stripped the pinwheel wallpaper, patched the drywall and spread nice fresh paint over all of the walls–simple white primer in the closet, Wythe Blue on the walls and Cloud White on the trim.

Painting the trim was the biggest delay on this project. I just could not motivate myself to do it, so the mudroom sat with blue walls and flesh trim all through the winter and spring. However, when we were trying to convince Baxter to spend time in the outdoor dog run, the mudroom proved to be a good place to hang out. I could listen for barking or whining to assess how he was doing, and I could see when he escaped… all while painting trim.

Along with addressing form, I also had to address function, which mostly meant the closet. I decided to split the closet in half, allocating one part for hanging some of our outdoor gear and storing taller items and at the other end adding floor to ceiling shelves for everything from shoes to cat treats to dog toys to work gloves to sport equipment.

Closet storage

I reused the two sets of hooks from the old mudroom, installing the wire one in the cupboard and removing the three wrought iron hooks from their backing board and hanging them vertically to handle leashes, the towel we use to wipe Baxter’s feet before he comes in the house and our ever-so-handy shoe horn.

This ridiculous woman made me climb up on this bench when everyone knows dogs are not allowed on the furniture. I'll just stare at my leash and think happy thoughts until she's finished with that clicky thing. #pleasesendhelp

This ridiculous woman made me climb up on this bench when everyone knows dogs are not allowed on the furniture. I’ll just stare at my leash and think happy thoughts until she’s finished with that clicky thing. #pleasesendhelp

The bench that Baxter’s not so fond of is just about my favourite part of the makeover. It’s just a simple rustic bench, but it gives us a place to sit down and put on or our take off our shoes. Plus our most frequently worn shoes and boots tuck conveniently onto trays underneath. My Pinterest challenge umbrella stand hangs out in one corner and in the opposite a galvanized metal pail (Knodd from Ikea) holds bird seed. A large cocoa fibre mat covers the floor to trap dirt, leaves and puddles.

Mudroom

This is about the limit of the accessorizing I’ve done in the mudroom, unless you count rotating display of feathers, pebbles, egg shells and nests that I bring home and arrange on the window sill.

Birds nest made of grass

The mudroom is not heated, so we’re strategic about what we store out here. For example, on a freezing winter morning I can handle putting on chilly boots, but I absolutely need a warm coat. So coats live in the closet inside the house, and boots live on the tray under the bench.

The best thing about this makeover is that everything now has a place. Need a pair of safety glasses? I know exactly where they are. Hungry cats at the door? Oh look, here are some treats for them. Found a golf ball? Add it to Matt’s stash.

The second best thing about the makeover is that the first impression of our house is no longer cloaked in the smell of manure. For some reason, that’s what the mudroom smelled like when we first took possession. Yuck.

And yes, I do consider being organized more important than being not smelly.

In the category of “even better if,” I didn’t do anything to the popcorn ceiling, the boob light, or the unpainted front doors, so there could still be some work if I feel like it. For now, I don’t, and I’m not really too concerned with these leftovers.

The one thing that I really should fix is the doorbell. I managed to kill it during the makeover when I was trimming a section of drywall to prepare it for patching. (Don’t tell Matt. All he knows is the bell stopped working. He doesn’t know it’s because I accidentally cut through the wires). A wireless version would be a good fix… and prevent any future mishaps.

Overall, I’m thrilled with the mudroom, even though it doesn’t yet match my ultimate vision. This is a good interim solution. It looks nice. It works well. It was a simple update, and we didn’t have to spend a lot of money. Let’s look at it one more time, shall we?

Simple bright country mudroom

I may be a year later than planned in finishing this project, but we are finally all set for whatever mud or snow Mother Nature throws at us this winter. And I’m even more thrilled to cross one room off my to-do list.

So, what do you think of the makeover? I know a lot of people were voting for opening up the closet and putting in some built-ins. Are you on board with my interim solution? How are you getting ready for winter at your house? Who hates painting trim? Has anyone else spent a full year making over one room?