All about farm property taxes

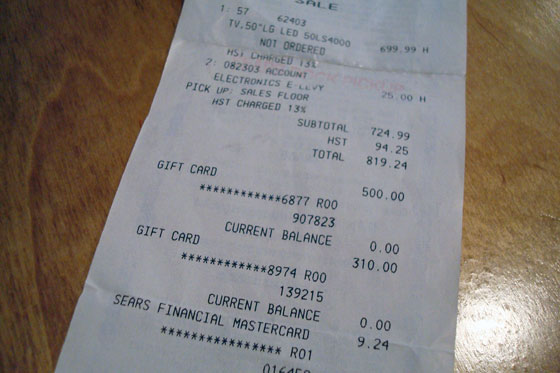
The first installment for our 2013 property taxes are due this week. I realize this topic will not apply to some readers, but I decided to write this post anyways, as our experience may be helpful to some of you.

Property taxes on a rural property can be a bit complicated. However, it’s worth it to seek out rebate programs, as the savings can be significant.

For us, the farm is divided into three parcels: residential, agricultural and conservation.

Large hayfields

The residential section is exactly the same as most people’s property taxes. It includes the house and one acre of land immediately around it. These are taxed at the regular residential rate.

The agricultural section of the property is the fields. These are classified under the farm property class and are taxed at 25% of the residential rate.

The conservation section of the property is the woods and marshland. For us, this adds up to 42 acres that is classified as “provincially significant wetland.” Under the Conservation Land Tax Incentive Program, these acres are tax exempt as incentive to maintain them as natural areas.

None of these tax rebate programs are automatic, as we discovered last year. Previous owners had let the rebates lapse, and between 2010 and 2011, the property taxes nearly doubled. The whole 129 acres was being taxed at the residential rate–ouch.

The residential classification was still in place when we took possession of the farm last March. We went to work right away to apply for the rebates that were available to us. What we learned is there is no single point of contact for farm property taxes.

Farm property tax paperwork

The Ontario Ministry of Agriculture, Food and Rural Affairs (OMAFRA) handles applications for the Farm Property Class Tax Rate. Operations such as tree farms, animal farms, greenhouse operations or crop farms like ours count under this class of property. The farm must simply generate at least $7,000 of income a year. The most important part of the application is the Farm Business Registration Number. Since we do not farm the property ourselves, the farmer who rents our fields has to complete this portion of our application and supply his registration number.

The Ministry of Natural Resources (MNR) manages the Conservation Land Tax Incentive Program. Most of our property is restricted under the local conservation authority. However, this does not automatically qualify us for the CLTIP. The Ministry has to deem a property—or a section of it—as provincially significant. Fortunately, our property was already in the MNR’s system, so we just had to apply for the rebate.

Marsh in the winter

We also went through our local municipality for a few other adjustments specific to the house itself: their records showed a mobile home on the property and a working indoor pool, both of which did not exist and which impacted the value of our house. After the “demolition” of the mobile home and the pool, our taxes decreased by a whopping $257.56–hey, I’ll take whatever I can get.

The Municipal Property Assessment Corporation (MPAC) is the overarching organization in Ontario that manages everyone’s property taxes. Approvals from the city, OMAFRA and MNR flowed through to MPAC, which pulled all of the information together, determined our tax rate and notified the city of what we should be billed.

The flow of applications, approvals and adjustments is very, very slow. Our applications went to the various organizations last spring. I followed up monthly by phone to make sure all of our applications were wending their way through the system and no information was missing.

Some of the approvals came through in the summer. However, none of the adjustments were applied at the city level until the fall. We paid three installments at the full residential rate—ouch again. However, by the end of the year when the reclassifications finally came through, we had a huge surplus on our account—so much so that we didn’t have to pay our last installment and the city still sent us a cheque at the end of the year.

Now heading into the 2013 tax year, all of the rebates are in place, and the quarterly tax bills are very manageable. In fact, the amount of property tax that we’re going to pay this year is equivalent to what we paid when we were living in our little house in the city.

How to use preglued veneer edging

I’ve posted an addition to this tutorial: How to apply pre-glued veneer on curved edges

Our new TV cabinet that you saw at the beginning of this week is a thing of beauty in my (admittedly biased) opinion. However, this wasn’t always the case.

The cabinet is made of 3/4″ pine plywood. It’s paint grade, so the surfaces have a nice smooth finish. However, the raw edges are just that… raw. They’re rough and the layers of plywood are clearly visible. To finish off the edges, I used preglued veneer edging. This edging is very easy to use. Here’s what you do.

1. Gather your tools and materials.

Materials to apply veneer edging

This is a simple job that doesn’t require a lot of technical tools. Clockwise from bottom left, I have my roll of preglued veneer edging, my iron, a scrap 2×4 block, a file and scissors.

2. Set your iron to the cotton setting.

3. Prepare the edging. Use your scissors to cut a section of veneer that’s roughly half an inch longer than the edge you’re going to cover. You don’t have to be precise in your measurements. I just hold the veneer against the cabinet edge to figure out how long the section should be. You can work directly from the coil, but it’s easy for the veneer to get twisted, so I recommend cutting it into lengths first.

4. Starting at one end, carefully position the veneer against the edge that you want to cover.

Iron on veneer edging

The veneer will be slightly wider than the edge that you’re covering. Keep it flush on one end and one side and let it overhang the other.

5. With your edging in position, apply the iron to melt the glue.

Ironing veneer edging

I’ve found a “pressing” technique rather than an “ironing” technique works best. Just hold your iron in one spot for about 20 seconds. When you remove the iron, make sure the veneer is still aligned along the edge of the plywood. The glue will stay soft for only a couple of seconds so adjustments have to be made quickly.

6. Using your block of scrap wood, firmly press the edging onto the plywood.

Pressing veneer edging onto plywood

Press hard and slide the block back and forth over the section that you ironed making sure that the veneer fully adheres to the plywood.

Repeat steps 5 and 6 until the raw edge is completely covered with veneer.

7. Once the veneer has cooled, trim the excess that’s overhanging the one side with a file.

Trimming veneer with a file

File towards the face of your plywood keeping the file at roughly a 45 degree angle. There are tools that will trim the veneer as well, but the file has always worked well for me.

Your edge should now be nice and smooth and ready for stain or paint.

Finishing a plywood edge with oreglued veneer edging

Some tips for using preglued veneer edging:

1. When cutting the veneer with your scissors, try to get a nice 90 degree cut. This will give you a good starting point for your next piece.

2. Check for joints in the veneer before you glue it to your plywood.

Finger joint in veneer edging

The veneer is connected by finger joints that aren’t the most attractive and wreck the illusion of a solid piece of wood.

3. Don’t skimp on pressing the veneer with your block. You don’t want your veneer to peel off once your cabinet is done. Pay special attention to the edges of the tape to make sure it’s firmly stuck.

4. If you use the file to trim the veneer, clean the file every so often. The sawdust will fill the grooves and make it more difficult to get a clean edge. I just tap the file to knock out the dust.

5. Watch out for splinters.

Splinter beside my fingernail

Ouch!

Although iron-on preglued veneer edging can be slightly dangerous for klutzes like me, it is very easy to use. Ironing is one of my least favourite tasks, but for some reason ironing wood is less tedious than ironing clothes for me. Just a little bit of effort results in a very nice polished finished for furniture, shelves or other creations.

Have you used veneer edging before? Who else is not a fan of ironing? Is anyone else susceptible to splinters? I seem to get a few a week. I’m sure a few are in my future this weekend. How about you? Any special projects on tap for the weekend?

I’ve posted an addition to this tutorial: How to apply pre-glued veneer on curved edges

Our $9 TV

It sounds like an episode of extreme couponing. Customer goes into a store. Cash register rings up a charge of $819.24. Customer opens wallet and pays $9.24.

Well, we’re not extreme couponers, but this is exactly what happened when Matt went to buy the new TV for our basement.

50 inch LG LED TV with DIY network on the screen

You know I had to put DIY Network on the screen for this photo

So how did he do it? It’s all about the points.

For years, Matt has had a Sears Mastercard. He liked it because he could redeem his points for gas or restaurant gift cards. But then everything changed. A couple of years ago, Sears decided that points could only be spent at Sears. We don’t shop at Sears a lot (at all), so Matt’s been building up his point balance for a long time.

Knowing that we wanted a second TV for the basement, Matt decided that this purchase was the chance to finally use his points. He did his research to figure out what TV he wanted. He cashed in his points for a couple of gift cards. He watched for sales. And then it happened.

A 50-inch LED LG TV came on sale. The total price after tax (including Ontario’s special e-tax) came to $819.24. He plunked down $810 in gift cards and charged the rest to his Sears Mastercard.

Bill for a new TV

Depending on how you look at it, the TV cost either $9 or $81,000–the amount of money Matt had to spend to earn all of his points. Buying on points is definitely not a quick process.

I should also say that while Matt and I use our credit cards often, we pay off the balance in full every month, so there are no interest charges and we didn’t go into debt to buy our $9 TV.

Have you ever bought anything on points? Are there any extreme couponers out there? What’s your favourite rewards program for collecting points? What’s the best deal you’ve ever found?

Video game heaven

Anybody know what this is a picture of?

Final fight nintendo game

I wouldn’t know what this is except that I live with someone who exposes me to such things. This picture is from Final Fight, a video game for the Super Nintendo.

Rather than asking what the picture is of, however, I should be asking you what it signifies. What this picture means is that Matt finally, for the first time in his life, has all of his video game systems set up at once.

The reason for this momentous occasion is our new TV cabinet.

TV cabinet for vintage video game systems

I’ve never been into video games, but Matt has played his whole life and has built quite a collection. However, it’s always been a case of he would get a new system and the old one would be packed away. On those days when he really wanted to relive his childhood and play his old Sega Master System (the first he ever bought), he was out of luck.

When we were renovating the basement, one of the criteria was to have a good TV area for watching movies and playing games–any game he wanted. So, we needed a TV cabinet.

And the cabinet needed to do a few things:

  • Accommodate all of the equipment: the TV, the satellite receiver, the Blu-Ray player and at least 10 video game systems.
  • Store DVDs and video games.
  • Keep all of the controllers, connectors and wires that come with video games handy but out of sight.
  • Keep everything tidy and organized.

I decided my best option was a custom cabinet, so I sketched up a plan, and my Dad and I went to work.

We went with adjustable shelves on the top section and drawers on the bottom. The overall dimensions of the cabinet are 80 inches wide by 16 inches deep by 33 inches high. The top gives us a spot for our phone (we need a land line in the country where cell service is a bit unreliable), our new 50-inch flat screen (more on that later this week) and a little bit of display.

The shelves are dedicated to all of the systems.

Video game systems in a TV cabinet

Matt has set up his XBox 360, PlayStation 2, Sega Dreamcast, Gamecube, Sega Genesis, Sega Master System, Nintendo 64, Wii, original Nintendo, Super Nintendo. Holes drilled in the back of the cabinet allow him to poke the wires through to hook up the systems.

The best part of the cabinet is the drawers.

Drawers in a TV cabinet for video games

There are four nine-inch-deep drawers along the bottom, and they hold DVDs, games and controllers. As we were building the cabinet, I kept increasing the size of the drawers, and I’m so glad that I did. They hold so much and make it so easy to keep everything tidy. It was a big pain to get four drawers perfectly lined up and sliding smoothly, but I can say now that it was worth it to have everything so well organized.

It’s also worth it to see how much Matt enjoys having all of his games at hand.

How many of you recognized the picture at the top of the post? Are there any other video gamers out there like Matt? In addition to Haggar and Cody from Final Fight, our basement has also hosted Link, Zelda and Mario over the past few weeks. What’s your favourite game? Have you ever built a piece of custom furniture? Any tips for constructing drawers? How do you keep video games or electronics organized at your house?

History lesson

A new flag is flying over the farm this week.

Pearson pennant

Forty-nine years ago, when Canada was deciding what its national flag should look like, this was one of the options.

Prime Minister Lester Pearson put out a call to Canadians, asking for them to submit ideas for a Canadian flag. Pearson’s own suggestion was for a flag with three red maple leaves bordered with blue bars on either edge–symbolizing Canada’s position as a sea-to-sea nation. Artist Alan Brookman Beddoe drew the actual design, which came to be known as the Pearson Pennant.

Throughout 1964, the government and citizens debated what was the best design for our flag. Eventually a submission from two men, George Stanley and John Matheson, was chosen as Canada’s official flag. Today, their design of a single red maple leaf between two red bars has become an iconic image, and the Pearson Pennant has become historical reference.

Feb. 15, 1965 is Flag Day in Canada, the first time the maple leaf flew as our nation’s official flag.

While it seems a bit backwards, this week we’re commemorating the flag debate by flying the Pearson Pennant.

Pearson Pennant

As a history buff, Matt has a special affection for the Pearson Pennant. For his birthday last year, I had one made for him, knowing that we’d soon have a flagpole and be able to fly it ourselves.

We’ll go back to the maple leaf soon enough, but for this week I don’t mind a little history lesson.

Thanks to Matt for helping to write this post. Happy Flag Day everyone.

The party after the storm

The morning after the snow day dawned bright and sunny and mild–perfect for our winter party. Outdoor activities were the plan for the day, and we were well set with the weather… if only people could make it up to the house.

First on the list was to clear the driveway so that it was passable for a car.

Matt went to work with the tractor, while I dug out the walkway and our cars with the shovel. A flat tire (beyond repair) presented some challenges, but Wiley managed to power through.

Clearing the driveway with the snowblower on the tractor

Second task of the day was to prepare the pond for skating. My plan had been to send everyone down to the ice with shovels, but, with the huge amount of snow that had fallen, that probably wouldn’t have been the most fun. Thankfully my cousin had offered to help, and he showed up with another snow blower mid-morning and went to work clearing the pond for us.

Snow blowing the frozen pond

By early afternoon we were all set, and a couple of hours later people started to arrive. Arrivals for the most part consisted of people opening the door, handing me the food they’d brought and then turning around to head out to the pond or the fields.

It was good that we’d cleared the ice, because nearly everyone had brought their skates–including my Dad with his vintage pair.

My Dad laces up his vintage skates

The rink was a huge hit, even considering the cracks that opened up around the shore. We’ve come to the conclusion that our pond does not like to freeze. The ice held Matt, my cousin, me, the snow blower–and later two small hockey teams. It was solid. However, a few fissures along the shoreline and the water that bubbled up between them resulted in some soakers when people went for out-of-bounds pucks. It made for a unique and memorable hockey game.

Playing hockey on a frozen pond

Away from the rink, a large group with two four-legged scouts headed out across the fields thanks to a bunch of snowshoes supplied by another cousin.

Snowshoeing along a winter trail

The final piece of equipment that arrived–albeit a little bit late–was another cousin’s snowmobile. (Yes, I have lots of cousins).

Snow mobile at night

In addition to providing hours of entertainment, we also provided food and tours (for most people it was their first time at the farm) when they finally made it back to the house.

I have a fairly large extended family on my Dad’s side, and most of us still live fairly close. We don’t get together as regularly as we used to though, so it was nice to see everyone and catch up.

The morning after, hockey sticks, pucks, snow shovels and Matt’s GT in the snowbank in front of the driveshed are a reminder of the fun.

Hockey sticks, snow shovels and a GT snow racer in a snow bank

Snow day

Snow day on the farm

Friday brought a record-setting snowfall, a day off work for both Matt and me and lots of unusual happenings, like going back to bed at 7am, eggs and bacon for breakfast on a weekday and movies in the afternoon.

Some of the other unique ways we spent our time included rescuing a not-so-bright kitten who decided she was bored in the barn, but then spent some time cowering under Matt’s car when she realized there was no one outside to play with and the snow was too deep for her to return to the barn.

Cleaning snow off the kitten

In this oh so flattering picture, Easter is being de-snowed over the kitchen sink.

We returned the kitten to the barn, which was definitely more sheltered than under Matt’s car but still slightly snowy. Lots of light and fluffy snow combined with strong winds meant drifts were everywhere, including inside the barn.

Snow drifts inside the barn

We traded the kitten for Matt’s GT snow racer, picked up a crazy carpet that came with the driveshed and headed out across the fields.

Snow was deep and the field with the best hill is farthest from the house. The walk was a workout, and rest stops were required.

Matt takes a break with his GT snow racer

The quote of the day came from Matt: “I don’t remember tobogganing being this tiring when I was a kid.”

A tip for anyone else who’s no longer a kid, yet still wants to ride his GT snow racer: the best way to “fit” on the sled is to ride in a mostly standing position.

Kid or not, a snow day is a pretty good deal–an unexpected free day. No excuse needed to stay home, break from the usual routine and have some new experiences.

Who else loves a snow day? Have you had one yet this winter? Anyone have a pet who’s not too smart? How about a GT snow racer? Matt figured out that his is about 24 years old. Have you been tobogganing this year?

Snowy winter weekend

The biggest snowfall in several years is forecast for tonight. As I was arriving home, the flurries were starting to fall, the wind was picking up and the snowploughs were scraping along the road in front of the farm.

I could see the storm coming over the fields as dusk was rolling in.

Snow clouds at dusk on the farm

It appears the weather gods heard that our winter warm-up party is this weekend and that sledding and skating are on the agenda.

Winter warm-up party invitation

We’ve had a full week of cold temperatures, so the pond seems to be well-frozen, and as of tomorrow we hope that we’ll have enough snow for sliding over the fields.

Plus, if by any chance work is cancelled tomorrow due to the weather, I’ll have some extra time to test the ice and the slopes. Not that my fingers are crossed or anything…

ETA: The weather gods and powers that be cooperated and work is closed! Woo-hoo!

What do you have planned for this weekend? Any outdoor activities or parties on the agenda? What’s the weather like at your house? Have you had a snow day yet this winter?

A better mousetrap

Living on a farm means there’s critters both outside and inside. Outside, my philosophy is live and let live. Inside, I want two-legged creatures only.

However, the reality of country living is that every so often in the house we hear the pitter-patter of little feet… or more accurately the gnawing of little teeth.

I’m speaking, of course, of mice. (The snake and the toad were one-time visitors).

If there’s a mouse in my house, he is not long for this world.

Matt is the resident exterminator, and he has found a highly effective weapon: an electronic mouse trap.

Victor electronic rat trap

Ours is made by Victor. Matt ordered it online, and we received the rat trap rather than the mouse trap, but it’s just as effective–probably moreso.

It runs on four C batteries. There’s a switch on the top that turns on the trap. One end is open for the mouse to enter. The other end is for the bait. Matt’s favourite is peanut butter.

As soon as the mouse enters the trap, the electricity kicks in and he receives the shock of his life–in fact, the last shock of his life.

Dead mouse in an electronic mousetrap

If we’re within earshot, we hear a quiet buzzing for about half a minute. A green light on the top of the trap starts blinking when we have a victim.

Unlike other mousetraps, disposal is no-muss. Simply up-end the trap to dump the dead mouse into the garbage.

We’ve found it a very helpful solution to our occasional unwanted visitors.

Anyone else have an effective pest control solution? We have feline mousetraps too, but their assigned territories are outside, not in. What four-legged creatures do you have in your house?

Jack frost

The view from the sun room on a sunny frosty morning.

The driveshed in the glow of the rising sun behind a frosty window pane

Looking through a frosted window pane

Looking towards the barn through melting frost on the window

Within a few minutes, the frost had melted away under the warm beams of the sun and the windows were clear.

When I’m busy working, my eyes are always focused on the next thing I have to do. I’m glad I took a moment to look up and notice the pretty scene right in front of me.

Did you do any sight-seeing this weekend?