Dreaming in front of a crackling fire

A couple of Saturdays ago, while my father-in-law and Matt assembled some deer stands with Baxter’s help…

Baxter "helping"

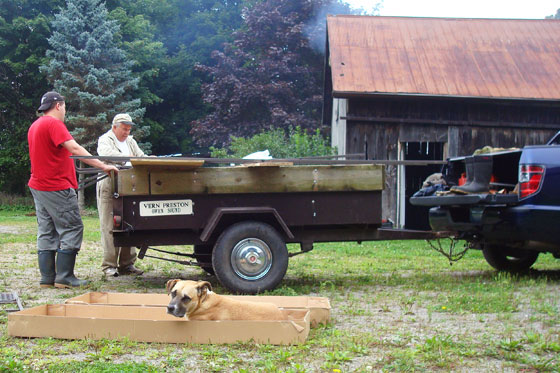
I took advantage of the log splitter my FIL had brought with him and cleaned up some firewood that had been lying around.

Never mind that we still don’t have a working fireplace. Tree management is ongoing here.

Splitting wood

In the category of wishful thinking, let’s take a minute and talk about this fireplace, though, shall we?

1970s fireplace

I have always wanted a wood burning fireplace. When we moved to our little house in the city, the fireplace in my parents’ family room was one of the things I missed most. Redoing our fireplace has been on my list since we moved in. But it’s been delayed due to finances.

We discovered quickly that making the fireplace what I envisioned wasn’t going to be as easy as we thought. I wanted to pop out the insert so that we had a beautiful open hearth. And I wanted to reface the whole thing with fieldstone.

Unfortunately, the chimney won’t accommodate an open hearth. I don’t understand exactly what’s wrong with it, but it’s not entirely right, even for the insert that’s there.

Fixing the chimney means rebuilding the whole fireplace as though we were starting new. Great for getting exactly what I want. Not so great for the wallet.

Matt, my wonderful, accommodating, frugal husband, thinks that we will be able to scrape together enough money to do the fireplace this year. I’m a little more skeptical.

But let’s not let a little thing like the budget derail this post. Let’s talk about what needs to be done.

Fireplace fixes

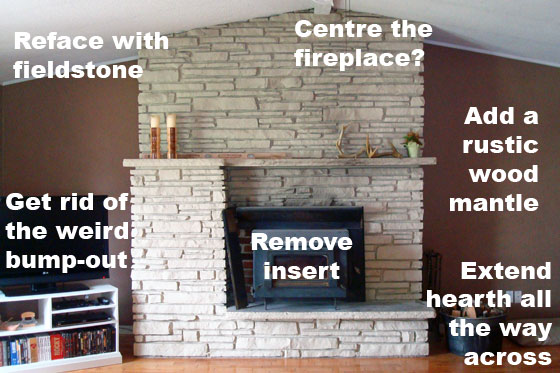
The biggest question is the location of the fireplace. You’ll notice in the picture above that it’s off centre (look at the beam at the apex of the ceiling). This actually isn’t a bad thing, in my opinion. By centring the furniture arrangement on the fireplace, we have room to walk around the edge of the living room to the dining room. If we shift the fireplace so it’s centred, passage to the dining room will be a little tight.

What do you think? Should we centre the fireplace?

My plan for the new fireplace is roughly the same location, roughly the same dimensions. The biggest change will be to make the fireplace itself symmetrical. One continuous wide hearth across the bottom. No weird bump out on the left side. A rustic wood mantel (I have some great old beams in the barn) at one continuous depth. Fieldstone face. Open hearth.

I know the insert is more efficient and is a great way to heat the house. However, we are not going to heat this house with wood. Our geothermal system works really well and costs us very little. This fireplace is more about ambiance and appearance than function.

What would you do with the fireplace if it was yours? Are you a fan of the ’70s asymmetry? What would you face it with? Brick? Tile? Stone? Plaster? Would you keep the insert? Or would you get rid of the fireplace altogether? What’s your opinion on centring the fireplace versus leaving it where it is?

Un-Labour Day

First post of the month means it’s time for another project. But I have something different for you this time around. You see, September’s my birthday month, so I’ve decided to give myself a break.

Of course, there’s still lots to do around here, and since I actually like to spend my time doing things, I will keep myself busy.

Finishing my bookshelves is at the top of the wishlist. My birthday was always my rough deadline to have the shelves completely set up and all of my books unpacked. Having my books back will be like reconnecting with old friends. I think that’s a pretty good gift to give to myself.

Bow on box of books

We made some really good progress this weekend. Matt and I painted the living room. The outer frames of the bookshelves are all primed, and I should be able to get two coats of paint on them today. The shelves themselves will come this week.

Painting the bookshelves

So despite this being an unlabour month, I was pretty productive this Labour Day weekend.

What were you up to this weekend? What are your plans for September?

Summer project report

Take a journey with me back to February, would you?

Don’t worry. You don’t have to actually go back to the time of snow and cold and dark.

Just remember back in February when we painted the foyer, kitchen and hallway.

Hallway painted Benjamin Moore Abalone

Now let’s go back a little bit further to January when I posted my 2014 Home Goals, and I said I wasn’t going to paint the living room this year.

Well, I lied… kind of.

The kitchen, hall, foyer and living room all run together, so I planned to paint them all the same colour. Knowing that I wanted to set up my bookshelves this year, back in February Matt and I painted one wall of the living room–the wall I planned to put the bookshelves on. I figured once my shelves were set up and full of books, I wouldn’t want to take everything down again to paint behind them.

So the living room has looked a little bit like this for the past six months. Stylish, I know.

Half-painted living room

Well, the thing is, when I started the bookshelf makeover this month, I realized that if I put the shelves where I originally planned, we wouldn’t have room to walk around the couch and into the dining room. I decided to put them on the opposite wall. A wall which was unpainted. Whoopsie-doodle.

So my August project report goes something like this.

  • Put the bookshelves that had gotten damaged in the move back together.
  • Took the big fat bookshelf apart, cut it in half and rebuilt two new sets of shelves.
  • Added iron-on edging to the new shelves where I needed to.
  • Stripped the paint off the TV stand.
  • Raised the TV stand by half an inch and added trim around the bottom.
  • Painted the TV stand.
  • Realized I was going to have to paint the living room.

Here’s some evidence that I did actually do some work on the bookshelves.

Steps in my bookshelf makeover

Despite my progress, the bookshelves are kind of on hold right now. They’re all set up in the guest room ready to be painted. However, I’ve shifted my attention to the living room.

The prep process is exactly the same as what we had to go through for the hallway:

  • Pull out nails where pictures were hung.
  • Take off cover plates.
  • Sand the incredibly rough walls.
  • Patch holes and divots.
  • Wipe down the trim.
  • Paint the trim.
  • Prime the walls.
  • Paint (two coats).

The living room is both simple and complicated to paint. Complicated because it’s a vaulted ceiling that requires a big ladder to reach the top of the wall. Simple because on the two walls I’m painting, there is an archway on one and a patio door on the other. The actual wall space is minimal.

And yes, you read that correctly. I am painting only two walls. Of the four walls in the living room one is already painted (as you saw) and the other contains the fireplace. I am not painting around the fireplace until we’re done whatever we do with the fireplace.

So my August project is another bit of a fail. I did manage to get the TV stand completely finished though. I’ve put it in place, even though we’ll likely have to move it when we paint. I had to finish something this month.

TV stand before and after

What did you accomplish this month? Have you ever gotten mid-way through a project and only to find your to-do list has grown?

Taking paint off melamine

The question of the day was can I strip paint off of melamine? The answer was kind of.

This is not my favourite piece of furniture. (Not the TV. I love my TV. My problem’s with the TV stand.)

TV stand

I attempted to build it when we lived at our old house. We had gotten a new TV. We needed a TV stand. I had some white melamine left over. So I sliced it up and went to work.

Cutting went fine.

Assembling not so much.

I didn’t have the right tools or fasteners and as my rocky, shaky shelf collapsed for about the fifth time, I called my Dad.

My Dad and I knocked it together in no time, but when I painted it I ran into trouble again.

My roller was disintegrating as I painted, and I ended up with all kinds of bits stuck to my shelf. It didn’t improve with time. The dark brown paint showed dust really easily, and when I tried to wipe it down, the dust just got caught in the flecks and it looked even worse. Believe it or not, this is the bottom shelf after I’d wiped it down.

Dust stuck in bumpy paint

I decided to include the TV stand as part of my bookshelf makeover this month. I’m not planning to strip the paint off of all the bookshelves, but the finish on the TV stand was just too awful. I needed a fresh start.

I went with my usual chemical stripper, and it worked pretty well. The stripper made quick work of the paint, even though it’s a heavy-duty oil-based enamel. The stripper also took off the white coating on the melamine. I’m not too worried because I’m going to be repainting, but the finish was a little bit rough. I went over it with my sander to smooth everything out. It may not look great, but I think it’s going to be okay.

Stripping paint off melamine

This week my Dad and I are tackling the rest of the shelves. We’ll be cutting down, putting back together and adding trim. Painting will come soon after. The TV stand should be looking much better the next time you see it. Maybe I’ll even like it by that point.

Have you ever tried to take paint off of melamine? Have you ever painted melamine in the first place? It’s not that hard to do… as long as your equipment is half decent. Has anyone else run into problems with disintegrating rollers? Do you have a piece of furniture that you don’t love?

Summer projects

I have two projects I wanted to complete this summer. First is getting rid of the stippled ceiling in the bedroom. Second is redoing my bookshelves.

Given my lack of success last month with the ceiling, I think both of these tasks are going on the August list.

You’ve already heard about the ceiling, so how about a little bit about the bookshelves?

Bookshelves and boxes of books

(Yes, this corner has looked like this since we moved in more than two years ago).

My Dad and I made these bookshelves for our first house. They’re shallow, so they don’t take up much space. They have adjustable shelves, which is handy. They’re going to work well for us here with just a few tweaks.

First on the list is cutting down one of the shelves. It’s twice as deep as the others because it held our TV back when it was a giant square box. I figure I can get two bookshelves out of this one.

Second on the list is putting another bookshelf back together. It was damaged in our move and is pretty wobbly.

Then, I plan to add some trim and paint everything white.

I’ll replace the adjustable shelving tracks with white ones and set the shelves in place.

Then it’s on to the best part: loading the shelves.

Boxes of books

My books have been packed away for more than two and a half years. I want them back.

Distractions in thrifting

The other weekend while we were anxiously waiting to see if we’d be approved to adopt Baxter, Matt and I decided to distract ourselves with some retail therapy. He mapped out a route of second hand stores, and we headed out.

It turned out to be a great outing. Wandering the streets, admiring the architecture and the gardens of the historic houses, popping into stores here and there–it was pretty relaxing, even if I was checking my phone every stop for a new email.

And we each came home with a few treasures. Mine was found deep in the back room of a cluttered consignment store.

Old wash tub filled with firewood

It’s been nearly a year since I pinned the Paxton Copper Bucket from Pottery Barn. Since then, I’ve been on the lookout for a metal wash tub to hold firewood in the living room.

This one is huge, and, just like the Paxton, it’s both practical and decorative. The handles have obviously been reattached at some point, but overall it’s in pretty good shape. And for $40, it was a decent price too, in my opinion. Much better than the nearly $260 that PB wants.

I may be jumping ahead a bit, given that we don’t yet have a working fireplace, but that’s a minor detail.

And the addition of our firewood tub has provided me with some motivation. Our mason is coming over tonight to advise us on what it’s going to take to make the fireplace live up to its beautiful new (to us) sidekick.

Are there any fellow thrifters out there? What are you on the hunt for these days? What’s the greatest treasure you’ve found? Anyone else have a wood burning fireplace? Can I say I have one even if it’s not useable? How do you store firewood?

Party time

I booked a Christmas party. Hosted by us. At the farm.

What’s with the tone?

Well, I’m a bit anxious.

Because, you see, the party is set for exactly one month before Christmas Eve. One month from today.

And my dining room currently looks like this.

Dining room

Keeping it real, folks. The drawer for the china cabinet was damaged in the move and won’t slide into place until we fix it. The extra furniture tucked in the left corner, the boxes stacked on the right and ironing board that is just outside of the picture will all go into the basement…whenever we finish the reno.

My living room looks like this.

Messy living room

The couch is in the right spot, but the grocery bags and cleaning supplies in the foreground of the photograph are not.

Oh, and my kitchen looks like this.

Messy kitchen

Our “island” is a metal patio table over which I have thrown a plastic dollar store tablecloth. All of my small appliances and boxes of cookbooks are tucked underneath, as I have no other place for them yet. On the bright side, we have a spot for our stash of Hallowe’en candy.

You may now realize why I haven’t shown a lot of pictures of the inside of the house.

For the past seven months since we moved to the farm, we’ve been living in an increasing level of chaos. And it seems to be getting worse.

Books, boardgames, extra furniture, sports equipment and all of the other items that will someday be in the basement are still packed in boxes and stacked behind the couch between the dining room and the living room. As we buy new things or have to access our packed items, everything gets a little more disorganized (see exhibit A above).

You can see the tracks of our footprints in the drywall dust on the living room floor (see exhibit B above).

I emptied the front hall closet, so that I could fit it out with shelves and rods and racks to actually store things in a somewhat more orderly fashion. That means our ancient vacuum cleaner, shopping bags, hats and gloves are all piled in the corner of the living room (see exhibit C above).

The good news is that we are heading into the home stretch on our basement reno.

The better news is that after exhibits A, B and C were photographed, a couple of tents, an air mattress, a camp stove and assorted Christmas decorations made their way downstairs.

Cartons in a storage closet

No need for colour, carpet or trim in the closet under the basement stairs. Two coats of prime do the job just fine. Some proper shelves would be nice though.

I’m hoping that by party time carpet will be the floors in the rest of the basement. We may not have baseboards or much furniture by then, but if we can at least put some more things downstairs, I’ll feel a little better about our living environment.

I like hosting parties, and I don’t worry too much about my house being perfect. However, I do have some standards. A basic level of organization and tidiness is required. The current state is not even close.

Here’s hoping a hard deadline makes things move a little faster.

Oh, and to Matt’s family… we’re really looking forward to hosting you next month! Really.

Anyone out there have any tips on how to get organized? Please tell me someone else has tiles stacked in the living room, an ironing board in the dining room, dust tracks on the floors, a makeshift kitchen island and tools sitting on pretty much every available surface? Or perhaps you’re already looking ahead to Christmas. Who’s also in party planning mode already? What makes a good party at your house?