Off to a quick start – One Room Challenge Week #2

Welcome to week 2 of the One Room Challenge.

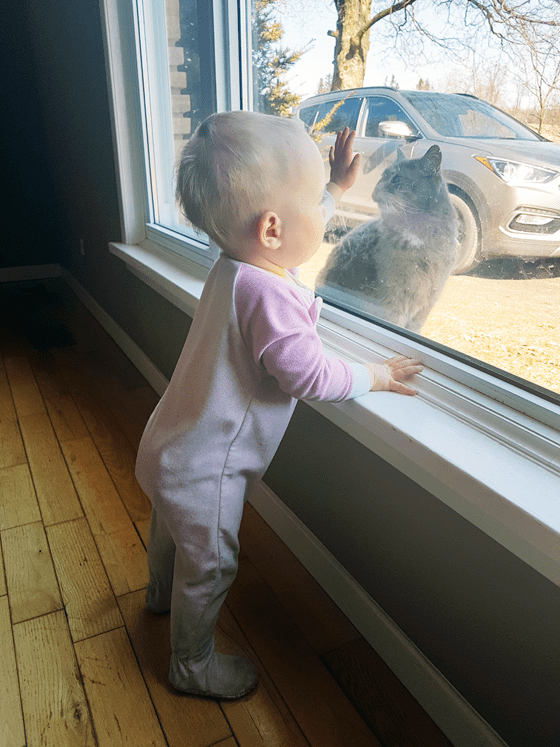
If you’re new to my blog, welcome. My name is Julia, and I live on a 129-acre farm in Ontario with my husband, Matt, our one year old daughter, Ellie, our rescue dog, Baxter, and #theworldsbestbarncat, Ralph.

Ellie and Ralph in the dining room

We moved here 7 years ago, and since then we’ve been working on our fixer-upper 1970s era ranch style house with lots of DIY, thrifting and occasional professional help. Our style is a bit traditional and full of very personal elements, with country touches to make our house look like it belongs in its farm setting.

The dining room is the last makeover before we start more major renovations like a garage addition, new kitchen or bathroom.

In last week’s post, I shared my plans for this update.

Today I thought I’d give more of an overview of this space.

Pros:

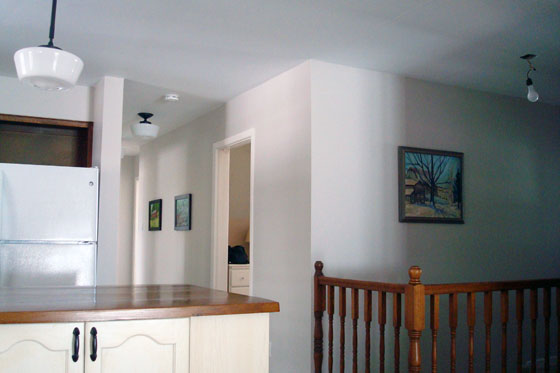
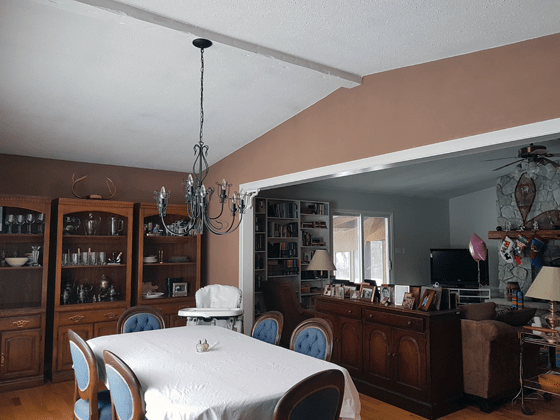
The dining room is a large room. A vaulted ceiling and a big archway to the living room make it feel even larger.

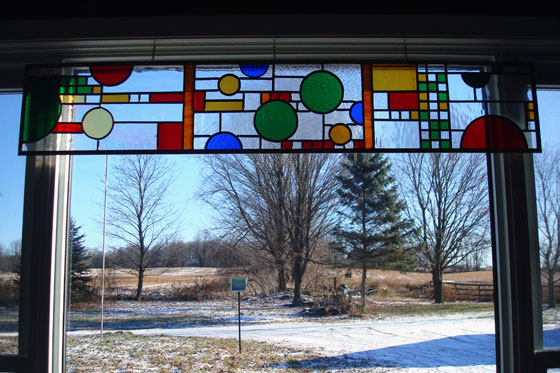
It has a big window that offers an amazing eastern view across the farm. Watching the sunrise over the fields while we have our breakfast is a beautiful way to start the day. (The Frank Lloyd Wright Coonley Playhouse-style stained glass was made for us by Matt’s uncle.)

Coonley playhouse Frank Lloyd Wright inspired stained glass panel

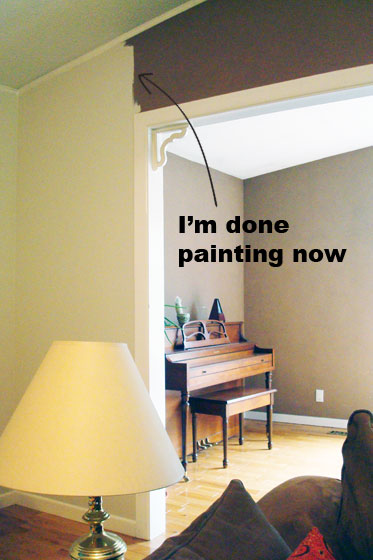
Over the years, we’ve collected vintage and thrifted furniture that are perfect for our traditional style: Matt’s grandmother’s piano, an antique dining table, 8 chairs that turned out to be a pretty good match to the table, and after an incredibly lucky thrifting score 3 circa-1980s bookshelves/TV/entertainment units that stand in for our china cabinet.

Cons:

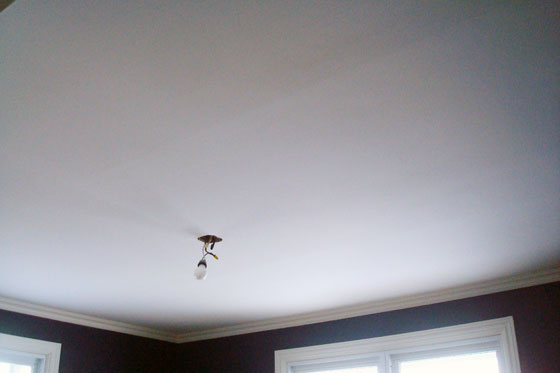
Like every room in our house, the dining room was rough–literally. The walls felt like sandpaper and the ceiling is popcorn. Add to that stains, scuffs, holes and cracks in the drywall and the trim, and the room was not pretty.

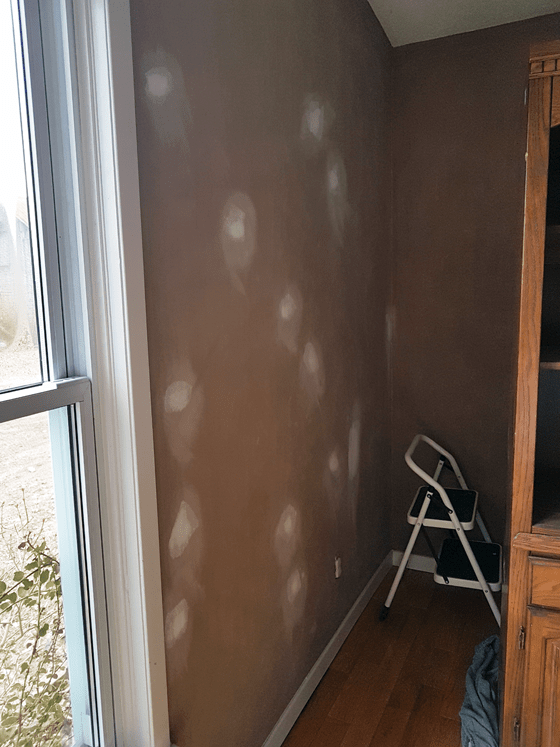
It was also dark. Even with the large window, the dark brown walls make the room feel dim. Another issue arose this winter when one of the panes in the window cracked. It’s on my list to be fixed during this ORC.

All of the furniture, except the piano, needs a makeover. The table and chairs need to be refinished. The chairs need new upholstery. And the china cabinet needs to leave the 80s behind for fresh white paint.

Vaulted ceiling in the dining room

Someday, I plan to cover the popcorn ceiling with planks. But for now, I’m going to be relying on the power of paint and focusing on the walls and hopefully the china cabinet.

And with the motivation of the ORC, I’ve gotten off to a quick start on this project.

The update

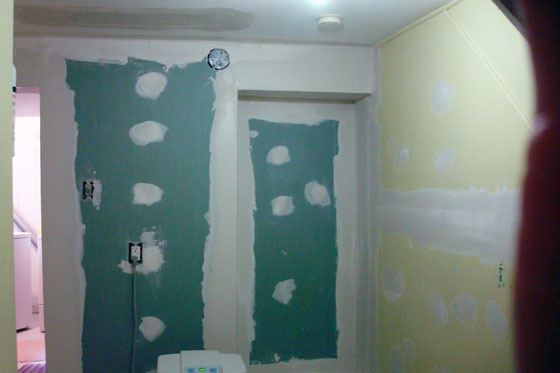
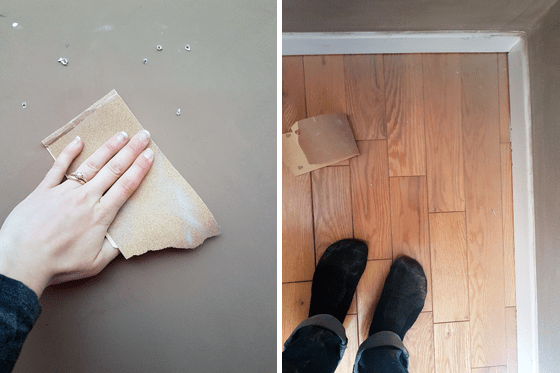
I sanded the walls smooth and made so, so much dirty dust. Vacuuming has been the central task of this makeover thanks to the baby crawling around–and occasionally licking the floor (why?).

Sanding rough dirty drywall

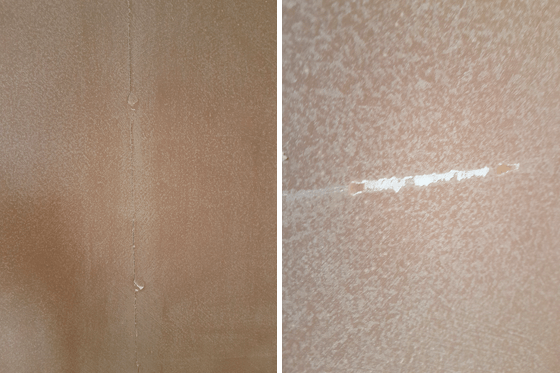
And then I got started patching all of those holes and scuffs and cracks. I knew the walls were rough, but I hadn’t noticed how many cracks there were.

Cracks and scratches in drywall

Patching cracks in drywall

Patching drywall

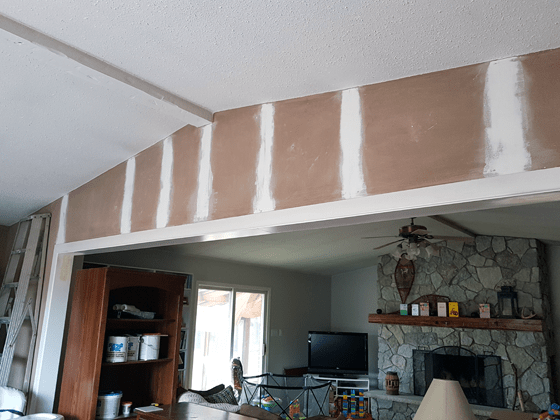
More sanding, more patching, more sanding–and lots of vacuuming to try and keep the baby out of the dust.

My other crew member, Baxter, was not helpful. He loves the morning sunbeam in the dining room and even the threat of 7 years bad luck from laying under the ladder wouldn’t keep him from his favourite napping spot.

Baxter laying under the ladder

My luck seems to be good so far. One week in and the walls are smooth and ready for priming. The floor–and the baby–is relatively clean. Onward with the challenge.

You can check out all of the ORC participants later this week. The designer participants share their updates on Wednesday and the guest participants will be posting on Thursday.

One Room Challenge Guest Participant logo

Is anyone else dealing with rough walls or ceilings? How about battling dust? Who else has a helpful DIY crew?


How to patch and repaint a gallery wall

Turquoise gender neutral nursery

For a long time, I’ve loved the idea of a turquoise nursery. So when we were transforming my office into Ellie’s room, I knew I didn’t want to change the colour. However, we did have to do some painting when I removed my gallery wall and my display of vintage hats in favour of more baby-friendly art.

Vintage hat display in my craft room

Sooooo many holes (and weird reflections from the light fixture).

Patching holes after removing a gallery wall

There are a few tricks to patch and repaint a gallery wall.

The first step is obviously to patch the holes. Use your favourite drywall spackle. Let it dry and then sand the patches so they’re nice and smooth. Do a second coat of spackle if any of the holes are extra deep and sand again. (Spackle sometimes shrinks as it dries, so you may find you have an extra dimple to fill in.)

Once you’re happy with the patches, it’s important to prime. Painting directly over the “raw” patches will result in “flashing.” This means dull or shiny spots on your wall. While the colour may look the same, the patches will still be visible as the drywall paste absorbs the paint differently than the surrounding wall, which has already been painted.

Prime gives a fresh surface for your paint to adhere to. You can limit your priming to just the patches, but make sure to cover all of the raw drywall paste.

Priming drywall patches

Priming drywall patches

The next step is paint. Again, you don’t have to paint the whole wall. Cover the primed area completely with paint.

Repainting a patched wall

The final step is to repaint the wall–the entire wall. Time, sun or slight variation in the mix stirred up by the paint store may lead to variation in your paint. So while your patches may only be in one section, repainting the whole wall ensures that the paint looks completely uniform.

Repainting a patched wall

However, you do not need to repaint the whole room. Stop painting at the corners, either an outer or an inner corner works. Even if your paint is a slightly different tone, the difference won’t be noticeable if you “break” at a corner.

Cutting in at a corner

The result will be a seamless finish and no one will be able to tell that you repainted.

How to patch and repaint a gallery wall

Beating the heat

I don’t know what the weather’s like where you are, but here in Southern Ontario we are having a serious heatwave.

So what do you do if it’s mid-July and the forecast is showing hot and sunny all weekend? For many Ontarians, the answer is head to cottage country where you can be by a lake. In fact, that’s just what my husband did.

However, if you’re me, the answer is, “Why don’t you go by yourself? I’ll stay here and tape the drywall.”

What?

Yeah. I dunno what’s wrong with me.

Drywalling the laundry room

Thanks to our basement waterproofing (I promise I’ll share more details on this project), we have some drywall to repair. We also are building an extra closet in our laundry room, so we decided to do all the drywall at the same time.

We spent last week on framing, insulating and drywalling. Matt and I hung the last few sheets on Friday before he left. We’re a little rusty at drywall. Measurements were off and gaps between sheets were large. Fortunately, paste covers a lot.

By the time Matt got home, I had finished the first two coats, and things were looking much better.

Plus, the basement was cool. Not quite lakeside, but not an altogether terrible way to spend a weekend.

What did you get up to this weekend? Do you like the summer heat? I love it, honestly, and would have been quite happy to spend my weekend outside versus in the air conditioning. Would anyone else have prioritized drywall over a weekend away? Did you see the temperatures from Basra? I think that’s a little hot even for me.

Scraping a stipple ceiling

Pimples. It’s not even a nice word.

Popcorn. That’s a much nicer word.

Stippled ceilings have come to be known as popcorn ceilings. However, in my opinion, popcorn is much too nice of a word to be associated with these ugly ceilings. Not to trigger any traumatic teenage flashbacks, but stippled ceilings are closer to pimples than popcorn.

Popcorn ceiling

Step one in the master bedroom makeover was to help the ceiling grow up from its ugly adolescence into beautiful adulthood–and I couldn’t just make like a fashion magazine and airbrush.

It was gonna take muscle, and it was gonna be messy.

So, armed with an all-clear on my asbestos test, trowels, a spray bottle of water, pole sander, extra sandpaper and a dust mask, I went to work.

Tools for scraping popcorn ceiling

In the basement where we also had stipple ceiling, I actually sanded a lot of it off. This technique gave me a really nice smooth finish, even if it did generate a tonne of dust. In the bedroom, I found soaking in water and then scraping with the trowel worked best. As much as the big yellow trowel would have been faster, I liked the control of my little trowel.

It was still a lot of work. Scraping a stipple ceiling is not fun. However, fueled by ju-jubes, I got it done. (My skin may have progressed from its teenage years, but my diet has not. The orange ones are still my favourite).

Jujubs

Underneath the stipple, the drywall was smooth and painted, which leads me to ask why? Why finish a ceiling smooth, paint it and then cover it in pimples? I just don’t understand.

We all know the prep work is most important to get a good paint job. I spent more time on prep for the bedroom than I ever have before. Scraping the ceiling, scraping the caulking from between the crown molding and the ceiling (ugh), patching hundreds of little chips in the ceiling (they were just minor chips of paint, but there were truly hundreds of them), patching one bad ceiling seam and one crack in the wall, sanding and pasting over again.

Ceiling after scraping the popcorn

It took days.

Thank goodness I was off work for the Christmas break. Although it wasn’t the most restful holiday.

In the end though, my ceiling is all grown up and pimple-free. Much nicer to look at when I’m lying in bed in my new master bedroom. (Apologies for the really bad photo, but I think you can tell it’s nice and smooth. Oh, and there’s a sneak peak of the blue walls).

Finished ceiling after scraping the popcorn

Have you ever scraped a stipple ceiling? Any techniques to share? Any insights on why people stipple ceilings? And most important, what colour ju-jubes are your favourite?

Summer project report

Take a journey with me back to February, would you?

Don’t worry. You don’t have to actually go back to the time of snow and cold and dark.

Just remember back in February when we painted the foyer, kitchen and hallway.

Hallway painted Benjamin Moore Abalone

Now let’s go back a little bit further to January when I posted my 2014 Home Goals, and I said I wasn’t going to paint the living room this year.

Well, I lied… kind of.

The kitchen, hall, foyer and living room all run together, so I planned to paint them all the same colour. Knowing that I wanted to set up my bookshelves this year, back in February Matt and I painted one wall of the living room–the wall I planned to put the bookshelves on. I figured once my shelves were set up and full of books, I wouldn’t want to take everything down again to paint behind them.

So the living room has looked a little bit like this for the past six months. Stylish, I know.

Half-painted living room

Well, the thing is, when I started the bookshelf makeover this month, I realized that if I put the shelves where I originally planned, we wouldn’t have room to walk around the couch and into the dining room. I decided to put them on the opposite wall. A wall which was unpainted. Whoopsie-doodle.

So my August project report goes something like this.

  • Put the bookshelves that had gotten damaged in the move back together.
  • Took the big fat bookshelf apart, cut it in half and rebuilt two new sets of shelves.
  • Added iron-on edging to the new shelves where I needed to.
  • Stripped the paint off the TV stand.
  • Raised the TV stand by half an inch and added trim around the bottom.
  • Painted the TV stand.
  • Realized I was going to have to paint the living room.

Here’s some evidence that I did actually do some work on the bookshelves.

Steps in my bookshelf makeover

Despite my progress, the bookshelves are kind of on hold right now. They’re all set up in the guest room ready to be painted. However, I’ve shifted my attention to the living room.

The prep process is exactly the same as what we had to go through for the hallway:

  • Pull out nails where pictures were hung.
  • Take off cover plates.
  • Sand the incredibly rough walls.
  • Patch holes and divots.
  • Wipe down the trim.
  • Paint the trim.
  • Prime the walls.
  • Paint (two coats).

The living room is both simple and complicated to paint. Complicated because it’s a vaulted ceiling that requires a big ladder to reach the top of the wall. Simple because on the two walls I’m painting, there is an archway on one and a patio door on the other. The actual wall space is minimal.

And yes, you read that correctly. I am painting only two walls. Of the four walls in the living room one is already painted (as you saw) and the other contains the fireplace. I am not painting around the fireplace until we’re done whatever we do with the fireplace.

So my August project is another bit of a fail. I did manage to get the TV stand completely finished though. I’ve put it in place, even though we’ll likely have to move it when we paint. I had to finish something this month.

TV stand before and after

What did you accomplish this month? Have you ever gotten mid-way through a project and only to find your to-do list has grown?

Operation popcorn

You know those things that you have to do, want to do, but don’t really want to do? That’s this month’s project.

The plan is to start our master bedroom makeover. Step one is remove the popcorn ceiling (the fan’s on the list too).

Popcorn ceiling

I’ve been saving this project until I could open the windows, as there is likely to be a bit of dust and mess.

What are you up to this July? Do you have any tips for removing stippled ceilings? In the basement, I scraped some and sanded others. Sanding’s way messier, but I got a nice smooth finish and had to do less patching.

Battling the dungeon

On the quest to renovate the basement at our first house, Matt and I dove in with our characteristic “go big” approach.

Everything that was in the basement came upstairs and was stacked in the dining, living and bed rooms making for a lovely “Hoarders” atmosphere.

Items from the basement stacked in the dining room

Downstairs, just like we would do a year later at the farm, we went back to the concrete. Buh-bye blue room.

Gutted basement
And farewell weird shelving area.

Gutted basement

We reframed. We rewired. We reinsulated.

Basement renovation

We drywalled. Lots of drywall, although not as much as last summer. Lots of taping. Lots of pasting.

Basement renovation

We laid new flooring, and we painted. We installed new trim, new shelving, new closet rods and doors.

Curious how it all turned out? Were we able to banish the dungeon?

Tune in next for the reveal.

Stick a trowel in me…

… I’m done.

We are calling it on the drywall phase of the basement reno. Five and a half months–in case the text version wasn’t clear, let me translate that into numerals 5 1/2 (or 5.5 for you digitally minded folks) months–after we started drywalling the basement, we are finally finished.

Oh the glamourous life of DIYers.

Lest there’s any additional lack of clarity, the basement reno itself is not finished. Only the drywall stage is done.

Some other things that are done:

  1. Bandaging my fingers for my evening sanding sessions.
Bandaged fingers

This is what my hands looked like at the end of a night of sanding. The bandages are pretty much worn away.

I built up calluses on my fingers, of course, but calluses can only do so much. It took me two nights of bleeding fingers to learn my lesson. (Point in my favour: the nights were not consecutive. I’m not that dumb). Before the second incident, I thought my fingers were sufficiently toughened from the first incident to not require protection. I learned that no matter how leathery and rough I think my hands are, I can apparently always do more damage.

Good news is I would make a good spy these days, as my fingerprints are sanded off.

  1. Also done is Matt’s nightly decoding dilemmas as he tries to interpret the pasting instructions I draw on the drywall.
Pencil markings

The two circles highlight a scratch and some divots that need to be filled. The U and V markings are supposed to be arrows that point out a ridge that needs to be feathered out with paste.

The division of labour when it came to drywall was I sand, Matt pastes. As I work, I keep a pencil behind my ear, so that I can mark spots that need particular attention.

Additional symbols in my drywall lexicon include lines and once in awhile actual words–that usually still require translation.

  1. The biggest change that will result from concluding drywall work will be no more drywall dust throughout the house.
Pile of drywall dust

The partially swept office floor (and yes, I know my work shoes are looking a little worn).

In the basement, the dust was so deep that dunes were starting to form. It took Matt and me a full afternoon to wipe down the walls and ceilings, sweep up the worst of the dust and then vacuum the remaining powder.

Upstairs is also covered in a fine skim of dust, although we haven’t done a deep clean there yet. We have to keep up our glamourous DIY lifestyle, after all.

Starting out on this project, I never dreamed that drywall would take us nearly half a year (ouch, that sounds like a really, really long time). My only excuse is that we ended up having to redo a huge area–pretty much the whole basement, we didn’t work on it religiously every single day and we’re not professional, so we’re slow.

The finish is definitely not perfect, but I’m satisfied with how it turned out, and I’m really happy that Matt and I were able to tackle such a big project together by ourselves (with help from my Dad, of course. Thanks, Dad!).

And now, in the way of DIY, concluding one stage of the project means it’s now on to the next. Painting here we come!

What’s on your agenda for this weekend?

Help! I have hod claw

Matt and I put on a push this week in the basement in an attempt to pick up the pace on the pasting. (I love alliteration, but that’s a lot of ‘p’s even for me). We’ve made a lot of progress, but a side effect of all of this productivity (I just can’t stop!) is that we are both suffering from hod claw.

hod·claw

noun

an uncomfortable contraction of the hand, typically occurring after holding a hod for an extended time

For those that haven’t had the pleasure, a hod is basically a big tray that holds the drywall paste (also known as mud or compound) while you’re working.

After a full evening of working in the basement, uncurling our fingers from our hods is harder than you’d think.

Hod with drywall paste

Matt holding the hod

It’s not that we love drywall and don’t want to stop. The issue is that our hands have seized around the handle of the hod and returning them to their regular dexterity requires much flexing and massaging.

When it comes to drywall, there are a variety of tools people choose to hold their paste. Some work directly from a bucket. Others use a mudpan. I grew up using a hod, so that’s what we use now.

Once I cross the three hour mark of pasting, I don’t think it matters what’s holding my paste. At that point, my hands have cramped. As long as I keep working, I don’t feel it too much. As soon as I set the hod down, though, that’s when I realize how tired my hands are.

Drywalling with a hod

Matt in action

Fortunately, by the next morning, I’ve usually regained most of my range of motion.

Even more fortunately, thanks to our concentrated efforts this week, we’re nearing the end on this pasting odyssey and will soon be setting down our hods. Hopefully, our  hands recover from their case of hod claw shortly thereafter.

Any other DIYers out there who use a hod for drywalling? Have you ever been afflicted with hod claw? Or do you have your own unique DIY injuries?

Degree of dustiness

If you zoomed out on Friday’s photo, you would have seen something like this.

Matt and me after sanding drywall

Matt and me after sanding drywall

No, we did not have a baking accident and we’re not 18th century aficionados who powder our hair and faces.

We’re renovators and these days drywall is on the top of the to do list. Actually, it’s probably more the “please can we just get this done already” list, but I’m trying not to sound too desperate.

The photo that I posted on Friday was a thick layer of drywall dust coating Matt’s arm. Even though I teased her at the time, Catherine was actually pretty close with her first guess on last week’s post of “really dry skin.”

Drywall dust

Skin and arm hair with a heavy dusting of drywall. Yum.

The sanding stage of drywall installation is usually the time I start to reconsider my affection for DIY renovations.

This is a lot of work, and sanding drywall is really not fun work.

  1. Pretty much every single surface in the basement has new drywall or at least a patch of some kind. That means I’m sanding more than I’ve ever sanded in my life. My arm muscles are toned like they’ve never been before, but my nails and fingertips are rubbed off in some places. Ow. And I’m sure the amount of dust that has entered my body through my nose, eyes and mouth can’t be healthy.
  2. We’re not pros, so we’re slow. Therefore, the drywall and sanding stage take a long time.
  3. Even though we’re only working in the basement right now, dust is everywhere. Good news, you can slide around easily on the floors upstairs which makes getting around quick. Bad news, don’t set your black clothes down anywhere, or else you’ll have to choose a new outfit.
  4. We’re not pros, so there tend to be a few more bumps and ridges that we have to sand out… meaning more time, more sore muscles, more dust.

Matt uses the pole sander, but I have never been able to master it. I also feel like I get a better finish by hand. So that means I get up close and personal with every single square centimetre of drywall.

Covered in drywall dust

It’s a good look, wouldn’t you say?

The good news is that the basement is looking really good. We’re at the third (and final) coat of paste pretty much everywhere, and a few spots need only touch-ups.

If we can keep up the momentum, I’m anticipating being covered in paint spatters instead of drywall dust in just a few weeks.

That will be a nice change of style. I’m ready for a makeover.