Split personality

We are now officially in the month of winter. At the farm, most of our prep has been the same as last year–shut off the outdoor taps, put away the outdoor furniture, take the mower deck off the tractor, put on the snowblower. However, there was one thing that I knew I absolutely wanted to change this year: my footwear.

Our first winter at the farm taught me that my previous boots were inadequate for country life. In case you can’t tell from the photo below, they are not only completely snow-covered. They are wet. Soaked right through.

Wet and snow-covered winter boots

So, this fall I was on the hunt for better boots. Here’s what I ended up with. Can you tell which pair is the “farm” boots?

Dress boots and winter boots

The “office” boots are the divas on the pedestal afraid of our first dusting of snow. The farm boots are tall, furry, with rubber soles and removable lining. I’m hoping that they will stand up to whatever the farm throws at them in the coming season.

At my previous job, one of my co-workers had a hard time reconciling the person she knew from the office with the person she saw on the blog. I had never noticed a disconnect, but then my shoe shopping ends up illustrating the two sides of my personality… or at least my fashion sense.

Do you have a split personality between home and work or in your style? Any winter boot recommendations to share? Have you had your first snow yet?

Barn board hook board

It could have been the paint fumes, the sleep deprivation or four hours spent in the two by nine foot front hall closet, but once the brainwave hit, I couldn’t get it out of my head. “What this closet really needs is some barn board!”

Barnboard hook board

So I made my way out of the closet, out of the paint fumes and out to the barn… where surprisingly it’s more difficult than you might expect to find barn board. Don’t get me wrong. We have plenty of barn board. It’s just that most of it is attached to the barn.

I found one piece that was just lying there waiting for a woman on a mission. He was close to the right length, beautifully weathered, lovely tones of grey, knots and a ragged edge. I told him he was a contender.

And then, on the far side of the barn, stacked amongst some giant planks and a very long log, I saw it. Perhaps not quite as weathered as his predecessor, slightly more brown than grey, the exact right length, not too many knots but a couple of rusty nails, one ragged edge that even had a few worm holes… a truly authentic barn board… right down to the… is that? … yep… it is… manure that was caked on the one side.

And that is how I found myself standing in the driveway on Sunday afternoon in November, brush in hand, cleanser close by, hose spewing frigid water, scrubbing a piece of wood as I frantically rehearsed responses in my mind for what I would say when Matt came out to ask me “What the heck are you doing?”

I didn’t think my new-found philosophy of interior design that every room–closets included–needs an element of something rustic would be met with the same enthusiasm I was currently experiencing.

I picked up my dripping–but now clean–board and strolled as nonchalantly as possible back to the house. I studiously avoided looking at the dining room window where I knew my husband was sitting at the table working.

I carefully propped my board by the front door to dry while I returned to my closet, preparing my hooks for hanging, sweeping the floor, killing time until the husband disappeared somewhere, and I quickly scuttled outside and retrieved my still damp board.

I held it up to the wall and it was perfect. It was going to make the closet.

I screwed it in place, attached the hooks and felt completely validated in my new decorating philosophy. My enthusiasm was so great that despite its dampness I started grabbing coats and hanging them up.

Wrought iron hooks on a barn board backer

It was at about this time that Matt reappeared and peaked around the corner to check out the closet.

I shifted my feet. I avoided direct eye contact. I did not say anything.

And he said, “It looks good, woman. But what about that board up there?”

I followed the direction of his gaze.

He was looking not at my beautiful barn board, but instead at a plywood support I had screwed together to hold up the eight foot shelf that couldn’t quite span the whole nine foot length of the closet. He was concerned that it wasn’t painted the same as the rest of the wood in the closet.

He didn’t even seem to notice the barn board. There was no admiration. There was no disgust. I feel a bit gypped by the lack of reaction.

Sigh.

I am consoled by the fact that every time I open the closet doors, I know exactly what the best part of the closet is.

Closet makeover after

When thinking about options for increasing the functionality of the front hall closet, I strongly considered converting it to an open nook with built-in bench like Shelley and Cason did over at House of Smiths.

House of Smiths entryway closet makerover

However, the closet is right off the kitchen, and I knew our coats and shoes and outerwear would not always look tidy. Being able to close the doors on any mess appealed to me. Plus, I had a lot of other things I wanted a home for, so a variety of storage options was important, and I felt I could do that better behind closed doors.

Because the closet is behind closed doors, it’s not as pretty as some of the spaces you see on other blogs. And definitely not as pretty as the Smith’s nook. However, it is exactly what we need.

At the top, we have one long shelf that stretches the full nine feet of the closet. It holds mitts, hats, scarves at one end, and light bulbs, plastic bags and pest control (mouse traps, ant traps, bug spray) at the other. The shallower shelves at the one end (made with white melamine, of course) hold flashlights and rags, Baxter items, cleaning supplies and reusable and plastic bags. Cleaning buckets tuck underneath the bottom shelf. The broom and the mop hang from nails tacked into the wall, and a hook board hangs along the back.

Closet with different storage options

At the other end, a short hanging rod goes perpendicular across the closet to hold dress coats. A bin of extra cold weather gear sits on the floor along with my backpack.

Closet with different storage options

Behind the rod, there’s a hanging caddy that holds (some of) my dress shoes. It’s a vintage caddy that my Mom had before she was married. How cool is that?

Hanging shoe caddy

A row of cup hooks screwed into the shelf/rod support hold extra keys and flyswatters.

Key storage in a closet

If I was truly a blogger, I’d have a lot more pretty baskets to hold all of the hats and mitts and scarves that currently are just folded on the shelf. However, the shelf is taller than I am–too tall for me to see into a basket–so stacks of clothing work best.

Hats and mitts on a closet shelf

Obviously, this was not an intense makeover. Patching the walls, a fresh coat of white paint, a few 1x3s and some white melamine to make some shelves, reusing the closet rod, a handful of cup hooks, a hook board made out of barn board all add up to an organized, functional space that accommodates everything that was on my original list. Even better, we still have room to grow with more space on the shelves and some hooks to spare.

How do you organize your front hall closet? What items do you find hardest to store? Any tips for making sure there’s a place for everything and everything’s in its place?

Closet makeover before

Along with the mudroom, updating the front hall closet was also on last year’s fall to-do list. Now that the mudroom makeover has been revealed, it’s time to share the closet as well.

But not today.

As with any makeover, there is of course a before.

Here’s the closet just inside the front door. The mudroom is just outside the front door.

Front hall closet

This closet is the scene of the first injury we had at the house, which occurred on day one when the shelving that was in here collapsed on my sister. All of the shelves had just been propped against each other and weren’t actually attached to anything. When my sister and brother were cleaning them out and wiping them off, everything came crashing down. Fortunately, the injury was only a pinched finger with minimal blood and was easily solved with a bandage. (I’m still sorry, Jenn).

In the photo collage below, the white strip in the centre (and it is supposed to be white on both halves) is where the shelving was originally. In its absence, we had piled cleaning supplies and everything else on the closet floor–not the most efficient storage method.

Messy front hall closet

The closet’s other issues are illustrated below: chipped baseboard cut out for the extremely flimsy shelving (plus a paint job that went around the shelving and a strip cut out of the ceramic tile for some long ago storage arrangement), wire shelving jammed into the drywall rather than installed properly, a hole in the ceiling likely belonging to a critter (plus a beautiful paint job) and an old non-functioning electrical box of some kind (perhaps an alarm?).

Closet problems

As I mentioned previously, the mudroom is not heated, so this closet was the spot for all of our outerwear–coats, hats, scarves, mitts. I needed both a rod and hooks because I want to be able to hang my nice coats on hangers, and Matt will never ever use a hanger.

While boots and running shoes live in the cooler climate of the mudroom, some of my dress shoes were going to move into the more temperate zone of the front hall closet.

Along with the coats, jackets and shoes traditionally stored in a closet, I had a few special additions that I wanted to accommodate:

  • Broom, mop, dustpan, mop bucket, rags, cleansers
  • Plastic and reusable bags
  • Light bulbs, flashlights and timers
  • Pest control, including fly swatters and mouse traps
  • Keys
  • Dog paraphernalia

Obviously, the space needed some help to accommodate any of those items. Through a variety of storage solutions, we managed to fit everything in.

Tune in next to find out how.

What do you keep in your closet? Are there any items that you find difficult to store? Who else has suffered a shelving injury?

Top o’ the manure morning to ya

Our fields are in the process of being transitioned from hay to soybeans. Earlier this fall, our farmer killed off all of the hay, and at the end of last week, the manure men showed up.

I had an inkling that something might be in the works when on Baxter’s and my morning run on Friday–which takes place entirely before sunrise–a very, very large manure-smelling piece of equipment loomed out of the dark as we entered the big field. Baxter and I  were both a bit disconcerted, as it’s usually just the two of us alone. Once I ascertained that it wasn’t a) coyotes b) a UFO c) poachers, we were able to get on with our run, although Baxter continued to give it the stink eye (pun not intended, but I feel clever now, so I’m leaving it in) as we did our morning perimeter patrol.

Saturday morning, the rumble of machinery signaled that work was underway. Being the weirdo country newbie that I am, I rushed outside with the camera to document the process. I’m not sure that the manure contractors have ever been models before, but they were pretty tolerant of my presence and even took time to answer my questions.

Despite their explanations, I still know very little about manure spreading, so I’ll do my best to explain what I saw.

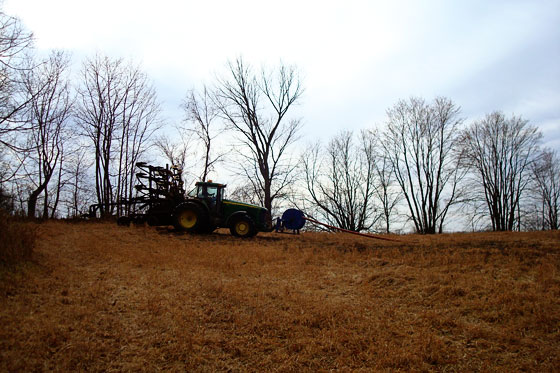
To start, this is a massive operation. The manure men were independent contractors hired by the farmer who rents our fields. They had traveled 3 hours by tractor that morning to come to our farm. Here’s just some of the equipment that was involved in manurefying our fields.

Equipment for manure spraying

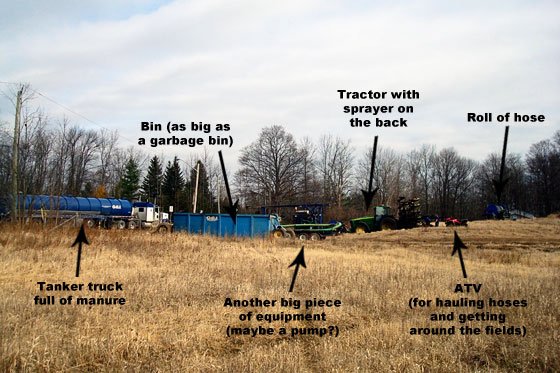
Outside of the frame of this picture is a second tractor, a pick-up truck and another tanker. Each tanker holds 8,000-10,000 gallons of manure. Our front field, which is roughly 6 1/2 acres, took 7-8 truckloads of manure. Holy crap (okay, that pun was intentional).

The trucks were in a regular rotation, going to the veal farm down the road from our place to get filled with manure and then coming back to the farm to deposit their load.

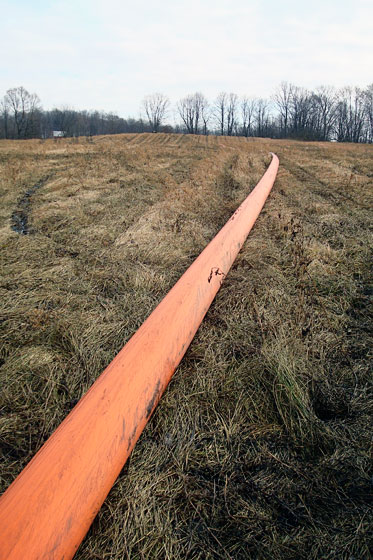
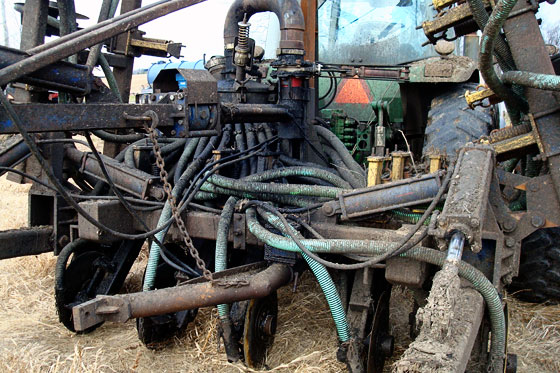
The manure flows from the trucks, I’m assuming through some kind of pump, and then travels in long hoses across the fields to the tractor.

Hose for manure spraying

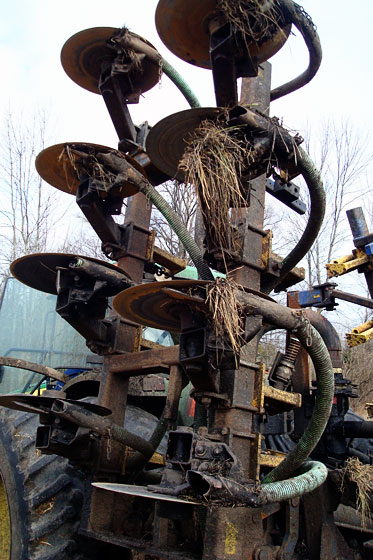
The big hose connects into smaller hoses on the tractor, which are each attached to a disc. It’s a bit hard to see here, but the rear window on the tractor cab has its own windshield wiper… a necessity for when one of the hoses has a “blow-out.” Ewwwww.

Tractor for manure spraying

Here is the spraying attachment folded up (for scale, the tractor’s tire is as tall as me).

Manure spraying attachment

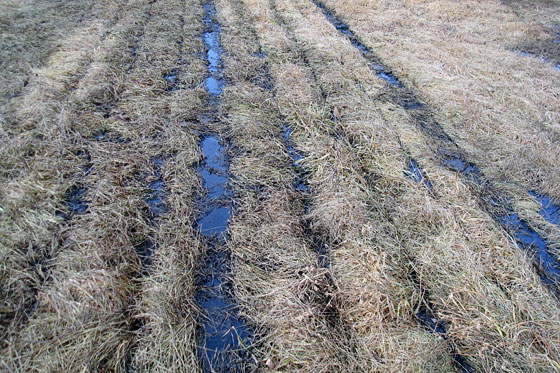
The discs cut into the ground so that the manure goes right into the dirt, although some of it does pool on top.

Field that's been sprayed with manure

When the field is done, the hose rolls up onto a spool on the front of the tractor.

Manure spraying

Here’s an action shot of the spraying.

Tractor spraying manure

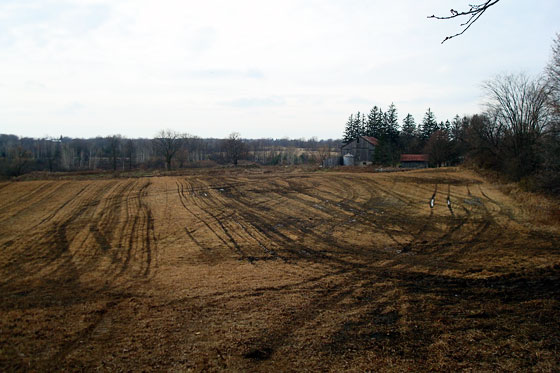
And here’s what our fields look like now. (For contrast here’s a picture from the same angle taken at the start of summer after this year’s first hay harvest.)

Field after spraying with manure

As for what our fields smell like now, well, I have to admit things are a bit stinky around here. It’s not as bad as I thought it would be (perhaps I’m building a bit of an immunity to “country air”). At the same time, I feel like I’m constantly smelling manure. Even when I’m in the house with the windows closed, the smell is still in my nose.

I’ll leave that part of the experience to your imagination.

Does anyone have any wisdom to share about manure spraying? How weird was it that I felt the need to document the whole process? Is anyone else dealing with a malodorous environment? Any idea how long it will take for the smell to fade?

Trompe l’oeil barn board

If that title isn’t a contradiction in terms, I don’t know what is.

I associate trompe l’oeil with fancy murals and beautiful chateaus. Not with farmhouses, and certainly not with mudrooms. However, in my recent mudroom makeover, I created the look of barnboard in an attempt to dress up basic boring slab bi-fold closet doors.

The closet doors are one of those projects that were added on to the makeover because I had to. The doors were coated with an anaglytpa wallpaper that had been painted. It did not match up to the rustic feel I was going for, so I decided to strip it off the doors. Doing that revealed why the doors had been wallpapered in the first place: layers of badly chipped paint that I couldn’t simply paint over.

Chipped paint on bifold closet doors

I briefly considered covering the doors right back up with another textured wallpaper–bead board this time–but then I had another brainwave and decided to strip them back to the bare wood. The thought process went something like this: “Bead board… paneling… planks… vertical planks… like siding on a barn… like barn board… hey, barn board!”

I had seen Minwax Classic Grey stain on the dollhouse Jessica made over at Running With Scissors and was impressed by how she was able to replicate weathered wood, so I decided that was the way to go.

However, just like when I was painting trim in the mudroom, the motivation to strip the closet doors was hard to find. After a few months of procrastinating followed by many, many coats of stripper and lots and lots of sanding, my closet doors were finally naked. Perhaps because of all of the stripper I had to use, I found it difficult to get an even coat with the stain, but I think that works in my favour, as barn board is made up of varied tones.

Minwax grey stained bifold closet doors

Then to make my flat bi-fold closet doors look a little bit more like weathered grey boards, I took a black marker and drew vertical lines down the middle of each door to make trompe l’oiel planks. If I’d really been serious, I could have routed a very shallow gouge down the middle of each door, but I was just going for the feel of barn board and not trying to replicate it too closely.

Draw barn planks with a marker

I reused the black metal pulls that were on the doors originally, turning them vertical to look a little more barndoor-ish. Remember, this makeover was all about cheap and cheerful and working with what we had.

So there you have it. Magic marker barn board planks. Or if you want to be fancy, trompe l’oeil barn board planks. Not a bad way to dress up basic flat panel bi-fold doors.

And there you have the last project of the mudroom makeover. Thanks for all of your great comments and suggestions throughout these posts. It’s so great to finally have one room done.

There are lots more ideas on how to make flat doors more interesting on Pinterest and all over the blogosphere. What are some of your favourites? Do you have barn board (real or fake) in your house? Anyone have any suggestions of the best paint strippers to use? I’m not sure the brand I chose was the most effective, because I felt like these doors took an awful lot of stripper. Any stripping horror or success stories to share? Have you ever “faked it” and made your own trompe l’oeil?

How to build simple closet shelves

When I first asked everyone’s advice on what we should do in our mudroom makeover, the most frequent suggestion was to pull off the closet doors and make built-in storage with a bench, cubbies, shelves and hooks. While I love that look, I knew I needed places to put things more than I needed to be able to sit down. The biggest improvement I could make to how the mudroom functioned was to build more storage in the closet.

As you saw in the reveal, I split the closet in half, putting floor to ceiling shelves at one end and a single shelf over top of a hanging rod at the other.

Closet storage

To build these simple shelves, I went with my go-to shelving material: white melamine. It may not be the fanciest, but this stuff is easy. It comes in 12-inch or 16-inch widths (I chose the 16) and 8 foot lengths. One long edge is pre-finished. There is no painting (although you can), no sanding, no special tools.

To support the shelves, I screwed 1x2s (which I did paint) into the wall studs with 3 inch screws. The shelves simply sit on top.

White melamine shelving on 1x2s

For the top shelf, I used 1×3 as I wanted a wider board to attach the rod.

How to attach a closet rod

The divider in the middle is a piece of melamine run vertically. There was a cut-out in the ceramic tile floor for some long-ago shelving system, so I filled that with a 2×4 and cut a channel to hold the melamine in place.

Supporting a closet divider

The melamine comes in 8 foot lengths, so for my 9 1/2 foot closet, I had to splice a few of the shelves. My technique was to tack a piece of melamine underneath. It’s perhaps not the most attractive solution, but tucked inside the mudroom closet I wasn’t super concerned about appearances. It’s sturdy and will easily hold a golf ball collection or anything else you want to put on it.

Joining melamine shelves together

The sturdiness of melamine is its best feature in my opinion. As long as it’s properly supported, it can hold a decent amount of weight and won’t sag. To prevent any droopiness, it’s important to put the 1×2 supports along all three sides of the shelf, not just at either end.

I know there are much more attractive storage systems out there, but, for a behind closed doors solution, this simple set up of melamine and 1x2s works for us. Even better, it’s completely custom and accommodates exactly what we need.

How do you handle closet organization? Has anyone else built a custom storage system? Any other melamine fans out there?

We’re gonna need a bigger rug

The famous line of “you’re gonna need a bigger boat” was uttered in reference to a murderous shark. Obviously, the mud and dirt outside our front door is less threatening than a very large fish. However, protecting the house from Mother Nature’s ongoing assault is a no less of a battle.

Most of the year, two mats at either door in the mudroom are sufficient for containing the dirt that comes in on our boots. However, in the winter, when the mud and the wet increase, a bigger rug was required.

I needed something durable that would trap lots of dirt. And it had to be cheap, of course.

Growing up, we always had a cocoa mat at the front door. And I always hated it. It was scratchy and ugly, in my naive child’s opinion. However, it worked, and when we moved into the farm last year, it was only a few weeks before I went out and bought one of my own.

Now that I needed a bigger rug, I decided cocoa was the way to go. Rona sells cocoa mat by the linear foot, so I decided to buy two strips and make my own rug with the help of some duct tape.

I “tacked” the seam every foot or so with a short piece of tape making sure to keep the two runners tight and even. Then I went over the join with a single strip of tape. My helper carefully checked everything.

Seaming a rug with duct tape

I cut the rug to the exact length using a drywall square to get a perfect straight edge.

Cutting a rug using a drywall square

The finished rug is 52 inches wide by 9 1/2 feet long. The seam is mostly invisible.

Homemade cocoa mat is a mudroom

It probably won’t keep sharks at bay, but so far it’s doing a good job of handling the dirt that keeps trying to invade the house.

Have you ever made your own rug? Are you on the like or dislike side of cocoa mat? How do you handle floor covering at your entryway?

Beautiful beat up bench

You may have thought that after a full week of posts we were done with the mudroom. No way! It’s my first finished room. I’m going to savour this for awhile yet.

To start, I’m sharing my favourite project, my beautiful beat up rustic wood bench.

Rustic wood bench in a mudroom

I love this bench.

My nephew Nicholas and I designed it, built it and stained it. It’s made out of one single plank that I found in the barn. I looked for the most beat up piece of wood I could find. It’s full of knots, splits and gouges. We sanded and sanded the bench so that it was smooth enough to sit on, but made sure all of the “defects” still showed through. Unfortunately, when it came to staining the bench, the wood was so thirsty that it sucked up every single drop of stain (Minwax Provincial), so the bench came out much, much darker than we expected. Some of the knots and gnarls aren’t as obvious now because of the dark tone, but I still think it has good character.

Knot hole in a rustic wooden bench

We designed the bench to some very specific requirements. We wanted the legs to be wide enough that we could put two trays of boots and shoes underneath. The seat had to be a comfortable height for sitting and also high enough that Matt’s tall boots would easily fit underneath. And we wanted it to be relatively slim so that it didn’t take up too much space in the room.

Rustic wooden bench

My nephew and I went back and forth on the design of the legs and finally settled on a simple upside down V cutout. I used my Kreg jig to attach the legs to the bench top. This was the first project that I used the Kreg for, and I quickly learned that the Kreg is built for standard modern day lumber. This plank was milled back when 2x4s were actually 2 inches by 4 inches, so it’s fatter than today’s lumber. We made the jig work, but it was a tight squeeze in a few spots.

It’s a very simple rustic wood bench that’s perfect in a country house. I’ve dubbed it the “Nicholas” after my design sidekick. If you want your own Nicholas, you can’t have the nephew, but you can have the bench. Click here for the plans.

Who else has a construction sidekick? Have you ever designed and built your own custom piece of furniture? Are there any other Kreg fans out there? Who else has stained a “thirsty” piece of wood? Are you a fan of the “distressed” look of beat up lumber?

Remembering

In a corner of my parent’s family room hangs a very special display. It is a shadow box made by my Dad, filled with photos and mementos from my grandfather’s service in World War II. There are his medals, pins, his ID bracelet (his “dog tag”), his tank drivers license, pictures from training here in Canada and with his division overseas.

World War II medals and mementos in a shadow box

The centre of the display is obviously my grandpa’s medals. It took my grandfather a long time to share these medals with the family. Growing up, my Dad never saw them. Slowly, as the years passed and grandchildren were born, my grandfather began to show us items from the war. Eventually, when we went to the annual Remembrance Day service, he wore his medals.

Grandma and Grandpa

My Grandma and Grandpa in 2000

My grandfather did not talk about the war. My Dad asked him once and has a single page of notes from the conversation. It was obviously very hard for my grandfather to remember that time.

Perhaps that is why Remembrance Day is so important to me. I don’t know what my grandpa went through when he was overseas, but I know it had a big impact on him. Therefore, today, I take the time to remember him and to be grateful.

For last year’s Remembrance Day post, click here.