Colourful creative office

Office after

My office. A space that’s completely my own. The last bedroom in our house. It’s done. And I’m so happy with how it turned out.

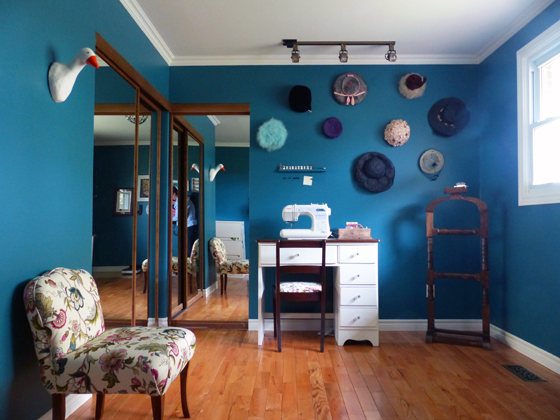
While I’ve used the word “office” to describe this room, it’s really a sewing, crafting, creative space.

It’s filled with the things that I like to do. The things I like the most and that mean the most to me (Bill!). I love that I now have an organized room that I enjoy being in.

Favourite things in the office

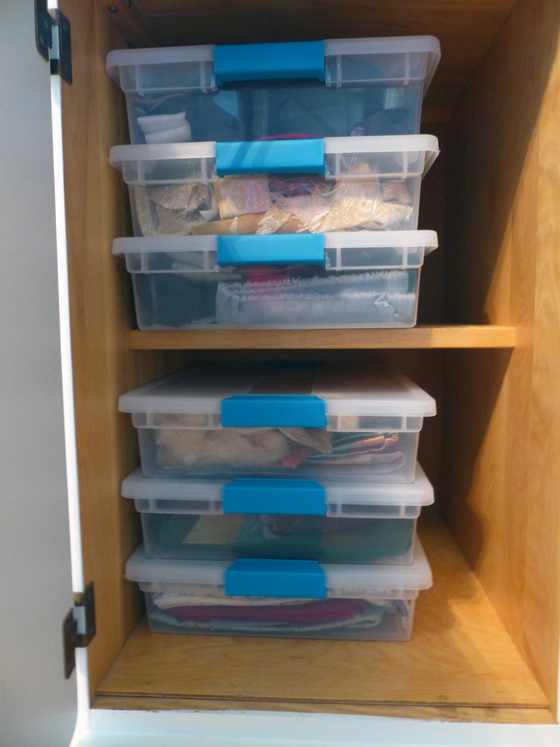
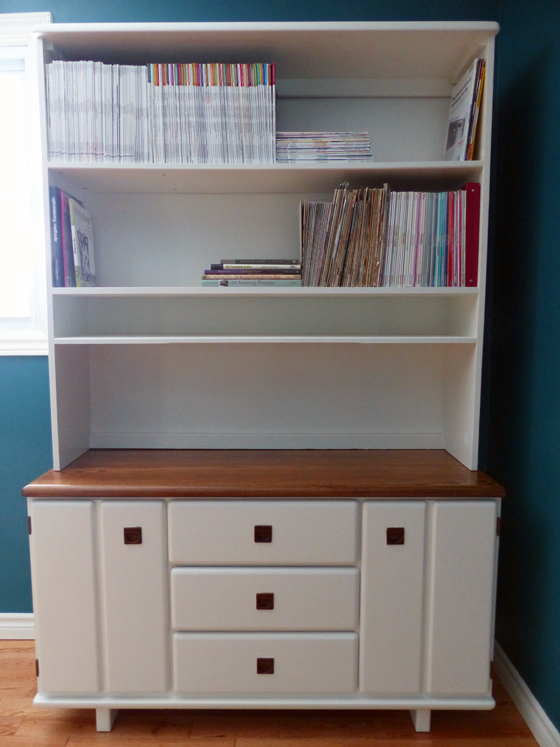
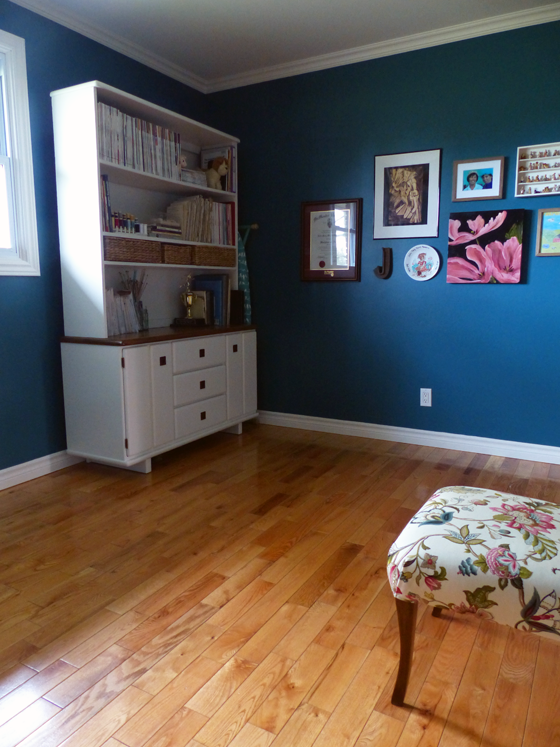
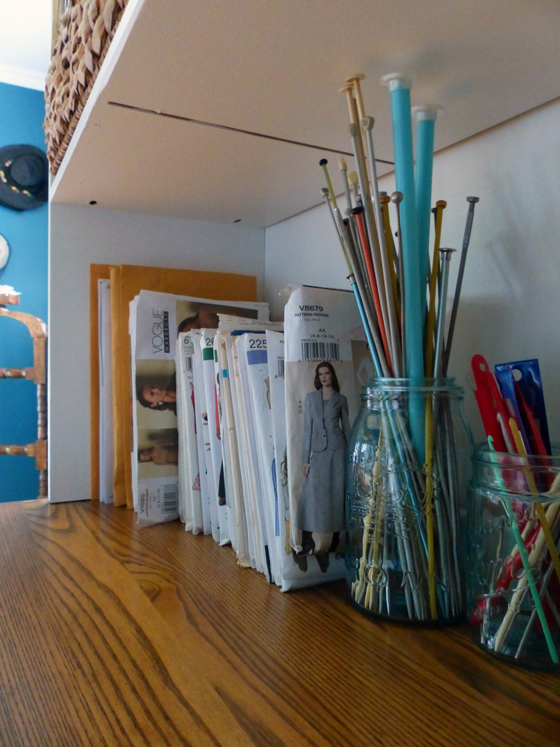
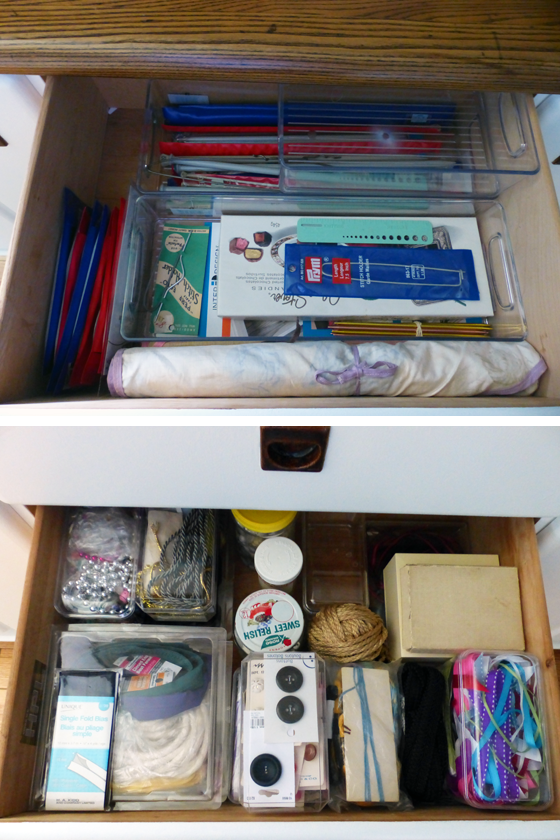
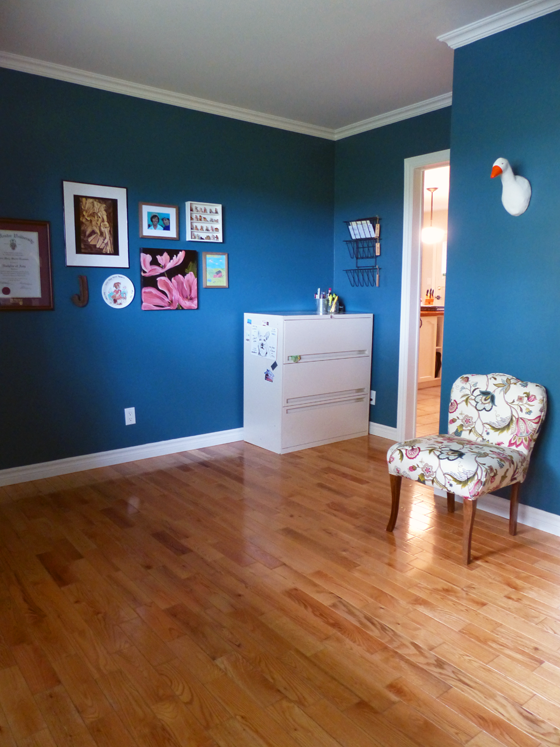
This wall used to be filled with boxes that had been packed since we moved in five years ago. Now, the thrifted china cabinet holds sewing and knitting supplies, magazines and memorabilia–and keeps them all organized.

China cabinet storage in the office

Sewing pattersn and knitting needles

Knitting and sewing supplies

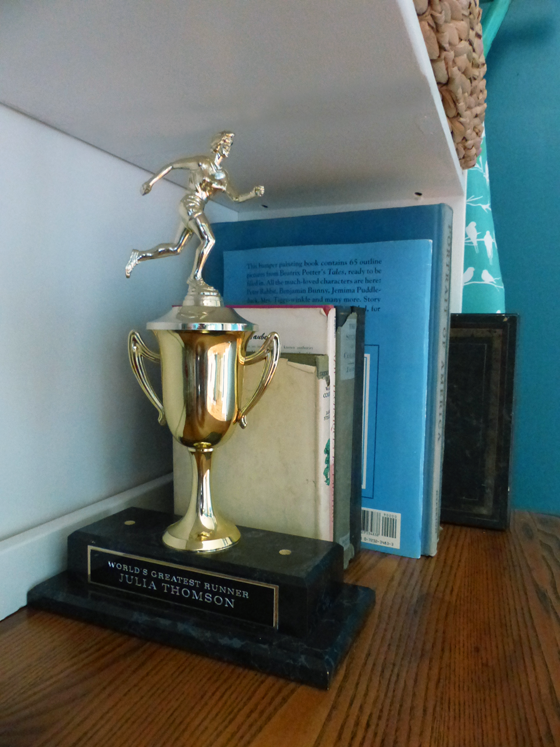
Growing up, I never won a trophy. When we were dating, I mentioned this to Matt. One fall, after I ran my first 10K, Matt presented me with a huge trophy. It meant so much to me that he did that. However, the trophy was truly huge. I took it apart and then put it back together in a slightly smaller configuration, and it fits easily on the shelves.

Running trophy

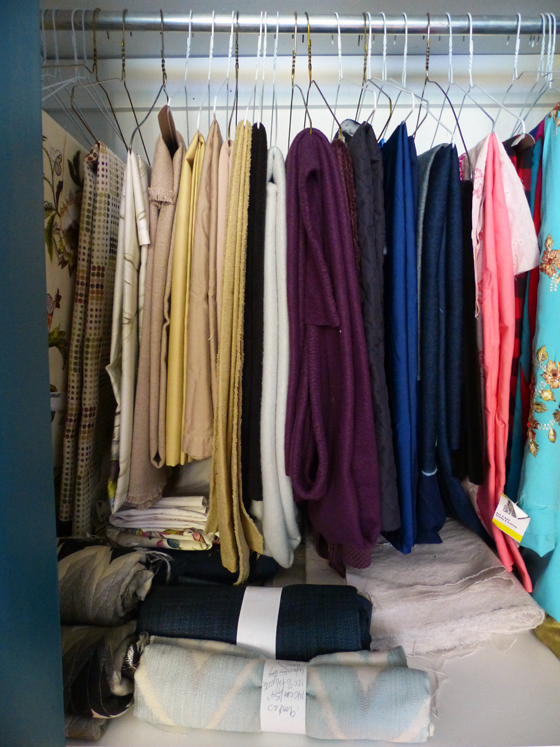
Reconfiguring the closet was also hugely helpful to keep everything organized. Hanging up my big pieces of fabric makes it easy to see what I have and ensures that I’m more likely to use them.

Fabric stash hanging in the closet

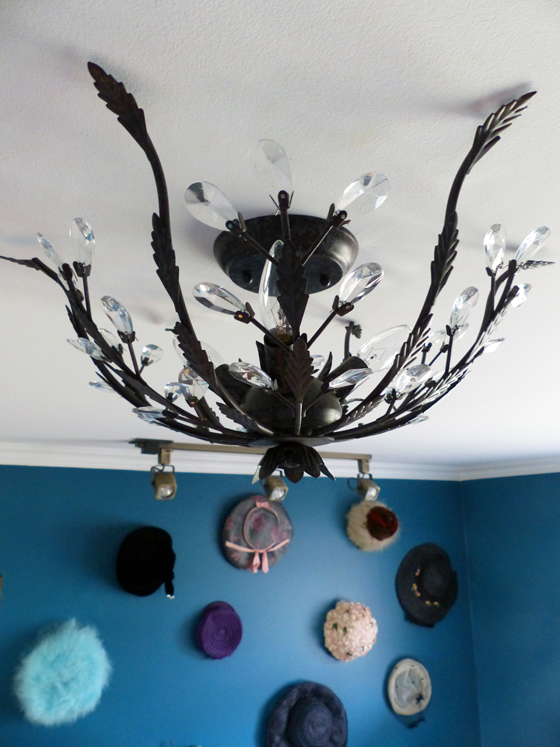
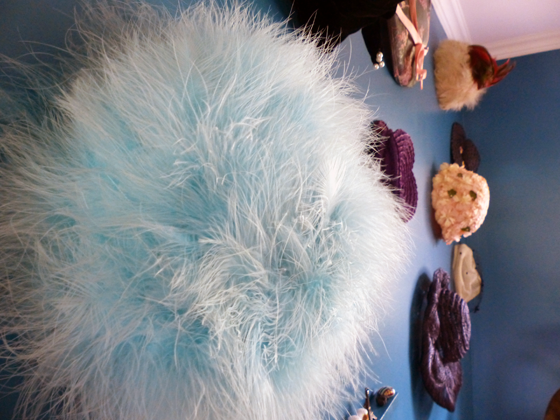
When it came to art, I wanted to display some of my favourite things–like this collection of vintage hats. My Mom taught me how to sew. She learned from her mother–the original owner of most of these hats. In fact, my great-grandmother made one of the hats that is hanging on the wall.

I love the idea of a time where people regularly dressed up to go out, and hats were part of the outfits. I don’t live in that world, but I can still enjoy these hats by having them on display.

Vintage hats hung on the wall

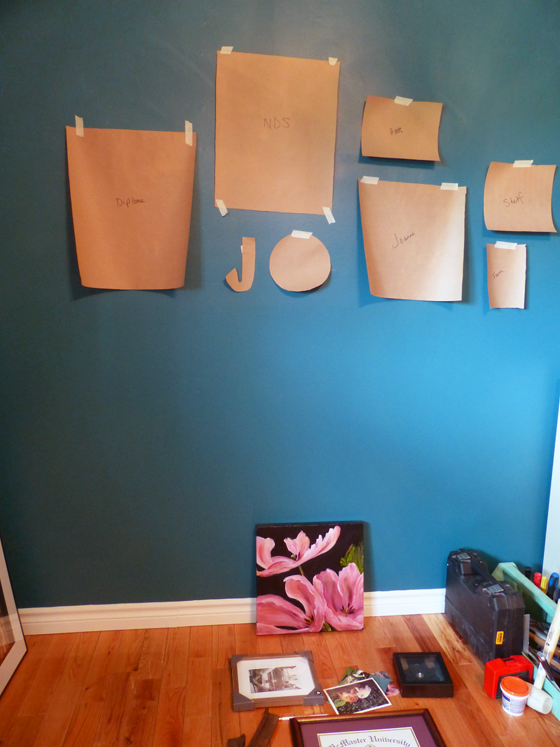
The gallery wall is another showcase of my favourite things.

Gallery wall

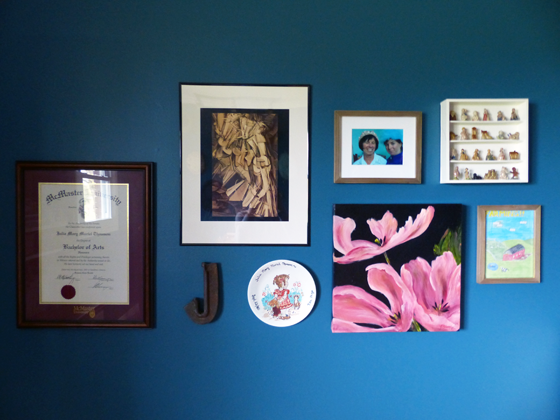
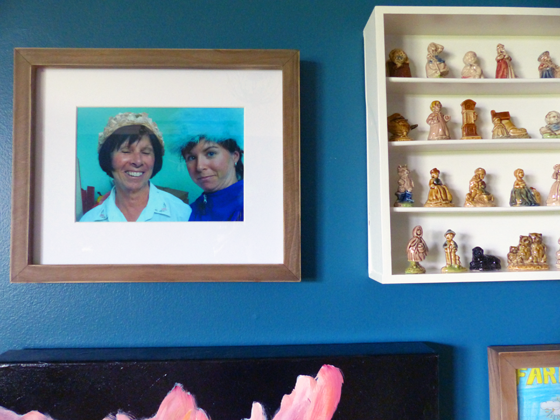
The same grandma that taught my Mom to sew also had a collection of Red Rose Tea figurines. Often when we were leaving her home after visiting, she would give us a figurine to take home. A few years ago, I decided to collect a full set of the nursery rhyme statues. Between gifts and flea markets, I got every one. However, I’ve never had a place to display them. Now I do–along with a fun photo of my Mom and I modeling some of the hats.

Red Rose Tea figurines

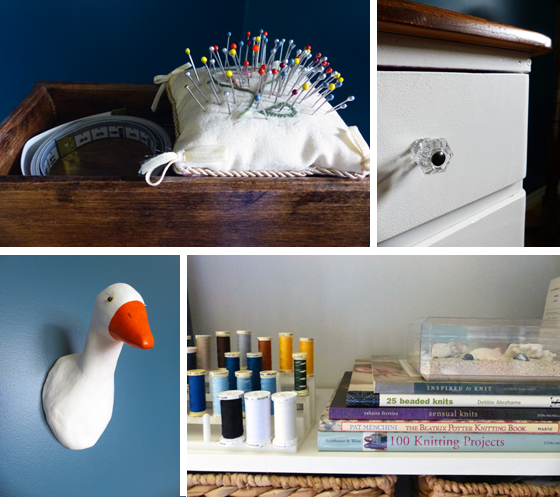
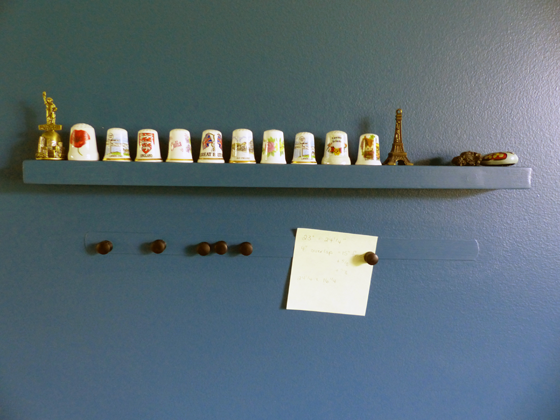
Another small collection that is finally on display is my thimble collection. Matt’s parents travel a fair amount, and my MIL buys a china thimble for me pretty much everywhere they go. I made a really small shelf to go above my sewing machine, and it holds all of the thimbles perfectly.

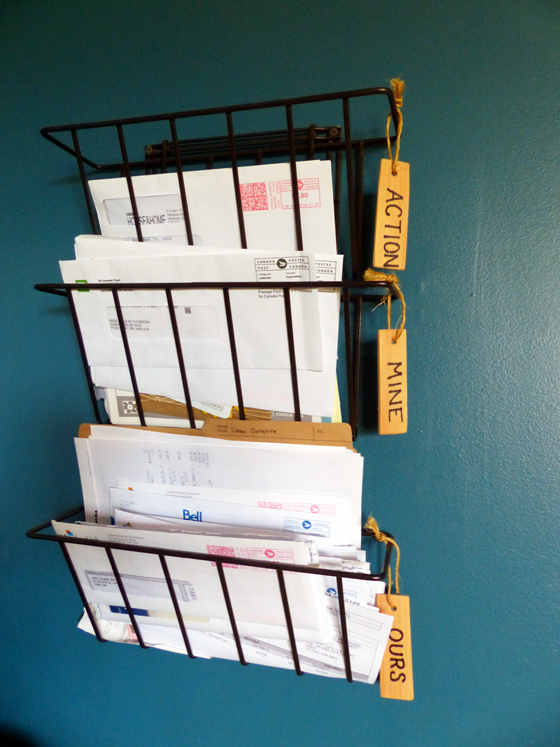
A magnetic strip from Lee Valley, painted the same colour as the wall, holds sewing instructions where I can easily see them as I’m working.

Thimble collection

While I’m not an official participant in the One Room Challenge, which concludes this week, it definitely helped motivate me to finish off this room. I love that every item on my to-do list is crossed off.
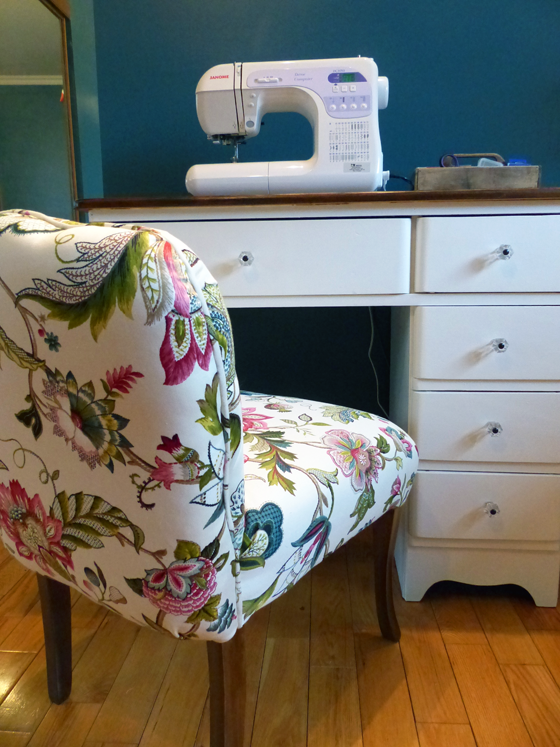
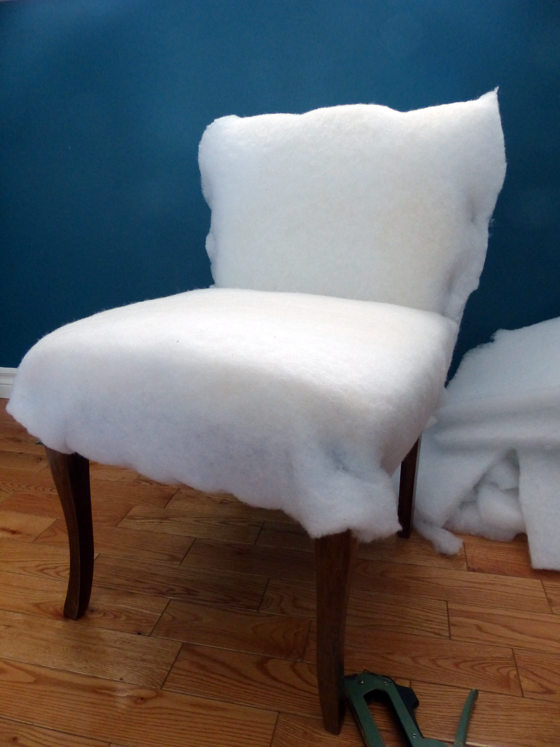
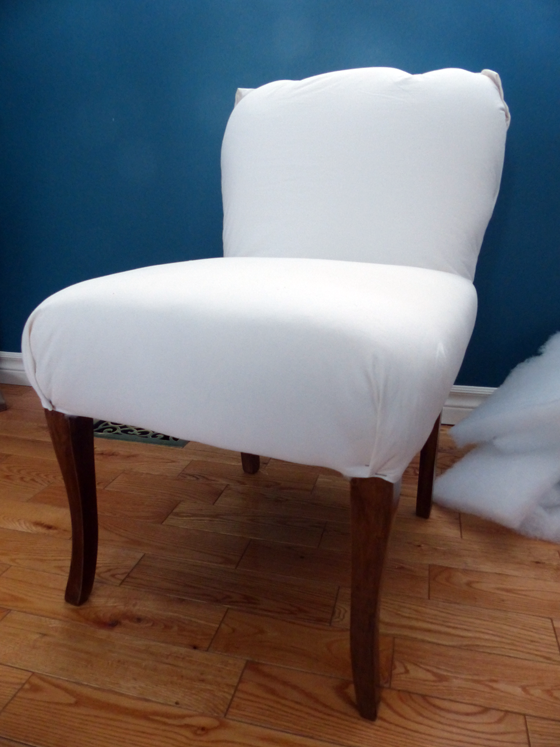
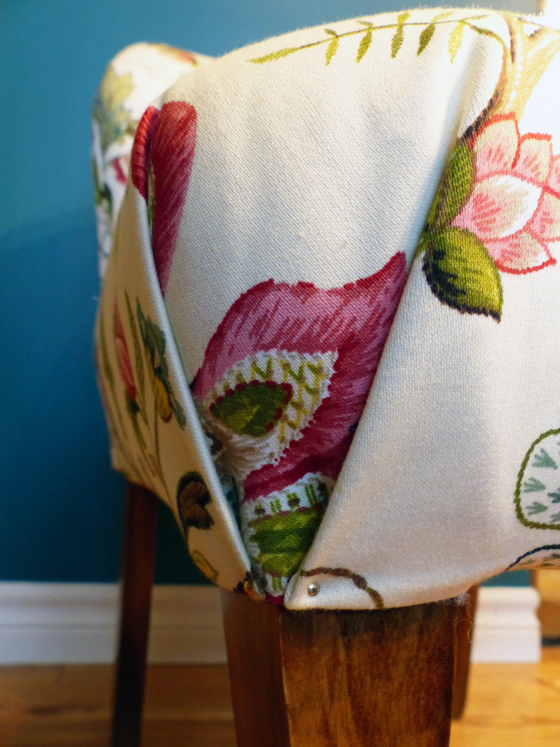
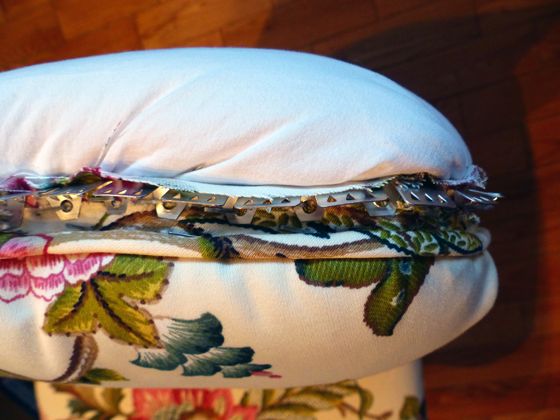
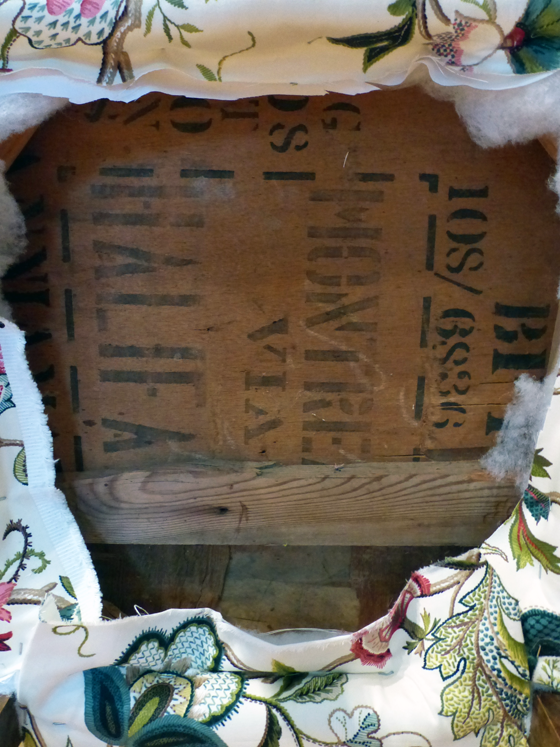
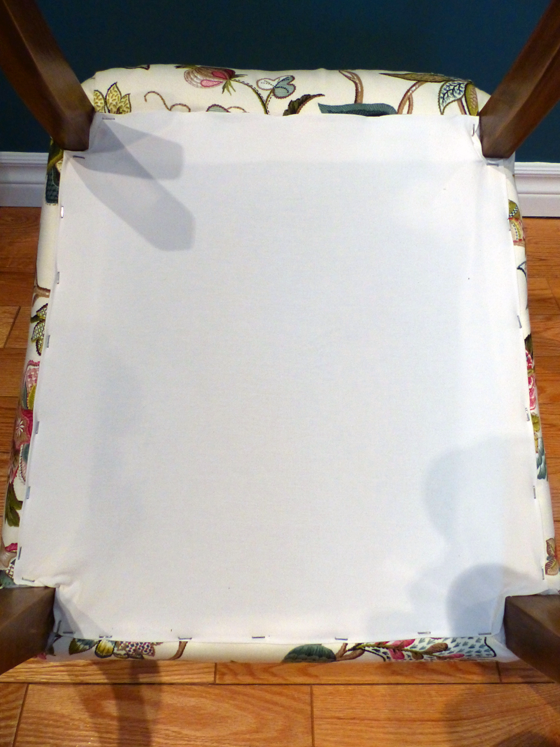
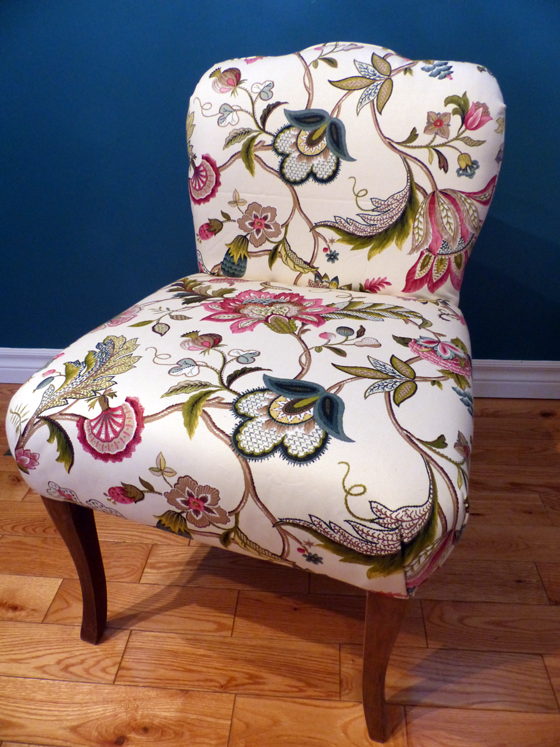
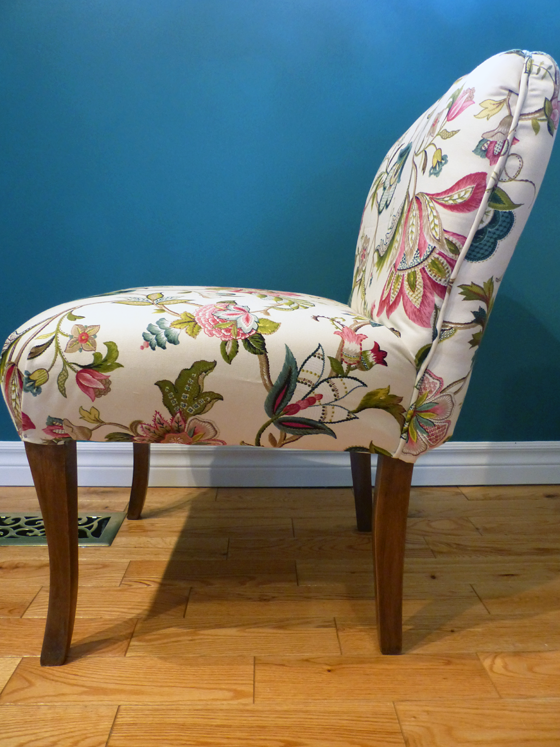
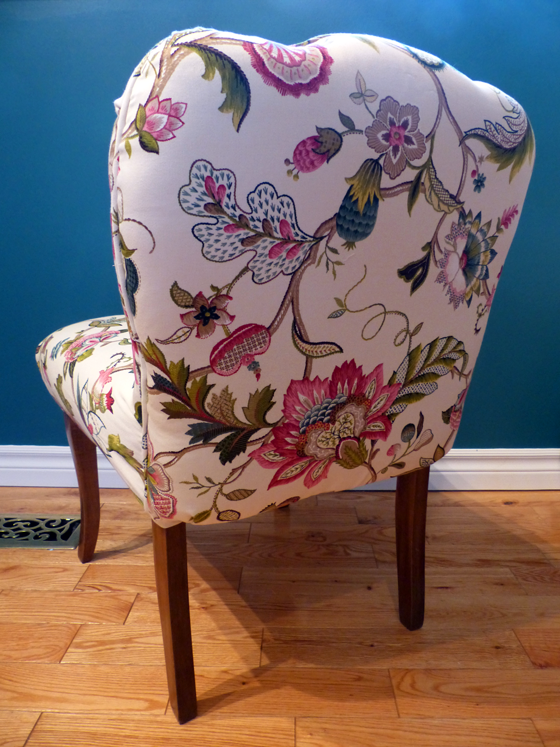
You can check out all of the official ORC participants at Calling it Home.

Feminine blue and floral office

There are so many little details that make this room work really well for me. And I love the beauty and the sentimentality that I was able to incorporate as well. While the ORC motivated me to finish the office, the room itself is now motivating me to keep crafting. I’ve returned to some projects that have been hanging around for a little while and had a super productive sewing month where I’ve churned out a dress, jacket and several pillows. I’m excited by what else this room is going to inspire.

Thanks for following along on the makeover. Do you have a crafty creative space at your house? What helps motivate you to finish projects–whether big like a room makeover or smaller crafts? Do you have a favourite collection on display?

Snoring, storing and decoring in the office

Baxter dozing

My sidekick and I made some more progress in the office this weekend. To be truthful, my sidekick snored and snuggled his dinosaur. I made the progress.

Beyond making the office pretty, I want to make it useful, organized and tidy. Usually when it comes to storage, I make due with whatever freebies I can find–cardboard cartons, shoe boxes, containers destined for the recycling bin.

While sometimes they work, sometimes they don’t. So for the office, I bought proper storage containers. Thanks to all of the sorting and tossing I’ve done, I didn’t need too many.

From a big cardboard box full of old school papers, I now have one–much smaller–plastic bin.

Plastic storage box

Six smaller containers hold all of my fabric remnants and fit perfectly into one of the cupboards in the china cabinet.

Plastic storage boxes

On the pretty side of the office makeover, I worked on the gallery wall. I’m actually not a huge fan of gallery walls. But I when I thought about everything that I wanted to display in the office, I realized that the best arrangement was to put them all together.

I am not a patient person, so I tried just laying it out on the floor and translating that to the wall. But it was hard to visualize. I traced each item onto paper and then taped them to the wall. I’m glad I took the time to map it out. It helped to finalize the layout–and realize that the initial placement was much too high.

Planning the gallery wall

Once I settled on the arrangement, I started hammering nails into the wall right away. But then I had to exercise some patience again. It was hard to get the pictures exactly where I wanted just by guessing where to place the nail. I took a minute to run downstairs and grab a paint stick and a screw. I don’t know why it took me so long to make this little tool. It made hanging the pictures so easy.

Paintstick picture hanger

I’m excited to show you the final gallery wall and the rest of the office next week when the One Room Challenge concludes. You can check out all of the official participants at Calling It Home.

Do you have a gallery wall in your home? How do you handle storage? Who else has a lazy sidekick?

Walking down memory lane via the office

Sorting bills

Oooh, you’re in for a special blog post today. The next step in my office makeover was… wait for it… paperwork and filing. You can’t stand the excitement, right?

Paperwork may not be the most photogenic or interesting topic for a blog post. But it’s a fact of life, or at least a fact of my life.

I actually have some great systems to manage paper in my office. I’ve set these up over the last few years and they work pretty well for me. So even though I’m making over the office, I’m not making over absolutely everything.

This mail organizer is my main tool. As soon as the walls were painted, I reinstalled this right away. I only file paperwork a few times a year (all of our bills except for our credit cards are set up for automatic debits), so the piles of mail and bills grow and get messy. The organizer isn’t always tidy, but it avoids the piles.

Mail organizer

Receipts live in a box in a drawer until I reconcile them with my statements.

Receipts

You know we keep a pretty close eye on our finances. This reconciliation is one of the ways I do that.

Once everything is sorted, the papers go into our filing cabinet. The filing cabinet may not be the prettiest piece of furniture, but it’s very functional for us. I’ve seen some cool filing cabinet makeovers with paint, hardware and even fabric, so that may be something to consider for the future.

In the meantime, appreciate the nearly empty mail organizer.

Filing cabinet and mail sorter

The other paperwork I tackled was a huge box full of old schoolwork. As in from kindergarten through to university. Most of it ended up on the burn pile, but I kept a few things like report cards, class photos, my award-winning science project, a couple of memorable stories and this prophetic drawing.

Farm drawing

Even for the things I didn’t keep, it was fun to look back. I could see how my teacher’s comments on my grade 12 English essays made me a better writer–she was a tough marker, but completely right. In the kindergarten folder, I found this mimeographed matching sheet.

First test

On the back in my Mom’s hand-writing, it said “Julia’s first school test.” Awww.

First test

Now that I have returned from memory lane, I’m looking ahead again on what’s left for the office. Here’s where I’m at:

  • Buy and install light fixture
  • Unpack remaining boxes and organize china cabinet
  • Style china cabinet shelves
  • Sort and file paperwork
  • Install gallery wall #1
  • Install gallery wall #2
  • Reupholster seat of wooden chair

We’re down to two weeks to go in this mini One Room Challenge. Remember you can check out the official ORC participants at Calling it Home.

How do you organize mail, bills, receipts and paperwork at your house? Have you gone paperless yet? Has anyone else kept old schoolwork?

Mini One Room Challenge update #1

Vine flushmount light fixture

There are three weeks left in the official One Room Challenge. And three weeks left in my personal mini-ORC, also known as mission finish the office.

Already the motivation of the ORC is working. I had a very productive weekend, and I’m excited to see the finishing touches for the office coming together.

Here’s the to-do list update:

  • Buy and install light fixture
  • Unpack remaining boxes and organize china cabinet
  • Style china cabinet shelves
  • Sort and file paperwork
  • Install gallery wall #1
  • Install gallery wall #2
  • Reupholster seat of wooden chair

As you can see from the photo above, I have a proper light fixture now. I’ve envisioned this light fixture in the office for a long time. I second guessed myself for a moment when I finally bought it, but now that it’s installed it’s perfect. I love the dark metal and the vines and the crystals.

It’s kind of fun and a bit of a different experience to decorate a room completely for myself.

Something that’s also entirely for me is the gallery wall you see behind the light fixture. I’ll share more about that in a couple of weeks when I post the final the reveal.

Another personal favourite is the Brissac Jewel fabric by P Kaufmann that I used on my bulletin board and slipper chair. It’s making another appearance, this time on a wooden chair that past owners left at the farm.

Upholstering this chair hadn’t been part of the original plan for the office, but I couldn’t let this chair go (I have a thing for chairs). Covering a slip seat is a whole lot easier than upholstering the slipper chair. Pulling all of the staples out of the old upholstery probably took longer than adding the new fabric.

The dark wood and the bright fresh fabric look so nice against the white desk and turquoise walls.

Sewing desk

A major perk of the ORC is it ensures I complete all of the little details of a makeover. Details like paint touch-ups (which were also part of my weekend) and upholstering this chair.

It’s those little details that make a room come together. I’m thankful to finally be at that point with the office. Just a little more to go. We’re getting there.

So are all of the other bloggers that are participating officially in the ORC. Even though I’m not linking up, I encourage you to check out the other makeovers at Calling It Home. There will be new updates every Wednesday and Thursday until May 10.

Have you ever decorated a room just for you?

New upholstery for a vintage slipper chair

Slipper chair upholstered in Brissac Jewel by P Kaufmann Fabric

When my Mom was cleaning out my grandmother’s house, I asked if I could have the slipper chair. When my Mom showed up with a pink skirted chair, I was surprised. I actually didn’t remember ever having seen this chair before. The “slipper” chair I had in mind was a parson’s chair that had sat in my grandmother’s front hall. I ended up with that chair too–in fact it turned out to be one of a pair and I got them both in addition to the little pink slipper chair.

Yes, I have a thing for chairs.

I stripped off the pink cover and the old padding way back when we were still living at our first house. And the poor chair has sat naked in the pool room since we moved here to the farm. (I still had the pink cover balled up in a plastic bag. I slipped it back on the chair for a photo op. However, with no stuffing and an extreme number of wrinkles, the chair, which was already pretty sad, looks really, really sad.)

Reupholstering a slipper chair

I’ve always envisioned the slipper chair being part of my office, so now that that makeover is underway, it was finally time to give the slipper chair a new life.

This was a totally start from scratch scenario. I had the wood frame of the chair and that was it.

Wood frame of a slipper chair

This was also a totally make it up as I go scenario. I am not experienced in upholstery and am–like many people–a bit intimidated by it.

So I just dove in. I stained the legs to a dark brown. I covered the seat with some foam, and then put more foam on the back. I covered it all with batting, mashing it around the corners. I stapled, stapled and stapled.

Reupholstering a slipper chair

Then I covered it all with an old sheet, stapling the heck out of every fold.

Reupholstering a slipper chair

Then things got serious. I pulled out my bolt of Brissac Jewel fabric that I’ve had for longer than I’ve had the chair. There was lots of laying things out, turning them around, laying them out again, putting them back to the exact way they were before. And then doing it all over again. Once I finally figured out how to place the fabric, I then spent a lot of time stuffing material around the legs and trying to get the folds just right–or right enough.

Reupholstering a slipper chair

Reupholstering a slipper chair

I made my own piping and used flexible metal tack strip (plygrip) for the first time (this video was very helpful).

Reupholstering a slipper chair

I built my grip strength using my vintage manual staple gun–seriously, I’m almost ready for American Ninja Warrior. My fingertips are still tender. If I take on more upholstery, I would invest in an air powered staple gun. However, a project like this can be done with very basic tools–and very basic skills.

I covered up the messy underside with another piece of the sheet (although the packing crate that was used for the seat is pretty cool–I wonder what went to Montreal via Halifax).

Stamped wood on the underside of the vintage slipper chair

Underside of the slipper chair

My grandmother grew up in her family’s furniture store and reupholstered furniture regularly. She made the pink slip cover that was on the slipper chair originally. All I could think as I was working on this chair was that she would definitely have something to say about my technique if she was around. And I wish she was around to tell me how to do it right.

Right or wrong, though, it turned out pretty well. I can see the few flaws, but overall, I’m really proud.

Slipper chair upholstered in Brissac Jewel by P Kaufmann Fabric

Slipper chair upholstered in Brissac Jewel by P Kaufmann Fabric

Slipper chair upholstered in Brissac Jewel by P Kaufmann Fabric

Slipper chair upholstered in Brissac Jewel by P Kaufmann Fabric

I think my grandmother would be too.

Cool or creepy?

Bookshelves

One thing our home is lacking is bookends. I know. It’s tragic. You pity me, don’t you?

I will admit that as our bookshelves are filling up, there is less and less need for bookends. On many shelves, the books now go end to end, and I have a hard time squeezing in the decorative objets that I want to display.

However, I am still on the hunt for some bookends. So far, I’ve found them hard to find.

I’m only looking casually at thrift stores, so this hasn’t been the most active of hunts. I don’t want them to be super kitschy. I also want them to be cheap–hence, thrift store.

I came across this hand bookend last week. I immediately picked it up, but then I second guessed myself. Was it creepy?

Hand bookend

I bought it anyways.

Even if it is creepy, I think it works with Matt’s Stephen King collection.

Hand bookend

What’s your vote? Creepy? Or cool?

Finding a home for a favourite table

Drop zone in the front entryway

Do you have a drop zone in your house? It’s one of those handy areas, usually near the entry, where you can “drop” things as you come in. Mail, keys, purse, receipts, stray paper.

Our drop zone has been set up for a long time, but I realized recently that I’d never shared it with you.

Maybe because I don’t consider this spot “done.” I continue to mull over the pieces I used in this space–and if we ever proceed with my big reno plan to move the front door, the drop zone will definitely relocate.

However, our drop zone is a great example of two of my favourite home decorating lessons: 1) buy what you like and you’ll find a way to make it work 2) use what you have. So despite thinking of this layout as temporary, it deserves a moment in the spotlight.

The standout piece is the table. This is my very first solo auction purchase. Usually I went to auctions with my parents and my Dad bought for all of us. Then one day my brother and I headed out to an auction just the two of us. When the table came on the block, I bided my time and then jumped in. I had $60 as my cutoff and went one more. I got the table for $65. (Auction lesson: most people will pick a round number for a cutoff. If you can go one more–just one more, don’t get carried away–you might be the winner.)

Carved wood table

I can’t remember exactly when I bought this, but I might have been in university–maybe even high school. For years my parents moved it around their house, trying to fit it in with their furniture.

Even when I moved out, Matt and I didn’t have a spot for it in our first house. But when we moved to the farm, this little wall was the perfect dimension for this table. See what I mean about buy what you like and it will work out?

I am totally a child of the nineties. Remember dark red cherry-ish wood? Back then, I totally envisioned a house with cherry kitchen cabinets, a cherry sleigh bed with matching dresser and nightstands. I love this dark red wood.

But one of my stumbling blocks with this table is the dark red wood. I’m not sure it really works with our house. It doesn’t seem “farmhouse” or “country” to me. I feel like I should maybe paint it. But I love the red wood. And if I don’t like it white, it will be hard to take it back to the wood thanks to all of the deep carvings.

For now, I’m happy to keep the table as it is.

The rest of this little spot is things that we already had. The basket on the bottom holds receipts. Every so often, Matt does a tally so that we keep track of all of our household expenses. The shallow wood saucer on the tabletop was made by my Dad. It’s a spot to drop mail or other papers and it usually holds a flashlight. The rest of the surface stays relatively clear. Usually my camera bag is sitting here, where it’s easy to grab.

Drop zone in the front entryway

Above the table is a little mirror that my cousin gave us for our wedding. Again, this was something that we didn’t have a place for at our first house, but it fits perfectly beside the light switches. The mirror is something else I mull over occasionally. The wall could accommodate something taller, and the gold frame doesn’t exactly say “country.” I have visions of making a simple barn board frame for a taller mirror… maybe.

Despite its shortcomings, this is a very handy spot. It saves things piling up on the kitchen island most of the time. And I’m happy to see my table finally find a home.

Do you have a drop zone at your house? What are essential features of a drop zone for you? Do you have any furniture that took awhile to find its home? Would you paint the table?

Office makeover update

Made over china cabinet for office storage

I mentioned on Friday that I’ve been a bit frustrated by how long the office makeover is taking. I had made huge progress over the Christmas break, but then I went back to work and it felt like things came to a screeching halt.

Here are my previous posts about this project:

I’ve only been working on the office on the weekends, so that’s the biggest factor affecting my progress. Between working long hours at the day job, writing on the side, spending time with my husband, oh and eating, bathing and sleeping, something’s gotta give, and it’s been the office.

But, I feel like I finally turned a corner.

Here’s our original to-do list, and where we’re at:

  • Scrape ceiling – Finished over the Christmas break
  • Paint ceiling, trim and walls – Finished over the Christmas break
  • Add new shelf to closet – Two shelves are installed. Next step is to fill them.
  • Redo china cabinet and desk – This was the part of the project that took much longer than I’d hoped, but they’re done. And like the closet they’re ready to be filled.
  • Reupholster slipper chair – I stained the legs of the chair while I was doing the desk and the cabinet. I have the fabric. I need some foam. Then I’ll teach myself upholstery.
  • Reupholster ironing board – Because a primary activity of the office is sewing, I have an ironing board in the room. It needs a new cover to match the new office.
  • Unpack all of my boxes and decorate – Oh I am so excited to do this finally.

Finishing the furniture was a big step.

I decided to break up all the white with some wood, so I stripped the top of the desk and china cabinet and stained them darker. The rest of the desk and cabinet went white.

In the left side of the photo below you can see a glimpse of the tall narrow dresser that I made a few years ago for the weird little niche. I swear I bought matching hardware for desk drawers at the same time that I made the dresser. It’s been nearly three years, though, and I’m not sure where I put it.

Office makeover in progress

We’re approaching the “put-it-back-together” stage.

I’m looking forward to sorting my yarn, fabric, other crafting supplies and tchotchkes. I’ve already moved some of my magazines and knitting patterns into the china cabinet. There are some amazing vintage patterns from my grandmother. This may be a farm living, home makeover blog, but I’m going to write another post to show you some of them.

Magazine and knitting pattern storage

Often, I see bloggers moving so fast on makeover projects and doing multiple major renos in a single year. That’s not how I do things (obviously).

I’ve been thinking about this project for a long time, though, and it’s starting to look like the picture in my mind. I feel like this is going to come together–I’m not entirely sure how yet, but I think we’re going to get there.

Do you have a first project of the year? How’s it going for you so far? How do you balance projects with all of the other things happening in  your life? Any tips for organizing fabric or yarn? I admit I’m not entirely sure where to start with some of the things that have to come back into this room.

Tips to create a stylish and dog-friendly home

I recently wrote an article for homify that combines my two loves–dogs and home decor. (My husband is another one of my loves, but that’s a post for another time).

I know that many of you are also dog lovers, so I thought I’d share my tips for creating a stylish and dog-friendly home. From dog beds (complete with a trio of super cute dachshunds) to dog showers, there’s a whole range of ideas–and cute puppy photos.

I’d love to hear what makes a dog-friendly home for you.

For many people, home isn’t home without a dog…

A dog-friendly home is one that is comfortable for both its human and animal occupants. There should be a balance of style and function and–good news–it’s easy to have both.

Read my tips.

What makes your home dog-friendly? What do you wish you had that would make your home friendlier? (For me, it’s definitely a dog shower in the mudroom).

Office oddities

My office,which we’re making over, is an odd little room. It is by far the smallest of our bedrooms. It has a weird floorplan. And it’s also apparently haunted. Yup. You read that right.

Here is a floorplan that is mostly to scale. Note the off-centre window and light. The weird little niche just inside the door. The pocket door that leads into our bedroom (which comes in handy as the switch for the second light is in our bedroom).

Office floorplan

When we scraped the ceiling, we uncovered evidence of earlier walls, and Matt came up with the best explanation I’ve heard so far to explain the odd layout.

It appears that at one time the room was divided roughly in two. Matt’s theory is that half the room served as a large pantry for the kitchen, and the other half was a big walk-in closet off the bedroom. (You can kind of see the lines on the ceiling around the dangling light bulb).

Evidence of old walls on the ceiling

The closet theory explains why there are three full-length mirrors in this one little room–even the pocket door is mirrored. As dated as the mirrors are, they come in handy when I’m sewing and want to see how things fit, so they will be staying.

My office before

I’m doing my best to make the layout work for me. You may remember that our long term plan is for this room to become the foyer when we relocate the front door to the house. So I don’t want to do any major renovations that will be ripped out down the road.

I think I’ve come up with a furniture plan that will work.

Office furniture layout

I figured out how to make use of the tiny niche a few years ago when I set it up as a command centre with a tall narrow dresser, bulletin board and our calendar.

Beside the pocket door, there’s a track light on the ceiling. This makes that wall the best location for my desk.

I bought the china cabinet specifically because it was the exact dimensions to fit on the wide side of the window. The cabinet could also go just inside the door (where our filing cabinet is currently located). However, I feel like a tall piece of furniture might crowd the entryway too much.

I’m hoping that all of the changes will exorcise the ghost in the office.

When we were scraping the ceiling, the room got a little humid. The words “Raven Room” appeared in the steam on the window.

Raven room

So very, very odd.

Do you have an odd room at your house? How about a haunted room? How would you lay out the furniture in this room?