Landscaping… the long list

I cannot bring myself to write a list of everything I want to do for renovations in the house, but for some reason I have no problem doing a master list for the landscaping outside.

Landscaping plan

Alright, I’ll admit it. That’s a little overwhelming.

There’s obviously a lot to be done, so it’s a matter of prioritizing what part of our 129 acres we want to focus on. This year, it’s the residential area.

Layout of the residential section of the property

And just to make things a little clearer than the animation above, here’s the plan for this year.

Landscaping plan for this year

That’s manageable, right? As you saw at the beginning of the week, we’ve already made some progress on the turn around, the flowerbeds and the pond shore. Maybe by the end of the growing season, we’ll have the property in shape.

The long term plan will take who knows how long.

Long term landscaping plan

I’ve decided my goal when it comes to outside work is to transition from landscaping to gardening. Weeding flowerbeds is much more manageable than building them.

How do you handle renovations and landscaping at your house? Do you write everything down or just keep a mental list? What are you hoping to accomplish this summer?

Death by landscaping

I am dead.

I’ve been working on a lovely introduction to this post referencing the Secret Garden and the joy of tending a neglected garden. But it’s not coming together for me, and I lack the mental power to make it work. Because I am dead.

You never heard any of the characters from the Secret Garden say, “I am dead. This garden has killed me.” Let’s be honest here, Ben probably said it, but Frances Hodgson Burnett did not include it in her story of love, childhood and horticulture.

In my story of love, adulthood, responsibility, country living and horticulture, landscaping has started.

The turn around has gone from mountain goat terrain to a blank slate, thanks mostly to our farmer with his heavy equipment.

Making a garden on our turnaround

I’ve weeded one flowerbed and my mother-in-law tackled two more. (All of the plant pots were left by the last owners. The plants are still alive, so I’ll be planting them soon on the blank slate of the turn around).

Weeding a flower garden

My father-in-law trimmed some of the trees and stumps around the pond. We still have a ways to go before we can actually mow the shore, but I’ve staked out the new fire pit, and we have lots of wood ready to burn.

Broken tree branch

Matt, my Dad and I dismantled one of our biggest rock piles on the property–and it only took us four hours.

Cleaning up a rock pile

I started building a new flower garden around the well head. And this is when I died.

Rock edged flower garden around a well head

Last year’s landscaping efforts were limited to some very cursory grass cutting. The property was unkempt when we bought it, and our neglect over the past year while we focused on the basement reno made it worse.

The amount of work required to bring a garden back after years and years of neglect is never mentioned in the Secret Garden. Sure there’s a bit of pruning and weeding, but mostly it’s romance and roses.

In the category of things get worse before they get better, even our efforts at clean up have led to more mess. Drilling the new well and trenching new waterlines destroyed one established flowerbed and left lumpy piles of very hard dirt in its place. Burning brush and scrap lumber as we’ve tried to pick up around the property resulted a mountain of ash and a half scorched spruce tree.

Landscaping was at the top of the list on my home goals for this year, and I will get a handle on the situation outside, even if it kills me.

The doughnut tree

Outside the front door, what looks like a regular maple tree is not. It is a doughnut tree.

Pink doughnut hanging in a maple tree

Doughnut trees are sneaky. Under the canopy of leaves in the spring and summer, you forget that they bear a remarkable fruit. However, as the tree sheds its leaves in the fall, the doughnuts become visible again.

Pink doughnut hanging in a maple tree

The question is though, how does one pick a doughnut?

doughnuttree7
Any suggestions?

Home Goals 2013

I’ve never been big on new year’s resolutions, but there is a list that’s been building in my head for some time now. It is the Home Goals 2013 list.

After having most of last year sucked up by the basement-renovation-that-never-ends, my plan for this year is to avoid any other massive all-consuming projects. However, as you can probably imagine, there are a few to-dos I’d like to accomplish.

1. Landscaping. This is going to be the big one this year. As I’ve noted, we didn’t do any landscaping in 2012, so there is a huge need to get on top of the situation outside. However, with 129 acres of property, we will have to prioritize where we spend our energy.

  • Reestablish the flowerbeds around the house. Some will have to be rebuilt. Some will be extended. Everything will have to be weeded.
  • Level old fire pits at the top of the driveway and plant grass seed.
  • Build new fire pit close to the pond.
  • Tidy the east shore of the pond. The brush grew so thick over the past year that I can only access about ten feet of shoreline. Chainsaws and perhaps a bush hog will be required.
  • Put in a garden on the turnaround. This pile of dirt and rubble and weeds is approximately the size of a suburban backyard. A big lush flowerbed sounds like a better plan than mowing any additional grass.
A lush garden with a brick path winding through it

I’m going with inspirational photos for this post, rather than reality. A lush garden with a brick path winding through it would be perfect for the turnaround. Source.

2. Painting.

  • Living room
  • Dining room
  • Kitchen
  • Main floor hallway

3. Living room fireplace. A wood burning fireplace was high on my wish list when we bought the house. We have one, but it needs a little work to make it exactly what I want.

  • Replace the woodstove-esque insert with an open hearth one.
  • Reface with fieldstone.
  • Put up a new rustic wood mantle.
Stone fireplace with wood mantle

4. Laundry room. The final section of the basement needs to be brought up to our new and improved standard.

  • Fix the leaky foundation wall.
  • Paint.
  • DIY a fun light fixture.
  • Build a drying rack.

A few other things will sneak in there, I’m sure, but here’s hoping 2013 brings slightly more time for enjoying rather than always working the farm.

How do you feel about resolutions? Do you have any home goals for 2013? The nester, the champion of annual home goals, published her list last week. It’s a bit more philosophical than mine. I think I’m still at the stage of working on the underlying form for our house and property. Once I have that established, I’ll build in a bit more philosophy.

Growing free

When we had the nephews at the farm two weeks ago, the tall one and I went to work on task #10 on the fall to-do list: remove stakes from established trees and stake the new trees that we planted this spring. The first step was to unshackle the trees from the cuffs that were wrapped around them. Some were tied with rope, some had sections of garden hose, some had wire. All were snug. Some were strangling. It was quite an arboreal torture chamber we were running here.

No tree emerged unscathed. Some are simply scarred.

Dark rope line on tree bark

Others are permanently deformed.

Deformed tree

We cut the wires and hoses and ropes out of the trees as best we could. Where we ran into trouble was the stakes. The nephew and I did fairly well on the first few trees rocking the stakes back and forth to loosen them up and then pulling them out in a coordinated effort. However, after he left and it was up to Matt and me, the rest of the stakes held strong.

We must have been missing the magic touch, because no matter how much we wiggled the stakes we couldn’t get them to budge.

In desperation, Matt went and got Wiley, and I found a rope. We tied the rope to the stake and attached the other end to Wiley’s loader. Then Matt raised the bucket, the rope snapped, and the stake stayed where it was.

I went and got a chain. We hooked everything together, and Matt raised the bucket again. And the front wheels of the tractor lifted off the ground.

We spent a while adjusting the chain, adjusting the tractor, tugging on the stake and only succeeded in bending it.

Tree with a bent metal stake

The conclusion I came to is that the stakes have been in the ground so long that the tree roots must have grown around the metal. I don’t think we’re going to get them out. Above ground, the trees are free. I can only hope they survive their ordeal and continue to grow. Matt, however, is a bit traumatized from his wheelie on the tractor, so we’re calling this job good enough for now. The rest of the stakes–removing them from the older trees and adding them to the new trees–can wait until spring.

Staking our claim

When European explorers first landed in the new world (including Canada), it was customary for them to plant their flag as a symbol of ownership.

I think this latest development means the farm is officially ours.

Canadian flag on a flag pole

Please ignore the overgrown mess that is the turnaround. Past owners dumped heaps of dirt and rubble here that made mowing impossible. Landscaping is next year’s project.

This project also means that Matt and I have officially started in on the fall to-do list. Planting the flag pole was #11.

I had bought the pole second hand on kijiji back at the end of June with the idea that we might be able to install it for Canada Day (July 1). That didn’t happen.

We drilled a hole for the pole back in August when we had the auger, and I tried to convince Matt that installing the flag pole would be a good birthday present for me at the end of September. That didn’t happen.

Finally on Sunday morning, we dragged out the wheelbarrow and a bag of concrete and made it happen. It took all of a half hour to mix the concrete, place the pole in the hole and pack the cement around it.

The hardest part was making sure the pole was plumb and holding it in place with ropes and stakes.

Flagpole braced with ropes

Our mini-circus tent… or the bottom third of the flag pole braced in place while the concrete sets.

Our flag pole came in three pieces, so it was very easy to wrangle one 7 foot piece into place, rather than a long 20 foot pole.

By Monday (I love long weekends by the way–we get so much accomplished) the concrete was set.

Flag pole in concrete

Set, secure and straight!

While Matt and his dad were working in the back bush clearing the trails, I went to work wrangling the rest of the pole into place. If you’re ever looking for a laugh, watch a 5’4″ woman staggering around with a 12 foot flag pole–to which she has already attached the halyard (or rope)–trying to keep it perfectly vertical so she can set it in place on top of another pole that’s as tall as she is. It took two tries, and the cats were absolutely no help.

Once the pole was fully assembled, it was a simple matter of attaching the clips to my rope and hoisting the flag.

Matt’s comment when he returned from the bush and saw the flag was, “I think we just improved this property more than any other owners. Except for maybe the guy who built the barn.”

So yes, we are both ridiculously happy to be flying the flag at the farm. Sometimes it’s the simple things.

I’m missing my front-end loader gene

You know when you see those large machines working away, effortlessly moving large piles of dirt, easily scooping massive rocks, bopping along over the roughest terrain? I’ve discovered there’s a lot of skill that goes into this mechanical ballet.

Skills I apparently don’t have.

Wiley’s been getting a workout over the last little while, cutting, hauling, scooping and carrying. He’s a great partner when it comes to managing the property. Me, however? I’m not such a good teammate.

My specific issue is with the front-end loader.

I just do not find the front-end loader intuitive.

I raise when I want to scoop, I dump when I want to raise. It’s all kinds of awkward.

Backfilling a trench with Kioti CS2410

Please ignore the long grass and the basketball net. Landscaping is next year’s project.

The front end loader is controlled by a joystick. Move it up to raise the bucket, down to lower the bucket. Move it to the left and the bucket curls up. Move it right and the bucket tips to dump.

Maybe it’s because I never played video games growing up, but I just can’t master the joystick. I’m forever moving it the wrong way and end up digging the blade into the ground or prematurely dumping my bucket.

We finally got the new waterline trenched into the driveshed last week, and I decided to backfill the trench. While the job did go quicker with Wiley than it would have with a shovel, I was not efficient by any means. Poor Wiley must have been so confused. “Why is she dumping the dirt here when the hole is over there?”

Yeah. It wasn’t pretty.

Every so often I’d hop off the tractor and grab the shovel or the rake to deal with a random pile by hand.

Matt, Mr. I-love-video-games, has no such issues with the loader. Allow him to demonstrate.

Moving rocks with a front-end loader

This is how you position the bucket to carry a load. This one happens to be one of the many piles of rocks that exist around the property.

Dumping a front-end loader

This is how you dump a load out of the bucket.

So is my lack of front-end loader ability an actual genetic deficiency? Or do you think front-end loader manipulation can be learned? Should I hook up Matt’s old Jump Man game for some joystick practice?

I live in a gated community

It’s a very exclusive enclave we have here in the country.

Population: 2 (plus 1 cat and 1 kitten)

With our new gate in place at the bottom of the driveway, farm living has become quite chi-chi.

Gate at the bottom of the driveway

Open sesame

Actually, setting aside my new pretensions, we installed the gate for security. We’re far enough from civilization that neighbours or police really wouldn’t be much help to us in the event of a break in. If we’re home we can keep an eye on things, but when we’re not the gate may just be enough of a deterrent to people who are thinking about trespassing.

I’ll admit that I was initially pretty resistant to having a gate. I don’t like the way they look, and I didn’t want the inconvenience of opening and closing it when I was coming and going.

However, I actually like the way our gate ended up looking. It’s still a bit of a pain to stop, open the gate, drive through, park and close the gate when you’re leaving or arriving, but it’s a small price to pay for feeling secure about our house.

It’s a simple set up: just a chain and a padlock

Padlocked gate

If you want in, you have to have the key

My Dad and Matt made some metal hooks to support the gate when it’s closed and when it’s propped open.

Large metal hook

The hook supports the gate to ease the weight on the hinges and also secures the gate in place.

We do like having visitors at the farm–at least from people we know. So if you’re planning on dropping by, let us know, and we’ll open the gate for you!

Open gate

Welcome to the farm

Anyone out there live in an actual gated community? How do you deal with security at your house?

See my earlier post for the story of setting the posts for the gate.

This is not taking it easy

Remember on Friday when I said that I was hoping Matt and I would do nothing this weekend? Yeah, well, that plan didn’t work out at all.

Instead of sleeping in and sitting outside in lawn chairs for two days straight, we went and rented an auger.

We’ve had a number of people turn in the driveway and come all the way up to the house. Once they get to the top and realize our cars are parked there (i.e. we’re home), they make their way around the turnaround and go back down the driveway. Usually by this point I’ve come out of the front door to glare at them as they drive away.

We have a long driveway, so if people are lost and need to just turn around, we wouldn’t even know they were there. For people to end up at the house, they’re trespassing.

We decided we need a gate at the bottom of the driveway.

A gate needs posts, and posts need holes, so we needed an auger.

Drilling post holes with an auger

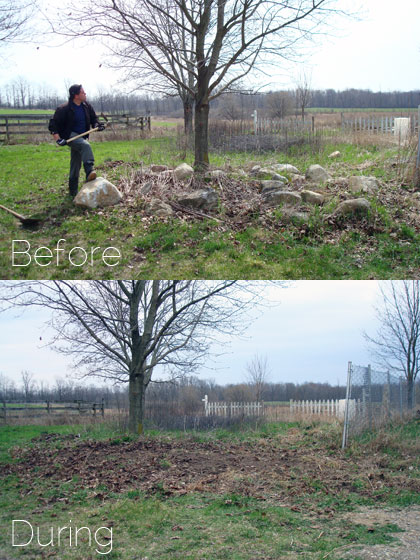
Matt and my Dad drill a post hole with the auger

Matt and my Dad ran the auger while I came behind and cleaned out the holes.

Reaching into a post hole

Why does the person with the shortest arms have to clean out the hole?

We do own shovels, but a hands-on approach worked better for me sometimes given what we found in the holes.

Field stones

Lots and lots of stones

The auger did not like the stones.

Rock at the bottom of a post hole

It particularly disliked this stone.

This boulder became the bane of my existence for about an hour. We all took our turns working around it with the shovel, the prybar, even a pick. It was massive, and it wasn’t moving.

The post that was to go in this hole was supposed to be our hinge, so we needed it to be really solid. But with the rock in the way, we couldn’t get the hole deep enough. So, we decided to swing the gate the other way and drilled a new nice and deep hole on the other side of the driveway.

Then, it was a matter of mixing up our concrete and setting our posts in place.

Mixing concrete in a wheelbarrow

I take a turn mixing while Matt adds the water

By the end of the day, we had four new posts in place: two at either end of the gate, one to hook the gate to when it’s open and a new post for the mailbox.

Posts braced

We braced the posts to hold them plumb while the concrete sets

Oh, and we also had more sore muscles and a few new calluses.

Have we reached the end of the to-do list yet? Has anyone spotted the end? Can you please tell me is it far away?

And please tell me someone out there got to sleep in and sit in a lawn chair this weekend.