Searching for my dream ‘man

Never fear, Matt, you are still the man for me. What the title of this post refers to is my search for the perfect ottoman.

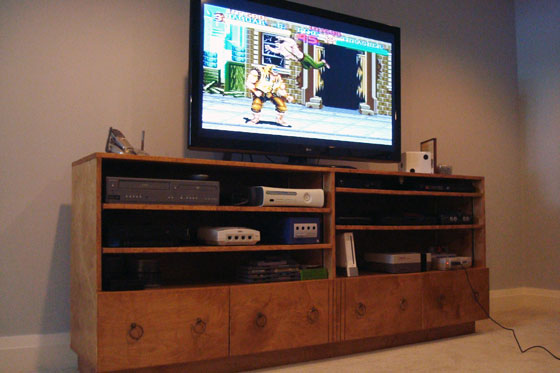
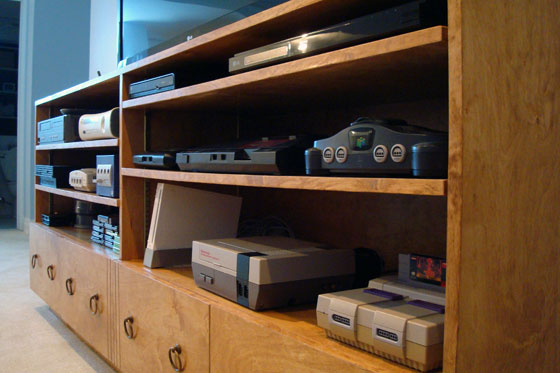
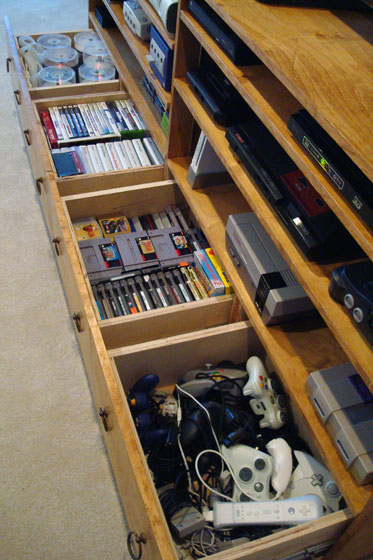
In case it hasn’t been clear, I’m loving our big, beautiful, brand new basement. However, things are a little barren down there. Between the two very large main rooms, we’ve only furnished one corner of one room–the TV area home to the most comfortable sectional ever and my homemade custom TV cabinet.

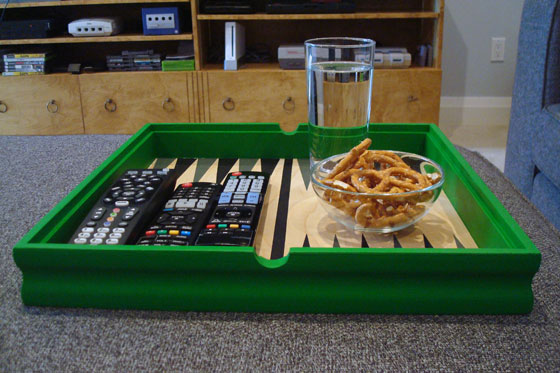
Our two lone pieces of furniture were both working out great. What wasn’t working so well was the big empty space in the middle of the sectional. We had nowhere to set a glass, a snack or a remote control.

I knew I wanted an ottoman–somewhere soft and cushy for people to put their feet up, something that could serve as extra seating if needed and something that had storage inside.

I was still in the looking around and seeing what’s available stage when we stopped into the store where we’d bought the couch. They offered a large storage ottoman with a hinged top made by the same company that made our sectional, Decor-Rest. I was planning to take it under consideration, but then Matt said the magic words, “Just buy it, woman.”

The guy really wanted a spot to set his drink.

We put in our order, and a few weeks later it arrived.

But now that it’s here, I’m not sure that I love it.

Decor Rest storage ottoman

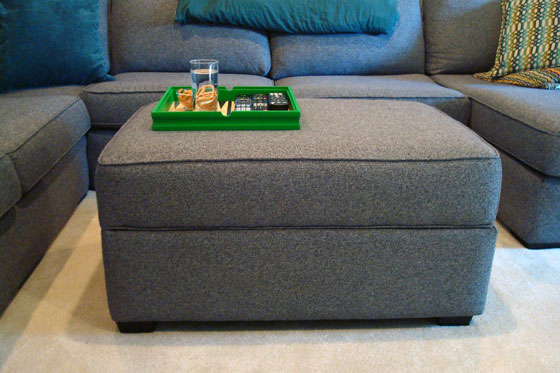
Faced with placing the order more quickly than I expected, I chose the same fabric that we used on the couch. My original vision had been for a contrasting fabric with a bit more pattern, rather than matchy-matchy.

I didn’t want the same fabric, but I did want the same feet. The feet on the ottoman are in the same finish as the feet on the couch, but they’re narrower and taller than the feet on the couch. I realize this probably isn’t noticeable to most people, but the fact that the ottoman is an inch or so taller than the couch bugs me.

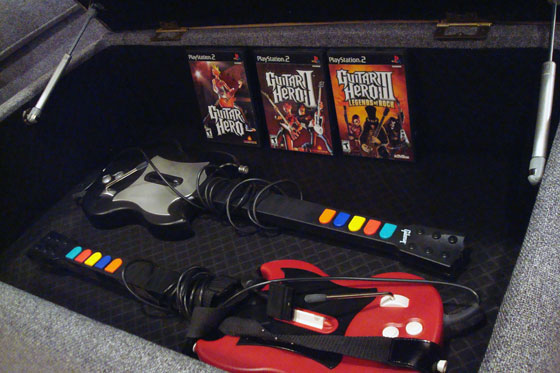
While the ottoman is too tall outside, inside it’s too short–or at least shorter than I expected. The top cushion is very thick, which limits the depth of the storage part. There’s still enough space to put the video game accessories, DVDs, throws or whatever else I decide to hide away, though, and the shallower storage will save me from losing things in the depths of the box, I guess.

Allow Guitar Hero to demonstrate the interior capacity of the storage ottoman.

Guitar Hero games and guitars inside the DecorRest storage ottoman

The biggest thing I’m not sure about is the shape. Back when I was imagining the basement, I had envisioned a square ottoman. This one is rectangle. It is a very large rectangle–36 inches by 28 inches by 20 inches tall–and fits comfortably in the centre of our sectional. And I guess the rectangle gives more breathing space between the ottoman and the TV, which isn’t a bad thing.

I’m not planning on returning the ottoman or reupholstering it any time soon, so it’s not as though our relationship is doomed. It does what I want in terms of storage, seating and providing a soft space to put up your feet. The overall style matches the style of our couch. I may trim the feet a little bit–we’ll see.

Even if the ottoman isn’t my dream ‘man, it accomplishes one other important objective: it gives my two-legged dream man a place to put his drink.

Tray on top of an ottoman

Isn’t there some saying about this situation? Happy husband, happy life? Somehow that doesn’t sound quite right to me. What about you? How do you approach furniture shopping? Have you ever had buyer’s remorse after a big purchase? Are you an ottoman or a coffee table person?

How to use preglued veneer edging

I’ve posted an addition to this tutorial: How to apply pre-glued veneer on curved edges

Our new TV cabinet that you saw at the beginning of this week is a thing of beauty in my (admittedly biased) opinion. However, this wasn’t always the case.

The cabinet is made of 3/4″ pine plywood. It’s paint grade, so the surfaces have a nice smooth finish. However, the raw edges are just that… raw. They’re rough and the layers of plywood are clearly visible. To finish off the edges, I used preglued veneer edging. This edging is very easy to use. Here’s what you do.

1. Gather your tools and materials.

Materials to apply veneer edging

This is a simple job that doesn’t require a lot of technical tools. Clockwise from bottom left, I have my roll of preglued veneer edging, my iron, a scrap 2×4 block, a file and scissors.

2. Set your iron to the cotton setting.

3. Prepare the edging. Use your scissors to cut a section of veneer that’s roughly half an inch longer than the edge you’re going to cover. You don’t have to be precise in your measurements. I just hold the veneer against the cabinet edge to figure out how long the section should be. You can work directly from the coil, but it’s easy for the veneer to get twisted, so I recommend cutting it into lengths first.

4. Starting at one end, carefully position the veneer against the edge that you want to cover.

Iron on veneer edging

The veneer will be slightly wider than the edge that you’re covering. Keep it flush on one end and one side and let it overhang the other.

5. With your edging in position, apply the iron to melt the glue.

Ironing veneer edging

I’ve found a “pressing” technique rather than an “ironing” technique works best. Just hold your iron in one spot for about 20 seconds. When you remove the iron, make sure the veneer is still aligned along the edge of the plywood. The glue will stay soft for only a couple of seconds so adjustments have to be made quickly.

6. Using your block of scrap wood, firmly press the edging onto the plywood.

Pressing veneer edging onto plywood

Press hard and slide the block back and forth over the section that you ironed making sure that the veneer fully adheres to the plywood.

Repeat steps 5 and 6 until the raw edge is completely covered with veneer.

7. Once the veneer has cooled, trim the excess that’s overhanging the one side with a file.

Trimming veneer with a file

File towards the face of your plywood keeping the file at roughly a 45 degree angle. There are tools that will trim the veneer as well, but the file has always worked well for me.

Your edge should now be nice and smooth and ready for stain or paint.

Finishing a plywood edge with oreglued veneer edging

Some tips for using preglued veneer edging:

1. When cutting the veneer with your scissors, try to get a nice 90 degree cut. This will give you a good starting point for your next piece.

2. Check for joints in the veneer before you glue it to your plywood.

Finger joint in veneer edging

The veneer is connected by finger joints that aren’t the most attractive and wreck the illusion of a solid piece of wood.

3. Don’t skimp on pressing the veneer with your block. You don’t want your veneer to peel off once your cabinet is done. Pay special attention to the edges of the tape to make sure it’s firmly stuck.

4. If you use the file to trim the veneer, clean the file every so often. The sawdust will fill the grooves and make it more difficult to get a clean edge. I just tap the file to knock out the dust.

5. Watch out for splinters.

Splinter beside my fingernail

Ouch!

Although iron-on preglued veneer edging can be slightly dangerous for klutzes like me, it is very easy to use. Ironing is one of my least favourite tasks, but for some reason ironing wood is less tedious than ironing clothes for me. Just a little bit of effort results in a very nice polished finished for furniture, shelves or other creations.

Have you used veneer edging before? Who else is not a fan of ironing? Is anyone else susceptible to splinters? I seem to get a few a week. I’m sure a few are in my future this weekend. How about you? Any special projects on tap for the weekend?

I’ve posted an addition to this tutorial: How to apply pre-glued veneer on curved edges

Our $9 TV

It sounds like an episode of extreme couponing. Customer goes into a store. Cash register rings up a charge of $819.24. Customer opens wallet and pays $9.24.

Well, we’re not extreme couponers, but this is exactly what happened when Matt went to buy the new TV for our basement.

50 inch LG LED TV with DIY network on the screen

You know I had to put DIY Network on the screen for this photo

So how did he do it? It’s all about the points.

For years, Matt has had a Sears Mastercard. He liked it because he could redeem his points for gas or restaurant gift cards. But then everything changed. A couple of years ago, Sears decided that points could only be spent at Sears. We don’t shop at Sears a lot (at all), so Matt’s been building up his point balance for a long time.

Knowing that we wanted a second TV for the basement, Matt decided that this purchase was the chance to finally use his points. He did his research to figure out what TV he wanted. He cashed in his points for a couple of gift cards. He watched for sales. And then it happened.

A 50-inch LED LG TV came on sale. The total price after tax (including Ontario’s special e-tax) came to $819.24. He plunked down $810 in gift cards and charged the rest to his Sears Mastercard.

Bill for a new TV

Depending on how you look at it, the TV cost either $9 or $81,000–the amount of money Matt had to spend to earn all of his points. Buying on points is definitely not a quick process.

I should also say that while Matt and I use our credit cards often, we pay off the balance in full every month, so there are no interest charges and we didn’t go into debt to buy our $9 TV.

Have you ever bought anything on points? Are there any extreme couponers out there? What’s your favourite rewards program for collecting points? What’s the best deal you’ve ever found?

Video game heaven

Anybody know what this is a picture of?

Final fight nintendo game

I wouldn’t know what this is except that I live with someone who exposes me to such things. This picture is from Final Fight, a video game for the Super Nintendo.

Rather than asking what the picture is of, however, I should be asking you what it signifies. What this picture means is that Matt finally, for the first time in his life, has all of his video game systems set up at once.

The reason for this momentous occasion is our new TV cabinet.

TV cabinet for vintage video game systems

I’ve never been into video games, but Matt has played his whole life and has built quite a collection. However, it’s always been a case of he would get a new system and the old one would be packed away. On those days when he really wanted to relive his childhood and play his old Sega Master System (the first he ever bought), he was out of luck.

When we were renovating the basement, one of the criteria was to have a good TV area for watching movies and playing games–any game he wanted. So, we needed a TV cabinet.

And the cabinet needed to do a few things:

  • Accommodate all of the equipment: the TV, the satellite receiver, the Blu-Ray player and at least 10 video game systems.
  • Store DVDs and video games.
  • Keep all of the controllers, connectors and wires that come with video games handy but out of sight.
  • Keep everything tidy and organized.

I decided my best option was a custom cabinet, so I sketched up a plan, and my Dad and I went to work.

We went with adjustable shelves on the top section and drawers on the bottom. The overall dimensions of the cabinet are 80 inches wide by 16 inches deep by 33 inches high. The top gives us a spot for our phone (we need a land line in the country where cell service is a bit unreliable), our new 50-inch flat screen (more on that later this week) and a little bit of display.

The shelves are dedicated to all of the systems.

Video game systems in a TV cabinet

Matt has set up his XBox 360, PlayStation 2, Sega Dreamcast, Gamecube, Sega Genesis, Sega Master System, Nintendo 64, Wii, original Nintendo, Super Nintendo. Holes drilled in the back of the cabinet allow him to poke the wires through to hook up the systems.

The best part of the cabinet is the drawers.

Drawers in a TV cabinet for video games

There are four nine-inch-deep drawers along the bottom, and they hold DVDs, games and controllers. As we were building the cabinet, I kept increasing the size of the drawers, and I’m so glad that I did. They hold so much and make it so easy to keep everything tidy. It was a big pain to get four drawers perfectly lined up and sliding smoothly, but I can say now that it was worth it to have everything so well organized.

It’s also worth it to see how much Matt enjoys having all of his games at hand.

How many of you recognized the picture at the top of the post? Are there any other video gamers out there like Matt? In addition to Haggar and Cody from Final Fight, our basement has also hosted Link, Zelda and Mario over the past few weeks. What’s your favourite game? Have you ever built a piece of custom furniture? Any tips for constructing drawers? How do you keep video games or electronics organized at your house?

The Dyson dilemma

I love the new carpet in the basement. It’s cozy and warm and soft. Its light colour is nice and neutral.

What I don’t love is cleaning it.

Fluff on a light carpet

Don’t judge

The fluff. Oh the fluff!

I blame Matt and his black socks. The fact that the basement stairs start at the front door, a major traffic point for the house and source of many “bits” and dirt, doesn’t help.

My parents loaned us their old vacuum (old as in purchased in the 1970s before they moved to a house with central vacuum), but its suction kind of sucks–not in the good way a vacuum should. Our shop vac does a slightly better job, but it’s not really skilled at cleaning carpet and doing the whole basement with it is a pain.

If I’d been thinking ahead, perhaps I would have put in a central vacuum system when we had the walls open in the basement. However, I didn’t think of it, so we didn’t do it.

So now, I’m dealing with a fully carpeted basement and the weekly sock fluff invasion. And all I keep thinking is “Dyson.”

Dyson vacuum brochure

I really know nothing about them aside from the marketing hype. In the informal polls I’ve done so far with people at work, Dyson comes highly recommended. We’ve looked at them in stores, where, of course, the price tag makes me blanch.

So now I’m turning to you. Is a Dyson worth it? What version do I buy? Is there another brand that works just as well?

We have a cut pile carpet in the whole basement (1100 square feet). The stairs are carpeted too, so the vacuum can’t weigh a ton, or it needs to have an attachment that lets me easily go up the steps. The biggest requirement is that it easily and cleanly picks up the sock fluff and all of the little bits that accumulate every week. Someday, it will likely have to pick up dog hair too. Oh, and I need a vacuum that lasts. I don’t want to have to buy a new one–especially if I invest in a Dyson–anytime soon.

Please weigh-in in the comments. Do you have a Dyson? How does it work for you? Is there another vacuum that you recommend?

Christmas comes early

Merry Christmas to us!

Decor-Rest sectional couch with chaise

Sorry for the lighting. Winter hours plus being underground make for challenging photography.

The sectional we bought for the basement–Matt’s and my Christmas present to each other–wasn’t slated to arrive until maybe Dec. 22. However, the Christmas elves were obviously working overtime, because the couch showed up early.

Unloading couch from delivery truck

Despite the fresh snow, the couch arrived by truck rather than sleigh

There may have been a happy dance when I heard it was on its way… Okay, and a fist pump too.

Sectional pieces prior to assembly

The sections of the sectional as our delivery team elves set it up

We went with what I would term a semi custom sectional. It’s made by Decor-Rest, a Canadian company, and we ordered it through Smitty’s Fine Furniture, another Canadian company.

Semi-custom means we got to pick the configuration and the fabric from a selection of options. We went with a pretty neutral grey-black-white tweed fabric, and then I picked a few brightly coloured cushions to pep up the fun factor.

Retro striped cushion

It’s probably not everyone’s taste, but I love the bright colours and retro look of the striped cushion

Ever since I first saw the basement, I knew I wanted a big corner sectional with a chaise. With this couch I definitely got my Christmas wish. The couch fits perfectly in the corner and has lots of space for Matt, me and anyone who comes to visit.

Chaise extension on a sectional

Although please do not sit in my seat

It’s incredibly comfortable too. In fact, there may have been an hour-long nap one evening when we were supposed to be working on finishing touches in Matt’s office.

I’m looking forward to a lot more of those soon! Maybe over Christmas vacation?

My new pet

There’s yet another new addition at the farm, and this one is soft and fuzzy and warm and brings me much joy.

Standing on carpet in barefeet

These are happy feet, in case you can’t tell. The novelty of going down to the basement without first putting on shoes still hasn’t worn off.

Our new carpet was installed on Friday, and the difference it makes in the basement is amazing.

After the nasty, stained, old carpet that came with the house and the bare concrete that we’ve been looking at for the past 8 months, even just the sight of the underpad going down was an incredible transformation.

Carpet underpad

Our installers likely thought I was slightly odd given how I cooed over the underpad as soon as it was installed

Between the underpad and the carpet, the basement floor is extremely cushy on our tootsies–and our tushies, which is handy given that we currently don’t have any furniture.

Carpeted basement

Matt and I have both spent time sitting on our imaginary couch across from our imaginary TV. The shelf standing in for a TV stand is real, for anyone who’s wondering if they’re seeing things.

When it comes to selecting carpet, the array of choices is somewhat befuddling, in my opinion. Matt and I made our decision very quickly, mostly because we wanted the carpet installed as soon as possible so that this renovation could be finished as soon as possible.

Here’s the details:

Who: Alexanian in Burlington, Ontario. They have a good local reputation and had been used by a few people we know, including Matt’s Dad.

What: Spillguard underpad, the thickest offered by Alexanian, topped with a nylon cut loop carpet in a light beige colour

Why: For the coziness. I know carpet isn’t a lot of people’s first choice for flooring, but for a basement, it’s at the top of my list. In terms of the specifics of what we chose, I probably would have gone with a Berber or loop carpet. However, Matt prefers the plusher feel of the cut loop carpets, so I deferred to him on the texture while I chose the colour. I may regret going with such a light colour someday, but I really wanted something neutral.

Where: The whole basement, about 1100 square feet, including 11 stairs.

Carpeted stairs

All of the stairs, including risers, stringers and treads, got carpet.

Carpet installation is a major milestone in the basement renovation. We still have some paint touch-ups to do, light fixtures to install, (don’t talk to me about the bathroom that needs to be tiled), and a few other finishing touches, but overall the basement is now livable and useable. And it looks fabulous.

As much as I disliked that concrete floor, it did have one nice element.

Matt + Julia 2012

A secret message commemorating our renovation

Is it too harsh to say I’m hoping that we never see this message again?

How to install pot light trim

The end stage of a renovation involves a lot of little tasks: put on the cover plates, caulk the trim, touch up the paint, clean and dust everything. One of the little to-dos on our list was to put the trim on the pot lights.

My post on how to install pot lights is one of the most frequently accessed posts on the blog. But it’s unfinished. The housing for the pot light is just one part of the fixture. The other part is the trim, which goes on after the ceiling is finished.

Without the trim, the pot light looks a bit rough.

Pot light without trim

Our trim-less pot light

The first step in installing the trim is to wash a summer’s worth of drywall dust off of them.

Pot light trim in the sink

This step may be optional for some installations.

The trim should be made up of three pieces: the baffle, trim ring and spring or hook.

Pot light trim spring

This spring connects the trim to the housing

Step one is to attach the hook to the baffle. There should be little holes in the narrow end of the baffle specifically for this purpose.

Spring attached to pot light baffle

The end of the spring without the loop should be hooked to the baffle.

The next step is to connect your baffle and trim ring.

Putting trim on the baffle

This is probably the simplest step. Just slide the the trim ring over the baffle.

Remove the light bulb, so that you can reach into the housing. If necessary, adjust the height of the socket so that your bulb is recessed as much or as little as you want.

Adjusting the socket in a pot light

Loosen the wing nut, and the metal socket will slide up and down. Tighten it back up when the socket is positioned where you want.

To connect the trim, insert the baffle into the housing, stretch the spring and hook it into the cut out on the pot light.

Pot light trim hooked in place

On our pot lights, the cut out looks like a candy cane

I found I was able to reach into the housing and hook the spring by hand. If your hands aren’t as small as mine, needle nosed pliers may come in handy.

Screw the light bulb back in and admire your trimmed pot light.

Pot light

All done!

The trim reduces the brightness of the light somewhat and directs it downwards. I may adjust the height of the bulbs if we feel we need more light once we’re using the basement.

However, for now the pot lights are bright enough for me to admire our nearly finished basement. Is it weird that I stood there for nearly five whole minutes on the weekend just looking at the rooms and remembering how far we’ve come?

Monday night football

360 feet: the length of an American football field (including end zones)

384 feet: the length of trim currently in our basement–all of which required two coats of paint

Painting trim

Matt and a portion of our 23 pieces of casing

We’re at the two minute warning on this basement renovation. Walls are painted, carpet is scheduled for next week. The next play is to install the trim.

We bought pre-primed MDF casings and baseboards, but they still needed two coats of paint–Benjamin Moore Cloud White in a pearl finish. So I strapped on my knee pads and got to work.

Didn’t you know painting trim is a full contact sport?

Painting baseboard

Me and a portion of our 18 pieces of baseboard

The task for this week is to install all of the trim. It’s team MJ versus seven doorways and five rooms.

Cheer us on as we head for the end zone!

Saturday night love letters

For our Saturday night date, Matt and I primed his office–it’s an exciting life we lead, I know.

Given that we were on a date, I tried to inject some romance into the evening and left a note for him while I was cutting.

I love you

He wrote back.

I love you bacon

It’s clear where his heart lies. He even framed his message.

Painting green walls

Ultimately, the love letters, the bacon and even the retina searing green primer were all covered by two coats of Benjamin Moore’s Manor Green–Matt’s choice of colour. Helping your husband paint his office forest green? That’s true love in my opinion.

Anyone else have a hot date this weekend? How did you spend your Saturday night?