Oof!

Friday’s mystery image was a preview of this week’s to-do list. There is only one item on the list. And it’s a doozy. It makes me say, “Oof!”

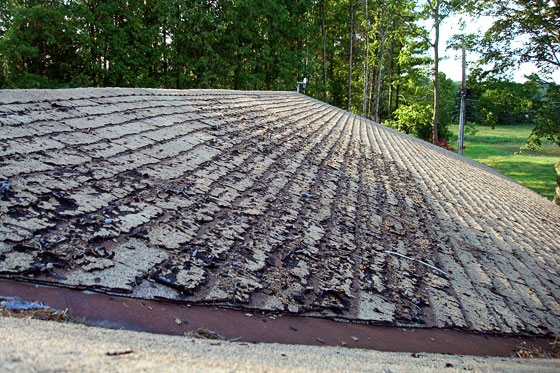
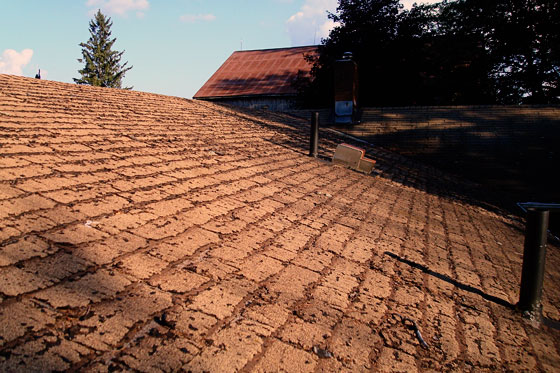
As many of you guessed last week, the picture was of shingles. The project for this week is the roof. Oof.

You’ve seen the detail shot. Let me zoom out a little bit and show you the scope of our issues.

Old shingles

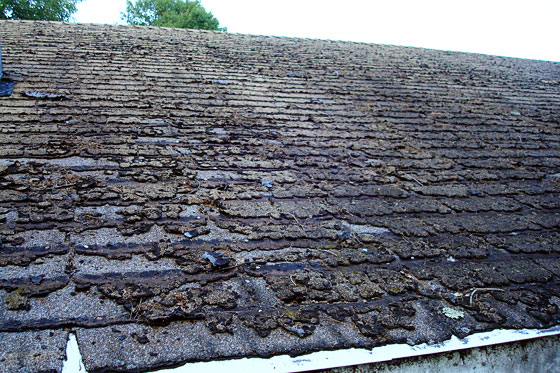
Shingles are not supposed to look like this

Our shingles have gone beyond curling and are officiallyfried. They have to be replaced.

Roof

At this angle, I’m looking above the broken shingles on the house and gazing longingly at the steel roof of the barn

Somehow, our attic is still dry inside, but I’m a little anxious about what the plywood under the shingles is going to look like.

Shingles in need of replacement

The front half of the roof is as bad as the back

Normally, roofing a whole house is not a job I’d choose to DIY. However, given the long list of must-do fixes we’ve done so far (new geothermal system, upgrading insulation in the attic and the basement, redoing the well and water system, rewiring the basement) the budget is reaching its limits, and so we chose free labour (us) over professional help.

Matt will be the lead on this, as he’s able to be home while I have to keep up with my day job. However, I will be working in the evenings and he’ll have some help from his dad and one of his friends.

The roof is just under 3,400 square feet. That works out to 110 bundles of shingles. Oof.

In addition to new shingles, we’ll be looking to make a few other changes to the roof.

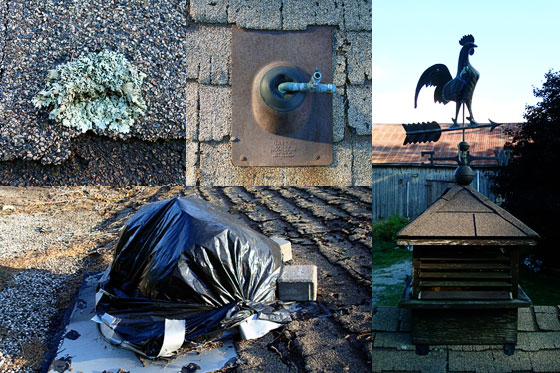
Collage of roof images

Areas of concern from our roof

Clockwise from top left:

  1. The sea creatures–or moss–that have grown up on the old shingles will be extinct by the end of the week.
  2. The old hook-ups for the solar hot water heaters for the indoor pool will hopefully not be too difficult to remove and patch.
  3. The cupola and buxom rooster weather vane (the only thing I like about the roof) will be carefully removed so that I can reuse them on the attached garage, which we will build some day.
  4. The last remaining piece of the woodstove chimney will be removed and the hole will be patched–with plywood and shingles, not a garbage bag and duct tape.

The other necessary upgrade is to improve the ventilation. Currently, there is not a single vent anywhere on the roof. Hence the reason why our shingles look the way they do–they cooked. No vents is not only unhealthy for our house; it’s also against the building code.

We’re crossing our fingers that we haven’t taken on more than we’re capable of with this project.

If anyone has any pointers or words of encouragement, they would be most welcome.

A peek of pretty

Amidst the dust and the upheaval and the tired muscles and the very, very, very long to-do list, I need a little reminder of what we’re working towards. The stack of tile piled in Matt’s future office provides some good encouragement right now.

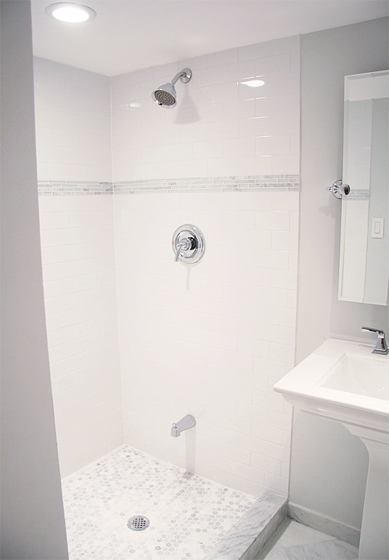
Here is a little sneak peek at the various pieces that will eventually make up the basement bathroom.

Marble mosaic tiles

I think the white balance is a little off in this photo, as there is much more white than grey in real life

The white subway tile in the centre is going to be the main feature in the room. It will cover the three walls of the shower from floor to ceiling and the bottom half of the wall behind the toilet up to the height of the vanity. I chose a 4 inch by 8 inch tile, rather than the standard 3 by 6. It’s going to take a lot of tiles to cover the walls, and I’m hoping there will be slightly less labour with the larger tiles.

The white tiles will be accented by a narrow band (probably a strip 3 or 4 tiles high) of the grey and white marble mosaic mini subway tiles at the right. These will run at about eye level in the shower area only. Not an original design feature these days, I know, but hopefully a pretty timeless look.

The marble mosaic hexagon on the left is the shower floor. And the square (pseudo marble) tile at the bottom is the floor in the main area of the bathroom. They’re all sitting on the piece of marble, which you’ve seen already. This slab will top the bench in the shower.

Not pictured here are two more pieces of marble that we’ll be using for the top of the shower curb and the base of the niche.

As a reminder, the inspiration for the basement bathroom is Aubrey + Lindsay’s beautiful bath.

We managed to find tiles that were very similar to theirs. Although there were times that I joked that tile sourcing was going to break my enthusiasm for renovating.

The original tile that I picked for the accent band were back ordered until the end of August. They were another beautiful white and grey marble, but longer and more irregular lengths rather than an even subway shape. I really liked the irregular lengths for the contrast with the regularity of the white subway tiles. At the rate we’re moving now, August might have worked, but at the time I didn’t want to delay the project, so I found another option. Ultimately the colour is what will be most noticeable, and the overall feel of the bathroom will likely be pretty much the same with the tile that we ended up choosing.

For the main floor area, my original vision was to have large format white subway-ish shaped tiles. These were incredibly hard to find. Floor tiles seem to be square for the most part. And the ones that I was able to find were more creamy than I wanted. I nearly placed the order for the off-white tiles, but decided to take one more look at other options and found the square tile in the grey and white tones that work well with the colour palette that I’d established.

Ultimately, we ended up sourcing tiles from three different suppliers plus Home Depot for the marble sills and plus our stone supplier for the bench top. Fortunately, everything works very well together and it looks beautiful, even when it’s just sitting in a pile on the floor.

The bathroom is actually ready for tiling, but a couple of other projects (okay, slightly more than a couple) and the universe’s dogged persistence in only putting 24 hours in the day continue to delay installation.

For now, ogling the cases of tile–and remembering how far we’ve come already (psycho shower, anyone?)–keeps me going on this renovation.

Where do you find your motivation?

Olympic dreams

I had hoped today to be showing you the Canadian flag flying from our newly installed flagpole in honour of the Canadian Olympic team. However, the flagpole is still lying in the barn and the flag is folded up in Matt’s office.

However, we did manage to get something installed that has come in handy with the Olympics.

Shaw satellite dish

Our new satellite dish

Like everything else at the farm, the job of installing the satellite turned out to be more work than initially expected.

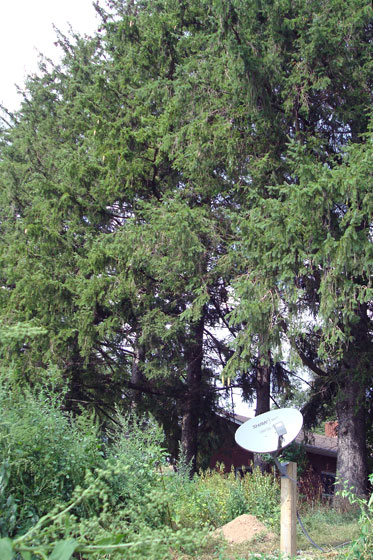
First, we couldn’t install the dish on the house. The satellite signal wouldn’t clear the row of huge pine trees right beside the house. The solution was a post in the meadow on the other side of the pines. Matt spent a couple of hours digging a deep hole while my Dad and I cut a big 6×6 for the post and with Wiley‘s help gathered concrete and gravel to set everything in place. It’s handy having spare construction supplies lying around courtesy of past owners.

Satellite dish on a post

Our dish is dwarfed by the big pines

Satellite dishes on posts in the middle of people’s yards is one of my pet peeves. I’m trying to come to terms with mine by remembering that it’s our only solution (aside from taking down the trees) and it’s in the meadow where we’ve let the grass grow long, so it’s fairly hidden.

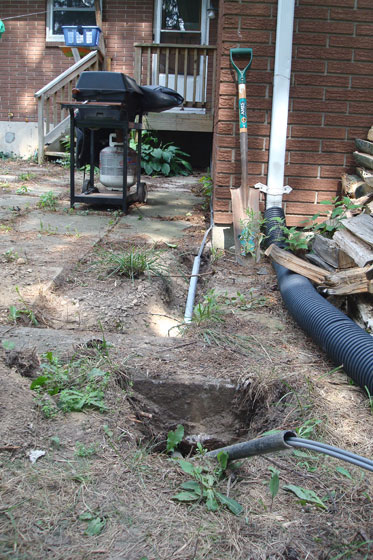
The second issue was running the wires from the post in the meadow up to the house. Trenching the wire in the meadow and across the lawn was no sweat–well, it’s sweaty work, but not super difficult. However, between the house and the lawn is a large patio. Running wires over the surface, even if we protected them in conduit, was obviously not a great option. We were able to lift the patio slabs pretty easily, but the poured concrete border around the edge was a bit more challenging.

With two shovels and a bit a teamwork from both Matt and me, we each dug from opposite sides to tunnel under the concrete so that the installer could easily feed the wire under the patio.

Wire running under concrete slab

We also ran the wire through some plastic conduit for extra protection

As the saying goes, bad news comes in threes, so two challenges were not enough in the saga of the satellite.

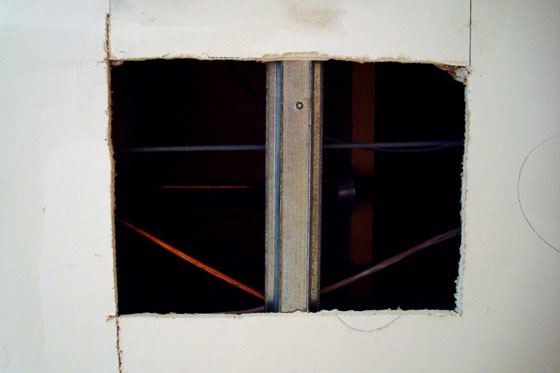
We decided we wanted a satellite receiver in the basement as well as in the living room upstairs. Installing an additional feed in the basement would have been easy had we done it while the ceilings were all open. However, we weren’t certain initially that we were going for two receivers, so we went ahead and installed all of the new drywall and made no accommodations for the satellite wiring. Argh!

Matt and I had realized we were going to have to cut some holes in our brand new ceilings and had gone through all of the stages of grief about undoing our nearly completed work. For my Dad, though, who showed up with his long wire fish to help us prepare for the installation, he had to get from denial (“maybe we don’t really have to cut holes”) to acceptance (“we’re going to need another hole here too”) pretty quickly.

Metal stud

Ouch! Our poor ceilings. The satellite wire is the grey one at the top of the hole

Thanks to all of our prep work, the actual installation of the satellite went fairly smoothly. And just in time. Two hours before the opening ceremonies started, we had TV at the farm.

CTV Olympics on TV

Please ignore the drywall dust which is every where

Matt and I enjoy our TV, but we really haven’t missed it since moving in, mostly because we’ve been so busy with renovations.

However, I am a huge Olympic fan, so being able to stay on top of all of the coverage is a nice treat.

Any other Olympic fans out there? What event are you watching for? Anyone have tips for fishing wires or your own story of a challenging installation?

Oh and one more thing.

Go Canada go!

(Feel free to add your own national cheer below).

Change of plans II

You heard about one change of plans yesterday, and today I have another for you. This one was a relatively minor change in plans, but it did require a bit of a backtrack, because we were already installing drywall when I decided I wanted to make a change.

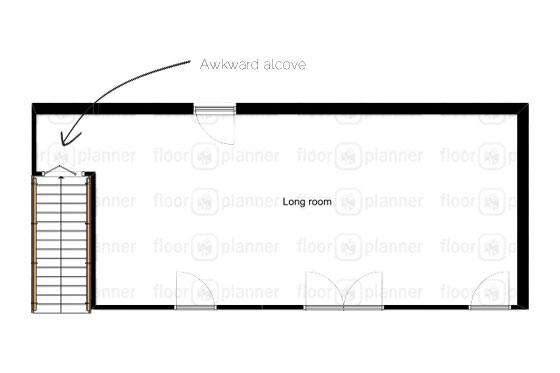
Originally in the basement, there was a closet under the stairs. I’m all in favour of closets. This one was a good way to use an awkward space and I had plans to make it a wonderful home for our Christmas decorations. I had nothing against the closet. However, the little alcove at the end of the long room to access the closet always puzzled me a little. What was I going to do with that space?

Awkward alcove

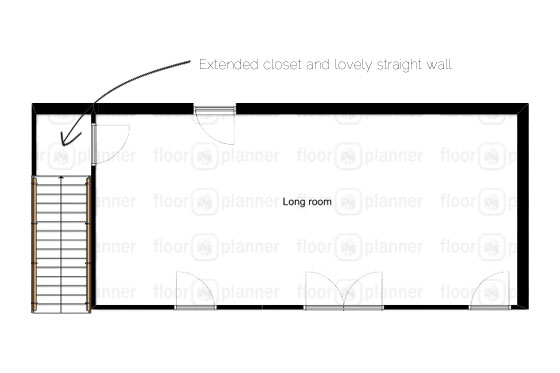
It took a visit from my youngest sister to open my eyes to the obvious solution. Just square off the room and enlarge the closet slightly. Duh!

Floorplan for extending a closet

So, while drywall installation was underway, I threw on the brakes and demanded that we go back to demo (removing the old doorway into the closet) and construction (framing in a new wall and doorway).

Matt said, “Why does it matter?” and then he just shook his head, sighed and went along.

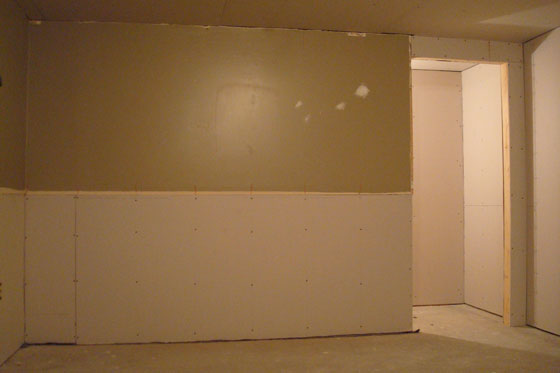
We had the new doorway framed up in about an hour and drywalled it in one more. We moved the light inside the closet–with only one bleeding bent backwards fingernail (ow!)–so that we could install shelves along the whole back wall. And now we have a nice rectangular room with a very large functional closet.

Doorway into a closet

The new straight wall in the long room. Old wall on the left. New doorway on the right.

Looking at my new straight wall makes me happy. This may seem like a minor change, but it’s one of the things that makes the basement exactly what I want, and is part of the reason I’m able to say that this renovation is turning out even better than I imagined. Isn’t it nice when reality matches up to imagination?

Change of plans

You’ll recall that one of the things we needed to do in the bathroom renovation was to increase the storage. This is Matt’s bathroom, and he’s a pretty basic kind of guy who doesn’t believe in a lot of lotions and potions.

However, he is the type of person who changes what toothpaste, deodorant and soap he uses each day depending on how he’s feeling. Some days it’s about the Irish Spring. Others, he’s Ivory all the way. And don’t get me started on the difference between the blue bar and the green one. As well, my husband can’t pass up a deal, so when something comes on sale he stocks up.

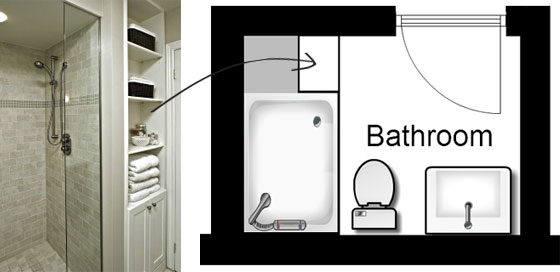
We needed somewhere to stow all of his toiletries (that word sounds too delicate for a man’s bathroom stuff) and the small single vanity was not going to do. The original plan was to tuck some built-in shelving into the one end of the shower.

Bathroom storage

The original floor plan for the bathroom reno showing the shelving unit tucked in beside the shower.

Once we started actually working in the bathroom, though, the space started to feel a bit tight. We were concerned that carving out the storage area would make the shower too small. The bathroom is not huge. However, the hallway outside the bathroom is fairly generous–in fact it’s about seven feet wide.

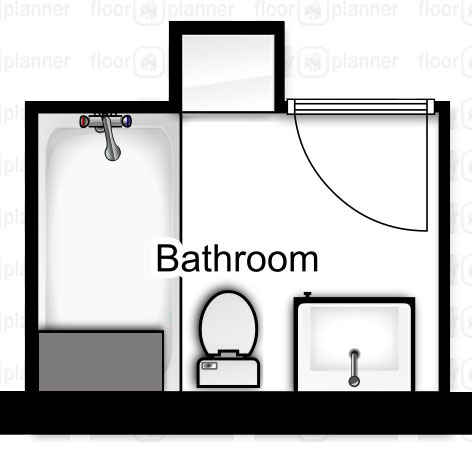
So Matt came up with the idea to borrow approximately one foot from the hallway to make the storage unit.

Bathroom floorplan

Ahhh… much more roomy. The revised floorplan for our new basement bathroom.

We’ll still get floor-to-ceiling built-in storage, so Matt gets to keep all of his different flavours of soap and toothpaste. And making this little bump-out into the hallway allows us also to have a fairly generous shower, complete with a bench.

For your reference, here are some of the measurements for the bathroom:

  • Bathroom itself: 5 feet by 7 1/2 feet
  • Storage area: 20 inches wide by 16 inches deep
  • Shower: 3 feet by 5 feet
  • Shower bench: 32 inches wide by 16 inches deep by 18 inches high

Planning is an important part of renovating. You should take the time to think about your project before you pick up a hammer and go to town. However, you have to be prepared as well to make adjustments as you go along. Sometimes you have to compromise. Sometimes you can improve on your original plan. I think this modification is an improvement on our original plan.

Change of pace

This past weekend was a little different for Matt and me. We left the work clothes in their piles on the bedroom floor and the measuring tapes stayed in the toolbox. Instead, we got dolled up in our best duds and put on our dancing shoes.
Matt and me

What was the occasion for such finery? The celebration of my sister’s wedding.

You know I’m all about DIY, though, so for the past couple of months I’ve been taking a bit of time off from the basement renovation to work on this little number.

Yellow dress from sewing pattern Vogue 1108

I’ve no plans to turn this into a sewing blog, but this was a special dress made with a special fabric for a very special occasion, so please bear with me as I break with our regular program of country living and home improvement to share a little bit about The Dress. For those that want the full project breakdown, see my review on Pattern Review.

This dress is the most challenging thing I’ve ever sewn, and it’s my first sewing project at the farm. The fact that my sewing room isn’t set up yet and has in fact become the holding room for most of the boxes we haven’t unpacked and a lot of the things that we don’t know what to do with yet complicated things slightly. Between a desk leftover by the past owners where I could set up my sewing machine, an ironing board in the dining room and a few square metres of clear floor space behind the living room couch, I made it work.

I probably would not recommend tackling a project like this concurrent with moving, renovating and caring for a large property, but despite a bit of stress about finding sewing time everything worked out very well in the end.

The fabric for this dress is actually courtesy of my sister, the bride. She bought it for me in Malaysia when she was visiting her fiancé’s family. Initially I wasn’t sure where I’d ever use such a fancy, brightly coloured fabric. But when my sister said that she wanted to be the white in the middle of a brightly coloured rainbow of her bridesmaids, I knew this was perfect.

Different colour bridesmaid's dresses

A family wedding is a tremendously special occasion, and I was very happy to be part of my sister’s and her new husband’s special day. Congratulations, Jennifer and Jeremy. I wish you much love and happiness together.

We have walls!

It’s been more than a month since I posted the first pictures of new drywall in the basement. Things definitely don’t move quickly when you’re DIYing–or at least Matt and I don’t move quickly!

I am pleased to announce that thanks to a big push this weekend as of Sunday afternoon all of the drywall is installed. Yay!

Untaped drywall

The new view in the long room

The total tally was 59 sheets. The entire bathroom, all of the exterior walls, and the ceilings in the main room and long room all got new drywall (click here for a refresher on the floorplan for the basement).

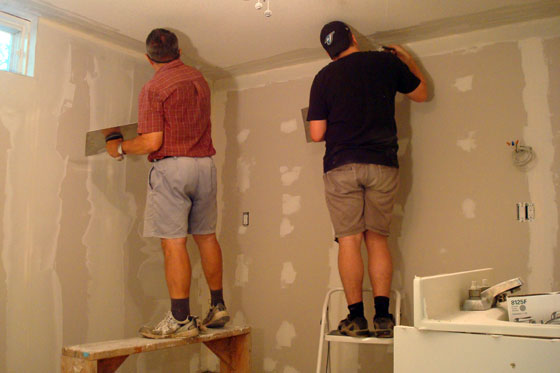
And taping is already underway. The bathroom has its third (and final) coat, the office has its second, the main room has its first. Matt has taken the lead on this part of the project, and my Dad has come up several times to help out. Between the two of them, they are motoring.

Pasting drywall joints

My Dad and Matt put the second coat of paste on the office

With three coats of paste plus sanding between each coat, this will be a big part of the basement renovation. Hopefully the next update is less than a month away.

The reveal… aka how to strip wallpaper

As neat as it would have been to find an old newspaper hidden in the wall–as we’ve heard other renovators have–that was not the case for us.

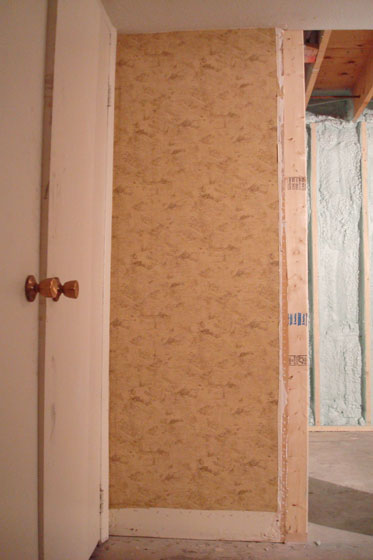
The answer to last week’s guessing game, if you haven’t already guessed from the title of this post, is that the “antique newspaper” is wallpaper that graced the walls in the basement.

Wallpaper pattern

I work in communications. I appreciate good journalism. However, graphics of old newspapers pasted onto my wall are not good journalism.

While the wallpaper trend in decor shows no signs of going away, this particular pattern is not in keeping with our decor vision for the basement. The newspaper wallpaper was going away.

In my experience, removing wallpaper goes one of two ways. You either spend hours and hours scraping with a trowel only to have it come off in teeny tiny chips approximately the size of your smallest fingernail, or you smoothly peel the paper away a few minutes after you spritzed it with hot water.

Over the years, I’ve tried a variety of scrapers and scorers, tools and techniques, chemicals and solutions. I’ve suffered burns from heavy steamers and patched pock-marked walls when the wallpaper peeled away the paper on the drywall.

You never know how your paper is going to come off until you start trying to remove it. Fortunately for me, our newspaper wallpaper came off very easily. Fortunately for you, I’m going to share my method.

Unfortunately for some of you likely, this is not a tutorial of how to remove stubborn wallpaper. This is how to remove wallpaper that’s a single layer, has been installed correctly and isn’t sticking like bubblegum to the wall.

If your wallpaper has an attachment disorder, you have my sympathies. My best advice is to keep going and remember you can fix the divots and tears afterwards. Drywall compound is your friend.

Here is my very simple chemical-free method for stripping wallpaper. First, assemble your tools.
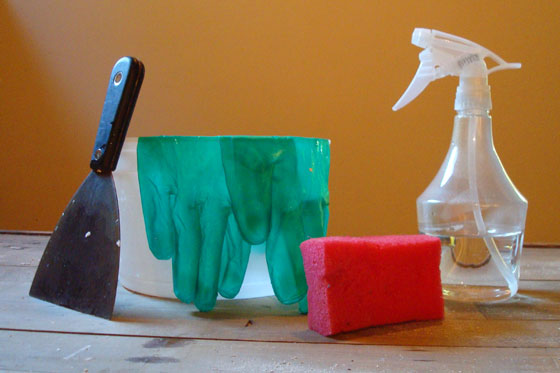
Tools for removing wallpaper

There is nothing fancy here. You need a scraper or trowel, a bucket and a sponge. Optional equipment is a spray bottle and gloves. If you’re working in a nicely finished area as opposed to a gutted basement, you’ll likely also want a tarp or a sheet to protect your floors.

Fill your bucket and spray bottle with hot water. You don’t need to boil the kettle. I find hot tap water works just fine. Just make sure to run the water for a few minutes until you have truly hot water.

Wallpaper on a wall

Here’s what I started with. Just a small wall covered with wallpaper.

The easiest method I’ve found for removing wallpaper is a two-step approach.

Start by soaking your paper using either your sponge or the spray bottle. Just like drywall compound is your friend after the wallpaper is removed, water is your friend during the removal. Start at the top of the wall and work your way down. The water will drip and run down the wall, but making sure the paper is fully saturated will make your life easier in a few minutes.

Once you’ve completely soaked the wallpaper from top to bottom, find a seam and use your trowel or your fingernails to grab an edge. Peel back the paper.

How to strip wallpaper

You can let the water soak in for a little while, but I usually find at this stage I can go right from soaking to peeling without delay.

You’ll likely notice that when you peel off the paper you are only removing the outer layer, the one with the pattern printed on it. There is still a second layer that is stuck to the wall. Do not despair. Remember this is a two-step process.

Once you’ve removed the outer layer, your next job is to–surprise!–tackle the inner layer. This is the part of the paper that’s actually adhered to the wall. The patterned side of wallpaper often has a glossy or smooth finish on it that prevents the water from fully soaking into the paper and reaching the glue that’s holding the paper on the wall. By removing the outer layer first, you can then fully soak the inner layer and (hopefully) easily loosen the glue.
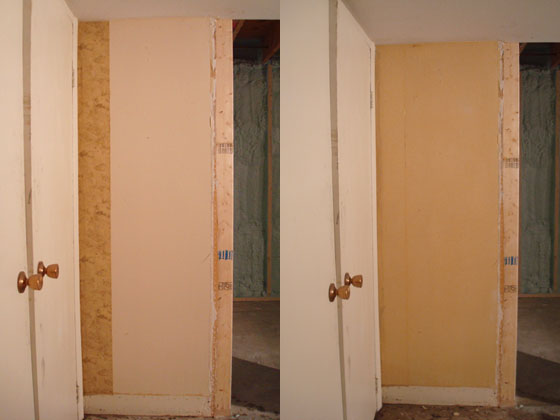
How to remove wallpaper

The left shows one panel of the outer layer removed. The right shows the inner layer after I’ve spritzed it with my spray bottle of hot water.

Again, you want to saturate the paper that’s on the wall. Don’t be shy with your spray bottle. Just like before, start at the top and work your way down. I usually find it helpful to let the paper sit for a few minutes to let the water fully absorb. Then, go to work with your scraper.
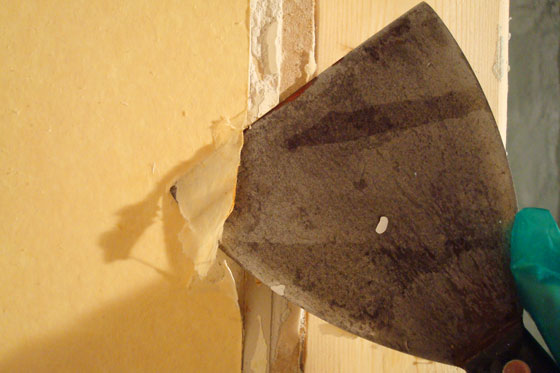
Scraping wallpaper

Catch an edge on the wallpaper. This time, instead of pulling the paper off by hand, let your trowel do the work.

Scrape with your trowel. I usually try to keep my trowel at a fairly shallow angle–less than 45 degrees off the wall. This allows me to easily get under the paper and scrape it smoothly off the wall.
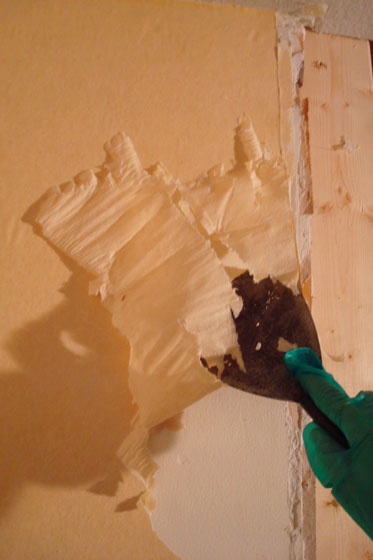
Removing wallpaper with a scraper.

If the water has done its work, the paper should scrape off the wall fairly easily.

Apply more water as you need to to keep the paper peeling off easily. I like to spray a large area so that it can soak while I’m working on another section.

How to remove wallpaper

Halfway there

Once you have scraped all of the paper, wipe the wall with your wet sponge. You’ll find small shreds of paper and a film of glue left behind. The remaining pieces of paper will usually come off with a few swipes of your sponge. Go over the wall a couple of times to remove as much of the glue as possible. Before you paint, you may want to consider washing the wall with TSP, just to make sure there’s no residue.

At this point, you should have a nice clean wallpaper-less wall.

Wall after wallpaper is removed

The after.

And a pile of paper on the floor.
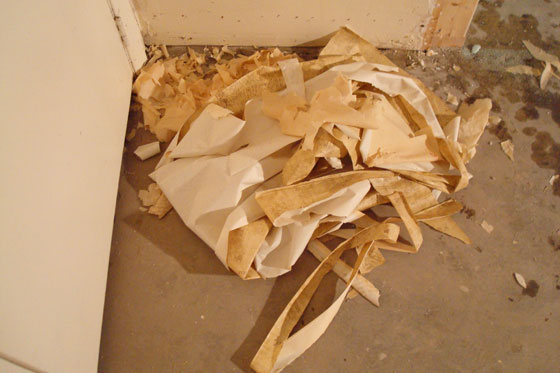
How to remove wallpaper

I get a lot of satisfaction from seeing the wallpaper on the floor instead of on the wall.

Even if your wallpaper came off with minimal effort, you may have a few spots on the wall that need smoothing out afterwards with drywall compound. In my experience, wallpaper can hide a lot of lumps and bumps. Remember, drywall compound is your friend.

Now, some of you may be wondering why I’m spending time stripping wallpaper when we don’t even have walls in the rest of the basement. Shouldn’t I be hanging drywall instead of flitting around with a spray bottle? The answer is probably yes, but I do have two good reasons for focusing on the wallpaper now:

  1. Instant gratification: I spent 30 minutes stripping this wall. It was quick, it’s done, and I can now check it off the to-do list. If I spent 30 minutes working with the drywall, I would not get nearly as much done and I would have much less sense of satisfaction.
  2. Efficiency: Once we finish installing the new drywall, the next step is taping and pasting all of the seams. I can easily patch any areas on the wallpaper wall at the same time. The end result will be a nice smooth finish on all the walls, old and new.

So, here concludes my method for stripping wallpaper. Anyone else have a method they’d like to share? Or any tips? A lot of people have horror stories of stripping stubborn wallpaper. Feel free to share your saga in the comments. We will commiserate with you.
Progress

Greenboard and cement board in the bathroom

Greenboard and cement board are up in the basement bathroom

I’m a little bit excited to finally be at the drywall stage in the basement reno. It’s going to be a huge job though, so we’ve decided to break it into smaller projects to make it more manageable. We started with the bathroom.

We used cement board in the shower and then moisture resistant greenboard on the ceiling and the rest of the walls. We’ve also patched the floor where Matt broke up the concrete for the drains and put the new concrete pan in the shower.

Cement board in the shower

Our new shower comes with a storage niche as well as a bench

Next step is taping all of the joints, and then we’ll move on to tile. It’s amazing what a difference the drywall makes. The room is already starting to feel more finished.

Things I love:

  • the niche
  • the bench
  • the precision cutting we were able to do around the electrical and plumbing–less pasting for us!

Hopefully the progress continues this weekend.

What are your plans?

Wiring woes

As you saw yesterday, work on the basement continues. In the meantime, I’m going back a few weeks to talk about some of the problems we encountered with the electrical.

Burnt junction box

Fried junction box in the basement ceiling. In case you were wondering, no, the inside should not be black like that.

We ended up discovering a total of 10 junction boxes in the basement ceiling, hidden behind the drywall. This is a big no-no. Junction boxes themselves are okay. But covering them over with drywall is not. You’re supposed to put a cover on them so that they are accessible.

The conversation during demo went something like this:

“I found another one.”
“Seriously? Crap!”
“Do you want to just pull the whole ceiling down?”
“We probably should. Who knows how many there are up there.”

One of my goals in hiring a professional electrician was to eliminate as many junction boxes as possible, because I didn’t want the covers polka-dotting our nice new ceiling. In the end, our electrician was able to get rid of all but two–much better than I’d hoped for.

The other unsettling moment during demo was when we’d open a wall or part of the ceiling and find a loose wire. The ends were usually cut. They weren’t capped or taped at all, and we had no idea where they went and whether or not they were live.

This was the moment when Matt would reach for his tester and point it at the offending wire. If the tester chirped, that meant the wire was live. It turned out that most of the wires were dead, completely disconnected at both ends. No one had ever bothered to remove them, so they just sat there behind the drywall waiting to scare future renovators.

Matt made it his mission to eliminate all of this useless wiring, and he spent a lot of time tracing wires through the ceiling and along the walls so that he could pull them out.

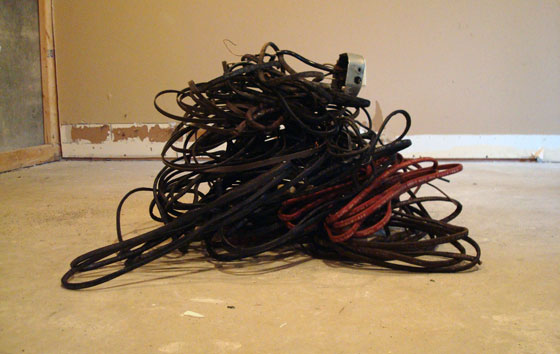
Pile of old electrical wires

Pile of some of the old wires Matt pulled out in the basement.

We did as much of the wiring work ourselves as we could, but having the help of a skilled professional was absolutely necessary for fixing all of the problems. Electrical is not always straight-forward, and it can be dangerous if it’s not right.

I’m all about DIY, but only if I know what I’m doing. Thanks to our electrician, all of the problems have been fixed, the panel is organized and labelled, circuits have been tidied up and new outlets and lights have been added where we wanted them. Most important of all it’s done right and it’s safe.