Time to zigzag or stay on the straight and narrow?

Remember this picture from my 2013 home goals?

A lush garden with a brick path winding through it

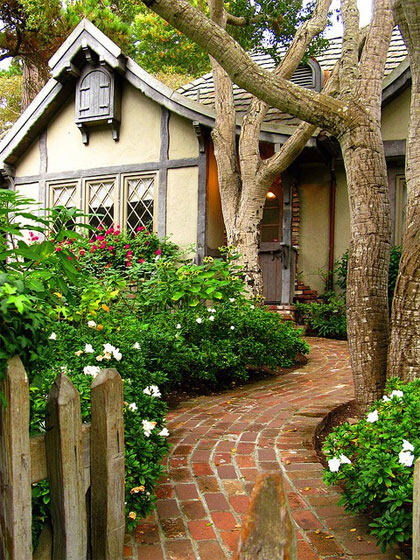
This is my inspiration for the garden I’m building on the turnaround at the front of the house. Lush. A little bit wild. A beautiful brick walkway winding through.

Honestly, the path is an excuse to use up some of the piles of bricks that we have lying around the farm. But, it does have two additional benefits: the path will save us from having to walk all the way around the turnaround when we want to get to the other side (it’s farther than you might think) and it will be an attractive feature at the front of the house (I hope).

The path is next up on the landscaping list. I’ve dug out the route across the turnaround and gathered my bricks. Now I’m just trying to decide how to lay them: trendy herring bone or traditional brick pattern.

Herring bone brick walkway

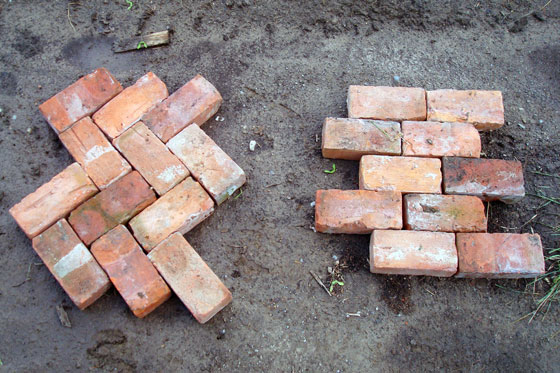
If I go with the straight brick pattern, I’ll probably do six courses, not the five that are pictured here. If I go with the herring bone, this is pretty much what it’s going to look like. I’m not going to cut the bricks, so the edge will be a bit ragged. It will probably be hidden eventually by all of the lush plants, but that might take a little while.

I think I know what you’re all going to say, but I’m going to put it to a vote nonetheless. What do you think?

For those who might be concerned by the photo above, I am not going to lay the bricks directly on the dirt. I’m planning a base of sand, which we also just happen to have a huge pile of lying around. I’d use gravel, but the gravel in our pile (yes, we have one of those too) is a bit too large to provide a really stable base.

No matter what pattern I end up using, I’m planning on leaving about a half inch gap between the bricks. Does anyone have any experience with polymeric sand? I’ve heard that it’s good for filling the spaces between the bricks.

Feel free to expand on your opinions on polymeric sand, the beauty of herring bone, dos and don’ts of brick laying, fast growing plants and any other topic that strikes you in the comments. I appreciate any advice.

How to mend a torn window screen

In the category of better late than never, I’ve finally fixed our torn window screens.

Torn window screen

You may remember that one of the last jobs I completed on my fall to-do list (on the first day of winter, no less) was to remove all of the window screens so that I could clean and patch them over the winter.

So yeah. That didn’t happen.

Now June is here and I’d really like to open a window without inviting the local mosquito population inside. It was time to get on with mending the tears.

First I trimmed the ripped screen so that I had a regular shaped hole.

Square hole in a window screen

Then I cut a patch from my replacement screening. The patch should be about 1/4 inch bigger than the hole all the way around.

Patching a torn screen

Next I lined the patch up over the hole and sewed it in place. I used regular black polyester sewing thread and tacked the screening about every three holes.

Stitching a patch on ripped window screen

I stitched my way around the patch and when I got to the end I simply knotted the thread a couple of times.

The patch is not invisible, but it’s not very noticeable. Most important, it does the job of keeping the skeeters and other flying critters on the outside while letting the fresh air come through to the inside.

Patched window screen

I will take an open window over air conditioning whenever possible, so with the weather getting steadily warmer, the repaired screens are a cause for celebration for me.

How about you? Are you a fresh air lover or an air conditioning aficionado? Does anyone else have experience patching screens? I’m sure my method isn’t the only solution. What’s the mosquito population like where you are? We seem to have had a baby boom this year, so the screens are absolutely essential.

Naked snake

A flasher recently passed through the farm. He left his coat behind.

We’re keeping our eyes open for a skinny fellow, more than two feet long, currently wearing shiny new scales. He’s not considered dangerous.

In case anyone still hasn’t guessed the answer to last week’s guess what post, it’s a freshly shed snakeskin.

Shed snakeskin

I found it in one of our flowerbeds last weekend. I’ve never seen a snake skin before outside of exhibits at the zoo. I found it really neat how it was all in one piece and how the scales were so clearly defined.

Close up of a shed snakeskin

A few of you guessed that it was a milk snake. Matt and I have conducted extensive research online, and we’re pretty confident that this skin belongs to just a regular garter snake. Regular or not, for me the snake skin is another novelty of country living.

Guess what?

What is this?

Hints:

  1. Found while weeding the garden last weekend.
  2. While it’s not that exotic, I’ve actually never seen one before.

How to play:

  1. Leave your guess in the comments.
  2. Check back next week for the answer.

Have a good weekend, everyone.

Ready for Rover

Matt and I are ready to expand our family. But not in the way you might think.

We’re expecting a furry, four-legged bundle of joy in the next month or so. Last year we were distracted by our four furry, four-legged feline bundles of joy. This year we’re hoping for something of the canine variety.

We haven’t met our new addition yet. We’re planning to adopt, so we’re keeping watch on the local shelter and foster web sites.

In the meantime, we’ve been readying his or her room. There was already a dog run behind the driveshed, but it was a little run down.

Collage of pictures of a rundown dog run

Homey, no?

Matt and my Dad spent an afternoon clearing out the barn doors, pallets, rocks and weeds. They patched the siding, built a sun shade/elevated perch and made the gate swing the right way.

Dog run

My job was the house, which is an insulated box inside the driveshed. (Ignore the clutter around and on the house. Cleaning up the driveshed is on the summer to-do list, right below playing with our new dog.)

Insulated dog house.

I converted the house from a duplex to a one bedroom and blocked off the second entrance. I also had the pleasure of cleaning out the interior. I don’t know who the most recent residents were, but no self-respecting dog would create such a mess in its den. In addition to the… mess, there was a piece of carpet, a few bones, a couple of toys and some hunks of ropes. Cleaning it out was a lovely job.

However, the job is done and now our doggy will have a lovely home.

Patched barn board siding

Doggy won’t be expected to spend all of his or her time outside. We want someone relatively energetic who will go for runs, hikes and long walks with us, but also someone who is relaxed enough to be inside the house when we’re cooking dinner or watching TV.

Anyone have any suggestions on breeds with a good balance of energy and calmness? I’d like a big dog (the bigger the better in my opinion), but Matt’s a fan of the smaller varieties (not tea cup or handbag size, but a funny looking Boston terrier is his ideal).

What about advice on adopting a dog? I like the idea of helping a dog who needs a home, but I’ll admit that I’m concerned that we might end up with a dog that has behavioural issues. I’d appreciate any tips anyone has.

Manure manouvering

So how was your weekend? Mine was crappy–as in filled with manure.

We’d made some progress on the turnaround so far this spring, picking up the rocks and rubble and flattening out the piles of dirt. However, I wasn’t very confident in the quality of that dirt, so before I started to plant anything, I wanted to give it a boost of nutrition. Like any decent farm, ours came with that barnyard fixture, the manure pile, so we have lots of natural fertilizer.

Manure pile

The turnaround is the size of some people’s backyards, so a decent quantity of manure was required. Likewise, there’s a decent distance between the pile out behind the barn and the turnaround at the front of the house.

My Dad left his trailer here a few weeks ago, and with the help of Wiley and his front end loader–my skills are much improved over last year–I brought three full loads of manure up to the garden.

Kioti CS2410 towing a trailer full of manure

The manure isn’t smelly anymore, but the lesson of the weekend is that it can be a bit slippery. I had a couple of close calls standing in the trailer shoveling it off.

This probably wasn’t quite what my Dad had in mind for his trailer when he left it with us, but he’s a good sport. So good in fact that he brought his rototiller up to the farm and went back and forth over the turnaround mixing the manure into the soil. My Mom pitched in too spreading the soil around the edges and picking out the rocks–lots and lots of rocks.

Rototilling a garden

Thanks to my parents, our tractor, the trailer and our convenient manure pile, the turnaround is now ready for planting, so I guess my weekend wasn’t that crappy after all. Pretty productive, in fact.

How was your weekend?

Memories of Muriel

I’ve said that I didn’t do any gardening last year, and that’s not entirely true. I planted one thing: this lilac.

Double French light purple lilac

This lilac came from our first house. It had lived for six years in the flower garden Matt and I made in the front yard. It never bloomed. It didn’t really grow very much. But I nursed it along because this plant is another one of my special treasures.

This lilac was a shoot that I transplanted from a beautiful bush my grandmother had growing in her backyard. She was always very proud of her lilac and its prolific double blossoms. A few of the grandchildren took shoots to plant in their own gardens.

Last spring as we sold our first house and moved to the farm, I carefully dug up the lilac, cleared a space in the overgrown garden at the front of the house and transplanted it.

Double French light purple lilac

Over the past year, it has finally started to thrive. It’s grown taller and bushier. And for the first time ever, it’s blooming.

This is a banner year for lilacs at the farm and it turns out we have lots: a large bush outside our bedroom window, others scattered around the gardens, a hedge stretching nearly from the house to the pond. However, this, our smallest plant, is my favourite.

Landscaping… the long list

I cannot bring myself to write a list of everything I want to do for renovations in the house, but for some reason I have no problem doing a master list for the landscaping outside.

Landscaping plan

Alright, I’ll admit it. That’s a little overwhelming.

There’s obviously a lot to be done, so it’s a matter of prioritizing what part of our 129 acres we want to focus on. This year, it’s the residential area.

Layout of the residential section of the property

And just to make things a little clearer than the animation above, here’s the plan for this year.

Landscaping plan for this year

That’s manageable, right? As you saw at the beginning of the week, we’ve already made some progress on the turn around, the flowerbeds and the pond shore. Maybe by the end of the growing season, we’ll have the property in shape.

The long term plan will take who knows how long.

Long term landscaping plan

I’ve decided my goal when it comes to outside work is to transition from landscaping to gardening. Weeding flowerbeds is much more manageable than building them.

How do you handle renovations and landscaping at your house? Do you write everything down or just keep a mental list? What are you hoping to accomplish this summer?

Death by landscaping

I am dead.

I’ve been working on a lovely introduction to this post referencing the Secret Garden and the joy of tending a neglected garden. But it’s not coming together for me, and I lack the mental power to make it work. Because I am dead.

You never heard any of the characters from the Secret Garden say, “I am dead. This garden has killed me.” Let’s be honest here, Ben probably said it, but Frances Hodgson Burnett did not include it in her story of love, childhood and horticulture.

In my story of love, adulthood, responsibility, country living and horticulture, landscaping has started.

The turn around has gone from mountain goat terrain to a blank slate, thanks mostly to our farmer with his heavy equipment.

Making a garden on our turnaround

I’ve weeded one flowerbed and my mother-in-law tackled two more. (All of the plant pots were left by the last owners. The plants are still alive, so I’ll be planting them soon on the blank slate of the turn around).

Weeding a flower garden

My father-in-law trimmed some of the trees and stumps around the pond. We still have a ways to go before we can actually mow the shore, but I’ve staked out the new fire pit, and we have lots of wood ready to burn.

Broken tree branch

Matt, my Dad and I dismantled one of our biggest rock piles on the property–and it only took us four hours.

Cleaning up a rock pile

I started building a new flower garden around the well head. And this is when I died.

Rock edged flower garden around a well head

Last year’s landscaping efforts were limited to some very cursory grass cutting. The property was unkempt when we bought it, and our neglect over the past year while we focused on the basement reno made it worse.

The amount of work required to bring a garden back after years and years of neglect is never mentioned in the Secret Garden. Sure there’s a bit of pruning and weeding, but mostly it’s romance and roses.

In the category of things get worse before they get better, even our efforts at clean up have led to more mess. Drilling the new well and trenching new waterlines destroyed one established flowerbed and left lumpy piles of very hard dirt in its place. Burning brush and scrap lumber as we’ve tried to pick up around the property resulted a mountain of ash and a half scorched spruce tree.

Landscaping was at the top of the list on my home goals for this year, and I will get a handle on the situation outside, even if it kills me.

How to match seams across an invisible zipper

I have a different type of how-to for you today, completely unrelated to home improvement or farming (not that I am any particular expert in that area yet).

This how-to is related to the dress that I sewed for my sister’s wedding. The bodice on this dress is made up of lots of pieces with a zipper in the side seam. The challenge when putting in that zipper is to line up all of the seams from front to back.

I’ll admit that the first attempt was a big fat fail. Horizontal seams were stair stepping down the zipper. Not attractive. In fact, I couldn’t even bring myself to take a picture.

Second attempt was much more successful. So, here’s my tutorial on how to line up horizontal seams across an invisible zipper.

Sew the first side of your zipper to the dress, having the zipper open and leaving the other side free.

How to insert an invisible zipper and match horizontal seams

Close the zipper and, using pins, mark the seams that you need to match. Insert the pins horizontally in the tape on the unsewn side of the zipper.

Marching horizontal seams while inserting an invisble zipper

Unzip the zipper, and pin the unsewn side to the dress, starting at each of the seams.

How to insert an invisible zipper and make sure seams line up

Baste the zipper in place and stitch. When you close up the zipper, all of your seams should match.

Marching seams when inserting an invisible zipper

Or at least match close enough.

Next week, I promise a return to our regular program of home improvement and country living. We’re heading into the first long weekend of “summer” and I have big plans. Chainsaws–not sewing machines–are involved.

Hope you have a good weekend. Happy Victoria Day to my fellow Canadians.