Garden #harvest15

In case you haven’t heard, a vegetable garden was my biggest home goal for this year. Well, I am officially declaring the garden a success.

We did our last harvest a week or so ago.

And just in time too. Frost is a regular occurrence now, and the plants have all shriveled up. They’re not producing any more produce. But they were pretty productive for most of the season.

Especially the squash.

I knew the squash was going to be plentiful. When it was time to pick, I didn’t even consider a basket. I got out the wheelbarrow.

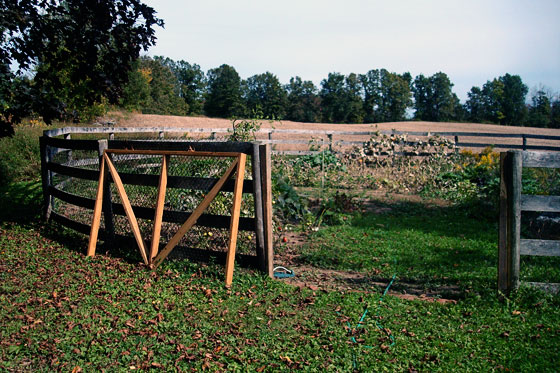
This is the first load. Please note that there are still numerous pumpkins hanging on the fence, just waiting to be picked.

Wheelbarrow full of acorn squash, butternut squash and pumpkins

The second load.

Wheelbarrow full of acorn squash, butternut squash and pumpkins

The grand tally is 37 pumpkins, 39 butternuts and about 70 acorns. We donated several of them to Thanksgiving dinners on both side of our family, and then brought them as party favours for all of the guests. We’re also eating them ourselves, of course.

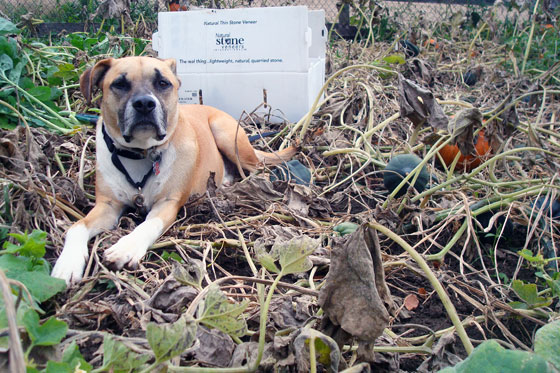
This is the corner of my dining room where they are currently living. Lovely dinner party decor, aren’t they? Apparently, there was a reason I didn’t toss the cartons that held the fireplace stone.

Squash curing in the dining room

The cartons also came in handy for the rutabagas.

Matt was joking when he suggested we plant rutabagas. Neither of us knew what they were. I don’t think I’ve ever eaten one. I know I’ve never cooked with one. Seeing a carton full of these large vegetables was a bit daunting.

Rutabagas

We strategically picked the rutabagas the week before Thanksgiving. Then we divvied them up, and Matt and I took two-thirds of them to work. Thankfully, many of our coworkers were enthused by the idea of adding rutabagas to their Thanksgiving menus, and we were able to get rid of most of them.

Rutabaga

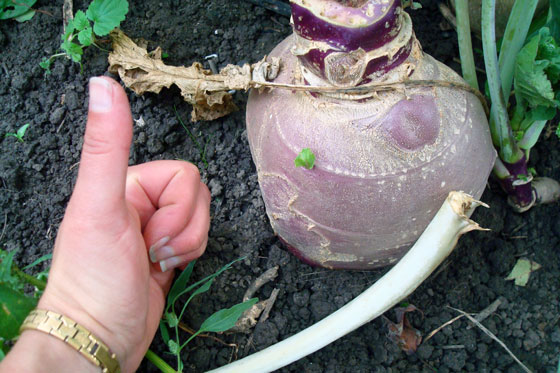
I did cook one for our own Thanksgiving dinner. The recipe called for one large rutabaga “about 1 1/2 pounds.” My version of a large rutabaga weighed in at 3 pounds–double the recipe. Thankfully, we liked the rutabaga, so we didn’t mind that we had a lot of it.

The other star of our harvest were Matt’s potatoes. We had just three plants, but they produced some beautiful taters.

Harvesting red potatoes

There were some big ones, some medium ones, and some wee-tiny potato-lets.

Potatoes

That big guy came in at more than a pound all on his own. In total, we had 6 pounds 4 ounces of potatoes.

Weighing a potato

And they taste amazing. I definitely notice a difference between our fresh homegrown ones and the grocery store. (This may be cruelty to vegetables).

Breakfast for dinner

The only things that did not do well–and I’ve talked about this before–are our poor peppers. We had 8 red pepper plants and 12 (supposedly) jalapenos, all of which did pretty much nothing. We got probably about 6 peppers total, and they all resembled misshapen green bell peppers.

The one pepper that started to turn red shriveled up and fell off. And note how the plant is blossoming again even though fall leaves are on the soil around it? These guys just could not get it together.

Red pepper

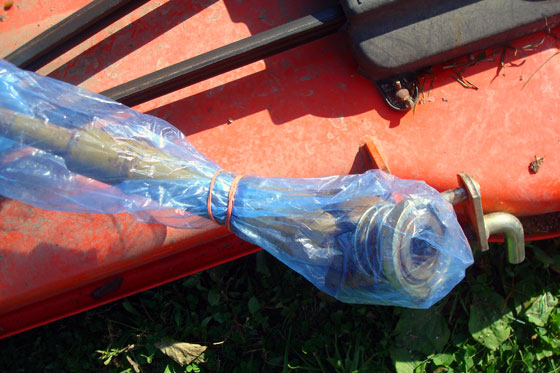
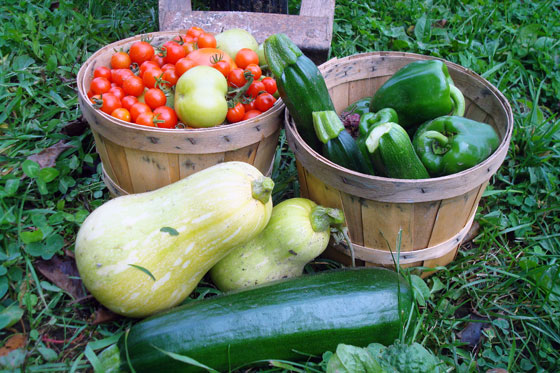
Our final harvest included those last few peppers, a small bushel of tomatoes, half a basket of beets, and of course, more zucchini. Those things just kept coming.

Not pictured are two more baskets of Matt’s onions.

Harvest 2015

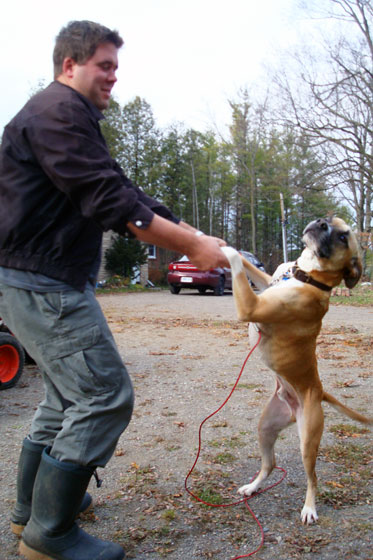
Oh, and we grew a puppy too!

Baxter in the garden

The last of the tomatoes and peppers are now on the dining room table, ripening the rest of the way in front of our best window.

Tomatoes ripening in front of the window

It’s so great to have finally fulfilled my dream of having our own garden and growing our own food. And it’s something that Matt and I both really enjoyed–I love projects that happen like that.

We have more to do to wrap up the garden for the season. I’m already full of plans for next year. But for now, I can pretty much check vegetable garden off the 2015 wishlist.

Did you have a vegetable garden this year? How did your garden grow? Do you have any favourite squash or pumpkin recipes to share?

How to remove a belly mower from a Kioti CS2410

Every year, twice a year, Matt and I get up close and personal with our little tractor, Wiley. Attaching the mower deck in the spring and detaching it in the fall are pretty intimate operations.

Just a refresher, Wiley is a Kioti CS2410. His mower deck is a Kioti SM2410. It’s a belly mower, meaning it rides under Wiley’s middle (as opposed to the mowers that are towed behind a tractor).

How to detach a Kioti SM2410 mower

I thought this year that I’d finally properly document the process. I’ve tried to do this for the past few years, but attaching and detaching is always a bit stressful. See how concerned Baxter is when we did this two years ago?

Baxter helping to remove the mower deck

I usually feel like it’s better for my marriage if I don’t try to prep a blog post at the same time as we’re installing or removing the deck.

That’s not to say this is an overly complicated undertaking. It’s just an undertaking that is a bit tricky in spots.

Here are the steps to remove the mower deck from the tractor:

1. This whole operation will be dramatically aided by level ground (which does not exist at the farm). So, step 1: park the tractor on level ground… or at least the levelest ground you can find.

2. Start with the mower raised but set at the shortest cutting setting.

Cutting settings on a Kioti CS2410

3. Turn the wheels that support the deck so that they’re perpendicular (90 degrees) to the tractor’s wheels. Pop out the pins and rotate the wheels.

How to detach a Kioti SM2410 mower

Repin them in the highest position–meaning the mower is as high off the ground as you can get it, i.e. the pins are in the bottom hole on the sleeve.

Pin in the bottom hole

4. Disconnect the PTO. Push the shiny gold collar towards the mower deck (forwards), and pull it off the shaft. The person with the longest arms should do this (i.e. Matt), as the PTO is right in the middle under the tractor, and you have to reach over the deck and around the back wheel to reach it.

PTO on a Kioti CS2410

5. Lower the deck–use the three-point lever, not the cutting height lever. Give the deck a good shake to make sure it’s all the way down. You do not want this thing falling on you. It will crush you. (Not quite the same, but I have this line in my head now and I can’t resist. Plus, it’s one of Matt’s favourite movies.)

6. Pull the pins that attach the deck to the tractor. There are three on each side. The quick connect pins at the front and back are on springs. Just pull them out and turn them out of the way. The other pins at the very front have split rings that you have to remove first.

Quick connect spring pins on a Kioti CS2410

Cotter pins on a Kioti CS2410

The pins are when things get stressful for us. The deck is super heavy. And if you’re not on level ground, there’s invariably some weight still resting on the pins. So sometimes they just don’t want to come out, no matter how hard we yank on them.

There are two techniques we’ve found to help: one, slide some blocks under the deck to help support the weight. Use trial and error to find out where you need them–front or back, starboard or port.

Tips to remove a Kioti CS2410 mower deck

The second solution is tried and true: the hammer. Tap (as gently as you can given your current frustration levels and your limited maneuverability under the tractor).

It’s a wonderful feeling when the pins pop free. You will end up with two metal arms that hold the deck to the front of the tractor. Those arms should stay with the deck. Don’t lose them. You’ll need them if you ever want to cut grass again. (And just a note for when it comes time to reattach them, the springs point in).

Kioti SM2410 mower deck arms

7. Raise the mower using the three-point lever to fully detach the deck. At this point the deck should not be connected to the tractor, but still sitting under the tractor. Use the front end loader to lift the tractor up a little bit–just enough to give you clearance to slide out the deck. (Put the parking brake on–safety first!)

Use the front end loader to lift the front wheels off the ground

8. Push, push, push and pull, pull, pull the deck out from under the tractor, and you’re good!

How to detach a Kioti SM2410 mower

Well, you’ll probably want to tip up the deck, scrape the dried up crusty grass from the underside, hit it with the hose, inspect the blades and grease all of the fittings.

Scraping grass out of a mower

Cleaning the mower deck

Just to be safe, we also tuck the PTO into a plastic bag to keep dirt out of it.

Protect the PTO with a plastic bag

But do all that, and you’re done. And you don’t have to cut grass for another few months. (Don’t mention attaching the snowblower).

Time for a victory dance! (Wow, Bax was skinny that first year).

Victory dance

What type of mower do you use at your house? Have you tucked your mower away for the season yet? Do you have any jobs that put your relationship to the test? Do you have a sidekick who helps (and celebrates) the tough jobs?

Birthday birdbath

Everyone who guessed last week got it right. Our new addition at the farm is our birdbath.

As usual, when it came to my birthday last month, my wishlist was pretty short–as in there was only one thing on it. This year, what I wanted most was a top for the birdbath.

Birdbath

The base has been here at the farm all along, but we’ve not seen any sign of the top. It probably broke sometime ago, so we resigned ourselves to having a new top made.

Concrete birdbath

A house down the road has a sign out front for pre-casting and a yard full of concrete animals, fountains and birdbaths. They said yes, they could cast us a basin.

Concrete birdbath basin

I picked out a design that I liked and that I thought would work well with the base. About a week later, they delivered the birdbath (delivery was so helpful, as it weighs about 3 tonnes).

Concrete birdbath

It’s obviously the end of birdbath season here in Canada. So we’ll be tucking this away for a few months, and I’ll be getting my morning bird-watching fix from the birdfeeder.

Nonetheless, I’m thrilled to finally have a complete birdbath. Thank you, Matt!

Do you have a birdbath at your house? Have you ever had anything cast in concrete?

Birthday presents previously:

Guess what?

Something new showed up at the farm a few weeks ago, but I haven’t gotten around to posting about it yet.

Before I do, I’m going back to an old standby: my guess what post.

Any guesses as to what this is?

Guess what?

I’ll be back on Monday with the answer. Until then, have a great weekend.

Farming questions never end

Since moving to the farm, I’ve realized how incredibly hard farmers work and how little I knew–and know–about farming. I’m learning more because I now live here and I see farming up close, but I still have a lot of questions. Sarah in Illinois is back today to share some of her experience living with a farmer and some of the lessons she’s learned so far.

Corn cobs in the field

Growing up in a farming community, I have always been familiar with some aspects of farming. I could always identify a corn field from a soybean field and a tractor from a combine. I knew that farmers put seeds in the ground in the spring and harvested crops in the fall. But what else did they do all year?

Why did they always seem so stressed about the rainfall, the wind, and the temperature when there was nothing they could do about it? What were all those other pieces of equipment that traveled up and down the roads and slowed me down?

When Steve and I started dating he was working for a company that sold seed and chemicals and applied chemicals to fields. And I was fascinated with what he did. I asked questions, and more questions, and more questions. And after 6 years, I realize that I still know so little.

What else do farmers do all year? They watch their fields for weeds, fungus, and insects and then treat accordingly. They maintain their equipment, they keep the ditches mowed, they clean out grain bins to prep them for harvest, and I am not even talking about the farmers that also have livestock.

Why are they so stressed about the weather? Well, there are some obvious reasons, but they also have to be concerned whether the root system of the plant is strong enough to hold up against a bad windstorm. Did they plant the seed too deep? Not deep enough? Did they apply the right chemical, fertilizer and at the right time? And all of those pieces of equipment? I am still learning their names and what they are used for.

Now that Steve is finishing his second season working for himself, and we have crops of our own, my questions have only multiplied.

Every one of those decisions, every single factor affects the quality and the quantity of the harvest. Should we have put on more fertilizer? It may make more bushel, but will it be worth the cost? How much damage have wild turkeys and deer done to our field? (This year, we had a fair amount of damage.) And now that Steve has harvested, should we sell right away? Or store it and hope prices go up? And if we store it, since we don’t own any bins, will the price go up high enough to offset the cost of storing it?

Ear of corn

I saved our first ear of corn!

But even with all of those scary decisions and all of those risks, all of the evenings I spend home alone because Steve is in the fields, all of the stress wondering if we are making the right decisions, I still love that we are taking a leap into farming.

We are growing crops that feed people, feed animals and produce fuel. There is so much to learn. My questions to Steve will only increase.

I never tire of watching a tractor driving through the field turning over the ground or the combine cutting beans and unloading them into a waiting truck.

I hope that we are able to grow our business, rent more acres and even buy some when possible. And I hope to continue to learn all I can about farming!

Thanks so much for sharing your questions (and some of the answers), Sarah. I learned some new things. When it comes to farming, I find there are lots of things I’ve never thought about before–like root systems.

What about you? What questions do you have about farming? Or any surprising lessons you’ve learned?

Happy Thanksgiving

Maple tree behind the barn

Photo by my mother-in-law, Audrey.

Today, I am thankful for (in no particular order) a day off, starting the weekend with a fun night out with my father and brother, Doritos (Sweet Chili Heat and Dill Pickle) and fizzy Coke, a squirmy nephew, a wiggle-butt dog, a barn cat with a serious balance issue (and an affinity for belly scratches), two turkey dinners and all of the chefs who cooked them, my mother who works so hard to bring everyone together, my father-in-law and his chainsaw, my mother-in-law who takes the dog for a walk and shares pictures for my blog, my husband and helpmate (who supplies the Doritos and wields his own chainsaw), an outstanding harvest that’s more than enough to share (seriously, so many squash), this farm and my favourite tree out behind the barn.

Happy Thanksgiving to my fellow Canadians.

Fall mantel

Pumpkins, antlers and candles decorating the mantel

There have been some beautiful fall home tours going around the blogosphere recently. I’ve held off on bringing fall inside, trying to hang onto summer just a little bit longer. However, now that it’s October, I can’t deny that fall is here.

This is our first fall having a working fireplace, so that’s where I started my decor. Behold the fall mantel.

Stone fireplace decorated for fall with pumpkins

The black lantern, wooden sphere tealight holders and antlers have become staples on the mantel. For fall, I added two wooden candlesticks that my Dad made and a whole bunch of pumpkins.

Antler, pumpkins and candles decorating a fall mantel

These 10 pumpkins are probably only about half of what the garden has produced this year. From what I’ve read, squash (and pumpkins) need to cure in a warm-ish place before they’re stored for the winter. So this display is about both form and function. (And yes, that’s the Blue Jays game on the TV in the background. Summer continues even into October. Go Jays!)

Pumpkins, antlers and candles decorating the mantelAntler, pumpkins and candles decorating a fall mantel

I love the barn beam mantel so much. The wood against the stone is beautiful. Now with the pops or orange and black it feels right for fall.

The only thing we have yet to do to fully embrace fall is light the fire.

Candles lit on the fall mantel

How are you decorating for fall? Have you had a fire at your house yet? Did anyone else grow your own pumpkins? Any suggestions of what to make with the pumpkins (besides jack o’ lanterns)? How about tips to store the pumpkins? Who else is watching the baseball? Let’s hear it for the Jays!

Praying mantis

The other weekend, while working outside, I felt a tickle on the back of my neck. I craned my head around and managed to catch a glimpse of the tickler: a praying mantis.

Praying mantis on the back of my neck

Because of course. Out of all of the vegetation available on the farm, why wouldn’t you land on the human?

I think praying mantises (plural?) are really neat insects. Sightings are relatively rare, so I’m always happy to see one.

Praying mantis

Eventually, it flew into the garden where the camouflage was much better. Just look at how it blends in with this lily. The brown and yellow and green tones are so similar.

Praying mantis camouflaged against lily leaves

Nature’s pretty cool.

What insects and animals are you seeing around your house? Who else likes praying mantises? What’s the best example of camouflage you’ve observed?

Time to get my act together

I can no longer deny it. Fall is here. I’ve been hanging onto summer as long as I can, but last week the temperatures DROPPED. As in, we had a windchill, and I wore my winter jacket, hat and mitts for Baxter’s and my morning walk.

So, it’s time.

Every year as fall rolls in, a list starts in my head. It’s not completely a do or die list, but it’s definitely a “winter is coming and you’d better get your act together” list.

So here we go: the fall to-do list.

The vegetable garden

Unhung garden gate

This was my biggest home goal for 2015, and before the year ends, there are a few more things I’d like to do.

  • Hang the gate – The gate has been hanging around unhung for long enough. We need to take a bit of time, sort out the hinges and just get this done.
  • Edge the garden – We have a huge pile of old fence posts, and my plan is to use them as kind of “curbs” to help keep the weeds out of the garden.
  • Put in raised beds – I’m going to use the rest of the fence posts to make a ring of shallow raised beds around the outside edge of the garden.
  • Spread manure – This is our chance to knock two tasks off our to-do list at one time: clean out the 17 stalls in the barn and fertilize the garden. The manure is well-aged since it’s been here since before we bought the farm.

The bird feeder

Bird feeder and pole

I love watching the birds from the dining room window, and feeder is the best way to attract them.

  • Reattach feeder bracket – Last year when we were hammering the bird feeder post into the ground, one of the brackets broke off. My cousin made the post for us originally, so I’m going to tap him to reweld the top bracket.
  • Install a sleeve for the post – To make sure we don’t have to hammer the post anymore, I’m going to put a length of pipe in the ground so that the post can just slide in every fall.

Firewood

Downed tree at the edge of the field

This is our first fall with a fireplace, and we’re so looking forward to firing it up.

  • Put up another row of firewood – We have two rows of wood dried, split and stacked. I think we’ll need one more row to get us through fireplace season.
  • Tidy up the trees – Tree maintenance that’s an ongoing task at the farm–as demonstrated by the big tree above that came down over the weekend. Fortunately, we have a steady supply of firewood as a result.

Get Wiley ready for winter

Clearing snow with the tractor

Our handy-dandy tractor needs his annual tune-up.

  • Change the oil – More accurately, have my handy cousin change the oil for us.
  • Check the battery contacts – Wiley’s a bit reluctant to start sometimes. In the spring, we had a loose connection on the battery terminal, and my cousin made us a little sleeve to tighten up the clasp. Cold weather starts are even harder for Wiley, so we want to make sure we do everything to help him out.
  • Remove the mower deck – It’s that time of year again.

The house

Cleaning gutters with a leaf blower

There are a few things to do for the place where we actually live.

  • Take off the screens – The screens get so dusty during the summer, I’ve found it’s necessary to take them off and give them a good cleaning before it’s open window season again.
  • Clean the heat pump filter – I broke out the shop vac on Friday, figuring that we’d need to fire up the geothermal before the end of the weekend. Sure enough, as of last night the heat is on.
  • Clean out the gutters – Matt did round one last week, but we’ll need at least one more cleaning before the snow falls.
  • Turn off the water

I feel like I’ve been taking it easy for a little while when it comes to work around the farm. So step one to completing is to find my motivation. Any tips?

Obviously, some of these tasks are unique to the farm. But some of them are universal no matter where you live.

What’s on your fall to-do list? Are you feeling the pressure of impending winter?

Previous fall to-do lists:

Finishing up the deck

I’m pleased to welcome Sarah in Illinois back to the blog. Today’s post is full of the things I love: a big doggie, country views and a great DIY transformation. Take it away, Sarah.

One of Steve and my favorite places to relax is on our deck. The summer of 2013 we drew up plans and built a large deck off the back of our house. There are some things about the deck that we wish we had done differently, but overall we are very happy with it. (Hello, Treu!)

Deck with Treu

We had done a little research on how to protect it. One thing that we had read was to wait a year to put any sealant on it.

We chose to wait even longer. The boards we used were very green. That is, they had a lot of moisture in them. This was obvious when we installed it, but it also showed up over time as the boards warped more than we had liked as they dried.

This year I decided that it was time to get at least one coat of sealant on it. The thing was, after two years, the deck was very dirty and stained. I believe this was a combination of normal use, stains from the grill, mold from moisture and just pollution in the air.

Deck railing before

So I chose to clean it first. It took just a little bit of prep work. I have two unbelievable huge and beautiful mums, so I made sure to drape plastic drop cloths over them to keep the cleaner off of them. The deck wash I purchased was a bleach base and it worked like a charm for cleaning the deck.

Cleaning the deck

I bought what I believed to be enough based on the square footage that it said it covered. This was way off. I ended up needing double the amount. I think that part of the reason was that maybe the square footage listed did not take in account the railings. But I am sure it also had to do with how heavy I sprayed it on the wood.

I used a hand held pump sprayer to apply the cleaner, then I used a broom to lightly scrub trouble spots, and finally I sprayed it off with a garden hose. This was easily a one person job and if I had had enough cleaner would have taken just one afternoon.

Then I let the deck dry for a couple weeks. I wanted to make sure not to trap any moisture in with the sealant.

Deck before and after cleaning

When it was time to seal the deck, it took more prep work and took two people. Steve and I used the same hand pump sprayer to apply the sealant. We found the method that worked for us was for Steve to spray the railings, then the floor and for me to follow up with a brush and smooth any drips and puddles. We wanted to make sure we put a heavy coat on, but we wanted it to be fairly even.

Applying sealer to the deck

The sealant was much messier than the cleaner. It got everywhere–on us, on the siding, and even oversprayed to my nearby herb garden. We are planning to reside the house in the next year when our addition is finished, so I was not too upset by the overspray on the siding, but I sure wish I had harvested my basil and oregano before we got started.

We feel the deck needs at least one more coat of sealant for us to be happy with it. But since harvest has started, it looks like it is going to be next spring before that gets done.

In the meantime, I am so happy to have the first layer of protection on it. The cooler weather is just begging us to come out of the house and relax!

Deck with mums

What a great outdoor space, Sarah. Those mums are amazing. I’m always so impressed by how wood can be restored with a good cleaning and a bit of work. Good job. I hope you get to relax outside and enjoy it.

Anyone else have tips to share about restoring wood? Have you ever stained a deck? Who else has had a project that’s taken a bit longer to complete than planned?