Bill

Last week, I said I would post the story of Bill. Today is Part 1. You can read Part 2 here.

He was known as Bill.

He’d been given the name before he was even born. It had been scrawled in pencil on the outside of the large white egg.

Each day as the egg was turned the name would disappear and reappear.

After more than a month in the warm incubator, a crack appeared in the egg. Bill was ready to get out. But he wasn’t strong enough to do it on his own.

Carefully the man chipped away at the shell, breaking off small shards with his fingernails. He stopped and waited, hoping Bill could wiggle his way free. It took a long time and more help, but finally the small gosling hatched.

His dark feathers were wet and plastered flat.

His fragile pink skin showed through.

For nearly a day, he laid on a soft cloth in a small cardboard box. He was too weak to move, unable to even raise his head. The man put a light bulb over the box to keep the small bird warm.

This is how Bill, my goose (gander), came into the world.

Bill and me

Bill soon found his feet. He was part of a small hatch–the only goose–and shared his box with just one duckling. But from the start, Bill considered himself more human than bird.

From his home in the corner of the kitchen he would keep an eye on what the family was up to. At night when the family went to bed, we couldn’t sleep because his piercing peep-peep-peeps would fill the house. Batman and Robin had just been released so we cut George Clooney out of the cereal box and taped him to the side of Bill’s box for company. It seemed to help.

Soon, Bill was big enough to move outside to the coop and its covered run. He and his duck friend, Magellan, made their home there.

Bill and Magellan

Even though he lived outside, Bill made sure he was in on pretty much everything the family was doing.

Photo bombing.

Bill photo bomb

Snow forting.

Bill and Magellan at our winter snowfort

Gardening.

Bill gardening wiht my Mom

Cottaging.

Swimming with Bill

A few years later, though, things changed.

Read Part 2 here.

Scraping a stipple ceiling

Pimples. It’s not even a nice word.

Popcorn. That’s a much nicer word.

Stippled ceilings have come to be known as popcorn ceilings. However, in my opinion, popcorn is much too nice of a word to be associated with these ugly ceilings. Not to trigger any traumatic teenage flashbacks, but stippled ceilings are closer to pimples than popcorn.

Popcorn ceiling

Step one in the master bedroom makeover was to help the ceiling grow up from its ugly adolescence into beautiful adulthood–and I couldn’t just make like a fashion magazine and airbrush.

It was gonna take muscle, and it was gonna be messy.

So, armed with an all-clear on my asbestos test, trowels, a spray bottle of water, pole sander, extra sandpaper and a dust mask, I went to work.

Tools for scraping popcorn ceiling

In the basement where we also had stipple ceiling, I actually sanded a lot of it off. This technique gave me a really nice smooth finish, even if it did generate a tonne of dust. In the bedroom, I found soaking in water and then scraping with the trowel worked best. As much as the big yellow trowel would have been faster, I liked the control of my little trowel.

It was still a lot of work. Scraping a stipple ceiling is not fun. However, fueled by ju-jubes, I got it done. (My skin may have progressed from its teenage years, but my diet has not. The orange ones are still my favourite).

Jujubs

Underneath the stipple, the drywall was smooth and painted, which leads me to ask why? Why finish a ceiling smooth, paint it and then cover it in pimples? I just don’t understand.

We all know the prep work is most important to get a good paint job. I spent more time on prep for the bedroom than I ever have before. Scraping the ceiling, scraping the caulking from between the crown molding and the ceiling (ugh), patching hundreds of little chips in the ceiling (they were just minor chips of paint, but there were truly hundreds of them), patching one bad ceiling seam and one crack in the wall, sanding and pasting over again.

Ceiling after scraping the popcorn

It took days.

Thank goodness I was off work for the Christmas break. Although it wasn’t the most restful holiday.

In the end though, my ceiling is all grown up and pimple-free. Much nicer to look at when I’m lying in bed in my new master bedroom. (Apologies for the really bad photo, but I think you can tell it’s nice and smooth. Oh, and there’s a sneak peak of the blue walls).

Finished ceiling after scraping the popcorn

Have you ever scraped a stipple ceiling? Any techniques to share? Any insights on why people stipple ceilings? And most important, what colour ju-jubes are your favourite?

Once upon a time, I went insane

Back in September, I lost my mind. It was just for a moment, but it was a definite psychotic break. And it’s taken me until now to talk about it.

In my normal state, I don’t

  • Shop online
  • Make impulse purchases, especially not over $20
  • Buy much decor

These aren’t formal rules. I’m just very frugal and tend to avoid purchases that I view as “frivolous.”

Well, in a moment of insanity, I whipped out my credit card and bought something that is the very definition of frivolous.

Behold my papier-maché goose head.

I first saw it on Lindsay’s blog, and it was pretty much love at first sight. Although, in all fairness, the goose wasn’t a complete impulse. I did think about this purchase for 24 hours before I finally pulled out my credit card and logged in to Etsy.

When the box came, I couldn’t even tell Matt what was in the package. And once I opened it, he still didn’t understand why I had to buy it (and Matt knows my history).

And I think it’s time you know this bit of my history too. Next week, I’ll share the story of Bill.

A different kind of weekend

This was not a big DIYing or blogging weekend. And actually it was pretty nice.

However, because it was a different type of weekend, you get a different type of post today. Get ready for a view into my life outside of renos.

Somehow, Matt and I both arrived home before sunset and at the same time on Friday evening. We headed out with Baxter for a family walk across the fields, which was a lovely way to start the weekend.

Nephew's first birthday

Saturday was lots of family time for my nephew’s first birthday, and then a girls’ night at my friend’s new house. I’ve been friends with some of these women since kindergarten. Our unit of six was solidified before we started counting our ages in double digits. While we don’t see each other as often as we’d like anymore, when we do, it’s as though no time has passed. I am very thankful I have such amazing friends.

Sunday, Baxter and I went for a hike with some of his doggie friends. We’re doing the 21-day dog walking challenge from ThatMutt.com (#ActiveMutts). A two-hour off-leash hike is a good way to get some exercise and training practice. My focus with Baxter this month is “come.” There were some great successes and one epic failure. Baxter abandoned our hiking group to join another group with a Great Dane and two Dobermans. He looooves Great Danes.

Sunday dog hike

Since moving to the farm, I’ve become a huge homebody–and there’s obviously no shortage of things to do. Weekends like this that take me away from the farm are not my favourite. However, it ended up being a very nice time and a good reminder to me that it’s important to make the effort to do something different every so often.

How was your weekend? What did you do? How do you like to spend your weekends?

Master bedroom makeover plans

We’re already down to just one more week yet in January. It’s definitely time to get moving on the first project on this year’s Home Goals list: the master bedroom makeover. You saw the inspiration picture last week in my Home Goals post.

Black, white and gold bedroom

Source: Chez V (found via Little Black Door)

You also saw the fancy-schmancy room we’re going to be using as our master.

Master bedroom before

So there’s just a little bit of work to do to transform this former guest room into a truly fancy master bedroom:

  • Buy a queen size bed – Matt and I have slept on a double ever since we first moved in together. The mattress was my old bed from my grandma’s cottage. It was on its second life when it went up to the cottage, never mind when it came to our first house. We were truly due for an upgrade. In the middle of shopping for a new mattress, we decided to really upgrade and went for a king size. Those extra six inches in the fancy master will come in handy.
  • Remove popcorn ceiling – Scraping the ceiling was not the funnest way to spend a day, but the popcorn is gone and so are all of the cobwebs that were stuck to the stipple.
  • Patch ceiling and walls – Also known as, “how I spent my Christmas vacation.” Patching took such a long time.
  • Paint ceiling, trim and walls – I had such a hard time picking a colour. Finally, I found Chez V’s makeover, which made me decide to go dark and dramatic. Trendy blogger favourite Hale Navy it is.
  • DIY a headboard – No idea what I’m going to do here. White? Wood? Upholstered?
  • Relocate light switch – Oddly, the light switch is behind the door. It’s perfectly positioned if you used the mirrored pocket door from the other bedroom to enter the master. I wouldn’t really call this feature fancy. It’s just weird.

Light switches behind the door

  • Replace light fixture – Anything’s better than the ceiling fan that was there before. I like the brass and crystal in the inspiration picture.
  • Make/find window treatments – We haven’t had curtains since we moved in. We don’t need them for privacy, but it would be nice to sleep in past dawn some summer weekend.
  • Paint dresser and replace hardware – We have a beat up black dresser that we bought at a garage sale. I think it can be freshened up with some nice white paint and brass hardware.
  • Refresh dinged up closet doors – It appears our closet doors spent their past life as bulletin boards, except with tape rather than pushpins.

Beat up closet doors

  • Decorate and personalize – It will be nice to finally personalize a bedroom. Although the giant pink ape you saw above probably isn’t the personalization I’m looking for.

Someday, when we do our major house renovation, we will build a beautiful master suite. At that point, there will be no mistake as to what bedroom is the master. Until then, this makeover will give us a nice–and a little bit fancy–space of our own. I’m not quite sure yet where the ape is going to end up sleeping.

DIY ruler growth chart

Matt’s and my nephew population increased by two last year, bringing our total allotment to four. For each of our nephews, whether he counts his age in years or months, Christmas is a big deal. But there’s an extra specialness for nephew’s first Christmas, as you probably expect.

My sisters were very specific in their gifting instructions:

“Please remember he will only be about 9 months at Christmas and does not need tons of presents. His favourite toys are currently boxes, paper, strings on his Dad’s sweatshirts and his socks. As you can see, he has simple tastes and you do not need to spend a lot of money on him this year.”

The instructions didn’t really help. The little boys still got a lot of gifts.

The one who followed the directions best was probably my Dad. He gave each of the boys a stick.

Of course, he did hand turn the wood very carefully on his lathe and then sanded them smooth and varnished them. They were special sticks… and were winners with the boys.

Matt and I also made something for the boys, although they didn’t appreciate them as much as the sticks.

We made growth charts that look like big wooden rulers.

DIY kid's growth chart

I thought these were pretty clever when I first saw them online. Plus, if my sisters ever move, they can take this with them much easier than a door frame or a piece of drywall.

I’m not going into a full tutorial on how we made our rulers, but don’t worry, I will give you my templates, some tips, and posts on two other blogs that will give you everything you need to make your own.

There are lots of examples of these types of growth charts online and lots of tutorials out there. Here are the two posts that were most helpful to me:

  • Sketchy Style’s DIY Growth Chart – This one is more of a life chart than a growth chart–super inspiring and fun. Becky’s tutorial for transferring type onto wood was revolutionary for me. No stenciling! No painting! Wonderous. (The font I chose is Baskerville Old Face in case you’re interested).

Detail of DIY ruler growth chart

  • Decor and the Dog’s DIY Growth Chart – Michelle’s tutorial turned me on to paint pens. Transferring type to wood isn’t fool proof, and the paint pens helped me be super precise for the touch-ups. Plus, I was obviously inspired by Ike’s cute photos… although my model wasn’t quite as cooperative.

Baxter modelling with the growth chart

I made my growth charts out of half inch plywood, roughly 10 inches wide by 6 feet tall. I liked the layered edge that was visible from the plywood. Since they’re so thin, they’re pretty light weight, so a simple sawtooth picture hanger on the back was all I needed.

And here are my templates, just in case you want to make your own ruler. If you’re going to transfer the type directly from paper onto wood, you’ll need the reversed file.

Tomorrow is my third nephew’s first birthday. He lives a bit far away, so I don’t get to see him as often as I’d like. I’m hoping my sister’s able to squeeze in time–and get my nephew to hold still long enough–to make the first mark on his chart. Happy birthday, Cole. It’s been very special to see you grow over the past year.

Not quite masters of our universe

It turns out Matt and I have been sleeping in the wrong room ever since we moved to the farm. We’re the owners of this farm, the adults of the house. That means our room should be the master bedroom, right?

Well, we got it wrong when we moved into the farm.

We did nothing to fix up any of the bedrooms. The paint colour is gross and walls are dirty. The ceilings are stippled so that cobwebs and dust get caught on the pimples (no, I’m not the greatest housekeeper). The light fixtures are massive outdated ceiling fans. In the midst of all of this beauty, we just picked a room, plopped down our furniture and called it our bedroom.

Unbeknownst to us, the room across the hall (which we’ve been using as a guest room) was where we should have plopped down our furniture.

Why, you ask? Well it’s obvious. This is the fancy room.

Master bedroom before

Now looking at this picture, you may still feel the need to question what makes it fancy (aside from the giant pink ape, obviously).

Let me enlighten you.

This room has special moldings. All through the rest of the house, the trim is basic, narrow and flat. But this room has the fancy curvy trim. Just ignore the fact that screws for the window blinds have destroyed some of it.

Molding with screw holes in it

This room even has crown molding! Oooh, fancy.

Crown molding

This room also has a mirror, which our current room lacks. The fact that it’s a full-length mirrored pocket door that accesses the small bedroom next door (my “office”) isn’t weird at all.

Mirrored pocket door

This room has drywall, while the room we chose as our bedroom has painted faux wood paneling. Nothin’ says fancy like drywall.

And most of all, this bedroom is bigger… by a whole six inches. Woo-hoo!

So it’s obvious. Matt and I have to move across the hall.

Sarcasm aside, I’m actually looking forward to the move. This is my chance to make a comfortable, relaxing, personal, pretty bedroom for Matt and myself.

Next week, I’ll share how I plan to do that.

Home Goals 2015

I have to admit I’m a bit chuffed by how well we did on my Home Goals 2014. We got a lot done! However, I also have to admit I’m a bit tired. In 2015, I’m hoping to take it as it comes a little bit more.

I of course still have projects, but I’ve tried to pick some smaller ones this year.

I’m also going to try to be a little more flexible and not feel like I have to do a different project every month, each with its own schedule and deadlines. Yes, that worked for me in terms of getting things done. But it wasn’t always the most fun.

So in 2015, I’m trying to find the balance between the complete loosey-goosey failure of 2013 and the rigid productivity of 2014.

As is my tradition in my annual Home Goals post, I’m going with inspirational pictures, rather than reality.

Master bedroom

This project is a carry-over from 2014. We haven’t done any updates to any of the bedrooms, and I think the master is a good place to start.

Black, white and gold bedroom

Source: Chez V (found via Little Black Door)

List:

  • Buy a queen size bed Done… except it grew to a king!
  • Remove popcorn ceiling
  • Patch ceiling and walls
  • Paint ceiling, trim and walls
  • DIY a headboard
  • Relocate light switch
  • Replace light fixture
  • Make/find window treatments
  • Paint dresser and replace hardware
  • Refresh dinged up closet doors
  • Decorate and personalize

Basement art

This is definitely a light-weight project. The basement reno finished two years ago. It’s time to do a little more decorating. The eclectic enamel basin “art” I added to the laundry room highlighted how bare the walls are elsewhere. I have ideas for some simple, fun art that will really finish off the space.

  • Build a shadow box frame for Matt’s infant PJs in the laundry room
  • Print and frame a pair of playing card posters for behind the games table
  • Build a big chalkboard for score-keeping in the long room where the ping pong table and dart board live
  • Make some classic board game-inspired art for the long room (not surprisingly, there’s a long wall that would be perfect for some art)

Furniture

I made some good progress on the furniture front last year. There are still a few more pieces that I’d like to make or find this year.

Pottery Barn Benchwright inspired coffee table from Ana White

Source: Ana White

  • Dining room hutch
  • China cabinet for my office
  • Coffee table for the living room
  • Chairs for the dining room

Vegetable garden

A vegetable garden has been on my list every single year. It has to happen this year. It just has to.

A beautiful country vegetable garden from Country Living

My dream, dream, dream vegetable garden. Source: Country Living

I’ve come to the conclusion the problem is that we have 129 acres, which means a lot of outside work. I also live in Canada, which means a very narrow window in which to complete that outside work. I say, “This weekend I’ll do this. Next weekend I’ll go over here and do this.” Before I know it, it’s July, summer is half over, and I still don’t have a vegetable garden.

So this year, the plan is the garden and only the garden. Forget about the flower beds. Forget about the rock piles.

  • Start the vegetable garden.

And in keeping with my plan to be more flexible (planning to be flexible isn’t an oxymoron, is it?) that’s the end of this year’s goals. Some other projects may sneak in, but I think I’ve got room for them.

In addition to being a bit more flexible about this year’s goals, I have one more over-arching goal: spend less money.

If you’ve been around here for any length of time, you’ve probably figured out that Matt and I are pretty frugal in a lot of areas. However, we do splurge at times. 2014 had a few big splurges, mostly the solar panels and the fireplace. Our bank accounts need to recover from those projects, so I’m declaring this year Frugal Flexible ’15.

Do you have any goals or resolutions for 2015? What projects would you like to do around your house? Are there any tips to share about balancing flexibility and productivity?

Home Goals previously:


Farmhouse fieldstone fireplace

There’s lots of discussion these days about adding character to our houses. I believe a home should reflect both the people that live there and its setting. For me, this is one of the misses with our house. Our ranch-style bungalow looks like it could be in any neighbourhood from the 1970s. Inside and out, it doesn’t reflect its farm setting. So my mission since moving here has been to inject a little more country into the house.

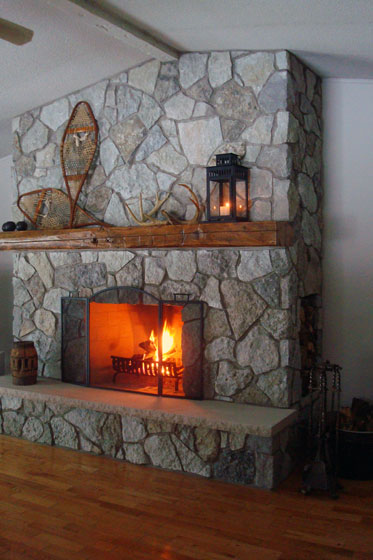
Just before Christmas, the living room got a huge (literally) injection of country character with our new stone fireplace.

Fieldstone fireplace with barn beam mantel

Whew. That’s a lot of philosophy for a fireplace. More pictures.

Old wagon wheel hub on a stone fireplace hearth

The fireplace is beautiful, safe and, best of all, it works.

In a time when people are painting and white-washing over brick, tiling and drywalling over surrounds, a huge stone monolith like this is not necessarily in style. However, for me, this is one of those timeless designs that is about the farm, not the trend.

Fieldstone fireplace with barn beam mantel

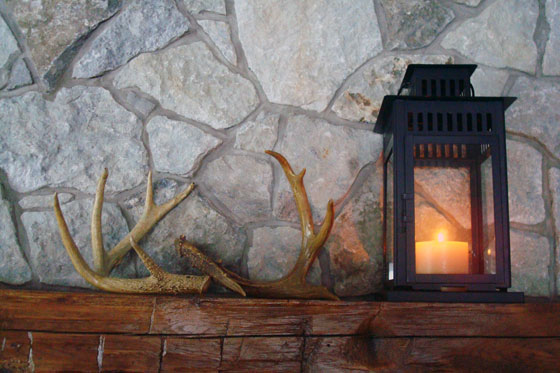
The stone is Bluewater by Natural Stone Veneers. It’s real stone that’s been sliced to form “tiles” about 1 inch thick. You can order both corner pieces and flats. It’s a way to get the look of a stone fireplace for much less cost and much less labour. In fact, as my mason was doing the stone, he commented how close the Bluewater was to the fieldstone that’s found naturally in this area. Exactly what I was going for.

Just like real stone, the veneers are irregularly shaped. Our mason had great attention to detail in putting this stone together. Take a look at the upper half of the fireplace near the centre. See the diamond-shaped stone? He saw the special shape of this stone and worked to feature it in the middle. He chose the stone directly below the diamond specifically because of how its notch fit the bottom of the diamond.

Fieldstone fireplace with barn beam mantel

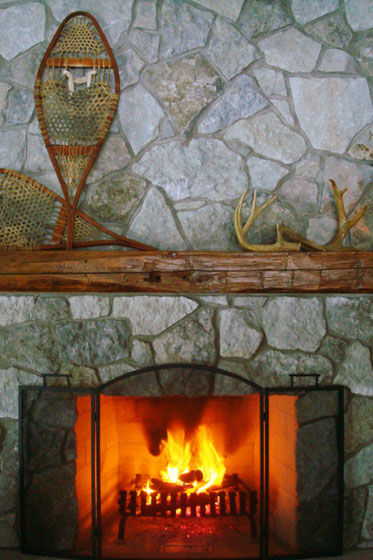
The mantel is barn beams from our own farm that we had milled at a local sawmill. We used two beams sandwiched together to get the depth we wanted. They’re finished with three coats of clear polyurethane.

The woodbox was a mid-project addition. This is why it’s important to be present during renovations like this. As he was building the fireplace, my mason said, “You have a lot of space here now that we’ve removed the chimneys for the decommissioned furnaces. Do you want a woodbox?”

Woodbox in the side of a fieldstone fireplace

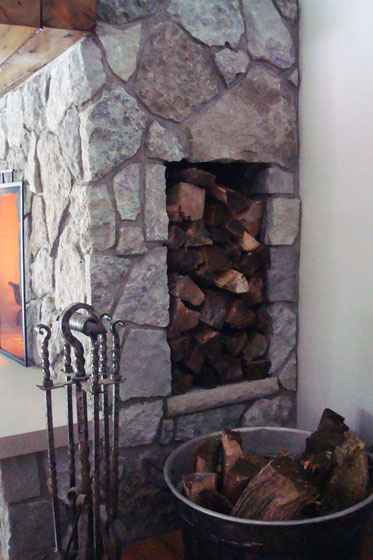
I hadn’t even considered that possibility, and now I can’t imagine the fireplace without it. It’s really handy to have a place to store extra wood, but it also makes really nice visual. This is the side of the fireplace that faces the kitchen. As much as I love the stone, the woodbox breaks up the monolith and makes the view much more interesting.

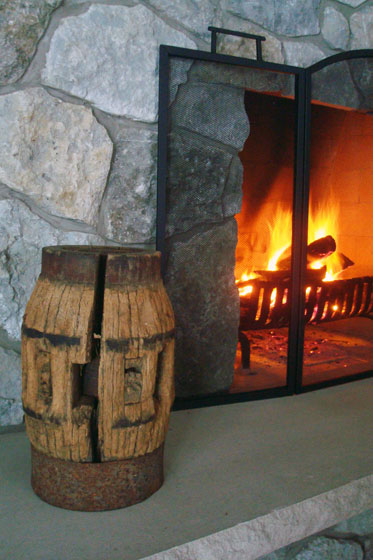
The wood bucket is an old washtub that Matt and I bought at an antique store several years ago. I take the whole bucket outside, fill it with wood and bring it back inside–really heavy, but a really easy way to bring a big load of wood inside in only one trip.

Initially, I had a very, very plain rectangular fireplace screen in mind. However, since having this one, I find I like the contrast of the arched top with all of the other straight lines we have going on. It’s simple to move the screen to the side when I need to tend the fire. Surprisingly, the handles never get hot.

Fireplace screen

The grate is from my grandmother’s house. It sat outside at my parents’ house for years until my Dad brought it up to the farm one day last month. It fits as though it was made for the fireplace–just another example of how things work out the way they’re meant to.

We’ve had the fireplace for less than a month and already it’s been well-used. I’ve split wood, cleaned out the ashes and had lots and lots of fires. Last week temperatures were in the -20s. It was so nice to come home from work, light a fire and have dinner in front of the warm glow.

Deer antlers and Ikea Borrby lantern on a barn beam mantel

For me, nothing beats a real wood fire. In its function, as well as its fieldstone facade, it’s a perfect fit for our country farmhouse.

And just to remember how far we’ve come, here’s the full 14-day project:

Fireplace renovation animated gif

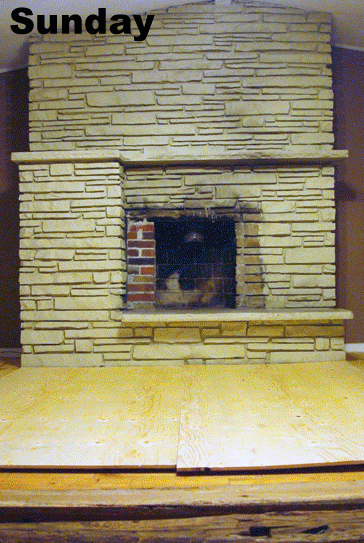
Soooooo much better.

Fieldstone fireplace with barn beam mantel