September garden update

Look! We grew a puppy again!

Baxter in the garden

We grew a lot of other things too. Yet again, this garden is crazy productive.

Sicilian Saucer tomatoes

Purple peppers

Butternut squash

First year grape vines

Watermelon

Watermelon

Asparagus

Acorn squash

Red potatoes

The puppy didn’t fit in the basket.

Not pictured are the zucchinis that just won’t stop and hundreds of cherry tomatoes (I roasted a bunch last night for all kinds of goodness).

What’s growing in your garden?

Save

Save

Save

Getting in the mood

I had planned to share the final post in our waterproofing project today, but some of the finishing touches have been delayed. So instead, inspired by the project that took us away from the basement, I’m going to be sharing some thoughts on DIYing.

As I sat down to start writing this post, the announcers who are calling the baseball game on TV were talking about one of the players taking some time off for family problems.

Matt added his own commentary. “Family problems? What, did his wife make him dig a trench too? And complain all afternoon about not having a backhoe?”

Now, in my defense, I did not make Matt dig a trench. I came up with the brainwave to add a hose connection out at the garden this spring. I also advocated for renting a small backhoe or hiring out the trench (I even got a quote). Matt’s the one who came up with the brainwave to hand dig the trench for the new waterline and to do it on a humid 30+ degree afternoon in August.

As much as it might sound from my description that we’re sniping at each other, really we’re just teasing each other. This is part of our rhythm. When it comes to working around the farm, we are very much a team.

Trenching a waterline to the garden

But the thing about DIYing as a couple is sometimes we’re not both in the DIY mood at the same time. And that was definitely the case for me when we were digging the trench.

It was hot, between a cold (I hate a summer cold) and a lurking migraine (thank you, humidity) I wasn’t feeling great, our clay soil is super hard and full of roots and rocks, and the distance from the hose hook up at the driveshed (where we’re tying in) and the garden is loooooong.

But because of all of the things I listed above (except for how I was feeling), I didn’t want Matt to have to do the whole trench all by himself.

Plus, I really want a hose out at the garden, so if Matt’s in the mood to trench the waterline, I’m going to take advantage of that, no matter what mood I’m in.

So I grumbled about a backhoe, how hard our soil is and my bad mood. I took breaks to sit and lie down in the shade. I kept refilling our water bottles and planned how we’d reward ourselves with a post-trench refreshment. And I also kept swinging the pick while Matt wielded the shovel.

And Matt was understanding. He didn’t begrudge me slacking off. He got extra drinks for us, posed for pictures and encouraged snuggle breaks with the dog.

Farmboy lemonade reward for a hard day's work

He also recognized that even though he said at various points, “Why don’t you go in and watch the Olympics,” there was no way I was going to leave.

Relationships are about give and take. Add in a farm and a heap of DIY, and we need to be even more flexible. For Matt and me, recognizing where we each are at and supporting each other–no matter our moods–allows us to accomplish everything we do around the farm.

How do you get in the DIY mood? What’s your secret to DIY success? Are you part of a DIY duo? How do you make a partnership work?

Save

Save

Save

How to grow tomatoes vertically

This season in the garden, we’re all about growing vertically. I’ve shared how we’re keeping our raspberries upright. Today, I’m talking tomatoes.

How to train tomato plants to grow up a string

I love training my tomatoes to grow tall. They take up less space in the garden, and I think they’re also more productive due to increased air circulation, better sunlight and less contact with the dirt.

Since moving to the farm, I’ve used various methods to stake or cage our tomatoes, but this year for the first time we had space to build a proper trellis. This method is not new for me. I learned from how my Dad grew tomatoes in his garden.

How to train tomato plants to grow up a string

I used 2x2s to build a frame. Matt hammered three 2×2 posts into the ground leaving about 8 feet between each post. The posts were about 5 feet long, and he hammered them in about a foot, giving us a final height of roughly 4 feet. Then we screwed 8 foot pieces of 2×2 across the top of each post. This gave us rows that were 16 feet long.

Here’s a photo from back in the spring of the trellises in place.

How to build a simple tomato trellis from 2x2s

We then planted our tomato seedlings underneath the trellis. Once they grew about a foot tall, it was time to tie them up.

Using twine, I tied a very loose knot around the base of the tomato stem. It’s important that the knot is loose as your tomato plant has a lot of growing to do, and you don’t want the twine to end up too tight.

How to train tomato plants to grow up a string

I then wrapped the twine around the stem a few times, making my way up the plant. Leaving a bit of slack, I tied the other end of the twine to the 2×2 crosspiece directly above the plant.

From then on, it was about basic maintenance. Every few days, I’d walk the row and continue to wind the tomato plants around the string.

I’m also pretty vicious when it comes to suckering my plants. I remove the lower leaves plus any “suckers” that sprout in the crotch between branches and the main stem.

Tomato sucker

Suckering allows the plant to put its energy into producing fruit rather than more leaves and keeps the plants a manageable size. Suckering usually depends on whether you have determinate (bush) or indeterminate types of tomatoes. I always just assume I have indeterminate tomatoes and rip those suckers off.

However, we tried a new kind of tomato this year–Sicilian Saucers–and they did not take well to suckering. They kind of rebelled when I started pulling off their leaves, so I backed off and tried to let them do their thing a bit more.

I was still able to wind them up the strings fairly well, which is helpful because these plants and their fruit are super heavy. Our giant tomatoes would definitely be lying in the dirt if they weren’t supported by the trellis.

How to train tomato plants to grow up a string

Now that the plants and the fruit are very well established, I did go through and clipped off a lot of the lower leaves. I’m trying to get a bit more sunlight onto the Saucers to encourage them to ripen.

As the plants have grown, some of them have exceeded the height of the trellis. I’m tying them along the top 2×2 and just trying to support them so the stems don’t bend or break.

How to build a simple tomato trellis from 2x2s

So far this season, we’ve had a great tomato harvest. From the looks of our Sicilian Saucers we have much, much more goodness ahead.

Do you grow tomatoes? Are you into suckering or do you leave them alone? Have you ever tried to grow tomatoes vertically? What method do you use to trellis tomatoes?

Save

Save

Mid-summer garden update

Basket of potatoes and zuccini in front of marigolds in the vegetable garden

It’s been awhile since I shared what’s up in the vegetable garden. Deep in the middle of summer, lots is up. As in lots of beautiful vegetables.

Looking back at my last update from the end of June, I’m amazed at how much things have grown. Here’s the tour ’round the ring.

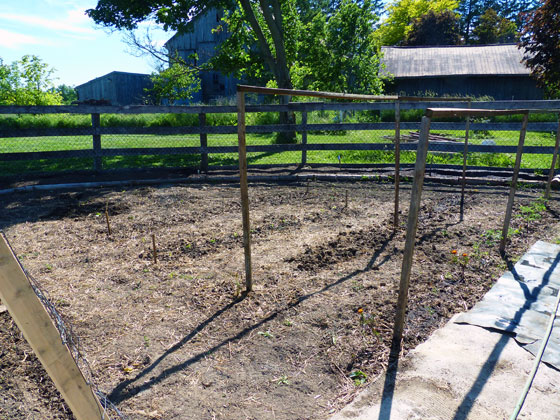
Quadrant #1, where the first three of the five rows of potatoes are ready to be dug.

Potatoes in the garden

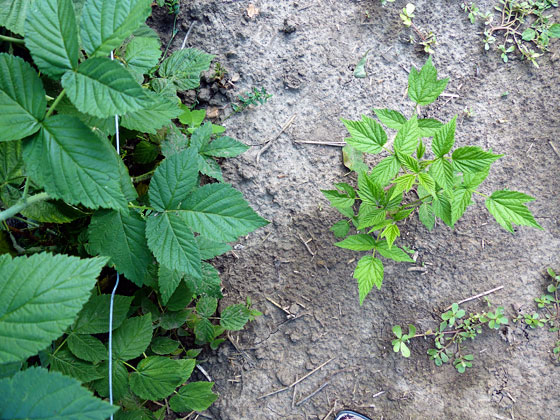
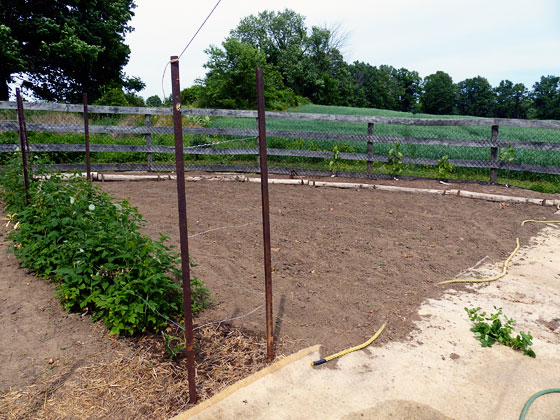
The raspberries along half the centre axis. I think that the black raspberries (the mess on the left) will be coming out to be replaced with either more raspberries or something entirely different. We have enough growing wild around the farm that we don’t need them in the garden too. And they do not seem amenable to being tamed.

Two rows of raspberries

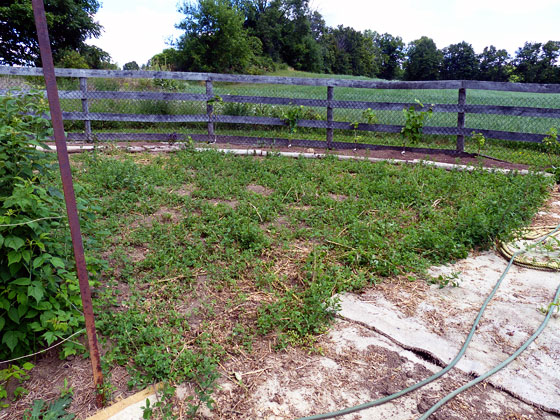
Quadrant #2 which continues to be weed central as there’s nothing planted here beyond asparagus and grapes in the perimeter beds. I actually broke down and mowed this section last weekend. Let’s pretend I’m a really sophisticated gardener and we’re intentionally letting this section lie fallow this year, okay?

Weedy section of garden

Quadrant #3, which also continues to be quite weedy. However, no mowing is happening here, as this is home to our watermelon, which have totally taken off (more on this below).

Watermelon vines growing in the garden

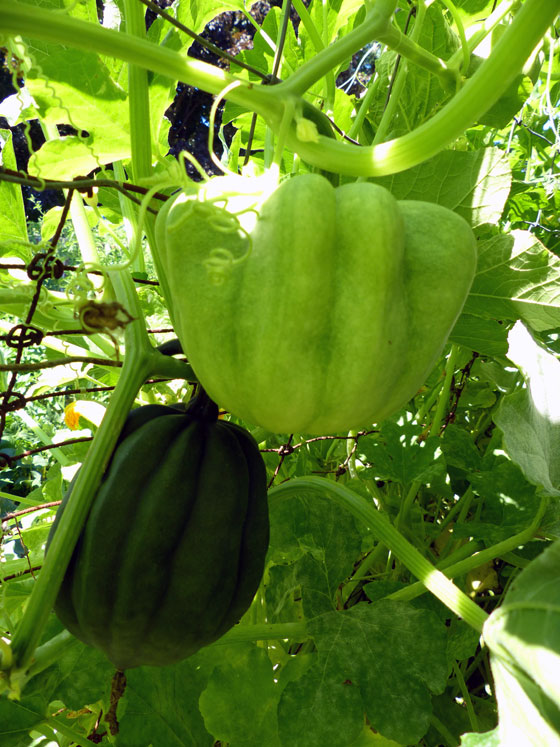
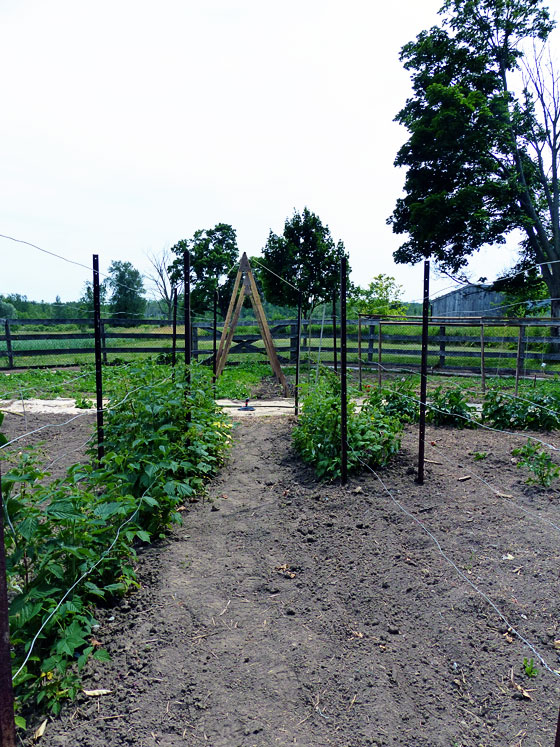
The other half of the centre axis is our squash A-frame. The vines are climbing! I’m very excited that the trellis seems to be working. We have baby butternuts, acorn squash and gourds.

Squash growing up an A-frame trellis

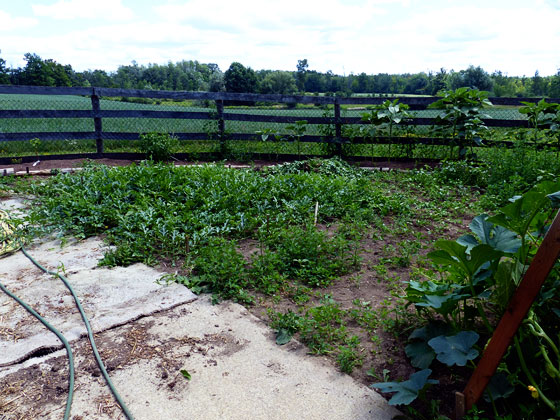
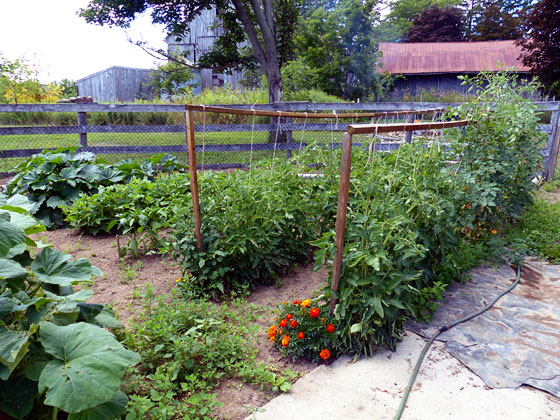
Quadrant #4 is the best looking, especially after Matt spent hours last weekend pulling weeds. It’s home to our very bushy tomatoes, peppers, beans and more zucchini.

Vegetable garden

I tried to pick a few highlights to zoom in on a little more. A few is hard, as I’m super excited about everything.

Most exciting is our watermelon. As in we actually have watermelon! They’re about the size of softballs right now, so they’re not quite watermelons, but they’re on their way.

Baby watermelon

Another vegetable that is exciting just by its presence is our yellow bush beans. Last year all of four plants sprouted. This year we have a whole row and each plant is loaded with beans and blossoms. We’re going to have more than enough beans to freeze for the winter.

Yellow bush beans

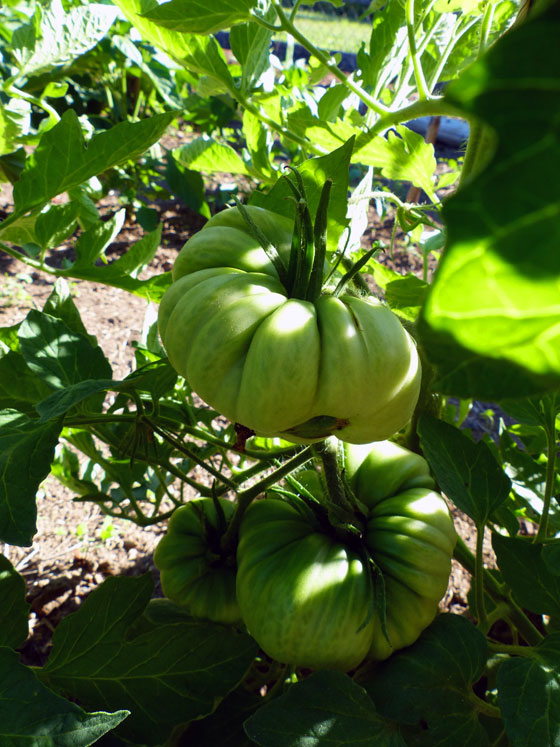
Also on their way are our Sicilian Saucer tomatoes. I picked up these seeds on a whim, so I’m not sure what to expect. The blossoms were huge, befitting the “saucer” name. We have some catfacing on the bottom of the fruits, which I’ve learned is common with big tomatoes. The fruits aren’t saucer-size yet, but I feel like they’re on their way to being quite large.

Sicilian Saucer tomatoes

The plants that I’m watching most closely are our grapes. A few of the vines have finally reached the top of the fence, and some tendrils have even started to wind themselves around the wires.

Grape vines

These are the highlights, but there are a few lowlights.

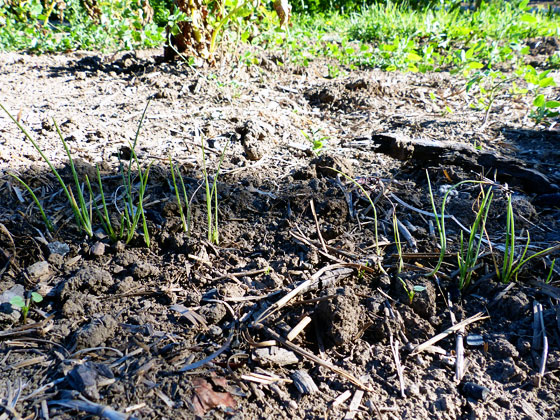
I planted the bunching onions in the raised bed, which are filled with the dirt we bought this spring. The onions did not like the dirt at all. They’ve looked like blades of grass ever since they sprouted back in June. Last weekend we transplanted those wee little sprouts into the main section of the garden. They’re already looking perkier.

Green onion sprouts

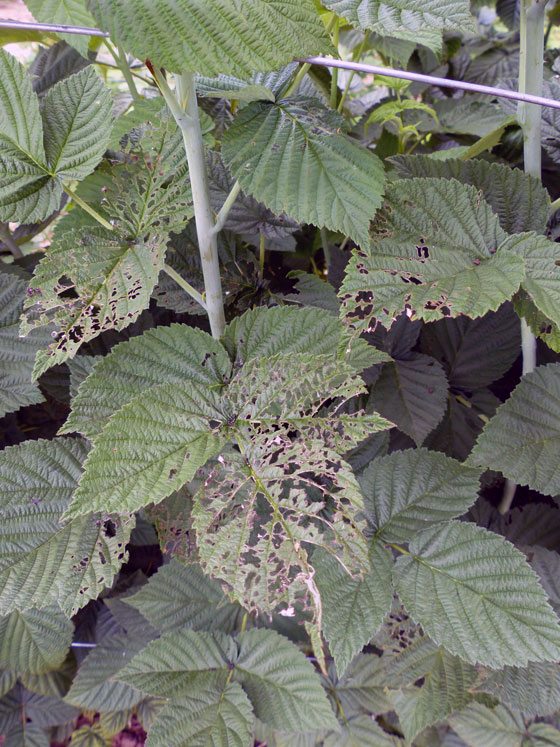
A few of the raspberries have been hit by Japanese Beetles. The damage hasn’t been too bad, and we have so many canes that I’m not miffed to sacrifice a few leaves. However, that doesn’t mean I’m not on a campaign against the beetles. It only took me a couple of days to get over my squeamishness at the crunch they make when I crush them.

Japanese beetle damage on raspberry canes

This one may not be a lowlight, but some of the tomatoes that we purchased as sprouts are growing oddly. The plants are all the same type, but the fruit are all different sizes. Everything from the size of a marble to the size of a pingpong ball.

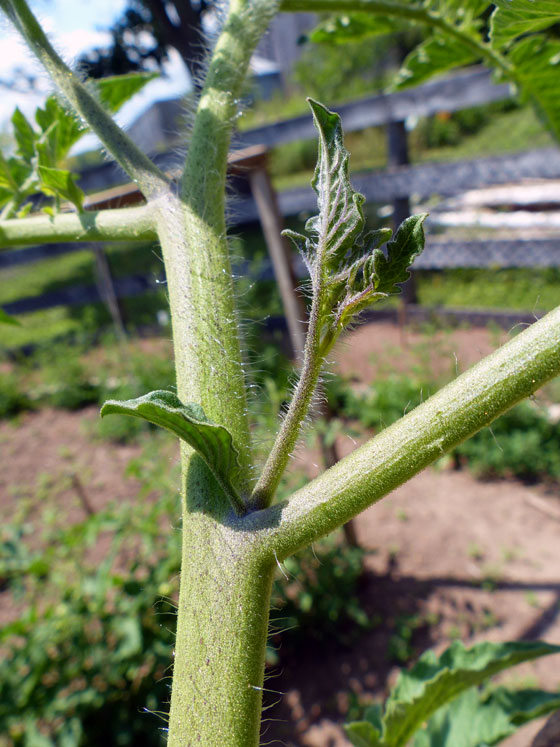
And then we have a few plants where the stems that support the trusses have taken a turn and branched up into “suckers.” You can see the stem looping around and up in the photo below. I’ve never seen this before. Have you?

Sucker on a tomato truss

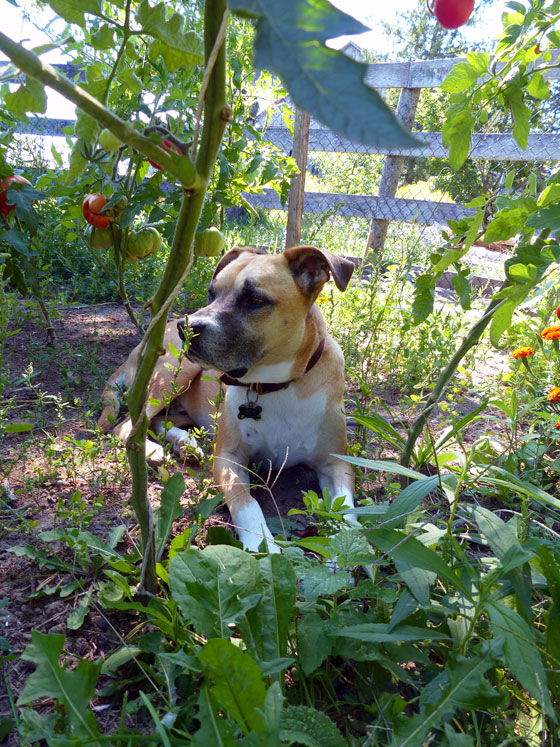
One final highlight that I have to share. As I was photographing the garden, I came across this guy in the watermelons. A frog in the garden is a good omen, right?

Frog in the garden

What we’re loving most is eating the garden–the vegetables and fruits only, no frogs. We have so much desire to cook in the summer, and our meals are so fresh and full of variety.

How is your garden growing? What fresh produce are you enjoying this summer?

Save

Save

Save

Save

How to build a raspberry trellis

Raspberries are a pretty easy crop to grow in my opinion. Last year I transplanted a whole bunch of raspberry canes from my parents’ garden to ours. The canes have grown and spread like crazy.

This year, the object of the game is to contain the canes–a little bit. Raspberry canes don’t bear fruit until their second year, so the first year is all about letting the canes grow… and grow… and grow.

The taller the canes grow, the more likely they are to fall over. A trellis can help to keep them upright and also keep the row a manageable width.

Here’s how Matt and I made the trellis for our berries.

How to build a raspberry trellis

We started with metal T-posts. We happened to have a large quantity courtesy of past owners–free materials, yay! And I liked that the metal won’t rot like wood.

The posts were about 7 feet long. Matt hammered them into the ground leaving about 5 feet sticking up. We used six posts, three on each side, for our rows, which are about 18 feet long. The width of the rows is 2 feet.

Then I strung wire through the holes on the T-posts. There are three rows of wires, each about 16 inches apart.

How to build a raspberry trellis

At the final corner I doubled the wires back and twisted them around themselves.

How to build a raspberry trellis

The raspberries grow between the wires staying nice and straight. About once a week, I walk along the row and make sure all of the growing canes are tucked inside the wires.

Any canes that sprout outside the row can be transplanted to inside the boundaries.

How to build a raspberry trellis

So far, we’ve had just a handful of berries, as we only started our canes last year. Our plants, though, have become thick and lush. With our trellis in place, we’re set to have a great crop of raspberries next year.

Have you picked any raspberries this year? Do you grow raspberries? Have you ever built a raspberry trellis?

Save

The benefit of neglect

I haven’t shared much about the flower gardens this year. Mostly because I’ve done nothing in the flower gardens.

In life we have to make choices. And my choice this year has been to focus on the vegetable garden. That means I haven’t done anything in the flower gardens… at all.

Most of the gardens have filled in enough that they still look somewhat presentable, but here and there are weeds that are taller than me.

I try not to pay too much attention and remind myself that there are only so many hours in a day and I’ve made my choice about where to spend my energy.

However, this week I received another reminder: sometimes leaving things alone isn’t such a bad plan.

Look at this mini sunflower. There are two of these volunteers courtesy of the birdfeeder.

Mini sunflower

Had I been weeding this year, I would have pulled these out long ago. I never would have seen their sunny blooms.

Sometimes neglect isn’t such a bad thing.

Save

Save

Update and a new adventure in Illinois

Sarah in Illinois is back today with a bunch of updates on what’s happening at their home. Hint: some new additions are on the horizon.

This may be a disjointed post. I had been working on a project, and I thought I would be done before I had to send this week’s post, but it didn’t turn out how I had planned. (Argh. So frustrating when that happens, Sarah.) I will be sure to include why it didn’t work and I had to regroup in a future post.

This post will be a little bit of an update and share what I have in the works.

Kittens

Tiger stripe kitten

As of when I am writing this, the black kitten has been reserved and the tiger-stripe is still waiting for a new home. The mother cat has been to the vet and spayed so I will not have to be in this situation again.

The cutting garden

Zinnias in a mason jar

There are about a half dozen different varieties of flowers that are growing. Right now the only one ready to cut is the zinnias.

Three zinnias in milk bottles

Future posts

I hinted in one of my comments a while back that I am getting chickens! My neighbor has been raising several chicks and offered four of them to me. They will not be ready to lay until about September, but I can get them as soon as I have a secure place for them.

So my free time has been spent reading and reading about chickens and working on making a secure coop for them. I have never had or really even been around chickens so this is all a new learning experience.

Some of the books I have been reading include (not affiliate links):

I think I am ready to start this adventure. I have been told that I am overthinking everything and that chickens are a lot easier than I am making it out to be. I hope so! I will be sure to post about my adventure and in the meantime, any advice would be appreciated.

Cute kitten, pretty posies and exciting news–this worked out to be a post after all, Sarah. Congratulations on the chickens. I confess, I’ll probably take the same approach as you when it comes time to add birds to our farm. Your forethought just might make you a more successful chicken farmer.

Having grown up with backyard chickens, my best advice is to make sure to collect the eggs a couple of times a day. We got a bit lazy and our hens started eating their eggs. That was a hard habit to break!

Save

Save

Save

Save

Save

Home Goals 2016 mid-year report

Six months ago, I shared my Home Goals for 2016. We just crossed the halfway point of the year, so it’s time for my mid-term report.

Beyond sharing my Home Goals, I also started the year by sharing some of my ideas for the major renovation that we want to do… someday. And the first goal on the list was to get an idea of how much the reno is going to cost to help us figure out when that someday might be.

We consulted with a contractor, got some feedback on our plans and got some numbers. They’re big numbers… as in not any time soon numbers… but it was helpful to give us an idea of where we’re at.

In terms of specific projects, here are the rest of our goals.

Guest room

Robin's egg blue country guest room

The guest room was our first project of the year, and I’ve already done the official “reveal,” so I’m feeling pretty good about crossing this project off. However, there’s one task left on my original to-do list, which has also made it onto my summer to-do list.

  • Paint the walls and trim
  • Replace the light fixture
  • Make window treatments
  • Refinish the desk chair
  • Strip the paint off the metal bedframe (and maybe repaint)
  • Decorate and personalize

Finish the basement

Building shelves in the closet under the stairs

The basement was essentially finished a looong time ago. However, those niggly finishing details are still hanging around. Plus, we have two new summer projects, one that you know about and one that you don’t yet. (I’ll be talking more next week about things that are going to affect our basement progress).

  • Trim around the cold cellar doorway
  • Finish the built-in storage area in Matt’s bathroom
  • Make/buy art to finish off the space
  • Build shelving in the closet under the stairs
  • NEW Build a new closet in the basement
  • NEW Mystery project (more to come next week)

Furniture

Vintage china cabinet

I’m always on the hunt for a few key pieces of furniture. So far this year, I’ve found one piece–the china cabinet for my office–but it’s still awaiting its makeover.

Vegetable garden

Centre axis of a round vegetable garden

My all-consuming summer project every year has become the vegetable garden. Thanks to Dueling DIY this spring, the garden is in really good shape.

  • Hang the gate
  • Edge the garden
  • Build raised beds around the perimeter
  • Build trellises for the raspberries, tomatoes and squashes
  • Plant perennials: grapes, asparagus, rhubarb, more raspberries
  • Run a waterline out to the garden
  • NEW Spread hay mulch over the garden

Outdoor clean-up

I ambitiously added another outdoor goal to the list, although I realized I’d have to pick my battles in terms of which area I chose to clean up.

Thanks to a bit of distraction at the start of the garden Dueling DIY, I’ve cleaned up the large lumber pile on the north side of the centre field and burned the long grass and weeds on the south side of the garden. Matt’s been mowing the burn, and it almost looks like a real lawn already.

Burned lawn

I’m feeling pretty good about what we’ve accomplished so far. Work on a farm never ends, but I love seeing the progress we’ve made.

How are things going at your house? Do you feel like you’re making progress on your goals?

Save

Save

Save

Garden at the end of June

Garden at the end of June

Much progress has been made on the garden. You might notice in the photo above that we have a gate! And it’s not just propped in place. It’s actually on hinges, and it swings and everything. It’s only been 10 months since I built the gate. Not at all unreasonable to wait that long to fully protect the garden, right?

Inside, things are slowly filling in. I’m trying to remind myself to be patient and things will grow… eventually.

Let me take you on a tour of around our garden as it’s growing right now.

Quadrant one is our most well-established. It is home to five rows of potatoes–three red, one Kennebec and one Russian Blue. Although I really could have done two Russian Blues given how many we had and how much space there is in this quadrant. There are also three zucchini plants. Then in the perimeter beds there are onions, beets, carrots and a selection of herbs.

Quadrant one of the vegetable garden

I’m a bit disappointed in the onions. They are spindly, some of the ends are brown, and I’m not confident that they’re going to size up. But I keep watering them and sowing new rows for my attempt at succession planting. (The beets in the background are doing excellent, however).

Green onions

Quadrant two is bordered by our perennial crops: raspberries, grapes and asparagus. The middle is empty however, and we don’t have plans to plant anything here. One of the things I’ve realized is that we can only handle so much with this large vegetable garden.

Quadrant 2

The asparagus isn’t that much farther along than the onions, but I’m beyond excited by it. I’m trying to grow asparagus from seeds, and I thought I wasn’t going to be successful. These seeds took so long to sprout. Almost three weeks. I thought it wasn’t going to happen. So these little tiny ferns are tremendous progress.

Asparagus sprouts

Quadrant 3 has a lot of growth, but not the kind I want. Welcome to weed central. Ugh. There are some watermelon seedlings in here, but I’m not sure they’ll last that much longer without some defense. The outside edge has our sunflowers which are growing incredibly.

Quadrant three in the vegetable garden

Quadrant four is slightly better than weed central, but not by much. This is our first year planting this half of the garden, so it’s taking more effort to clear out the weeds on this side. In this quarter we have two rows of tomatoes (under the wood frames), one of peppers, one of beans and three more zucchini plants. The outer edge has some more herbs, more sunflowers and our hollyhocks.

Quadrant four of the vegetable garden

You’ve caught glimpses of the centre axis already, but here’s the view that I’ve been working towards for the past two years. A long look between our two rows of raspberries, through the squash A-frame and out to the back fields.

Centre axis of a round vegetable garden

On Monday I posted about vision. The vision for this vegetable garden has been a long time coming, but it’s oh so wonderful to see it come to life.


Save

Save

Save

Peony victories and failures

White peony bloom

Our peonies were spectacular this year. After lots of transplanting and splitting in past seasons, each bush is getting more established, and we had a beautiful mix of fuscia, blush and white blooms.

Pink and fuscia peonies

I don’t usually do cut flowers, but after a bunch of the white peony blossoms proved too heavy for their stalks, I cut them and brought them inside.

I don’t do cut flowers because they quickly turn depressing on me. I’m not one to remember to refresh water or pamper my plants. So blooms wilt, stems droop and the flowers look more funereal than fabulous.

But with these peonies, I think I beat even my own record. One day–just one day–after bringing them in, a blossom shed every single one of its petals. I scooped the white flakes into the composter and carried on. Three more flowers disrobed the following day. At that point the whole bouquet–or the remains–went in the composter.

Wilted peony bouquet

So lesson learned, I will focus on enjoying the peonies outside and refrain from any further florist failures.

And it’s Friday, so I will be spending a lot of time outside this weekend.

What do you have on tap for the weekend? Do you have any peonies either in your garden or in a vase at your house?