Putting down roots

We inherited many, many things from previous owners when we took possession of the farm (I haven’t shown you pictures of our personal Hoarders episode yet, but I may some day).

A number of those things were plants. Sometime last year, the people we bought the farm from went out and got many, many plants, but they never planted them! Bushes, flowers, trees, shrubs, all of them were still in their plastic pots sitting on the ground in and around the areas where the front flower gardens would be if they weren’t completely overgrown with weeds.

The stockpile included 5 trees.

Our inherited trees

Our inherited trees

I have no idea how long they’d been there, but when we saw the property for the first time at the beginning of January, they were all laying on their sides, frozen into a kiddie pool (I guess an attempt to keep them alive?), and they were still there, just like that, when we took possession in March.

When the ice in the pool melted enough, Matt and I stood them upright, but they were so curvy and bent from laying down that they easily tipped over again. We propped them up with concrete blocks and checked them frequently searching for any signs of life.

A few weeks ago, we noticed buds. Finally on Sunday (fittingly, Earth Day), we made some time to plant them.

I love a tree-lined driveway, and we’re already in pretty good shape, but there are a few blank spots, so that’s where we focused our plantings.

One of our new trees

One of our new trees. He's a little spindly right now, but the inspiration of what he can become is right behind him.

According to the tags that were tied to the trees, we have an Autumn Radiance Maple, two Unique Littleleaf Lindens, and an Autumn Blaze Maple. The fifth tree wasn’t labelled, but it looks like some kind of maple.

Close up of buds on our new maple tree

It's alive!

The trees make a nice addition to the farm, and planting was a very nice way to acknowledge Earth Day.

What about you? Did you do anything for Earth Day?

Snapshot

Old stump

Mossy stump on a damp morning

The idea and the title for the snapshot post comes from Joan at For the Love of a House, a beautiful blog that chronicles an inspirational and exceptionally thoughtful renovation of an antique farmhouse in New Hampshire.

Joan also has an affection for tree fungi, or, as she calls them, “conks.”

Evening at the pond

The other night after work, I walked down to the pond. The sun was low in the sky, the shadows were long.

I saw a mallard, a fish (an honest to goodness fish, 6-8 inches long) and a red winged blackbird.

And then I saw this, and I was so excited I nearly fell into the pond.

Maybe a muskrat

Do you see what I see?

I managed to recover my balance and only ended up with a wet boot, which was fortunate because 1) I’m pretty sure me falling into the pond would have spooked this guy and caused him to move to another watershed, and 2) the camera would have gotten wet and then I wouldn’t have been able to take the dozen other pictures I shot.

Maybe a muskrat

Hello there!

My new friend was a little suspicious of the statue (once I found my stability, I wasn’t moving!) that had turned up on the shore of his pond, and he swam big ‘S’ patterns across the water as he eyed me. Eventually he decided I wasn’t that interesting and he went back to paddling and diving. I was able to track him swimming under the water by following his bubbles. At one point he climbed out of the water onto the opposite shore and I got a better look at him.

He’s a big guy! Almost 3 feet long, nice and round and very, very sleek.

I’m not sure exactly what species he is. My best guess is some kind of muskrat, although I guess beaver or otter could be a possibility. I never saw his tail clearly, so that doesn’t give me a clue.

Over the course of our farm search, the pond came on and off the must-have list. I really, really wanted a pond, but at times I was ready to sacrifice it in order to just get a farm. Now, I’m so glad we have the pond. It’s one of my favourite spots on the property. I love walking down to the water and just watching the sun glisten over the ripples, the reeds waft in the breeze and the bugs dance across the surface. Seeing this guy enjoying the pond was a complete bonus–a really special moment for me.

For the weekend, I leave you with this video of our new pond paddler.

All of you naturalists out there let me know in the comments what you think he is.

Psycho shower

In previous posts I mentioned that our basement bathroom is deserving of its own feature. Well, here it is. The promised post on our basement bathroom.

Let’s take a look, shall we?

Basement bathroom before

Hey, that looks pretty good. Shower, toilet, vanity, sink, mirror, light. All of the parts seem to there.

Let’s look a bit closer, shall we?

Shower in our basement bathroom

Psycho shower! No, this is not a crime scene. We have some issues with iron in our water.

Psycho shower on a platform

Psycho shower on a grody platform (and yes, some demo has taken place between the first two photos and this photo)

Decent sink, but ugly faucets and some spray issues

Decent sink, but ugly faucet and some spray issues

Off-centre light

Off-centre light (and random vent… don’t know what it’s covering yet)

Exhause fan

Exhaust fan issues (we haven’t touched this yet. This is actually how it was when we bought it.)

Cushy toilet seat

Cushy toilet seat with colourful hunting scene on the lid

Lovely, isn’t it?

We knew from the first time we saw it that we would be tearing out the basement bathroom entirely. Here’s the vision for what it will be.

Not at all psycho shower

Decidedly not psycho shower. Source: Aubrey + Lindsay’s Blog

While most of the key features of the bathroom are in place, the one thing that we’re missing is storage, so the reno will have to include space for extra soap, toilet paper, towels and all of the other stuff that is part of a bathroom. Something like this will be perfect.

Built-in storage

Source: Houzz

Here’s the floor plan before.

And after.

Basement bathroom floor plan after

Much larger shower (hopefully not on a platform), with a ledge at the one end for shampoo and soap. The other side of the ledge will be floor to ceiling storage. Source: floorplanner.com

Like in the rest of the basement, we’re not making major changes to the layout, but everything will be coming out and the walls will be opened up and the insulation will be upgraded. We’re probably going to reuse the vanity, albeit with a new faucet. There will be a new toilet, new floor, new lighting and lots of nice, clean, new tile.

After growing up in a house with only one bathroom, Matt now requires his own bathroom. So I will be the main user of the upstairs bath, and this one will be all his. Somehow it doesn’t seem entirely fair that he gets the nice new bathroom all to himself. Don’t you think?

For more inspiration images, including ideas for fixtures, see my basement bathroom board on Pinterest.

How to recover a chair seat

As part of preparing for the family dinner that we hosted on Good Friday, I had to put new cushions on our dining room chairs.

We had our dining room set refinished just before we moved into the farm, and since moving in the chairs have been naked.

Naked dining room chair

Yikes, naked chair!

I know it’s not a hard core renovation, but it is DIY, so I’m posting a brief how-to. I should be clear though that this was my first true upholstery project, and I am sure I made a few mistakes along the way. There are lots of great tutorials online by people much more skilled than me. However, here’s the method that I used for our dining room chairs.

1) Remove the seat from the frame. In my case, this meant unscrewing the seat from four corner braces that were underneath.

Bracket

Brace under the seat that holds the seat to the chair frame.

2) Cut your foam. My foam was 1 1/2 inches thick. I cut the foam about a 1/2 inch bigger all the way around than the seat (no measuring, I just eyeballed it). If you’re fancy or a professional, you’ll probably want to use a foam saw for this step, or even an electric knife. I didn’t have either of those things. I tried a utility knife but ended up having the best luck with my kitchen scissors. The edge wasn’t perfect, but it was smooth enough for me.

Cutting the foam

I allowed about a 1/2″ border all the way around.

3) Using the tips in this video, I tacked the foam to the top of the seat. I stapled about every 3 inches around the three outside edges. Again, if you’re fancy or a professional, you will likely use a pneumatic staple gun for this. I am neither of those things, so I used my manual staple gun that’s a hand-me-down from my father-in-law (pictured in the upper right below). It takes a bit more muscle, but you can do this project without fancy (or professional) tools.

Foam tacked in place

Foam tacked in place

4) The next step is batting. Cut a square of batting that’s about 8 inches bigger all the way around than your seat. Lay the foam covered seat face down on the batting, fold the batting around your seat and staple it on the bottom. Make sure to pull the batting taunt. This is the moment to make a nice smooth surface for your fabric. Start on the straight edges in the middle and work your way out to the edges. Do the corners last. For the corners, I didn’t have a special technique. Usually, I just tried to smooth and squish the batting into position and then I stapled the heck out of it. Once you’ve stapled all the way around, trim off the excess batting.

Batting

Bottom of the chair with the batting stapled in place

5) Flip over your seat and admire the lovely cloud that is now your cushion. At this point, you’re ready for fabric.

Chair seat ready for fabric

Chair seat ready for fabric

6) The process for installing your fabric is the same as the batting. Make sure to allow yourself lots of extra fabric all the way around your cushion, start in the centre of the front edge and staple in place. Pull your fabric taunt as you go and make sure it’s square on your cushion–especially important if you’re using a plaid or striped fabric. I probably stapled every inch or so. For the most part, I used 5/16″ staples, but I switched to longer staples for the corners where I had to staple through a lot of batting and pleats of fabric. The corners are the spots where you’ll have to spend a bit of time figuring out exactly how you want your cushion to look. For me, because I had rounded corners at the front, the best solution seemed to be a double pleat. It took some time to get my fabric to lay exactly the way I wanted it. And then it took some more time to make sure the other corners all looked roughly the same as my first pleat.

Pleats on the front corner

Pleats on the front corner

At the back I did a simple single pleat that’s pretty much hidden by the chair frame.

Back corner pleat

Pleat on the back corner (ignore the wrinkle)

7) Once your cushion is complete, the next step is to reattach the seat to the frame. In my case, this meant rescrewing the seat to the corner braces. I ended up having to get longer screws for this because, with the batting and fabric, the old screws were too short.

Finished chair

A finished chair

As I said at the beginning, this is my first upholstery project (beyond sewing toss cushions for the couch), and my verdict is that this is a very easy DIY. You don’t need any sewing expertise, and you need very minimal equipment. My chairs are not perfect by any means, but I still think they look great, and I’m really pleased with the fabric I chose.

I picked a linen blend that looks very natural. It has a slightly rough texture that I think is appropriate for a farm setting.

Close up of the new fabric

Close up of the new fabric

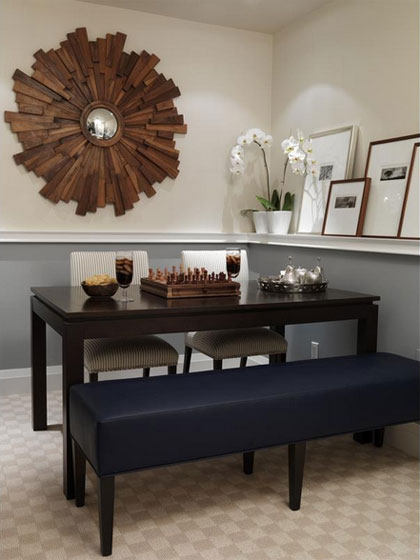
We’ve had this dining set for five years (I’ll save the story of how it came to be ours for another post), and during all that time the cushions have been torn, mis-matched and not at all cushy. It’s so nice to walk through the dining room and see the chairs finally finished.

Dining room set with finished chairs

Dining room set with finished chairs

For a more comprehensive (and professional) tutorial, I recommend you check out this video which I mentioned in step 3. I used this as a reference when I was beginning my project. Jenny on Little Green Notebook also tackles a lot of upholstery projects and posts great step-by-step tutorials, including this one for chairs that are much more complicated than mine.

Demo done

Our Friday night looked something like this.

Matt declares victory over a pile of drywall and insulation.

Matt declares victory over a pile of drywall and insulation.

The upside of schlepping 28 garbage bags of insulation up from the basement and out to the drive shed at 11:30 on a Friday night is that you don’t have to do it on Saturday. That means you have time to pull every nail, staple and screw out of the studs, rip up all of the carpet, load everything in to the truck and trailer and make it to the dump before it closes–with a half hour to spare.

Demo in the basement is pretty much done now. The next items on our to-do list include fixing up the electrical.

Does this look right to anyone? I think we may need professional help.

Does this look right to anyone? I think we may need professional help.

And beefing up the existing studs, which have been laid flat, leaving us only 1 1/2″ for insulation–not enough.

New lumber to fur out our existing studs.

New lumber to fur out our existing studs.

Our formerly finished basement is now very much unfinished, but I’m actually really happy to see the clean slate. And I feel like we’re approaching the point where we finally start to put it all back together.

Matt's office

Hello clean slate (also known as Matt's office)

What did you do on your weekend? Productivity is satisfying, but I do hope someone out there got to sit and relax a bit.

Our first deer

Deer in the back field

Deer in the back field. Can you see them? I promise they are actually there.

One of the nice things about a holiday weekend is that you’re around to see things you wouldn’t normally see.

Last Friday morning, eagle eyes Matt spotted two deer in the back field. We walked back to get a closer look and we were actually able to get near enough to see it was a small doe and yearling.

We’ve been waiting to see deer on the property. Up to now, all we’ve seen is tracks.

I didn’t have the camera with me, so I wasn’t able to get a picture of them.

However, a trio of deer showed up in the same field on Saturday morning. Unfortunately, this group was a lot more skittish and as soon as we started to walk towards the field they took off. The photo above shows their white tails as they bounded away. If you squint really hard at the circled areas and use your imagination, you might be able to envision them there.

We’ll keep an eye out this weekend and try to get actual photo proof that deer pass through our property. What’s on your weekend wish list?

Wishing everyone a great one.

Basement plans

So I realized I talked a lot about what we have to do to the basement, but not a lot about what it will be.

The main words to describe this space are cozy, comfy and casual.

Sarah Richardson Sarah's House Season 1 basement

Not our basement. Inspiration picture from Sarah’s House Season 1

We’re starting with a pretty good space. We have great ceiling height, large rooms and really good bones. You’ve already seen a sneak peak of the room I’ve dubbed the long room and heard about some of our early demo work. Here are the other rooms that make up our basement.

The main room before

The main room. Picture a large, comfy sectional couch where the wood stove is and a big TV on the wall opposite the staircase.

The basement before

The other side of the main room in the basement. Not sure what the deal is with all of the cabinetry and the workstations. This has all been removed, but some of the cabinets will be reused in Matt’s office. Picture a ping pong table and games table in this space.

Basement bathroom before

The basement bathroom, soon to be known as Matt’s bathroom. This project will get its own post.

Basement before

Another view of the basement before. The laundry room is to the left and Matt’s soon-to-be office is through the doorway in the centre. The half wall has already been demolished and a new doorway to the office has been cut behind it.

The basement also includes our cold cellar and utility room, but we’re focusing our renovation on the actual living space.

Here’s a floor plan showing how the spaces fit together.

Basement floor plan before

Basement floor plan before (Image courtesy of floorplanner.com)

And here’s the plan showing the changes I’d like to make.

Basement floor plan after

Basement floor plan after. Just subtle changes (except for the aforementioned bathroom). Just moving some things around and dialing up the cozy factor. (Image courtesy of floorplanner.com)

In the end, the main spaces in the basement will be used for TV watching, games and hanging out.

Sarah Richardson is known for putting a full size table in her family rooms as a spot for games, work, crafts or dining.

I think that’s a great idea and we’ve got the space for one, so that’s on the list too.

Sarah Richardson Sarah's House Season 1 basement

Inspiration photo from Sarah’s House Season 1.

I’ve already made some fun board game-inspired artwork to go on the walls.

We found a ping pong table top in the barn, so we’ll be making a base for it and bringing it into the basement. There’s a dartboard in the office that we’ll be hanging up somewhere. We’re also storing my brother’s pool table for him and I’ve told him not to be surprised if it ends up in the long room while it’s here.

The basement was Matt’s main priority when we were house-hunting, so I’m excited to make it a nice space that’s special for him.

For more of our inspiration images, visit my Basement board on Pinterest.

And feel free to add your input in the comments. What makes up your perfect basement? Are you a rec room fan or a home theatre enthusiast?

This

Sunday morning, this arrived at the farm.

Woodsplitter

And with it came these.

Chainsaws

Soon, there was lots of this.

Matt and his dad cutting wood

And a whole bunch of this.

Me splitting wood

By Monday evening (yes, that means this exercise in lumberjacking went on for a full two days), we had this.

Our new wood pile

Hello, crackling fires on cold winter nights

A huge thanks to Matt’s Dad for all of his work, time, equipment and expertise. He took down the tree on our first weekend and then came back to help us finish the job–and do battle with two huge stumps. End result is three rows of wood, each about 16 feet long, 5 feet high, and all of it cut, split and stacked.

I love my father-in-law’s wood splitter. You might say we cheated and didn’t do it the way a real farmer would. I say it’s magic. The best invention ever.

Scenes from Good Friday

Forsythia in my grandmother's vase

Forsythia in my grandmother's vase

Table set ready for guests

Table set ready for guests

Mom's lemon meringue pies

Mom's lemon meringue pies

A golden moon rising over the fields

A golden moon rising over the fields

Family gathered around the table

Family gathered around the table

We have a tradition in my Mom’s family of getting together every Good Friday. My grandmother hosted every year, and when she died, Matt and I took over.

It was very special to host everyone at the farm this year.