End of season beauty in the garden

Hollyhocks in fall

The garden at the end of the season has its own beauty.

Our hollyhocks, which I loved so much when they were blooming at the height of summer, are still standing beside the garden gate.

Hollyhocks in July and December

The weathered wood fence, the barns and silo in the background, the sturdy stalks and the remains of the blossoms say “farm” to me as much as they did nearly five months ago.

Anyone know if I should be cutting back these stalks as I’m putting the rest of the garden to bed for the winter? Any tips for encouraging future blooms (I know hollyhocks are an every-other-year kind of plant)?

Coffee table – Input needed

Car loaded with lumber

I bought materials for the most exciting project on my fall to-do list, our new coffee table. However, before I start construction, I need your input.

I’m going (roughly) with this plan from Ana White.

I love the idea of the drawers. So much in fact that I’m going to be doing four drawers, two on each side.

This addition may end up changing the dimensions of the table a wee bit, so I’m going to take it slow and buy more material as I need them.

The one area where I’ve bought absolutely no material is the top.

In Ana’s plan, the top is made out of 2x6s. A 2-by top seems very heavy to me. Unnecessarily heavy. Plus I’m not sure it’s proportionate with the rest of the table, which is 1-by. Our current coffee table (which is nothing special, but has served us very well for 10 years) has a top that’s half an inch thick.

In fact, our current coffee table isn’t all that different from the Benchwright table, minus the drawers.

So what do you think readers, a 2-by or a 1-by top? What would you do?

Fall to do list – Report #2

We are officially in the month of winter now. (Happy first of December, BTW.) That means I have just 21 more days to finish my fall to-do list. And if I’m going by the weather rather than the calendar, who knows how long I have.

Anyone else feeling the pressure?

Here’s how we’re doing as we head into the final stretch.

1. Clean out the vegetable garden

I think I’m cutting my losses on the vegetable garden. Matt did a pass over one quadrant with the rototiller as he was running it out of gas. All of his work leveled out the dirt and uprooted the last of the weeds.

I’ve trimmed the asparagus and wrapped (most of) the grapes in burlap. Remember last year I did this in the snow? I was feeling pretty good about picking a mild Saturday before the snow arrived to get this done this year.

Then I ran out of burlap.

So this is almost done.

In keeping with the theme of cutting my losses, I bought two large tarps. My oldest nephew, who has been giving us lots of help at the farm, worked with me to spread them over half the garden. I’ve talked before about my love of tarps for killing weeds. So at least half the garden is tended.

Blue tarp spread over the vegetable garden

And lest there’s any confusion about what cutting my losses means, here’s the other half of the garden. Partially wrapped grapes, plants still in the ground, weeds, even the little sticks with the seed packets on top saying what’s in each row. Let’s just call this compost, shall we?

Messy garden in late fall

2. Remove window screens

The dining room is still the only window that is screenless. I will get to the others in the next 21 days.

3. Wash dining room and living room windows

Done at last update.

4. Put away the birdbath and put out the feeder

Done at last update. I’m loving watching the birds at the feeder as I’m working at the dining room table.

5. Bush hog the meadow, septic and pond shore one more time

This is another cutting my losses scenario. Not done. Won’t be done. Spring is soon enough.

6. Clean gutters

Matt’s done this once. Maybe one more to go?

7. Switch out the mudroom mats

Done just before our Christmas party. As in hours before. Great, except that I forgot the mat takes awhile to relax after being rolled up all summer. We had a variety of footwear and even a level and square spread around when guests arrived trying to flatten it out.

Here’s my post on how I DIYed a large mat for our mudroom.

8. Sweep the chimney

Done, as you saw in my post earlier this month.

Matt goofing around while cleaning the chimney

9. Vacuum my car

Still to come. Anyone want to arrange a detailing session for me?

10. Service the tractor

Matt and I took the mower deck off (as snow flurries flew around us). Then my cousin came over and changed the oil for us. Ralph and Bax supervised, until Bax decided he was bored and chased Ralph. He ended up in the house on a timeout, which may have been his plan all along. Dude’s work ethic is seriously questionable.

But my cousin’s is not. We’re very grateful for all of the help we get around the farm from our families.

Ralph and Baxter supervising the oil change on the tractor

11. Build a new coffee table.

Still to come.

12. Pick up the lumber pile beside the silo

Done, thanks to some more helpful cousins.

13. Regrade back and side of house

Another cut my losses. Boo. Add this to the spring list.

As fall progresses, I keep finding other things I need to do. Big things like putting away the hoses and turning off the outside water. Oops. That’s one not to forget (and now that I’ve remembered, it’s done).

I don’t like conceding defeat on these items. My mantra was, “Everything I do now is something I don’t have to do in the spring.” Because scaling up in the spring is as much effort as winding down in the fall. But c’est la vie. Everything is not going to be done.

But we’ll be done enough to be ready for winter.

At least my fingers are crossed that that’s the case.

How are you doing on winter prep at your house?

DIY cracked corn for chickens

Most of us will do anything for our pets. With the help of a local farmer, Sarah in Illinois is giving her hens a special treat this fall. Although I’m not sure how helpful this farmer has actually been.

My chickens are fed layer feed every day, but once in a while I buy a bag of cracked corn for them as a treat. I throw it around in the run for them to peck and scratch at during the day. It gives them something to do and they seem to love it.

So imagine my surprise when my farmer neighbor knocked on my door a few weeks back and told me that he had spilled some corn in the field while he was filling his bins. All I had to do was go out behind my barn and scoop it up before it rained. Well, heck yes. Free corn!

I went out in the field with a wheelbarrow and a scoop shovel, and I got corn. Lots of it.

While the chickens will occasionally eat whole kernels of corn, they much prefer when it is cracked, and I think it is also easier for them to digest.

My dad, whom I have mentioned before doesn’t throw anything away, said that he thought he had an old corn mill stashed somewhere. And it turns out that he did.

The mill is a simple machine. You fill the hopper on top with whole corn. It holds about 4 cups.

Then there is a wheel to crank and it turns a cylinder inside. It has a few slots that the corn falls down into and as it turns it crushes the kernel.

There is a knob on the side that you can turn and adjust the clearance inside the mill. The tighter it is turned, the finer the corn is milled.

We adjusted it to a point where the corn comes out just slightly cracked so that it is a good size for the chickens to handle.

All that is left is to crank away.

And crank.

And crank.

Steve asked me when I wanted him to mount an old motor to the crank.

I am getting closer to giving him the go-ahead!

I am making my way through this corn… 4 cups at a time.

Wheelbarrows of corn, 4 cups at a time. You’re a woman dedicated to her chickens, Sarah. When I was growing up and we had ducks and geese, they would get a ration of corn mixed into their winter feed. I think my Dad’s rationale was that the corn was higher fat and would help the birds in the cold weather. So the timing may be right for this influx of corn. Whether a treat or a bit of extra warmth, I hope your girls appreciate your work.

How to build a simple toolbox from scrap wood – Free plan

When I was working with my contractor father, every job, big or small, would inevitably start the same way. “You might as well go get the toolbox. Otherwise we’ll spend all our time running back and forth for tools.”

Within a few months of Matt and I moving into our first house, my Dad gifted me with a toolbox of my own.

How to build a simple toolbox

Like most DIYers, our tools are in a variety of places, and we endeavour to have hammers, wrenches, tape measures and whatever else we might need wherever we might need them. However, no matter where we’re working and how I try to spread tools around, we usually end up needing the toolbox as well.

(I might think a screwdriver and a pair of pliers will be sufficient, but the universe usually laughs at my overconfidence.)

After Sarah in Illinois got a glimpse of my toolbox in a post a few weeks ago, I thought I should share it here. It’s an indispensable part of my DIY life.

How to build a simple toolbox

The idea of this toolbox is not to hold every single one of our tools. The idea is to hold the basic tools needed for most jobs. Limiting the number means that the toolbox stays relatively light, so I can easily carry it to wherever I’m working. (When I once complained that the box was too heavy, my Dad’s helpful response was, “You’ve got too much in it, honey. You don’t need all that stuff.”)

There’s a main area that holds the bulk of the tools. (And yes, there are two hammers here, because Matt and I each have our own.)

How to build a simple toolbox

My Dad added a partition on the one side that makes a spot for blades–a couple of utility knives and a large and small hacksaw.

How to build a simple toolbox

On one end, a “pocket” holds a chisel, pencils, crayons and earplugs. How many times have you found yourself pencil-less in the middle of a job? Just me?

How to build a simple toolbox

And finally a bar on one side of the box holds screwdrivers. This bar is one of my favourite features. It keeps the screwdrivers out of the jumble of the rest of the tools in the bottom of the box and makes it easy to find the one I need.

How to build a simple toolbox

I like that this toolbox is open. I don’t have to deal with latches or trays. I can simply reach in and grab what I need. Plus, if I know I’m going to need more wrenches or sockets or another tool that doesn’t normally live in the toolbox, I can easily toss in the case, and carry it to the worksite.

Here’s what I have in my basic toolbox:

  • Hammer
  • Tape measure
  • Speed square
  • Pliers (regular, needle-nosed, side cutters, adjustable)
  • Vicegrips
  • Adjustable wrench
  • Electrical tape
  • Stubby screwdrivers (slotted, Robertson red and green, Phillips)
  • Nailsets
  • Awl
  • Screwdrivers (Robertson, Phillips and slotted in various sizes–12 in total)
  • Trowels (medium and small)
  • Chisel
  • Pencils
  • Crayons
  • Earplugs
  • Hacksaws (large and small with spare blades)
  • Utility knives (two with spare blades)

If you’re interested in a building a toolbox like this for yourself, I’ve sketched a plan that you can download. Since this is built using scrap wood, adjust it for what best meets your needs.

How do you store your tools? Anyone else have a DIY toolbox? What are your indispensable tools?

Musings and a frosty dawn

Frost covered fields at sunrise

Slowly winter is creeping in at the farm. This weekend will be filled with some more work outside as we try to get everything wrapped up before freezing temperatures are here to stay. Mixed in of course will be hot chocolate breaks and cozy nights in front of the fireplace.

I hope that you enjoy a wonderful weekend.

And to those of my readers still celebrating Thanksgiving, I wish you an especially wonderful holiday.

How to live with your kitchen until you’re ready to renovate

Ugh, our kitchen. Our poor, poor kitchen. I’m so excited for the day that we finally renovate this room. However, I’m a bit scared too because I feel like we’re going to uncover so many issues when we pull everything apart.

One of the hinges on our cabinet doors had come loose (not unusual, all of our cabinets are falling apart).

Cabinet hinge with stripped screws

Repairing a stripped screw hole with toothpicks and glue

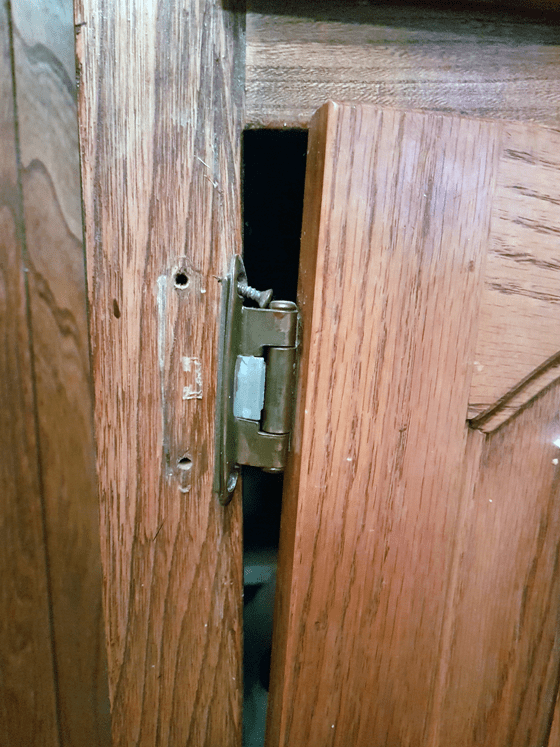
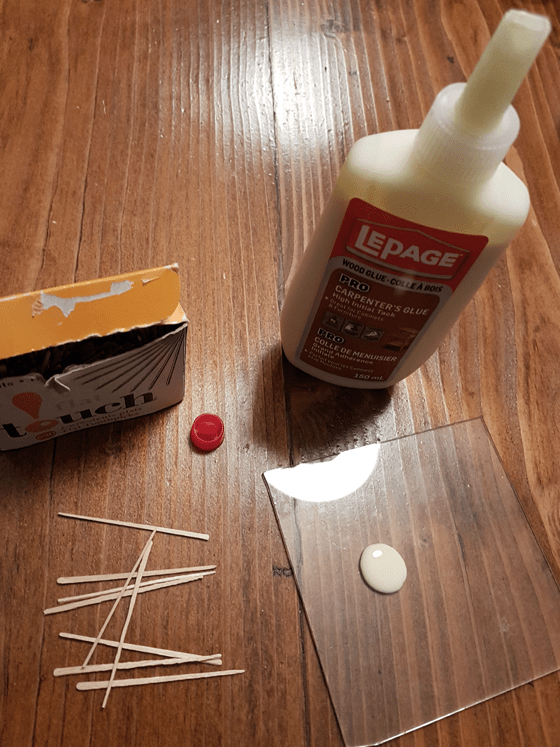
As I was putting it back together last week (wood glue + toothpicks = repaired), I was thinking about how we’ve lived with this kitchen for 5 years and will continue to do so for awhile yet.

Kitchens are important rooms. We spend a lot of time in them, so we want them to look nice and work well. But they’re also expensive and disruptive to renovate.

As a result, many of us live with lackluster kitchens, waiting until that magical day when we pull out the sledgehammer and start to forge the kitchen of our dreams.

For me, I hate to invest time or money into a space that I know I’m going to gut, even if that gut isn’t going to happen for 5 years or more. However, there are a few things that we’ve done in our kitchen that have made it more liveable, more functional and more attractive.

I thought I’d share them today in case they help someone else living in a similar kitchen situation. And I’d love to hear your ideas too for making a less than ideal kitchen work for you.

Paint

Between cabinets and appliances, wall space in a kitchen is often minimal, so giving your walls a fresh coat of paint is quick and inexpensive. With our open concept main floor, painting the kitchen, living room and hall the same colour made the spaces cohesive and the light colour that we chose brightened up the rooms a bit.

Painting cabinets is another update that can have a big impact. I did this in our first house and it was a great transformation. However, it was also a bigger job than I expected, so I was in no hurry to do it again–especially since our cabinets are falling apart and I feel like paint will not help the situation.

Hardware

Updating cabinet hardware can be another quick way to inject some style and personality into your kitchen. I spray painted our hardware for a mini update. The results have been mixed. The paint has chipped off some of the handles, but others have held up pretty well.

What is this?

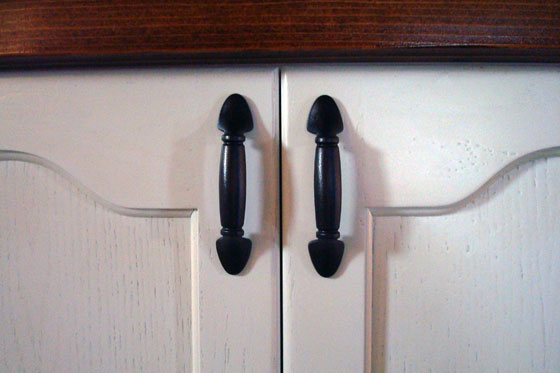
The nice thing about a hardware update is if you truly love the handles or knobs that you choose, you can easily reinstall them in a new kitchen down the road.

Lighting

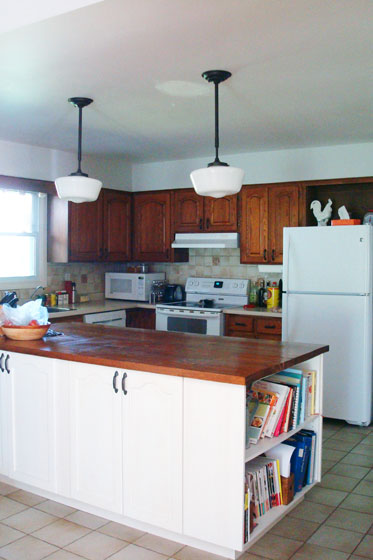
Just because you don’t have your dream kitchen doesn’t mean you can’t have your dream lights. I loved the idea of a pair of schoolhouse style pendants over the island, so I went and bought them.

We only had one light fixture in the kitchen and it wasn’t positioned quite right, but I didn’t let that stop me. I put up one of the lights anyway. Maybe a single, randomly located pendant looked a bit weird, but it made me happier than the boob light that was there before.

A year or so later when we had an electrician in for some other work, I had him move the first light and install a second. The electrician’s labour was relatively inexpensive.

School house pendant lights over the kitchen island

Even if you’re planning on reconfiguring your kitchen down the road and will need to move lights again, the investment in an electrician is not that significant. And assuming you still love your lights, you can reuse them.

Island

The biggest addition to our kitchen has been the island. I bought the doors at Habitat for Humanity and we DIYed the countertop. Having a cabinet maker build the boxes was still a bit of an investment, but worth it for us for the storage and prep space we gained.

Kitchen island painted white with wood countertop

I can’t imagine working in the kitchen without having this extra space. And I’m hoping that we can reuse the island in our future kitchen.

Accessories

Just because a kitchen is a utilitarian space doesn’t mean you can’t decorate it. Accessories can add function to the room as well as style. A long towel bar on the end of the island gives us a space to hang oven mitts and towels within easy reach. Plus pretty towels inject some personality and colour. We also removed a wine rack that was above the fridge (we don’t drink much wine and I can’t reach the space anyways) and put a fun country rooster and our kitchen scale on display.

Organization

No matter what your kitchen looks like or how large it is, keeping things organized can dramatically improve how you feel about the space.

In adding the island we were able to add storage for a few key things: cookie sheets, cutting boards and cookbooks. Our kitchen is lacking in drawers, so we also added hidden drawer to the island.

The few drawers that we do have are too small for most organizers, but I found a plastic organizer that I could cut to size with a utility knife, so I was able to keep our cutlery sorted.

Narrow cookie sheet shelves in island

Making a kitchen work until you can do a full reno is about trade offs. What can you live with and what can’t you? How many repairs are you willing to do? How much money are you comfortable spending, knowing that whatever you add may end up in a dumpster? For us DIYers, how much time and effort are you willing to invest knowing that you may be ripping out your hard work down the road?

For me, I think I’ve found a balance that is tolerable.

What are your tips for holding a kitchen together? How do you feel about mini renovations to tide you over until the big one? Have you made any improvements to your kitchen that have made a difference in how it works or looks?

Denise at Happy Haute Home (who often comments on my posts) recently renovated her kitchen for the One Room Challenge. While it’s a much grander space than ours, she embraced a very similar philosophy to mine. She shared her tips for how to update a kitchen on various budgets in her reveal post.

How we cleaned our chimney ourselves

Alternate title for this post “That time Matt’s Dad didn’t suffocate and fall off our roof.”

If you’ve been reading along here for any length of time, you know how much we enjoy our wood-burning fireplace and have fires nightly as soon as the weather turns cold.

It’s been three years since the fireplace was rebuilt and over that time we’ve never cleaned the chimney.

Before we fired anything up this year, I knew I wanted to address that.

Red brick chimney

Our go-to was Matt’s Dad. He heats his entire house with wood and cuts and splits all his own firewood. He’s our resource for all things fire.

He initially suggested dropping a heavy chain down the chimney and using it to knock off the soot. I was skeptical, but after a quick online search it seemed like that was a legit method of cleaning a chimney. However, consensus seemed to be that a brush was a more legit method.

Onto my Dad. I was pretty sure I remembered seeing a chimney brush and poles up in the rafters of the garage. After spending some time on a ladder peering around the garage, I found the poles but no brush.

So onto the store. I found a brush that I thought would probably fit our chimney and brought it to my parents’ house to try it on their poles. They didn’t fit together.

Back to the store, where I bought a handful of poles guessing at how many might be needed to reach the full length of the chimney.

Chimney brush in front of the hearth

Once we had the equipment, we needed to prep the inside of the house. I cleaned out the hearth, opened the damper and then covered the mouth of the fireplace to prevent dust from coming into the house.

Covering the fireplace to prevent dust during chimney sweeping

Covering the fireplace to prevent dust during chimney sweeping

Then it was onto Dick Van Dyke Matt and his Dad. (I asked for a Mary Poppins rooftop routine, but they were not in the mood. Although Matt did give me a strong man demonstration.)

Matt goofing around while cleaning the chimney

They popped the cap off the chimney and took a look.

Taking the cap off the top of the chimney

The chimney wasn’t too dirty. You can see the flakes of soot on the flue.

Soot on the inside of the chimney flue

They screwed the brush onto the first pole and got ready to sweep.

Chimney cleaning brush

Then this is where the suffocation comes in. Before he stuck the brush down the chimney, Matt’s Dad stuck his head in a large plastic bag–probably one that has a suffocation warning printed on it.

Cleaning the chimney

When he cleans his own chimney, my FIL does it from a ladder, which doesn’t give him much maneuverability. Therefore, there have been times where the wind has blown soot back in his face. The plastic helps to protect him from getting entirely dirty. On our roof, they could move around to avoid the wind if necessary.

The next stage was–to quote Matt–“dunk and scrub.” (My husband loves his movie references… although the line is actually “plunge and scrub,” but my darling husband maintains that “dunk” sounds better than “plunge”… or at least it does in his version of an Irish accent.)

My FIL dunked plunged the brush up and down in the chimney until the soot was removed. As he reached the end of one pole, he and Matt screwed on another section.

Attaching chimney sweeping poles together

Once they’d done the full length of the chimney, that was all there was to it. They put the cap back on top, came inside and pulled the plastic off the opening, swept the wee bit of dust out of the hearth, and we were ready for a fire.

Logs burning in the fireplace

Cleaning the chimney turned out to be pretty easy (so says the woman on the ground… but seriously, I know I could do it and you can too). I’m very grateful to Matt and his Dad for their work.

Here are my tips to clean your chimney yourself.

  1. Find a brush that fits your chimney. Our chimney has a 12 inch square flue. Most of the brushes I found in different stores were smaller and round. That works for my FIL’s woodstove, but not for our masonry chimney. Eventually, I found a brush that was an 8-inch by 12-inch rectangle. Even though it wasn’t the 12 by 12 that I originally had in mind, Matt’s Dad said that it worked very well.
  2. Buy extra poles. It turns out that two poles and a long arm (to quote Matt’s Dad) are enough to do our whole chimney. I bought five because I did not want to come up short. I’ll be returning the other three.
  3. Lubricate your poles. The poles screw together so that the handle of your brush gets progressively longer as you proceed down the chimney. Before he went up on the roof, Matt’s Dad gave the threads a shot of WD40 to ensure they’d easily screw and unscrew this year and for the years to come.
  4. Cover up inside. Tape a sheet of plastic over your fireplace opening. If you have doors on your fireplace, this step may not be necessary. With our open hearth, there was a good chance that soot and dust dislodged during cleaning would float into the living room. Covering the opening with plywood or plastic helps to contain the mess in the fireplace, where you can sweep it up later.
  5. Dunk and scrub (or plunge). Jostle your brush up and down inside the chimney. Be relatively vigorous–you want to knock off all the soot–but a bit gentle–you don’t want to damage your chimney.
  6. Watch which way the wind blows. It’s probably not necessary to don a plastic hood and face shield à la Matt’s Dad. However, chimney cleaning is a dirty job (another Mary Poppins clip, anyone?), so wear old clothes or coveralls, gloves and try to choose an angle where you won’t have soot blowing in your face.
  7. Do this yourself. Chimney cleaning is an easy DIY. It took about a half hour start to finish and in total our investment in the brush and the poles is less than $100. We’ll have the equipment for years. We didn’t get a professional quote on cleaning the chimney, but I’m certain that we would have spent more than $100 if we’d hired this out.

Now we can enjoy the fireplace, confident that it’s safe and clean.

How we cleaned our chimney ourselves

Traditions

Simple Christmas party table setting

Our annual Christmas party is tomorrow. It’s always special to be together with family and friends and over the years Matt and I have come to really enjoy hosting everyone.

I commented on one of Brooklyn Limestone’s Instagram posts last week where Stefanie shared the beautiful engravings that I used as place cards for our very first month before Christmas party at the farm.

Placecard inspired by Brooklyn Limestone

She was intrigued by our “month before Christmas” party, and our exchange got me thinking about the gatherings that Matt and I host every year.

It’s become a tradition that Matt and I host a few dinners on key occasions every year–the month before Christmas party for his Mom’s extended family and a Good Friday dinner for my Mom’s extended family.

I like having these set dates that everyone knows they’re coming to our house. We still send out invitations well in advance (a simple email reminder), but for the most part people have them in their calendar already.

Hosting a Christmas party (a bit more than) a month before Christmas can feel a little early, but we squeeze it in before schedules get too busy, so it’s easier for everyone to make it.

The guest list is extended family that we don’t get to see very often. As our families get bigger, we find it’s harder to see everyone, so this ensures that we’re connecting at least once a year.

The menus don’t change very much. Tomorrow Matt will be cooking a full Christmas dinner, and everyone will be bringing appetizers and sweets to share.

We try to keep it casual. The house will not be fully decorated for Christmas. Some reno projects are underway that have led to clutter. But the point–and the joy–is to have everyone together.

What holiday traditions do you have? Do you host parties at your house? What are the big occasions for your family? How do you keep your family connected?