Last post I shared plans for Ellie’s playroom makeover. Today, I’m back with an update. Thanks to March Break, we’ve made really good progress.
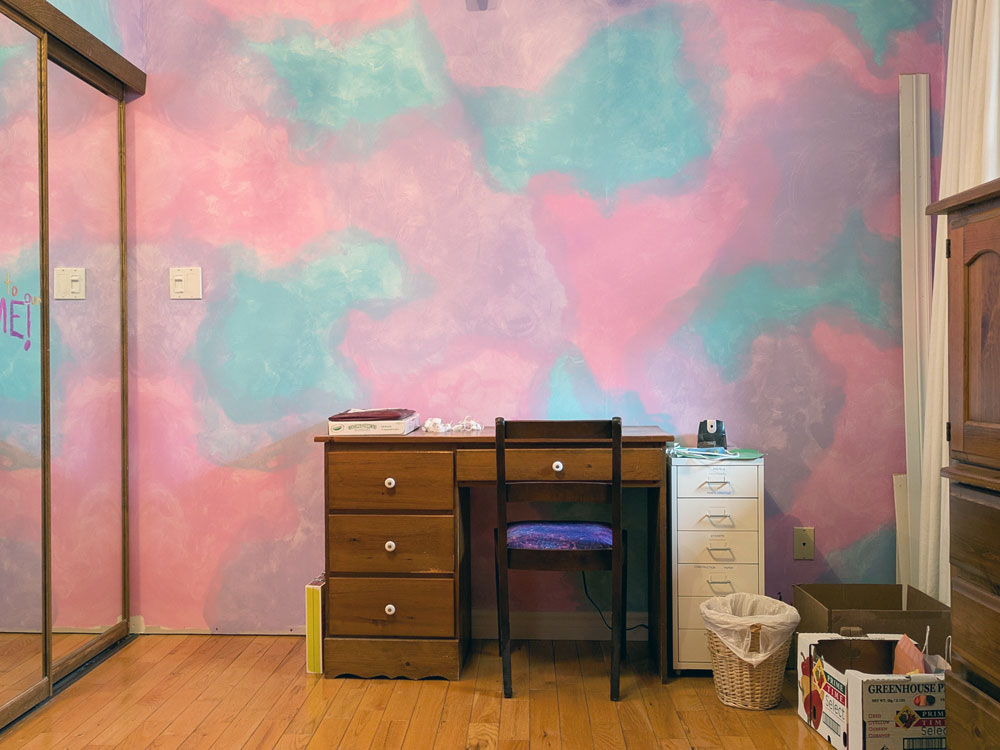
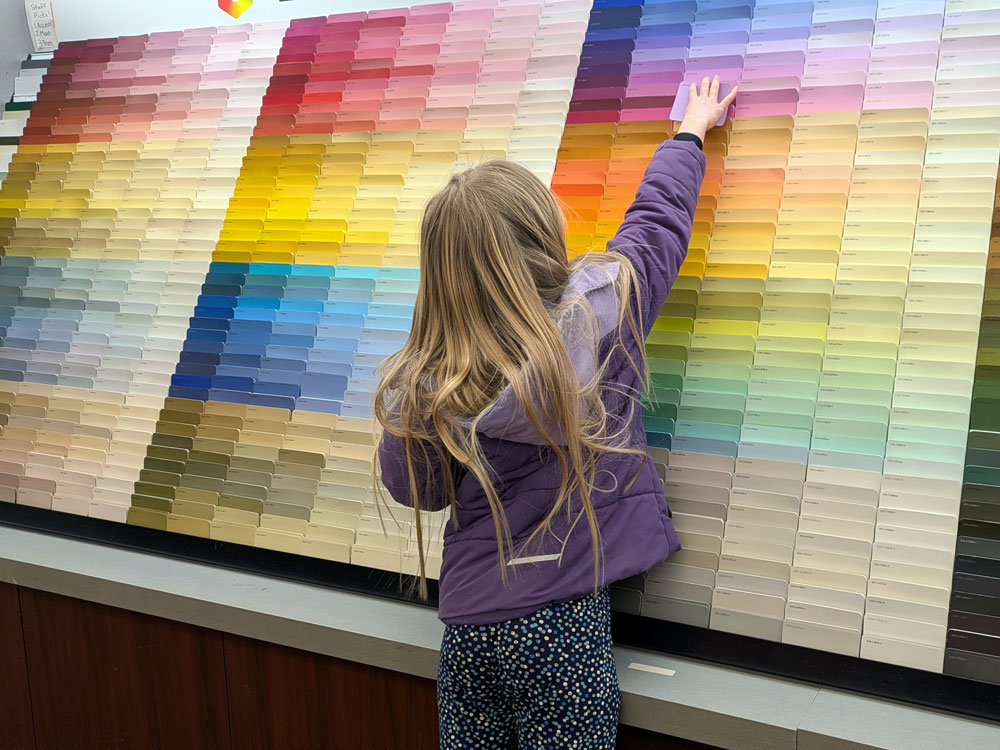
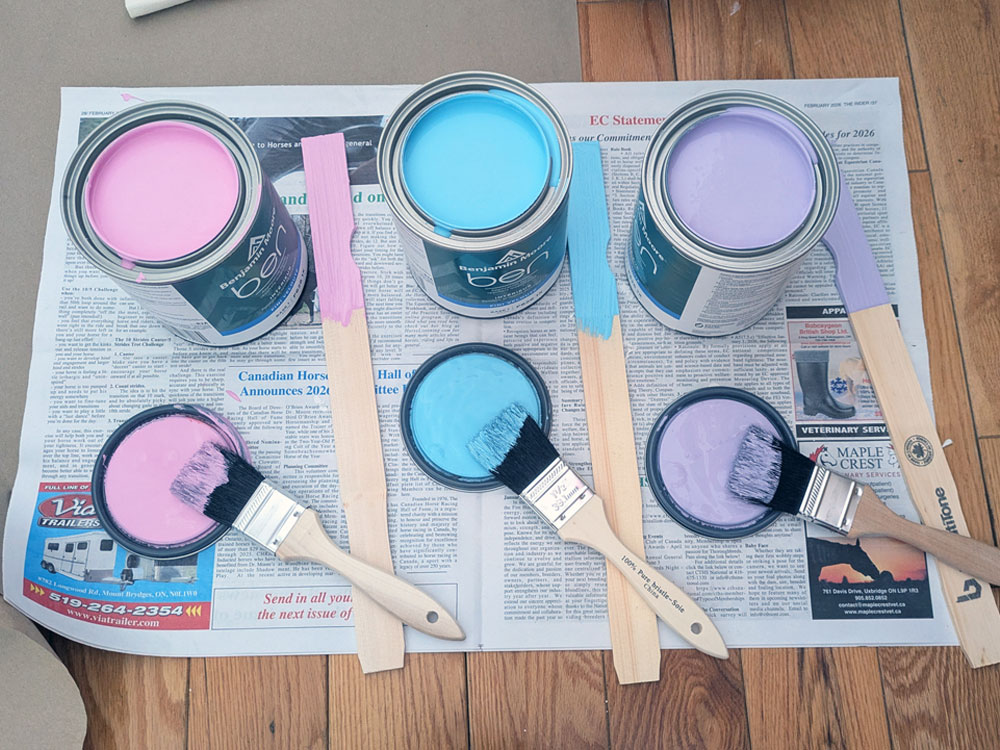
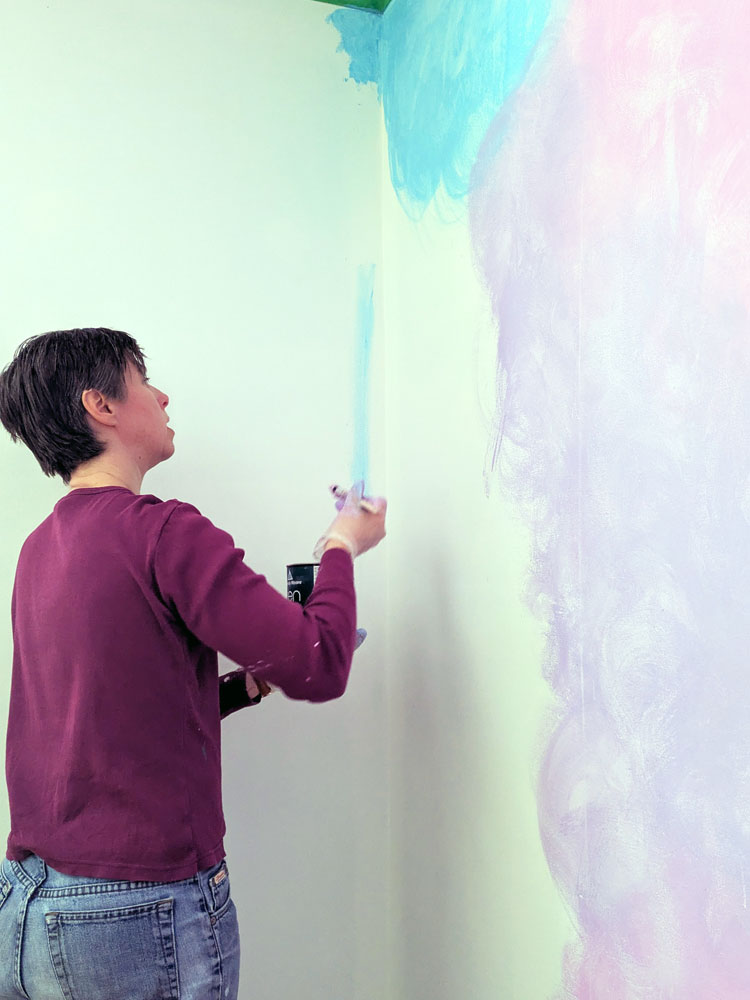
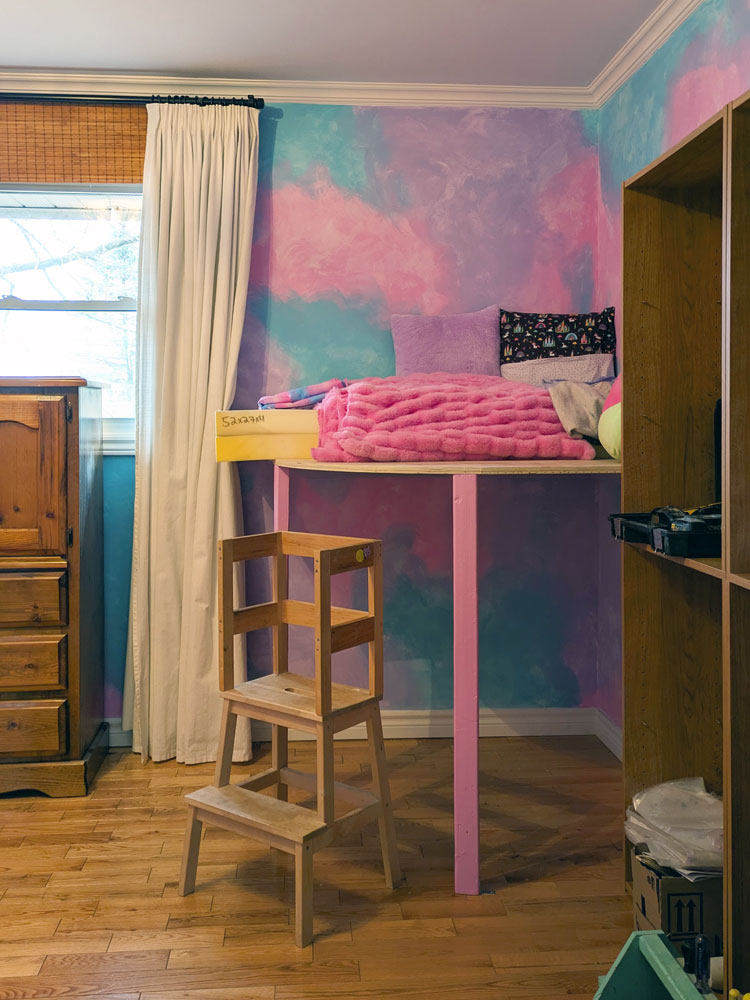
The biggest milestone is paint. Look at these walls. Ellie couldn’t decide what colour she wanted. Then she spotted a pink, purple and blue cloud-like shoebox and said, “If I could paint the walls like that, that’s what I want.” We took a look for wallpaper, sought advice from staff at a couple of paint stores, searched for tutorials online, collected lots of paint chips, tested some samples and then went for it. She loves the result.
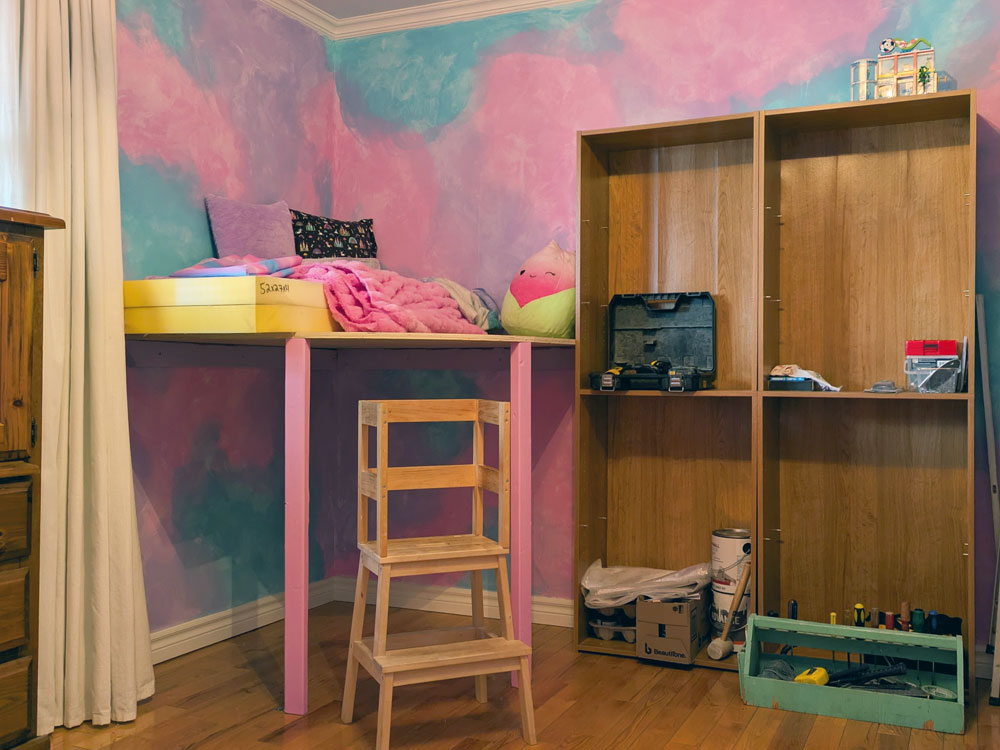
We also started building a cozy corner. High on the priority list for this room is a reading nook. Ellie loves an oversized chair, so we considered a few options and then decided to build a loft nook. This way, she still has a lot of floor space for other activities. The platform is in place and next up is cushions (and a taller ladder).
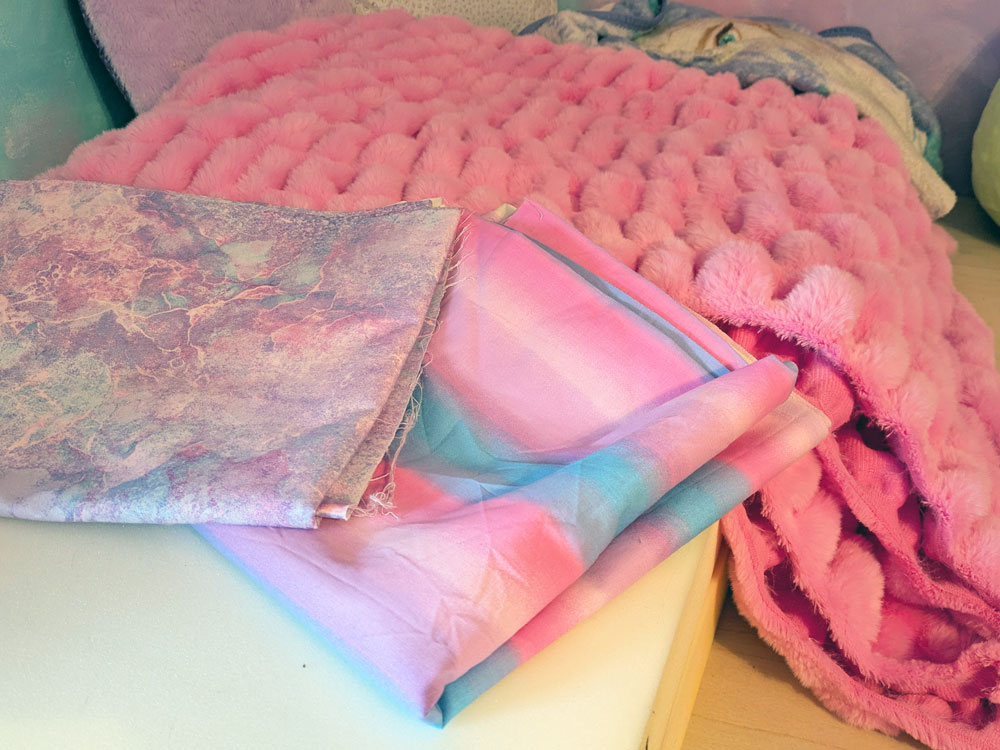
On the topic of cushions, while she was off for March Break we also went fabric shopping. Ellie picked out a bunch of beautiful fabrics that all coordinated really well with the walls and with each other. We’ve recovered the desk chair already. Other fabrics are going to make curtains and a cushion for the cozy corner and cover a large bulletin board that we’ll hang over her desk.
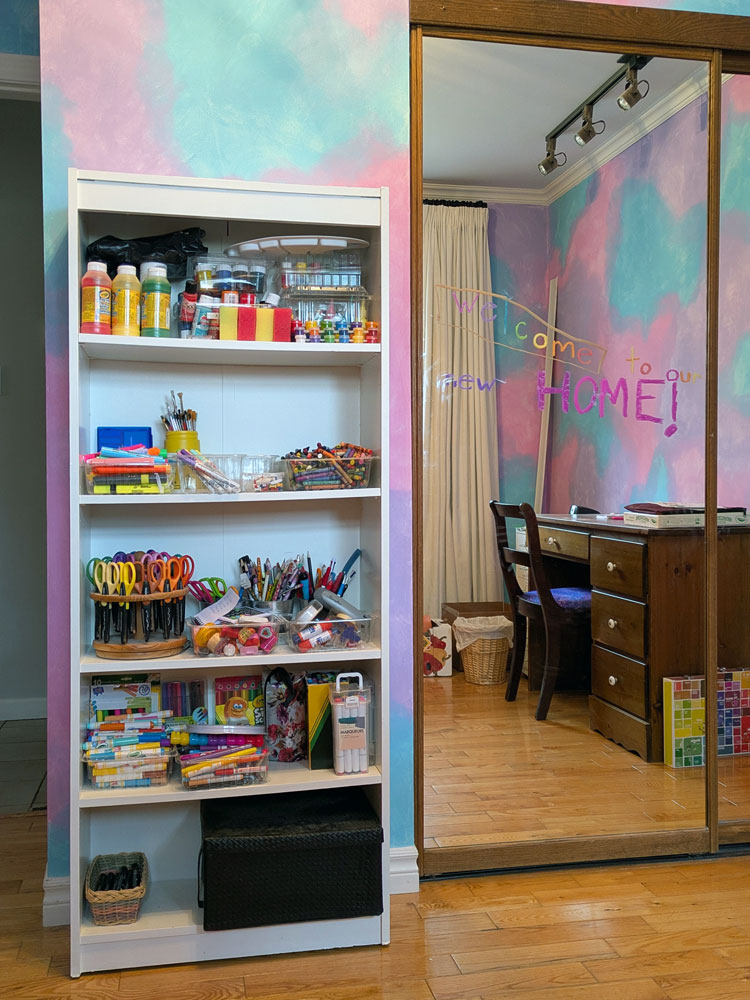
We’ve already started putting the room back together a little bit. Shelves and bins are set up in her closet, and we’ve loaded them up with crafts and dolls (note the welcome message on the mirror). The desk is in place, curtains are hung, and we reorganized her main craft shelf. The dress-up zone is back with hooks and a big basket of outfits. Matt’s nephew helped me carry in some bookshelves that we had stashed in the barn, so I’ll be redoing those to give Ellie more storage. Some pillows and blankets have been added to the cozy corner and we’ve already snuggled in with a few chapters of her current book.
This is turning out to be a really fun project. Everything is designed for Ellie and what she likes and what she does. We’re really enjoying working on it together and seeing it come to life.
Anyone want to go to the bathroom? (I realize that may be an odd question, but I really hope you say yes, because I have things to show you.)
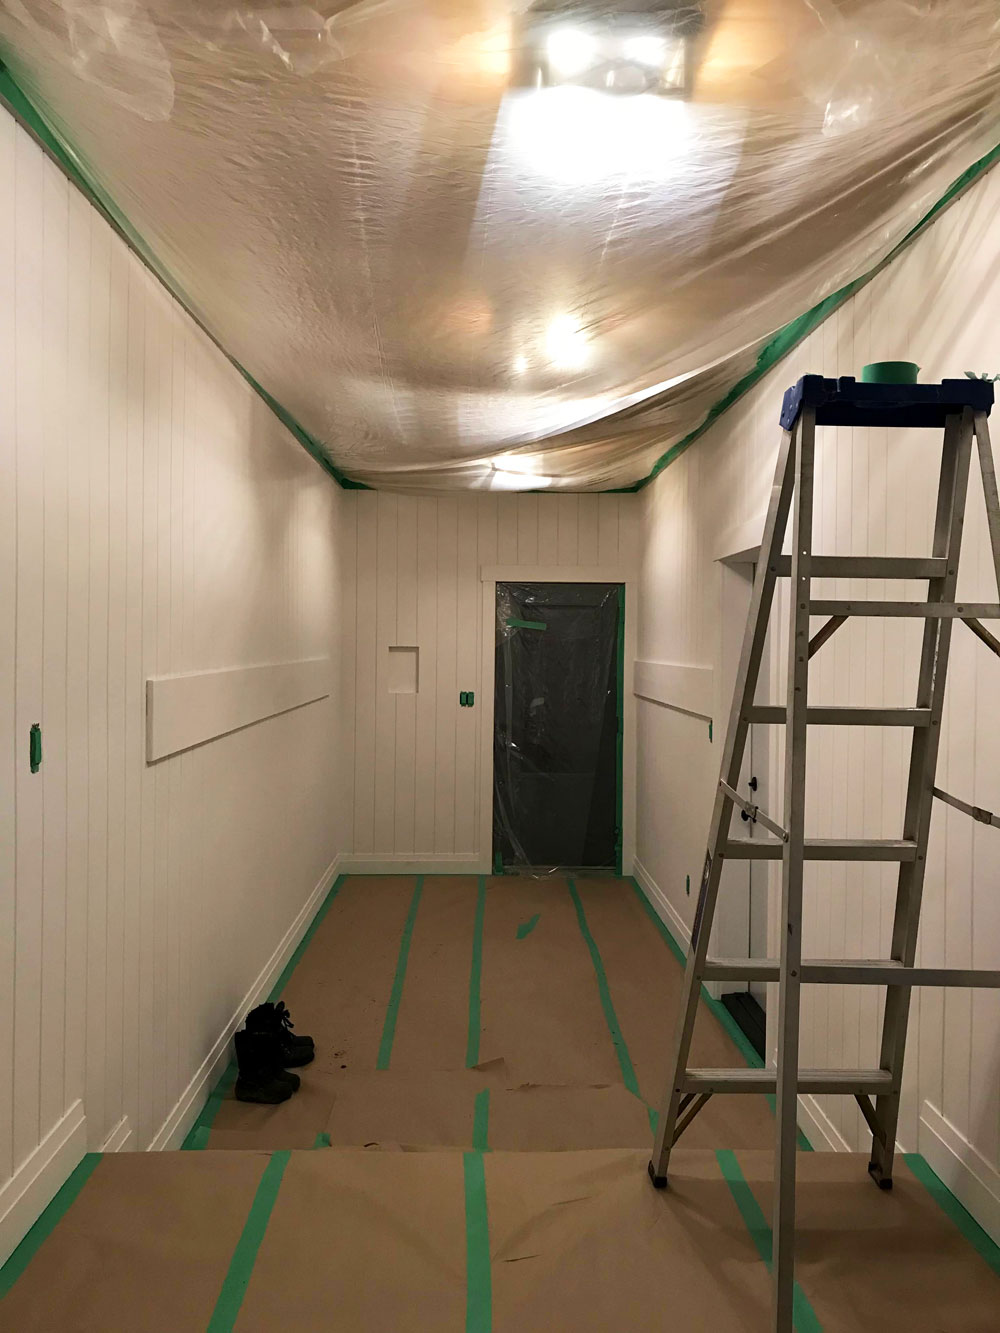
Our main bathroom is looking so good. We are still under renovation, but I’m making progress (one of the realities of DIY is that things usually take a while).
My last update took you through demo, plumbing and electrical rough-in, tile and the start of the wall panelling.
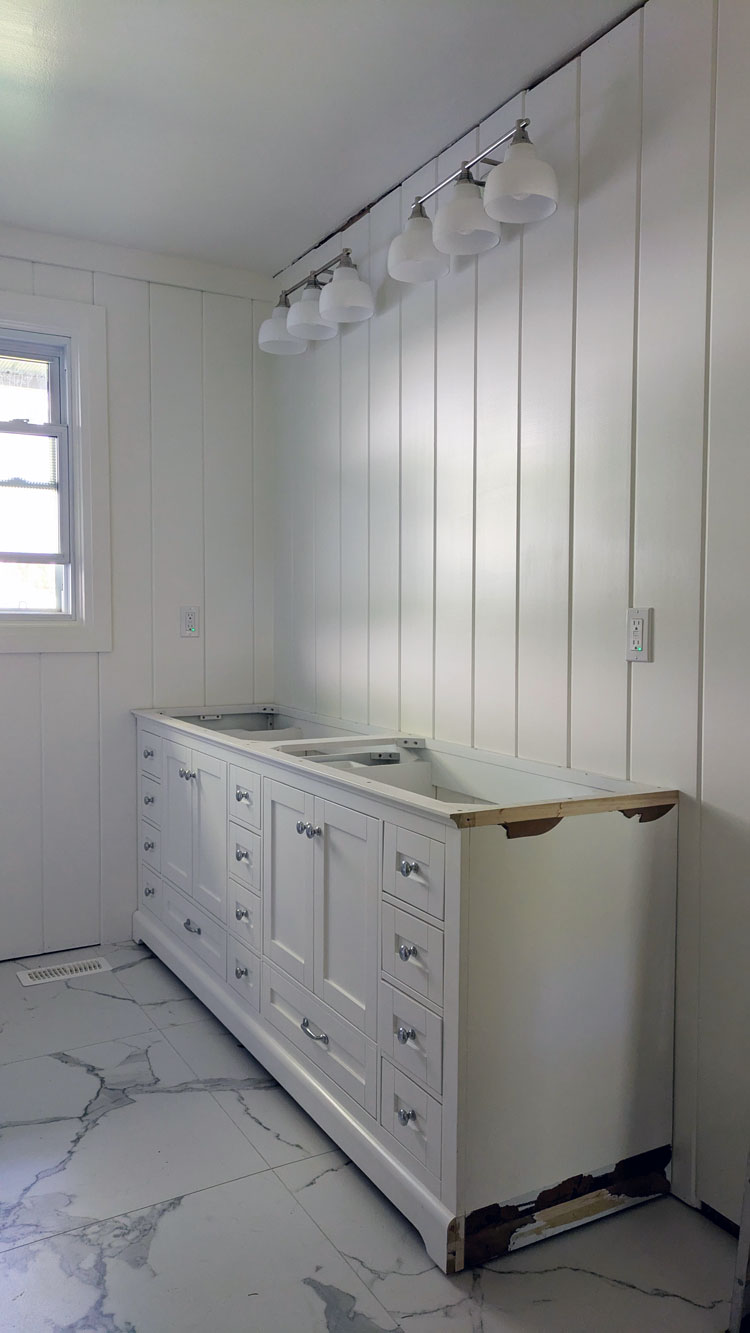
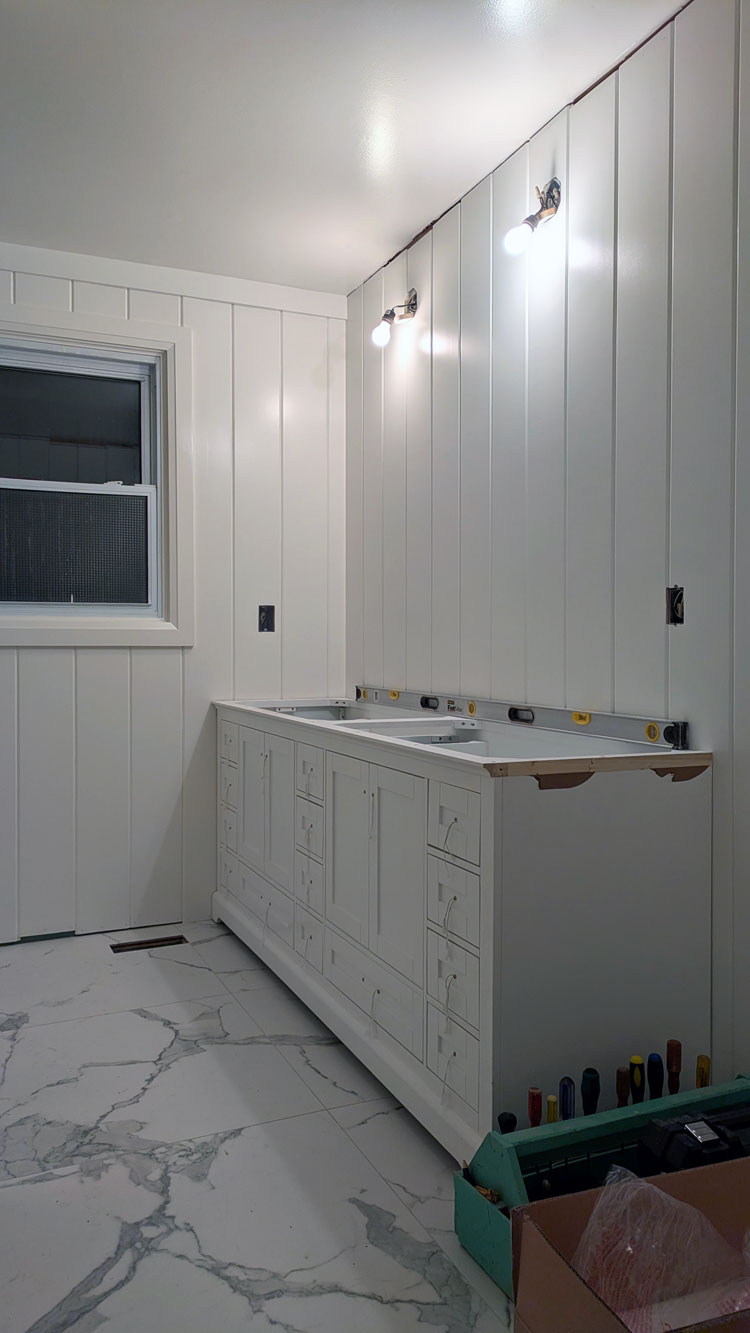
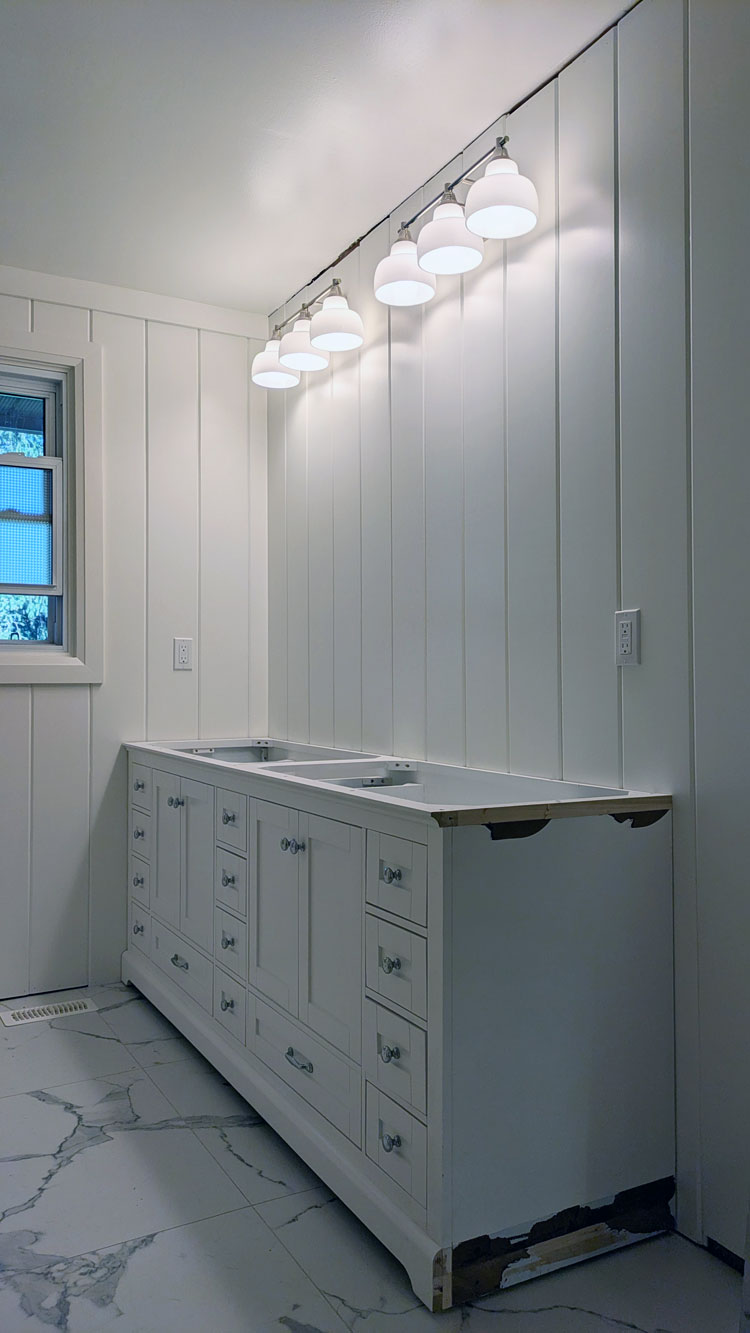
Now, the panelling is up and painted. The vanity is in place. And the electrical is complete. Today I’m going to share the details of how it all went.
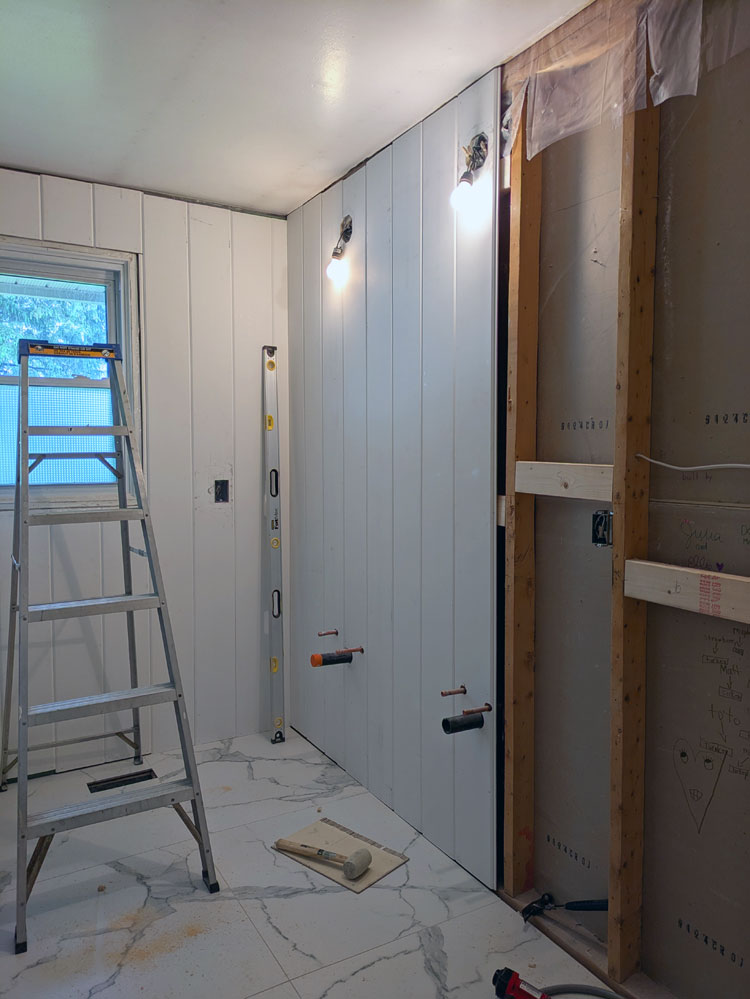
This bathroom has been a stretch for me in terms of my skills, and panelling was something I’ve not done before. I chose a pre-primed, tongue and groove, pine V-groove for all the walls. I started installing it behind the door so I could hide any mistakes, but everything worked out fine.
I prepped for the panelling by installing blocking between all the studs about halfway between the ceiling and the floor. This gave me an extra spot to nail the boards and ensure they were fastened securely. I used my Dad’s long level to make sure each board was straight and a rubber mallet to make sure the joints were tight. Then I face nailed each board top and bottom and one nail through the tongue into the blocking.
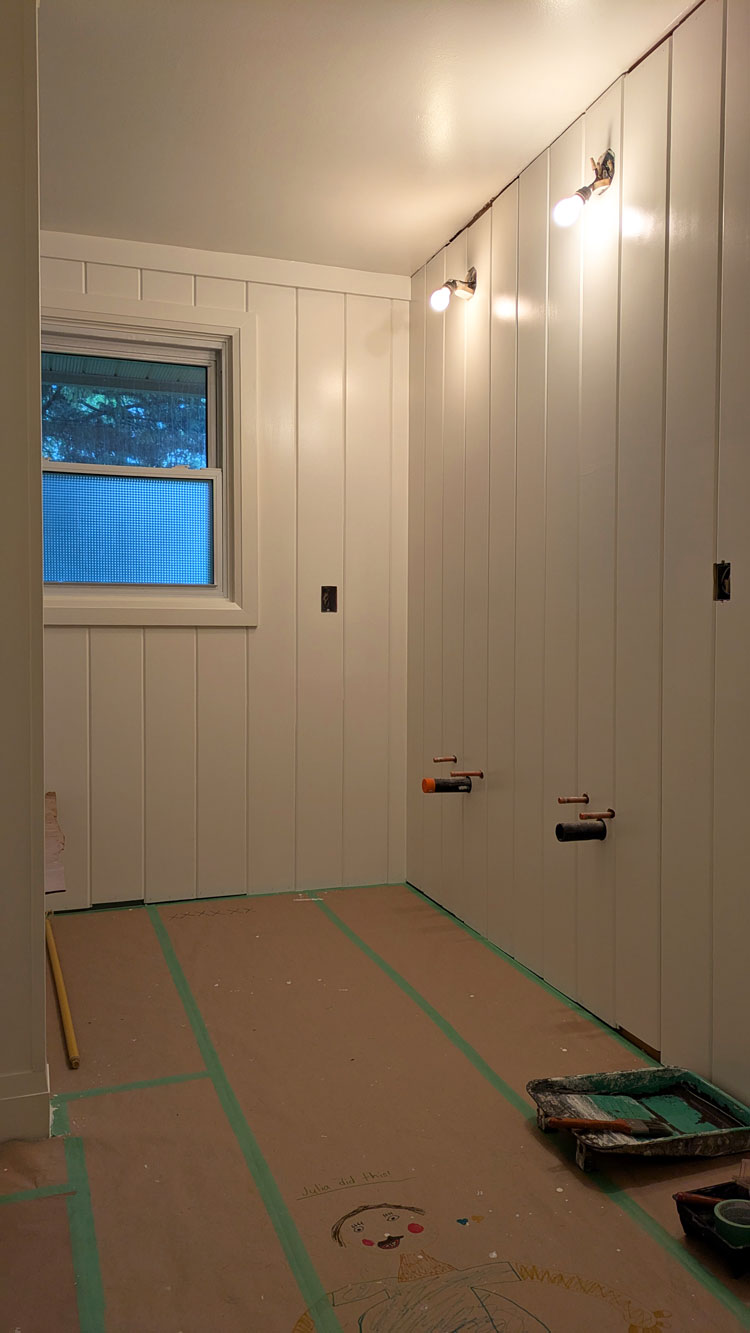
Once the panelling was up, I moved onto the trim. Trim was essential because it covered all of the gaps with the V-groove. I did window and door casing, baseboard, flatstock along the ceiling, and corner pieces over every outside corner. There are a few spots that still need trim, but I’m waiting until the vanity and hutch are complete before I install these finishing touches.
Trim is slow and challenging because I had to be super precise with every measurement, every cut and every install. But it turned out really well and finished off the panelling beautifully.
Then came paint. While I hadn’t installed panelling before, I had painted it in the mudroom. There, I rented a sprayer to ensure I got into every groove. I didn’t love the sprayer. The rental process was not straight forward, and my spraying technique wasn’t great. For the bathroom, I decided to try a roller and brush and hope I could get into the grooves and achieve a good finish.
It ended up working out really well. I cut in around the ceiling, floor, corners, door and window with my brush. It was tedious, but I covered everything well. Then, as I hoped, I was able to squish my roller into the V-grooves between each panel, so they were completely painted. Then I carefully went over the whole board with the roller to smooth out any excess paint.
I chose to paint the bathroom white. I’m not a white room person usually, but I really like the warm white we have on trim and furniture throughout the house (Benjamin Moore Cloud White). I thought it would look good for the bathroom. The V-groove adds a lot of texture to the walls, so there is good visual interest. Plus the white lets the other elements of the bathroom–the tile, counter and wood hutch–stand out.
I used Benjamin Moore’s Advance line. This is my go-to cabinetry paint, so I figured it would be extra durable for the bathroom.
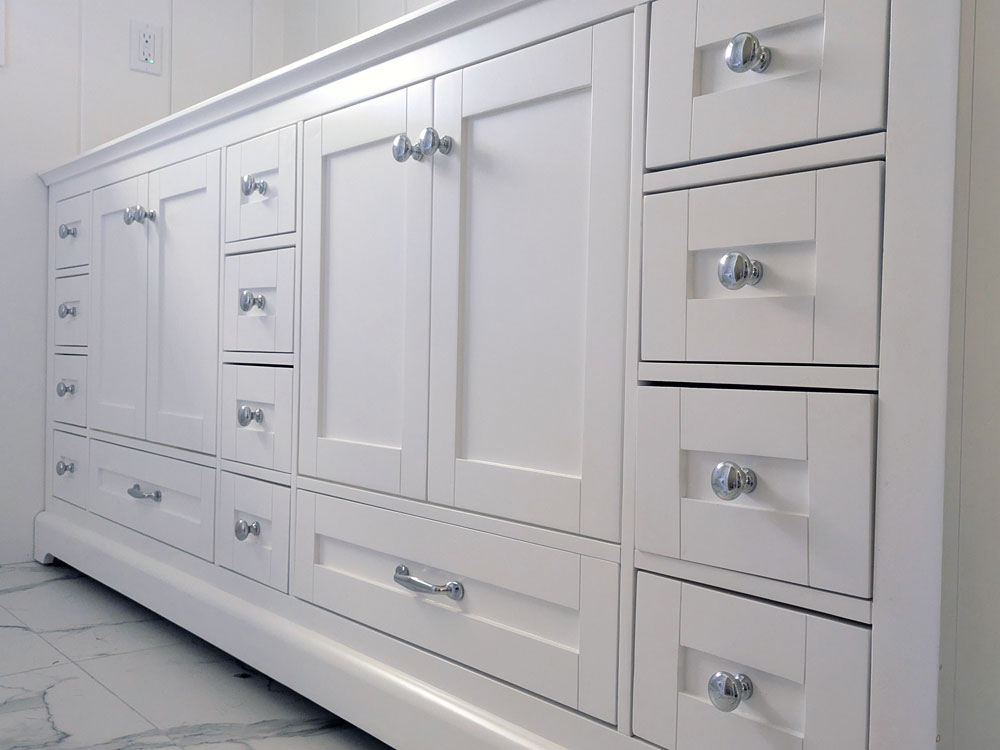
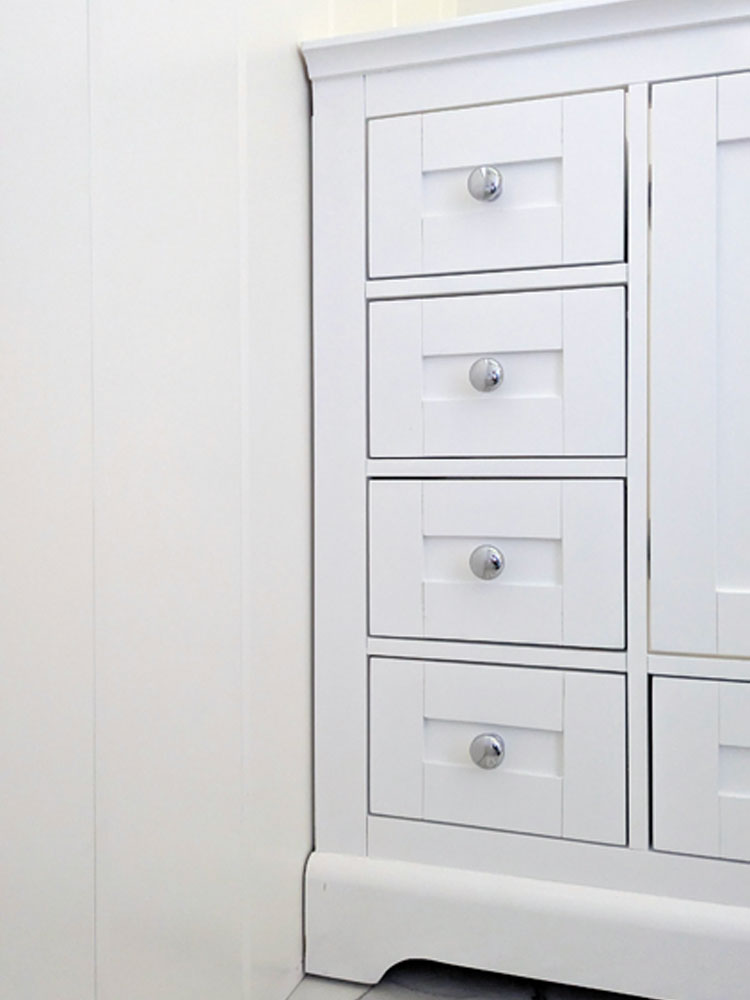
Next up was the vanity. I picked the vanity design a very long time ago (before Ellie was born). I had stumbled across an image of a vanity with cabinets under the sinks, but they were shorter than usual. Under the cabinets were drawers. I loved the idea of drawers for extra storage, rather than wasting space with a big cupboard.
I knew I wanted simple shaker doors and it was going to be white.
When I ordered all of the bathroom fixtures, the consultant I worked with looked at my plans and said, “You’ll need custom for the vanity.” So I called numerous cabinetry companies and tried to find someone to make my dream vanity. When I finally found one to give me a quote, the estimate came in at $9,000 and they couldn’t build it until the fall. Umm. No.
I hopped online and was amazed to discover a vanity very close to what I wanted at Home Depot. It was the size, colour, profile and even more important drawers I wanted. It was half the price of the custom vanity. And it could be here in a week. Sold.
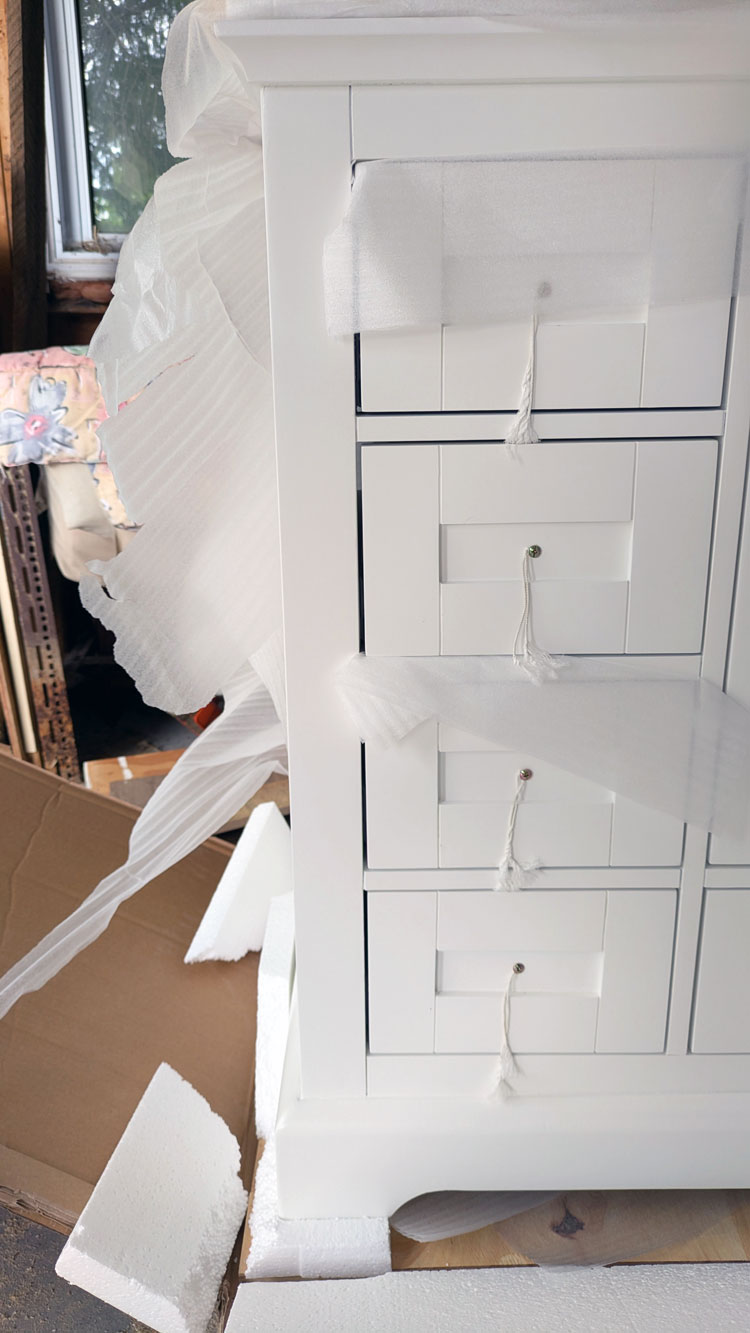
The vanity did need some adjustments. It’s meant to be free-standing, but I wanted it tight to the wall and the hutch I’m having built. To make that happen I had to cut off a bit of trim at the top and bottom on either end.
Cutting into a brand new vanity is a bit nerve wracking. The amputation also required turning the vanity upside down, which was too heavy for me to do on my own.
So I exercised my phone-a-friend option and that friend, her very precise engineer husband, and weight-lifting son came over to help. They removed the necessary pieces and then carried the vanity inside. It was a tight fit, but they made it into the bathroom, and I was so pleased once I saw it in place.
One of my concerns with the vanity was the colour. Would the white be too cool against my creamy walls? Would I have to paint the vanity? The white looks great. It’s not an exact match to the walls, but it is definitely on the warmer side. The surgery worked and the vanity fits tight to the wall. All of the nicks and cut marks will be hidden.
One of my other concerns with the vanity was the hardware. The online listing said it came with brushed nickel hardware, which was not the look I was going for. I planned to source hardware that fit the pre-drilled holes. But as I unscrewed the hardware (it was installed backwards for shipping), I discovered it was polished, so I decided to install it.
The decision to go with the polished hardware solved another dilemma–the lighting. In my original mood board for the bathroom, I had thrown in a light, but I really had no idea what kind of light I wanted.
I planned to mix metals. Chrome on the taps and maybe towel bars? Black on the hutch hardware and hooks? Brass on the lights and vanity hardware?
I searched through so many lights online and couldn’t find ones that seemed exactly right. I wandered lighting boutiques and big box stores. I added to my Pinterest board. I polled my family with various options.
I finally ordered a gold light that I liked. But when it arrived, it turned out I didn’t like it that much. The gold was very brown. Almost copper. It blended with the frame of the mirrors, when I wanted it to stand out. It was not the look I was going for.
The polished vanity hardware helped me decide to skip bringing brass or gold into the bathroom. I would still have the touches of black I was planning, but the lights were going to be shiny silver.
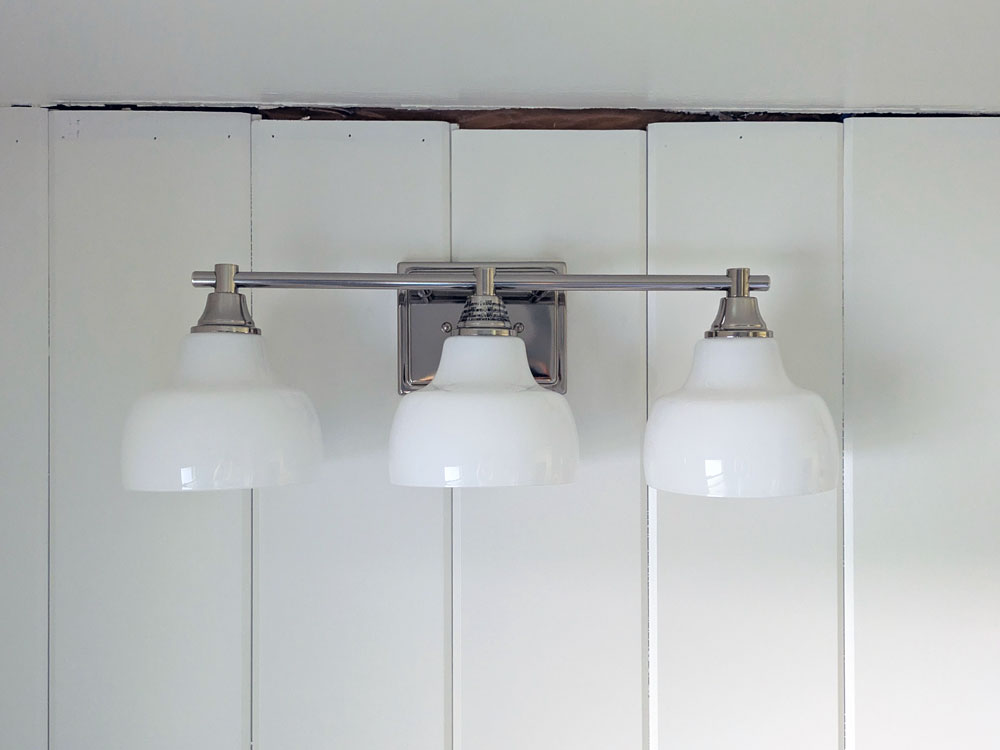
I went back to a light I’d seen at Home Depot. It had white milk glass-esque shades like the schoolhouse lights we have in the hall and kitchen. It had bright shiny polished metal. Even better, it was in stock at my local store–critical since the electricians were coming in 5 days.
So I bought the lights. When I unpacked them at home, I decided I still liked them.
The electricians came and installed the lights, plugs, floor thermostat, timer for the fan and dimmer switch for the lights. So electrical is done.
The bathroom feels extremely bright with our new lights and white walls. We went from two bulbs to six, which is a big glow up. Fortunately, we have the dimmer switch. We also went from one plug to two. And of course there’s the heated floor. So many upgrades.
I’m really glad to have one trade completely finished. The biggest tasks that I had to tackle are also done. I managed to finish the painting before Ellie finished school for the summer. All of my jobs now are very manageable.
As more and more pieces come together, I’m thrilled with how everything looks together. I had a very clear idea of what I wanted in the bathroom and how I wanted it all to look. But when designing a bathroom, you pick these big, really hard to change things like a tub, tile, vanity, countertop mostly in isolation. Then you cross your fingers and hope they all look good in the room together. So far, they do, which makes me very happy.
I’m documenting the bathroom reno and sharing it in a series of videos on Instagram. Follow me at juliaon129acres, and catch up on all the construction in the bathroom highlights Part 1 and Part 2.
Have you ever modified a brand new piece of furniture? How do you feel about the metal mixing trend? Are you a polished or brushed person? Are you a white room person?
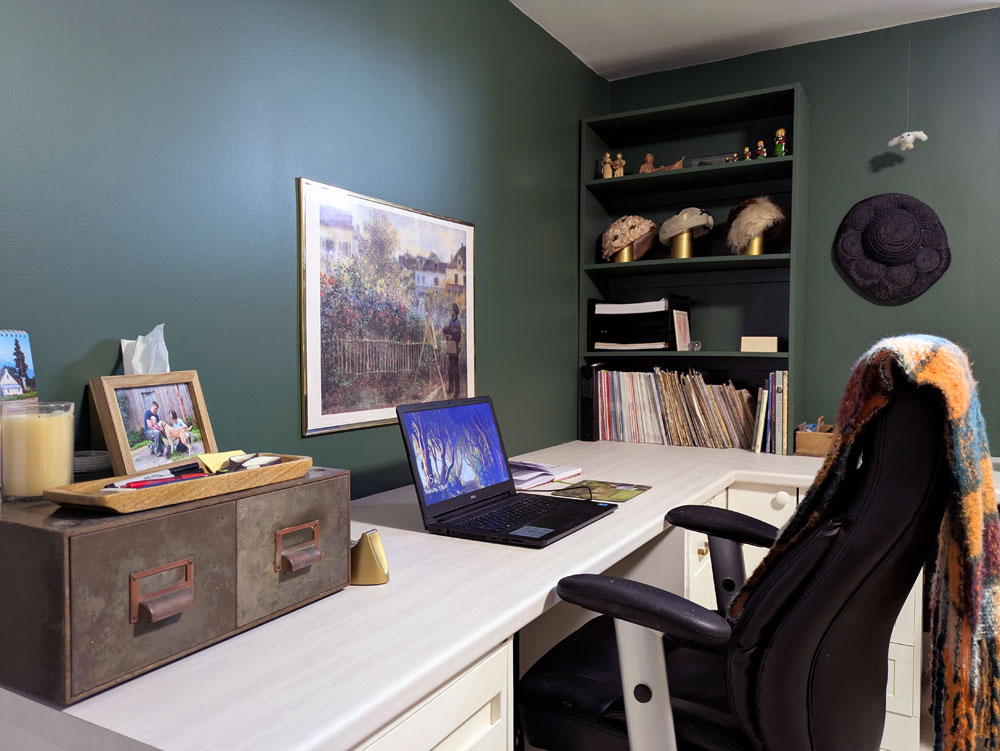
I was unsure what colour I wanted to paint the office for a long time. Back when we first set up the room, Matt picked a forest green (Benjamin Moore Manor Green). It was not my favourite colour, but it was his room, so I didn’t say anything.
Once I decided the office was going to be mine, I was more than ready to repaint.
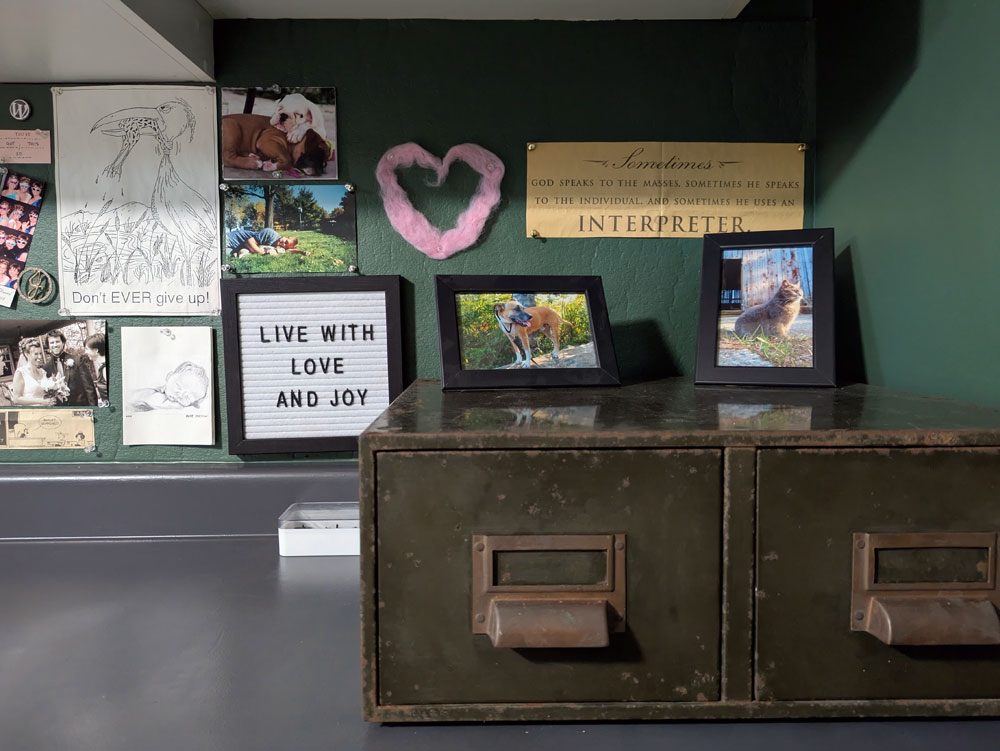
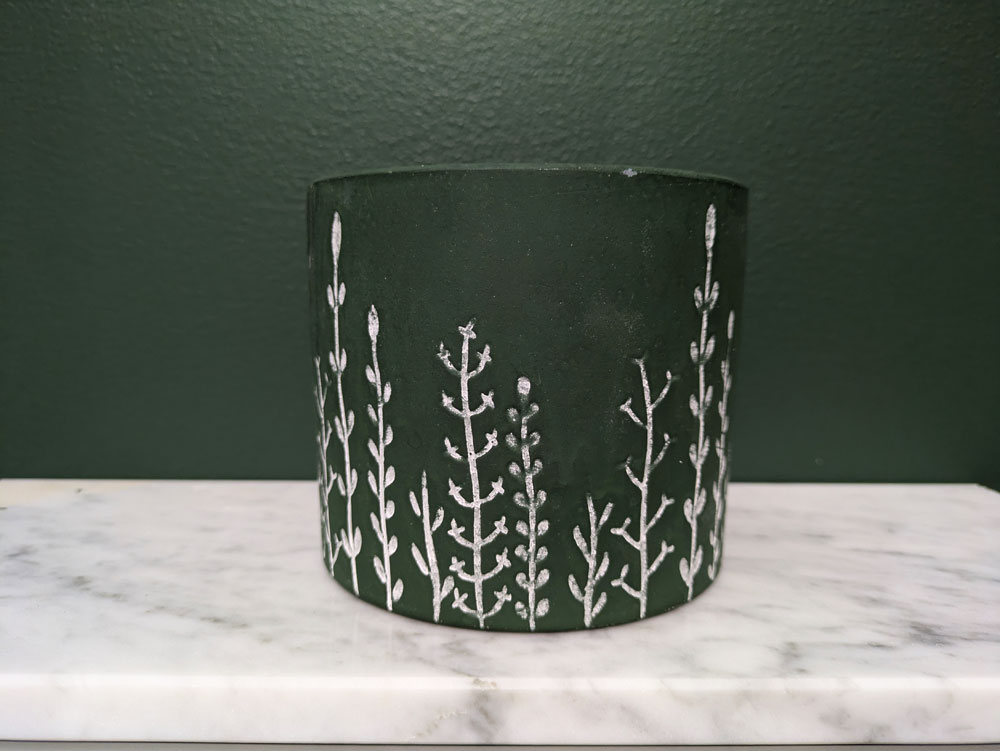
I liked the idea of sticking with some shade of green. I like green and it would be another memory of Matt. I knew I wanted dark olive green a few places in the room (namely the vintage metal drawers I found years ago at an auction). Did I want it on the walls too?
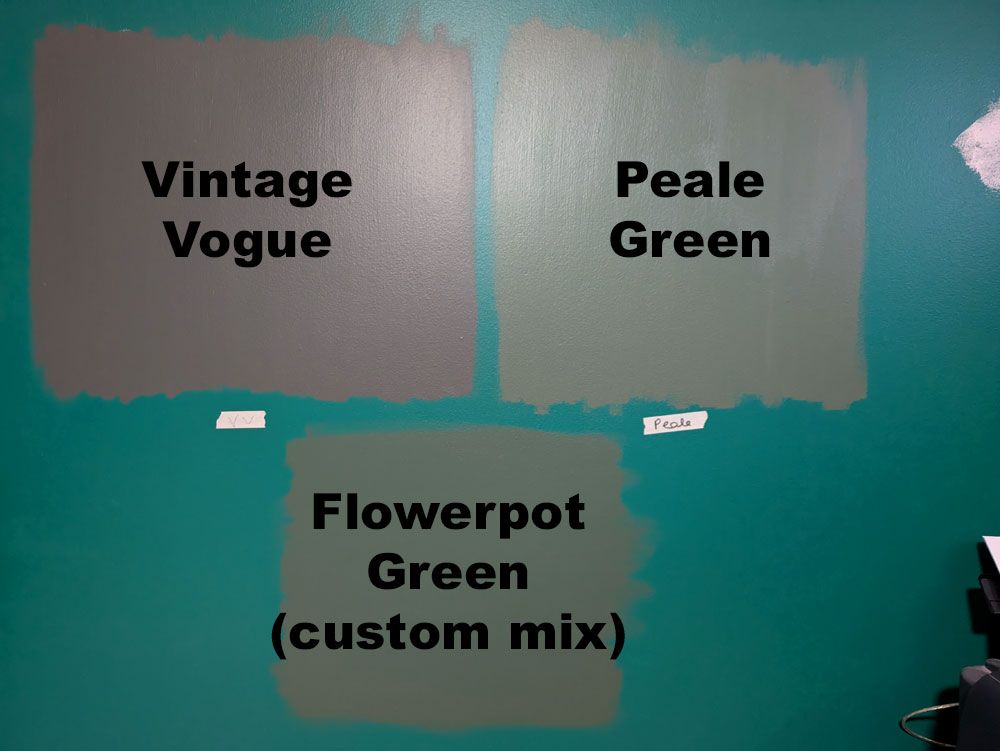
I finally decided to go for it. But then I had to figure out what green. I sampled several: High Park, Rosepine, Cushing Green, Peale Green. They were too light, too grey or too brown.
Ellie’s comment was, “So you’re painting the office garbage can green.”
Thanks, girl.
I returned to the paint store in search of my goldilocks–not garbage can–green.
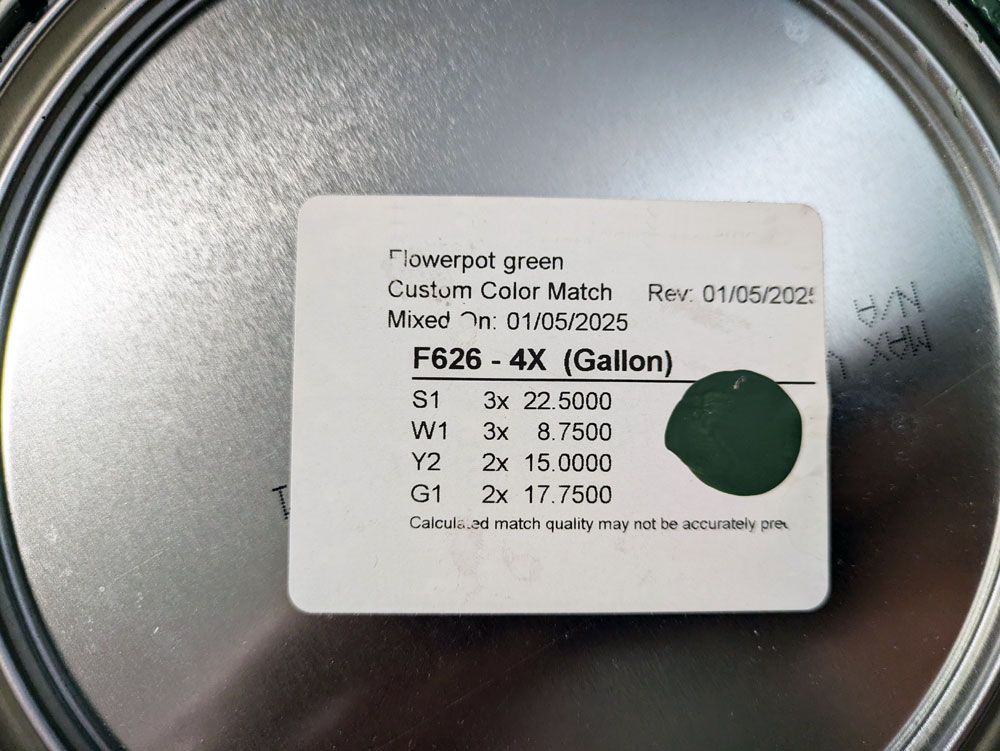
I bought two more samples: the oh so popular Vintage Vogue and a custom shade matched to a flowerpot my sister gave me for Mother’s Day.
Back at home, I put them on the walls… and Flowerpot Green was the winner. It’s dark, but not black, not brown, not grey. It is definitely green, and it picks up the tones of so many of the things I used in this room.
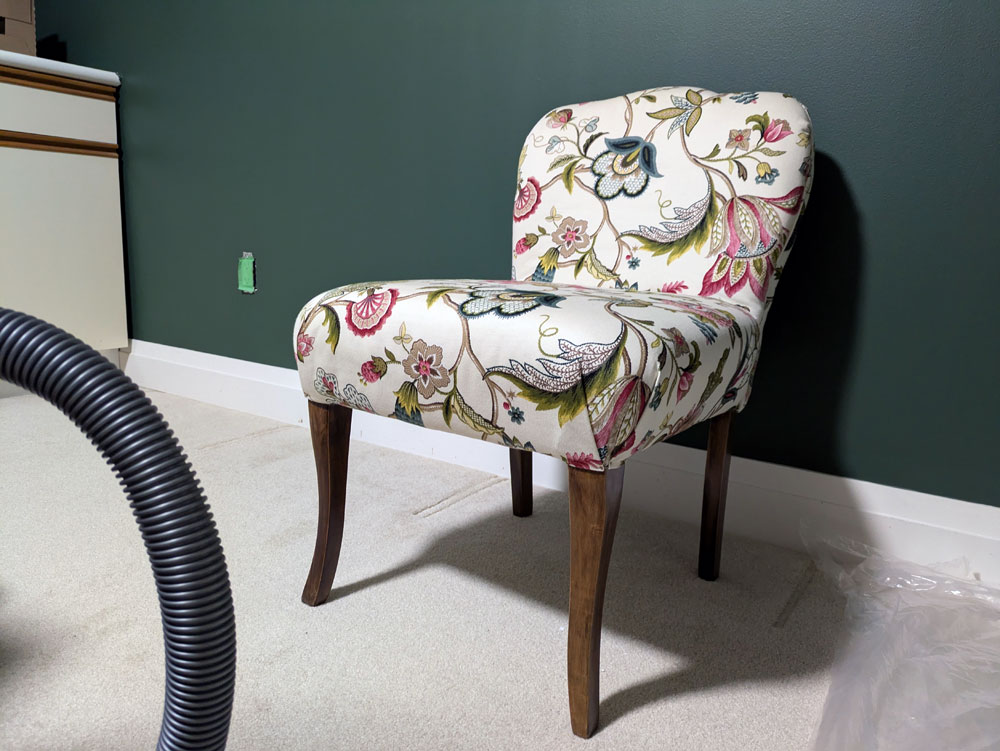
I had a few moments of hesitation as I was painting the first coat, but then I decided I liked it. When I moved my vintage slipper chair in just to see, I loved it.
My Mom’s reaction gave me another reason to love it. Her comment the first time she saw the room was, “Oh, this is the colour we had in the living room and dining room at home!” She was remembering a time that my grandmother (a frequent redecorator) got new furniture, painted the living room dark green, and then sewed curtains to match.
So from my grandmother to Matt to my sister taking care of me on Mother’s Day, my new office paint is full of history and meaning and family. That feels like a good choice to me.
Do you have a favourite colour? Have you ever had a custom paint colour mixed for you (this was my first time)? Are you a fan of neutrals? Or do you go for colour? Who prefers light shades over dark?
Ellie’s new room is officially done. It’s green, floral, fresh, vintage, thrifty, personal and her.
When I first came up with the plan to have Ellie move rooms, she was not enthused. But as we started planning her new room, she became more and more excited. Finally she was so excited she gave me a deadline. She wanted to sleep in her new room by Tuesday night (this was about a week earlier than I had planned). So I finished off most of the final touches and our girl moved in.
This was over a year ago.
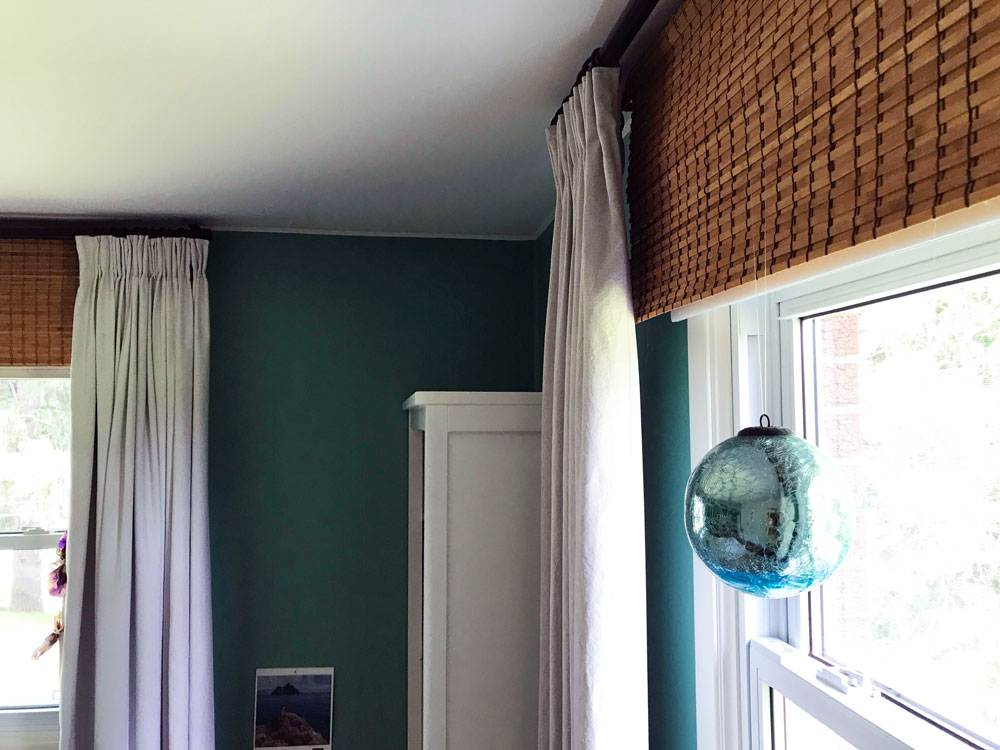
The final, final touch was some bamboo valances to cover the blackout roller blinds. I finally installed these at the end of June, and her room is officially done.
I actually like that the reveal is a year after she moved in, because she’s added some of her own details to the space now–as she should. (And she’s added even more since these photos were taken, as over the weekend we hung a little cuckoo clock Matt’s Dad brought her from Switzerland.)
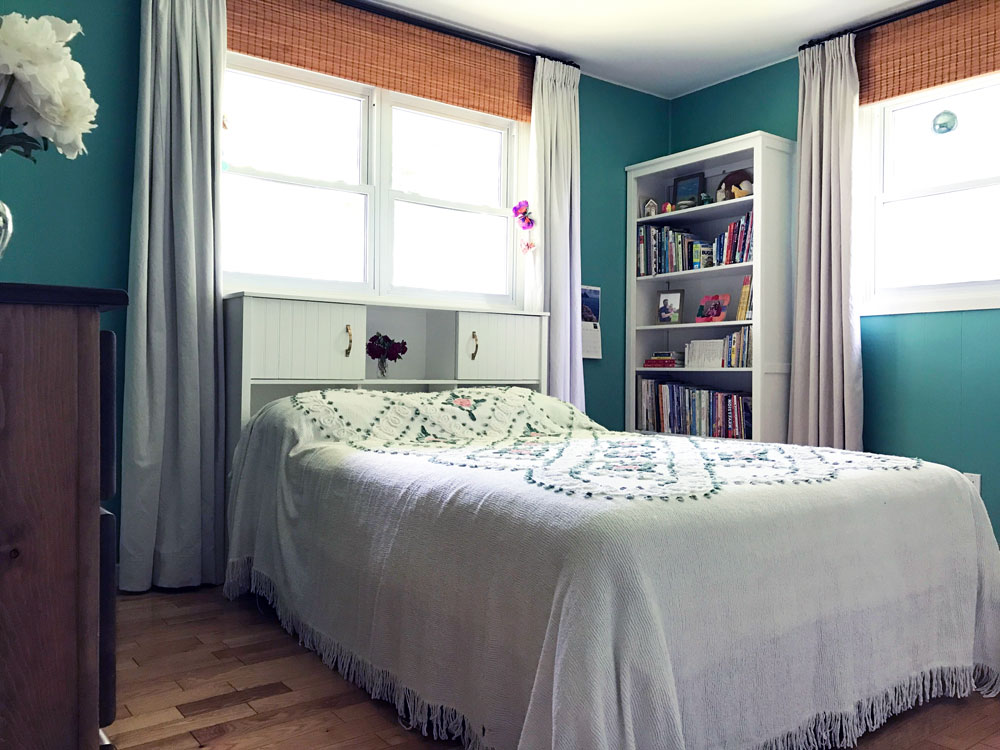
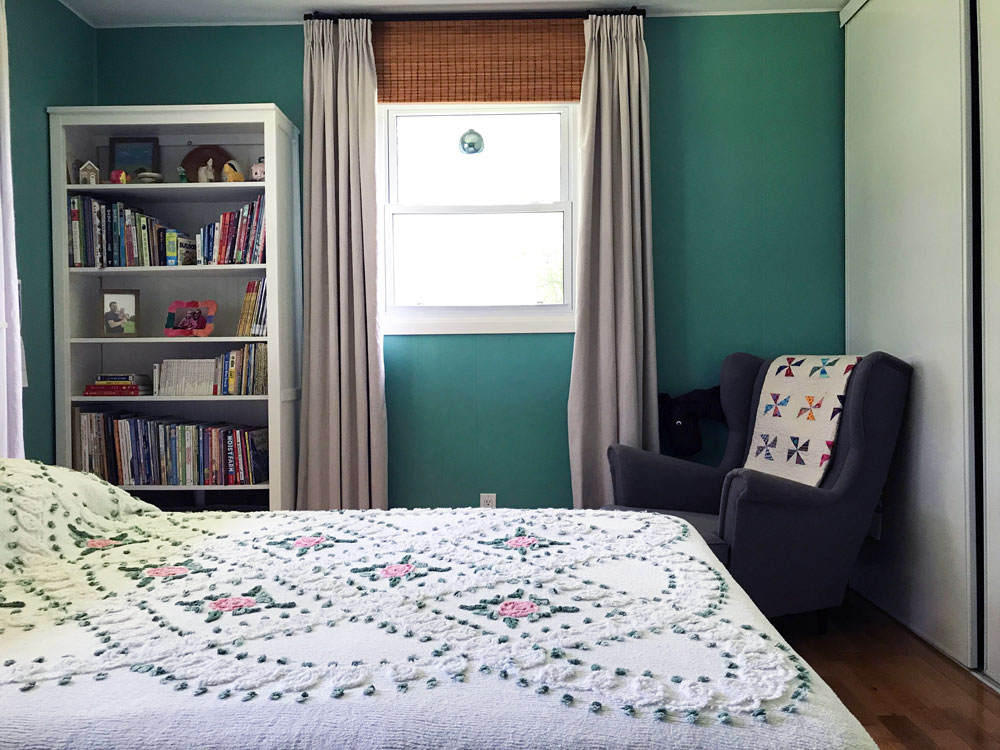
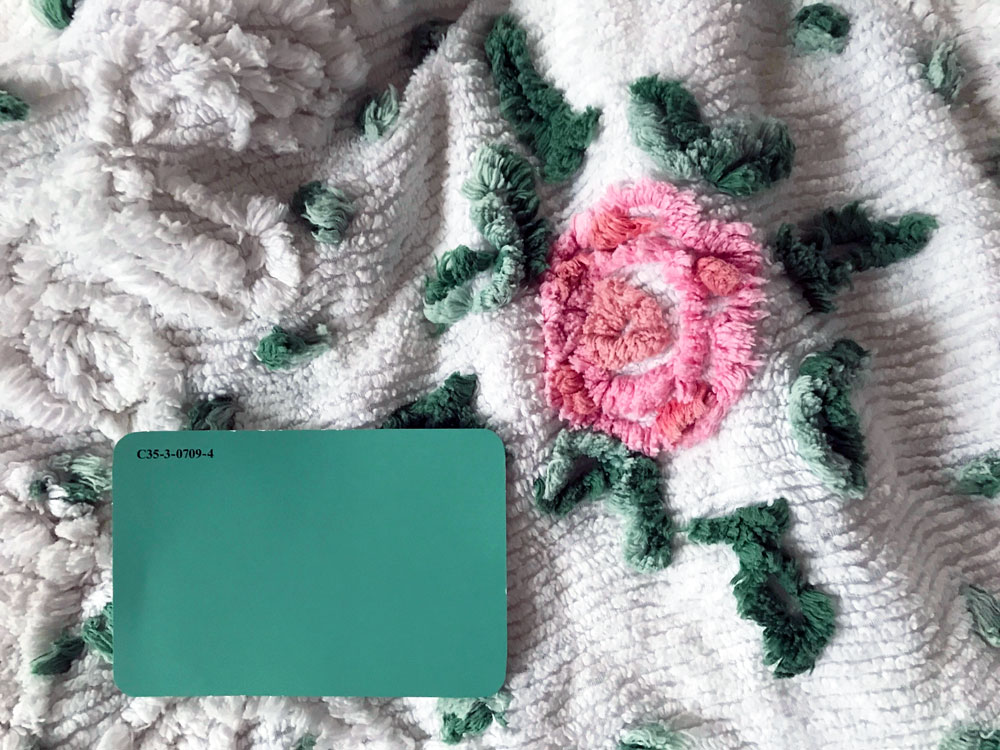
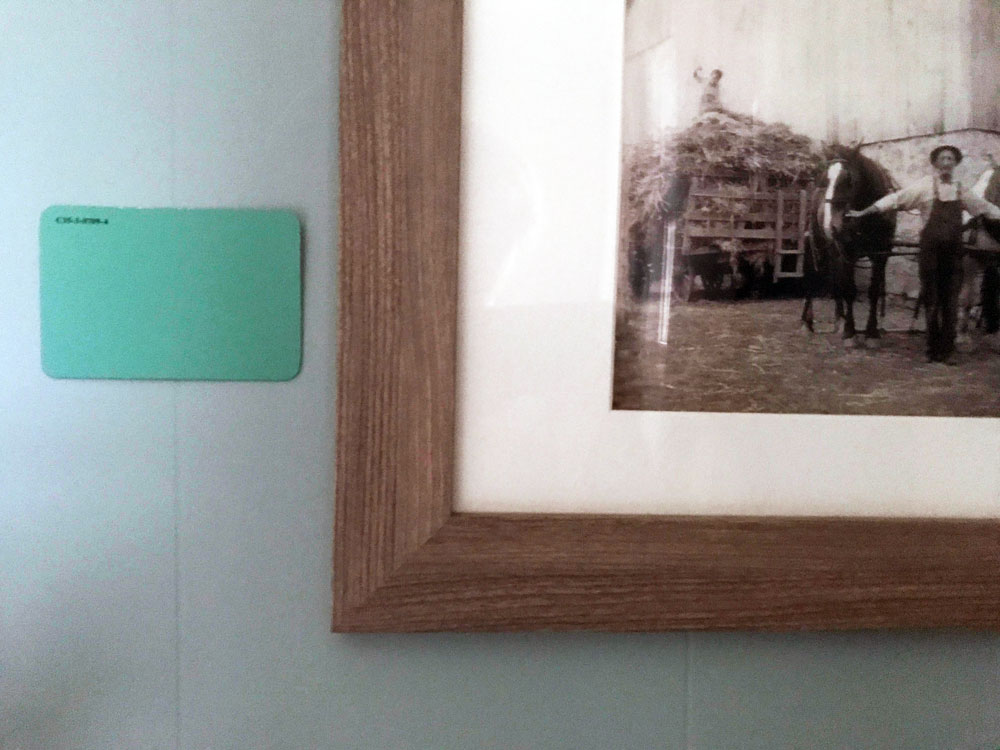
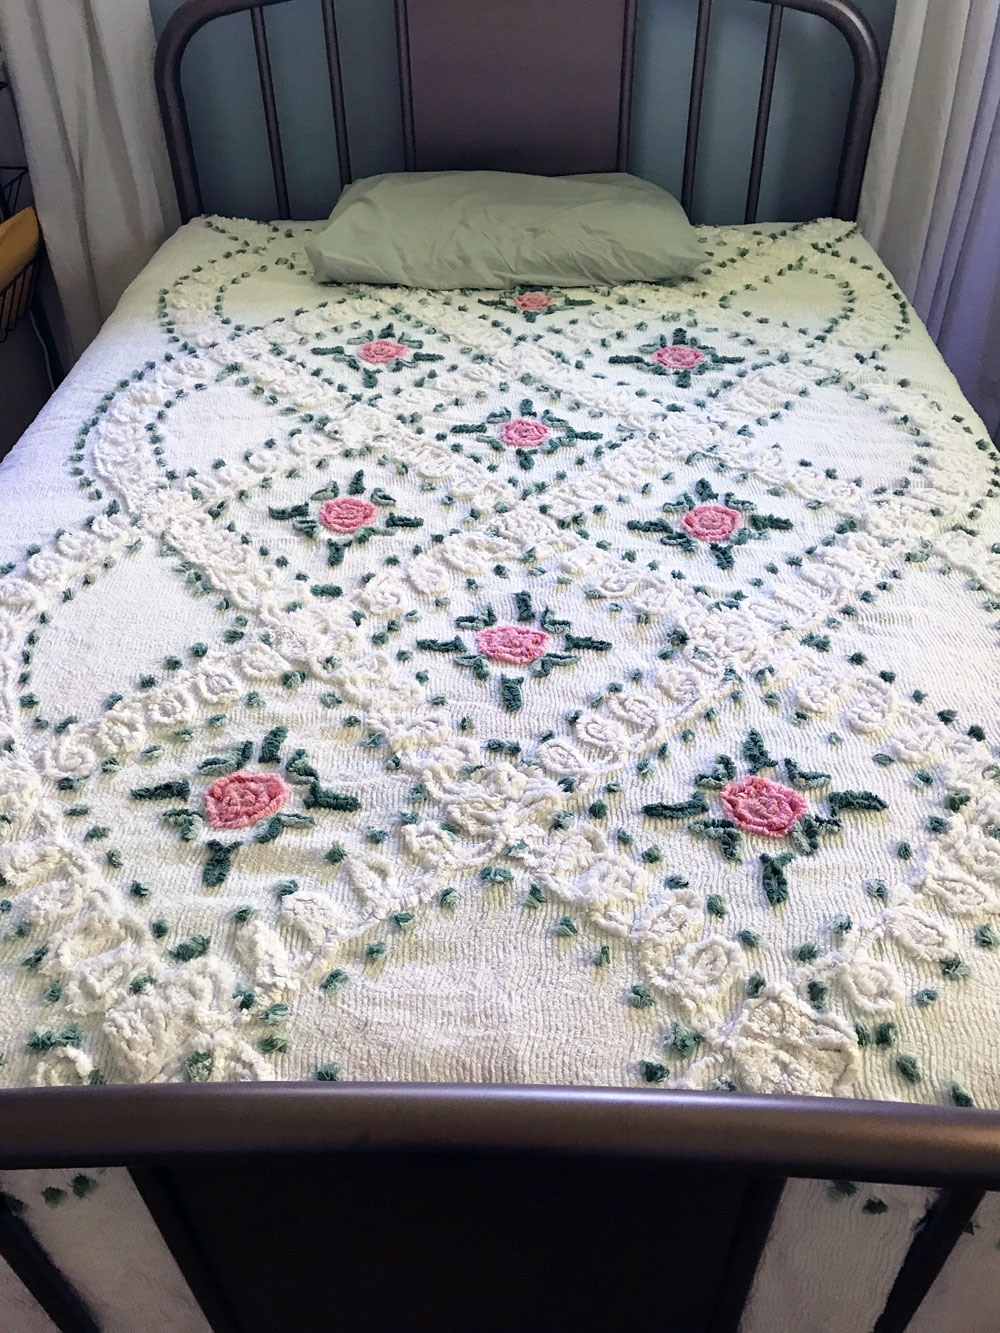
Ellie’s favourite colour at the start of the makeover was green, and she chose the paint chip she liked (Calmness C35-3-0709-4 by BeautiTone from Home Hardware). It’s much brighter than I would have chosen, but it ended up working perfectly with the vintage bedspread I wanted to use. Of course, by the time she moved in she informed me her favourite colour was no longer green. It was purple. But she’s tolerated the green.
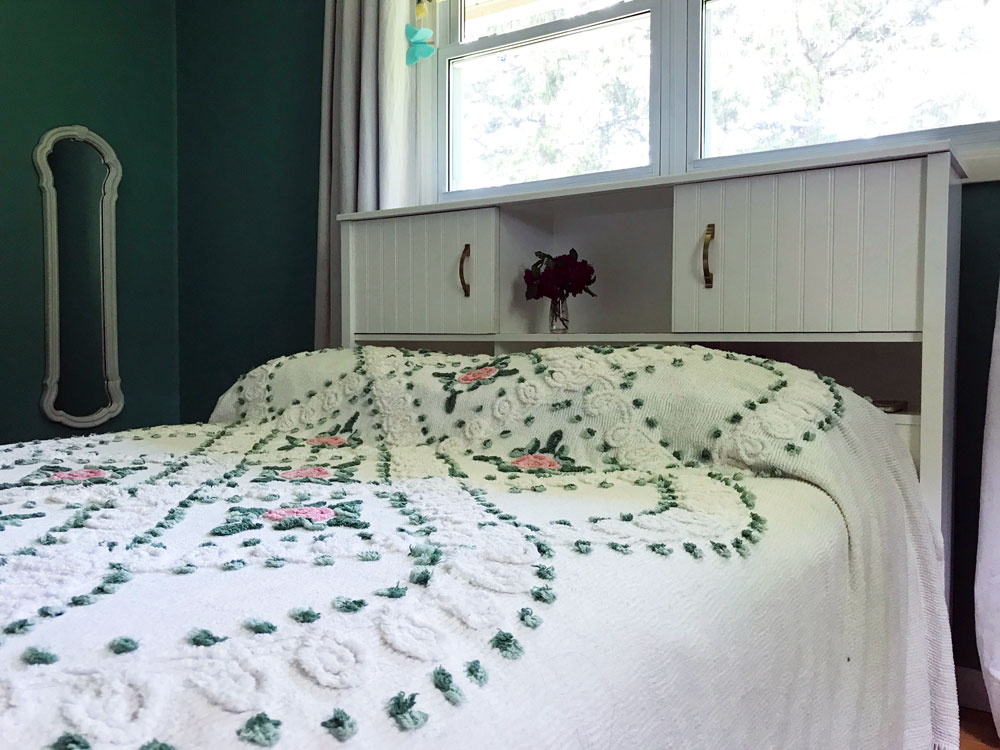
In Ellie’s old room, she had my childhood bed, which had cubbies with sliding panels in the headboard. She liked those secret hiding spots and requested the same style in her new bed. I had plans to build a headboard, but then I found a double size headboard with cubbies in a thrift store. I was amazed at my luck and that re-energized me to get moving on the makeover.
I added bead board to the headboard to match Ellie’s bookcase and then painted the whole thing white. I attached the headboard to an old metal bedframe that we had in the barn, and Ellie picked out some handles for the sliding panels. It all came together so well. The cubbies are full of “treasures.”
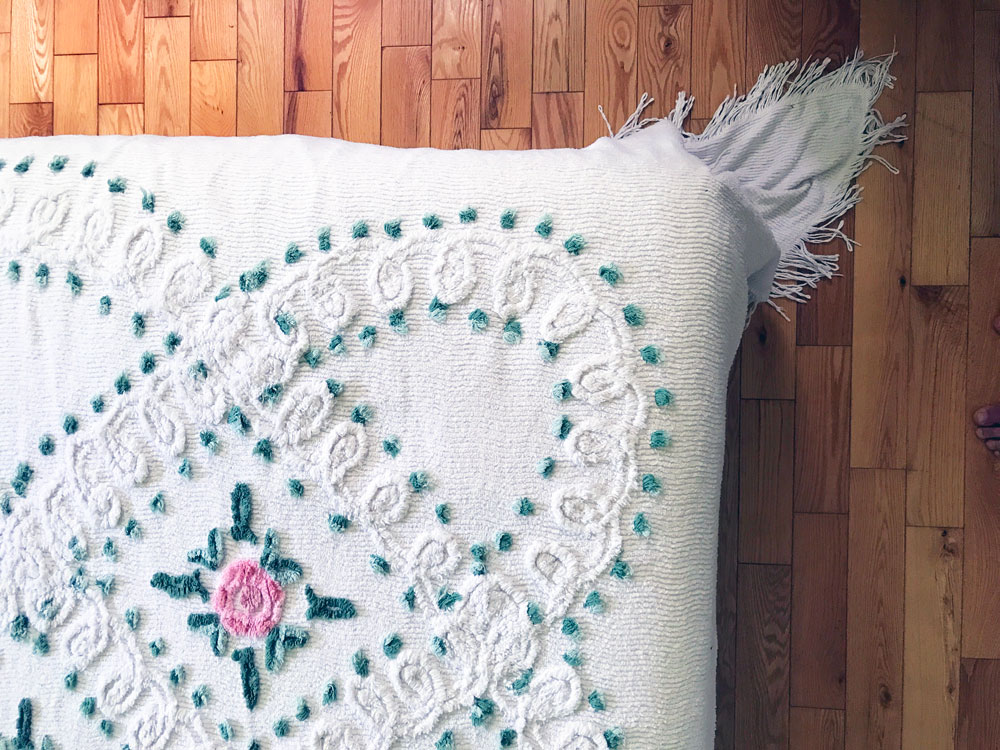
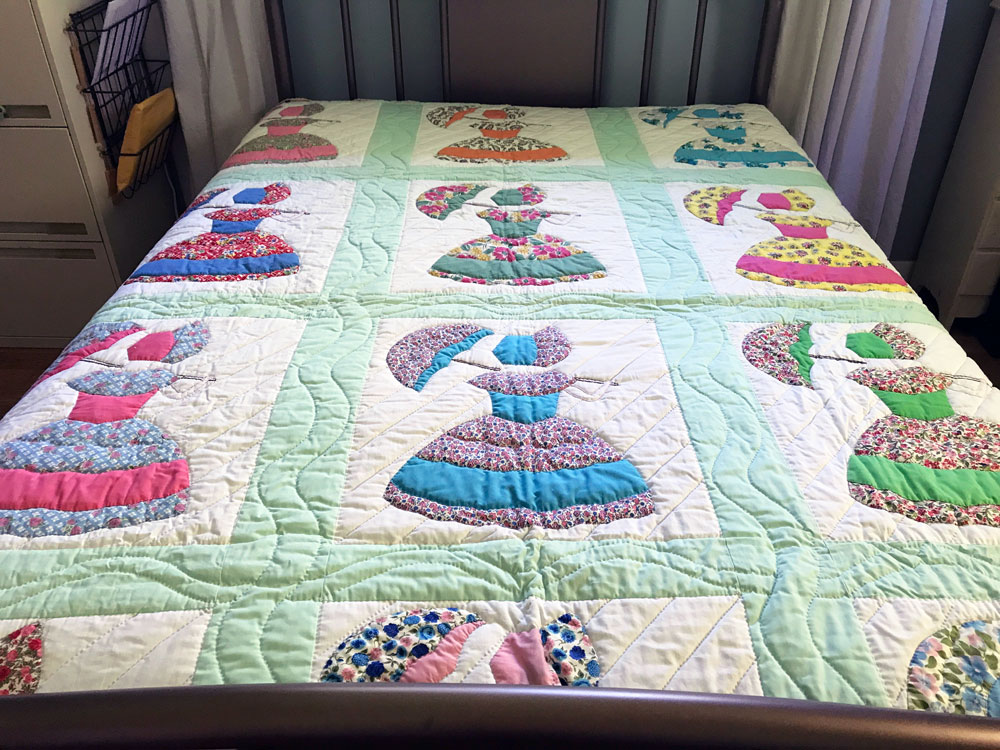
The bed is covered with a vintage chenille bedspread from my grandparent’s cottage. I love this bedspread so much. The colours are so vibrant and the contrast of the green and the pink is so pretty. Plus the fringe is super fun.
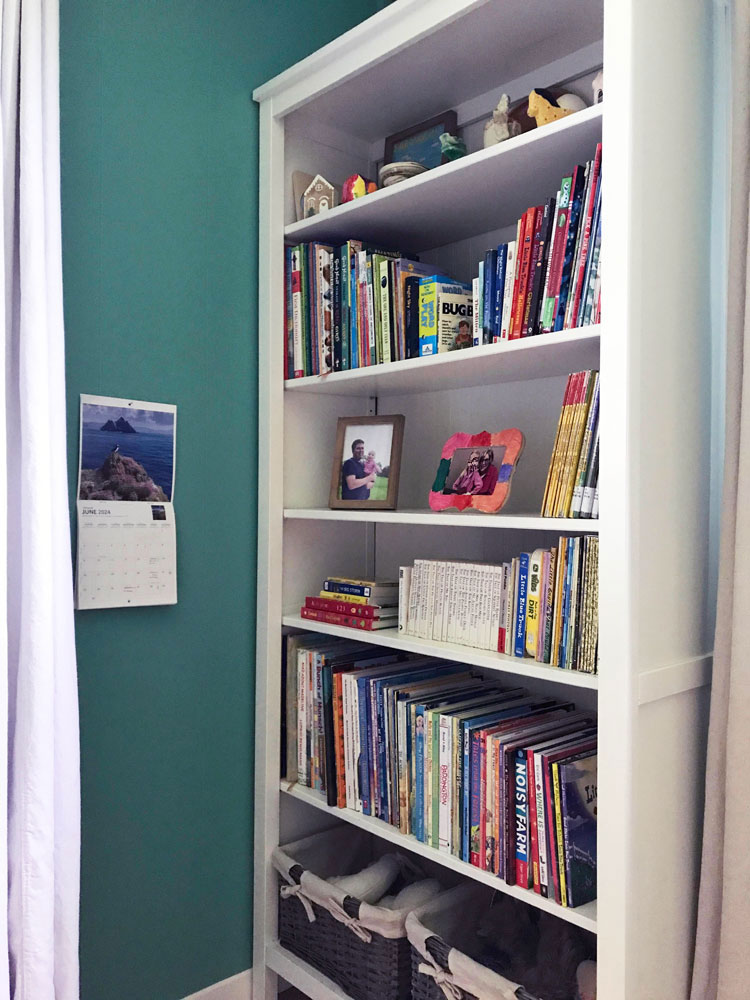
The bookcase and dresser moved from Ellie’s nursery and they work great here. The mirror I thrifted for this space when it was the guest room.
I also moved in her Ikea Strandmon wing chair. It is too large for the space and we don’t use it anymore for reading, but it’s been a comfort to Ellie to have the chair. As excited as she was for her new room, she was only up for so much change.
I kept the same dropcloth curtains that I sewed for this room back when it was the guest room, but I added blackout lining. Probably unnecessary since I also bought blackout blinds. We’ve never had to close the curtains. I like that they’re a neutral colour but not white. They add a little bit of contrast and also soften the bright green walls.
The bamboo valance is a technique I’ve used in all of our bedrooms so far. I even used the same blind, just chopping it up for each window. The delay in finishing Ellie’s room was that I didn’t have very much blind left. I had to reweave part of it to make sure it was long enough to cover the top of the window. This was a tedious job that took me awhile.
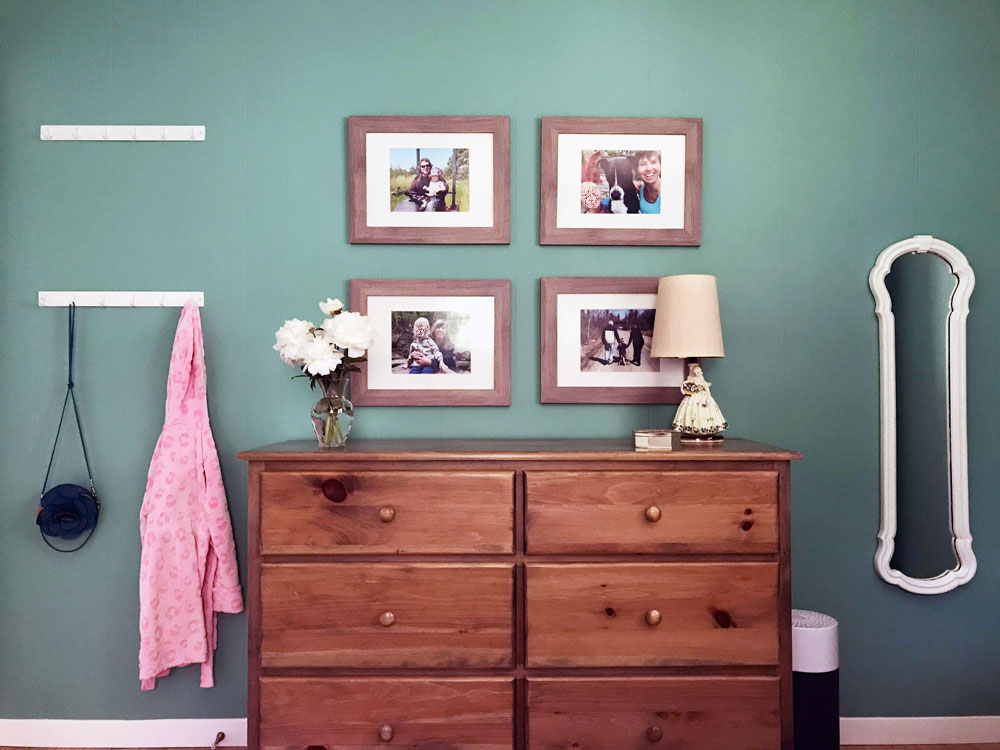
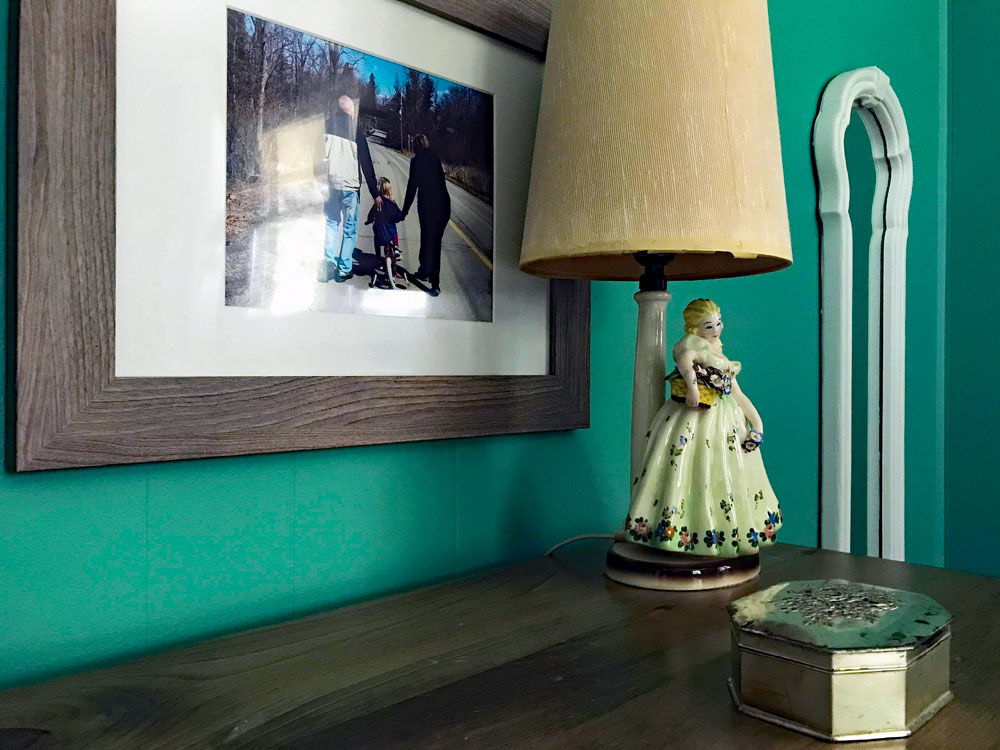
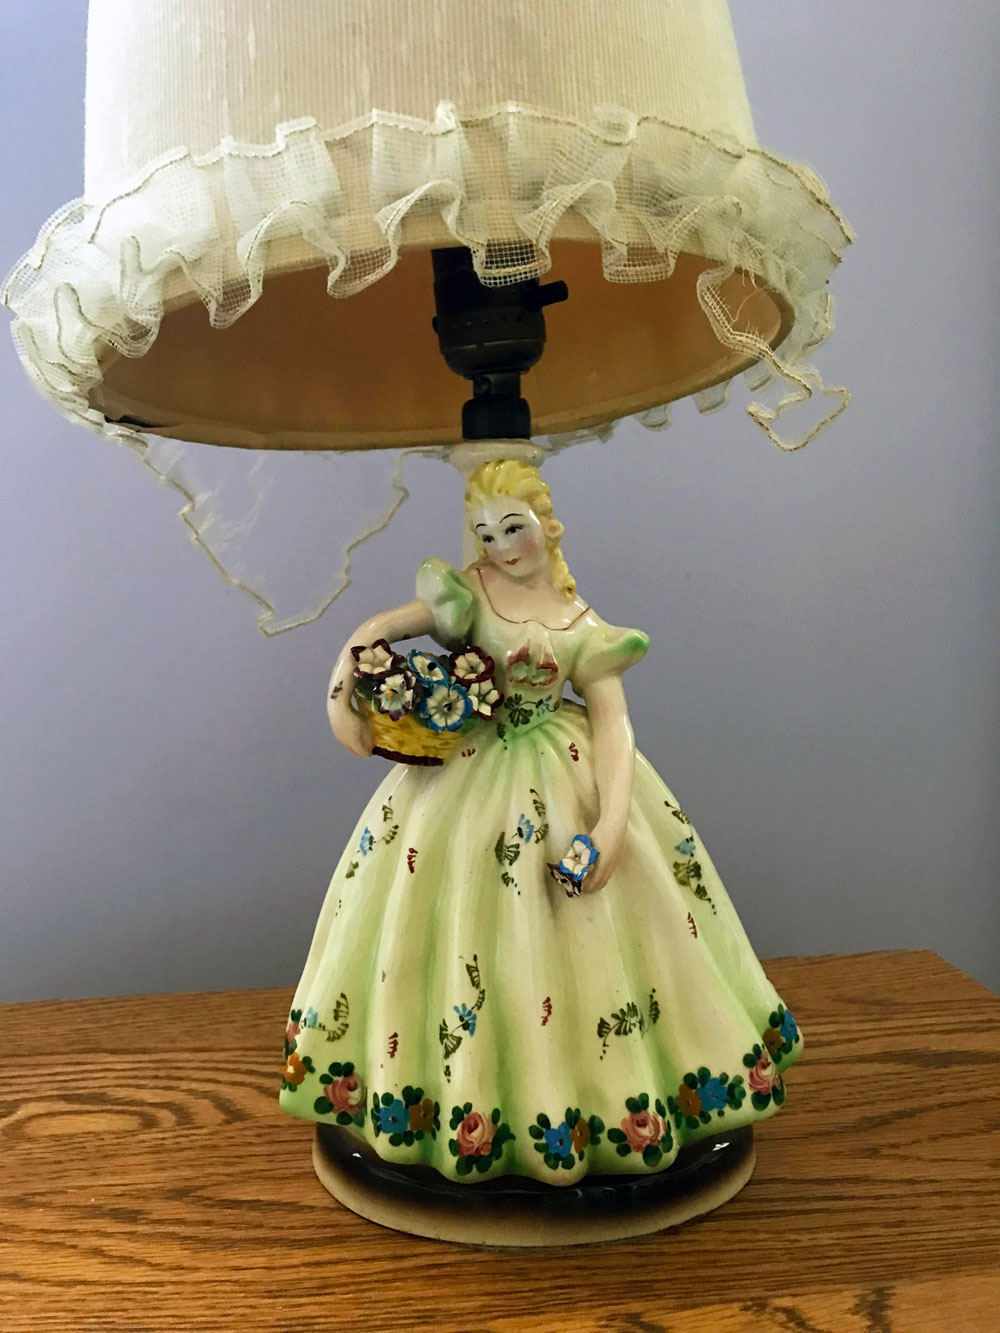
On top of Ellie’s dresser is a treasure that I’ve had in mind for her room always. My Mom’s flower girl lamp. My Mom’s grandparents had a furniture store, and she remembers going in when she was about Ellie’s age and being able to pick out whatever she wanted. She chose this lamp. The lamp was in my room for a little while when I was little. I love that it’s in Ellie’s room now.
Above the dresser are four photos of Ellie with Matt, me and her grandparents. I wanted her to see how much she is loved and have these important people present for her every day.
She’s added her calendar to the wall, coffee filter butterflies on the curtains, a sparkly glass ball in front of the window, suncatchers on the windows, lots of toys and treasures in the headboard cubbies and other places too.
It’s become a really fun, comfortable space that is unique to her.
I’d love to hear what your favourite detail is from the room. Do you have a favourite memory of your childhood bedroom?
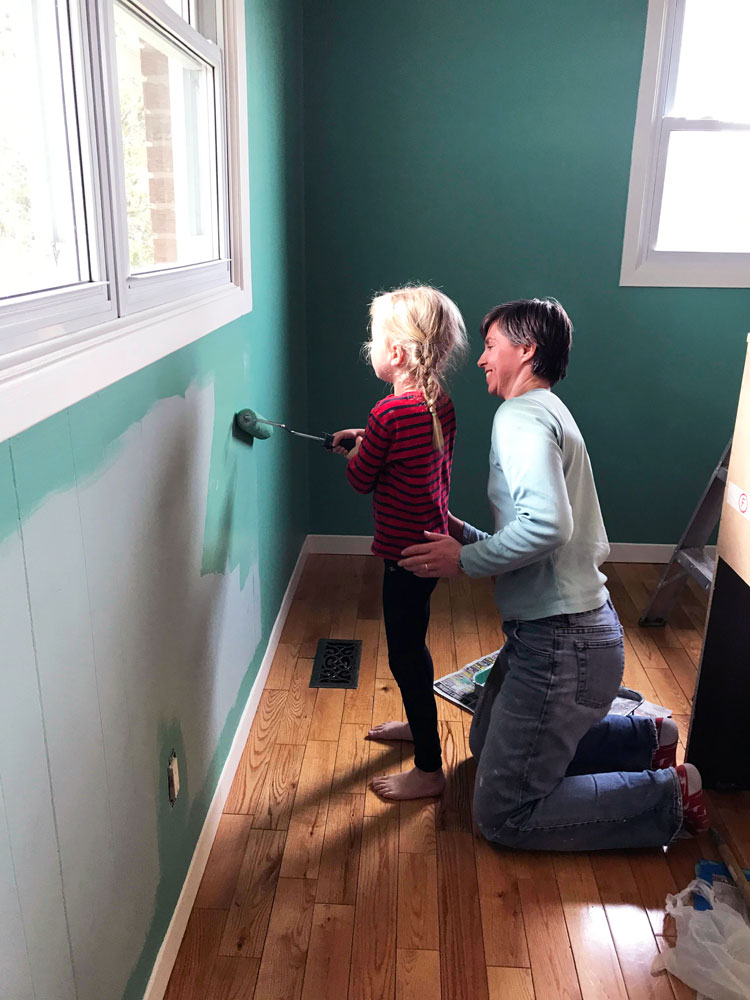
Welcome to week 2 of Ellie’s room makeover. Last week was paint week, and Ellie was involved in every part.
I see blogs occasionally talk about how to DIY with kids or the challenges of home reno with children. So I thought I’d join the conversation and share how Ellie (5 years old) and I painted her room together. Fittingly, I have 5 tips.
Start small
Painting a whole room should not be a child’s first project, in my opinion. Ellie’s first real build was just before she turned one when we put together her play table and chairs. Simple tools. Quick project. Since then, she’s been part of all different kinds of DIY (and she no longer tries to eat the tools).
For painting (beyond her craft paints and paper), she’s practiced on a bird feeder and shelves. We’ve built up her knowledge and comfort level over the years, so that she is interested in and capable of being involved in painting a whole room.
When it came to painting that room, we broke it up into smaller tasks. The first day, we worked for about an hour doing the edging. The second day, I finished the edging and started the rolling while she was at school, but left a section for her to roll. The third day, I did the second coat solo.
Step by step
There are multiple steps to painting a room, and Ellie was part of all of them. This is a good way to get your child involved and excited (and have them participate without actually painting, if you prefer).
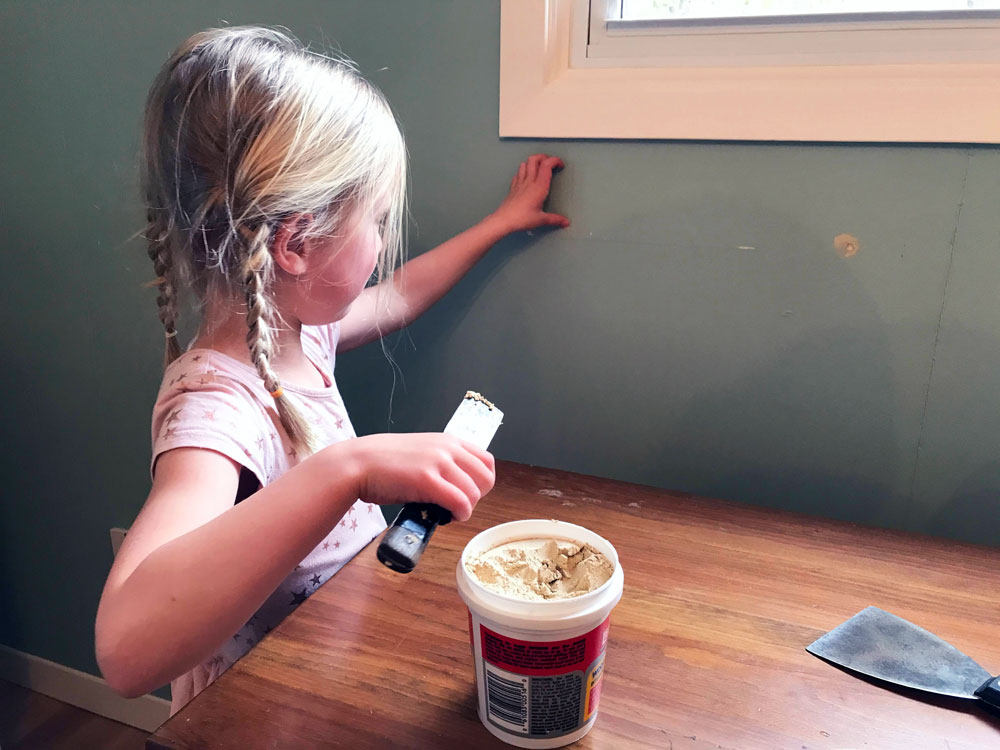
Planning what colour to paint. Going to look at paint chips. Buying the paint (we got to watch the colours being added to the can and then the can being mixed in the shaker). Clearing the room. Patching any holes in the walls (spying holes is a good task for a child). Sanding and priming the patches.
For the actual painting, there is both the cutting in and the rolling. Cutting is great for children as it’s done with a brush. Just make sure to pick a spot where precision isn’t required (more on this below). Rolling is a bit more challenging. Ellie tried the roller all by herself, but decided she preferred when we held the roller together, so we did.
Gear up
As with any DIY project, the right equipment is key to success.
Ellie prides herself on having “work clothes”–pants and a shirt that got paint on them when she was working on an earlier project. Having clothes that you don’t mind getting dirty is one less thing to worry about.
Choose a small paint brush and pour some paint into a smaller cup. These will be easier for your child to handle and minimize the mess.
Tape off trim or anything that you don’t want painted, lay out newspaper or dropcloths to protect the floor, and have some rags handy. (The dog and his bed are optional, though not in our house.)
Talk it through
Painting is like any other skill. You have to teach your child how to do it. Take a bit of time at the start to demonstrate the proper technique. Be detailed: how deep to dip the brush in the paint, how to wipe it off on the rim, how wide to make their strokes.
I had instructed Ellie to paint as wide as her hand. That was not a concrete measurement for her, and I noticed her edges were growing wider and wider. I ended up swiping a line on the wall with my brush so that she knew how wide to go.
Pick your spot
Ellie is careful and responsible. But she’s also 5, and this was her first time painting a room. I didn’t expect her technique to be perfect, so I thought about where she could do the least damage. We started with edging around the outlets. They’re low to the floor so they’re easy to reach. They’re small, so she can finish one off quickly and feel a sense of accomplishment. If she gets any paint on them, I can easily scrape it off once it’s dry. For the most part, they’ll be behind furniture so an imperfect finish won’t be an issue. I also assigned her each of the corners, starting behind the door.
Ellie strayed from her assigned spots once and started working her way across the wall. I explained that we were rolling that section and didn’t want to see brushstrokes there. She understood and went back to her corner.
No matter how careful you are, how well you prepare, or how skilled your child is, it’s also absolutely fine to smooth out your child’s brushstrokes while the paint is still wet. Touch-ups are also fine. We had a few spots on the trim that needed to be covered, which was no big deal.
The result of our teamwork is a fully painted room, and a great feeling of pride for us both. I love seeing her grow and learn. I know that I’m teaching her so many valuable lessons. Ellie, who was once reluctant about moving rooms, is now excited. Everyone who visited us this weekend for Easter got a tour of her new room.
Ellie has been around DIY her whole life. She’s comfortable around tools and knows how to be safe. She knows projects take time and she has to be patient. DIYing together is not always perfect. I’m not always as productive as I want to be. But I know the skills she is learning are important. And the experiences of doing these projects together is priceless.
Up next, window week. Blinds and curtains here I come.
Do you DIY with kids? What are your tips for helping kids learn to be handy? Any painting disasters or triumphs to share?
The last project on my Home Goals 2023 list (and the only indoor project) is going to be our first project of the year. Ellie’s new room.
If you’ve been following along, you know I’ve been trying to convince Ellie to move into the guest room for a while. The room is bigger, so she can have a double bed instead of a single. Her current room is closer to the centre of the house, a good location to become a playroom (and remove some of the toys from the living room). Most importantly, sleeping next to each other–with an open door between us–is not restful.
In December, we were struck down by a bad cold, and I moved into the guest room so that my coughing fits wouldn’t disturb her. Even with being sick, we both slept so, so well. I think that showed Ellie that the guest room was maybe okay, and she became a little more open to the idea of moving.
There’s still some resistance and sensitivity. Our girl is not thrilled with change. But talking about her new room and how we can design it like she wants is helping… a bit.
My initial plans (reuse the bed, paint the walls a muted green, make it soft and girly and floral) are shifting a bit based on her vision. But I’ve decided to let her make the choices. It’s her room, and I want her to be happy with it.
Right now, her favourite colour is teal, so that’s where I’m starting. We went to the store and looked at paint chips last week. With no hesitation, she immediately picked the colour she wanted (Calmness C35-3-0709-4 by BeautiTone from Home Hardware). It’s not as bright as I expected, and actually isn’t too different from what’s on the walls already. I’ll still be bringing in lots of neutrals to balance everything out.
I’m planning to reuse the dropcloth curtains that are currently in the guest room. Their warm colour will soften the bright walls better than white, I think. Hopefully I have enough bamboo shade left to make my standard layered window treatment. I need to buy blackout blinds to go underneath, and I may also add a blackout lining to the curtains (we like to sleep in the dark).
White will play a part with a new headboard. I had planned to reuse the metal bedframe that is in the guest room. But our girl likes how her current bed has a shelf (or as she calls it a nightstand). She stashes her water bottle and various other treasures. So I’m going to build a simple headboard with a shelf and paint it white. We have an extra metal bed base in the driveshed, so I will attach the headboard to that.
Her bookshelf (also white) and dresser (grey-ish wood tone) will move with her to the new room.
The tractor and likely the Strandmon wing chair will not. In my new quest to be thoughtful about how we use our house (like, do we really need a guest room?), the chair doesn’t make sense for her room. The chair was helpful when she was really little (especially for nursing), but now we read stories sitting on her bed. I’m trying to minimize clutter, and a big chair that we never sit in seems like clutter. The tractor can move out to the garage. Thanks to her new headboard, she won’t need nightstands.
Accessories and finishing are a bit undetermined right now. I really wanted to use the flowered chenille bedspread that I shared previously, and it looks like it is a nice match with the paint chip. My Mom’s flower girl lamp will hopefully find a home (and a new shade) as well.
For art, I’m wondering about a big gallery wall of black and white family photos. But I’m not sure black and white are what Ellie has in mind. There’s a cute curvy mirror (with a white frame) in the guest room already, but it’s a bit small to get a good look at your outfit. Maybe the light fixture should be more sparkly. Or I could paint the ceiling a really light pink.
I’m all over the place. Usually I’m pretty good at picturing spaces and have a vision in mind. Designing for someone else is a challenge.
Work on the room is kind of underway. The first step is clearing it out. As the guest room has been a catch-all space for years, this is a bit of an undertaking. We’re slowly going through things and have sold, donated and thrown out a lot with more to come.
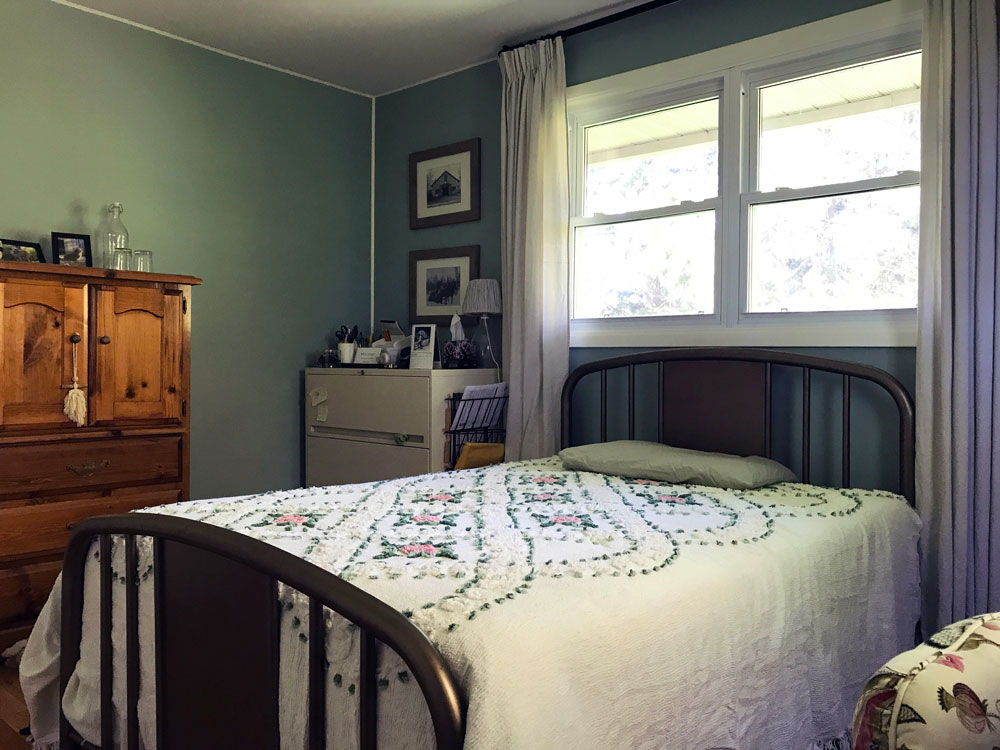
Some major progress was getting rid of Matt’s and my bed last week. I don’t love sleeping in a king size bed and it was too large for our room. So in the spirit of making our house work for us, I posted it on kijiji and it went to a new home. The guest room bed is now my bed–once again. It was in my cottage bedroom as a child and was Matt’s and my bed at our first house and when we first moved to the farm. I’m glad that it continues to have a place in our lives.
Now I have more space to work on Ellie’s new room and make it what she wants it to be.
Is anyone else having realizations about what works and doesn’t in your house? What would you mix with teal to make beautiful room for a happy, sensitive, energetic young girl?
I’ve been trying to convince Ellie to move into the guest room for awhile. Our rooms join with a pocket door, which we leave open. I think we’d both sleep better if we weren’t quite so close. (I could do without a little voice calling, “Stop snoring, Mama!”)
Also the guest room is larger with a double bed.
Aaaand… her current room would make a great playroom, which would mean the living room no longer has to be overrun with toys.
(Am I selling you on this idea?)
Ellie is change averse, so she has not been a fan of my plan. But she is a big fan of green. So when I mentioned we could paint the guest room green, she was a little more enthused about the idea of relocating.
But don’t tell Ellie the guest room is already green(ish).
My inspiration is slightly softer. In fact, I’ve been planning a green room for a hypothetical little girl long before I ever decided to have a baby, all due to a special gift from my grandma.
My grandmother made all of the girl grandchildren quilts for their weddings (she knit afghans for the boys). The one she gave me is girls with umbrellas–with a green backing.
I thought it would be perfect for Ellie. Though when we unfolded it the other day, her first words were, “That’s not my green.” I also realized that it’s sized for a single bed, not a double. So the quilt will not be the inspiration for Ellie’s new room, though I do hope to use it somewhere.
But, I have another option. An old chenille bedspread from my grandparents’ cottage was folded alongside the quilt. It’s the perfect size for a double bed and it includes a nice dark and saturated yet soft green. Plus Ellie’s first words on seeing it were, “It’s so flowery!”
My Mom has this lamp, which she had in her childhood room, and I think the two would work really well together. (She needs a new shade and some new wiring.)
So now to find a green that is sufficiently saturated for our girl, but sufficiently mellow for Mom.
House & Home tells me that juniper green a “softer, more saturated green” is trending. They cite Webster Green from Benjamin Moore as an example. I think this green would look great (and sufficiently farmy) on our (fake) paneled walls. As long as it’s green enough for Ellie.
The brass-ish bed would contrast with the green, so we could keep that. We’d also keep the dresser that Matt’s parents bought for her nursery. Then it’s what else do we need? Nightstands? A desk? Bookshelf? Some fun, colourful, flowered curtains?
The move is likely a ways off. Moving one room has a domino effect with the rest of the house, as I would need to relocate everything that’s currently in the guest room. Plus then there’s redecorating, and it might take some time to negotiate the final design with my partner/client.
For now, I’m having fun thinking about it. And it was really special to pull out the quilt and the bedspread and share them with our girl.
Are there any other green fans out there? What’s your favourite shade? What’s your must-have for a kid’s room? Do you have any special gifts from your grandparents?
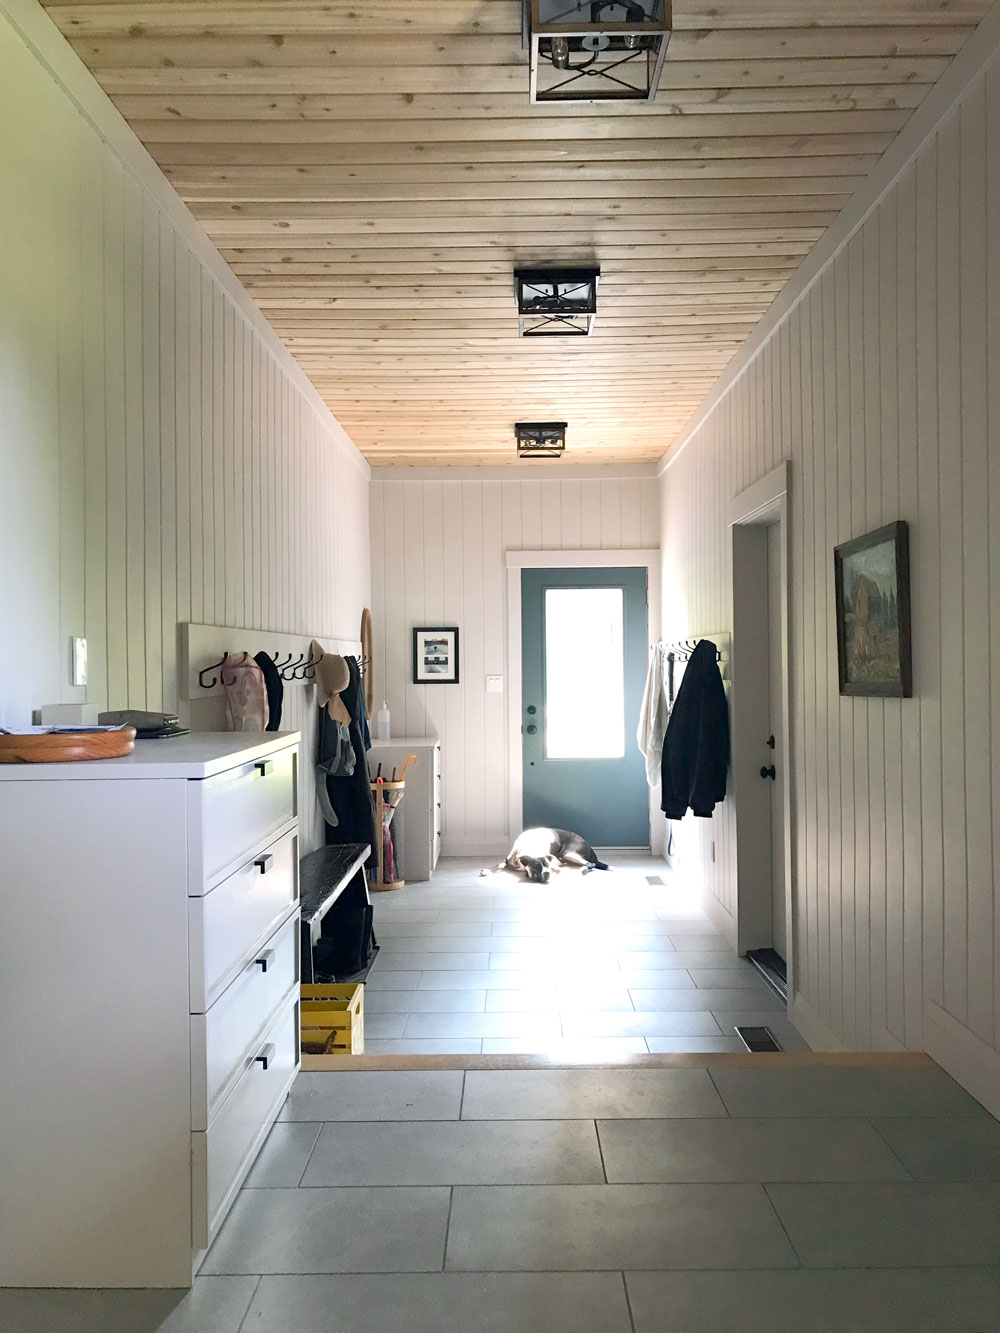
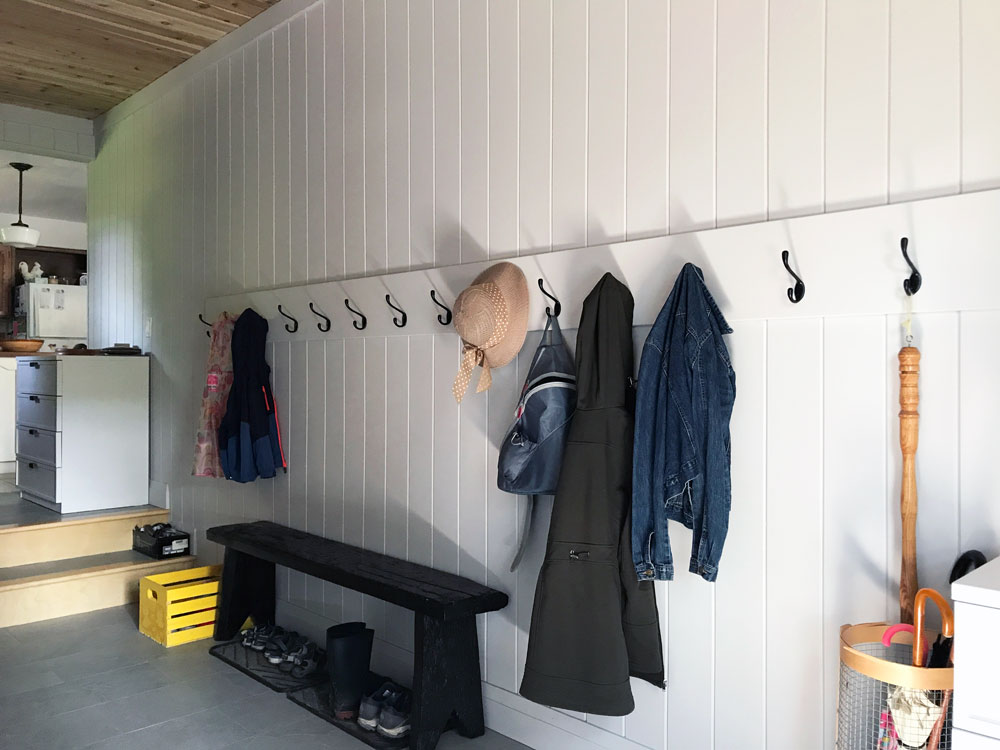
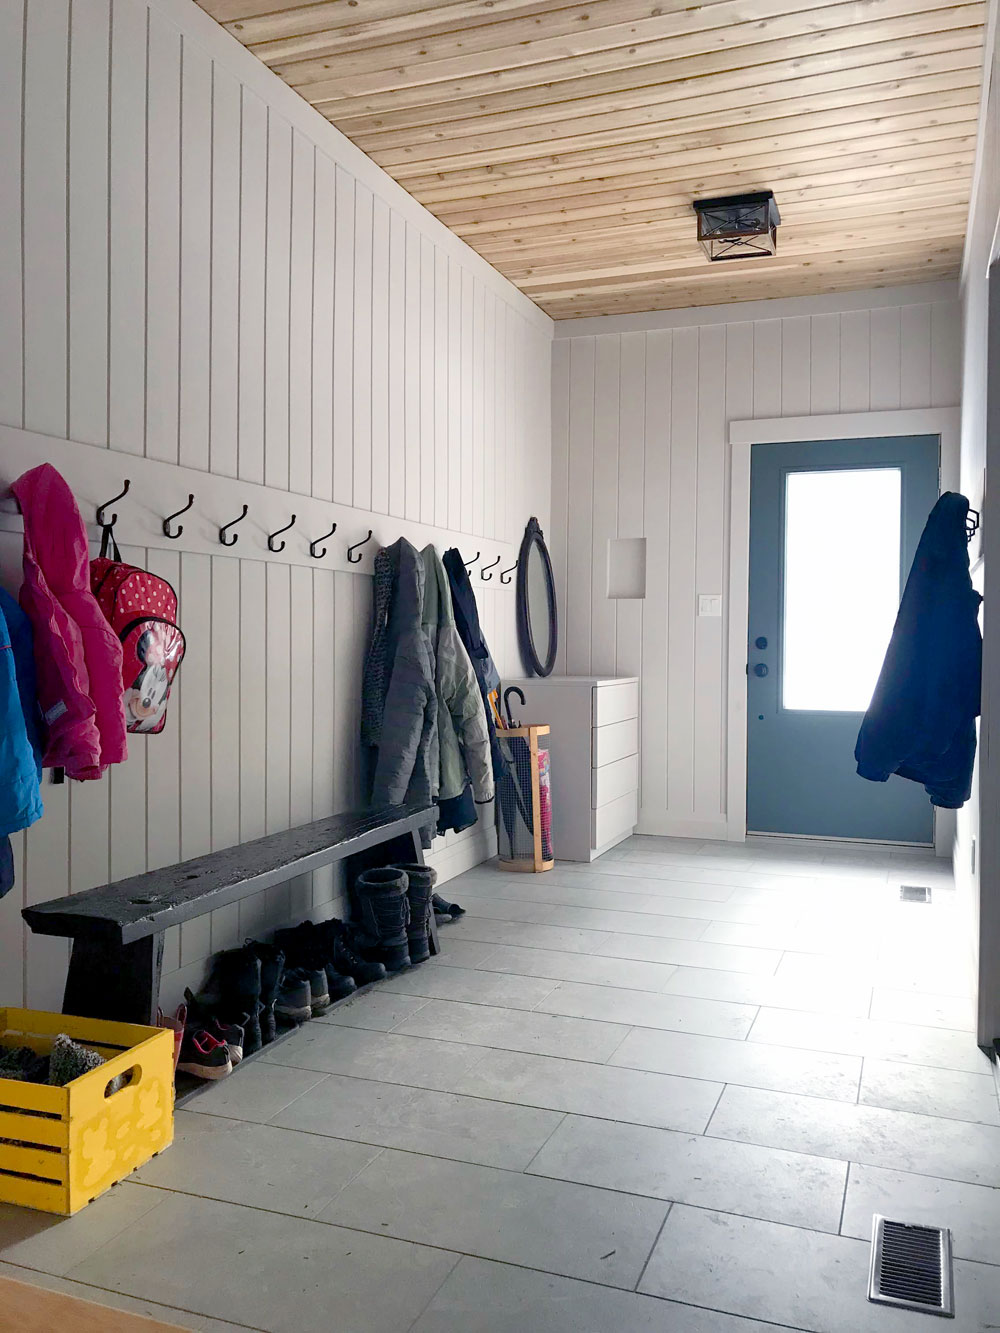
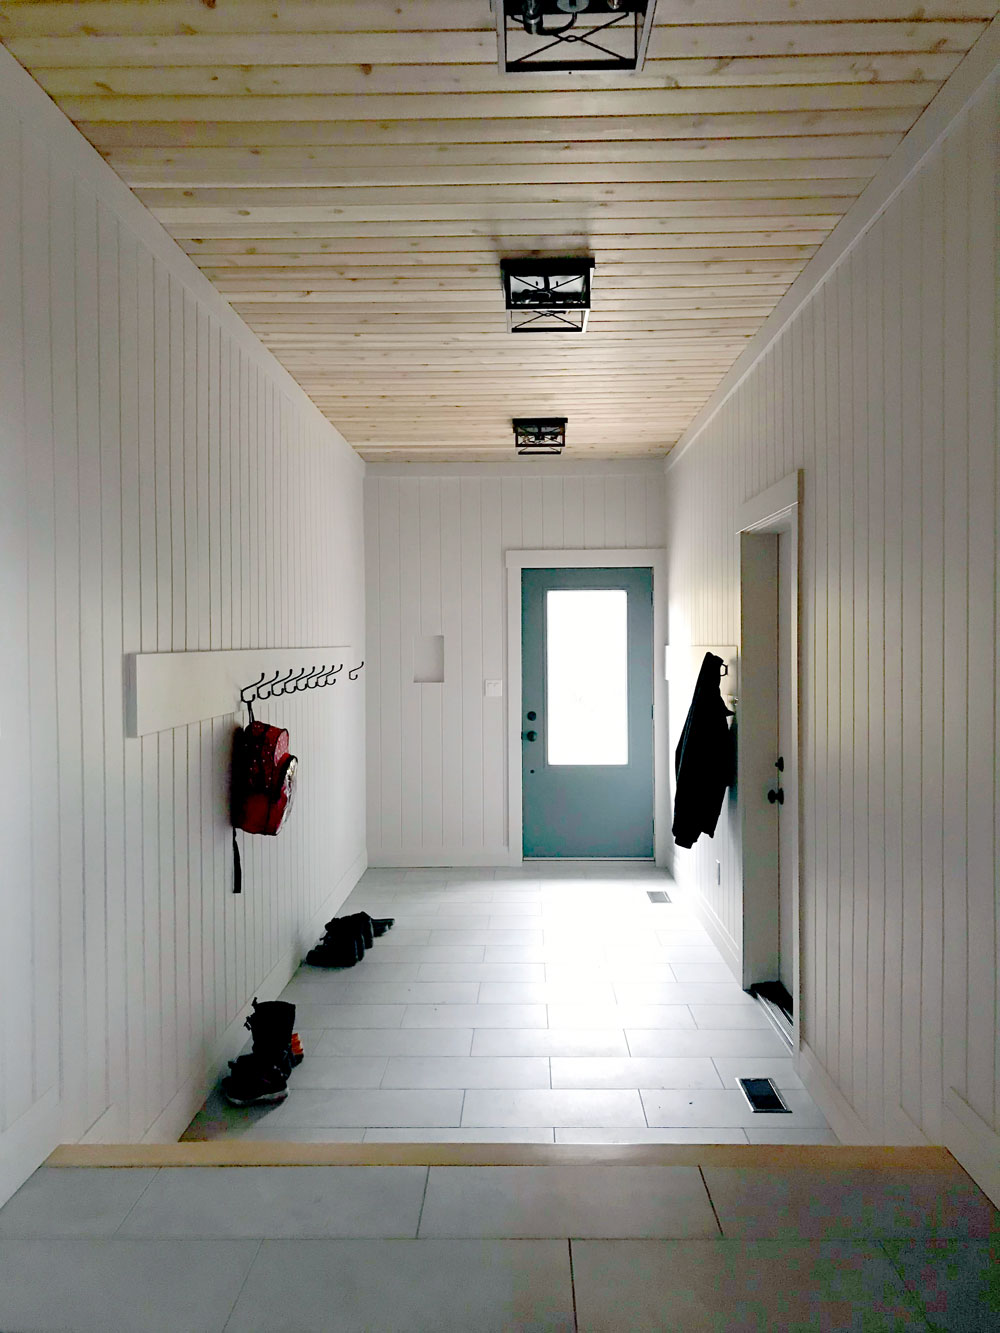
Our mudroom is done–for now. This room was the first on my home goals list for this year. I had just five small tasks to do, and they are finally finished.
Today, I’m giving a tour of the space and highlighting some of my favourite features.
The secret behind the picture
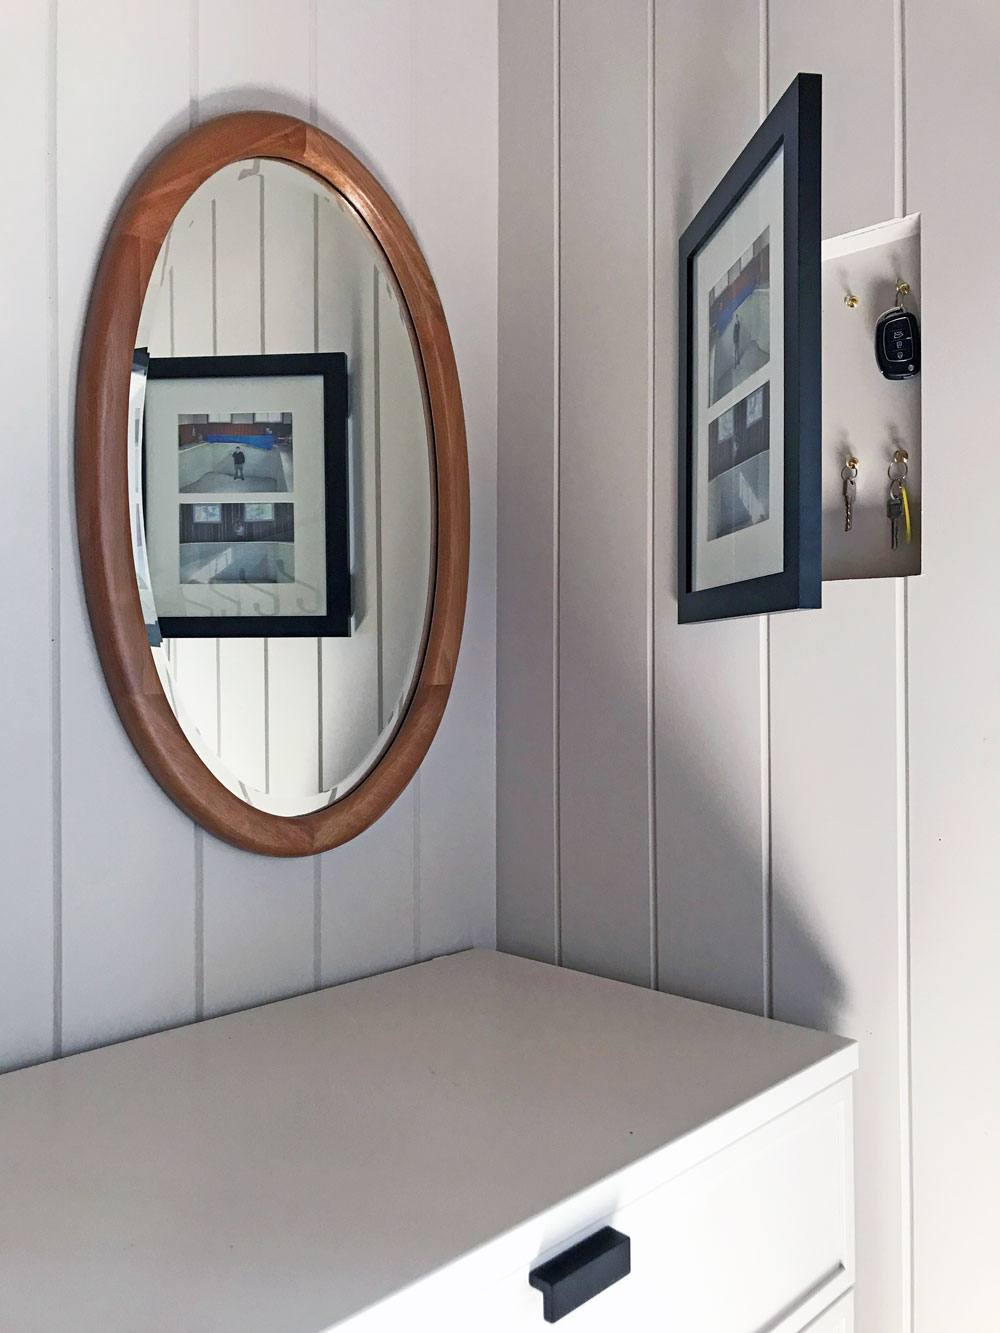
Let’s start with the hidden (literally) gem. I’m particularly proud of how this secret cupboard turned out.
One weekend, I built a little box. When our contractors arrived, I asked one of them to install it in the wall next to the door. Then I attached hinges to a picture frame and installed it over the box. Inside the box, I screwed two rows of little cup hooks. Voila, hidden key cupboard.
I like having our keys hung up, rather than jumbled together in a basket in the drawer. Originally I’d planned to find a farmy painting for the door. But when I couldn’t find the right size, I decided to go with photos. I chose a picture of Matt in the pool during our home inspection, and then I selected another photo of Ellie and me in the pool during demolition. A literal snapshot of the history of the mudroom, and our little family together in this space we dreamed about.
Figure it out furniture
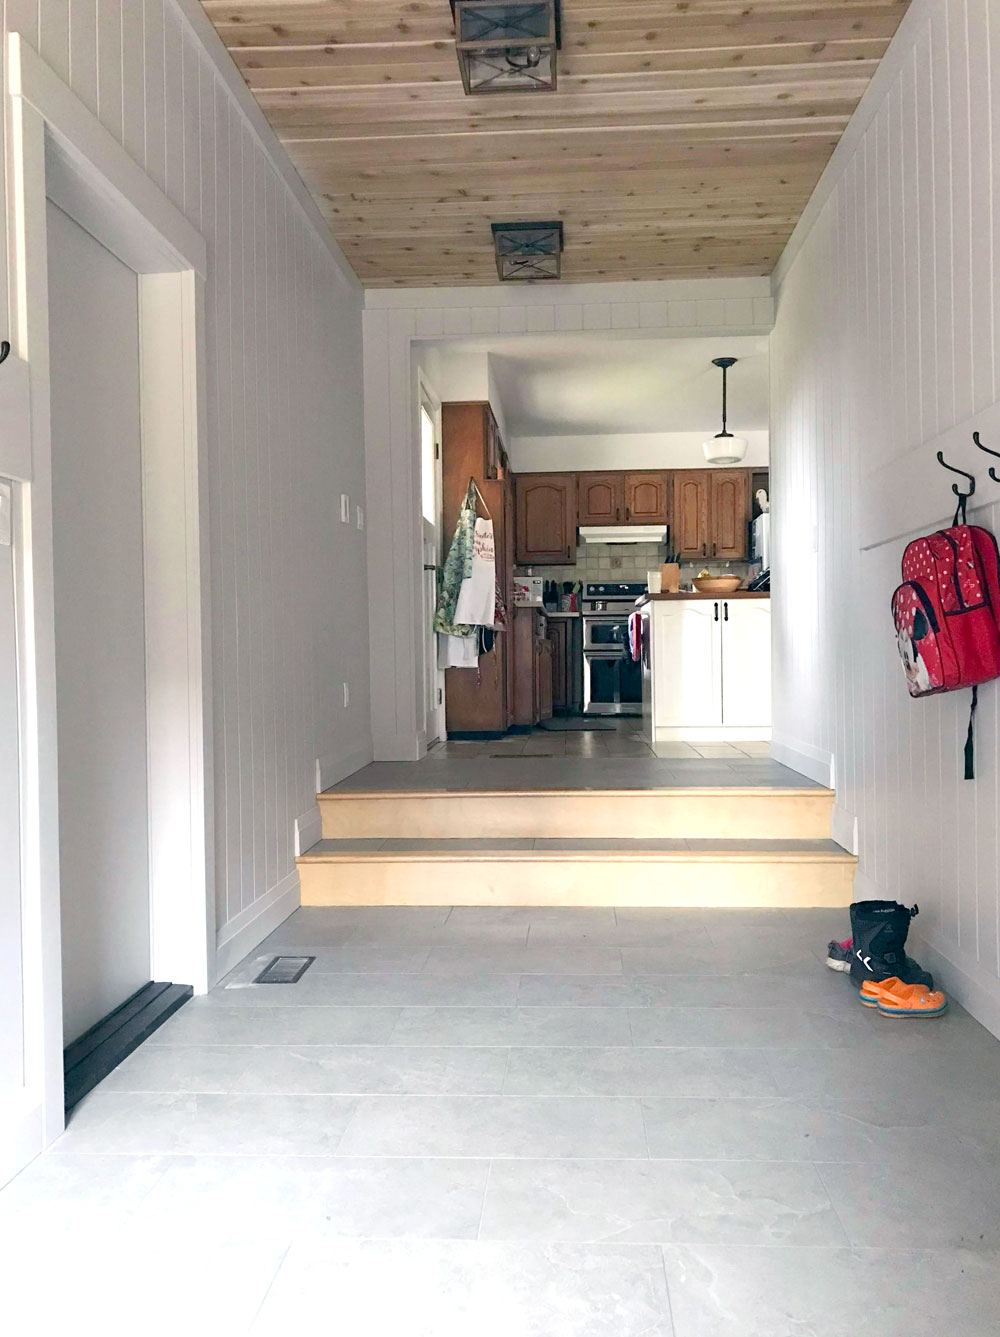
Someday the mudroom may have beautiful built-ins. But for now, we’re making it work with free hand-me-down dressers, our homemade bench and other DIYs. And honestly, they’re working great.
The dressers look fresh after a coat of paint to match the walls. Spraying the hardware to match the black hooks that we used in the room was the finishing touch. The dressers are likely not going to be here forever (the one on the landing is too small and the one by the door is too big), but they’re doing everything we need.
The upper one holds puzzles, colouring books and games for Ellie. Plus cards, flyers, coupons. It’s also our mail drop, wallet and phone charging station. The lower one holds sunglasses, sunscreen, bug spray, masks and some outdoor toys and tools. In the winter it stashes hats, mitts and scarves. Both dressers have empty drawers, so we have more than enough storage for now.
Matt’s nephew and I made the bench almost nine years ago. I’ve been surprised by how much I like having the free-standing shorter bench. It gives space for my longer coats to hang freely, instead of puddling on the seat. Ellie is still a bit short to reach too high, so having her hats or other gear in a dresser drawer or a bin on the floor works best for her, rather than putting them on a too high shelf.
Living with the space as it is now gives me an idea of what we need and what works best.
A little bit country
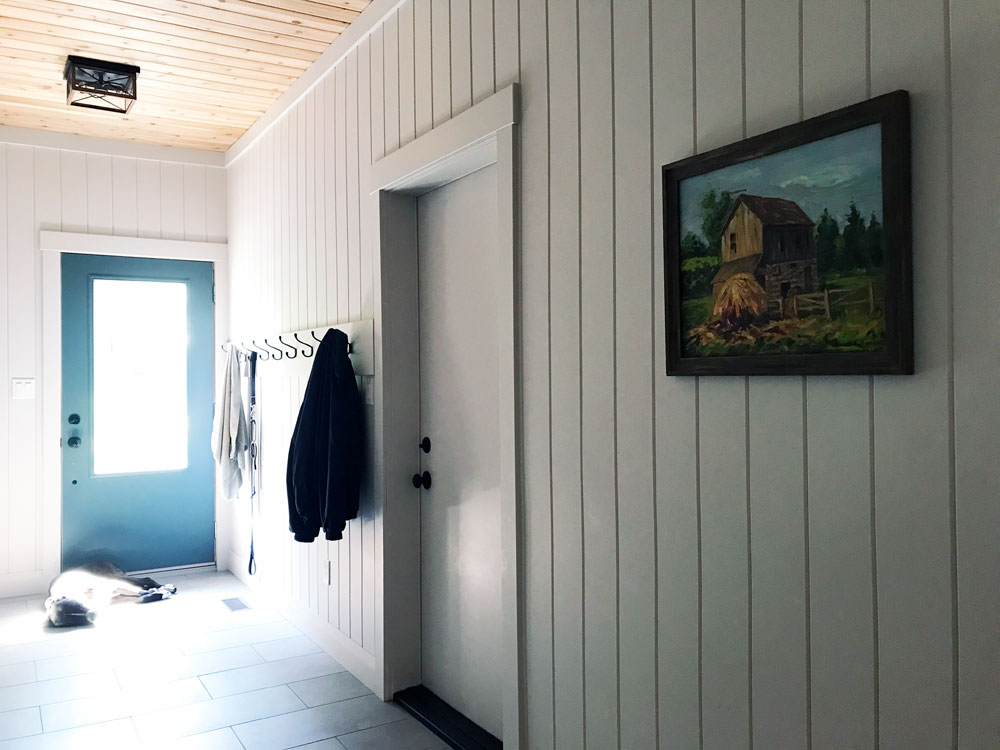
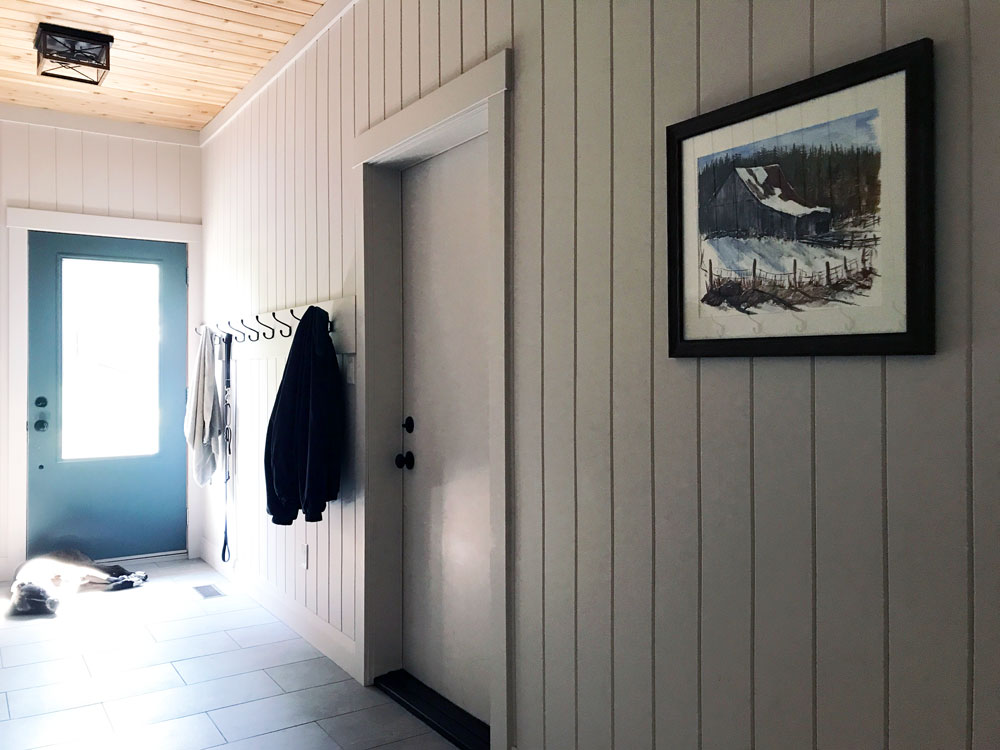
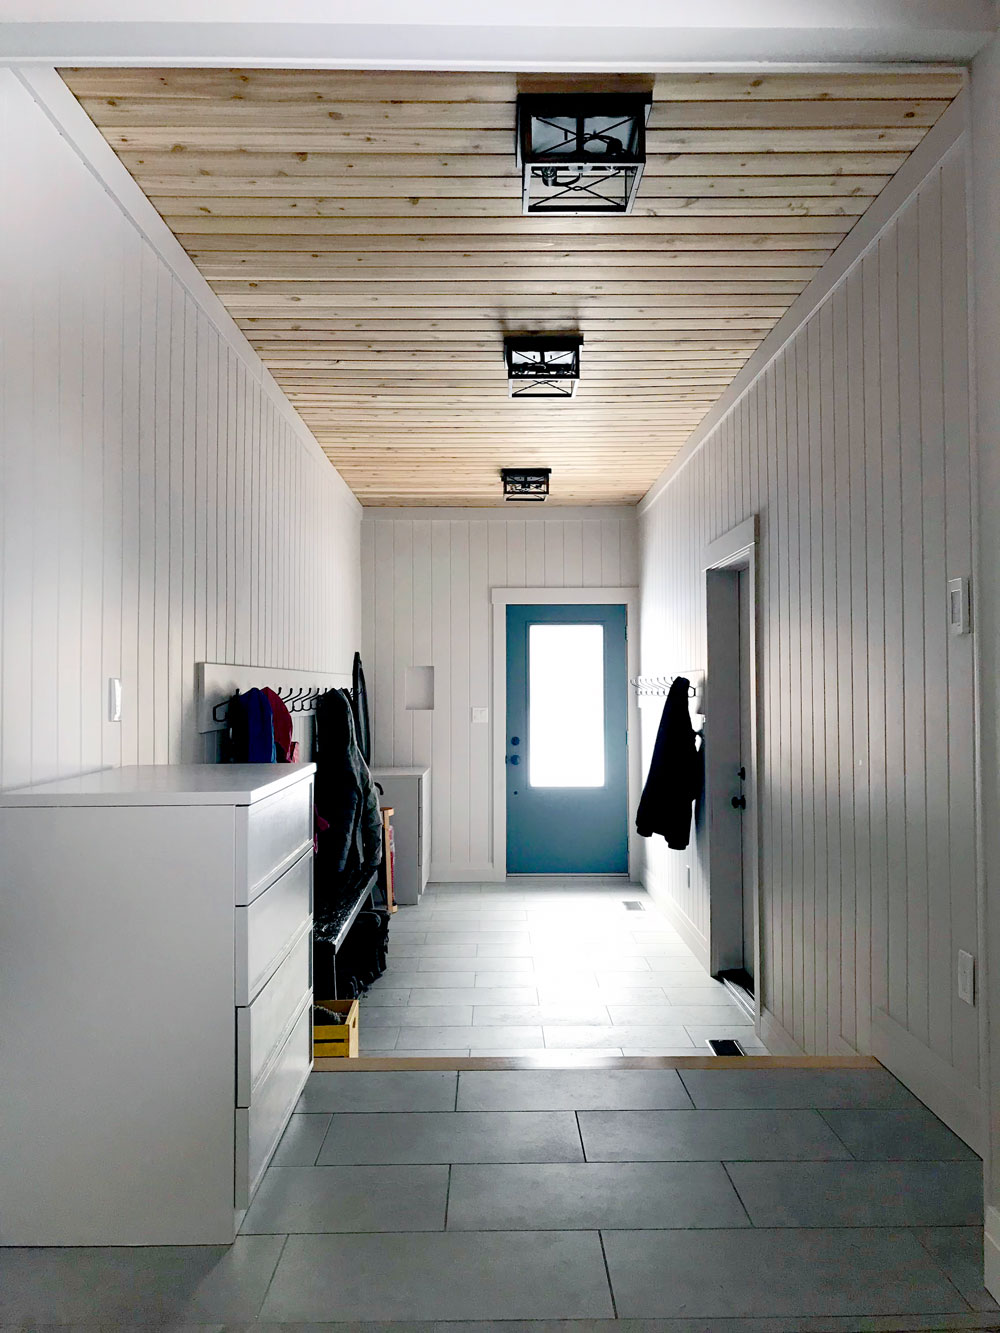
We live on a farm, but we don’t have a farmhouse. With every tweak we make, I try to inject more country character. The V-groove paneling on the walls, cedar on the ceiling and simple black hooks are all examples of that.
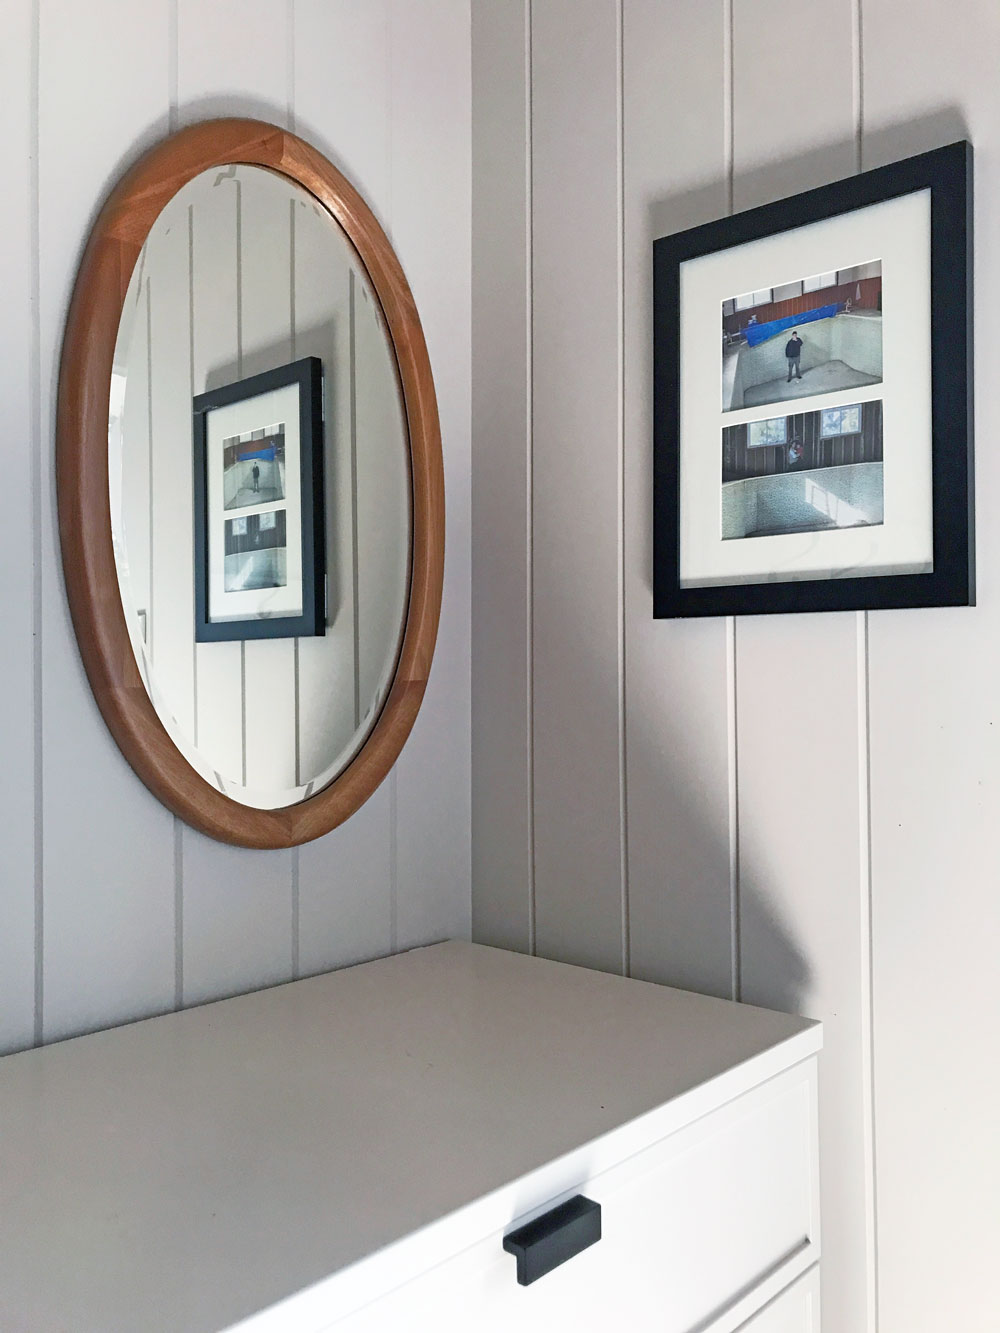
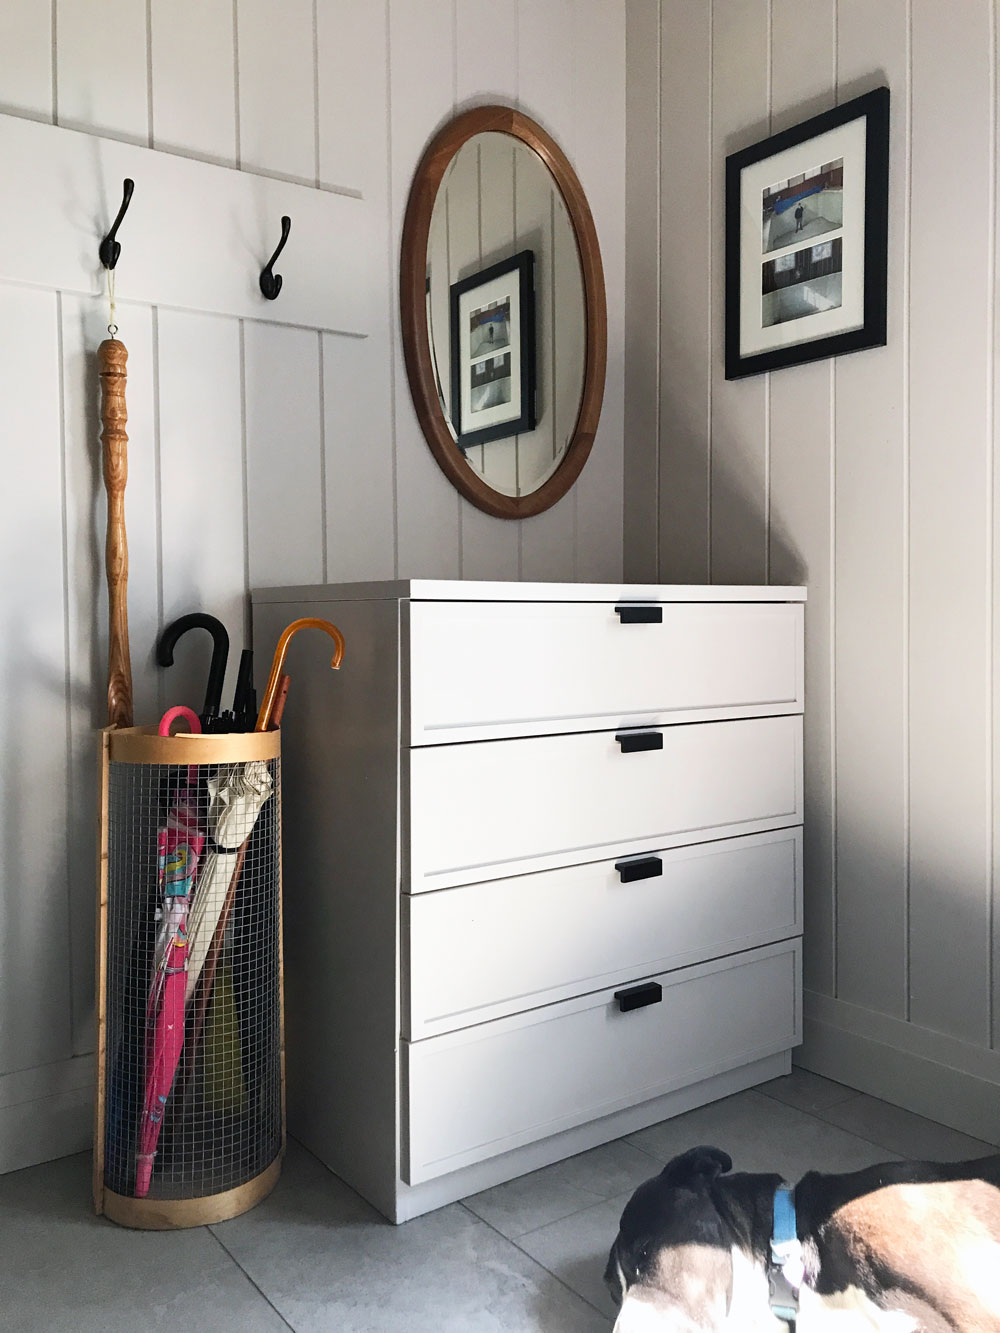
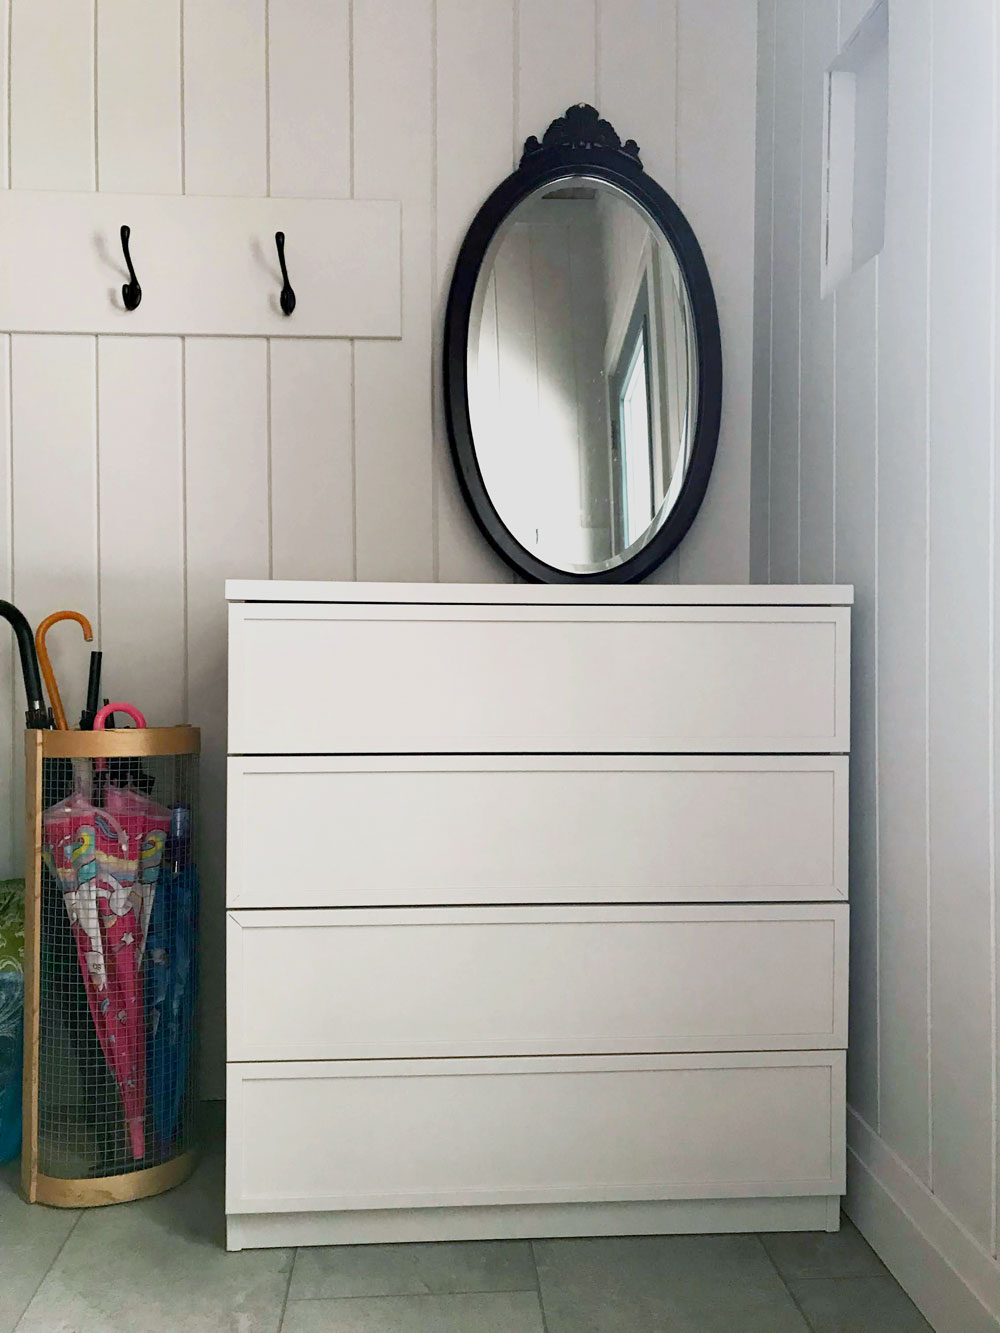
The mirror is another. It was a bit ornate when I found it in the thrift store. Removing the decorative top piece and the cherry-esque finish countrified it a lot. The factory finish was so hard and thick, but patience and a lot of sandpaper prevailed. Finding the right way to refinish it took a bit. Everything I put on the wood turned red. Finally, I went with simply varathane. That countrified it the rest of the way.
The mirror bounces a bit more light into the room (enhancing Cigo’s sunbeam), and its round shape contrasts with all of the straight lines from the paneling and other elements in the room.
Designed for us
Installing an LED nightlight cover plate on the landing (I was influenced by Young House Love) was probably the easiest task on my to-do list. It gives a perfect glow for the stairs. The location of this plug–and all of the other switches, outlets, light fixtures, heated floor control panel–was very carefully mapped out by me. The electrician and the tiler didn’t completely agree with my choices, but I’m the one that lives here, so I got my way.
The dimension and height of the landing, the way the doors swing, where the openings were located, and the height of the archway into the kitchen were other areas where I pushed for what I wanted. Sometimes I felt guilty asking for a change, but I knew I would regret it if I didn’t make the mudroom exactly the way I wanted.
Now everything is so convenient and it works for how we live.
Make it personal
Like all spaces in our house, the mudroom is personal to us. Matt’s nephew and I made the bench and I made the umbrella stand for our last mudroom. My sister-in-law made the yellow crate for Ellie. My Dad made the wooden shoehorn that’s hanging from the hook and the large wood plate on the dresser that we use for mail. There’s even a box on the stairs to hold stones, sticks, pinecones, feathers and other treasures that Ellie collects.
Matt’s winter coat which I wear to take the dog out hangs beside the door. Having a whole section dedicated for Cigo has been a game-changer. In the old mudroom, towels were draped over the bench, leashes were piled on top of each other. Now we have ample hooks for everything. I even stash his nail clippers and a bottle of dog shampoo in the dresser by the door, for those moments when he smells a bit too farmy to allow in the house.
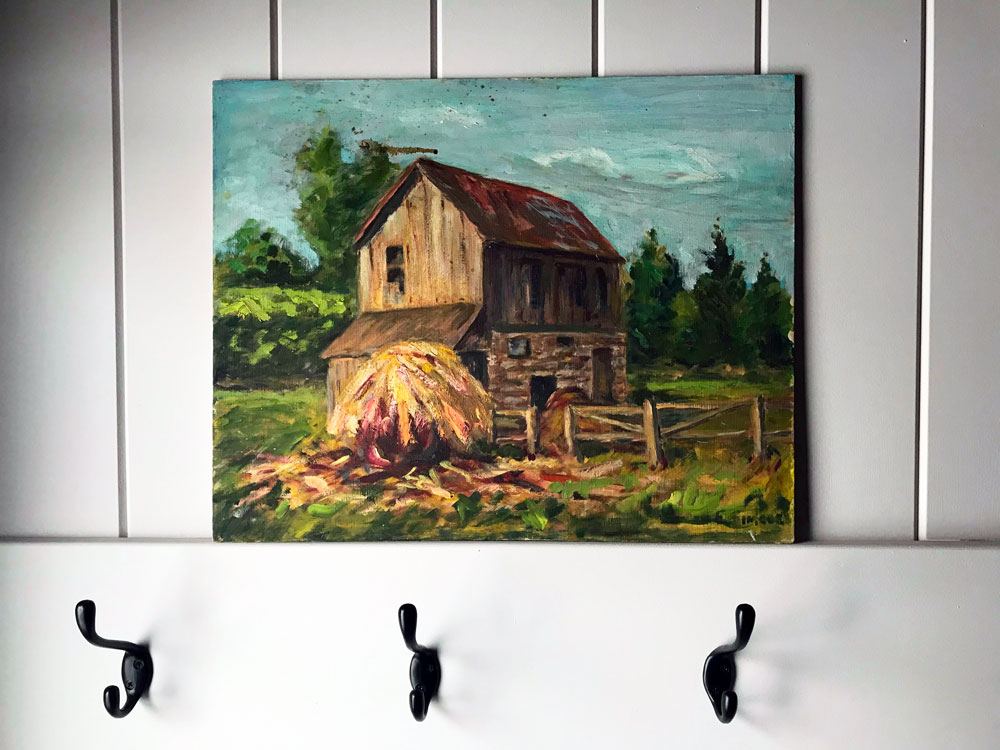
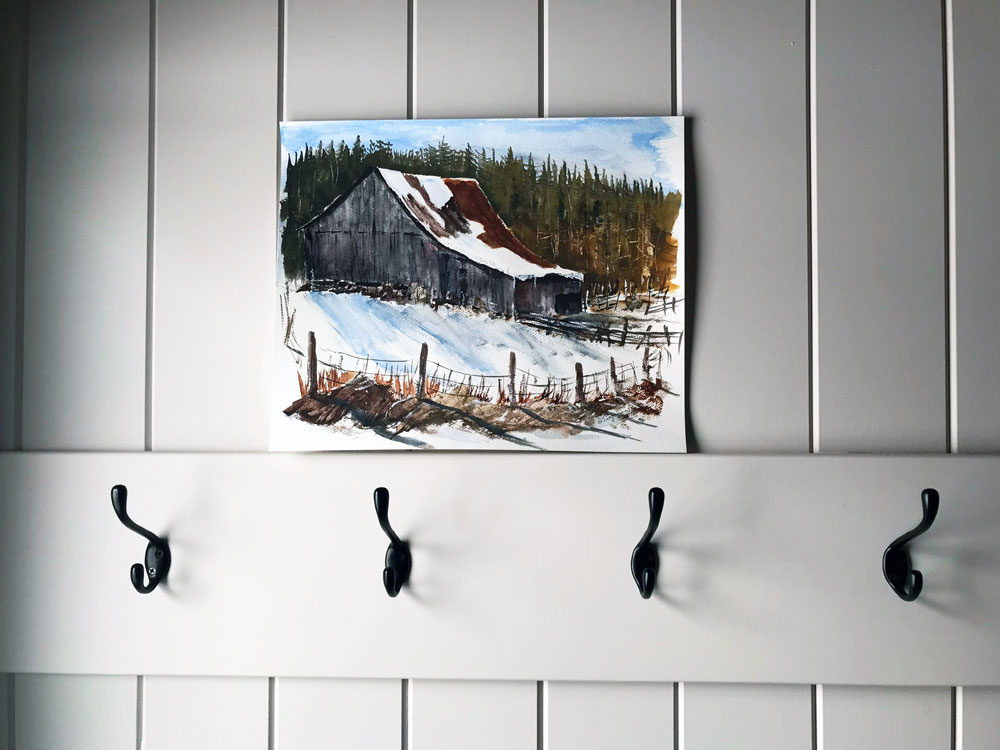
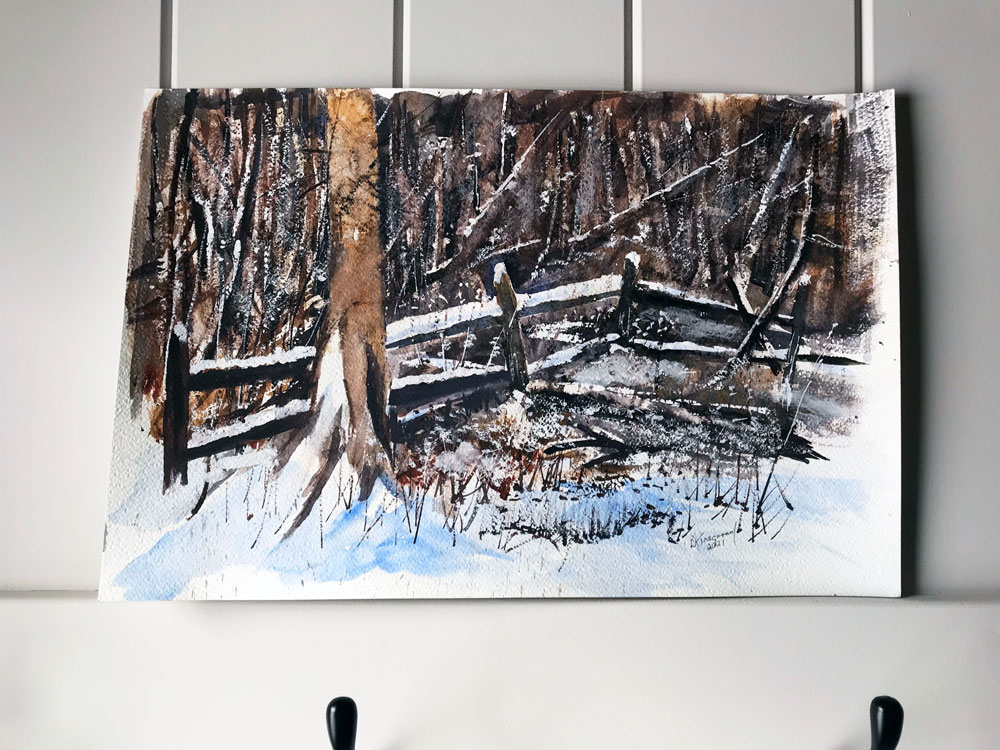
The painting on the wall is another special, personal touch. Like so much of the art in our house, this too was painted by Matt’s grandpa. When I shared art options for the mudroom a long-time reader had a brilliant suggestion: switch between paintings. So I had two framed. One summer scene (by Matt’s grandpa) and one winter (by my Mom’s friend). They’re roughly the same size, so they can hang on the same hook.
The mudroom has been a great addition–literally–to our house. This is a space that we live in every day, and that I enjoy every day. I am very proud that we dreamt it and we built it. It’s much more than a mudroom.
Do you have a room that’s more than a room? What is your must-have for an entry? Do you have any secret storage at your house? Who else switches art seasonally? Anyone else have a sunbathing dog?
We also added two dressers, which I painted last week.
They give us eight big drawers of storage, so I finally have a place to put my hats and mitts. As well as car keys, sunglasses, reusable bags, pens, notepads, phone charger, masks (who thought we’d need mask storage?) and so much more stuff.
One dresser is by the door–keys, outerwear, sunscreen, bug spray, etc. will live here. One dresser is on the landing by the kitchen. My vision is that it will become a kind of command centre for mail, papers, household stuff, and even some of Ellie’s toys.
Part of my goal with not adding built-ins right away is to discover exactly what kind of storage we need.
The dressers aren’t quite the style I’m looking for in our eventual built-ins and they’re not quite the right size for their spots, but they do the job for now. And the price was right. Matt’s Dad picked them up years ago and they lived first in his shed and then in our barn. After some repairs, a cleaning and a coat of paint, they are a great interim solution.
Here are some of the other things I’m planning to do in the mudroom.
Install dresser hardware
The dressers don’t have a lot of space to screw on drawer pulls. The centre recessed panel is actually glass, so I can’t drill through it. I’m likely going to reuse the old pulls, but I’m going to spray paint them black first.
Refinish mirror
I found a big oval mirror at a thrift store this fall. The rounded shape will be a nice contrast to all the straight lines in the room. I’m going to remove the decorative piece on the top and refinish the wood frame, aiming for a rustic finish that will go with our cedar ceiling.
Install nightlight cover plate
I remembered last week that I had one LED cover plate left from a three-pack I bought a few years ago (I was influenced by Young House Love). The mudroom would be a perfect place for a nightlight, so I dug it out. Bonus, the cover plate also has a USB port, so it will be going at my new phone charging station on the landing dresser.
Build key cupboard
During construction I had our contractors insert a little wood box that I made into the wall beside the door. This box is going to become a hidden key cupboard. A few rows of cup hooks will give us plenty of space to hang keys. For the cupboard door, I’m going to use a picture attached to hinges. Storage. ✓ Art. ✓ Function. ✓ Form. ✓
Hang art
We don’t have a lot of wall space for pictures (and I don’t want to put too many holes in the paneling). I’m planning on hanging one painting. Matt’s Mom and my Mom have both sourced art for me. Matt’s Mom gave us a painting by Matt’s Grandpa. My Mom’s friend gave her two water colours that he painted. They’re all great farm scenes, and I really like how the blue and green tones contrast with the beige paneling. (Note that despite the photo differences below they’re all close to the same size.) Which would you pick?
We are definitely at the fun stage of the mudroom. These are pretty quick, inexpensive, easy projects. All of these little details make the room function the way we need it to and personalize the space for us.
What’s your first project of 2022? How do you handle storage at your entry? How many hooks is enough?
The mudroom is painted. The mudroom is painted. The mudroom is painted. Yay! Yay! Yay!
(And we even have some hooks.)
The spray painting was a bit of a saga, but not because of the spraying. The first sprayer I rented ended up being double booked (and I was the odd woman out). After a quick scramble I found another sprayer to rent, but when I got it home, it didn’t work (turned out to be a clogged hose). Third time’s the charm, and I finally had a working sprayer by lunch on spray day.
The spraying itself was pretty easy. I was not a pro by any means, but the paint went on fairly evenly and covered very well.
I decided to do all of the trim the same colour as the panelling (Abalone from Benjamin Moore at 75%). It’s a change from the rest of our house where the trim is painted white, but I like the seamless single colour in the mudroom. Plus, I don’t think white in a mudroom is the best choice for the way we live.
I was able to get two coats on in one day. Each coat took just a half hour. Then I let the paint dry overnight and took off all the masking the next day. When I was able to get a good look at the room, I was proud. The finish is not perfect, but I’m going to call it great. For the V-groove panelling and all the edges we had with the trim and hookboards, spraying was definitely easy.
Here are some lessons I learned from my first time spray painting:
Spraying uses lots of paint. The mudroom is not a big room (140 square feet), but I went through two full gallons.
PPE is critical. The paint aerosolizes. Any time I took off my mask or glasses, I could feel the particles stinging my eyes and throat. Don’t skimp on your protection (a hat and gloves are also helpful).
Have a brush just in case. You can gently brush out drips or “spits” without messing up your finish too much.
Mask, mask, mask. Cover anything that you don’t want painted. For us that meant the entire floor, the entire ceiling, the exterior door, the garage door knob and deadbolt, the archway to the kitchen, plugs, switches and the floor thermostat. Check your masking to make sure it remains in place throughout painting.
Keep the sprayer outside. Switching buckets and setting up the sprayer resulted in some splatters and drips around the machine by the end of the day. I put the sprayer in the garage on a sheet of plastic and pulled the hose inside, which meant that most of the mess stayed in the garage.
The paint feels like a big milestone. I sprayed the whole room by myself and it turned out well. Yay me! It’s also the last item on my mudroom to-do list. Now I can move on to fun stuff like decor and storage. In fact, we’re already using those hooks and have moved in some of our coats.
Have you ever spray painted a room before? Do you have any tips to share? Do you have any DIY sagas to share?


