Stone moving party

I was super happy when our stone supplier was able to source a single piece of stone for our hearth. No seams! Score. 🙂 However, now we’re at the point of installing the hearth. Moving a who-knows-how-heavy stone! Not so score. 😦

The stone is 10 feet long by 18 inches wide by 2 1/2 inches thick. Every time it has moved up to now has involved a forklift. However, we face two problems:

  1. We do not possess or have access to a forklift.
  2. A forklift will not fit into our house.

We are relying on people power. Pure brute strength.

I do not have good photos to illustrate the scale of this task because, you see, I really didn’t think ahead to consider the scale of this task.

So here’s the hearth at the far right peeking out from behind the skids of stone back when they were first delivered two and half weeks ago.

Stone for the fireplace

And here’s our mason sitting inside the fireplace, just to give you an idea of the size that we’re working with.

Mason building a fireplace

The plan was that Matt and I would get home from work a bit early last night and together with our contractor we’d move the hearth into place. Well, I made it home, but Matt got caught in a snowstorm and spent two hours on the road. Our mason and I tested moving the stone on our own. Not gonna happen.

New plan. The three of us would reconvene this morning at 6am before Matt left for work.

Matt and I did a test last night when he finally made it home. His verdict? “Woman, I don’t know if this is gonna happen, even with three of us.”

So we did what you always do in this situation: call Dad.

So the new, new plan is a stone moving party at our house this morning at 6am. There will be Matt’s Dad, the mason, Matt and me. Baxter will be here too, though he probably will not be very much help.

Wanna join us? It’ll be a special way to start your day. 😉

I realize most of you will be reading this after the stone moving party has ended. However, we’d still appreciate if you could send your good wishes. Heck, send levitation charms. Send muscle enhancing drugs. We’ll take all the help we can get!

Update: The stone is in place and is still in one piece. Yay! Full fireplace update to come on Monday.

Two new feet

A neat thing about having a blog is that people know a lot of what’s going on in my life. Sometimes it weirds me out when people start talking to me seemingly out of the blue about something that I mention on the blog. Most of the time though it’s a neat way to stay connected with people I don’t get to see all that often. When Matt’s aunt came to our house for our annual month-before-Christmas party, she brought a perfect gift for us: some fun additions for the laundry room–these wooden sock forms. Vintage wooden sock stretchers Matt’s aunt is an avid vintage and antique shopper. Fortunately for us, she’s also a regular blog reader. So when she saw these wooden sock forms, she thought of our laundry room makeover and decided to give them to us for Christmas. They fit in perfectly with the rest of the eclectic art in the laundry room and echo the wood accents we have elsewhere. Vintage wooden sock stretchers Something else I like is that these feet aren’t a pair. One is a bit bigger than the other, so there’s basically one for Matt and one for me.

What are some favourite vintage pieces you’ve used in your decorating? Do you decorate your laundry room? Who else has relatives who shop for them?

Fireplace update – Week 1

It’s time for the first official update on the fireplace project. You got little tidbits last week, but today you get details and photos.

For a reminder, here’s what the fireplace looked like originally.

1970s fireplace

And here was the plan.

Fireplace fixes

To make this plan happen, we had to start over.

There was no liner or flue in the chimney, so if I wanted a true–and safe–wood burning open hearth, we had to build a proper chimney. That meant starting on the roof and taking everything down.

Demolishing the chimney

Wiley was very helpful during demo. I pulled him up to the edge of the roof and raised the front-end loader so that I could throw the bricks into the bucket and then drive them around to our rock pile.

Demolishing the chimney

Of course, even tractors get tired. All was going well until Wiley decided that one load was too heavy. No tractors or drivers were harmed, but it was definitely an anxious moment.

Wheelie in the tractor

Once we made it inside, it was more of the same: jackhammer, rubble and dust… lots and lots of dust. I’ve concluded that masonry dust is the worst kind of dust. Worse even than drywall dust. My hair has never been as stiff as it was on Monday night (no picture of that, sorry).

Demolishing the fireplace

It turns out there’s a reason for everything. The fireplace is where it is and is the size it is because it’s a chase for pretty much everything you could think of. There were two chimneys to vent the old furnaces that we used to have. There was the fireplace insert and its wonky chimney. And then on the far left, there was a heating duct and cold air return for the pool room.

The bump-out that I hated so much was actually there for a reason. It wasn’t just decorative. It was concealing the heat run to the pool room. Since we’re not using the pool room yet and don’t need to heat it, we just capped off the duct. When it comes time to redo the pool room, we’ll run heat some other way.

Capped heating duct inside the fireplace

After demo came rebuilding, which started a bit slowly. The wall behind the fireplace had to be insulated and then drywalled for fire protection, the duct had to be capped, the hearth had to be expanded, the base had to be laid. But by the end of the week some really good progress had been made. This fireplace is huge, so it takes a lot of time to put it all together.

Building the fireplace

Here’s how the fireplace progressed day by day.

Fireplace demo and rebuilding

We made some really good progress on the mantel yesterday, and we should be able to mount it by the middle of the week likely. I’m not sure that we’ll have everything finished this week, but we’re still on track to have fires by Christmas.

Milling the mantel

The fireplace is progressing. It’s still just cinder block, but it’s almost up to mantel height. You’re going to have wait a little while longer to see a picture. In the meantime, let’s take a little detour into the making of the mantel.

We started with some big barn beams. These have been lying outside the barn as long as we’ve owned the farm. You can see them beside Matt in this picture from our first summer.

Barn beams

They are huge, heavy hunks of wood. They were more than 12 feet long, and it took my Dad, Matt, his Dad and me to move them, even after Matt cut them down with his chainsaw.

When I came up with my plan to use our barn beams for the mantel on the new fireplace, I hadn’t examined them very closely. I expected the beams to resemble beams. Instead, they were very round.

Barn beams on the forklift

To be a mantel, I was looking for something with some corners. One of the beams had one flat side, but that was it. My Dad found a local sawmill that would cut the beams square for me.

I love finding spots like the sawmill. They’re treasures of unique services and products. The variety of wood they had in their yard was amazing–trees, slabs, boards, logs, crosscuts, exotics, domestics. They mill custom flooring and trim. And of course they have cool equipment. I have to confess I’m looking for an excuse to go back.

After our logs went through the sawmill a few times, we ended up with two beautiful cedar beams 6 inches by 6 inches square. We’re going to sandwich them together to make one big 12 by 6 mantel. We were able to preserve the original flat side on the one beam. That’s going to end up facing into the room where its hand hewn face, complete with marks from the adze that originally shaped it, will be visible.

Attaching these two pieces and mounting them on the fireplace is a whole other issue–and tomorrow’s project. I think we’ve figured out our plan. Fingers crossed everything works out.

Anyone have any tips for installing the mantel? Have you ever custom-milled any of your own wood? Have you ever used reclaimed wood for a project?

Dining room sideboard as living room sofa table

The fireplace project is going well. We got it all down on Monday, and it started to go back up yesterday. Unfortunately, so far it’s rising pretty slowly, so I don’t have anything to show yet.

Let’s turn our attention to another part of the living room… or at least another part of the living room as it looked last week before everything was taken apart.

Last week when I showed you my family photo display, I kind of glossed over the piece of furniture that they were sitting on. Finding a table of some kind to go behind the couch in the living room was one of my Home Goals for 2014. I seem to be posting a lot of Home Goals these days. Credit it to a last minute surge in productivity before the end of the year.

The idea was to find something to hide the back of the couch, have some space for display and also provide some additional storage, mostly for the adjacent dining room.

Sideboard

The story of finding this piece illustrates why I have measurements of the furniture I’m hunting for and a tape measure in my purse at all times.

Someone was moving out of an office at work. The cleanout uncovered a wood sideboard sitting opposite the desk. It looked like it might be close to the right dimensions. I dashed back to my office for my measurements and my tape. A surreptitious measurement session later, I had confirmed that it was the exact right height and the exact right depth. It was a little short, but I had an idea for that. Off I trotted down the hall to find someone with authority to ask if the sideboard was up for grabs. Of course, that turned out to be not the VP himself, but his assistant. She said, yes, I could take it.

Even though I had permission, when Matt and I were loading it into my Dad’s truck the following Saturday, I kept expecting security to come speeding up to the building. Luckily, we made a clean getaway.

Asset control sticker

Back at home, the sideboard fit perfectly in the living room… pretty much. It’s still a bit shorter than I wanted. (I’d love to put a pair of lamps on it and clear off our end tables). Here’s that first photo again. See how the couch is sticking out on either side?

Sideboard

My original plan had been to cut the sideboard in half and insert some open shelving in the middle. A new top and new trim around the bottom would camouflage the addition, and then I’d paint it all out.

Well, once I had the sideboard, that plan didn’t seem like such a good idea. It’s really, really well made, and I feel like chopping it up would be a bit of a crime. (Plus I was told it’s a Krug, which is apparently pretty good furniture). Yes, there are some dings in the wood, but I feel like I’d rather refinish it than paint it. It’s a beautiful colour that’s actually pretty close to our dining room table (which also needs to be refinished).

If I decide I truly cannot live without a sofa table that’s the full length of my sofa, I will probably start over and source or make a complete new one.

For now, this thing is awesome. I love having the shallow drawers at the top. To be honest, I’m only using one of them, but it holds all of my napkins, so I don’t need more space yet.

Napkin storage

For the cabinets themselves, I’m using even less. My piano books take up half of one lower shelf, but other than that the sideboard is empty.

So much for needing storage. Oh well. Let’s call it room to grow. We’re obviously still a work in progress over here.

What would you do with this sideboard if it was yours? Do you have a sofa table, or some another piece of furniture behind your couch, at your house?

Getting fired up

So remember back in November when I said, “No more projects until 2015”?

And remember before that when I talked about the living room fireplace? And before that when I posted my Home Goals 2014? (And 2013?)

Ummm, yeah. So we’re doing the fireplace.

Right now.

The stone–six skids of it–was delivered a week ago. Ralph signed off after a careful inspection.

Ralph inspecting the chimney pieces for our new fireplace

Yes, I believe Santa will fit down this chimney.

We gathered the various barn beams we have lying around (yeah, we’re lucky like that) and picked out a couple of contenders for the mantel. Since they were closer to tree trunks than lumber, on Saturday my Dad and I took them to a local sawmill and had them squared off.

Barn beams on the forklift

Matt and I removed the extremely heavy metal insert yesterday. We emptied the living room to get ready for demo and taped off all of the openings with plastic in a (probably vain) attempt to contain the dust and soot.

I should be clear that this is not a DIY project for us. We do not possess the expertise to build a fireplace. However, a close family friend does. He’s a professional mason, and he did all of the brickwork on my parents’ house, including their fireplace, and worked with my Dad for years. We’ve hired him. So when I say we’re doing the fireplace, I have a loose definition of we and doing.

I’m off work today to help with the take down, and I’m planning to work from home a couple of days this week, but my involvement will be very limited.

Regardless of my minimal contributions, we should have a new fireplace by Christmas.

Now that’s what I call a present.

Winterized

Notice the past tense on the title of this post? We are ready for winter here at the farm.

… Well, I’m not ready for cold and dark, but the house and the property are.

I had a small project list for November.

  1. Make sure all of the gutters and downspouts are winter-ready.
  2. Remove the mower deck from the tractor (and maybe attach the snowblower).
  3. Add some protection around our new trees.
  4. Turn off the outside water taps.
  5. Take off the window screens.
  6. Transition the mudroom to winter mode and get the winter clothing out of storage.
  7. Set up the bird feeder on the driveway turnaround.

I am thrilled, proud, excited, relieved (choose your adjective) to share with you today that every single one of these tasks is done.

Here is some photographic evidence to prove it.

Patchwork brown and white downspout that regularly fell apart replaced with white downspout that’s securely screwed together.

Fixing downspouts

Weeping tile rabbit/weed eater barriers around all of our littlest trees. (How to: Cut section of weeping tile approximately 12 inches long. Slit it vertically (a sharp utility knife works well, but it takes patience). Wrap the weeping tile around the bottom of your tree).

Use weeping tile to protect trees from rabbits in the winter

Bird feeder in the ground, full of food and accepting customers.

Chickadee at the bird feeder

The thing I’m most excited about is seeing the birds at the feeder. Last year, it took them until Christmas to find it. This year it took them a day. As usual, the chickadees are the bravest, but a pair of cardinals has joined them as of last weekend.

Are you all ready for winter? What have you accomplished? Or what’s still outstanding on your to-do list?

Tips for making renovations manageable

Let’s be honest. Renovations can be a nightmare. DIY renovations can be especially challenging. In watching my Dad do construction for his whole career, working with him for several years and talking to friends and co-workers, I’ve seen some of the same issues:

  1. The vision in my head is too big. I don’t know where to start.
  2. The vision in my head is big and beautiful, and I’m going to do it all right now.
  3. I’ve started, but the vision in my head has gotten bigger, and now I’m never going to finish.

I’m going to share some of my perspective on each of these three scenarios. I’d love if you would weigh in too with your tips… or your renovation challenges. Between all of us, I think we can come up with some useful tips to help each other make renovations more manageable.

Problem #1: The vision in my head is too big. I don’t know where to start.

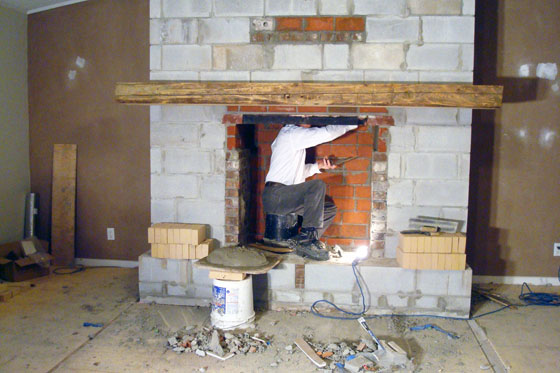
Yup. Renovations are daunting. But like anything you do, there is a first step and a second step. Sure in a renovation you might get to 1,000 steps… or even more. But sometimes you have to just take the first step.

My original vision for the laundry room was a standalone room on the main floor. Full of natural light, it would be a dedicated space for sewing, crafting and laundry. I’d have a big island, tonnes of storage, multiple sewing machines, an impressive fabric and yarn stash and so on and so on. It would be beautiful.

I’m pretty sure that this laundry room is never going to happen, but even if it does, there’s nothing to stop me from having a pretty laundry room now. I started with updating the cabinets, moved on to paint, did some decorating and now I have a pretty, functional space in the basement, thanks to a simple makeover.

Problem #2: The vision in my head is big and beautiful, and I’m going to do it all right now.

I’m a big believer in taking your time when renovating. You have to really figure out what exactly you need and what makes the most sense for your family. You also have to build up your energy and your finances.

Renovations take a lot of time and a lot of money. Gutting a whole house and renovating every room and landscaping your entire property all at once is a lot to take on.

Renovating in stages takes longer, but it might make it more manageable, both for your budget and your sanity. Paint the walls, but don’t replace the floor yet. Update the hardware, but don’t feel like you have to renovate the whole kitchen.

Using the laundry room as my example again, there are a few things I would have liked to have done. To borrow a phrase from one of my former bosses, here are my “even better ifs.”

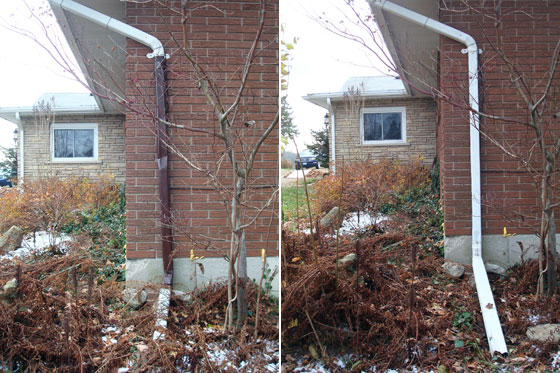
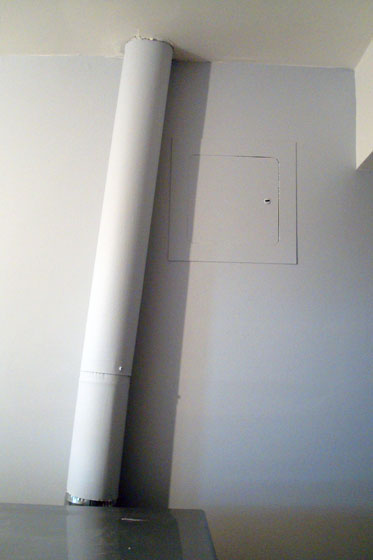
I think some wood butcher block counters would look great in that room. A new floor would definitely spruce things up. I’d love to add some more racks for laying sweaters flat to dry. It would have been nice to put the plumbing for the washing machine and the venting for the dryer inside the wall rather than on the surface and patch the old observation portal for the oil line to the furnace.

Laundry room venting running over the wall

But if I did all of that as part of my makeover, I’d still be renovating. Counters and floors and drying racks can be individual projects that I do someday in the future.

Problem #3: I’ve started, but the vision in my head has gotten bigger, and now I’m never going to finish.

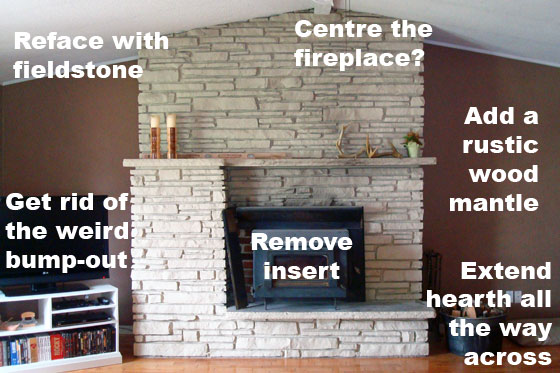
Scope creep happens in most renovations. As I wrote way back when as we were just beginning the basement reno:

Scope creep happens when you say to each other, “Since we’re doing A and B, we might as well do C, D, E, F and G.”

Sometimes scope creep is necessary. If you uncover an electrical problem, you’re going to have to fix it. However, sometimes we just get carried away.

Towards the end of the laundry room makeover, I started thinking about replacing the faucet, sewing curtains and building a picture frame. These may sound like small add-ons, but they definitely would have extended the project. And just like the countertop that I mentioned above, none of these things were necessary. Pretty, but not necessary.

I was working towards a deadline for the One Room Challenge. I wanted time to take pretty photographs and write my blog post. Scrambling up to the last second with add-ons would have added extra stress that I just didn’t need.

Even if you don’t have a blogging deadline to meet, there are life deadlines, and sometimes you just have to stop. There’s always Laundry Room Version 2 (and 3 and 4 if necessary).

My tips:

So looking back over what I’ve written, I feel like these 7 tips sum up some of my approach to renovating:

  1. Start. Just start.
  2. Take your time and figure out exactly what you need.
  3. Don’t do everything at once.
  4. Have a plan.
  5. Break it down into steps and stages.
  6. Stick to the plan.
  7. Know when to stop.

I can’t promise if you follow these tips you’ll have a problem-free reno (does that even exist?), but they might help to make things go a bit more smoothly.

Now it’s your turn. What are your tips for keeping a renovation manageable? Have you ever encountered any of the problems I described? How did you work through them?

Family photo display

One of the biggest hits at our month-before-Christmas party over the weekend (aside from the food) was a family photo display that I added to the living room. Everyone who came to the party spent time looking at the pictures.

Family photo display

It was neat to see my young nephews, who never met their great grandparents, getting to know them a little bit more through their pictures. I liked talking with Matt’s uncle about my family and introducing him to some of my relatives.

The photos sit on the sideboard behind the couch. Some frames face the living room and some face the dining room. The frames mostly came from Value Village. In the store, the smaller frames (for photos 4 inches by 6 inches or less) are bundled together and sold for just a couple of dollars. Which is great, because I think the smaller frames work best for a display like this since I can squeeze in more photos. (And I already have plans to add a few more frames).

Family photo display

To fill the frames, I chose a mix of pictures from Matt’s and my families. My Mom and I spent a fun afternoon a few weeks ago going through all of our old albums so that I could pick out some of my favourites.

Family photo display

I love having our family members with us. It was great to see everyone at the party on the weekend, and it’s nice to have the reminder of them in the pictures throughout the year.

How do you display family photos?

Odds and sods

Some happenings from this week:

  • Matt and I got the mower deck off the tractor. Taking it off is easier than putting it on, but either way the mower deck is a beast. This John Deere commercial blew me away the first time I saw it. Who would have guessed that I’d find tractor attachments so exciting? (And, yes, Wiley’s safe. We’re not trading in our Kioti any time soon).
  • We’re holding off on putting the snow blower on the tractor, although we’ve had a surprising amount of snow over the past week–although not Buffalo quantities. It’s only November for goodness sake!
  • A friend gave me a chandelier that she didn’t want in her house. It’s a gaudy shiny brass crystal monstrosity that I think will be wonderful in my office.
  • Matt and I are hosting our annual month-before Christmas party this weekend, including a full turkey dinner. Of course one of the oven elements is on the fritz. Matt sourced a new one and installed it, but it’s still not working. Argh.
  • I have the vision for our master bedroom worked out in my mind. That is, except for the paint colour. This bedroom has me thinking about navy.
  • The safe house bedroom that Kelly at View Along the Way made is one of the most thoughtful spaces I’ve seen.

What’s been the highlight of your week? Any special plans for the weekend?