Scorched earth

Hello everyone. Happy Monday. I hope you all had a great weekend. I feel like I need another weekend to recover from my weekend. It was super productive, so I am wiped.

You’ll see Saturday’s project in my One Room Challenge post later this week. Today, I have to talk about Sunday’s project. Sunday turned out to be a good garden day.

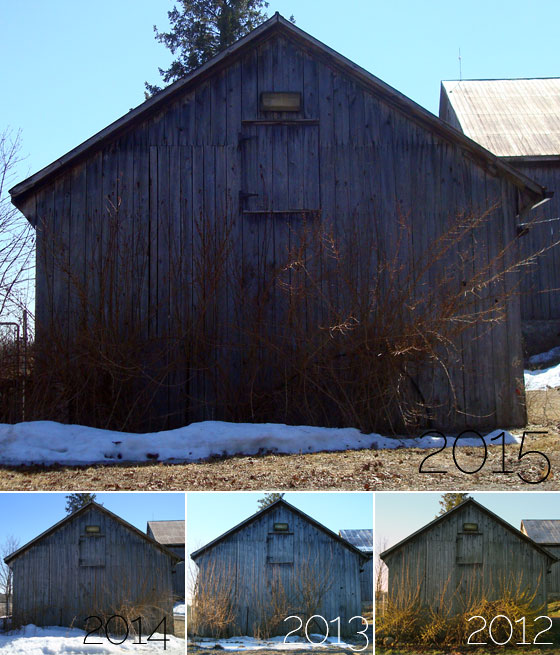
In my last garden update, I mentioned my plan to use the longe ring. I also mentioned my dilemma of how to clear it of weeds.

Longe ring

Weeds

By Sunday, I had a bit of a plan of how to start. I also had a sidekick: my oldest nephew.

He loves being at the farm, and he and I work really well together. We also share another unique trait, which I’ll talk about in a minute.

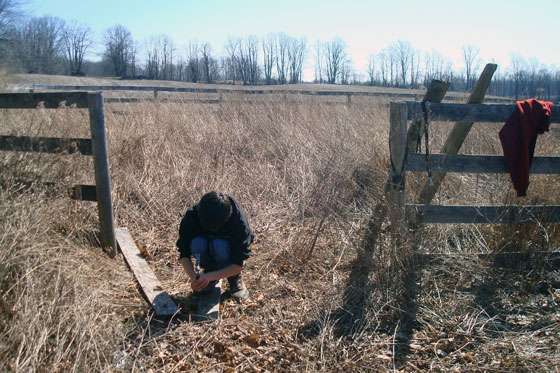
Step one was to cut a new opening in the fence. There’s a gate, but it’s on the wrong side of the ring. Nick selected what he thought would be the best location for the new gate. I ran the saw, he used the drill and then the hammer to knock off the boards (yes, they were both nailed and screwed to the posts).

Voilà, access.

Opening for new garden gate

Then came the slightly dicey part of my plan–and the opportunity to exercise Nick’s and my shared trait: pyromania.

We piled some of the cardboard that’s been amassing in the driveshed in the middle of the ring. And then we lit it on fire.

Burning weeds

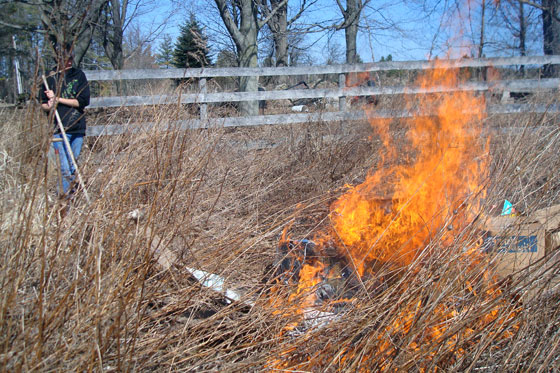
After a bit of a slow start, things started to take off. And then they really took off. It wasn’t that bad though. I only hurled myself over the fence once to get away from the flames. And poor Baxter nearly strangled only once when he got tangled in the hose.

We quickly got everything under control. Nick ran the hose while I directed the fire with a rake.

Burning weeds

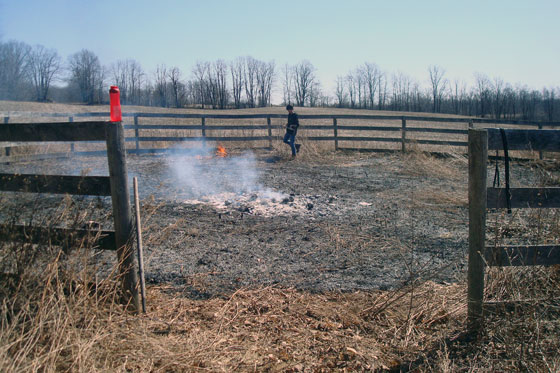
When the smoke cleared, I still had a nephew, I still had a dog and I still had a fence around the ring.

But I didn’t have any weeds left. Yay!

Burning weeds in the future garden

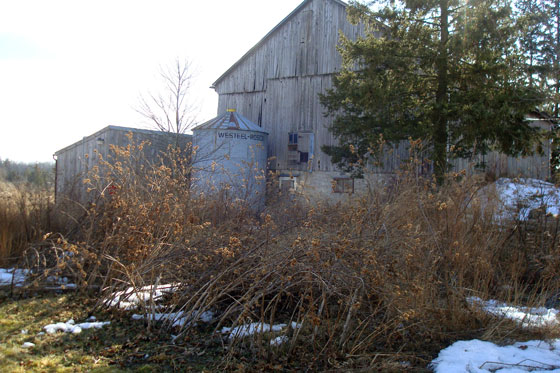
Nick and I had been really careful to keep the fire inside the ring, so I spent another few hours hacking at the weeds outside the ring with my trusty rake. My plan is to have Matt mow a single loop around the outside of the ring to try and keep the weeds on the field side of the fence, so I needed to clear a path for him.

Three quarters of the way around the ring I found something that’s going to be harder to get rid of than the weeds.

Anyone need some carpet?

Roll of carpet dumped in the field

Who says, “I’ve got a huge roll of carpet. Let’s carry it out to the field and leave it there?” How is this a reasonable disposal option?

The carpet is either frozen or rooted to the ground, and by the time I found it I had pretty much lost the ability to raise my arms above my shoulders. So removing it will be a project for a future weekend.

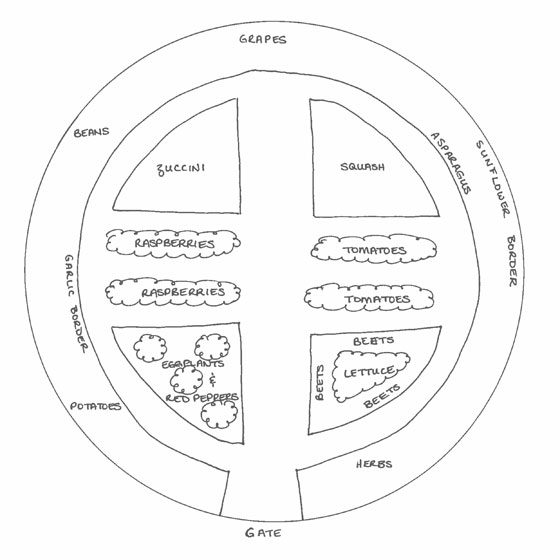
But for now, let’s look at the garden!

Garden after the weeds have been burned

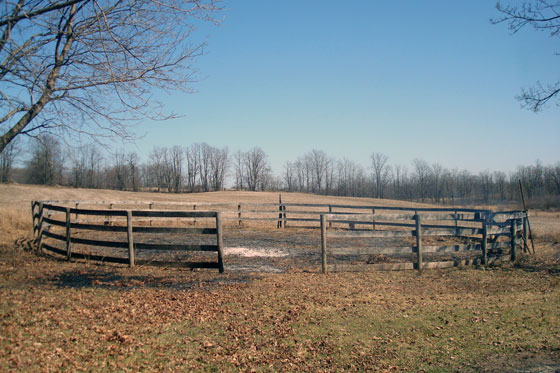
You can actually see all of it for the first time. You can see the fence on the far side. You can tell it’s a ring.

Sure there’s still a long way to go, but some major progress has been made.

I’m pretty sure the roots of the weeds are still living, so tilling the soil is still going to be a challenge.

On my last post, Meghan suggested covering the ground with tarps for a few weeks to kill the weeds. I’ve read about this technique before, so now that the weeds are knocked down I think I might give it a try.

Once I regain the use of my arms, that is.

What did you do with your weekend? Have you ever done a controlled (or not-so-controlled) burn before? How about using a tarp to kill weeds? Any tips?

Good Friday

On our first Good Friday at the farm, I cut a huge bouquet of forsythia off the bushes beside the driveshed. Every spring since then, I’ve marked the start of April with a forsythia check-in.

Forsythia on the first of April

Thanks to a few mild days in March, we’re in a better snow situation than we were last year. The blossom situation is still TBD. Last year we seemed to be dealing with frostbit forsythia. Hopefully we have blooms soon.

And I hope that you have a very happy Easter.

Forsythia through the years:

Put a ring on it

Thanks so much to everyone who gave their advice on my vegetable garden post the other week. Everyone’s input was really helpful. Also helpful? Being home for a week. It allowed me to spend some time outside and develop my plans.

It also allowed me to change my plans.

The location I’d planned to put the garden just isn’t going to work. See that big wooden thing in the background? Our beautiful barn?

In the shade of the barn

Obviously there’s a large tree too, but the barn is the bigger problem–literally. Because of the barn’s size, it casts a prodigious shadow. Too much of a shadow for a veggie garden, I’m afraid.

So new plan: Matt’s goat ring (aka the longe ring), gets to stay. It’s sunshiney pretty much all day. I’ll build the garden inside the ring.

Longe ring

Bonus: the fence is already in place. I don’t have to drill holes, set posts, or hammer boards.

Quandry: I have to break up the really thick sod somehow. This ring has been growing weeds for years. My father-in-law and mother both think I need to call our farmer for help. I’ve seen his tractors, though, and I’m concerned there’s nothing that will fit inside the ring. Remember, preserving the fence is a key bonus of using this spot.

Weeds

Quandry 2: I’m not quite sure how to arrange a garden that is shaped like a ring. I usually think in terms of grids and boxes and rows. Arcs and pie wedges are hard to work out in my mind. Here’s a preliminary idea.

Plan for a round vegetable garden

I feel like I need to get the ring cleared of grass and weeds so that I can see what I’m working with. It’s 56 feet across. That’s an area of roughly 2,462 square feet. Too big to wrap my head around. I’m not even sure I can fit it on a piece of paper at a scale of 1 foot=1/2 an inch.

Once I get it cleared, staking out the planting beds will be the first step. I have a suspicion that I’m going to have to cut some of the quadrants into slices. But first I need to understand how much space I actually have, what size beds will work and how much I’m going to be able to plant.

I’d still appreciate your advice, though. Any tips for working in the round? How much space do you think I need between beds? What would you plant? How would you lay things out?

Help plan the vegetable garden

I’m starting to think about my vegetable garden.

You may recall that this garden does not exist yet. Even moreso right now since everything is still buried in snow.

However, that’s not stopping me from thinking about layouts and plants and dimensions and fencing and fertilizer and trellises and… and… and…

The garden is my one and only outdoor project for this year.

Would you help me with planning, please?

The objective is to turn the patch of burr bushes behind this little picket fence…

Vegetable garden before

Into a bucolic oasis like this.

No sweat, right?

Here’s what I’ve sorted out so far.

I’m going to dismantle what Matt calls the “goat ring” (I think it’s a longeing ring for horses) to get my fencing.

Longe ring

Under this mound of snow, I have a stash of wood posts that I can use either for fencing or for edging the garden beds.

Wooden fenceposts under snow

I’ve collected a few rolls of chain link that will be helpful to keep small hungry critters from munching on my produce.

Roll of black chain link fencing

Aaaaaand that’s about all I have so far.

Next week is spring break. I’m taking a vacation from the day job, which means a little more time at home to work on projects. One project is starting to map out the garden.

I don’t think I can do much more than that until the snow melts.

I’m going to be taking a break from the blog for the week too. While I’m away, I’d really appreciate it if you could offer your suggestions for the garden.

What should I plant? How should I organize the garden? What dimensions are best for the individual beds? How big should the garden be overall? What’s the best way to get rid of the burr bushes and prepare the soil? Do you have a garden yourself? What grows best for you? Are there any garden blogs I should be reading? Thanks in advance for your help.

Home Goals 2015

I have to admit I’m a bit chuffed by how well we did on my Home Goals 2014. We got a lot done! However, I also have to admit I’m a bit tired. In 2015, I’m hoping to take it as it comes a little bit more.

I of course still have projects, but I’ve tried to pick some smaller ones this year.

I’m also going to try to be a little more flexible and not feel like I have to do a different project every month, each with its own schedule and deadlines. Yes, that worked for me in terms of getting things done. But it wasn’t always the most fun.

So in 2015, I’m trying to find the balance between the complete loosey-goosey failure of 2013 and the rigid productivity of 2014.

As is my tradition in my annual Home Goals post, I’m going with inspirational pictures, rather than reality.

Master bedroom

This project is a carry-over from 2014. We haven’t done any updates to any of the bedrooms, and I think the master is a good place to start.

Black, white and gold bedroom

Source: Chez V (found via Little Black Door)

List:

  • Buy a queen size bed Done… except it grew to a king!
  • Remove popcorn ceiling
  • Patch ceiling and walls
  • Paint ceiling, trim and walls
  • DIY a headboard
  • Relocate light switch
  • Replace light fixture
  • Make/find window treatments
  • Paint dresser and replace hardware
  • Refresh dinged up closet doors
  • Decorate and personalize

Basement art

This is definitely a light-weight project. The basement reno finished two years ago. It’s time to do a little more decorating. The eclectic enamel basin “art” I added to the laundry room highlighted how bare the walls are elsewhere. I have ideas for some simple, fun art that will really finish off the space.

  • Build a shadow box frame for Matt’s infant PJs in the laundry room
  • Print and frame a pair of playing card posters for behind the games table
  • Build a big chalkboard for score-keeping in the long room where the ping pong table and dart board live
  • Make some classic board game-inspired art for the long room (not surprisingly, there’s a long wall that would be perfect for some art)

Furniture

I made some good progress on the furniture front last year. There are still a few more pieces that I’d like to make or find this year.

Pottery Barn Benchwright inspired coffee table from Ana White

Source: Ana White

  • Dining room hutch
  • China cabinet for my office
  • Coffee table for the living room
  • Chairs for the dining room

Vegetable garden

A vegetable garden has been on my list every single year. It has to happen this year. It just has to.

A beautiful country vegetable garden from Country Living

My dream, dream, dream vegetable garden. Source: Country Living

I’ve come to the conclusion the problem is that we have 129 acres, which means a lot of outside work. I also live in Canada, which means a very narrow window in which to complete that outside work. I say, “This weekend I’ll do this. Next weekend I’ll go over here and do this.” Before I know it, it’s July, summer is half over, and I still don’t have a vegetable garden.

So this year, the plan is the garden and only the garden. Forget about the flower beds. Forget about the rock piles.

  • Start the vegetable garden.

And in keeping with my plan to be more flexible (planning to be flexible isn’t an oxymoron, is it?) that’s the end of this year’s goals. Some other projects may sneak in, but I think I’ve got room for them.

In addition to being a bit more flexible about this year’s goals, I have one more over-arching goal: spend less money.

If you’ve been around here for any length of time, you’ve probably figured out that Matt and I are pretty frugal in a lot of areas. However, we do splurge at times. 2014 had a few big splurges, mostly the solar panels and the fireplace. Our bank accounts need to recover from those projects, so I’m declaring this year Frugal Flexible ’15.

Do you have any goals or resolutions for 2015? What projects would you like to do around your house? Are there any tips to share about balancing flexibility and productivity?

Home Goals previously:


Looking back at home goals 2014

Before we dive too much into 2015–boy it feels weird typing that–I’m going to take a little look back to my Home Goals from 2014.

I’m proud to say that Matt and I kicked butt in 2014. I don’t mean to sound boastful. But we got a lot done around the house over the past year. Today’s post is about celebrating some of our accomplishments. Woo-hoo!

Here’s the list of my original goals and how we did on each.

1. Painting. Check!

  • Main floor hallway
  • Kitchen
  • New addition – Living room

Hallway painted Benjamin Moore Abalone

Painting the hallway and kitchen was the first project we tackled last year, and we crossed them off the list in February. The living room wasn’t on the list at first, but over the course of the year we slowly got it painted one wall at a time. In fact, we finished the final wall just last week (okay, so it was Jan. 2, but who’s counting?).

2. Laundry room. Check!

The laundry room was my first participation in the One Room Challenge. I love how I was able to transform this utilitarian space with just a bit of paint, some simple updates to the cabinets and a few fun accessories.

Black and white shaker cabinets with chrome hardware in the laundry room

3. Master bedroom. No check.

We were not very successful at the master bedroom makeover. I was supposed to scrape the popcorn ceiling back in the summer but never worked up the effort.

… That is until last week. Yup, the master bedroom makeover is underway.

Matt and I bought a new bed (a king-size one–yipes) just before Christmas. Its imminent delivery motivated me to deal with the ceiling. We’ve got a bit more work yet to go, but that’s what Home Goals 2015 are for (that post is coming up next).

4. Furniture. Partial check.

I had a few pieces of furniture that I wanted to find/make last year. I can cross off about half of my list.

  • Refresh bookshelves and living room TV stand with new trim and paint – More on the bookshelves here and the TV stand here and here
  • Coffee table for the living room
  • Sofa table for the living roomDetails here
  • Hutch/cabinetry/built-ins for dining room
  • Narrow dresser for my officeDetails here
  • Hutch for my office
  • Free-standing cabinet for the hallway to the laundry room – No details, but you can see it with the ironing board hanging on it here

Corner bookshelves

5. Living room fireplace. Big fat check!

I honestly did not expect to be able to cross the fireplace off the list this year, but I can. And it makes me a little bit giddy. We squeaked it in right at the end of 2014. The full wrap-up post is still coming, but I can let you know that the fireplace is fabulous. It was wonderful to lounge in front of the fire over the holidays.

And no, you’re not getting a picture of this yet. 😉

6. Landscaping. Maybe a partial check.

Landscaping continues to be my nemesis at the farm. I did some work outside, but not as much as I had hoped.

Front of the house May 2014

  • Reestablish the flowerbeds around the house. I’m about halfway around the house and have come to the decision that we don’t need flowerbeds on the south side or the back. It will take a lot of work to rip out the old beds, but once I do mowing will be quicker than weeding.
  • Plant grass seed where old firepits were and clean up the detritus that’s still hanging around. Again, halfway done. The grass is growing, but there are a few more piles still to clean up.
  • Tidy the east shore of the pond and build a new firepit near the water. I decided that this task is too big to take on myself, but budget constraints prevented me from recruiting some professional help. Maybe next year.
  • Continue to plant the turnaround. Half the turnaround is in really good shape. The other half we’ve gone with grass until I can work up the energy to make it a flower garden.
  • Put in a vegetable garden. Oh I had such ambitions around this one, but it was a complete non-starter.
  • Continue with the landscaping master list. I don’t think this task is ever going to go away.

2014 was much more successful than 2013. Last year at this time I was quite frustrated with how little I had accomplished. This year, I’m over the moon by how much we’ve done.

Having my goals was really important to help me stay focused. What made the difference this year was translating those goals into monthly projects. Thanks to all of you for sticking with me and encouraging us through 2014. Coming up next, Home Goals 2015.

Was 2014 a productive year for you? What was your biggest accomplishment last year? How do you stay on task?

Fall iris

So apparently it’s not fall after all.

One of our irises has popped out in bloom.

Purple iris

Should I be concerned? I know the climate’s changing, but this seems a little off. This iris bloomed already this year back in the spring. Isn’t that normal? Aren’t irises usually spring flowers?

At the base of the iris, the blooming sedum and fallen leaves give away what season it really is.

Iris blooming in fall

Tell me. How weird is this? Have you ever had a flower bloom out of season?

Transplanting season

In case you missed it, fall is here. (The autumn tablescapes, fall home tours and Hallowe’en decorations proliferating the blogosphere are a big clue. We bloggers appear to have trouble living in the moment). Anyways, we’re officially into fall. And it’s official transplant season.

Now I have to confess that I got a bit of a head start this year. I transplanted peonies back in August, and a couple of weeks ago Matt and I moved a few trees around.

I generally pay little attention to gardening timelines. With our gardens in the state they’re in, if I wait until the “right” time to move my plants it will take me decades to get things where I want them.

You’ve seen that we have lots of peonies spread all over the property. My mission this year was to move a few of them into the gardens I’ve established.

Bright pink peonies in front of a steel silo and old barn

I don’t profess to being any type of transplanting expert.

My usual technique is to try to keep as much of the soil around the plant intact as possible. Of course, the first peony I dug up was surrounded by weeds, and I had to hack at the roots to get rid of everything non-peony. If you’re curious, here’s what peony roots look like.

Peony tubers

The other thing I’ve learned over the years is to not replant the plants too deep. Transplanting makes it easy because I just keep them at the same level they were.

Transplanting trees

The other component of my not-at-all-scientific transplant process is to water the heck out of them. I remember when I first started gardening I read an article that recommended aiming for “quagmire”-like wetness. So far, September has been pretty rainy, so we have had plenty of help keeping up the quagmire factor, although we have supplemented with hoses and buckets as needed.

Watering transplanted peony

We have a few more trees and bushes yet to move before fall gets too far along. Oh and bulbs to plant. Don’t forget to do those too. The transplanting PSA just never stops.

Are you doing any transplanting this fall? Do you have any transplanting tips?

Sweet cherry tomatoes

She’s my cherry pie tomato, Put a smile on your face, Ten miles wide…
Tastes so good, Make a grown man cry, Sweet cherry pie tomato
(Badly paraphrased from Warrant)

After my lack of success last year attempting to grow tomatoes, I refused to plant anything edible this year.

But Matt wanted to try tomatoes again.

He got some plants from his Dad, and he carefully tended them all summer. He cleared an area on the turnaround, put the tomato cages in place, suckered them and watered them. When they outgrew the cages, he improvised with other trellises gathered from around the property.

It took nearly all summer, but his attention paid off. We finally have ripe, edible tomatoes! So much better than last year.

Even better, most of our plants turned out to be my FIL’s cherry tomatoes. These are wonderfully sweet. My absolute favourite tomatoes.

These tomatoes sprout every year in my FIL’s garden. However, just to be safe, I’m going to try to save some seeds this fall to grow our own plants next year using this tutorial from The Art of Doing Stuff.

Yes, my reluctance to grow edible plants has apparently been overcome by sweet ruby spheres.

Cherry tomatoes

Improvised tomato trellises

Improvised tomato trellises

Cherry tomatoes

How has your garden grown? What’s your favourite kind of tomato? Have you ever tried saving seeds? On a topic more likely to make you lose your appetite, can you believe that Warrant music video? There’s absolutely nothing like 80s hairbands.

Plant problems

Anyone know anything about lilacs, Japanese maples or holly? Each of mine is feeling under the weather.

The lilac is probably my biggest concern, simply because this plant has tremendous sentimental value to me. My bush grew from a shoot that sprouted off my grandmother’s lilac. It survived the move from our first house to the farm and up to now has thrived in the front flower garden. However, this summer the leaves started getting dry spots and then the tips curled under.

Blight on lilac leaves

When I unfurl the leaves, there’s a dirt-like substance inside. If there’s parasites, they’re too small for me to spot.

Blight on lilac leaves

Anyone have any guesses what might be wrong? I’d really rather not lose this plant.

The Japanese maple has his own problems as well. First, I will concede that he’s pretty crowded. I’ve been working at thinning the ferns since spring. The walnut tree is obviously another problem. I don’t have a good excuse why he’s been allowed to invade the maple’s personal space so much. Whether it’s crowding or some other issue, the tippy top branches are losing their leaves.

Japanese maple

Like on the lilac, the leaves are drying out and falling off.

Dying leaves on my Japanese maple

The Japanese maple took a beating during the ice storm. The trunk was completely wrapped in ice that was a quarter inch thick.

Ice caking the trunk of the Japanese maple

I was wondering if the tree is still traumatized from his winter ordeal. He’s just a bit weak this summer. He’ll pull through and grow more leaves next year. Won’t he? Or is that wishful thinking?

The final patient is my holly bush. Now I have to take most of the blame for this guy’s misery. He used to live in the front flower bed. However, I redrew the border of the bed, and he fell outside the line. I dug him up and moved him around the corner to the well garden. He was fairly well established in the front bed, so I cut through some pretty big roots when I transplanted him. He’s not fully recovered yet. You can see the leaves are pretty sparse and fairly yellow.

Sick holly bush

In my defense, I do have to say he wasn’t the healthiest guy before I moved him. He had very few leaves and probably produced all of a half dozen berries for the two years we’ve lived here. He seems to be plagued by ants. When I dig around the trunk, both at his original home and now in his new location, I unearth what looks like a whole colony. There’s not much bark left on his thick old trunk, and I wonder if the ants are eating him.

Trunk of the holly bush

When I pulled off a leaf, though, I found a different type of pest.

Small green caterpillar

Is this little green caterpillar the culprit? Is it the ants? Or the transplant?

I’d really appreciate any ideas anyone has. Anyone else having botanical illnesses in your own gardens this year? Let’s commiserate in the comments.