Beautiful bathroom to be?

I mentioned last week that we had some issues with the cold water tap in our main bathroom. I started to think that the solution might be a bathroom reno.

I really don’t want to do anything to this bathroom—including fixing the taps—until I can do everything.

And by everything I mean go back to the studs and start over.

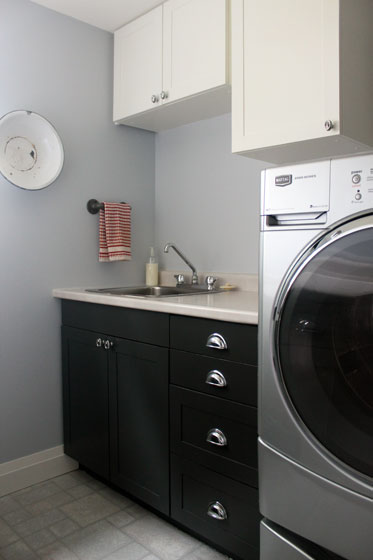
The layout of the bathroom is decent: big linen closet, large vanity with good storage, long counter and double sink. Plus the basics: tub-shower combo, toilet, window.

Main bathroom before

Main bathroom before

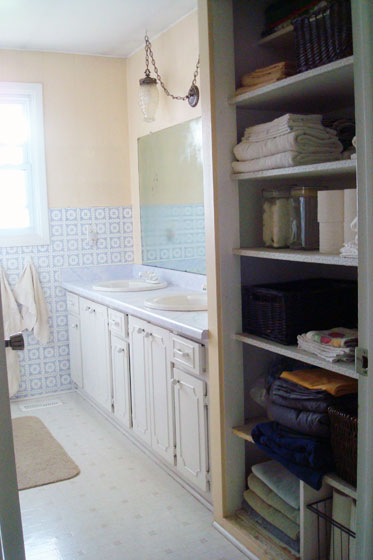
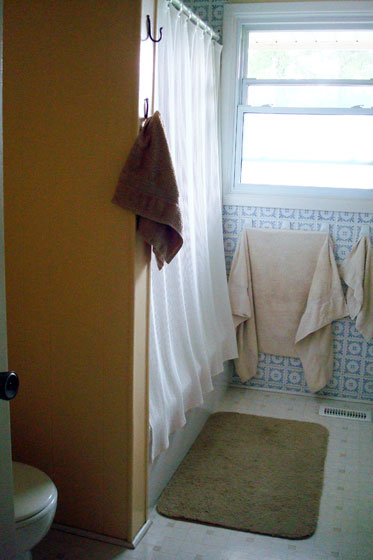
However, everything is old, chipped, discoloured, beat up–or, in the case of the countertop, Care-Bear-coloured.

Bathroom Before Collage

We were able to get the tap working again, so we’re not hauling out the sledgehammers any time soon (yay for the wallet, boo for my bathroom beauty). To cheer me up, I dove into my Pinterest board and pulled out some inspiration to share with you. I also need your input on a couple of areas where I’m not sure what to do.

For general inspiration, I really like what Jenna Sue did to her guest bathroom in the most recent One Room Challenge. It’s a clean, country space with lots of personality. I probably want something a bit brighter (more white), but I love the overall feel of her space.

So let’s dive into my not-so-loved space, okay?

My plan is to leave the fixtures in the same places (likely–I’ll talk about what might change below).

I want a new vanity (I’ll stick with white) with lots of drawers for storage and a beautiful white/light/natural coloured countertop. Undermount sinks (for function) with shiny retro look faucets (for form).

Bathroom vanity with lots of drawers

I like how this vanity squeezes in another drawer below the sink. Source: One Week Bath

Above the vanity, what do you think would work best for a mirror? We have a pretty big bathroom, but I like how the sheet mirror makes it feel even bigger. I’ve seen some cool ideas to get the space-expanding effect of the sheet mirror but in a little more stylish fashion. Or should I just go with two big wood framed mirrors? (That would let me do some fun wall-mounted sconces).
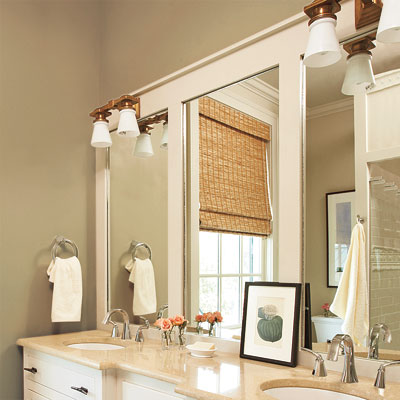
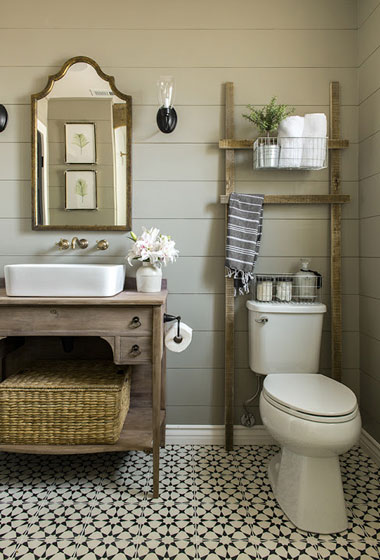
I’ll break up all the white with a beautiful solid wood built-in floor-to-ceiling linen closet. Again, I want lots of drawers, but I’ll probably do glass doors on the upper half. I do okay at keeping the linen closet tidy, but there are always those mismatched sheets, shampoo bottles or tissue boxes that aren’t as aesthetically pleasing to have on display.

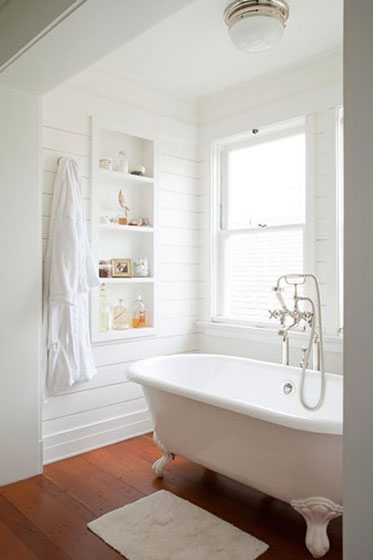
My biggest question is whether I should try to separate the tub and shower. It would be a bit of a squeeze to fit everything in, but we could probably do it. Is a country style claw foot tub worth it? If we keep the tub and shower together, how would you get a country feel?

With the high iron content in our water (even after it runs through our filtration system) everything turns orange very quickly. I’d rather not have tonnes of grout to clean, but one of those acrylic monsters doesn’t say “farm” to me. I also don’t love getting up close and personal with a shower curtain. What would you do?
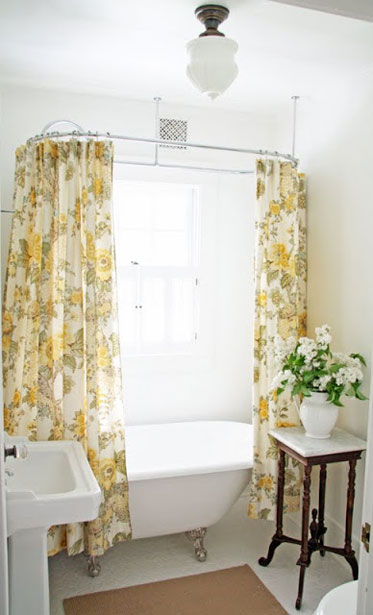
The floor is an area where I’m open to having a bit of fun. A patterned cement tile like Jenna Sue? A wood-look tile? Really retro with black and white?

I also like the idea of wood planks on the walls. We currently have fake paneling that’s been painted. It’s so stained, that no matter how many times I wipe it down I can still see where pictures hung in the past. I think real wood would be a step up. But would that be okay in a bathroom? I like a really hot shower, so I’m worried about how the steam will affect the wood.

Lighting is still TBD. I actually really like the cut glass swags that we have currently. In fact, you might remember I found a vintage light to match them. However, I’m not sure that they go with my vision for the new space. Do I just do pots and sconces?

Hmmm, I still have lots of things to sort out apparently. Maybe it’s a good thing we didn’t have to dive into a full on reno.

What would you do with this space? What style is your dream bathroom? What fixtures are on your wishlist?

Accidental demo

So I started to take apart the sunroom last weekend.

Inside the sunroom

It was a bit unexpected. I mean, we’ve always been planning to demolish the sunroom. However, I wasn’t planning on doing it now.

I opened one of the patio doors and it just fell apart.

Broken patio door on the sunroom

Broken patio door on the sunroom

The door is just one of the problems with the sunroom. Allow me to share the other reasons the sunroom is not worth saving.

Weeds growing inside the room.

Weeds growing inside the sunroom

Rain dripping inside the room.

Rain dripping inside the sunroom

Moss growing in the carpet inside the room.

Moss growing inside the sunroom

Glass shattered over top of the room.

Shattered windows in the sunroom

The sunroom is pretty disgusting. We haven’t used it, except for the very first week we owned the house. The heat was out, and the sunroom was the warmest place to have lunch–yes, we were that desperate.

Knowing the sunroom is coming down, we’ve not worried about maintenance. (Nor about finding a better spot for the skids leftover from the fireplace stone yet). So this view makes our house look a bit more derelict than it actually is.

Sunroom

The eyesore isn’t going away any time soon though. Matt patched the door back together and stuck it back in place. And hello, driveshed reflection.

Broken door propped in place

So my impromptu demo turned out to be a bit premature. We’ll have a sunroom for a little longer yet.

What’s the biggest eyesore at your house? Have you ever unexpectedly demolished anything? Do you have sunroom? Does anyone else have vegetation growing or rain falling inside your house?

Wonky wiring and a pair of pendant lights

At some point today, an electrical inspector will knock on my door. (Hopefully. It’s one of those “sometime between 8 and 5 things”). It’s been awhile since our electrician was here, but I’ve been putting off the inspection because my day job was requiring me to be in the office. I finally got a break at work and am working at home today, so the inspection can happen. I also finally got my fingers in gear to tell you about this update.

Matt and I had upgraded from the boob light in the kitchen to a school-house pendant some time ago. The fixture wasn’t in the right spot, though. It was off centre with the island and a single pendant didn’t look quite right.

Single school-house pendant over the kitchen island

I had ordered a second pendant back when we installed the first one (February 2014), but I didn’t want to tackle adding it on my own.

When we had the electrician here to move the light switch in the master bedroom, I had him relocate the existing kitchen light and add the second.

The wiring in this house is wonky. When the electrician took down the first pendant, I remembered exactly how wonky. There was no box to house the wiring. Instead, the fixture was attached to a couple of plates that were screwed to the drywall, and the wires–which wasn’t the right type either–just stuck out from a hole in the ceiling.

How not to wire a light

Obviously, it wasn’t right, but Matt and I had installed our new light anyways, knowing that we’d hire a professional to fix it soon. Well, soon turned out to be more than a year, but better late than never, right?

I was surprised when the electrician hypothesized that there was another light somewhere else in the ceiling. A close look at the drywall showed us a patch that I had never noticed. When he climbed up into the attic, he discovered the light (disconnected, thank goodness). This one had a junction box. It also still had the socket lamp holder attached to it. The light had just been turned so it pointed into the attic and not through the ceiling. What were they thinking???

Light fixture in the attic

The electrician drilled two new holes, inserted two new boxes and ran the new wires–and did all of it properly.

Wiring pendant lights over the island

I was happy to have a professional electrician fixing all of the mistakes. I was also happy that he was the one crawling around in the attic, not me. I like my DIY, but I’ve learned where to draw the line. Things that are beyond my skills or just plain unpleasant (and this hit both of them) are a clear time to call in professional help.

If you’re in the Guelph, Hamilton or tri-city area, I highly recommend Agentis Electric.

Electrician going into the attic

I did patch the hole in the ceiling on my own though (but I haven’t painted it yet). And here’s the finished product: pair of pendants, properly positioned–and properly wired–over the island.

School house pendant lights over the kitchen island

How do you decide when to bring in professional help? What’s the wiring like at your house? Do you have any light fixtures lying around just waiting to be installed? How do you handle lighting in your kitchen?

Solar one year later

A year ago, we flipped the switch on our solar panels and started generating electricity. I thought it might be neat to take a look back at the past year and see how our little generating station worked out.

If you want to catch up, here are all of the previous posts about Going Solar.

Just a reminder, we’re part of Ontario’s microFIT program. Under this program, we install solar panels, and then the power that we generate goes back into the provincial grid. The province pays us $0.396/kWh.

Over the past year (10 months actually, since our first payment didn’t arrive until July), we made $3,621.13. Each month the hydro company pays us for the electricity we generated two months before.

Graph showing income from solar panelsJust for comparison, we spent $2,604.35 on electricity for the same time period (including the wee bit of power it takes to run the panels). That’s a profit of just over $1,000. Yay to coming out ahead!

Our inverters tell us roughly how much we make each day. So far, our record is just over $29. Matt so badly wants to break $30.

Solar panel inverter screen

When the panels were first installed, I estimated it would take 8 1/2 years before our income equaled the investment we made in the panels. Using the numbers from the past 10 months, it looks like the payback period is about 9 years and 4 months. I’m optimistic that spring is going to be a good generating time for us, though, so I think the 8 1/2 is still achievable.

The winter was pretty dismal. There were lots of days where the income was in the single digits. The sun being in the wrong hemisphere was the biggest problem, but then there was the snow. Snow on the panels drove Matt crazy. After a couple of big storms, he climbed up on the barn roof with a broom and very gently cleared the panels.

Clearing snow off solar panels

The solar array is pretty big though, and Matt’s arms are only so long. There was one hard-packed drift that he just couldn’t reach. This thing was his nemesis.

Snow on solar panels

Eventually, with some yoga-like contortions and gentle shovel work from Matt, combined with the help of–what else?–the sun, the drift slid down the panels and off the roof in big icy sheets.

Ice sheets sliding off solar panels

Once we hit February, we started having lots of sunny days. As the sun returns to the northern hemisphere, our output has been climbing every day. Even cloudy days result in double digits.

Beyond the snow, we’ve had no issues at all. The inverters and the panels all are chugging along, the money is trickling in, and we’re doing our part to generate some clean power. We’re really happy with our decision to install the solar panels.

Scraping a stipple ceiling

Pimples. It’s not even a nice word.

Popcorn. That’s a much nicer word.

Stippled ceilings have come to be known as popcorn ceilings. However, in my opinion, popcorn is much too nice of a word to be associated with these ugly ceilings. Not to trigger any traumatic teenage flashbacks, but stippled ceilings are closer to pimples than popcorn.

Popcorn ceiling

Step one in the master bedroom makeover was to help the ceiling grow up from its ugly adolescence into beautiful adulthood–and I couldn’t just make like a fashion magazine and airbrush.

It was gonna take muscle, and it was gonna be messy.

So, armed with an all-clear on my asbestos test, trowels, a spray bottle of water, pole sander, extra sandpaper and a dust mask, I went to work.

Tools for scraping popcorn ceiling

In the basement where we also had stipple ceiling, I actually sanded a lot of it off. This technique gave me a really nice smooth finish, even if it did generate a tonne of dust. In the bedroom, I found soaking in water and then scraping with the trowel worked best. As much as the big yellow trowel would have been faster, I liked the control of my little trowel.

It was still a lot of work. Scraping a stipple ceiling is not fun. However, fueled by ju-jubes, I got it done. (My skin may have progressed from its teenage years, but my diet has not. The orange ones are still my favourite).

Jujubs

Underneath the stipple, the drywall was smooth and painted, which leads me to ask why? Why finish a ceiling smooth, paint it and then cover it in pimples? I just don’t understand.

We all know the prep work is most important to get a good paint job. I spent more time on prep for the bedroom than I ever have before. Scraping the ceiling, scraping the caulking from between the crown molding and the ceiling (ugh), patching hundreds of little chips in the ceiling (they were just minor chips of paint, but there were truly hundreds of them), patching one bad ceiling seam and one crack in the wall, sanding and pasting over again.

Ceiling after scraping the popcorn

It took days.

Thank goodness I was off work for the Christmas break. Although it wasn’t the most restful holiday.

In the end though, my ceiling is all grown up and pimple-free. Much nicer to look at when I’m lying in bed in my new master bedroom. (Apologies for the really bad photo, but I think you can tell it’s nice and smooth. Oh, and there’s a sneak peak of the blue walls).

Finished ceiling after scraping the popcorn

Have you ever scraped a stipple ceiling? Any techniques to share? Any insights on why people stipple ceilings? And most important, what colour ju-jubes are your favourite?

Farmhouse fieldstone fireplace

There’s lots of discussion these days about adding character to our houses. I believe a home should reflect both the people that live there and its setting. For me, this is one of the misses with our house. Our ranch-style bungalow looks like it could be in any neighbourhood from the 1970s. Inside and out, it doesn’t reflect its farm setting. So my mission since moving here has been to inject a little more country into the house.

Just before Christmas, the living room got a huge (literally) injection of country character with our new stone fireplace.

Fieldstone fireplace with barn beam mantel

Whew. That’s a lot of philosophy for a fireplace. More pictures.

Old wagon wheel hub on a stone fireplace hearth

The fireplace is beautiful, safe and, best of all, it works.

In a time when people are painting and white-washing over brick, tiling and drywalling over surrounds, a huge stone monolith like this is not necessarily in style. However, for me, this is one of those timeless designs that is about the farm, not the trend.

Fieldstone fireplace with barn beam mantel

The stone is Bluewater by Natural Stone Veneers. It’s real stone that’s been sliced to form “tiles” about 1 inch thick. You can order both corner pieces and flats. It’s a way to get the look of a stone fireplace for much less cost and much less labour. In fact, as my mason was doing the stone, he commented how close the Bluewater was to the fieldstone that’s found naturally in this area. Exactly what I was going for.

Just like real stone, the veneers are irregularly shaped. Our mason had great attention to detail in putting this stone together. Take a look at the upper half of the fireplace near the centre. See the diamond-shaped stone? He saw the special shape of this stone and worked to feature it in the middle. He chose the stone directly below the diamond specifically because of how its notch fit the bottom of the diamond.

Fieldstone fireplace with barn beam mantel

The mantel is barn beams from our own farm that we had milled at a local sawmill. We used two beams sandwiched together to get the depth we wanted. They’re finished with three coats of clear polyurethane.

The woodbox was a mid-project addition. This is why it’s important to be present during renovations like this. As he was building the fireplace, my mason said, “You have a lot of space here now that we’ve removed the chimneys for the decommissioned furnaces. Do you want a woodbox?”

Woodbox in the side of a fieldstone fireplace

I hadn’t even considered that possibility, and now I can’t imagine the fireplace without it. It’s really handy to have a place to store extra wood, but it also makes really nice visual. This is the side of the fireplace that faces the kitchen. As much as I love the stone, the woodbox breaks up the monolith and makes the view much more interesting.

The wood bucket is an old washtub that Matt and I bought at an antique store several years ago. I take the whole bucket outside, fill it with wood and bring it back inside–really heavy, but a really easy way to bring a big load of wood inside in only one trip.

Initially, I had a very, very plain rectangular fireplace screen in mind. However, since having this one, I find I like the contrast of the arched top with all of the other straight lines we have going on. It’s simple to move the screen to the side when I need to tend the fire. Surprisingly, the handles never get hot.

Fireplace screen

The grate is from my grandmother’s house. It sat outside at my parents’ house for years until my Dad brought it up to the farm one day last month. It fits as though it was made for the fireplace–just another example of how things work out the way they’re meant to.

We’ve had the fireplace for less than a month and already it’s been well-used. I’ve split wood, cleaned out the ashes and had lots and lots of fires. Last week temperatures were in the -20s. It was so nice to come home from work, light a fire and have dinner in front of the warm glow.

Deer antlers and Ikea Borrby lantern on a barn beam mantel

For me, nothing beats a real wood fire. In its function, as well as its fieldstone facade, it’s a perfect fit for our country farmhouse.

And just to remember how far we’ve come, here’s the full 14-day project:

Fireplace renovation animated gif

Soooooo much better.

Fieldstone fireplace with barn beam mantel

Looking back at home goals 2014

Before we dive too much into 2015–boy it feels weird typing that–I’m going to take a little look back to my Home Goals from 2014.

I’m proud to say that Matt and I kicked butt in 2014. I don’t mean to sound boastful. But we got a lot done around the house over the past year. Today’s post is about celebrating some of our accomplishments. Woo-hoo!

Here’s the list of my original goals and how we did on each.

1. Painting. Check!

  • Main floor hallway
  • Kitchen
  • New addition – Living room

Hallway painted Benjamin Moore Abalone

Painting the hallway and kitchen was the first project we tackled last year, and we crossed them off the list in February. The living room wasn’t on the list at first, but over the course of the year we slowly got it painted one wall at a time. In fact, we finished the final wall just last week (okay, so it was Jan. 2, but who’s counting?).

2. Laundry room. Check!

The laundry room was my first participation in the One Room Challenge. I love how I was able to transform this utilitarian space with just a bit of paint, some simple updates to the cabinets and a few fun accessories.

Black and white shaker cabinets with chrome hardware in the laundry room

3. Master bedroom. No check.

We were not very successful at the master bedroom makeover. I was supposed to scrape the popcorn ceiling back in the summer but never worked up the effort.

… That is until last week. Yup, the master bedroom makeover is underway.

Matt and I bought a new bed (a king-size one–yipes) just before Christmas. Its imminent delivery motivated me to deal with the ceiling. We’ve got a bit more work yet to go, but that’s what Home Goals 2015 are for (that post is coming up next).

4. Furniture. Partial check.

I had a few pieces of furniture that I wanted to find/make last year. I can cross off about half of my list.

  • Refresh bookshelves and living room TV stand with new trim and paint – More on the bookshelves here and the TV stand here and here
  • Coffee table for the living room
  • Sofa table for the living roomDetails here
  • Hutch/cabinetry/built-ins for dining room
  • Narrow dresser for my officeDetails here
  • Hutch for my office
  • Free-standing cabinet for the hallway to the laundry room – No details, but you can see it with the ironing board hanging on it here

Corner bookshelves

5. Living room fireplace. Big fat check!

I honestly did not expect to be able to cross the fireplace off the list this year, but I can. And it makes me a little bit giddy. We squeaked it in right at the end of 2014. The full wrap-up post is still coming, but I can let you know that the fireplace is fabulous. It was wonderful to lounge in front of the fire over the holidays.

And no, you’re not getting a picture of this yet. 😉

6. Landscaping. Maybe a partial check.

Landscaping continues to be my nemesis at the farm. I did some work outside, but not as much as I had hoped.

Front of the house May 2014

  • Reestablish the flowerbeds around the house. I’m about halfway around the house and have come to the decision that we don’t need flowerbeds on the south side or the back. It will take a lot of work to rip out the old beds, but once I do mowing will be quicker than weeding.
  • Plant grass seed where old firepits were and clean up the detritus that’s still hanging around. Again, halfway done. The grass is growing, but there are a few more piles still to clean up.
  • Tidy the east shore of the pond and build a new firepit near the water. I decided that this task is too big to take on myself, but budget constraints prevented me from recruiting some professional help. Maybe next year.
  • Continue to plant the turnaround. Half the turnaround is in really good shape. The other half we’ve gone with grass until I can work up the energy to make it a flower garden.
  • Put in a vegetable garden. Oh I had such ambitions around this one, but it was a complete non-starter.
  • Continue with the landscaping master list. I don’t think this task is ever going to go away.

2014 was much more successful than 2013. Last year at this time I was quite frustrated with how little I had accomplished. This year, I’m over the moon by how much we’ve done.

Having my goals was really important to help me stay focused. What made the difference this year was translating those goals into monthly projects. Thanks to all of you for sticking with me and encouraging us through 2014. Coming up next, Home Goals 2015.

Was 2014 a productive year for you? What was your biggest accomplishment last year? How do you stay on task?

Tips for renovating with your dog

Hello everyone. Holidays are officially over and it’s back to the regular routine.

Except, that is, for today’s blog. I have a different type of post for you.

As you know, before Christmas we redid the fireplace at our house. Today isn’t the full project post, but that’s coming, I promise.

As part of the renovation we had to make some special considerations for Baxter. Today, I’m sharing some of my tips for renovating with a dog over at ThatMutt.com.

Baxter and I would both appreciate it if you’d click over there to read today’s post.

Baxter posing during the fireplace reno

And for That Mutt readers who are dropping in, welcome. My husband and I live on a 129-acre farm in Ontario, Canada. I blog about our adventures in country-living and DIY renovating, which of course includes our favourite furry fellow, our dog Baxter.

Here’s some links to help you get to know us:

Thanks, Lindsay, for featuring Baxter and my reno tips.

Fireplace update – Week 2

Work on the fireplace continues. Our mason originally expected this to be a one-week project, maybe a day or two over. But it turns out our fireplace is large. After two weeks of 9+ hour days, the fireplace is not yet done. But we’ve come a long way.

Last week, the fireplace looked like this.

Masonry fireplace in progress

Now, it looks like this.

Fireplace two weeks in to construction

You heard a little bit about the hearth stone on Friday. Before I get into the other activities from the week, Baxter has a video to share with you about carrying in the slab.

A few other things happened before we were ready for the hearth. First, the chimney went up both inside and out. As you may recall, the old chimney was pretty much the whole reason for this redo. It’s surprisingly thrilling to have a big, solid, proper chimney. My Dad and I still have a bit of flashing to do, hence all of the wrapping.

Chimney wrapped in plastic

The cinder block rough-in was completed, and then the firebox was constructed. That’s what our mason was working on in this photo that you saw on Friday where he’s sitting inside the fireplace.

Mason building a fireplace

The second most exciting part of the week was installing the mantel. When he was building the structure of the fireplace, our mason installed four pieces of rebar. The bars went back into the block about 2 feet and were securely cemented in place. They stuck out on the face of the fireplace by about 1 foot.

My Dad and I drilled carefully placed holes on barn beams that matched up with the pieces of rebar, and then Matt and I slid the beams onto the bars. Voilà, mantel. Or half a mantel. This photo shows the first beam in place. The second beam goes on in front of this one and hides the ends of the rods.

Installing a barn beam mantel

This weekend, I gave the mantel a few coats of clear varathane to protect it and bring out the quality of the wood a little bit more. I’m giddy over this mantel. The rough barn wood is just so beautiful.

Barn wood mantel

If the mantel was the second most exciting, what was the first, you ask? Absolutely the most exciting development of this whole project was seeing the face stone going on. I picked the stone fairly quickly, but then I doubted myself for the past three weeks. Had I picked the right stone? Would it look good in our house? Would I like it once it was installed? Should I have made more effort to source other options?

Well, I love the stone. It’s exactly what I was envisioning. Rough field stone that looks like it could have come from our own farm.

Fieldstone veneer on a fireplace

Here’s another montage of how the fireplace has progressed from the start up to now.

Two weeks of progress on fireplace demo and rebuilding

We have at least a few days yet to go. By the end of the week, everything should be done (although I can’t promise the post-reno clean-up will be complete).

Stone moving party

I was super happy when our stone supplier was able to source a single piece of stone for our hearth. No seams! Score. 🙂 However, now we’re at the point of installing the hearth. Moving a who-knows-how-heavy stone! Not so score. 😦

The stone is 10 feet long by 18 inches wide by 2 1/2 inches thick. Every time it has moved up to now has involved a forklift. However, we face two problems:

  1. We do not possess or have access to a forklift.
  2. A forklift will not fit into our house.

We are relying on people power. Pure brute strength.

I do not have good photos to illustrate the scale of this task because, you see, I really didn’t think ahead to consider the scale of this task.

So here’s the hearth at the far right peeking out from behind the skids of stone back when they were first delivered two and half weeks ago.

Stone for the fireplace

And here’s our mason sitting inside the fireplace, just to give you an idea of the size that we’re working with.

Mason building a fireplace

The plan was that Matt and I would get home from work a bit early last night and together with our contractor we’d move the hearth into place. Well, I made it home, but Matt got caught in a snowstorm and spent two hours on the road. Our mason and I tested moving the stone on our own. Not gonna happen.

New plan. The three of us would reconvene this morning at 6am before Matt left for work.

Matt and I did a test last night when he finally made it home. His verdict? “Woman, I don’t know if this is gonna happen, even with three of us.”

So we did what you always do in this situation: call Dad.

So the new, new plan is a stone moving party at our house this morning at 6am. There will be Matt’s Dad, the mason, Matt and me. Baxter will be here too, though he probably will not be very much help.

Wanna join us? It’ll be a special way to start your day. 😉

I realize most of you will be reading this after the stone moving party has ended. However, we’d still appreciate if you could send your good wishes. Heck, send levitation charms. Send muscle enhancing drugs. We’ll take all the help we can get!

Update: The stone is in place and is still in one piece. Yay! Full fireplace update to come on Monday.