Five standout houses from homify

I’ve been writing for homify.ca for a few months now. As a home reno and decor junkie, I love going behind the scenes on amazing houses from all over the world.

Here are a few homes that I’ve written about that stood out so much that I had to share them with you.

I love the idea of being involved in a barn conversion–especially when the result is as beautiful as this barn in the Netherlands.

country Corridor, hallway & stairs by reitsema & partners architecten bna


The tiny house movement is not something I can see myself participating in, but it was neat to see how every “room” of a house could fit into a single shipping container.

rustic Houses by Cristina Menezes Arquitetura


Container homes are very much not my style, but this one from Northern Ireland came with sheep and a cow, so it appealed to the country girl in me. Plus it has an amazing suspended bathtub that looks like a hammock (!).

modern Houses by Patrick Bradley Architects


I love a good before and after, and this Portuguese home was full of them.

translation missing: ca.style.schools.eclectic Schools by SHI Studio, Sheila Moura Azevedo Interior Design


And my most recent post, a restored rustic farmhouse in Northern England, complete with a beautiful country kitchen.

by Linda Joseph Interiors


Check out all of my homify.ca posts.

Country or modern, rustic or sleek, what home styles appeal to you?

How to make a DIY carpet kick – Free plans

Early in your life as a DIYer, you learn that having the right tool can make the job much easier. However, sometimes you don’t want to go buy a new tool for a project that you’re only going to do once, maybe twice.

Laying carpet is one such job in my opinion. Likely–hopefully–you’re not laying carpet every year. However, if you do want to tackle installing carpet yourself, there are a few things that can help you get a nice finish on your floor and make the end product look more professional. One of those things is a carpet kick.

How to make a DIY carpet kick

Unless you’re a professional carpet installer, a carpet kick is not likely a tool that you’ll use very often. If you’re a professional carpet installer, I expect that you will go buy your own professionally made kick. However, for a DIYer you can easily make your own carpet kick out of scrap wood.

How to make a DIY carpet kick

Download the plans to make your own carpet kick

Materials:

  • 2×4 approximately 14 inches long
  • 2×6 5 inches long (you’ll cut it to a 5×5-inch square)
  • 3/4-inch plywood (also cut to a 5×5-inch square)
  • Two 3-inch screws
  • Two 1 1/2-inch screws
  • Eighteen 1 5/8-inch drywall screws (or other screws with a coarse thread)
  • Scrap piece of carpet (about 12×12 inches)

Cut each piece of wood according to the plan. Screw the wood together using the 3 inch and 1 1/2 inch screws.

If desired, paint your kick–I recommend a stylish baby blue.

How to make a DIY carpet kick

Once paint is dry, wrap the butt end of the kick in the scrap carpet and staple in place. You’ll likely have to trim the carpet to make it fit. This is like wrapping a really awkward present.

How to make a DIY carpet kick

Screw the drywall screws part-way through the kick plate so that they poke out the bottom. These “teeth” are what will grip the carpet and stretch it over the tackstrip.

How to make a DIY carpet kick

And that’s all there is to it. Now you’re ready to install your carpet.

How to reuse old carpet

Save

Save

Save

Save

How to reuse old carpet

A few weeks ago you caught a glimpse of our redone basement. We put it back together after our waterproofing contractors finished their work.

Wall repaired after waterproofing

Fortunately, the carpet and underpad were not damaged  by the leaks, so we were able to reuse them. (Although they could use a good cleaning).

Our contractors had folded the carpet back out of the way while they were doing their work.

carpetrep4

After giving everything–the carpet, the underpad, the concrete–a really good vacuum we were able to unfold the underpad and lay it back down over the concrete. The vacuum is critical. You don’t want to discover any bumps under your carpet once you’re finished installing it, so make sure everything is really clean and smooth.

How to reuse old carpet

The next step was to install new tackstrips, also known as smoothedge. The tackstrips are what hold the carpet in place. The underpad provides the guide of where to install the strip. Tackstrips come in two different versions–one for wood subfloor and one for concrete. Make sure you buy the right type for your floor.

Line the tackstrip up with the edge of the underpad with the little spikes pointing in towards the wall. Hammer the small nails in the tack strip into your floor. With our new concrete from the waterproofing, we found the nails did not want to go in. We ended up gluing the tackstrips to the concrete with construction adhesive.

Installing carpet tack strip

Once the glue was set, we unfolded the carpet and laid it over the tack strips. It’s important to stretch your carpet tightly. For this, you need a carpet kicker. I’ll share how you can make your own kicker in an upcoming post.

The idea is you lay your kicker on the carpet and using your knee you kick the carpet towards the wall. While the carpet is stretched tight, run your hands over the edge to press it onto the tack strip. You should feel the carpet catch on the spikes. As you get towards the corner, kick on a bit of a diagonal to push the carpet towards both walls.

How to reuse old carpet

You’ll notice that we installed the carpet before we put the baseboard back on. Usually you will have baseboard or trim in place already. In those spots, use a chisel to tuck the carpet in under the trim. (You can see some of the water damage we have on the base of the door trim. It has since been covered with fresh paint.)

How to reuse old carpet

And that’s all there is to it. I’m so grateful that we were able to reuse the carpet. This carpet goes through the whole basement, so redoing this one area would not have been an option. Plus installing it ourselves was a quick and easy DIY.

Have you ever installed carpet yourself?

Save

Save

Save

The results of our basement waterproofing

Today is supposed to be the last post about our big summer project: waterproofing our basement.

Here are the previous posts if you need to get caught up:

However, I can’t wrap up this project because a week ago we had a torrential downpour and we had puddles in the basement. Wah-wah.

The first leak was in the laundry room and the second in the cold cellar–two places we’d waterproofed.

In the cold cellar, it appears to have come up through the shiny new floordrain.

Basement floor drain

In the laundry room, it somehow somewhere came through the wall. The rain was an extraordinary downpour, but nonetheless, my expectation from our waterproofing is that we would be waterproof.

The big selling point of working with our waterproofing company is that the work came with a lifetime guarantee, so we’re working with them now to make sure our leaks are truly fixed.

In the meantime, I can share some of our progress. Here’s the biggest illustration–and one area that doesn’t leak anymore:

Before (ish)

Spray foam insulation

After with framing, insulation, drywall, paint, carpet and baseboard all redone.

Wall repaired after waterproofing

I think the thing that frustrated me the most with this project–aside from the fact that the leaks are not actually fixed–is that we ended up basically back where we started. We shelled out a bunch of money, put in a bunch of work and it all looks the same.

But looks aren’t everything.

With home ownership, what’s behind the walls matters a lot. So that’s why it’s so important to us to fix our leaks, not just cover them up or ignore them.

Last week’s rain was a bit extreme. Up to then, we had a few other rainfalls without issue. In fact the night the crew left, we had our first big rainstorm of the summer. Matt and I were sitting in the living room, and I said, “I think I hear the sump pump.” Sure enough, rain was falling hard enough that the water was flowing through the weeping tile around the foundation and filling the sump pit. Talk about timing.

We love the assurance of our new sump pit and pumps. There are two pumps in our pit. One is a regular pump that is plugged into a regular electrical socket. The second is a back-up pump and it is plugged into a giant marine battery.

Back up sump pump powered by a marine battery

If for any reason the first pump gets overwhelmed or stop working (like the power goes out), the second one will kick in automatically. Considering that power outages are a real possibility during rainstorms, we feel very good about our back-up system.

The pumps have two alarms. The first will sound if the back-up pump comes on and second very, very loud alarm will go off if both pumps for some reason fail.

Sump pump alarm

I also appreciate the finish both inside and out. In the cold cellar, the dirt and footings around the perimeter are gone in favour of clean smooth concrete. And the crew did a great job of making the new concrete nice and even with the existing floor. Where the exterior waterproofing happened outside the laundry room, again the wall looks super clean, even though we appear to still have some problems here.

At the doorway to the cold cellar, where I always did a little hop across the dirt at the threshold, the floor drain is a nice addition. The floor drain ties into the weeping tile which in turn ties into the sump pit. Given the water we found in the cold cellar, I surmise that there was so much rain that it overwhelmed the weeping tile and spewed out of the drain.

So unfortunately, I can’t say we’re all done. We’re hoping we get there soon, and I’ll be sure to share when we do.Save

Save

Save

How we waterproofed our basement from the inside

So far in recapping our basement waterproofing saga, I’ve shared a glimpse of the problems and the options we considered to fix them.

As I said in my last post, we decided to go with Omni Basement Systems, a company that would fix the leaks from the inside (for the most part… more on this below) and would guarantee the leaks would never come back (and never is a pretty long time).

Full disclosure, the basement waterproofing project was not sponsored. We paid for the work ourselves and didn’t receive any discounts or compensation.

We had three things we were looking to fix:

  1. Leaks along the south wall of the house and around the perimeter of the cold cellar that seemed to be coming from where the poured foundation wall met the slab of the concrete floor.
  2. Leaks in the laundry room where the bottom half of a former doorway had been bricked in to become a window (at the complete opposite end of the house from the other leaks).
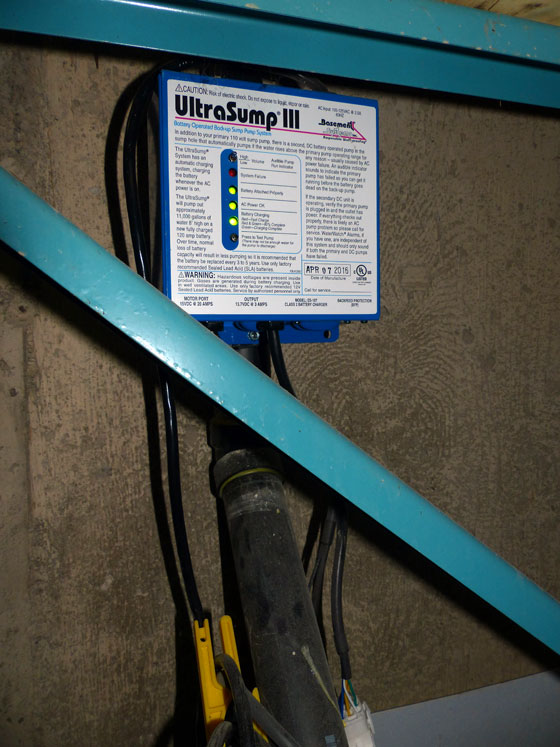
  3. New sump pit and pumps (plural) including a battery back-up system for when the power goes out.

Numbers 1 and 3 were going to be tackled from the inside, while number 2 was going to be tackled from the outside.

The laundry room window/door was located very tight to a corner. There wasn’t space to access the seam of the old doorway from inside the basement.

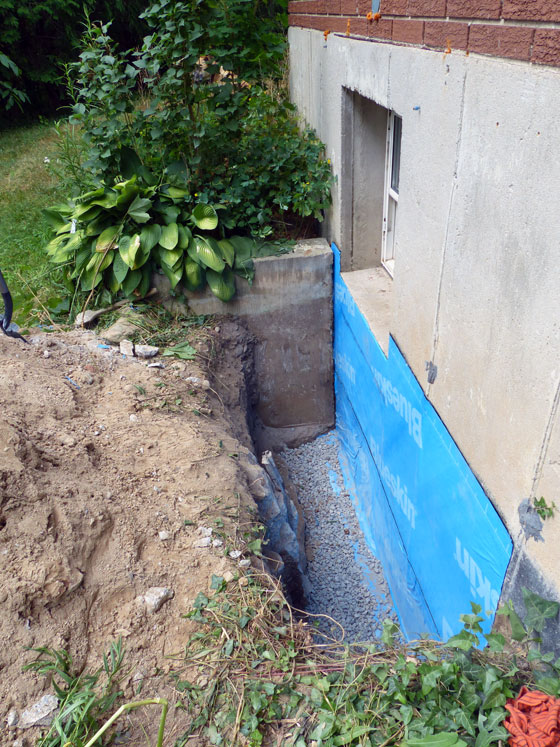
Working from the outside entailed digging down to the base of the foundation, a tough job at the best of times, but particularly unpleasant in the intense heat and humidity that has been this summer. This job was made doubly tough as the crew uncovered the original concrete retaining walls that had bordered the exterior stairwell and the slab at the base. Because of all the concrete, water had nowhere to drain and was seeping through the foundation into the house. The crew had to break up the extremely hard concrete as well as waterproof the foundation.

Waterproofing a basement foundation from the outside

Waterproofing involved filling the joint with special polyurethane polymer sealant. The sealant will never dry out or recrack even if the foundation wall shifts over time. A membrane called Blueskin was laid over the wall and then all of that was covered in “dimple sheet” and then the top edge was sealed with a thick line of tar. After that, the crew backfilled the hole. You can read more about the process on the Omni website.

Waterproofing a basement foundation from the outside

Waterproofing a basement foundation from the outside

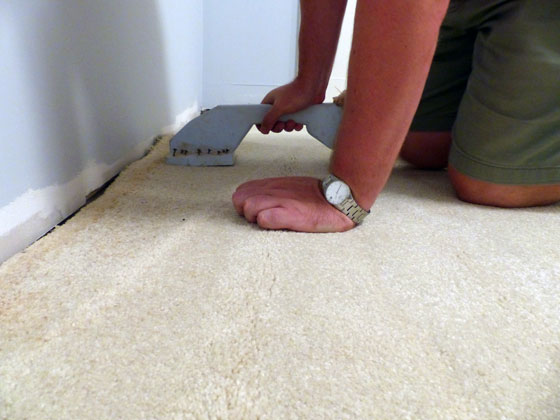
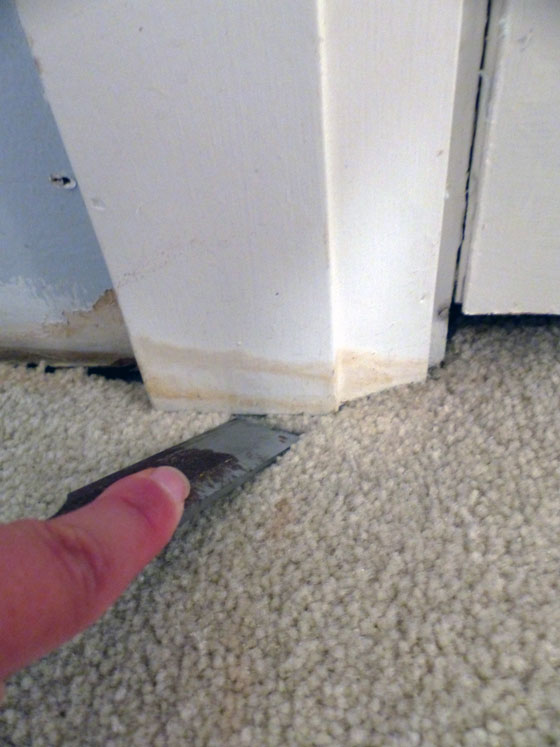
For the interior waterproofing, the first step was to access the foundation wall. In the long room (where our pingpong table lives), that meant removing the drywall. Matt and I did that ourselves, and I admit my heart broke a little bit after how long it took us to drywall the basement in the first place.

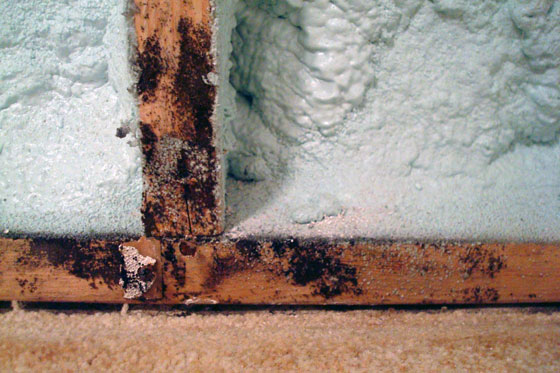
The crew then peeled back the carpet, scraped the sprayfoam insulation off the bottom of the wall going up about 16 inches, removed the bottom plate and cut about 16 inches off the studs.

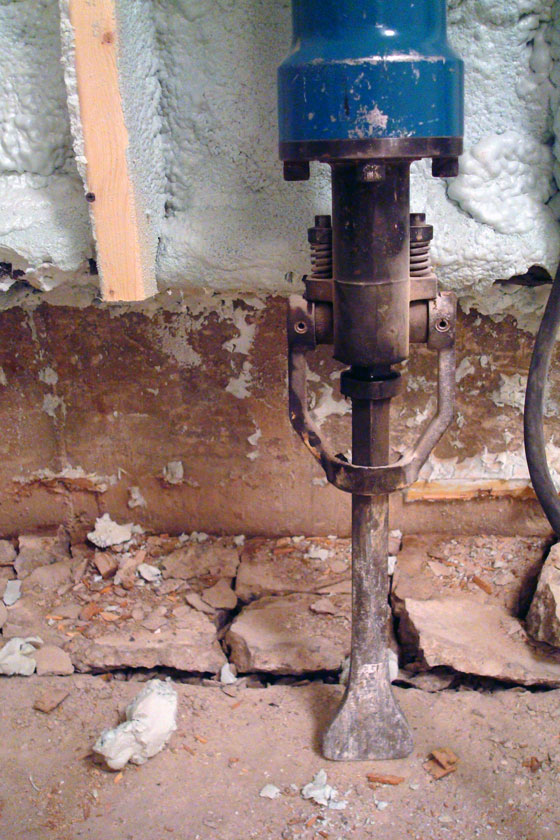
With a clear shot to the cement floor, they started the jackhammer. The object of the game was to remove the concrete floor about 8-10 inches along the base of the wall and expose the footing.

Waterproofing a basement foundation from the inside

Waterproofing a basement foundation from the inside

Breaking up concrete is dusty work. To contain the mess as much as possible, the crew went the extra mile, laying plastic over the carpets, pingpong table, piano, up the stairs and cordoning off the area where they were working.

Waterproofing a basement foundation from the inside

All of the concrete, dirt and gravel that was excavated had to be loaded into five gallon pails and hauled up the stairs out of the basement. Outside, it was dumped into larger garbage pails that were then loaded onto the truck at the end of the day. Such heavy, heavy work.

Brute garbage pails for a basement waterproofing project

The cold cellar is unfinished, so less prep work was needed and the crew could begin jackhammering right away. However, extra jackhammering was required as the cold cellar is the location of our sump pit. The old pit was described as a “farm-special.” We’ve encountered a few “specials” around the farm. They work, but they’re not always necessarily quite the right way to do things. The pit was thick, solid concrete, so it took a lot of work to get rid of the old pit.

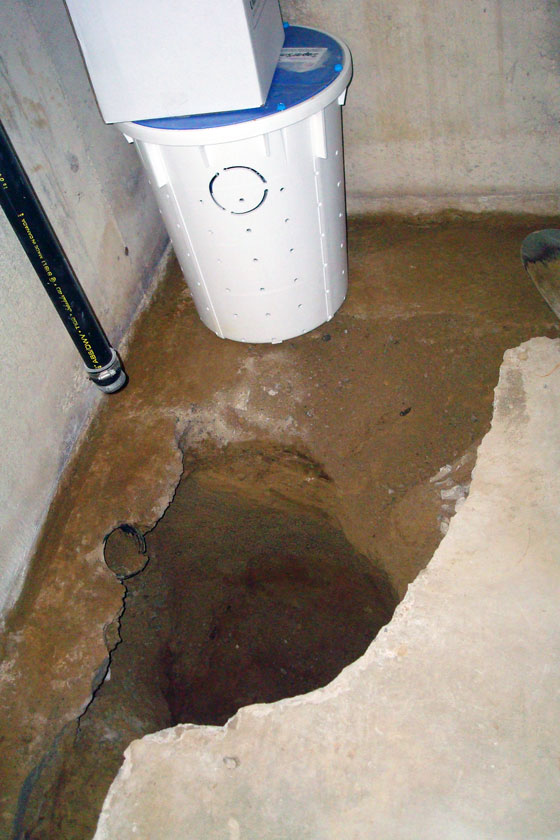
Below you can see the pit and our new liner ready to be installed. Note the holes in the sides of the liner. These allow ground water to flow into the pit, whereas before with our solid concrete pit, water had nowhere to go and ended up seeping in through the joint between the foundation wall and the concrete floor.

Replacing a sump pump pit

As part of installing the new sump pump, the crew replaced our old discharge line and extended it far out into the yard. Previously, the pipe had just dead-ended underground, and it was only about 10 feet from the house.

Old sump pump discharge line

The new line extends nearly 50 feet, and the end is capped with a sturdy grill–a “LawnScape outlet”–that sits at ground level. Obviously, ground level is not below the frost line. The whole pipe is just under the grass. We weren’t able to lower the discharge line at all. We didn’t have any issues with our old discharge line freezing, and we’re hoping we don’t with the new one. The sump pump won’t kick in until temperatures warm up in the spring, so we’re keeping our fingers crossed.

(“You really want a picture of me, don’t you? I’m much cuter than some pipe.”)

New sump pump discharge line

Back inside, once the footings were exposed, the crew dug a small trench around the perimeter and started to lay new weeping tile around the foundation. All of the weeping tile flow to the new sump.

Waterproofing a basement foundation from the inside

Part of what led us to choose Omni Basement Systems to handle our waterproofing was that they used some different types of materials  and systems than other companies.

One of these was the WaterGuard Perimeter Drainage Channel. This channel sits on top of the footing, so it’s away from the dirt and there’s no risk of the line becoming clogged over time. However, it turned out that the WaterGuard didn’t work with our footings, so the crew went with traditional weeping tile instead. I was a bit disappointed we didn’t get the assurance of a channel that will never clog, but the warranty still applies.

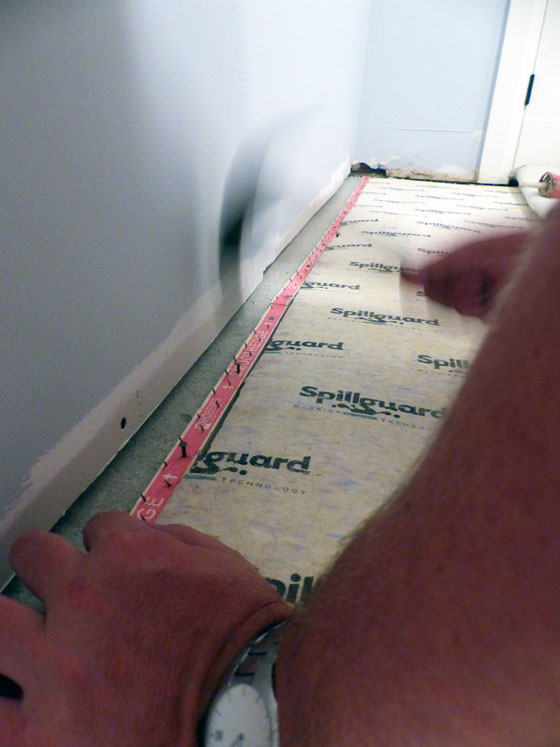
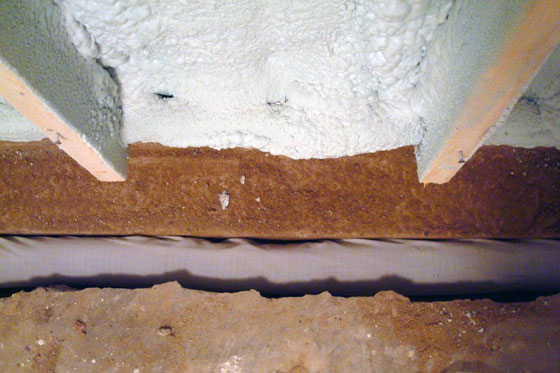
Once the weeping tile was laid the crew added some membranes over the concrete wall (the white panel and black strip in the photo below). These membranes form a barrier between the concrete–and any moisture that may be running through or down the wall–and the studs and drywall. The membranes curl over the weeping tile, funneling water into the pipe, and then concrete is poured on top.

Waterproofing a basement foundation from the inside

The concrete is smoothed and leveled so that it lines up with the original floor.

Waterproofing a basement foundation from the inside

And after two and a half days of work, that’s where the job ended. Next, it was over to Matt and me to finish the rest of the basement by repairing the studs, insulation and drywall.

But that will be for the final post. Stay tuned for the wrap-up where I share the finally finished basement, the results of the waterproofing and our experience working with Omni Basement Systems.

Save

Save

Save

Save

Save

Save

Save

Save

Save

Comparing interior and exterior basement waterproofing

Last month (who else can’t believe we’re already almost halfway through August?) I shared some of the water leaks we’ve had in the basement. Starting today, I’m going to go into a bit more detail about the waterproofing process.

Up first, I’m going to talk about the different waterproofing options we considered and what we ended up choosing.

Option 1: Exterior Waterproofing

Waterproofing a basement foundation from the outside

I don’t have any experience with waterproofing, but exterior waterproofing is what I was at least passingly familiar with.

In this approach, the foundation is dug out from the outside. You dig down the full depth of the wall all the way to the footing. Then weeping tile (that black corrugated flexible pipe) is laid in the trench along the base of the foundation. The idea is that water flows into the the weeping tile and is funneled around the foundation and into a sump pit.

The foundation wall is coated with sealant and/or membrane. And then the dirt is backfilled.

Option 2: Interior Waterproofing

Waterproofing a basement foundation from the inside

Due to my inexperience with waterproofing, the first time a contractor suggested an interior approach my reaction was, “But don’t I want the water to stay outside?”

It turns out, you can’t always keep the water out. But you can manage it once it gets in.

The method for interior waterproofing is somewhat similar to exterior, except for the digging. In interior waterproofing, the concrete floor is cut along the perimeter of the wall. The concrete is removed and then the dirt is excavated down to the footing. Weeping tile is laid along the footing and is funneled around the wall and into a sump pit.

The trench is filled with gravel and the floor is repaired with new concrete.

Option 3: Interior Waterproofing 2.0

As we went through the meetings with various waterproofing contractors, we came across one that had a slightly different approach. They worked from the inside like the other contractor had recommended, but the materials that they used were a bit different. The conduit that they laid along the footing were guaranteed never to become clogged with silt. They had membranes for the walls that funneled any seepage or humidity into the pipe. They had all kinds of informational videos and patents on a lot of their materials.

Their sales pitch was that they had invented a better mousetrap waterproofing technique. And they would guarantee it for forever.

Basement waterproofing cartoon

Our decision

The first time a contractor mentioned interior waterproofing to me, I admit that my reaction was something along the lines of, “Uh. No way, Jose. Do you see this finished basement? Do you know how much work we put into this? I’m not ripping it up to waterproof from the inside.”

After I calmed down, here were some of the other considerations we weighed in making our decision.

  1. Given the damage we’d had to the drywall, studs and baseboard, I was going to have to do some repairs inside. Waterproofing from the interior would allow us to have one disaster zone inside, rather than two, inside and out.
  2. The two contractors that recommended the interior approach also recommended focusing just on where we had problems, not on the whole foundation. Again, my reaction was a bit skeptical, as I wanted to waterproof only once and make sure we never have a problem anywhere ever. However, no one could guarantee that except for company #3.
  3. Over time regular weeping tile, whether inside or out, can get clogged with dirt. It may take a couple of decades, but when that happens water may once again seep into the basement (see no guarantee above).
  4. In exterior waterproofing, after backfilling the dirt will eventually settle. So a year or two after waterproofing we might have to do more work in terms of adding dirt and regrading.
  5. If we worked from the outside, the whole perimeter of our house would be dug up. I didn’t love the idea of sacrificing all of our flowerbeds after I’ve spent so much effort establishing them (although it did give me an excuse to skip weeding this spring). On the flip side, I liked that the disruption would be confined to the exterior, rather than our finished basement.
  6. All of the methods were within roughly the same price range. Money was not going to be the determining factor.
  7. Company #3 offered a lifetime guarantee that we would have no leaks in the areas that they waterproofed. Options #1 and #2 would only give us a 20 year warranty, but I wasn’t sure that was quite enough for me.

We decided to go with Option #3, Omni Basement Systems.

Omni basement systems truck

Coming up, I’ll talk about the waterproofing process and then share the results.

I’d love to hear your input. Have you ever gone through a waterproofing project? What option did you choose? If you haven’t gone through waterproofing, what solution would you select?

Save

Save

Save

Front porch dreaming

One of the things I most want to add to our house is a front porch. I think a porch is essential on a farmhouse.

Farmhouse front porch

Source: homify

Plus, I dream of watching summer storms roll across the fields, starting my day with breakfast outdoors and ending my day relaxing in a rocking chair.

Until that day comes, I’ll continue dreaming, imagining and planning. I recently wrote about how to create a functional and stylish front porch on homify.

Do you have a porch? Want a porch? What makes the perfect summer porch for you?

Save

Save

Beating the heat

I don’t know what the weather’s like where you are, but here in Southern Ontario we are having a serious heatwave.

So what do you do if it’s mid-July and the forecast is showing hot and sunny all weekend? For many Ontarians, the answer is head to cottage country where you can be by a lake. In fact, that’s just what my husband did.

However, if you’re me, the answer is, “Why don’t you go by yourself? I’ll stay here and tape the drywall.”

What?

Yeah. I dunno what’s wrong with me.

Drywalling the laundry room

Thanks to our basement waterproofing (I promise I’ll share more details on this project), we have some drywall to repair. We also are building an extra closet in our laundry room, so we decided to do all the drywall at the same time.

We spent last week on framing, insulating and drywalling. Matt and I hung the last few sheets on Friday before he left. We’re a little rusty at drywall. Measurements were off and gaps between sheets were large. Fortunately, paste covers a lot.

By the time Matt got home, I had finished the first two coats, and things were looking much better.

Plus, the basement was cool. Not quite lakeside, but not an altogether terrible way to spend a weekend.

What did you get up to this weekend? Do you like the summer heat? I love it, honestly, and would have been quite happy to spend my weekend outside versus in the air conditioning. Would anyone else have prioritized drywall over a weekend away? Did you see the temperatures from Basra? I think that’s a little hot even for me.

Our new summer project

Last week I mentioned that we’ve added a new summer project to our to-do list. Unfortunately this project is driven by a problem. You got a bit of a glimpse of the problem in this photo that I shared on Friday.

What is this?

This is the drywall in the long room in the basement. And in case there’s any confusion, it’s not supposed to look like this.

We’ve had water issues off and on ever since we finished the basement. This spring was the worst.

In the unfinished space just beside the long room, this was the scene. Water seeping in at the joint where the foundation wall met the concrete slab.

Basement foundation leak

We surmise that this happened along the whole wall, including in the finished area. The baseboard swelled and stained. The carpet was damp. And behind the baseboard mold grew.

Water damaged baseboard

We had some water-proofing contractors come in a few weeks ago and give us quotes to fix the problem. Work starts today. So our formerly finished long room now looks like this. And it’s about to get worse.

Spray foam insulation

With the drywall removed the studs don’t look too bad. Yes there’s mold, but it doesn’t go too high on the wall, and the wood isn’t rotted at all. Even so, I’m not sure much of this will be salvaged, as our contractors are doing the waterproofing from the inside.

Water damage

The other area of focus outside of the long room is the cold cellar. The cold cellar is an addition, and when it was added, the concrete floor was poured just up to the old footings. In the spring or even on rainy days, the whole perimeter of the cold cellar leaks.

Water leaks around a basement footing

This area isn’t as worrisome, as it’s unfinished, but nonetheless we’d rather not have water in the house at all.

Our contractor is also going to redo our sump pump pit and put in a two new pumps–one on a battery back-up. During a power outage in one big storm this spring, Matt bailed the sump pit for four hours. We’d prefer not to repeat this situation… or worry about the power going out if we’re not home.

Waterproofing is one of those projects that I’m not super excited about. Cutting into our drywall was a bit heartbreaking after all of the work we put into finishing the basement in the first place. Plus it’s a lot of money just to get us back to where we were when we first finished the basement.

However, it’s a very important project. Knowing that this is our forever home, we want this problem solved.

Have you ever waterproofed your basement? Do you have any water leaks?

Save

Save

Save

Save