Find a seat

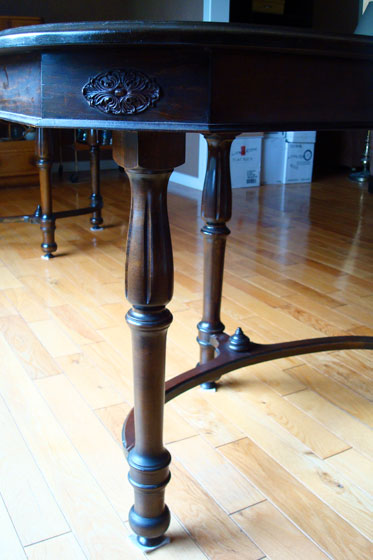
Now that we have our new dining table, my attention is turning to my favourite furniture: chairs.

Here are my criteria for new dining chairs:

  • Contrasts with, yet complements, the traditional dark wood table.
  • Reasonably priced–especially as I’d like to buy eight.
  • Not upholstered.
  • Slightly country feel. We live on a farm after all.

Here are some of the options I’m thinking of.

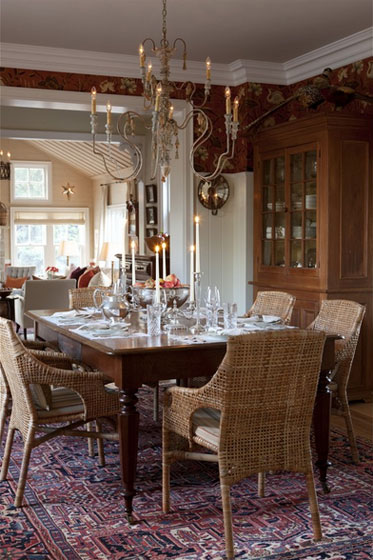
The front runner right now is something wicker or woven. Sarah Richardson used rattan arm chairs around the table at her farmhouse. I’d probably go more of a parsons chair route, as I want to squeeze as many people around the table as possible, but I really like the contrast and casual feel of a woven chair.

Sticking to the wicker theme, I also like the woven seats and the ladder backs on these chairs from for the love of a house.

Jen at Rambling Renovators found some great cross back chairs for a decent price. Their weathered finish would tone down the formality of the dining table and still keep the country feel that’s appropriate for our setting. Ikea has a white version that would contrast nicely with the dark wood table, but they look pretty plastic in person.

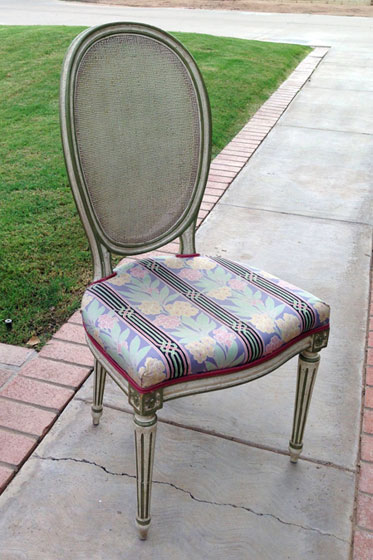
Jenny at Little Green Notebook recently scored a great deal on some Louis style chairs. The fluting on the legs picks up on some of the details from the table, and with a white glaze or slightly distressed finish we could still avoid the matchy-matchy dining set look.

Or I could just collect a whole bunch of old chairs, paint them all the same colour (cream, maybe?) and use them. I’ve seen people do this quite successfully. It would definitely be country and would probably be the cheapest option. I’m just not sure that that much mismatching is my style.

Sigh. I see why dining room sets are popular. Easy. No need for creativity or independent thought. Convenient.

What do you think? Do you like any of my ideas? Or do you have a suggestion of your own? I welcome any and all advice. How do you handle mixing and matching in your house?

Table for 2, 6, 10… everybody

Every time we have people over for dinner, I realize we need a larger dining room table. The table that we have fits four comfortably, six if we squeeze. A typical family dinner, no matter whether we’re hosting Matt’s family or mine, usually involves about eight people, not including us. Special occasions like Christmas or Easter when we add in extended family require a second table and lots of extra chairs.

Well, we may still need a few extra chairs, but we should now be set in the table department.

Antique dark wood dining table

I’ve been casually searching kijiji every so often (more popular in Canada than Craigslist), looking for a few very specific pieces of furniture. A couple of weeks ago, browsing the dining tables, I came across a beautiful antique dark wood table for an incredible price. I emailed, the seller replied, a meeting was scheduled. I borrowed my dad’s truck, we met, the table was examined, money was exchanged (a whole $130) and the table came home with us.

I know nothing about antiques, but I know I like this table. The unique legs obviously drew me in first. The size was what sold me: four feet wide by eight feet long when it’s fully extended. It has four leaves, and I think it could probably stretch to include a few more.

Triple curved legs on an antique dining table

At some point I may have some more leaves made. I feel like our dining room can comfortably accommodate up to a ten foot table. If we do add extra leaves, I’ll definitely need to also add an extra support leg of some kind in the middle. The table has a wee bit of a sag when it’s fully extended, but nothing too noticeable.

I would also like to have the top refinished someday. It’s pretty rough, but since I use a tablecloth most of the time, I can wait on the refinishing. The finish on the legs and apron is in great shape, so I’m hoping that I could find someone who would just refinish the top.

Damaged top on an antique wood countertop

I do need some bigger tablecloths. But not too big. I still want to see the pretty legs.

So who wants to come over for dinner?

Has anyone else had success with second hand shopping online? Any antique experts out there who can share what to look for in furniture? Anyone have any tips for refinishing furniture?

Coinkydink

There’s been some weird things happening this week… too weird not to share with you.

They could just be coincidences, but I’m choosing to believe that the universe is speaking to me.

Coinkydink #1: Tuesday, I posted about my wing chair dilemma. A few hours later, I found out that I won the Austin chair from Decorium in BlogPodium’s registration contest.

Austin chair from Decorium

What I’ve not shared with you before is that I have a bit of a thing for chairs, so this is absolutely the perfect prize for me (even though I still want a wing chair). Between our house and my parent’s, I have numerous chairs, most in need of repair, refinishing and reupholstery. I see them sitting at the side of the road, and I just can’t pass them up. Long before we ever inherited our dining room set, I had first fallen in love with the chairs which I’d seen spread around Matt’s grandfather’s house.

Apparently, the universe approves of my chair habit. In fact, the universe is an enabler helping me to build my collection.

Coinkydink #2: After writing the post on Sunday afternoon about Baxter’s disappearing act, I checked my stats to see how the blog was doing as I do everyday. I found that someone had found their way to my blog by searching “baxter dog runs away.”

Baxter dog runs away search term

Universe, I got the message. I will keep him on the leash from now on.

I’m still looking for the lesson the universe had in mind when Baxter ate the tray of brownies off the counter, raided the garbage for chicken bones and then chased a skunk–with the predictable result–all within 12 hours. I mean, beyond the lesson of “thou did not set thy dog up for success.” That one came through loud and clear… and pungently.

So, there’s been some ups and some downs this week. How’s your week been? Does the universe ever speak to you? Am I just imagining things?

Not so fab freebie

See my full review of the Ikea Strandmon.


People, I am uncomfortable.

It’s affecting me physically, financially and emotionally.

It all began at the start of the summer.

A colleague at work was downsizing. She had furniture–extremely well-made furniture–and she wanted it gone.

I said, “What I’m really looking for is a wing chair.”

She said, “I have a wing chair.”

I said, “I’ll pick it up on Thursday.”

Of course what I really meant was I’d convince Matt to go with me to pick it up on Thursday, as there was no way a wing chair would fit in my car. If you’ve read any of Victoria’s hilarious blog, Matt’s reaction is a lot like Paul’s (although the wing chair is not in any way the same as the kingdom mirror).

So with only slight jeopardy to my marriage, Matt was on board. After he carried the chair out of the house, loaded it, drove it home, carried it into our house and down the stairs to the basement, he stood there, looked at it, and said, “Do you like that fabric?”

I said, “Of course not. I’m going to recover it!” And then I sat down.

And he said, “What’s wrong?”

And very quietly I said, “It’s not the most comfortable.”

Matt was silent.

Since then, the chair has sat in the reading nook in the basement. Occasionally, I sit in it, hoping it’s gotten more comfortable. It hasn’t. I had a friend come over and test it for me. She agreed. It’s just not a comfortable chair.

Flowered wing chair

The seat is too shallow. The back is too straight and too short. The wings are too narrow. This is a sit up straight and balance your teacup on your knee type of chair (which I should have guessed from the fabric). This is not a slouch down, lay back, snuggle in and relax type of chair.

However, I found a chair that is exactly what I’m looking for.

Ikea Strandmon wing chair

Most of you are probably familiar with Strandmon from Ikea. This chair is extremely comfortable. The first time we met (before the uptight flowered one came into our lives), both Matt and I agreed that it is a great chair. You can sit sideways with your legs thrown over the arm and your head is still wonderfully supported by the wings–yes, I absolutely sat like this in the store. The back is the perfect angle to slouch a little bit but still be supported.

I want this chair.

But it’s Ikea. The chair that I have is probably full of hand-tied springs, high density foam and solid wood. There’s no way that Strandmon can match that. Plus, the chair that I have was just $25. Strandmon is $300. Twelve times more expensive!

Sure I’ve spent money on furniture before (hello most comfortable couch ever), but it’s always been a carefully researched decision into an “investment” or “adult” piece of furniture that will last us for years. You may say that $300 isn’t a lot to spend, but the rest of my furniture either came from garage sales or was made by me, so my threshold for sticker shock is pretty low.

The only way I can think of to make this work is to put Strandmon on my birthday list. September happens to be my birthday month. My family doesn’t typically do big extravagant expensive gifts for each other (and yes, in my world $300 is a lot to spend), but I think if all of my family members and Matt went in together, I would feel okay with them buying me Strandmon.

What do you think, family? Happy birthday to me?

Update: Check out if my birthday wish came true… and some more thoughts on the Standmon… in this post.

Update #2: See the finished reading nook here.

Searching for my dream ‘man

Never fear, Matt, you are still the man for me. What the title of this post refers to is my search for the perfect ottoman.

In case it hasn’t been clear, I’m loving our big, beautiful, brand new basement. However, things are a little barren down there. Between the two very large main rooms, we’ve only furnished one corner of one room–the TV area home to the most comfortable sectional ever and my homemade custom TV cabinet.

Our two lone pieces of furniture were both working out great. What wasn’t working so well was the big empty space in the middle of the sectional. We had nowhere to set a glass, a snack or a remote control.

I knew I wanted an ottoman–somewhere soft and cushy for people to put their feet up, something that could serve as extra seating if needed and something that had storage inside.

I was still in the looking around and seeing what’s available stage when we stopped into the store where we’d bought the couch. They offered a large storage ottoman with a hinged top made by the same company that made our sectional, Decor-Rest. I was planning to take it under consideration, but then Matt said the magic words, “Just buy it, woman.”

The guy really wanted a spot to set his drink.

We put in our order, and a few weeks later it arrived.

But now that it’s here, I’m not sure that I love it.

Decor Rest storage ottoman

Faced with placing the order more quickly than I expected, I chose the same fabric that we used on the couch. My original vision had been for a contrasting fabric with a bit more pattern, rather than matchy-matchy.

I didn’t want the same fabric, but I did want the same feet. The feet on the ottoman are in the same finish as the feet on the couch, but they’re narrower and taller than the feet on the couch. I realize this probably isn’t noticeable to most people, but the fact that the ottoman is an inch or so taller than the couch bugs me.

While the ottoman is too tall outside, inside it’s too short–or at least shorter than I expected. The top cushion is very thick, which limits the depth of the storage part. There’s still enough space to put the video game accessories, DVDs, throws or whatever else I decide to hide away, though, and the shallower storage will save me from losing things in the depths of the box, I guess.

Allow Guitar Hero to demonstrate the interior capacity of the storage ottoman.

Guitar Hero games and guitars inside the DecorRest storage ottoman

The biggest thing I’m not sure about is the shape. Back when I was imagining the basement, I had envisioned a square ottoman. This one is rectangle. It is a very large rectangle–36 inches by 28 inches by 20 inches tall–and fits comfortably in the centre of our sectional. And I guess the rectangle gives more breathing space between the ottoman and the TV, which isn’t a bad thing.

I’m not planning on returning the ottoman or reupholstering it any time soon, so it’s not as though our relationship is doomed. It does what I want in terms of storage, seating and providing a soft space to put up your feet. The overall style matches the style of our couch. I may trim the feet a little bit–we’ll see.

Even if the ottoman isn’t my dream ‘man, it accomplishes one other important objective: it gives my two-legged dream man a place to put his drink.

Tray on top of an ottoman

Isn’t there some saying about this situation? Happy husband, happy life? Somehow that doesn’t sound quite right to me. What about you? How do you approach furniture shopping? Have you ever had buyer’s remorse after a big purchase? Are you an ottoman or a coffee table person?

How to use preglued veneer edging

I’ve posted an addition to this tutorial: How to apply pre-glued veneer on curved edges

Our new TV cabinet that you saw at the beginning of this week is a thing of beauty in my (admittedly biased) opinion. However, this wasn’t always the case.

The cabinet is made of 3/4″ pine plywood. It’s paint grade, so the surfaces have a nice smooth finish. However, the raw edges are just that… raw. They’re rough and the layers of plywood are clearly visible. To finish off the edges, I used preglued veneer edging. This edging is very easy to use. Here’s what you do.

1. Gather your tools and materials.

Materials to apply veneer edging

This is a simple job that doesn’t require a lot of technical tools. Clockwise from bottom left, I have my roll of preglued veneer edging, my iron, a scrap 2×4 block, a file and scissors.

2. Set your iron to the cotton setting.

3. Prepare the edging. Use your scissors to cut a section of veneer that’s roughly half an inch longer than the edge you’re going to cover. You don’t have to be precise in your measurements. I just hold the veneer against the cabinet edge to figure out how long the section should be. You can work directly from the coil, but it’s easy for the veneer to get twisted, so I recommend cutting it into lengths first.

4. Starting at one end, carefully position the veneer against the edge that you want to cover.

Iron on veneer edging

The veneer will be slightly wider than the edge that you’re covering. Keep it flush on one end and one side and let it overhang the other.

5. With your edging in position, apply the iron to melt the glue.

Ironing veneer edging

I’ve found a “pressing” technique rather than an “ironing” technique works best. Just hold your iron in one spot for about 20 seconds. When you remove the iron, make sure the veneer is still aligned along the edge of the plywood. The glue will stay soft for only a couple of seconds so adjustments have to be made quickly.

6. Using your block of scrap wood, firmly press the edging onto the plywood.

Pressing veneer edging onto plywood

Press hard and slide the block back and forth over the section that you ironed making sure that the veneer fully adheres to the plywood.

Repeat steps 5 and 6 until the raw edge is completely covered with veneer.

7. Once the veneer has cooled, trim the excess that’s overhanging the one side with a file.

Trimming veneer with a file

File towards the face of your plywood keeping the file at roughly a 45 degree angle. There are tools that will trim the veneer as well, but the file has always worked well for me.

Your edge should now be nice and smooth and ready for stain or paint.

Finishing a plywood edge with oreglued veneer edging

Some tips for using preglued veneer edging:

1. When cutting the veneer with your scissors, try to get a nice 90 degree cut. This will give you a good starting point for your next piece.

2. Check for joints in the veneer before you glue it to your plywood.

Finger joint in veneer edging

The veneer is connected by finger joints that aren’t the most attractive and wreck the illusion of a solid piece of wood.

3. Don’t skimp on pressing the veneer with your block. You don’t want your veneer to peel off once your cabinet is done. Pay special attention to the edges of the tape to make sure it’s firmly stuck.

4. If you use the file to trim the veneer, clean the file every so often. The sawdust will fill the grooves and make it more difficult to get a clean edge. I just tap the file to knock out the dust.

5. Watch out for splinters.

Splinter beside my fingernail

Ouch!

Although iron-on preglued veneer edging can be slightly dangerous for klutzes like me, it is very easy to use. Ironing is one of my least favourite tasks, but for some reason ironing wood is less tedious than ironing clothes for me. Just a little bit of effort results in a very nice polished finished for furniture, shelves or other creations.

Have you used veneer edging before? Who else is not a fan of ironing? Is anyone else susceptible to splinters? I seem to get a few a week. I’m sure a few are in my future this weekend. How about you? Any special projects on tap for the weekend?

I’ve posted an addition to this tutorial: How to apply pre-glued veneer on curved edges

Video game heaven

Anybody know what this is a picture of?

Final fight nintendo game

I wouldn’t know what this is except that I live with someone who exposes me to such things. This picture is from Final Fight, a video game for the Super Nintendo.

Rather than asking what the picture is of, however, I should be asking you what it signifies. What this picture means is that Matt finally, for the first time in his life, has all of his video game systems set up at once.

The reason for this momentous occasion is our new TV cabinet.

TV cabinet for vintage video game systems

I’ve never been into video games, but Matt has played his whole life and has built quite a collection. However, it’s always been a case of he would get a new system and the old one would be packed away. On those days when he really wanted to relive his childhood and play his old Sega Master System (the first he ever bought), he was out of luck.

When we were renovating the basement, one of the criteria was to have a good TV area for watching movies and playing games–any game he wanted. So, we needed a TV cabinet.

And the cabinet needed to do a few things:

  • Accommodate all of the equipment: the TV, the satellite receiver, the Blu-Ray player and at least 10 video game systems.
  • Store DVDs and video games.
  • Keep all of the controllers, connectors and wires that come with video games handy but out of sight.
  • Keep everything tidy and organized.

I decided my best option was a custom cabinet, so I sketched up a plan, and my Dad and I went to work.

We went with adjustable shelves on the top section and drawers on the bottom. The overall dimensions of the cabinet are 80 inches wide by 16 inches deep by 33 inches high. The top gives us a spot for our phone (we need a land line in the country where cell service is a bit unreliable), our new 50-inch flat screen (more on that later this week) and a little bit of display.

The shelves are dedicated to all of the systems.

Video game systems in a TV cabinet

Matt has set up his XBox 360, PlayStation 2, Sega Dreamcast, Gamecube, Sega Genesis, Sega Master System, Nintendo 64, Wii, original Nintendo, Super Nintendo. Holes drilled in the back of the cabinet allow him to poke the wires through to hook up the systems.

The best part of the cabinet is the drawers.

Drawers in a TV cabinet for video games

There are four nine-inch-deep drawers along the bottom, and they hold DVDs, games and controllers. As we were building the cabinet, I kept increasing the size of the drawers, and I’m so glad that I did. They hold so much and make it so easy to keep everything tidy. It was a big pain to get four drawers perfectly lined up and sliding smoothly, but I can say now that it was worth it to have everything so well organized.

It’s also worth it to see how much Matt enjoys having all of his games at hand.

How many of you recognized the picture at the top of the post? Are there any other video gamers out there like Matt? In addition to Haggar and Cody from Final Fight, our basement has also hosted Link, Zelda and Mario over the past few weeks. What’s your favourite game? Have you ever built a piece of custom furniture? Any tips for constructing drawers? How do you keep video games or electronics organized at your house?

Christmas comes early

Merry Christmas to us!

Decor-Rest sectional couch with chaise

Sorry for the lighting. Winter hours plus being underground make for challenging photography.

The sectional we bought for the basement–Matt’s and my Christmas present to each other–wasn’t slated to arrive until maybe Dec. 22. However, the Christmas elves were obviously working overtime, because the couch showed up early.

Unloading couch from delivery truck

Despite the fresh snow, the couch arrived by truck rather than sleigh

There may have been a happy dance when I heard it was on its way… Okay, and a fist pump too.

Sectional pieces prior to assembly

The sections of the sectional as our delivery team elves set it up

We went with what I would term a semi custom sectional. It’s made by Decor-Rest, a Canadian company, and we ordered it through Smitty’s Fine Furniture, another Canadian company.

Semi-custom means we got to pick the configuration and the fabric from a selection of options. We went with a pretty neutral grey-black-white tweed fabric, and then I picked a few brightly coloured cushions to pep up the fun factor.

Retro striped cushion

It’s probably not everyone’s taste, but I love the bright colours and retro look of the striped cushion

Ever since I first saw the basement, I knew I wanted a big corner sectional with a chaise. With this couch I definitely got my Christmas wish. The couch fits perfectly in the corner and has lots of space for Matt, me and anyone who comes to visit.

Chaise extension on a sectional

Although please do not sit in my seat

It’s incredibly comfortable too. In fact, there may have been an hour-long nap one evening when we were supposed to be working on finishing touches in Matt’s office.

I’m looking forward to a lot more of those soon! Maybe over Christmas vacation?