How to help a turtle cross the road

Our farm is in a very marshy area. On the roads around the farm, I often encounter turtles on the move from one marsh to another–usually on the opposite side of the road.

A turtle covered in moss

Fortunately, most drivers seem to be pretty conscientious about doing what they can to protect turtles (I saw one car yesterday with an “I brake for turtles” bumper sticker). So it’s not unusual to see cars pulled over or stopped a safe distance from a crossing turtle.

Most times though people don’t seem to know what to do with the turtles. They’re obviously not the fastest creatures in the world, so it’s usually necessary to help the turtles on their way.

Here’s my technique to move a turtle along.

First the basics: safely pull over your car making sure to get as far out of traffic as possible. If you have to enter the road, look both ways and make sure you’re going to be safe.

Now the more complicated step: picking up the turtle.

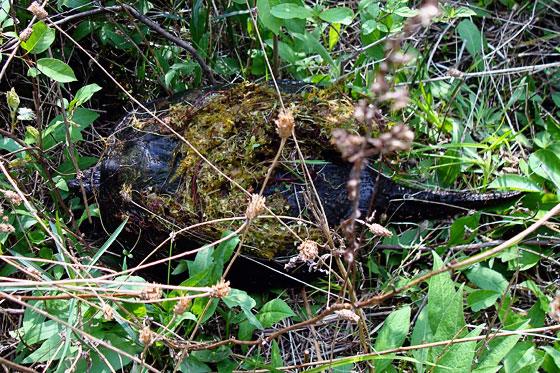
Most of the turtles I encounter are large snapping turtles. I have a childhood paranoia from swimming at my grandparents’ cottage about being bitten by a snapping turtle–not that I’ve ever been bitten. It’s just a childhood hangup.

However, I’ve learned it’s very easy to pick up a turtle without endangering yourself or the turtle.

My technique is to grab the turtle with both hands on the rear half of the shell. Get a firm grip. If the turtle’s on the small side, you might be able to grab it with one hand, but it’s safer to use two hands. The turtle might squirm a little bit or might be heavier than you expect.

Now lift. Her head will maybe turn around, but she won’t be able to reach you if you’re on the back half of her shell.

Make sure to hold the turtle away from you. It will likely be slimy and wet. And the last time I moved a turtle, I swear it tried to pee on me.

Now carry the turtle across the road and gently set it as far from the edge of the road as possible.

Wipe your hands (the grass will probably work if you don’t happen to have tissues in the car) and go on your way.

Have you ever helped a turtle cross the road? What’s your technique? What animals do you encounter around your home?

Garden in June

Vegetable garden in June

Every night when I get home from work, I walk through the garden. It’s one of my favourite times of the day–outside at the farm, seeing what’s grown during the day, appreciating all of the hard work we’ve done so far.

The garden is finally taking shape as I’ve envisioned it would from the start–as in years.

Sprouts are growing, from hollyhocks to beets to onions and sunflowers.

Hollyhock seedlings

Beet sprouts

Green onions

Sunflowers

Some of the plants have gone beyond sprouting and moved onto blossoming.

Tomato blossom

Potato blossom

Marigolds amongst the tomatoes

Sage blossom

There are even signs of fruit on the raspberries and grapes–although I’m working myself up to picking the grapes, as the vines are supposed to focus on growing, not fruiting yet.

Raspberries

Baby grapes on new vines

I’ve planted herbs all around the perimeter, lavender, thyme, sage, rosemary, basil.

Rosemary plant

The biggest progress since my final Dueling DIY update are the trellises for the squash, raspberries and tomatoes. I’ll go into more detail on each of these as we go through the season, but here are a few snapshots for now.

The tomatoes are planted under a simple 2×2 wood frame. I’ll add strings once the tomatoes grow a bit more.

Simple wood 2x2 tomato trellis

Matt hammered 12 steel T-posts around the 2 rows of raspberries. I still need to string wire between each post to hold the raspberries upright, but the hard work was definitely the posts. So much hammering.

Raspberries trellised with steel T posts

The biggest addition is our squash trellis. Fingers crossed this works to corral the squash. We have a big garden, but I learned last year that it was no match for squash.

A-frame squash trellis

We have a few more tasks to do before we can officially move into maintenance mode: hang the gate and spread the straw for our deep mulch experiment.

But for now, I’m enjoying my evening walks and seeing the growth so far.

What’s growing at your house?

China cabinet makeover plans

Last week you saw the china cabinet that I’m going to make over for my office. Today I’m back with my makeover plans–and a couple of spots where I need your input.

This cabinet is a win for a lot of reasons: drawers (surprisingly hard to find), the exact width I need to fit on the wall beside the window, solid wood, decent quality.

Silverware drawer in the vintage china cabinet

It has one big miss though. It’s not quite as tall as I want. The three shelves on the upper hutch are great. But they’re too short to hold even a magazine. So I’m planning to rebuild the top to give a little more breathing room between the shelves. I think I can reuse a lot of the hutch–everything except the side pieces, which isn’t a bad thing because I don’t love the half-moon cutouts anyway.

Vintage china cabinet

I’ll make the old and new wood blend with a coat of white paint, but I have a plan to let a bit of the wood show through. Hopefully I can sand out some of the scratches.

Scratches in the wood top of the china cabinet

I’m not sure what I’m going to do with the pulls yet. They’re all wood and completely recessed into the doors and drawers. I can’t remove them without leaving big holes in the cabinet. I’m wondering if some gold paint would work. I have an idea it might look a bit campaign-esque like this dresser from Centsational Girl. What do you think?

Recessed wood pulls

The other area I’m questioning is the legs. Right now, there are two long legs on the bottom. Basically 2x4s screwed to the cabinet. (Please ignore the dust).

China cabinet leg

I feel like I’d like something a little more traditional. Here are some options I picked up from Home Depot. Which do you like best?

Legs for the china cabinet

I’m not sure when I’m going to get to the cabinet makeover, but I’m excited by the possibilities.

What are your ideas for the makeover? Any ideas to deal with the handles? What about the leg options?

Thrifting with the in-laws

A few months ago (yes, I’ve been holding out on you guys), Matt and I went out to dinner with his family. The restaurant just happened to be next to a Value Village, so there was a family thrifting excursion after dinner.

After a little while in the store, Matt and I exchanged a look. His said, “I didn’t find anything. You ready to go?”

Mine said, “Nope. Absolutely not. I found something I’m quite excited about. You have to come over here right now.”

After years of searching I had found the cabinet that I wanted for my office. My office is our last untouched room–in fact it’s still full of boxes that have been in there since moving day. The cabinet is my trigger to paint the walls, unpack the boxes and finish this space in the way I’ve been imagining for years. So I was not leaving the store without this cabinet–no matter that I was surrounded by my in-laws.

In fact, the in-laws were a bonus. My father-in-law was our chauffeur for the night and his truck was just what we needed to transport the cabinet. My sister-in-law stood guard over the cabinet while I went to the cashier to pay. And my mother-in-law found my father-in-law and told him to bring the truck.

Ahhh, family.

Want to see what had me so excited? (In a very poorly lit picture?)

Vintage china cabinet

I have big plans for this cabinet. I think it’s going to be great. I’ll share some of my plans next week.

Do you go shopping as a family? Is there any furniture you’re hunting for?

June garden update

Sarah’s last post was her final report in our Dueling DIY garden challenge. She’s back today to share how her vegetable garden–and a couple of other things–are growing.

I thought I’d take this time to give a garden update. We have had an unusually cool start to spring and that means several of my plants got a late start. Thankfully though the temperatures have been rising and our garden is really starting to catch up. I will give a quick rundown of most of my crops. (Note: We got 1.5 inches of rain the day before I took the pictures below.)

Asparagus

This is my first time raising asparagus so I really don’t know what to expect. I know that the first year or so I am just supposed to let them grow and that’s what I’ve done. Most of the plants don’t look very good, but maybe next year they will grow back even better. I am just using a wait and see method.

Asparagus going to seed

Brussels Sprouts

One of the plants that got a late start. I am hoping they recover quickly.

Brussels sprouts plants

Carrots

At this point I can say that the tops look really good. Hopefully it is looking just as good underground.

Cucumber

Also got a late start but really seems to be recovering. I planted 4 pickling cucumbers that didn’t make it though. That is disappointing.

Kale

I have planted 3 varieties. And they have all taken off like crazy. I have picked some for salads, but I am ready to make some kale chips this week.

Leaf lettuce

Even with a late start, our lettuce looks healthy, and I have picked a few salads worth so far.

Peppers

We have green peppers, red peppers, jalapeno and several other varieties. The plants are all fairly small at this point so I hope they take off soon.

Potatoes

We have planted both a traditional russet and a thin skinned red potato. Like the carrots, the tops look great. I hope that means good things are happening in the ground too.

Rows of vegetables in the garden

Onions

The onions are very healthy. We really need to add them to more of our dishes so they don’t go to waste.

Radishes

Note for next year… plant less radishes. Seriously, we planted way too many and I am afraid they will go to waste. Anyone have any recipes or suggestions other than putting them in our salads?

Rows of vegetables in the garden

From right to left: lettuce, radishes, green beans, cabbage and potatoes

Rhubarb

Also my first year for rhubarb. When I first put it in the ground I was worried that it wouldn’t make it. Several leaves died off. But this week I noticed two really healthy new leaves so I think it is on the mend.

Rhubarb

Spaghetti Squash

The plants are looking great! I have left plenty of room around them to plant pumpkins hopefully in the next week or two.

Spaghetti squash

Strawberries

The plants look very healthy. This is one crop that Steve really wants to expand on next year, so we may have to add on to our garden again!

Sugar Snap Peas

Probably my favorite plant of the garden. I usually eat them before they even make it into the house. This is one plant that prefers cooler weather so I hope that I see some pods before it gets too hot here.

Tomatoes

Definitely our most used crop around here. Besides eating them straight out of the garden my mother-in-law cans tomato juice, and I plan to make salsa and pico de gallo. So it is a good thing that we have plans for them because I have planted 24 plants!

Actually, the plants that I started from seed are finally looking healthy enough to transplant so we will be nearing 30 plants.

They are all different sizes so I am hoping they ripen at all different times!

Tomato plants

I have a few things that I am still hoping to plant, but I am very happy that our garden is really looking great this year.

We do have two more things that we are growing around here:

Kittens

Jan asked for an update, and I am always happy to spend more time with these two before I find them new homes.

They turned 5 weeks as I write this, so we have another week or two before they are ready to leave. They are eating dry food pretty well and they are definitely becoming more active.

Kittens wrestling

If anyone from my area is reading this, I am still looking for homes for them if you are interested!

Striped kitten

Ahh. Super cute, Sarah. Too bad Illinois is a bit far away, because Ralph could use a sidekick. Congrats on the garden growth. Things are looking promising.

The best and the worst of people

I’ve written before about people throwing things in our ditches. A couch. A printer. Litter.

Last week, as best we can guess someone threw a cigarette. Now on it’s own, a cigarette is not an unusual find. Butts are plentiful on the shoulders of the road and in the ditch.

Cigarette butt on the side of the road

However, this butt ended up being unusual because we haven’t had much rain this spring. We ended up with a fire.

Aftermath of a ditch fire

When Matt arrived home from work, he was greeted by good Samaritan who had spotted the flames, pulled over, poured her water bottle over a smoldering fence post and called the fire department.

Burned fence post

We are very thankful that damage was minimal. The tree that was in the centre of the fire has some singed leaves, the fence posts are slightly charred and a patch of grass is ash.

Tree leaves singed by fire

I keep thinking about the Fort MacMurray wildfire and being grateful that this didn’t take off. The woman who stopped said to Matt she was surprised that no one else pulled over. We’re very thankful to her as well.

So litterers… the worst. Our impromptu firefighter… the best.

Hardboard and six favourite projects

There’s one material that I go to over and over for DIY projects: hardboard.

Hardboard

Hardboard is an engineered wood product also known as high-density fibreboard. Wikipedia says that it’s “made out of exploded wood fibers that have been highly compressed.” I’m not sure what exploded wood fibres are. By the time hardboard gets to the store, it has little resemblance to wood. It’s more like a super heavy-duty, super smooth cardboard. The main resemblance to typical construction materials is that hardboard comes in 4×8-foot sheets.

It’s less than a quarter inch thick, fairly light-weight, and cuts and bends easily. Sometimes it’s cut to other sizes than 4×8, finished with white on one side, or it’s also the material for pegboards.

Pegboard

Here are some of my favourite projects with hardboard:

Living room bookshelves – Hardboard makes a very sturdy back for shelves and bookcases. But it’s thin and fairly lightweight, so it doesn’t add bulk to furniture.

Monograms – Letters and words are popular decor trends. Hardboard is easy to cut with a jigsaw, won’t break or crack like solid wood, and is light enough to hang on a wall or sit on a shelf. I’ve found a quick pass of fine sandpaper can be helpful to smooth cut edges.

Ampersand monogram made out of hardboard

Ampersand monogram made out of hardboard

Doors and cabinet makeovers – Faced with boring slab doors in the basement and on the laundry room cabinets, I used strips of hardboard to transform them into barn doors and shaker-style cabinets. I was blown away by how successful the transformation was. I still love these doors. Plus the makeover saved us from spending money on new doors.

Making slab doors into barn doors

Score-keeping chalkboard – Hardboard is super smooth, and with a good primer and a foam roller, it takes paint very well. So I gave a sheet of hardboard a coat of chalkboard paint for a 6-foot tall, but very lightweight and easy to move chalkboard. Much lighter than actual chalkboard.

Cabinet door repair – Our kitchen needs a renovation, but until that day, we’re trying to hold things together however we can. Hardboard to the rescue once again. The cabinet door under the sink was separating from its frame. Backing it with hardboard has seen us through the last three years.

Holding a kitchen cabinet together with hardboard

Nightstand to dresser makeover – This dresser is one of my all-time favourite projects. Combining two nightstands into one dresser worked very well, but the join was very ugly. A panel of hardboard covered the seam and didn’t add much bulk to my narrow dresser.

I continue to find more uses for hardboard. And I’d love to hear if you’ve used it yourself. Any projects to share? What’s your go-to construction material?

Xs and Os

Saturday morning, I headed out bright and early for the Christie Antique Show. This annual event is the largest antique (and vintage) show in Canada, and it’s right in our neighbourhood. In fact, the conservation area where it’s held is one of Baxter’s and my favourite places to hike.

However, there was no hiking on Saturday. There were thousands and thousands of people and hundreds of vendors. Plus no dogs allowed.

I enjoy going to this show, but I have a confession. I’m not good at buying things. I’m not the type to buy something just because. And I’m not looking for anything specific right now.

So instead of shopping, I ended up playing, “What do I have already and how much is it worth?”

I think we all do that when antique shopping.

Some things I was blown away. A carved leather purse similar to one my MIL gave me was listed for $75. (Audrey, do you want it back now?) A vintage metal pedal tractor that my Dad has (not mine–it was his as a kid) was anywhere from $275-490.

Others were more reasonable. A silver butter dish similar to my butterfly dish was just $10. Snowshoes, which we got from my FIL, which decorate our mantel every winter were about $30. (Steve, do you want them back?) Metal card catalogue-esque drawers like I got from an auction a couple of years ago were everywhere and about $60.

Metal pedal car tractor

Carved leather purse

Metal drawers

Silver butterdish

Despite feeling like I already have everything I need–including some great benefactors–I did come home with one thing. I saw this little tic-tac-toe game on the edge of one of the booths. I’d been thinking about a tic-tac-toe artwork for the basement. But something more than a picture. When I saw this and it was only $10, I took the plunge (after offering $7). My plan is to hang this on the wall above the cabinet where we keep our boardgames.

Tic tac toe beanbag game

Did you do any shopping this weekend? Do you play the “what’s it worth?” game when you go shopping? Do you like to go antiquing?

Dueling DIY – The Final Update

Six weeks ago when I launched this Dueling DIY adventure, I thought, “I got this. No problem. I’ve got six weeks! Sarah’s going down.”

I had a somewhat ambitious list, but I thought it was entirely doable. Now that we’ve come to the end of the challenge and my final report, I’m stiff, I’m sore, I’m proud of what we accomplished… but I’m also a little bummed that I couldn’t cross everything off.

In that respect, Sarah, whose update you saw earlier this week, is the winner.

Here’s my final list:

  • Hang the gate
  • Edge the garden
  • Build raised beds around the perimeter
  • Build trellises for the raspberries, tomatoes and squashes (I have wood and wire, but nothing’s put together yet)
  • Start a few seeds indoors
  • Till in the ash, straw and manure (still only half the garden is done)

And a couple of maybes:

  • Weather permitting, plant grapes and potatoes
  • Run a waterline out to the garden (this one is Matt’s task, so I’m not really feeling too bad that we didn’t get this done)

So I made it just over halfway through my to-do list (56% if you’re wondering).

The perimeter beds were definitely a much bigger project than I anticipated–both in terms of the amount of work and their literal size. But I’m really happy with how they turned out. In fact, I’ve already started filling them up with onion (seeds), sunflower (seeds) and grapes.

Grape buds

Although filling might be a bit of an exaggeration. According to my original calculations when we started this challenge, the perimeter of the garden is approximately 175 feet. The beds are just over 2 feet deep, which means we have 350 square feet in the perimeter alone. I’m not sure Matt and I eat enough food to keep up with this garden!

Rustic raised beds in a round vegetable garden

The outer beds are obviously where I spent most of my time throughout this challenge, but the interior of the garden–or at least half of it–got some attention too. We’re now up to 5 rows of potatoes (who exactly is going to eat all these?). We have three rows of reds, which we grew for the first time last year, and then we have two new varieties that we’re trying out: Kennebecs (highly recommended by Karen at The Art of Doing Stuff) and Russian Blues (another Karen suggestion that I couldn’t resist adding just for fun).

Potatoes growing in the garden

Our sprouts have overcome their damping off and are growing well. In fact, I’ve moved on to the hardening off stage and they’ve spent a few days outside this week. Matt brought home some tomato plants to supplement our own seedlings. Those can probably go in the garden this weekend, but I’m going to let our sprouts grow a bit more before they move outside permanently.

Sprouts and seedlings

Aside from finishing the raised beds, our biggest accomplishment last weekend was wrestling an abandoned hay bale out of the tree line beside our big field (where it and a friend have lived for years)…

Bales of hay stuck in the trees

onto the trailer (seriously, it took us about 45 minutes to get to this point)…

Straw bale in the trailer

and up to the garden.

Straw bale for mulching the garden

I’m going to try the deep mulch method to deal with weeds, maintain moisture and add nutrients to the garden. This bale is going to be my mulch. Hopefully it’s enough because I do not want to go back to get his friend. What a ridiculous way to spend a holiday Monday morning.

So obviously work does not end on the garden just because Dueling DIY has concluded. Trellising and tilling and gating and waterlining are still going to happen. As is planting and growing and (hopefully) harvesting. And I’ll be sharing more garden updates as we go along–I can’t help myself.

The beauty of taking on a project like this Dueling DIY is that in the end we each win. We’ve each made progress on our gardens, and we’re closer to enjoying the fruits of our labour (literally) than we were six weeks ago.

Thanks for the motivation, Sarah. And congratulations on your victory. I may have to send you a potato as a prize. And thanks to all of you for following along, doing your own challenges at your homes and encouraging us.

How’s your big spring project going? What gardening progress have you made recently?