Medium rare with a side of blue air

The result of writing a post showing your barbecue bursting into flames is that your in-laws send flyers full of barbecue sales home with your husband. As a result of those flyers, you arrive home later that week to find a very large box sitting in your foyer.

Master Chef barbecue in a box

That very large box leads to a very big mess all over your living room as your husband assembles the new barbecue. It also results with you being kicked out of the house so that your husband can curse in private.

Assembling a barbecue

Readmission to the house is conditional on your participation in carrying the new barbecue outside, which results shortly thereafter in dinner–cooked by your husband.

Barbecuing hotdogs and hamburgers

So he took care of the shopping, the swearing, the constructing and the cooking. I’d say I got the better end of this deal.

Doe a deer

It’s apparently wild kingdom week here on the blog, and I’ve saved the best for last.

White tailed deer in molt

For the past week or so, deer have been grazing in the back field. They show up every night around 8 o’clock and eat their bed time snack before heading back into the bush.

White tailed deer grazing

Some nights there’s been only one. Usually there’s a group of three or four. The high point was a herd of seven.

We can walk partway along the back lane towards the field without them bolting.  Usually we just watch them with binoculars and try not to spook them.

Fortunately, Matt’s brother, who came to visit last weekend, has a better camera than we do–and is also apparently a bit of a deer whisperer–because he was able to get quite close and get the best pictures so far for us. Thanks, Greg!

Operation identification

While I didn’t see any ducks or geese at the pond this past weekend, there were lots of other animals. Red-winged blackbirds, a turtle, a frog, seven (!) fish, jitterbugs, waterstriders and this guy.

It’s been almost exactly a year since I asked for your help in identifying a pond creature. I’m pretty confident that last year’s was a beaver as everyone said. I’m also pretty confident that this guy is not a beaver.

I know the video is not the best. He was all the way on the other side of the pond, and it turns out that’s quite a ways away. But what do you think? Is he a mink? A weasel? The Loch Ness Monster?

For rent: pond (feathery young couple with family aspirations preferred)

Our tenants on the pond seem to be changing daily. Everybody seems to be looking for the best spot to set up housekeeping.

Our usual guests are Canada geese and mallard ducks–or both as seen in this picture from a few weeks ago.

Mallard ducks and Canada Geese swimming on a melting pond

I went down to the pond to get a more up to date picture on Saturday and only succeeded in spooking a very large solitary Canada goose. Actually, that’s not entirely true. I also succeeded in catching a nap, as I got tired of sitting quietly on the shore waiting for a bird to show up and laid back in the grass where I fell asleep. I also succeeded in getting my first sunburn of the year as a result of laying flat on my back with no shade.

Anyways, back to the uncooperative birds.

They mostly show up in pairs, although we have hosted singles as well as three mallard drakes for a bachelor party–perhaps the word on the wing is that our pond is the neighbourhood mixer?

Everybody is pretty spooky. I can’t get too close without them springing from the water and flying away–as my Canada goose did on Saturday. I am hoping that a nice young couple comes our way soon and decides that our pond is the perfect spot to start a family. I promise, I won’t take anymore naps on their lawn.

Treasures

In the most recent issue of Style at Home, editor Erin McLaughlin talks in her column about what makes a house a home. She writes, “It means filling your space with things of significance, things that are a reflection of who you are.”

Then this week Jen at Rambling Renovators posted about a painting she had made of her wedding gown as a reminder of the feelings she had that day wearing that dress.

These two articles got me thinking about the different treasures that I have gathered through the years.

One of my favourite treasures is a watch pin that I inherited from my grandmother.

Watch pin

My grandma wore this everyday. She couldn’t wear a wristwatch, because they always stopped–I have no idea why this was. My mom told me once that when a dowser came to dig a new well at their family farm, my grandmother found out that she could witch water, so maybe she had some unusual energy?

My grandma wearing her watch pin

The watch is for the wearer, so it hangs upside down. When I remember my grandmother, I can vividly see her tilting the face up so that she can see what time it is.

I treasure this pin for its uniqueness–I haven’t seen many watch pins–and also for how it signifies my grandmother and the times we shared together. For a small metal object, the associations this pin has for me are very strong.

What about you? Do you have any treasures that remind you of favourite people or occasions? What makes a house a home for you? How do you enjoy your treasures? Do you wear them or display them around your home? What are some of your most treasured things?

“I could be Thor!”

Pop quiz:

You’re walking in the forest and you see this tree.

Cracked tree leaning against another tree

What do you do?

  1. Marvel over the crack and continue on with the hike. Nature will take care of itself.
  2. Marvel over the crack and make a note to invite your father-in-law over with his chainsaw.
  3. Marvel over the crack and decide that it’s too dangerous to leave and go find a saw to deal with it yourself.
  4. Marvel over the crack. Poke sticks in the crack to try and lever the tree off the stump. Fail. Decide that this tree must come down right this minute. Decide that the best tool will be a sledge hammer. Saw, pshaw.

Matt prepares to do battle with a fallen tree with a sledgehammer and wrecking bar

So my answer would probably be ‘B,’ but of course my resident lumberjack saw an opportunity to advance from his most recent experience felling a tree with an ax to be even more manly. The words “I could be Thor!” did in fact come out of his mouth.

Knocking over a tree with a sledgehammer

A couple of hard whacks popped the tree off its stump–all while I watched and photographed from a safe distance. However, the tree is still standing more vertical than horizontal, branches tangled in his closest neighbour.

Knocking over a tree with a slegehammer

We are now moving on to plan B.

What would you do? Any idea what made the tree crack like that? We had a big ice storm the other week, so it could have been the weight of the ice, but other trees that came down didn’t crack horizontally across the trunk. Anyone else living with someone who fancies himself a god?

Why I love the local lumber mill

Maybe it’s because shopping carts and I don’t get along, and I like being able to pull my car right up to the aisle. Maybe it’s because I prefer shopping in the open air to under fluorescents. Maybe it’s because I always have questions and like it when someone has the answers. Whatever the reason, I love our local lumber mill.

Lumber yard

When I was buying the wood for our island countertop, I said in my first post that I went through nearly the whole pile looking for the straightest, cleanest boards possible. What I really should have said was that two guys from the yard crew at the lumber mill went through nearly the whole pile for me, letting me look at each individual board until I found the ones that I liked.

Then, they ran each of the boards through their big saw–twice–trimming the edges to my exact measurements. Oh and there was no charge for any of the cuts.

They loaded all of the lumber into my car, making sure that I had enough space to shift gears and see at least some of the traffic around me.

Lumber loaded into a small car

This is the experience every time I got to the lumber mill. Their staff is super knowledgeable and provides outstanding service.

Because they cater to contractors and not just DIYers, they have the answers and the materials that I need.

Have questions about what’s the best material for a particular project? They can talk me through it. Looking for enough baseboard in the profile I’ve chosen to trim the whole basement? They have job lot quantities in stock. Want shelving with the pre-finished square edge that matches my existing shelving? They carry it. Along with all of the nails, screws, tools, hardware and whatever else I might need.

There’s no wandering aisles trying to figure things out myself. I walk up to the counter, ask my questions, place my order and drive out to the yard. There someone finds exactly what I need, answers more of my questions and loads it into my car.

My one quibble with the local lumber mill is that often this loading happens first thing in the morning as, since they cater to contractors, they’re open 7:30 a.m. to 5 p.m. Most of my shopping tends to happen on my way to work, and I end up driving around all day with a pile of lumber stretching from the dashboard, across the passenger seat, through the back seat and into the trunk. Of course, this small inconvenience is outweighed by the convenience of getting exactly what I need, whatever the project.

Having a blast

I suspect that the universe is trying to tell me that it’s not yet barbecue season. When I fired up the grill for the first time this year, I had a bit more fire than I expected.

Barbecue dials on fire

Further investigation revealed additional flames around the pipe fittings on the underside.

Propane barbecue fittings on fire

Fortunately, the combustion was confined to fire and nothing actually exploded. Unfortunately, barbecue was not to be on the menu, and we had to rely on indoor appliances to salvage dinner.

Cooking steak and potatoes on the stove

Our barbecue is an old hand-me-down, so it may be time to replace it. However, I don’t like to give in that easily. Do you think it can be fixed? Tightening the fittings or maybe adding some teflon tape is a lot easier and cheaper than buying a new barbecue. Has anyone else had a problem like this? I’m open to advice for repairing barbecues or for grilling steaks. Any suggestions?

How to stain and waterproof a wood countertop

Update: See how our counters have held up after one year and after four years.

With our new kitchen island, we decided to do an inside out colour scheme. By that I mean that we reversed the existing finishes that were already in the kitchen.

Around the perimeter of the kitchen, we kept the natural wood cabinets and the light countertop. On the new island that we added in the middle, we chose white cabinets with a wood countertop.

Kitchen island painted white with wood countertop

I wanted to keep the wood tones consistent, so when it came to finishing our DIY wood countertop, the usual methods–wax, oil–were out, as they would have left the countertop too light in colour. I sampled lots of stain until I found one that matched the existing cabinets as closely as possible–Early American from Minwax.

To prepare to stain the countertop, I wrapped the island in plastic drop cloths to protect our nice white cabinets and went over the wood with a tack cloth to pick up any dust and bits that might interfere with the finish.

Preparing to finish a wood countertop

For staining, I used the standard technique of brush it on, let it sit, wipe it off.

Staining a kitchen island

After letting the stain cure, it was on to the waterproofing stage. Given that I was working on a countertop, I wanted something very durable and of course food safe. I chose to go with Waterlox after reading positive reviews online.

Waterlox to finish a wood countertop

I followed their very detailed how-to guide on their web site to make sure I got the finish I was looking for. Waterlox was pretty easy to use.

I did four coats, brushing it on liberally with a natural bristle brush and letting it dry for 24 hours between each application.

Here’s some of the pros, cons and lessons learned.

First, Waterlox stinks when it’s wet. After the first coat, we developed a routine of putting the Waterlox on right before going to bed. We opened the windows, turned on fans, switched off the heat (since we had windows open) and closed the bedroom door. Given that it was March, it wasn’t necessarily the best weather to have windows open, but it was necessary both for the odor and for the cross ventilation needed to dry and cure the finish. The worst of the odor did ease after a couple of hours, thankfully.

Second, sanding between coats is not recommended with Waterlox. Instead, the guide tells you to wipe down the countertop with mineral oil before each coat to get rid of any dust. I did this, but I still feel the finish isn’t quite as smooth as I would like. I’m used to using Varathane where I sand between each coat and get a super smooth finish. The Waterlox guide recommended using a very fine steel wool between the second-to-last and last coat of finish to sand out any rough spots, which I did, but it’s still not perfectly smooth.

Third, the finished surface is very shiny. I used Waterlox Original Sealer/Finish, which is recommended for the first few coats (or all coats, if you choose) and is listed as having a medium sheen. A satin finish is available, but honestly I was too cheap to buy another can, so I did all four coats with the Original.

How to make a wood countertop

After the final coat of Waterlox, we let the island top cure for a full week without putting anything on it.

Now that we’re using the island, the finish seems to be both waterproof and durable.

Water droplets on a wood countertop

Given that it is a wood counter, we use a cutting board if we’re chopping and cork pads for any hot dishes. However, there are still occasions to put the finish to the test. If we spill (which of course never happens), liquids bead up on top of the surface. When we slide dishes across the counter, we don’t have to worry about scratching the finish. The wood wipes down really easily and looks fresh.

Finishing our homemade wooden countertop was a question of both form and function. I wanted to match the wood tones we had in the kitchen, and I also needed it to stand up to actual kitchen prep work. Done and done.

Update: See how our counters have held up after one year and after four years.

How to make a wood countertop

How to make a wood countertop

We’ve lived with our homemade wood countertop for more than a year now. To see my report on how it has worked for us, click here.

See the update after four years with our counters here.

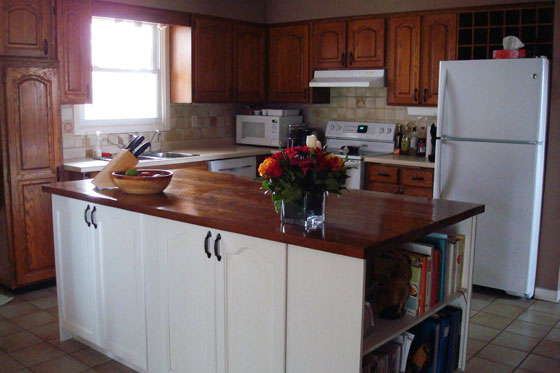
Since we’d splurged on having our new kitchen island professionally made, I had to balance the scales and DIY the wood countertop.

There are some tutorials online and lots of inspiring photos, but in the end we pretty much winged it. Here’s what we did.

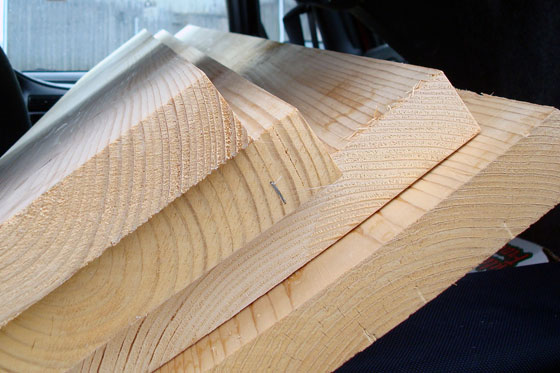
For our island’s 80 inch by 42 inch top, I decided that four 2x12s were the way to go. I chose spruce–the cheapest option at my local lumber mill. My first tip is to be very careful in selecting your lumber. I went through nearly the whole pile looking for the straightest, cleanest boards possible. Watch for chips, knots, bends and warps.

Once you’ve selected your boards, the first step is to trim them so that their edges are square rather than rounded. This will help you to get a smooth even surface when you join your boards together. I took a half inch off each side of my boards–or the staff at the lumber mill did for me.

Squared edges on lumber

We let our boards acclimatize inside the house for a day or so–especially important as the lumber had spent the winter outside and was completely frozen. We could hear them snapping as they adjusted to the temperature.

Once we were ready to start constructing the countertop, we laid out our boards and decided the best configuration.

Making sure we kept everything in order, we marked the backside of the boards for screw holes.

Measuring and marking lumber

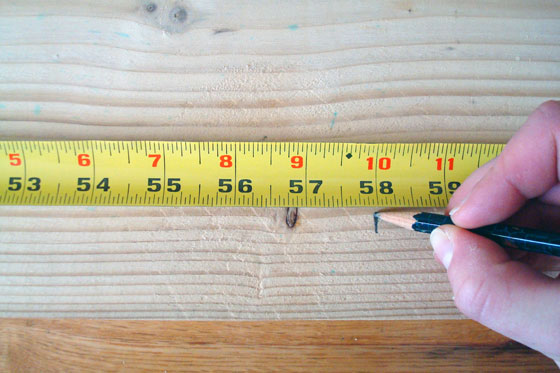
We spaced the screws 8 inches apart.

Then, I set up my newest toy and drilled holes using my Kreg Jig–yup, I got one!

Using a Kreg Jig to drill holes in a wood countertop

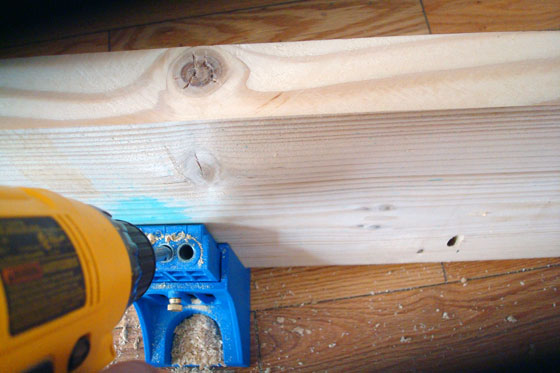
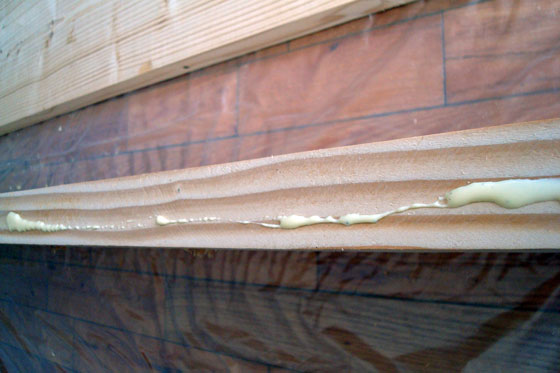
I was pretty confident that the Kreg Jig would give us really tight joints, but we glued each board as well with carpenter’s glue just to make certain. Be careful not to use too much glue, as you don’t want drips or seepage on the good side of your top.

Gluing boards for a wood countertop

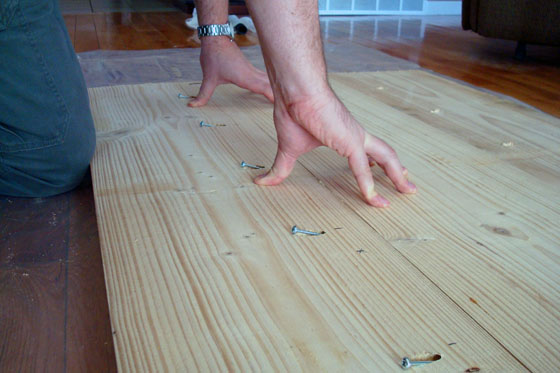
Holes drilled and glue spread, it was time to put it all together. Matt held the boards even and kept the joints tight while I went along with the drill and set each screw.

Connecting boards for a wood countertop

Soon enough, we had a large slab of wood. Don’t be confused by the stamps and the holes from the Kreg Jig. This is the underside.

Back side of a wood counterop showing holes from the Kreg Jig

We took our incredibly heavy countertop and flipped it over. I trimmed one end with my circular saw to get a nice flush edge. I left the other end ragged, because I wanted to wait until we had the island, just to make sure I got the length exactly right.

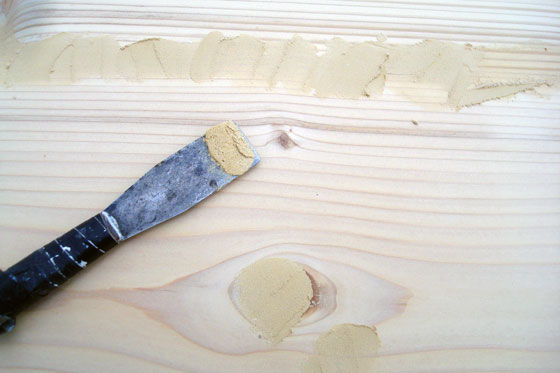
While the joints were really tight and pretty smooth, I still filled everything–every joint, every knot, every divot–with wood filler just to even out any imperfections.

Using wood filler on a wood countertop

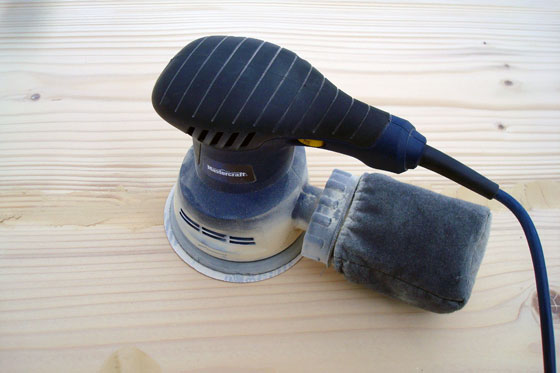
Then, it was on to sanding stage. Using my little orbital sander and lots and lots of sanding pads, I went over the countertop time and time again. I started with a 60 grit and slowly worked my way up to finer and finer grits (80, 120, 240 and 400).

Sanding a wood countertop

Despite choosing a very cheap grade of lumber, it came up beautifully smooth and even with the sanding. Take your time with your sander and don’t skimp on this step.

We did have one issue arise with our DIY wood countertop. Once the boards were all together and the top spent more time acclimatizing inside the house, it started to warp a bit. I attribute this to the frozen state of our lumber before we started construction. By the time the island was installed and we set the counter on top, we had a pretty good wave going on.

Unfinished warped wood countertop

Aaaah! A wonky wavy countertop was not at all what I envisioned. Our cabinet maker diplomatically limited his comments to “I dunno about that countertop.” My Dad suggested shimming under the one edge, where the gap between the underside of the countertop and the top of the cabinet was about 1/4 inch.

To everyone’s surprise–including mine–trimming the length of the countertop helped immensely. I don’t know whether most of the warp was happening at one end of the boards, but it was laying nearly flat after we cut off the extra length. Screwing the countertop into place on the cabinets leveled it out a bit more–even though we were very gentle and didn’t overly tighten the screws for fear of opening the joints between the boards.

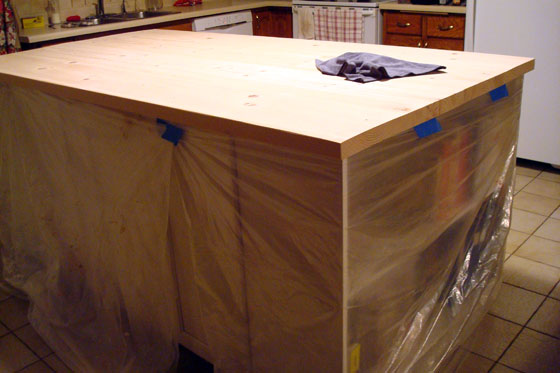
My enthusiasm for my DIY wood countertop was rekindled. However, it was basically a large hunk of raw wood sitting in the middle of our kitchen–an attractive hunk of wood, but not the most useable surface.

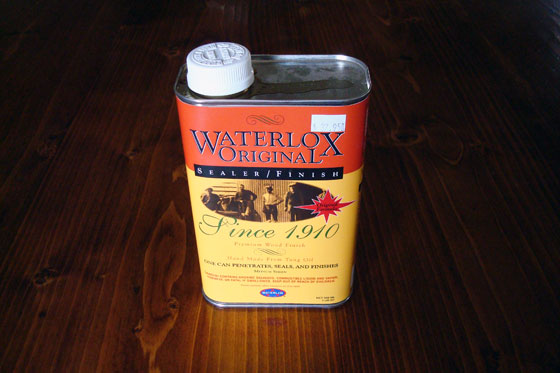
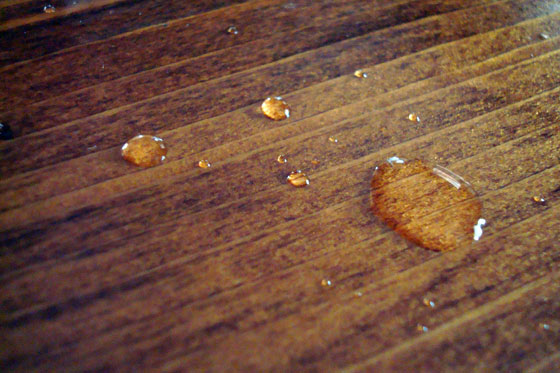
The next step was to finish and waterproof the wood–which I’ll talk about on Wednesday. Stay tuned.

See my review on how our wood countertop held up over its first year.

See my review after four years.