Going solar – Show me the money

It’s time for the final post in our solar panel saga. As we all know, going green costs green. Today, I’m going into the numbers (in a slightly artistic fashion).

Read on to find out how much our solar panels cost, how many kilowatts they produce and all of the other details for our solar system.

Solar panels cost and output

Obviously, our solar array and its associated dollars and cents are specific to the Ontario microFIT program. I expect some of our numbers will translate, though, for others who are setting up their own systems.

The last outstanding part of our solar project is to receive our first payment from the hydro company. I have to say I’m looking forward to moving on to the payback stage of this project.

Going solar – I’ve got the power

This week, I’m sharing all of the details on our solar panel project. For the first post, click here.

When we last left off, we finally had an approved application, and we’d made it through a wicked winter. But we were running out of time to complete our panels by the end of our contract.

Preparation

The first step to get ready for the install was an engineering assessment. We had to make sure that the barn was strong enough to hold the weight of the solar panels. Even though the barn is (at best guess) more than a hundred years old, it’s rock solid, so there was no concern there.

The second step was the building permit. Again, there were a couple wrinkles in the application paperwork, but our contractor was able to straighten them out

Installation

The actual solar install finally started at the end of March. First step was the inverters. These “convert the DC (Direct Current) power from your panels to AC (Alternating Current) before feeding it back into the hydro grid.” Our contractor’s web site calls the inverters “the brains” of the system.

Solar panel inverters

Then came the panels. Solar panels work best if they face south. The sun is strongest and hits them most directly from this direction. Fortunately, the back roof of the barn faces exactly south. Given the long delay in our application process, we had lots of time to observe the barn, calculate sun and shadow patterns and determine the optimum position for our panels. We have a long row of very tall pines along the west side of the barn. They’re so tall that in the late afternoon they cast a shadow on the upper barn roof, so we decided to install the panels on the lower lean-to roof as far away from the pines as possible.

Solar panel install on the barn roof

Three rows of racks went up on the lean-to, and then came the panels. We have a total of 40 panels, the maximum we’re allowed under the microFIT program. Panel install took about three days.

Connection

After the last panel was installed, it took another two weeks before the snow had melted enough for the trench to be dug between the barn and the hydro pole. Remember we’re feeding all of the power we generate back into the grid, so connecting into the hydro pole was essential.

Of course, it wasn’t simply a matter of waiting for the snow and frost to melt so that the trench could be dug. The trench was more than 300 feet long. Over that distance, we needed a special heavy-duty type of wire, so that we didn’t lose power. Pulling the wire through the trench was another bit of fun. When the trench was dug, the excavator laid a conduit in the bottom. It looks a bit like weeping tile.

Trenching for solar panels

There’s a rope running through the pipe. The trench is back-filled and the conduit is completely buried. To get the wire from the panels to the pole, our contractor had to pull it using the rope in the conduit–a heavy, 3-person job.

April 23 was connection day. Inspections had to happen. Power had to be shut off. Wires had to be hooked up. And everything had to be turned back on again. There were two or three different groups involved, along with our contractor. This was another instance where I was very glad for professional help. I would not have wanted to coordinate everyone.

But it turned out all of the scheduling didn’t matter.

Meter connection for solar panels

Connection was a no-go. The hydro inspector wanted to see the wire and conduit laying in the trench, but the trench was back-filled. The excavator had installed a T with a small section of conduit that looked down to the bottom of the trench and the wire, but that wasn’t enough. A section of the trench had to be dug out down to the wire so that the inspector could see it. Fortunately, the trench was re-excavated April 23, and by April 24 we were connected.

April 25, our contractor came out and walked us through all of the equipment and how it worked. He flipped the breakers and we were live.

In the infamous words of Snap, I’ve got the power!

Going solar – If at first you don’t suceed…

This post has been a long time coming. I don’t know why it’s taken me so long to write this, but it’s finally here. Everything you wanted to know (and more) about our solar system.

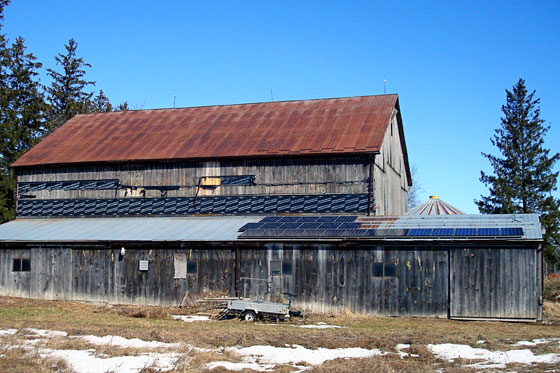
… I mean, our solar panel system… the one on the barn… not the one in the sky.

Solar panel array

In fact, now that I’ve started writing, I have so much to say that I’m breaking it up into several posts. In today’s post, we start at the very beginning.

How solar works in Ontario

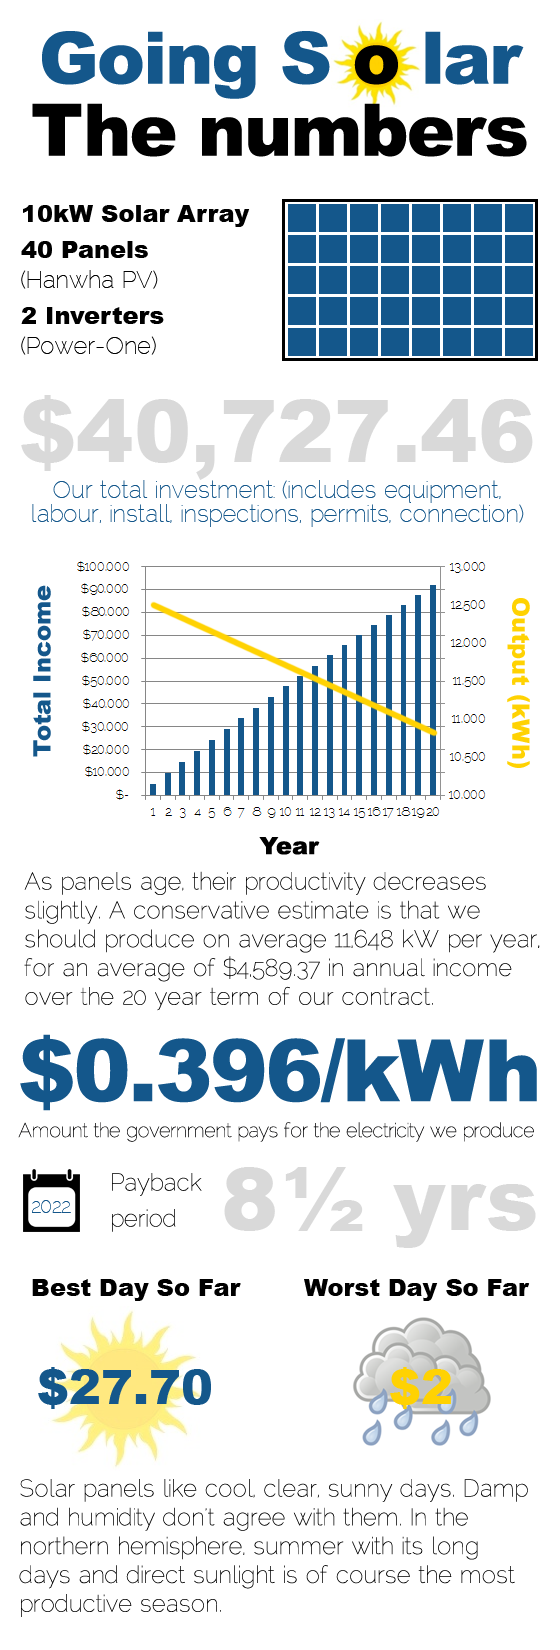
The provincial government operates a program through the Ontario Power Authority to encourage people to install solar panels. The program is called microFIT. It’s micro because it gives people “the opportunity to develop a small or “micro” renewable electricity generation project (10 kilowatts or less in size) on their property.”

Under this program, we enter into a 20-year contract with the government. We produce and deliver electricity to the province’s grid, and we’re paid a guaranteed rate per kilowatt for the term of our contract.

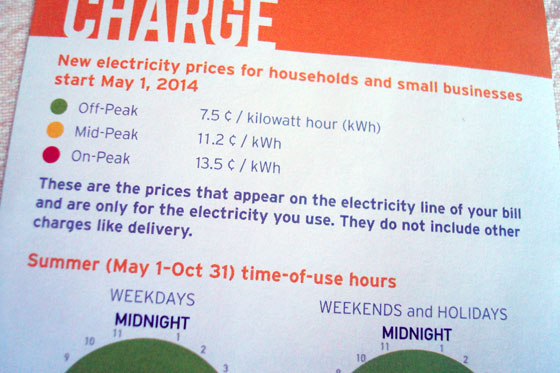
So we’re not “off the grid.” All of the power we generate goes directly back to the grid. We still buy the electricity that powers our house from the grid. This might seem weird to people. I’ll go into the numbers more later this week, but here’s the basic explanation: the government is paying us $0.396 cents per kW for what we generate. We’re paying the government $0.075 cents per kW (off-peak) for what we consume.

Hydro rates in Ontario

Our solar contractor

Once we made the decision that we wanted to go solar, we started meeting with contractors. Given how the microFIT program works in Ontario, lots of companies are full-service when it comes to solar installs. They take care of all of the applications to the government, they install the system, they monitor your system, they fill out all the paperwork along the way, they arrange for all of the inspections, they even help you apply for financing if you need it.

We found companies to contact through road side signs (there are lots of solar installations in our area). The company that we chose is called Hayter. Hayter had great service, had been around for a long time, offered a decent price, and the people we met with were very knowledgeable and down to earth.

Hayter solar

Application process

This was not a quick project. We met with Hayter for the first time in July 2013, liked them and decided to go with them. They submitted our application to the government. Our application was rejected about three times due to minor clerical errors. The microFIT forms are very complicated and missing even the smallest check box causes your whole application to be thrown out. We were very glad to have an experienced company working with us and taking care of all of the paperwork. I cannot imagine having to figure that out on my own.

Finally, our application went through. But that wasn’t the end of the bad news. In September, the government suspended the program. They were going to re-evaluate the rate that they paid per kW. When the microFIT program first started, the government paid about $0.80 per kW. When we applied, the rate was $0.55. The suspension meant that our application was dead, again. After re-evaluation in September, the new rate was $0.396. The decrease was very disappointing for us, but we decided to proceed anyways. We’d still be earning more for what we generated than we were spending on buying electricity from the grid.

We resubmitted our application. By mid-October, we got the good news that we were in. October 31, we made our first payment to our contractor, and they paid all of the fees with the government. And then came five months of nothing. Our solar company had said that they could work through the winter and complete our install before spring. However, the winter of 2013-14 wasn’t a normal winter. Between polar vortexes, ice storms and snow, nothing could happen.

Weathered picket fence in winter snow

Under the terms of our agreement with the government, we had six months to complete our install. That gave us until April 30. As spring slowly rolled around, we anxiously waited for work to begin.

Ooooh. Such a cliff hanger ending. Tune in next time to find out if installation begins and whether we meet the deadline.

If you have any questions, please feel free to ask in the comments, and I’ll do my best to answer them in upcoming posts.

Civics lesson

Ontario flag

June is election month here in Ontario, so we decided it was a good time to hoist the provincial flag for the first time.

We picked up this flag at Value Village a few months ago. As you’ve seen before, we have a bit of a thing for flags, so it was neat to do some research into Ontario’s flag, which I actually didn’t know very much about.

Ontario’s flag is very British.

“It was traditional for jurisdictions around the world with a British system of government and way of life to adapt either a blue or red ensign as a flag, by adding the local coat of arms or some other symbol.” (Wikipedia)

The Red Ensign is a red flag with a small Union Jack in the upper left corner. For Ontario’s version, the local symbol is the provincial shield of arms.

“The shield of arms… consists of three golden maple leaves, representing Canada, on a green background.” At the top of the shield is the Cross of St. George. Many of the British loyalists who left the US during the American revolution came to Ontario. They were loyal to King George III, hence St. George’s Cross. (Wikipedia)

Ontario flag

Leaving aside the history lesson to look to the future, I want to encourage my Ontario readers to please vote. Election day is tomorrow, June 12. Voting is truly important.

Magic beans

My husband is now known as Matt of the beanstalk. Or at least Matt of the magic beans. We have a little ways to go until we have actual stalks.

Our fields have been planted with soybeans this year. After tilling the soil, our farmer spread these little turquoise seeds.

What is this?

After a night of rain, they shifted from round beads to a shape more resembling beans.

Soybeans

Then the beans split.

Sprouting soybeansSoybeans

And now, a week after planting, a few sprouts have begun coming up through the soil.

Sprouting soybeans

Fee-fie-foe-fum. Fields of beans, here we come.

Has anyone out there grown soybeans? Or seen them in your area? Are you planting any new plants in your garden this year?

Robins update

Our baby robins didn’t make it.

They sadly didn’t grow much beyond the naked pink creatures I showed you in my first post.

Baby robins in a nest

I honestly didn’t know whether to write this post or not. I’d love to be able to show you pictures of cute fuzzy chicks, or awkward fledglings, or even the nest abandoned since the babies learned to fly. However, that’s not how the story goes this time around. This blog is about cataloging our life in the country–the good and the bad. In this case, there’s not a happy ending.

For the first few days after they hatched, Mama and Daddy stayed close, feeding them and sitting on them, keeping them warm. But then something changed. Mama didn’t come back to the nest one night. Maybe she got spooked or got attacked. Temperatures were still too cold for the babies, and they died.

When I first saw the babies, I thought they were the most helpless things I’ve ever seen.

Even though it was too late when I realized Mama wasn’t around, I started thinking about things like heat lamps and eye droppers. But the reality is that as much as I’m compassionate about animals, I’m also a “let nature take its course” kind of woman.

Growing up with chickens and ducks and geese–many of whom we raised from eggs and then ate, and many of whom had their own ailments and injuries over their lives–gave me a somewhat unique perspective on animals. Farm living has refined my attitude even more.

Nature is amazingly wondrous and exceedingly harsh. This is a fact of life… and death… that I’m reminded of every so often.

June project plan

June’s project might seem a bit unexpected. Weather has finally turned nice. Summer is almost here. Now is the time to be working outside.

However, this month, I’m going to turn my attention back inside to an area you haven’t seen too much of in a little while… the basement. The basement renovation was the big (all-consuming) project for Year One. That was not last summer, but the summer before. As with any renovation, there are still some finishing touches yet to be completed, even two years later.

This month’s project is the basement doors. There are 10 doors in the basement. Two of them are standard colonial style. The other eight (five of which you see below) are basic slab doors. Boooooooring.

Slab doors

All of the doors need to be painted. Smudges, scratches and yellowed paint make them look pretty shabby, especially next to our nice white trim.

Smudges on white doors

Even more than paint, the slab doors need an injection of personality. I think their personality should be a little bit country, so I’m taking inspiration from barn doors.

Barn door options

Sources: 1, 2, 3

A simple raised Z or X detail would be easy to apply, wouldn’t interfere with the hinges or knobs and would fulfill my interior design philosophy that every room needs at least one rustic element.

So the plan for this month is as follows:

  1. Figure out design for the doors – By June 6
  2. Buy material (and hopefully the store staff will cut it into strips for me) – By June 13
  3. Cut strips (if I have to) – By June 14
  4. Remove doors – June 14/15
  5. Remove hardware – June 14/15
  6. Trim the bottom of the door to the electrical panel closet (since it rubs on the carpet) – June 21/22
  7. Install strips on the doors – June 21/22
  8. Buy new ORB hinges – By June 27
  9. Paint the door jambs – By June 27
  10. Spray paint old knobs ORB – By June 29

You’ll notice that actually painting the doors and rehanging them are absent from this list. This is because my secret plan is to get the doors ready to paint, but then pass them on to Matt. He painted all of the doors in our last house, and I think it would be good to continue the tradition. Don’t you?

This probably is more of a one week project, rather than a one month. However, stretching it out will give me a chance to do some work outside still. It would be hard for me to spend the whole month of June indoors.

Have you ever dressed up basic doors? Are you on board with the barn door trend? What’s on your to-do list for June?

May progress report

Let’s see how many excuses I can come up with to explain my attitude towards working outside during most of May.

  1. Weather was cold and rainy.
  2. My Dad jetted off to England.
  3. The tractor still had the snowblower attached to it up until the middle of the month.

Despite sounding like a big whiner, I actually did accomplish a few things this month. In fact, I surprised myself by how much I was able to cross off my ambitious list of landscaping to-dos for May.

Here’s how I did.

Turnaround

  • Weed the flower garden half
  • Spread wood chips on flower garden – I nearly didn’t get to this one, but knowing I had to report back to all of you made me get my butt in gear.
  • Make a top for the bird bath – I still haven’t figured out what I’m going to do for this one. The idea that I had for the top is a little bit… well… little.

Trying to find a basin for a bird bath

  • Put the bird bath in place
  • Place the bench
  • Continue to fill in the garden with more plants

Garden with a brick path and park bench under a big tree

The turnaround is looking awesome IMHO. It’s turning out even better than I expected. Obviously the plants still need to fill out a bit (okay, a lot) more, but I think it’s going to be beautiful.

Front garden

  • Edge the garden
  • Transplant a few bushes, trees and other plants out of this bed and into some of the other gardens
  • Fill in the pit from the woodstove chimney
  • Fix the downspouts
  • Weed as I go

Trees

  • Pick up fallen branches
  • Cut branches to firewood lengths
  • Split firewood
  • Burn brush – We have three massive piles of brush, but the wood is still a little damp and isn’t that interested in catching fire.

Matt got an in-depth hands-on session with his new chainsaw when his Dad came over to help us with the clean up. This to-do was definitely a team effort. Lesson learned: The chainsaw is heavier than you think, a fact that becomes obvious after working with it all day. Second lesson learned: Your wife doesn’t care that you just learned how to use a chainsaw. She’ll still send you up an extension ladder to trim branches off the pines outside the kitchen window, all so that she can have a better view of the pond. Third lesson learned: Baxter was a big help, as usual.

Baxter supervising ice storm clean up

Grass

  • Add top soil beside the front stoop and seed
  • Overseed in front of raised bed under the dining room window
  • Rake solar trench smooth and seed

Wop-wop. Big fat nothin’ on the grass front. We did mow before it got knee-high, which is an improvement over the past two springs, so I guess that’s something.

Hoses

  • Turn on water to exterior taps
  • Install hoses at side and back of house
  • Install a proper hose bib at the driveshed, so that the hose isn’t laying on the ground. – My Dad’s going to help me with this one, but he couldn’t do very much from England.
    1. Shorten waterline
    2. Attach to waterline to wall
    3. Install a splitter so that I can someday add another hose bib at the opposite corner of the driveshed
    4. Reinstall tap on shortened waterline
    5. Install hose hanger
    6. Hook up hose

Hose coiled in the grass

My plan to focus on one area per week (or weekend) went a little off track due to weather, support crew and motivation, but I still feel like I put a good dent in this year’s landscaping plan.

Work is ongoing and will continue for a few months (years) yet.

What progress have you made outside so far? Have you learned to use any new equipment this spring? Are your four-legged friends as helpful as Baxter? How do you handle your hoses?