Office nook before and after

My office is a room of many issues, but there’s one corner that gets the award for most-improved.

Office nook

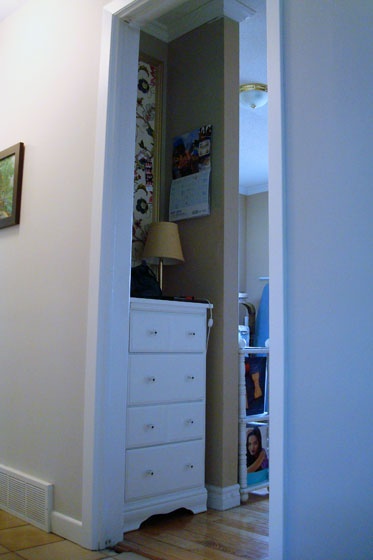
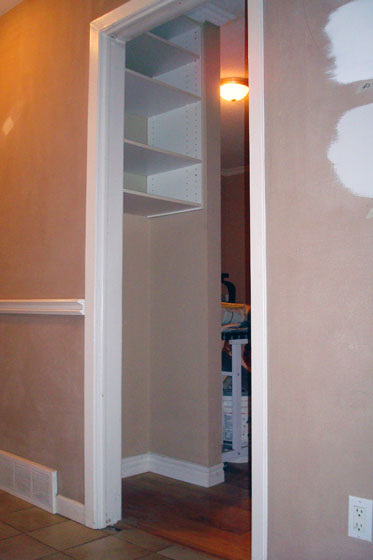
It’s a wee tiny alcove just inside the door. The space measures 16 inches deep by 24 inches wide. When we moved in, and for the first year and a half of living here, this space was fitted with some ridiculous built in shelving. The fact that it started at about five feet in the air and went up to the ceiling made it basically unusable.

Nook before

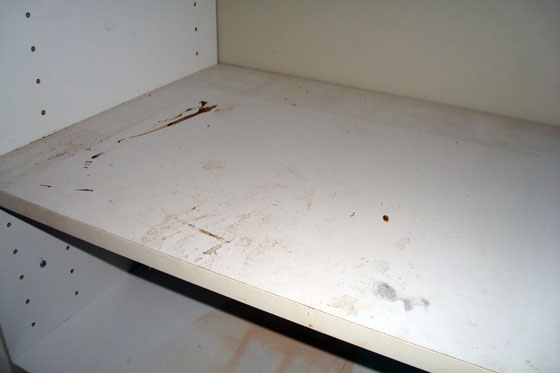
Not that you’d want to use it anyway. It was filthy.

Can I just ask why things in this house have to be both weird and gross? I mean, shelving that’s over your head out of reach isn’t enough? It also has to be disgusting?

Dirty white melamine shelving

One night, I snapped and decided that the shelving had to come down. Of course, it turned out it wasn’t that simple. The shelving had been installed all in one piece before the door casing was put on, and even once I unscrewed it from the wall, it wasn’t going anywhere. Smushing the shelving into a parallelogram allowed me to slide it past the casing and get it out of the nook. Then a set of Allen keys allowed me to take it apart into its composite melamine pieces. There were a few dings in the wall, but otherwise it was a victory. The nook was empty.

Painting the office will happen all at once sometime in the future. So for now I wasn’t worried about patching the drywall or dealing with the two tone paint that removing the shelf had uncovered. I did want to make the space more functional, though, and I didn’t want to wait.

The office is right off the kitchen, so I decided that this was a perfect spot to build a bit of a command centre. A place for the grocery list, a calendar, important numbers, even a spot to put my purse and keys when I come home at the end of the day.

I needed some storage, some display and lots of organization. Here’s what I came up with.

Pretty home command centre

It may be a weird tiny space, but I’ve packed a lot of function into this little corner. In the next post, I’ll share the details of exactly what went into my organized nook.

Has anyone else transformed a very small area? Do you have a command centre at your house? What are your tips for dealing with a small space?

May days

May has arrived, and work outside has begun. Landscaping remains the biggest project at the farm, and the biggest to-do this year.

The plan for this month is to focus my attention outdoors. I have only a few months of nice weather, so if I’m going to continue knocking things off the landscaping master list, I need to take advantage of every day.

Here are some of the projects I’m considering this month:

Turnaround

  • Weed the flower garden half (I gave up on planting flowers last fall and decided that half the turnaround can be grass for now)
  • Spread wood chips on flower garden
  • Make a top for the bird bath
  • Put the bird bath in place
  • Place the bench
  • Continue to fill in the garden with more plants

Bird bath base

Front garden

  • Edge the garden
  • Transplant a few bushes, trees and other plants out of this bed and into some of the other gardens (especially the turnaround)
  • Fill in the pit from the woodstove chimney
  • Fix the downspouts
  • Weed as I go
Baxter in the weedy front flowerbed

“What do you mean you have to weed?”

Trees

  • Pick up fallen branches
  • Cut branches to firewood lengths
  • Split firewood
  • Burn brush

Braches to be cut up into firewood

Grass

  • Add top soil beside the front stoop and seed
  • Overseed in front of raised bed under the dining room window
  • Rake solar trench smooth and seed

Trench that needs to be seeded for grass

Hoses

  • Turn on water to exterior taps
  • Install hoses at side and back of house
  • Install a proper hose bib at the driveshed
    1. Shorten waterline
    2. Attach to waterline to wall
    3. Install a splitter so that I can someday add another hose bib at the opposite corner of the driveshed
    4. Reinstall tap on shortened waterline
    5. Install hose hanger
    6. Hook up hose

Waterline

This list might be a bit ambitious for one month. Plus, I have to confess I don’t have sole responsibility for completing all of these tasks. When it comes to the tree clean-up, I’ll be relying on Matt and his Dad for their chainsaws and log splitter. Some of the transplanting will go easier with Matt’s help on the digging. My Dad will work with me on the plumbing for the driveshed waterline.

My plan is to focus on one area per week (or weekend)–weather, support crew and motivation permitting, of course.

Have you started outdoor work at your house yet? What’s on your gardening list? Seeding? Weeding? Transplanting? Watering?

April report

It’s the last post of April, so time to report on my accomplishments for the month.

My plans for April consisted of a few leftovers from March and a theme of “green.” So how’d I do?

Finish the projects for my home and work offices

I just can’t seem to motivate myself to complete the last few details for prettying up my work office. But my home office is getting much more organized and looking much prettier.

  • Add organizers to the new dresser and start filling the drawers – Done April 27
  • Make bulletin boards for my home and work offices – One done April 20
  • Recover the shade from my work office desk lamp

Fabric covered bulletin board

Don’t spend any green (on the house)

  • I didn’t spend any money on the house (I had purchased all of the supplies for my office projects long ago). In fact, I didn’t spend much money at all… aside from a completely unnecessary parking ticket. Country girl goes to the city and forgets the side of the street you can park on depends on whether you’re in the first or second half of the month… argh.
  • We spent a whole lot of green on the solar panels. As much as it hurt to write the massive cheque, we were very happy that we were able to pay for them in full without borrowing any money.

Solar panel array

Go with green projects

  • The solar panels are obviously about as green as we can get. Our hook-up was delayed by one day, but on Friday the inspector cleared us, and we were connected to the grid.
  • For my office projects, I was able to reuse some supplies I already had like spray paint, fabric and the boxes I made into dividers.

Start planning for a green (outdoor) project

  • At the start of the month, I said that I’d like to get a few quotes to see if it’s possible to get some help to clear the brush from the east shore of the pond. I’m not going to be hiring any help until our bank account recovers from the solar payment, so I’m back to DIYing it. Anyone have a bush hog I can borrow?
  • On the DIY front, two gardens have been weeded. Two more gardens have been de-edged of stones. Some of the grass has been raked. Brush has been cleared off of about half the vegetable garden area. And our free trees have been planted.

When I set my goals for April, I said that I was giving myself a bit of a break. Last Saturday afternoon, I actually crawled into bed and took a nap–unheard of for me. Even though I gave myself permission to take it a bit easier this month, I still feel I did a lot in April.

What did you do in April? Who else is getting organized? Going green? Saving money?

Project Replant

You may remember that our trees took a bit of a beating during the Christmas ice storm. So you can imagine that I did a double take when driving home on Friday I heard the words, “Lowes is giving away free trees this Saturday” come out of my radio. Free trees? Even better, I didn’t hear any words like “conditions apply” or “minimum purchase required.”

I walked in the house said something like, “Free trees!” to Matt and then dashed to my computer to look up the details.

It was true! Lowes was giving away 2,000 trees. And one of the locations was our local store.

Lowes Project Replant

The giveaway was called Project Replant, and the idea was to “help rebuild some of the tree canopy lost in … the ice storm.”

The giveaway started at 9:30, but I wanted to be absolutely sure I got a tree, so I got to the store 45 minutes early. Twenty-six other keeners were already lined up in front of me. About a half hour later, Matt arrived and joined the end of the line. Yay, another much needed tree!

Lowes Project Replant

There were coffee and hot chocolate and donuts and great camaraderie amongst the people in the line. The Lowes staff kept the hot drinks flowing and walked the line chatting with people. When the trees were finally wheeled out, I thought that people were going to cheer. They were 1 gallon red maples, about 4-5 ft. tall, and normally cost $30 each. But Saturday they were free!

And Sunday they were in the ground.

Our poor willow beside the driveway took such a beating over the winter and a tree-lined driveway is one of my big wants, so one tree went there.

Lowes Project Replant

On the turnaround our big maple only lost a few branches, but it looks so fragile and old that I’m not sure how much longer it will last, so we decided we’d better get a new tree started sooner rather than later. (Especially since the new trees are so small. In the photo below, you can see the metal stake that we used to keep the tree straight better than the tree itself).

Lowes Project Replant

Small or not, the trees are so nice to have. Thank you, Lowes.

Did anyone else get anything free this weekend? Did you do any gardening? Any tips to help our trees get established and make sure they survive?

The artist in the family

Back in January when I posted about the special painting by Matt’s grandpa that we received for Christmas, a couple of people expressed interest in seeing more of his artwork. You caught a little glimpse of the paintings when I shared the hallway reveal. Today I’m going to give you a closer look.

Paintings hung in the hallway

Matt’s grandpa was a draughtsman. He worked on the Avro Arrow, which in the 1950s was Canada’s most-advanced (and most expensive) jet aircraft.

Painting was his greatest hobby. He painted portraits, still lifes and landscapes.

Matt's grandpa painting

The four pieces that we’ve hung on the main floor are landscapes featuring rustic buildings.

There’s the two barns that Matt’s parents had framed for us for Christmas. We hung this painting in the foyer. When we were searching for our farm, a lot of the properties we toured had pictures, paintings or aerial shots of the farms hanging inside the entryways. Since this painting looks like it might as well have been painted at our farm, it was the perfect choice for a welcoming image right inside the front door.

Painting of two barns in winter

Along the hall, the two smaller images are of Matt’s aunts’ former cottages. Matt remembers spending time at the green cottage as a child. His aunt has since sold it, and I never had a chance to visit.

Painting of a green cottage among trees

The red cottage has been knocked down and a new cottage built in its place. Matt’s aunt and uncle still have the property. In fact, this is the cottage that we visit every fall. It’s special to have this very personal record of two memorable family places.

Painting of a red cottage

The large painting at the end of the hall shows the garage at Matt’s grandpa’s house. Surprisingly, this painting was stored away and unframed for decades. The sunlight in this picture is beautiful. It’s my favourite painting out of all of Matt’s grandpa’s pieces.

Painting of a sun-dappled garage

I’ve always said that I’d like to own some original art. I realized as I was writing this post that I do. Most artists make art because they love it, not as a “job.” As far as I know, Matt’s grandpa never tried to sell his paintings. He was prolific, and he painted because he loved it. He was most definitely an artist, and I’m very proud to display his paintings in our house.

Looking to hook-up

Today is connection day.

We have a very long, very expensive wire running from the solar panels on the barn, into the inverters affixed to the wall, through metres of conduit, along the 300+ foot trench and up into the box on the pole.

Solar panel wire route

Today is the day our feed makes it to the top of the pole, into the power lines and back into the grid.

Hydro pole

That is, as long as everyone shows up when they’re supposed to, the work passes all of the inspections and the right wires get plugged into the right spots.

Keep your fingers crossed for us. Tomorrow when the sun comes up, we should finally be generating electricity.

(And yes, I will do a post with all of the details on our solar project once we’re up and running).

What exciting happenings do you have going on this Wednesday?

Update: Connection was a no-go. The hydro inspector wanted to see the wire and conduit laying in the trench, but the trench was back-filled. The excavator is back sitting in the driveway and the trench has been dug out. We have a conditional pass, but we can’t connect until he inspects the trench. We’re still crossing our fingers.

Easter egg

As we wrap up Easter, I thought I would share a special family heirloom that has figured in our annual celebrations for as long as I can remember.

This antique silver egg coddler belonged to my grandmother. Every Easter, she would display it on her coffee table.

Antique silver egg coddler

I like to collect silver, so I was very honoured to add this piece to my collection when my grandmother passed away.

This dish is notable for the bird and her nest that form a kind of handle at the top the large egg. This bird was never attached when I was growing up. At some point, it had broken off, so each Easter my grandmother just perched it on top of the nest. A few years ago, I found an outstanding silversmith, and he was able to rebuild the bird’s legs and put her back on her nest. There are still some obvious quality issues with the dish, but I didn’t want to make too many repairs given the age of the piece.

Silver bird on top of an antique egg coddler

When you lift off the lid, inside there is a frame to hold six (very small) eggs.

Egg holder inside a silver antique egg coddler

I believe how this would have worked was you would fill the inside with boiling water and place your eggs in the holder. At the bottom of the dish, there is a spot for a burner of some kind, which would keep the water hot and cook the eggs.

Antique silver egg coddler

I have no plans to coddle any eggs, but I do plan to display it every Easter. It’s a piece that I treasure.

Do you have any Easter traditions in your family? Have you ever used an egg coddler? Does anyone else collect silver?

Crazy for a full moon

I think we’ve established that we don’t have a fenced yard, and we’re still working on helping Baxter remember he has to come when called. So any time Baxter goes outside, he’s wearing a leash, and a human is holding the end.

As the human responsible for the first and last outings of the day, I love a full moon.

Full moon over country fields

Being able to see my shadow at 6am and 10pm is a luxury.

On most of our walks this winter, I was stumbling over ruts, tripping over tufts of grass, straining my eyes for telltale strips of white–and my nose for the putrid scent–that signifies skunk.

Now that the days are getting longer, our walks are starting to be lit by the rising sun. However, I still have a special fondness for moon walks.

While the full moon is reputed to cause craziness, full moon walks are so much more relaxing. What drives me crazy is if my full moon is hidden behind cloud cover.

Aside: Apparently there was an eclipse yesterday. I missed it. Eclipses are neat enough that I would have given up my full moon without complaint.

What’s your favourite phase of the moon? Is anyone else wandering around outside in the wee hours of the morning and night? Did you catch the eclipse?

DIY wood countertops one year later

See an update on our counters after four years.

A year ago, I wrote about how we DIYed our own wood countertop. Since then, this post has become far and away the most popular on the blog. Given that we’ve been living with our homemade counter for a year now, I thought a good topic for today’s post would be an update on how our DIY counter has worked for us.

The simple answer is the counter has worked great. Here’s what it looks like today.

DIY wood countertop 1 year later

Just a reminder, here’s how the counter looked a year ago.

How to make a wood countertop

Here are a few more details on how the counter performed.

The biggest measure of this counter’s success is the joints. After a year of use, they’re still nice and tight. Squaring off the edges of the boards, gluing the seams before screwing them together with my Kreg Jig, cramming every joint full of wood filler and sanding everything perfectly smooth have ensured that the counter has held up really well for us.

Joints in a homemade wood countertop

The finish has held up as well. The tone of the wood has stayed constant, and the Waterlox sealer has been a great protector. Originally, the finish was pretty shiny. It has dulled a little bit over the past year. We’re not the best at wiping down the counter religiously, but no matter what we spill or how long something sits on the counter (ahem), it wipes up easily.

We have one spot that has stained, but it wasn’t from food. Of all things, it was from a plastic bag. We had set a regular grocery store bag on the counter. The bag had some red writing on the outside, and that dye somehow transferred onto the counter. No matter how much I scrub, this dye will not come out.

Red dye on wood counter

It’s well known that wood is softer than the other countertop materials that are out there. It dents pretty easily. After a year of use, there are some imperfections in our counter. Most are the size of a quarter or smaller, and this one’s about the deepest.

Dent in a wood countertop

The dents don’t worry me at all. We use a cutting board when we’re chopping, but if something leaves a mark, I don’t get upset.

Along one edge of the counter, we have some small chips. These were from a unique incident that had absolutely nothing to do with cooking. The night that we picked up our dining room table, Baxter got a little upset at being left alone in the house. To make himself feel better, he ate the pan of brownies that had been left on the counter. When he reached for the pan, his toenails left some marks on the edge of the counter. These marks are particularly noticeable because they go down below the stained surface. (The dark marks near the middle of the image are features of the board and aren’t a stain or damage that we’ve inflicted).

Chips in the edge of a wood counter

In my post a year ago, I talked about how the counter had warped a little bit and how we were able to flatten it by trimming the end and carefully screwing it to the cabinets. The boards have warped a little bit more over the past year. If you run your hand over the surface, you can feel a bit of a wave. The middles have curved up and the edges have curved down. The warp isn’t severe enough to impact the usability of the countertop and it’s not noticeable to the eye, unless I pull out the level to show you the gaps.

Warp in a DIY wood countertop

We don’t coddle the counter, and a year later it’s obvious that it’s had some use. I am really pleased with all of the choices we’ve made a year ago: going with wood, the colour of the stain, the Waterlox sealer, and especially making it ourselves. Everything has worked out really well.

The counters are still going strong four years later–although there are a few provisos.