Not quite masters of our universe

It turns out Matt and I have been sleeping in the wrong room ever since we moved to the farm. We’re the owners of this farm, the adults of the house. That means our room should be the master bedroom, right?

Well, we got it wrong when we moved into the farm.

We did nothing to fix up any of the bedrooms. The paint colour is gross and walls are dirty. The ceilings are stippled so that cobwebs and dust get caught on the pimples (no, I’m not the greatest housekeeper). The light fixtures are massive outdated ceiling fans. In the midst of all of this beauty, we just picked a room, plopped down our furniture and called it our bedroom.

Unbeknownst to us, the room across the hall (which we’ve been using as a guest room) was where we should have plopped down our furniture.

Why, you ask? Well it’s obvious. This is the fancy room.

Master bedroom before

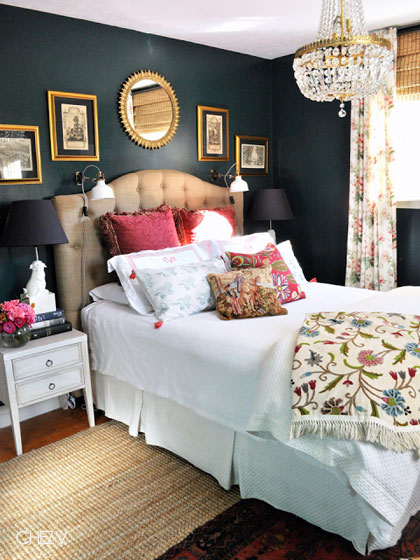
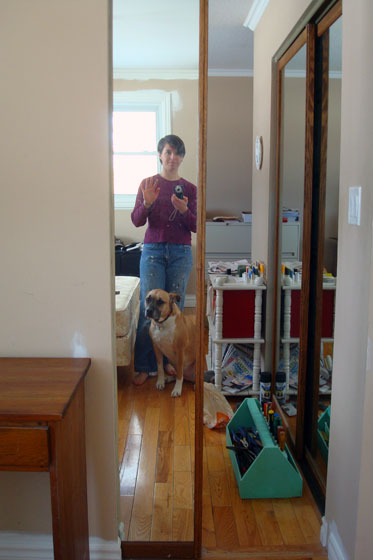
Now looking at this picture, you may still feel the need to question what makes it fancy (aside from the giant pink ape, obviously).

Let me enlighten you.

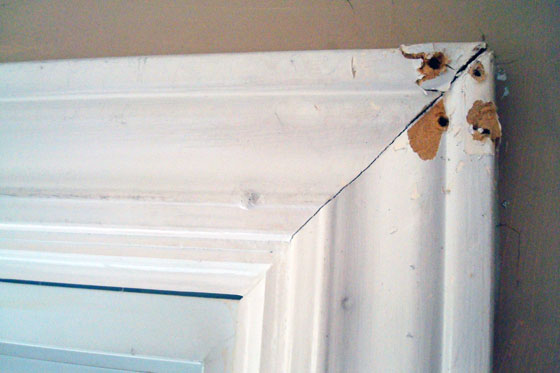
This room has special moldings. All through the rest of the house, the trim is basic, narrow and flat. But this room has the fancy curvy trim. Just ignore the fact that screws for the window blinds have destroyed some of it.

Molding with screw holes in it

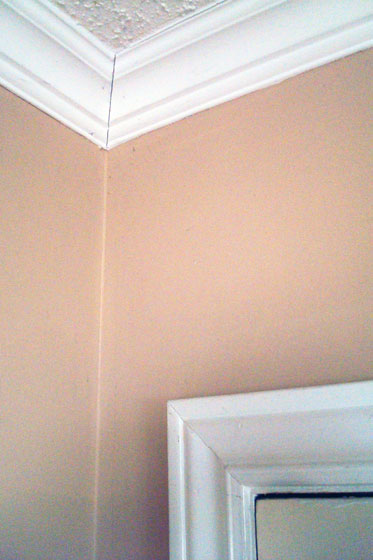
This room even has crown molding! Oooh, fancy.

Crown molding

This room also has a mirror, which our current room lacks. The fact that it’s a full-length mirrored pocket door that accesses the small bedroom next door (my “office”) isn’t weird at all.

Mirrored pocket door

This room has drywall, while the room we chose as our bedroom has painted faux wood paneling. Nothin’ says fancy like drywall.

And most of all, this bedroom is bigger… by a whole six inches. Woo-hoo!

So it’s obvious. Matt and I have to move across the hall.

Sarcasm aside, I’m actually looking forward to the move. This is my chance to make a comfortable, relaxing, personal, pretty bedroom for Matt and myself.

Next week, I’ll share how I plan to do that.

Home Goals 2015

I have to admit I’m a bit chuffed by how well we did on my Home Goals 2014. We got a lot done! However, I also have to admit I’m a bit tired. In 2015, I’m hoping to take it as it comes a little bit more.

I of course still have projects, but I’ve tried to pick some smaller ones this year.

I’m also going to try to be a little more flexible and not feel like I have to do a different project every month, each with its own schedule and deadlines. Yes, that worked for me in terms of getting things done. But it wasn’t always the most fun.

So in 2015, I’m trying to find the balance between the complete loosey-goosey failure of 2013 and the rigid productivity of 2014.

As is my tradition in my annual Home Goals post, I’m going with inspirational pictures, rather than reality.

Master bedroom

This project is a carry-over from 2014. We haven’t done any updates to any of the bedrooms, and I think the master is a good place to start.

Black, white and gold bedroom

Source: Chez V (found via Little Black Door)

List:

  • Buy a queen size bed Done… except it grew to a king!
  • Remove popcorn ceiling
  • Patch ceiling and walls
  • Paint ceiling, trim and walls
  • DIY a headboard
  • Relocate light switch
  • Replace light fixture
  • Make/find window treatments
  • Paint dresser and replace hardware
  • Refresh dinged up closet doors
  • Decorate and personalize

Basement art

This is definitely a light-weight project. The basement reno finished two years ago. It’s time to do a little more decorating. The eclectic enamel basin “art” I added to the laundry room highlighted how bare the walls are elsewhere. I have ideas for some simple, fun art that will really finish off the space.

  • Build a shadow box frame for Matt’s infant PJs in the laundry room
  • Print and frame a pair of playing card posters for behind the games table
  • Build a big chalkboard for score-keeping in the long room where the ping pong table and dart board live
  • Make some classic board game-inspired art for the long room (not surprisingly, there’s a long wall that would be perfect for some art)

Furniture

I made some good progress on the furniture front last year. There are still a few more pieces that I’d like to make or find this year.

Pottery Barn Benchwright inspired coffee table from Ana White

Source: Ana White

  • Dining room hutch
  • China cabinet for my office
  • Coffee table for the living room
  • Chairs for the dining room

Vegetable garden

A vegetable garden has been on my list every single year. It has to happen this year. It just has to.

A beautiful country vegetable garden from Country Living

My dream, dream, dream vegetable garden. Source: Country Living

I’ve come to the conclusion the problem is that we have 129 acres, which means a lot of outside work. I also live in Canada, which means a very narrow window in which to complete that outside work. I say, “This weekend I’ll do this. Next weekend I’ll go over here and do this.” Before I know it, it’s July, summer is half over, and I still don’t have a vegetable garden.

So this year, the plan is the garden and only the garden. Forget about the flower beds. Forget about the rock piles.

  • Start the vegetable garden.

And in keeping with my plan to be more flexible (planning to be flexible isn’t an oxymoron, is it?) that’s the end of this year’s goals. Some other projects may sneak in, but I think I’ve got room for them.

In addition to being a bit more flexible about this year’s goals, I have one more over-arching goal: spend less money.

If you’ve been around here for any length of time, you’ve probably figured out that Matt and I are pretty frugal in a lot of areas. However, we do splurge at times. 2014 had a few big splurges, mostly the solar panels and the fireplace. Our bank accounts need to recover from those projects, so I’m declaring this year Frugal Flexible ’15.

Do you have any goals or resolutions for 2015? What projects would you like to do around your house? Are there any tips to share about balancing flexibility and productivity?

Home Goals previously:


Looking back at home goals 2014

Before we dive too much into 2015–boy it feels weird typing that–I’m going to take a little look back to my Home Goals from 2014.

I’m proud to say that Matt and I kicked butt in 2014. I don’t mean to sound boastful. But we got a lot done around the house over the past year. Today’s post is about celebrating some of our accomplishments. Woo-hoo!

Here’s the list of my original goals and how we did on each.

1. Painting. Check!

  • Main floor hallway
  • Kitchen
  • New addition – Living room

Hallway painted Benjamin Moore Abalone

Painting the hallway and kitchen was the first project we tackled last year, and we crossed them off the list in February. The living room wasn’t on the list at first, but over the course of the year we slowly got it painted one wall at a time. In fact, we finished the final wall just last week (okay, so it was Jan. 2, but who’s counting?).

2. Laundry room. Check!

The laundry room was my first participation in the One Room Challenge. I love how I was able to transform this utilitarian space with just a bit of paint, some simple updates to the cabinets and a few fun accessories.

Black and white shaker cabinets with chrome hardware in the laundry room

3. Master bedroom. No check.

We were not very successful at the master bedroom makeover. I was supposed to scrape the popcorn ceiling back in the summer but never worked up the effort.

… That is until last week. Yup, the master bedroom makeover is underway.

Matt and I bought a new bed (a king-size one–yipes) just before Christmas. Its imminent delivery motivated me to deal with the ceiling. We’ve got a bit more work yet to go, but that’s what Home Goals 2015 are for (that post is coming up next).

4. Furniture. Partial check.

I had a few pieces of furniture that I wanted to find/make last year. I can cross off about half of my list.

  • Refresh bookshelves and living room TV stand with new trim and paint – More on the bookshelves here and the TV stand here and here
  • Coffee table for the living room
  • Sofa table for the living roomDetails here
  • Hutch/cabinetry/built-ins for dining room
  • Narrow dresser for my officeDetails here
  • Hutch for my office
  • Free-standing cabinet for the hallway to the laundry room – No details, but you can see it with the ironing board hanging on it here

Corner bookshelves

5. Living room fireplace. Big fat check!

I honestly did not expect to be able to cross the fireplace off the list this year, but I can. And it makes me a little bit giddy. We squeaked it in right at the end of 2014. The full wrap-up post is still coming, but I can let you know that the fireplace is fabulous. It was wonderful to lounge in front of the fire over the holidays.

And no, you’re not getting a picture of this yet. 😉

6. Landscaping. Maybe a partial check.

Landscaping continues to be my nemesis at the farm. I did some work outside, but not as much as I had hoped.

Front of the house May 2014

  • Reestablish the flowerbeds around the house. I’m about halfway around the house and have come to the decision that we don’t need flowerbeds on the south side or the back. It will take a lot of work to rip out the old beds, but once I do mowing will be quicker than weeding.
  • Plant grass seed where old firepits were and clean up the detritus that’s still hanging around. Again, halfway done. The grass is growing, but there are a few more piles still to clean up.
  • Tidy the east shore of the pond and build a new firepit near the water. I decided that this task is too big to take on myself, but budget constraints prevented me from recruiting some professional help. Maybe next year.
  • Continue to plant the turnaround. Half the turnaround is in really good shape. The other half we’ve gone with grass until I can work up the energy to make it a flower garden.
  • Put in a vegetable garden. Oh I had such ambitions around this one, but it was a complete non-starter.
  • Continue with the landscaping master list. I don’t think this task is ever going to go away.

2014 was much more successful than 2013. Last year at this time I was quite frustrated with how little I had accomplished. This year, I’m over the moon by how much we’ve done.

Having my goals was really important to help me stay focused. What made the difference this year was translating those goals into monthly projects. Thanks to all of you for sticking with me and encouraging us through 2014. Coming up next, Home Goals 2015.

Was 2014 a productive year for you? What was your biggest accomplishment last year? How do you stay on task?

Colour of the year

Maybe it’s because I don’t drink wine. I’m not feeling it for marsala, Pantone’s colour of the year announced last week. (Admittedly, it could be some of the weird photography on their site. More on that below–all in good fun, of course).

Marsala, Pantone's colour of the year

This muddy, dull red seems old fashioned, but I don’t know what era I’d put it in. I don’t see myself putting too much of it in the farm.

Sarah Richardson used some muddled marsala-like tones as accent pillows in the living room of her farmhouse, and they look great. I’d love to do a bunch of jewel toned velvet pillows for the couch in our living room. But jewel toned means brighter and deeper to me. Marsala is just too dull.

I think marsala’s best hope is as an accent colour… or fashion or makeup. Or Sarah Richardson. She can make everything better.

What’s your opinion on marsala? Do you see yourself using it anywhere?

And just for fun, because I truly am puzzled, what story do you think Pantone’s trying to tell in the Tasteful Hue section on the marsala page?

My theory is a love triangle between a stubbled florist (his apron doesn’t say chef to me), an oblivious tipsy strawberry blond and an apparently headless person wearing a marsala-toned bow blouse.

My thoughts on last year’s colour of the year, Radiant Orchid.

Two new feet

A neat thing about having a blog is that people know a lot of what’s going on in my life. Sometimes it weirds me out when people start talking to me seemingly out of the blue about something that I mention on the blog. Most of the time though it’s a neat way to stay connected with people I don’t get to see all that often. When Matt’s aunt came to our house for our annual month-before-Christmas party, she brought a perfect gift for us: some fun additions for the laundry room–these wooden sock forms. Vintage wooden sock stretchers Matt’s aunt is an avid vintage and antique shopper. Fortunately for us, she’s also a regular blog reader. So when she saw these wooden sock forms, she thought of our laundry room makeover and decided to give them to us for Christmas. They fit in perfectly with the rest of the eclectic art in the laundry room and echo the wood accents we have elsewhere. Vintage wooden sock stretchers Something else I like is that these feet aren’t a pair. One is a bit bigger than the other, so there’s basically one for Matt and one for me.

What are some favourite vintage pieces you’ve used in your decorating? Do you decorate your laundry room? Who else has relatives who shop for them?

Dining room sideboard as living room sofa table

The fireplace project is going well. We got it all down on Monday, and it started to go back up yesterday. Unfortunately, so far it’s rising pretty slowly, so I don’t have anything to show yet.

Let’s turn our attention to another part of the living room… or at least another part of the living room as it looked last week before everything was taken apart.

Last week when I showed you my family photo display, I kind of glossed over the piece of furniture that they were sitting on. Finding a table of some kind to go behind the couch in the living room was one of my Home Goals for 2014. I seem to be posting a lot of Home Goals these days. Credit it to a last minute surge in productivity before the end of the year.

The idea was to find something to hide the back of the couch, have some space for display and also provide some additional storage, mostly for the adjacent dining room.

Sideboard

The story of finding this piece illustrates why I have measurements of the furniture I’m hunting for and a tape measure in my purse at all times.

Someone was moving out of an office at work. The cleanout uncovered a wood sideboard sitting opposite the desk. It looked like it might be close to the right dimensions. I dashed back to my office for my measurements and my tape. A surreptitious measurement session later, I had confirmed that it was the exact right height and the exact right depth. It was a little short, but I had an idea for that. Off I trotted down the hall to find someone with authority to ask if the sideboard was up for grabs. Of course, that turned out to be not the VP himself, but his assistant. She said, yes, I could take it.

Even though I had permission, when Matt and I were loading it into my Dad’s truck the following Saturday, I kept expecting security to come speeding up to the building. Luckily, we made a clean getaway.

Asset control sticker

Back at home, the sideboard fit perfectly in the living room… pretty much. It’s still a bit shorter than I wanted. (I’d love to put a pair of lamps on it and clear off our end tables). Here’s that first photo again. See how the couch is sticking out on either side?

Sideboard

My original plan had been to cut the sideboard in half and insert some open shelving in the middle. A new top and new trim around the bottom would camouflage the addition, and then I’d paint it all out.

Well, once I had the sideboard, that plan didn’t seem like such a good idea. It’s really, really well made, and I feel like chopping it up would be a bit of a crime. (Plus I was told it’s a Krug, which is apparently pretty good furniture). Yes, there are some dings in the wood, but I feel like I’d rather refinish it than paint it. It’s a beautiful colour that’s actually pretty close to our dining room table (which also needs to be refinished).

If I decide I truly cannot live without a sofa table that’s the full length of my sofa, I will probably start over and source or make a complete new one.

For now, this thing is awesome. I love having the shallow drawers at the top. To be honest, I’m only using one of them, but it holds all of my napkins, so I don’t need more space yet.

Napkin storage

For the cabinets themselves, I’m using even less. My piano books take up half of one lower shelf, but other than that the sideboard is empty.

So much for needing storage. Oh well. Let’s call it room to grow. We’re obviously still a work in progress over here.

What would you do with this sideboard if it was yours? Do you have a sofa table, or some another piece of furniture behind your couch, at your house?

Family photo display

One of the biggest hits at our month-before-Christmas party over the weekend (aside from the food) was a family photo display that I added to the living room. Everyone who came to the party spent time looking at the pictures.

Family photo display

It was neat to see my young nephews, who never met their great grandparents, getting to know them a little bit more through their pictures. I liked talking with Matt’s uncle about my family and introducing him to some of my relatives.

The photos sit on the sideboard behind the couch. Some frames face the living room and some face the dining room. The frames mostly came from Value Village. In the store, the smaller frames (for photos 4 inches by 6 inches or less) are bundled together and sold for just a couple of dollars. Which is great, because I think the smaller frames work best for a display like this since I can squeeze in more photos. (And I already have plans to add a few more frames).

Family photo display

To fill the frames, I chose a mix of pictures from Matt’s and my families. My Mom and I spent a fun afternoon a few weeks ago going through all of our old albums so that I could pick out some of my favourites.

Family photo display

I love having our family members with us. It was great to see everyone at the party on the weekend, and it’s nice to have the reminder of them in the pictures throughout the year.

How do you display family photos?

My spin on a clothespin light

A lot of people had compliments for the clothespin light fixture in the laundry room.

Clothespin light in the laundry room

I can’t take credit for the idea or even the execution. I was inspired by this light from Young House Love.

I followed their tutorial pretty closely, and it was super easy. However, I did one thing differently and learned a couple of lessons along the way. I thought it might be helpful to share.

First the lessons.

I chose to do the same zigzag pattern that John and Sherry did. In their tutorial, they mention alternating squares. However, what they didn’t say is that they also skipped a row of wire between each row of pins. If you look closely at the pictures in the YHL post, you’ll be able to see the pattern. Skipping every other row gives a comfortable amount of space between the pins so that they lay at a nice angle all the way down the shade. And this makes the great pattern on the ceiling when it’s lit up.

Clothespin light fixture

And talking about laying at an angle, in the YHL post, Sherry emphasized that it’s important to have an even number of squares around the top to maintain the pattern all the way around the shade. However, she didn’t talk about how many squares there should be from top to bottom. I nearly trimmed the bottom row of mesh off my shade because I had an empty row of squares. However, if I’d done that, my bottom row of clothespins would have hung straight down while all the other ones sat at an angle. Having an extra row of wire at the bottom holds the pins on the angle. So, while you want an even number around the shade, you want an odd number from top to bottom.

Clothespin light fixture

And now for what I did differently.

My light is closer to a flush mount than the YHL pendant. I used an old single socket lamp holder that I had lying around as the actual light. You can’t get more basic than that. Or cheaper. (Or, let’s be honest, uglier).

Keyhole light fixture

It took me a little while to figure out how to attach the shade to the light. I didn’t love the cup hooks on the YHL fixture. My solution was to run two pieces of wire loosely across the top of the shade. I then looped each wire around the screws in the lamp holder. It’s pretty much invisible, unless you’re standing directly underneath the fixture looking up.

Clothespin light fixture

The YHL light used 320 pins. Mine has 288. The final dimensions are 64 squares around and 17 from top to bottom. The overall dimensions of the drum shade are 11 inches high by 14 inches in diameter.

I love that I have a light fixture made out of clothespins in the laundry room. Even better, I love how it looks. Thanks John and Sherry for the inspiration.

Have you ever made anything out of clothespins? Have you made your own light fixture?

Linking up to #DIYLightingChallenge

8 tips for building furniture out of pipe

Pipe furniture is really popular these days. In the laundry room, you saw how I used pipe fittings to build the hanging rack and towel bar. Along the way, I learned a few lessons that I’m going to pass on to you.

8 tips for building furniture out of pipe

1. Pipe fittings are really easy to work with. The pieces go together very quickly. Assembling the towel bar probably took all of 10 minutes. I loved lego as a kid (who am I kidding, I still do), and this was like revisiting my childhood.

Towel rack made out of pipe fittings

2. Pipe fittings are oily. The fittings come in black or galvanized options. I chose the black because it looks more rustic to me. However, the black coating rubs off really easily.

Oil and rust rubbed off of pipe fittings

Before I could do anything with the fittings, I had to clean them. Some people online recommended degreaser, which I’m sure would have worked. I didn’t have any so I tried 2 other options: wiping them down with vinegar (didn’t really work) and washing them with dish detergent. The washing worked. I dried the pipes with a rag and let them sit for 24 hours to make sure the threads and interior of the pipes were completely dry before I did anything with them.

Washing the oil off of pipe fittings

3. Pipe fittings come in different diameters. Pay attention to what diameter you choose, because different size pieces won’t screw together without special fittings. I chose the 1/2 inch size because it was a bit cheaper than 3/4.

4. Pipe fittings come in different lengths and connectors. You should be able to find the pieces you need for pretty much any project…

Black pipe fittings

5. … But if you can’t, the store staff can cut the pipe too. The cutting was one of the dirtiest operations I’ve ever seen. I felt bad for making the staff person get so oily from running the cutting machine. The result though was the perfect lengths of pipe. The machine will also put threads onto your pipe.

6. Pipe fittings don’t screw together fully. You’ll see the threads at each joint.

Screwing together pipe fittings

7. Drywall screws are good partners with pipe fittings. The pipe flanges attach to the walls with four screws. Since I chose black pipe, it made sense to use black screws. The coarse threads on the drywall screws dig into the wall and hold the pipe securely.

8. Attach the flanges to the wall first. Once your towel bar or hanging rack or whatever else you’re building is fully assembled, it can be hard to reach the screw holes in the flanges to attach your creation to the wall. However, attaching the flanges on their own is a piece of cake.

Tips for building furniture out of pipe

I elected not to paint my pipe fittings, although I’ve seen other projects online where people did. The finish isn’t pure black, but it’s a nice industrial dark grey–no sparkle here.

Just in case you’re interested in building your own towel bar or hanging rack, here are the pieces I used. I have to give credit for the hanging rack design to Angie over at Knick of Time. I’m not sure what pieces she used, but I think mine turned out pretty close. I spent a lot of time in the pipe fitting aisle at Home Depot. While my measurements may not be exactly the same as what you need, some of them might work for you and save you at least a bit of time.

Towel bar made out of pipeTowel bar

Dimensions: 10 3/4 inches long (from the outer edge of each flange) and projects 3 inches off the wall

  • 2 flanges
  • 2 elbows
  • 2 1 1/2-inch pieces
  • 1 6-inch piece

Hanging rack

Dimensions: 50 inches long, hangs down 10 1/2 inches from the ceiling and projects 17 inches off the wall
Hanging rack made out of pipe

  • 4 flanges
  • 2 elbows
  • 2 Ts
  • 2 3 1/2-inch pieces
  • 2 4-inch pieces
  • 2 15-inch pieces
  • 1 48-inch piece

And just in case laundry isn’t your thing, here are some of my other favourite pipe projects.

If you’ve spent any time on Pinterest, you’ve probably seen furniture, lights, shelves and numerous other things made out of pipe fittings. They add a great industrial style for a pretty reasonable price.

Have you ever made anything out of pipe? Do you have any tips to share? Anyone want to make anything out of pipe? Do you like the rustic industrial look?

Laundry room makeover

You saw the before and after of the laundry room last week. What you didn’t see was the cabinet hardware. Well, it finally came in. Between the sparkle of my new pulls and having an SLR camera for the weekend, I decided to reshoot the laundry room photos. You don’t mind do you?

Black and white shaker cabinets with chrome hardware in the laundry room

Clothespin light in the laundry room

Vintage washboard and red toy iron in the laundry room

Hanging ironing board in the laundry room

Black shaker cabinets with chrome cup pulls and knobs

Enamel basins and infant sleepers hanging in the laundry room

Matt's infant sleepers

Vintage wood hanngers on a hanging rack

Laundry room decorations

Towel rack made out of pipe fittings

Laundry room decorations

Laundry room

Thanks for your patience with my laundry room infatuation.