Looking back at home goals 2013

The subtitle for this post is “On goals, to-do lists, excuses, guilt and mojo.”

A year ago, I was the annoying perky pixie brightly declaring the projects I was going to accomplish over the coming 12 months. Today, I’m the dour, scowling troll who depressingly growls that I’ve done nothing. I suuuuuuuuuck.

I had four goals for 2013:

  1. Landscaping
  2. Painting
  3. Living room fireplace
  4. Laundry room

I can cross not a single item off the list.

On landscaping, I can say that I did something. I built a new garden around the well, weeded one of the front gardens and planted a new border of grass, leveled the old fire pit at the top of the driveway, established a new fire pit behind the driveshed, graded the turnaround, laid a brick pathway across it and planted a few flowers. It was somewhere in the massive tear drop shaped expanse of dirt that is the turnaround that my work ethic abandoned me.

Mixing manure into a garden

The garden was just too big. There weren’t enough plants in the world to fill it. We had just gotten a dog, and I’d rather spend my time with him. I have a week’s vacation, but we’re having record high temperatures, and I can’t really be expected to be outside gardening.

By mid-summer the weeds were taller than me and so thick that Matt–aka “he who does not garden”–took matters into his own hands and waded in with a shovel. It was clear that I had given up.

And that, ladies and gentlemen, is that last we saw of my mojo. People ask us often what we’re working on around the house. They usually find it funny when my response is, “Not much. I’ve lost my mojo.”

But it isn’t funny. Sure I was relaxed in the air conditioned comfort of my freshly renovated basement. Yes, I was bonding with my dog. But I was wracked with guilt.

When we hosted our annual month-before-Christmas party at the end of November, I realized that the walls upstairs looked exactly the same as they had a year previously–right down to the drywall patches. Ummmm, yes, welcome to my home. Can’t you just see what pride of ownership I take in it?

And now, a month and a half later, the walls are still not painted. In fact, I’ve added a few more drywall patches. I’ve sanded all of the walls (which previously were somehow the texture of sandpaper). I’ve mopped the ceiling (yes, mopped) and bought fresh white paint. I’ve slapped up a few colour samples. If anything, the walls are looking worse than they were before.
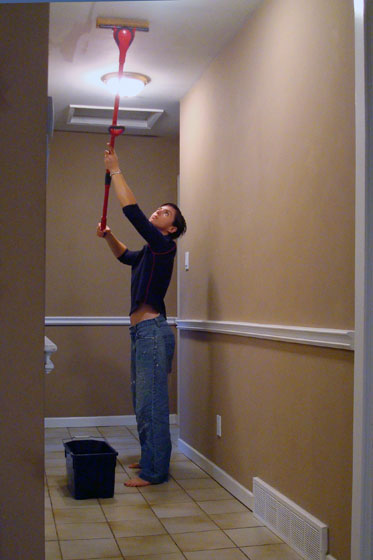
Mopping the ceiling to prepare for painting

And what about the fireplace? Well, we got a quote. And then I threw up. Then I fainted. I said, “There’s no way.” Then we talked ourselves into it because “we’re going to have to do it sometime.” Then our solar panels application regenerated (I’ll share more soon), and we realized we needed every single penny, nickle, dime, quarter and dollar we possessed and then some. So all other projects, especially expensive projects like fireplaces, were put on hold. Although a warm roaring fire would have come in really handy during the ice storm.

And then there’s the last holdout from the basement reno, the laundry room. This one I’ll pin on Matt. See, the first thing that needs to happen is to fix the leaky foundation. Matt kind of fixed it by putting a piece of plywood against the wall to funnel water away from the house. We hadn’t had a leak in the house since then, up until this weekend when a mid-winter thaw resulted in a puddle on the laundry room floor. The wall really needs to be dug out and waterproofed. This task was on Matt’s honey-do list for the summer, but he was so burnt out by the time summer started that I delayed giving him the list until we were well into August. By that point, his mojo was in no better shape than mine, so outside the wall still sits with its plywood water guard and inside the laundry room is still in its original ugly state.

So that is the saga of my very unproductive 2013. I did say last year that my plan was to avoid any other massive all-consuming projects and spend slightly more time enjoying rather than working the farm. I guess I was successful at those two goals. I’m not sure that makes me feel any better.

However, it is a new year, and you can be assured that my lack of success last year is not going to stop me from setting more goals for 2014. Stay tuned for that next.

What about you? Did you set any goals for 2013? How did you do at accomplishing things around the house?


A painter’s premonition

Matt’s grandpa was a painter. It was his hobby, and he was very skilled and prolific. Everyone in the family has a few of his works. This summer, Matt’s Dad came across a piece, and he immediately gave it to us. For our Christmas present, Matt’s parents had the painting framed.

It looks like it could have been painted at our farm.

Barn painting

What makes this a truly uncanny back to the future moment is that there’s a stump right at the edge of the driveway where the big centre tree stands in the painting. The small evergreens behind the barn ramp in the painting have now grown into our towering stand of pines.

Barns on a sunny, snowy winter morning

Matt’s grandpa died in 1991. I never met him. With this painting, it feels like he is a part of our life at the farm in a very meaningful way.

Do you have any artists in your family? Do you have a painting of your house or property?

Frank Lloyd Wright at the farm

Each fall when Matt and I go to his aunt’s and uncle’s cottage, we sleep in the back sunroom. Surrounding us at the top of every single window are beautiful stained glass panels made by Matt’s uncle Bill. The first time we visited, I remarked on the beauty of the shapes and the colours in the windows. Uncle Bill said, “That’s a Frank Lloyd Wright pattern.” I knew of Frank Lloyd Wright, of course, but I wasn’t that familiar with his work, so once at home I looked up his windows and found the Coonley playhouse with its fabulous windows.

A few years later, when we’d moved into our first house, Bill said, “I should make you a stained glass.”

Now, the thing that you should know about me is that if you offer, I’m always going to say yes. So I said, “Absolutely. Yes, please. That would be wonderful. I’d like one like you have in your sunroom please.” I went home and measured the dimensions of our dining room window and sent them off to Bill.

A few months later, Uncle Bill and Aunt Helen showed up at Christmas with a long package wrapped in bright poinsettia patterned fabric. Inside was our very own Coonley playhouse stained glass.

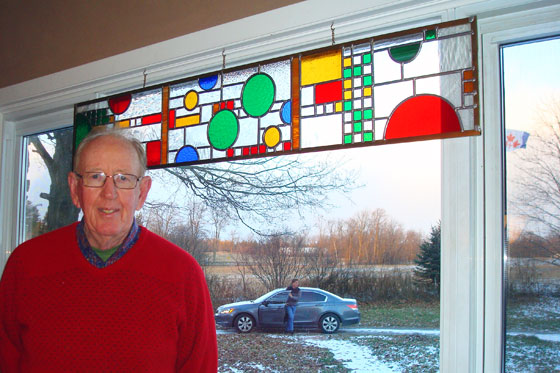
Coonley playhouse Frank Lloyd Wright inspired stained glass panel

When we sold our first house, I ever so carefully took down the window, wrapped it and brought it to the farm. Just like at the last house, I hung it in the dining room. When Bill was here a few weeks ago, I made him pose for a picture.

Coonley playhouse Frank Lloyd Wright inspired stained glass panel

This window faces east, so each morning when I eat my breakfast, beautiful colours are cast over the room as the sun rises. At our last house, the stained glass panel fit perfectly within the frame of the window and spanned right across the top. The dimensions of the dining room window are a little different than at our last house, and Bill keeps offering to cut the stained glass to the right size, but I don’t want to lose any of the wonderful pattern. Plus, I have lots of good memories from our first house and knowing this window was there first is a nice reminder.

Here’s a detail shot so you can see some of the different types of glass. There’s pebbled glass, wavy glass and clear, along with all of the coloured shapes.

Coonley playhouse Frank Lloyd Wright inspired stained glass panel

According to the MOMA web site, the brightly coloured shapes are supposed to “suggest balloons, confetti, and flags.” Happy things. And happiness is what I feel when I look at this window.

Thank you, Bill!

Do you have any stained glass at your house? Have you ever made stained glass? Are there any Frank Lloyd Wright fans out there?

Where to buy inexpensive cloth napkins

Last year for our Christmas party, I really wanted green napkins. I went to all of the usual stores, and even though it was just a month before Christmas, I had absolutely no luck. Then in July at Value Village, I found a dozen dark green napkins.

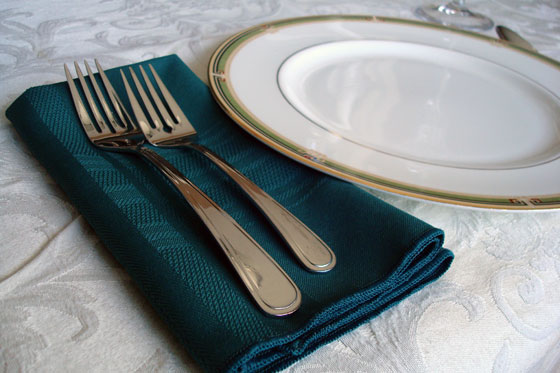
Dark green table napkin

Christmas was honestly not the first thing on my mind in July, but I knew I’d use the napkins and the price was much more reasonable than at any of the usual stores, so I bought them.

We use cloth napkins all the time at our house, and I’ve had the most success finding napkins at a decidedly unusual source: the dry cleaner.

You know the rack of abandoned clothing? One day at the cleaners, hanging from the rod alongside the shirts and trousers and outdated suits were dozens of napkins clothespinned to wire hangers.

I picked out a set of gold and a set of chocolate.

Where to buy inexpensive cloth napkins

They must have been from a nursing home or restaurant because there were so many of them. It’s been a few years since I bought them, but I’m sure I paid less than a dollar each. They’re all large and nice thick fabric.

The one issue with formerly institutional napkins is that some of them are stamped on the back side.

Stamp on a cloth napkin

For me, that’s a small price to pay to get 12 napkins for less than $10.

Do you use cloth napkins or paper? Where do you usually buy your napkins? Have you ever bought anything at the dry cleaner?

Last minute gift: Hand made wooden monogram

Usually I’m a last minute shopper/crafter when it comes to gift giving. (Exhibit A: I’ve done absolutely no Christmas shopping yet). However, back in March, inspiration struck and I whipped up a little gift for my sister and her husband. My plan was to give it to them as a housewarming present. Never mind that at that point they hadn’t even started building their new house.

Well, the house is done, and they’ve moved in, so the present has now been presented… and now it’s time to share it with all of you. Just in time for those looking for a simple craft to make as a Christmas present. Sorry that you don’t get to actually unwrap it like my sister did.

Wooden initials medallion

I was inspired by the wooden monograms created by Jamie Givens that I spotted through Pinterest. Mine is nowhere near as large or as professional as Jamie’s, but I’m pretty pleased with how it came out nonetheless.

This medallion ended up being about 12 inches in diameter. I used pencil tied to a string tied to a nail as a makeshift compass to draw the outer circle and then two more lines for the inner rings. A couple of vertical and horizontal lines finished off the letters. Then, I used my drill to make a hole for my saw blade and my jigsaw to cut out the initials.

A handheld jigsaw and my limited skill level means the lines are not perfectly straight, but I’m not sure how many people will notice that (except for all of you now that I’ve pointed it out). I tried to fix some of my mistakes during the sanding stage, but it was difficult to get the sandpaper into all of the nooks and crannies. The ‘D’ ended up being a bit stencil-ish, as I realized part way through cutting that I needed some way of keeping the centre of the letter still attached (duh).

My one piece of advice to anyone who tries this project is to be careful what wood you choose. I started with some planks I had lying around in the barn, and hidden splits became visible really quickly when my medallion broke in two. Plywood would probably work pretty well, as long as you don’t mind seeing the layers on the edges.

It’s neat to see how letters and names go together. In my sister’s case, she and her husband have a pretty symmetrical monogram. How about you and your partner? How do your initials combine? Have you made any gifts this holiday season? Do you usually make or buy gifts for people? Any go-to housewarming (or Christmas) gift suggestions to share? Who else is a last minute gifter? Please tell me someone else out there hasn’t started shopping yet.

Linking to: Happy Housie Get Your DIY On: Wall Decor

Barn board hook board

It could have been the paint fumes, the sleep deprivation or four hours spent in the two by nine foot front hall closet, but once the brainwave hit, I couldn’t get it out of my head. “What this closet really needs is some barn board!”

Barnboard hook board

So I made my way out of the closet, out of the paint fumes and out to the barn… where surprisingly it’s more difficult than you might expect to find barn board. Don’t get me wrong. We have plenty of barn board. It’s just that most of it is attached to the barn.

I found one piece that was just lying there waiting for a woman on a mission. He was close to the right length, beautifully weathered, lovely tones of grey, knots and a ragged edge. I told him he was a contender.

And then, on the far side of the barn, stacked amongst some giant planks and a very long log, I saw it. Perhaps not quite as weathered as his predecessor, slightly more brown than grey, the exact right length, not too many knots but a couple of rusty nails, one ragged edge that even had a few worm holes… a truly authentic barn board… right down to the… is that? … yep… it is… manure that was caked on the one side.

And that is how I found myself standing in the driveway on Sunday afternoon in November, brush in hand, cleanser close by, hose spewing frigid water, scrubbing a piece of wood as I frantically rehearsed responses in my mind for what I would say when Matt came out to ask me “What the heck are you doing?”

I didn’t think my new-found philosophy of interior design that every room–closets included–needs an element of something rustic would be met with the same enthusiasm I was currently experiencing.

I picked up my dripping–but now clean–board and strolled as nonchalantly as possible back to the house. I studiously avoided looking at the dining room window where I knew my husband was sitting at the table working.

I carefully propped my board by the front door to dry while I returned to my closet, preparing my hooks for hanging, sweeping the floor, killing time until the husband disappeared somewhere, and I quickly scuttled outside and retrieved my still damp board.

I held it up to the wall and it was perfect. It was going to make the closet.

I screwed it in place, attached the hooks and felt completely validated in my new decorating philosophy. My enthusiasm was so great that despite its dampness I started grabbing coats and hanging them up.

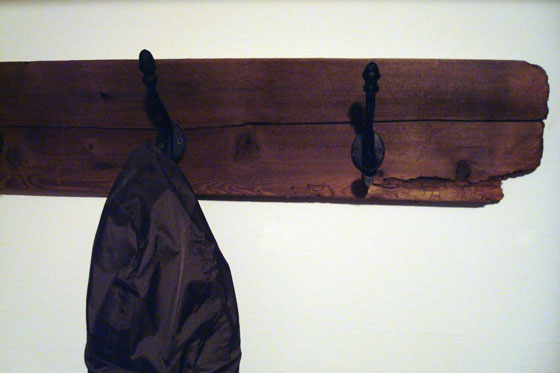
Wrought iron hooks on a barn board backer

It was at about this time that Matt reappeared and peaked around the corner to check out the closet.

I shifted my feet. I avoided direct eye contact. I did not say anything.

And he said, “It looks good, woman. But what about that board up there?”

I followed the direction of his gaze.

He was looking not at my beautiful barn board, but instead at a plywood support I had screwed together to hold up the eight foot shelf that couldn’t quite span the whole nine foot length of the closet. He was concerned that it wasn’t painted the same as the rest of the wood in the closet.

He didn’t even seem to notice the barn board. There was no admiration. There was no disgust. I feel a bit gypped by the lack of reaction.

Sigh.

I am consoled by the fact that every time I open the closet doors, I know exactly what the best part of the closet is.

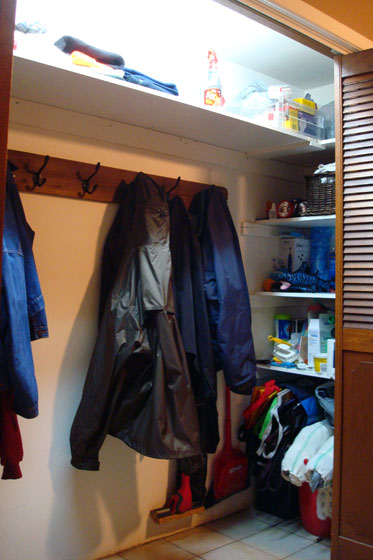
Closet makeover after

When thinking about options for increasing the functionality of the front hall closet, I strongly considered converting it to an open nook with built-in bench like Shelley and Cason did over at House of Smiths.

House of Smiths entryway closet makerover

However, the closet is right off the kitchen, and I knew our coats and shoes and outerwear would not always look tidy. Being able to close the doors on any mess appealed to me. Plus, I had a lot of other things I wanted a home for, so a variety of storage options was important, and I felt I could do that better behind closed doors.

Because the closet is behind closed doors, it’s not as pretty as some of the spaces you see on other blogs. And definitely not as pretty as the Smith’s nook. However, it is exactly what we need.

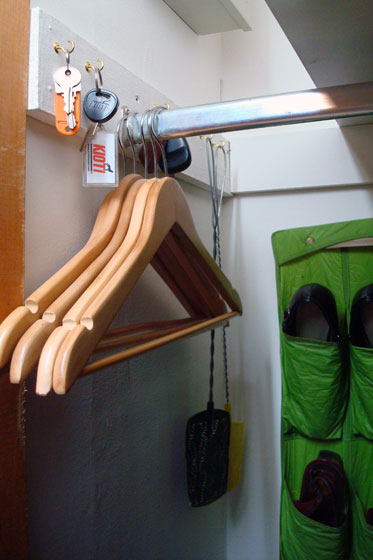
At the top, we have one long shelf that stretches the full nine feet of the closet. It holds mitts, hats, scarves at one end, and light bulbs, plastic bags and pest control (mouse traps, ant traps, bug spray) at the other. The shallower shelves at the one end (made with white melamine, of course) hold flashlights and rags, Baxter items, cleaning supplies and reusable and plastic bags. Cleaning buckets tuck underneath the bottom shelf. The broom and the mop hang from nails tacked into the wall, and a hook board hangs along the back.

Closet with different storage options

At the other end, a short hanging rod goes perpendicular across the closet to hold dress coats. A bin of extra cold weather gear sits on the floor along with my backpack.

Closet with different storage options

Behind the rod, there’s a hanging caddy that holds (some of) my dress shoes. It’s a vintage caddy that my Mom had before she was married. How cool is that?

Hanging shoe caddy

A row of cup hooks screwed into the shelf/rod support hold extra keys and flyswatters.

Key storage in a closet

If I was truly a blogger, I’d have a lot more pretty baskets to hold all of the hats and mitts and scarves that currently are just folded on the shelf. However, the shelf is taller than I am–too tall for me to see into a basket–so stacks of clothing work best.

Hats and mitts on a closet shelf

Obviously, this was not an intense makeover. Patching the walls, a fresh coat of white paint, a few 1x3s and some white melamine to make some shelves, reusing the closet rod, a handful of cup hooks, a hook board made out of barn board all add up to an organized, functional space that accommodates everything that was on my original list. Even better, we still have room to grow with more space on the shelves and some hooks to spare.

How do you organize your front hall closet? What items do you find hardest to store? Any tips for making sure there’s a place for everything and everything’s in its place?

Closet makeover before

Along with the mudroom, updating the front hall closet was also on last year’s fall to-do list. Now that the mudroom makeover has been revealed, it’s time to share the closet as well.

But not today.

As with any makeover, there is of course a before.

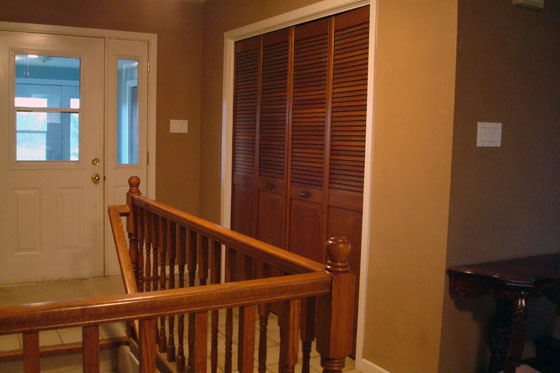
Here’s the closet just inside the front door. The mudroom is just outside the front door.

Front hall closet

This closet is the scene of the first injury we had at the house, which occurred on day one when the shelving that was in here collapsed on my sister. All of the shelves had just been propped against each other and weren’t actually attached to anything. When my sister and brother were cleaning them out and wiping them off, everything came crashing down. Fortunately, the injury was only a pinched finger with minimal blood and was easily solved with a bandage. (I’m still sorry, Jenn).

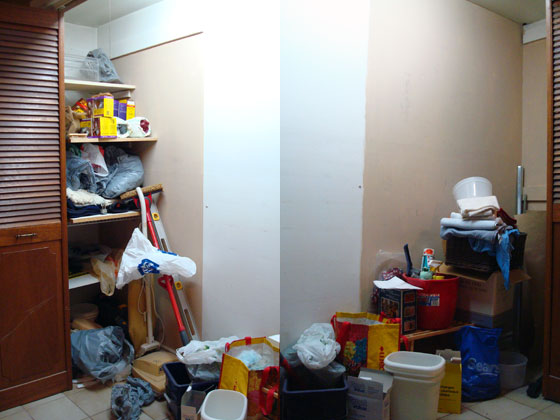
In the photo collage below, the white strip in the centre (and it is supposed to be white on both halves) is where the shelving was originally. In its absence, we had piled cleaning supplies and everything else on the closet floor–not the most efficient storage method.

Messy front hall closet

The closet’s other issues are illustrated below: chipped baseboard cut out for the extremely flimsy shelving (plus a paint job that went around the shelving and a strip cut out of the ceramic tile for some long ago storage arrangement), wire shelving jammed into the drywall rather than installed properly, a hole in the ceiling likely belonging to a critter (plus a beautiful paint job) and an old non-functioning electrical box of some kind (perhaps an alarm?).

Closet problems

As I mentioned previously, the mudroom is not heated, so this closet was the spot for all of our outerwear–coats, hats, scarves, mitts. I needed both a rod and hooks because I want to be able to hang my nice coats on hangers, and Matt will never ever use a hanger.

While boots and running shoes live in the cooler climate of the mudroom, some of my dress shoes were going to move into the more temperate zone of the front hall closet.

Along with the coats, jackets and shoes traditionally stored in a closet, I had a few special additions that I wanted to accommodate:

  • Broom, mop, dustpan, mop bucket, rags, cleansers
  • Plastic and reusable bags
  • Light bulbs, flashlights and timers
  • Pest control, including fly swatters and mouse traps
  • Keys
  • Dog paraphernalia

Obviously, the space needed some help to accommodate any of those items. Through a variety of storage solutions, we managed to fit everything in.

Tune in next to find out how.

What do you keep in your closet? Are there any items that you find difficult to store? Who else has suffered a shelving injury?

Trompe l’oeil barn board

If that title isn’t a contradiction in terms, I don’t know what is.

I associate trompe l’oeil with fancy murals and beautiful chateaus. Not with farmhouses, and certainly not with mudrooms. However, in my recent mudroom makeover, I created the look of barnboard in an attempt to dress up basic boring slab bi-fold closet doors.

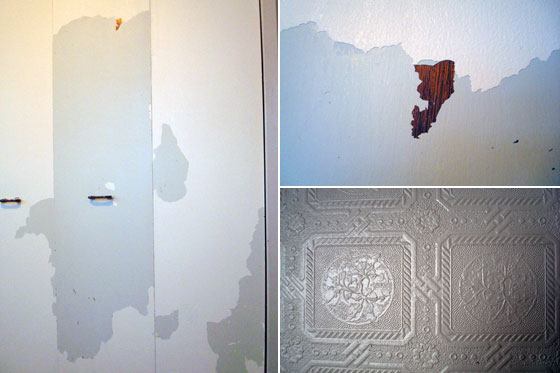
The closet doors are one of those projects that were added on to the makeover because I had to. The doors were coated with an anaglytpa wallpaper that had been painted. It did not match up to the rustic feel I was going for, so I decided to strip it off the doors. Doing that revealed why the doors had been wallpapered in the first place: layers of badly chipped paint that I couldn’t simply paint over.

Chipped paint on bifold closet doors

I briefly considered covering the doors right back up with another textured wallpaper–bead board this time–but then I had another brainwave and decided to strip them back to the bare wood. The thought process went something like this: “Bead board… paneling… planks… vertical planks… like siding on a barn… like barn board… hey, barn board!”

I had seen Minwax Classic Grey stain on the dollhouse Jessica made over at Running With Scissors and was impressed by how she was able to replicate weathered wood, so I decided that was the way to go.

However, just like when I was painting trim in the mudroom, the motivation to strip the closet doors was hard to find. After a few months of procrastinating followed by many, many coats of stripper and lots and lots of sanding, my closet doors were finally naked. Perhaps because of all of the stripper I had to use, I found it difficult to get an even coat with the stain, but I think that works in my favour, as barn board is made up of varied tones.

Minwax grey stained bifold closet doors

Then to make my flat bi-fold closet doors look a little bit more like weathered grey boards, I took a black marker and drew vertical lines down the middle of each door to make trompe l’oiel planks. If I’d really been serious, I could have routed a very shallow gouge down the middle of each door, but I was just going for the feel of barn board and not trying to replicate it too closely.

Draw barn planks with a marker

I reused the black metal pulls that were on the doors originally, turning them vertical to look a little more barndoor-ish. Remember, this makeover was all about cheap and cheerful and working with what we had.

So there you have it. Magic marker barn board planks. Or if you want to be fancy, trompe l’oeil barn board planks. Not a bad way to dress up basic flat panel bi-fold doors.

And there you have the last project of the mudroom makeover. Thanks for all of your great comments and suggestions throughout these posts. It’s so great to finally have one room done.

There are lots more ideas on how to make flat doors more interesting on Pinterest and all over the blogosphere. What are some of your favourites? Do you have barn board (real or fake) in your house? Anyone have any suggestions of the best paint strippers to use? I’m not sure the brand I chose was the most effective, because I felt like these doors took an awful lot of stripper. Any stripping horror or success stories to share? Have you ever “faked it” and made your own trompe l’oeil?

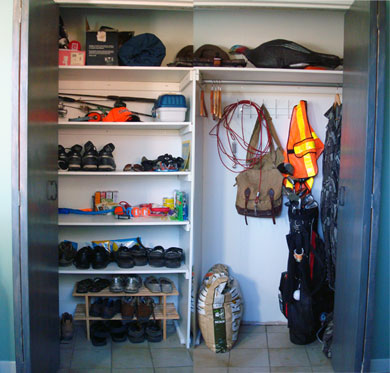
How to build simple closet shelves

When I first asked everyone’s advice on what we should do in our mudroom makeover, the most frequent suggestion was to pull off the closet doors and make built-in storage with a bench, cubbies, shelves and hooks. While I love that look, I knew I needed places to put things more than I needed to be able to sit down. The biggest improvement I could make to how the mudroom functioned was to build more storage in the closet.

As you saw in the reveal, I split the closet in half, putting floor to ceiling shelves at one end and a single shelf over top of a hanging rod at the other.

Closet storage

To build these simple shelves, I went with my go-to shelving material: white melamine. It may not be the fanciest, but this stuff is easy. It comes in 12-inch or 16-inch widths (I chose the 16) and 8 foot lengths. One long edge is pre-finished. There is no painting (although you can), no sanding, no special tools.

To support the shelves, I screwed 1x2s (which I did paint) into the wall studs with 3 inch screws. The shelves simply sit on top.

White melamine shelving on 1x2s

For the top shelf, I used 1×3 as I wanted a wider board to attach the rod.

How to attach a closet rod

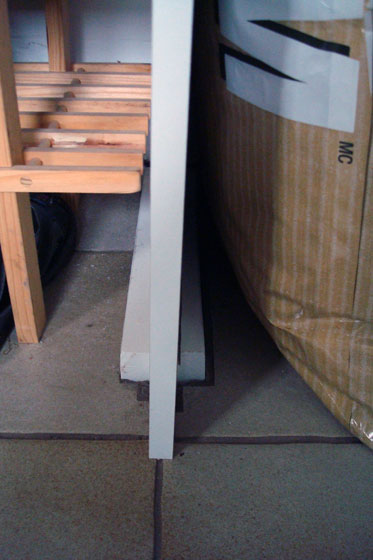
The divider in the middle is a piece of melamine run vertically. There was a cut-out in the ceramic tile floor for some long-ago shelving system, so I filled that with a 2×4 and cut a channel to hold the melamine in place.

Supporting a closet divider

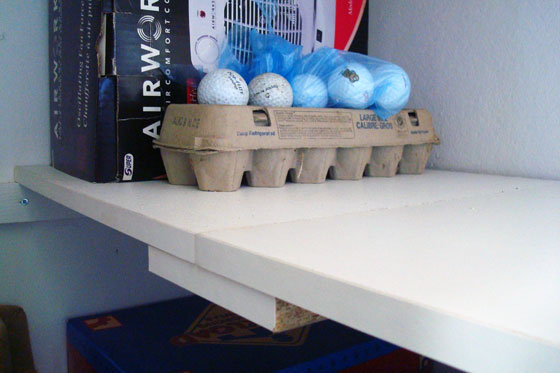
The melamine comes in 8 foot lengths, so for my 9 1/2 foot closet, I had to splice a few of the shelves. My technique was to tack a piece of melamine underneath. It’s perhaps not the most attractive solution, but tucked inside the mudroom closet I wasn’t super concerned about appearances. It’s sturdy and will easily hold a golf ball collection or anything else you want to put on it.

Joining melamine shelves together

The sturdiness of melamine is its best feature in my opinion. As long as it’s properly supported, it can hold a decent amount of weight and won’t sag. To prevent any droopiness, it’s important to put the 1×2 supports along all three sides of the shelf, not just at either end.

I know there are much more attractive storage systems out there, but, for a behind closed doors solution, this simple set up of melamine and 1x2s works for us. Even better, it’s completely custom and accommodates exactly what we need.

How do you handle closet organization? Has anyone else built a custom storage system? Any other melamine fans out there?