Coinkydink

There’s been some weird things happening this week… too weird not to share with you.

They could just be coincidences, but I’m choosing to believe that the universe is speaking to me.

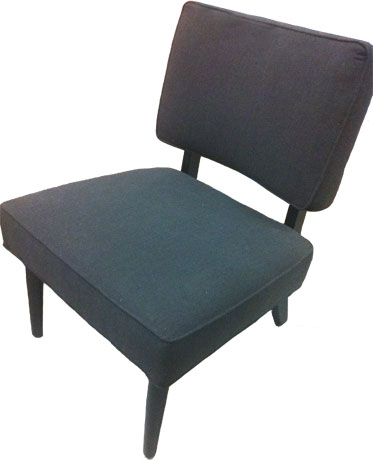
Coinkydink #1: Tuesday, I posted about my wing chair dilemma. A few hours later, I found out that I won the Austin chair from Decorium in BlogPodium’s registration contest.

Austin chair from Decorium

What I’ve not shared with you before is that I have a bit of a thing for chairs, so this is absolutely the perfect prize for me (even though I still want a wing chair). Between our house and my parent’s, I have numerous chairs, most in need of repair, refinishing and reupholstery. I see them sitting at the side of the road, and I just can’t pass them up. Long before we ever inherited our dining room set, I had first fallen in love with the chairs which I’d seen spread around Matt’s grandfather’s house.

Apparently, the universe approves of my chair habit. In fact, the universe is an enabler helping me to build my collection.

Coinkydink #2: After writing the post on Sunday afternoon about Baxter’s disappearing act, I checked my stats to see how the blog was doing as I do everyday. I found that someone had found their way to my blog by searching “baxter dog runs away.”

Baxter dog runs away search term

Universe, I got the message. I will keep him on the leash from now on.

I’m still looking for the lesson the universe had in mind when Baxter ate the tray of brownies off the counter, raided the garbage for chicken bones and then chased a skunk–with the predictable result–all within 12 hours. I mean, beyond the lesson of “thou did not set thy dog up for success.” That one came through loud and clear… and pungently.

So, there’s been some ups and some downs this week. How’s your week been? Does the universe ever speak to you? Am I just imagining things?

Not so fab freebie

See my full review of the Ikea Strandmon.


People, I am uncomfortable.

It’s affecting me physically, financially and emotionally.

It all began at the start of the summer.

A colleague at work was downsizing. She had furniture–extremely well-made furniture–and she wanted it gone.

I said, “What I’m really looking for is a wing chair.”

She said, “I have a wing chair.”

I said, “I’ll pick it up on Thursday.”

Of course what I really meant was I’d convince Matt to go with me to pick it up on Thursday, as there was no way a wing chair would fit in my car. If you’ve read any of Victoria’s hilarious blog, Matt’s reaction is a lot like Paul’s (although the wing chair is not in any way the same as the kingdom mirror).

So with only slight jeopardy to my marriage, Matt was on board. After he carried the chair out of the house, loaded it, drove it home, carried it into our house and down the stairs to the basement, he stood there, looked at it, and said, “Do you like that fabric?”

I said, “Of course not. I’m going to recover it!” And then I sat down.

And he said, “What’s wrong?”

And very quietly I said, “It’s not the most comfortable.”

Matt was silent.

Since then, the chair has sat in the reading nook in the basement. Occasionally, I sit in it, hoping it’s gotten more comfortable. It hasn’t. I had a friend come over and test it for me. She agreed. It’s just not a comfortable chair.

Flowered wing chair

The seat is too shallow. The back is too straight and too short. The wings are too narrow. This is a sit up straight and balance your teacup on your knee type of chair (which I should have guessed from the fabric). This is not a slouch down, lay back, snuggle in and relax type of chair.

However, I found a chair that is exactly what I’m looking for.

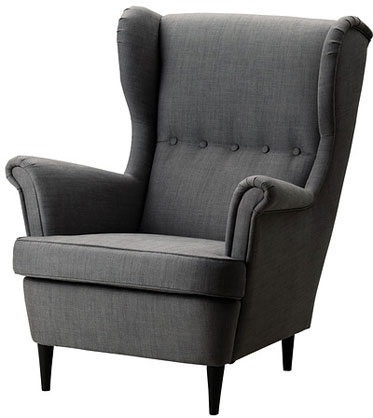
Ikea Strandmon wing chair

Most of you are probably familiar with Strandmon from Ikea. This chair is extremely comfortable. The first time we met (before the uptight flowered one came into our lives), both Matt and I agreed that it is a great chair. You can sit sideways with your legs thrown over the arm and your head is still wonderfully supported by the wings–yes, I absolutely sat like this in the store. The back is the perfect angle to slouch a little bit but still be supported.

I want this chair.

But it’s Ikea. The chair that I have is probably full of hand-tied springs, high density foam and solid wood. There’s no way that Strandmon can match that. Plus, the chair that I have was just $25. Strandmon is $300. Twelve times more expensive!

Sure I’ve spent money on furniture before (hello most comfortable couch ever), but it’s always been a carefully researched decision into an “investment” or “adult” piece of furniture that will last us for years. You may say that $300 isn’t a lot to spend, but the rest of my furniture either came from garage sales or was made by me, so my threshold for sticker shock is pretty low.

The only way I can think of to make this work is to put Strandmon on my birthday list. September happens to be my birthday month. My family doesn’t typically do big extravagant expensive gifts for each other (and yes, in my world $300 is a lot to spend), but I think if all of my family members and Matt went in together, I would feel okay with them buying me Strandmon.

What do you think, family? Happy birthday to me?

Update: Check out if my birthday wish came true… and some more thoughts on the Standmon… in this post.

Update #2: See the finished reading nook here.

Vacuum verdict

It’s been nine months since our new carpet was installed. And it’s been nearly seven months since I posted about our need to buy a vacuum.

It’s been two months since we got Baxter, and it turns out that Matt’s sock fluff has nothing on dog fur.

The vacuum situation had become critical.

So, in the category of better late than never, I’m pleased to introduce Sebo.

Sebo vacuum and attachments

Sebo, you ask? Who’s Sebo?

Sebo didn’t even figure in my original vacuum research, but after seeing it at the vacuum shop, it edged out the other brands. The salesman described it as comparable to Miele, which is also made in Germany. The Sebo has similar filters and attachments. However, I found the Sebo power head easier to maneuver than the Miele. Plus the power head is a little easier to take apart myself if something gets sucked up by mistake or wrapped around the beater bar.

The Sebo is about the same price point as the Miele, which is expensive. I may have spent more than I needed to on a vacuum, but I wanted something that worked really, really well and I didn’t want to have to buy another one any time soon.

So what’s the verdict?

Ladies and gentlemen, I am thrilled to tell you that my carpet looks brand new. It’s like I’ve gone back in time nine months. The beater bar is really effective at picking up all of the fluff and fur and bits. A dial on top of the power head sets the height, and a light glows green when the height is set correctly, so it’s really easy to figure out. I ended up lowering the power head by one notch. When I did, the drag on the wand increased noticeably, so it felt a little heavier to push and pull.

However, the vacuum is much, much lighter weight than any of the other uprights that I looked at, especially the Dyson. Weight was one of my biggest requirements because I wanted to easily vacuum the stairs. I pride myself on being a muscly (say it with a hard ‘c’ “mus-klee”) woman, but if I had to muscle (say it like a regular person) an upright vacuum up and down the basement stairs, I feared I would approach body builder proportions.

Doing the stairs still isn’t super straight forward.

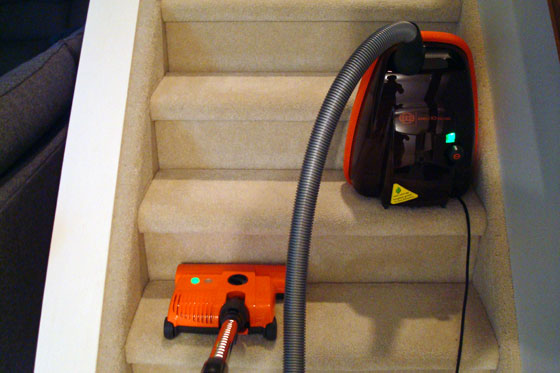
The hose only stretches so far, so I have to carry the canister with me to reach the steps in the middle of the staircase. The canister will balance on the steps, which makes it slightly easier, but I’m still juggling equipment in both hands. If any manufacturer wants to make a canister vacuum with a twenty foot hose, I am on board.

Vacuuming stairs with a canister vacuum

The other wrinkle on stair cleaning is that the power head is a little floppy. The wand will lock in an upright position only, and when it’s locked the power head doesn’t run. Moving from stair to stair is a little awkward, but not overly so.

On a flat surface, the vacuum is super maneuverable. The power head pivots smoothly, and the canister rolls easily on its three wheels, tugged around by the hose. On the hard floor, the parquet head did a good job of picking up dust and fur. A lot of fur got trapped in the bristles on the bottom of the brush rather than being sucked right up, so I had to vacuum the attachment. The other attachments worked well too, although it did take a bit of figuring to work out that the furniture attachment had to connect the crevice tool and not directly to the vacuum.

Overall, I’m happy with Sebo, even though it wasn’t on my radar at first. The original vacuum post still ranks as my most commented post ever. Thanks everyone for your input. If you have any questions about Sebo, I’ll do my best to answer them.

Wee-wee-wee all the way home

You might think from the title of this post that we are adding some little piggies to the farm. However, the opposite is actually the case. We are getting rid of some pigs… pigtails that is.

Pigtail light fixture

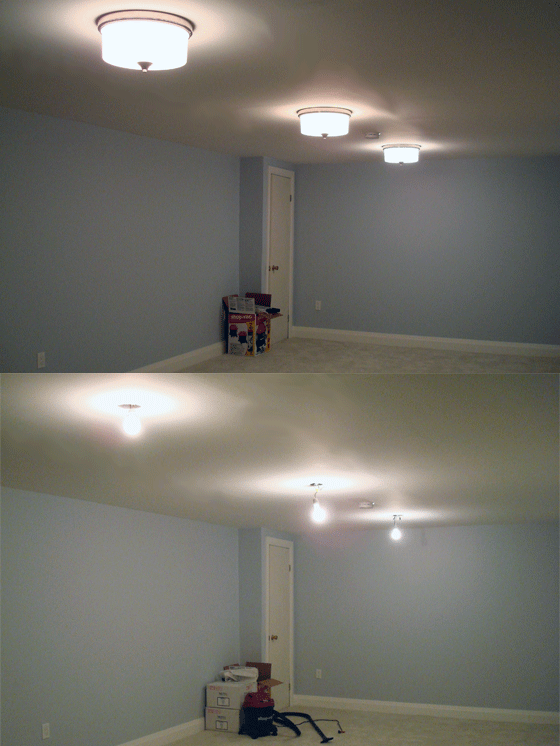
Most of our lighting in the basement is still pigtails—much to Matt’s annoyance. The conversations go something like this. “You can’t say the basement’s done until it’s all done. Including light fixtures.” Finding the right light takes time though, so rather than choose the wrong fixture, I’m fine to live with pigtails.

Matt, not so much.

However, in my defense, I bought the lights for the long room nearly six months ago. They’ve been sitting in their boxes stacked in the corner beside the shop vac for just that long. Yes, I could install them myself, but under the division of labour in our marriage, Matt is the electrician.

Well, the electrician finally got fed up with the pigtails and decided to send those little oinkers packing.

Replacing pigtails with flush mount ceiling light fixtures

Better, right?

Obviously, it’s still not “done” (the absence of furniture and art, the unpainted closet door, and the shop vac still in the corner kind of give it away), but baby steps, people. Or maybe piglet steps.

My pot problem

Hello. My name is Julia. And I have a pot problem.

It’s not what you think. In fact, it’s more like a problem with a pot.

You see, there’s this great window in the basement. It’s large, lets in lots of sunlight and has a great wide windowsill. I wanted to do a little display there. A vignette if you will. One of the features I wanted to include was a potted plant.

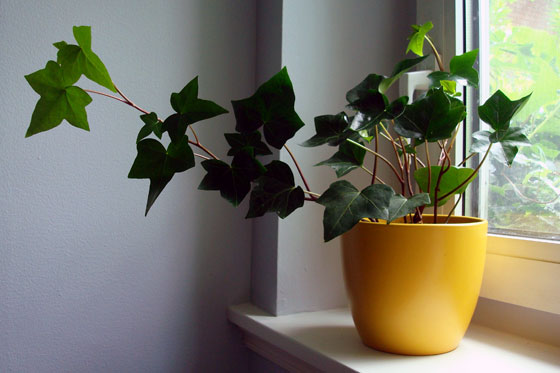
All of this was a rather vague idea until at a meeting at work everyone was given a plant. I selected a bright green ivy thinking to myself, “This would be perfect in a bright yellow pot on the windowsill in the basement.”

Never mind that I’m not good with plants, particularly houseplants, and my ability to keep this ivy alive was very much in doubt. I had a vision in my mind. I had to see it come to reality.

Unfortunately, my perfect pot was hard to find. Well, not really. I found it last fall. It was in the garden clearance section at Rona. And it was $12.99. Now I don’t know about you, but that seemed like a high price to pay for a ceramic pot, especially in the clearance section at the end of the season.

I walked away.

I came back every so often to check on it and see if the price had been reduced. I looked at other stores. I examined numerous yellow pots. I considered spray paint. Nothing matched up to the picture in my head.

Finally, this spring, I snapped. I pulled into Rona on my way home from work one evening, strode into the store, picked up my pot and bought it. With tax, it was close to $15. For a ceramic pot. Granted, it was a ceramic pot in the perfect style, of the perfect size, of the perfect shade of yellow.

I stuck my ivy in it and plopped the whole thing onto the windowsill. And it’s perfect. It matches my mental image.

Yellow pot with ivy in it on a windowsill

I still begrudge paying $15 for a pot, but I do admit that seeing the ivy–which somehow is still surviving–makes me happy.

I’ve never consciously “decorated” a house before, so I’m finding it tough to spend money on decorative elements, which seem somewhat frivolous to me. I have no hesitation about pulling out my wallet when it comes to big ticket items like construction supplies or, ahem, pets.

Is it weird that I spent nearly 6 months thinking about a ceramic pot? Do I have a problem? What’s your usual spending threshold for decorative items? How do you justify buying pretty things for your house?

Distractions in thrifting

The other weekend while we were anxiously waiting to see if we’d be approved to adopt Baxter, Matt and I decided to distract ourselves with some retail therapy. He mapped out a route of second hand stores, and we headed out.

It turned out to be a great outing. Wandering the streets, admiring the architecture and the gardens of the historic houses, popping into stores here and there–it was pretty relaxing, even if I was checking my phone every stop for a new email.

And we each came home with a few treasures. Mine was found deep in the back room of a cluttered consignment store.

Old wash tub filled with firewood

It’s been nearly a year since I pinned the Paxton Copper Bucket from Pottery Barn. Since then, I’ve been on the lookout for a metal wash tub to hold firewood in the living room.

This one is huge, and, just like the Paxton, it’s both practical and decorative. The handles have obviously been reattached at some point, but overall it’s in pretty good shape. And for $40, it was a decent price too, in my opinion. Much better than the nearly $260 that PB wants.

I may be jumping ahead a bit, given that we don’t yet have a working fireplace, but that’s a minor detail.

And the addition of our firewood tub has provided me with some motivation. Our mason is coming over tonight to advise us on what it’s going to take to make the fireplace live up to its beautiful new (to us) sidekick.

Are there any fellow thrifters out there? What are you on the hunt for these days? What’s the greatest treasure you’ve found? Anyone else have a wood burning fireplace? Can I say I have one even if it’s not useable? How do you store firewood?

How to match seams across an invisible zipper

I have a different type of how-to for you today, completely unrelated to home improvement or farming (not that I am any particular expert in that area yet).

This how-to is related to the dress that I sewed for my sister’s wedding. The bodice on this dress is made up of lots of pieces with a zipper in the side seam. The challenge when putting in that zipper is to line up all of the seams from front to back.

I’ll admit that the first attempt was a big fat fail. Horizontal seams were stair stepping down the zipper. Not attractive. In fact, I couldn’t even bring myself to take a picture.

Second attempt was much more successful. So, here’s my tutorial on how to line up horizontal seams across an invisible zipper.

Sew the first side of your zipper to the dress, having the zipper open and leaving the other side free.

How to insert an invisible zipper and match horizontal seams

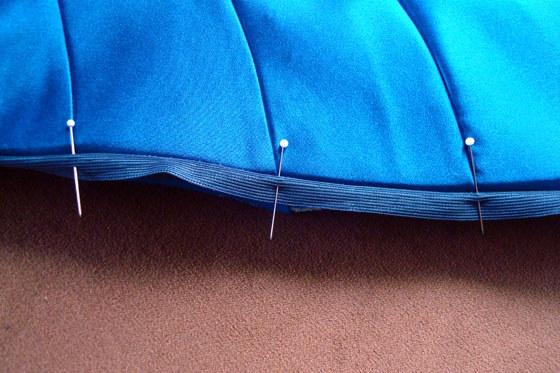
Close the zipper and, using pins, mark the seams that you need to match. Insert the pins horizontally in the tape on the unsewn side of the zipper.

Marching horizontal seams while inserting an invisble zipper

Unzip the zipper, and pin the unsewn side to the dress, starting at each of the seams.

How to insert an invisible zipper and make sure seams line up

Baste the zipper in place and stitch. When you close up the zipper, all of your seams should match.

Marching seams when inserting an invisible zipper

Or at least match close enough.

Next week, I promise a return to our regular program of home improvement and country living. We’re heading into the first long weekend of “summer” and I have big plans. Chainsaws–not sewing machines–are involved.

Hope you have a good weekend. Happy Victoria Day to my fellow Canadians.

Searching for my dream ‘man

Never fear, Matt, you are still the man for me. What the title of this post refers to is my search for the perfect ottoman.

In case it hasn’t been clear, I’m loving our big, beautiful, brand new basement. However, things are a little barren down there. Between the two very large main rooms, we’ve only furnished one corner of one room–the TV area home to the most comfortable sectional ever and my homemade custom TV cabinet.

Our two lone pieces of furniture were both working out great. What wasn’t working so well was the big empty space in the middle of the sectional. We had nowhere to set a glass, a snack or a remote control.

I knew I wanted an ottoman–somewhere soft and cushy for people to put their feet up, something that could serve as extra seating if needed and something that had storage inside.

I was still in the looking around and seeing what’s available stage when we stopped into the store where we’d bought the couch. They offered a large storage ottoman with a hinged top made by the same company that made our sectional, Decor-Rest. I was planning to take it under consideration, but then Matt said the magic words, “Just buy it, woman.”

The guy really wanted a spot to set his drink.

We put in our order, and a few weeks later it arrived.

But now that it’s here, I’m not sure that I love it.

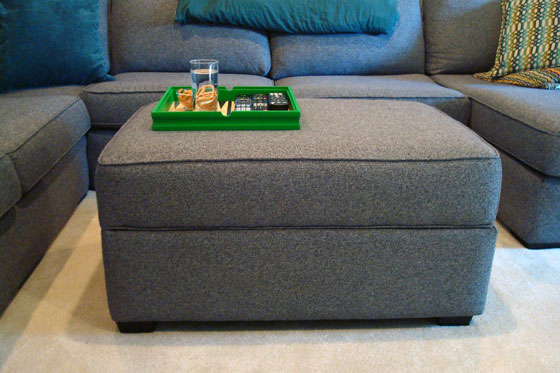
Decor Rest storage ottoman

Faced with placing the order more quickly than I expected, I chose the same fabric that we used on the couch. My original vision had been for a contrasting fabric with a bit more pattern, rather than matchy-matchy.

I didn’t want the same fabric, but I did want the same feet. The feet on the ottoman are in the same finish as the feet on the couch, but they’re narrower and taller than the feet on the couch. I realize this probably isn’t noticeable to most people, but the fact that the ottoman is an inch or so taller than the couch bugs me.

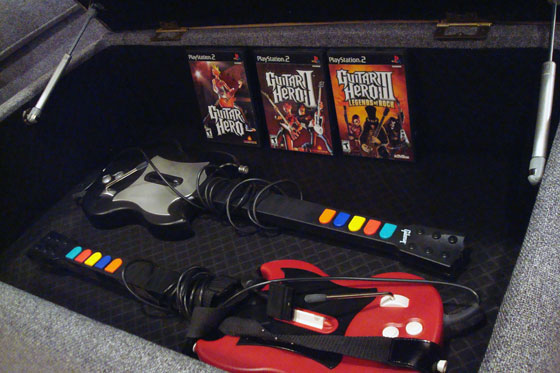
While the ottoman is too tall outside, inside it’s too short–or at least shorter than I expected. The top cushion is very thick, which limits the depth of the storage part. There’s still enough space to put the video game accessories, DVDs, throws or whatever else I decide to hide away, though, and the shallower storage will save me from losing things in the depths of the box, I guess.

Allow Guitar Hero to demonstrate the interior capacity of the storage ottoman.

Guitar Hero games and guitars inside the DecorRest storage ottoman

The biggest thing I’m not sure about is the shape. Back when I was imagining the basement, I had envisioned a square ottoman. This one is rectangle. It is a very large rectangle–36 inches by 28 inches by 20 inches tall–and fits comfortably in the centre of our sectional. And I guess the rectangle gives more breathing space between the ottoman and the TV, which isn’t a bad thing.

I’m not planning on returning the ottoman or reupholstering it any time soon, so it’s not as though our relationship is doomed. It does what I want in terms of storage, seating and providing a soft space to put up your feet. The overall style matches the style of our couch. I may trim the feet a little bit–we’ll see.

Even if the ottoman isn’t my dream ‘man, it accomplishes one other important objective: it gives my two-legged dream man a place to put his drink.

Tray on top of an ottoman

Isn’t there some saying about this situation? Happy husband, happy life? Somehow that doesn’t sound quite right to me. What about you? How do you approach furniture shopping? Have you ever had buyer’s remorse after a big purchase? Are you an ottoman or a coffee table person?

Coming to terms with my crafty side

I don’t consider myself to be a very crafty person. If I’m going to work on something, it’s likely going to involve large power tools, lots of dust, potential of injury and probably take over a whole room. However, as we’ve moved from the construction phase into the decorating phase in the basement, I’ve found myself working on crafts.

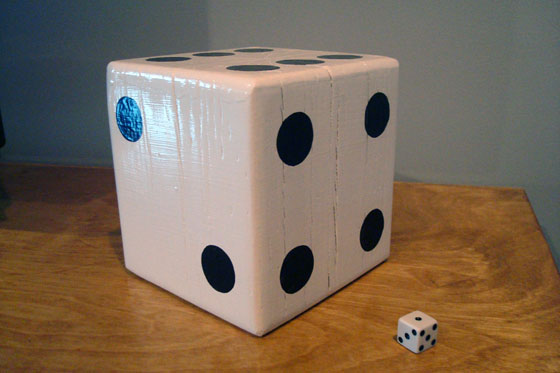
I made a large wooden die, as in singular dice.

Big dice beside a little dice

This was my first crafty project, and I felt really weird doing it. Like it wasn’t worth my time. I did use my skill saw and power sander and kicked up a bit of dust, which made me feel better. But then there was the miniature paint brush and the stencil. What the heck am I doing with a stencil?

The finished die is living on top of our TV cabinet in the basement, serving as a bookend to some classic tomes.

Large dice bookend

If you’re feeling crafty and want to make an oversize wooden dice yourself, here’s a link to my printable stencil. It’s sized for a 6×6 block (so each face is 5 1/2 inches). And if you’re a bit of a fiend about getting the details right, my stencil includes a pattern for the accurate configuration of the faces based on my Yahtzee game.

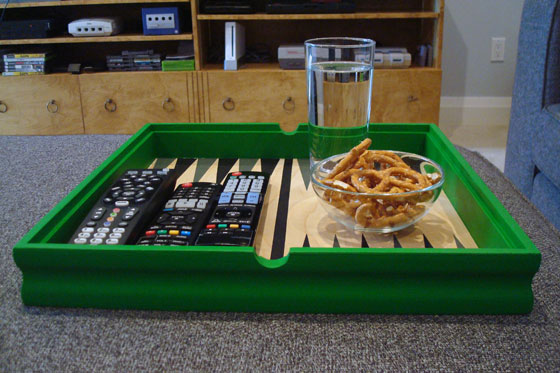
I also painted a tray.

Painting a backgammon tray

In keeping with the fun and games theme we have happening in the basement, I was planning to make a backgammon inspired tray for the top of the ottoman. When I found one at Value Village, I snapped it up–leaving the glass chess board that sat on top behind at the store.

The blond wood base and black and grey backgammon markings worked well for our decor. The red wood frame did not. A sample pot of Benjamin Moore yellow green perked it up in a hurry.

Tray with backgammon board base

You already saw the umbrella stand that I made for the Pinterest Challenge. I’ve also done some wood cuts–for gifts, so I can’t show them yet. I have plans for some more gifts and more fun and games inspired art for the basement.

It seems like now that I’ve started crafting I can’t stop. I’ll admit there’s something rewarding about working on a project that takes only one evening to complete, but I am starting to feel the need to demolish and rebuild something.

Year one theme: Go big

For me, our first year of farm ownership can be summed up in two words: big and more.

Everything we’ve done, every experience we’ve had has been bigger and more than I expected. It’s been amazing, frustrating, awful, exhausting, expensive, testing, uniting, surprising and wonderful–all to an extreme degree.

As this week is the one year anniversary of the farm becoming ours, I thought it would be a good time to look back at some of what we accomplished and a few of the lessons we learned over the first year. Click here for the two-week and six-month wrap-ups.

We started big, installing the new geothermal system the very first week. The excavation was bigger than if we’d been digging a foundation for a new house.

Geothermal excavation

Upgrading one central system for the house was quickly followed by another, when we decided to redo the entire water system, including a new well.

Our original plan for the basement to patch the walls, move a couple of things around and redo the bathroom quickly grew to a full gut job that involved reframing, rewiring, reinsulatingredrywalling and recarpeting.

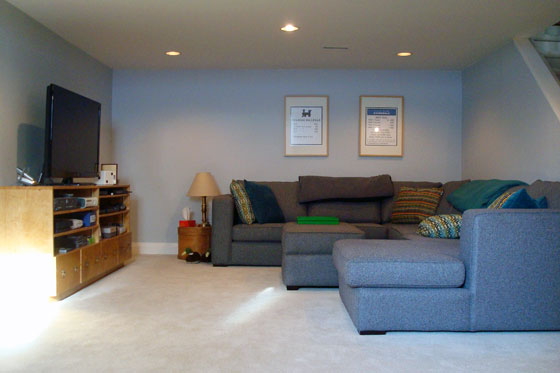
Eventually, we did get to painting, furnishing and decorating. We still need art and furniture in most of the basement, but the TV area is done. And it’s awesome. We spend every night here–if we’re not working on one of our other projects, of course.

TV area with sectional couch in the basement

So far, the basement has turned out even better than I envisioned.

The bathroom, which was the most disgusting room in the whole house when we moved in, is now one of the best thanks to new plumbing, marble tile, dramatic dark paint, extra storage, a shower bench and a big mirror. After breaking the concrete floor, running all new waterlines, marathon tiling and grouting sessions and, oh yeah, the snake, we ended up with a bright, clean, shiny, functional and modern space.
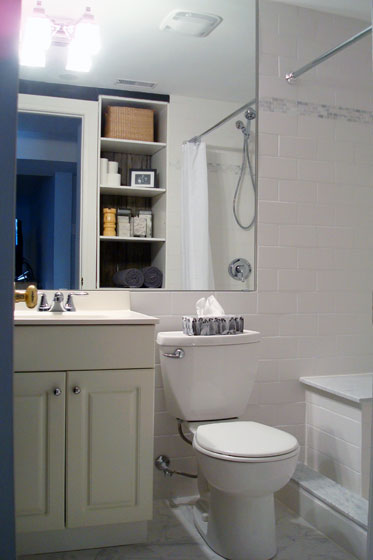
Small basement bathroom with white tile and big mirror

While the basement has been our longest project and most dramatic transformation, it wasn’t our most difficult. The hardest project was definitely the roof. Over five days in the middle of the summer with average temperatures around 30ºC, Matt reshingled our house. For him, this project is his proudest accomplishment for year one. For me, this project taught me my most memorable lesson: roofing is not a DIY job.
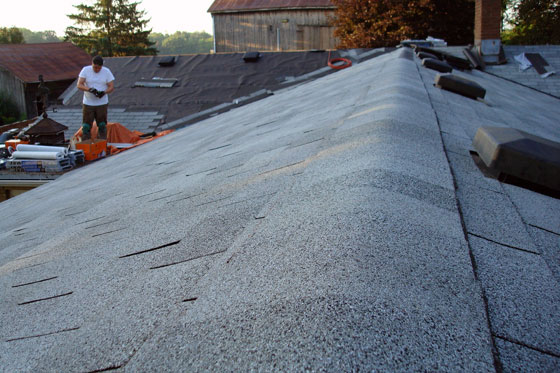
Half shingled roof

Away from the work and the projects, there’s been a few other big developments in our lives over the past year.

First, the property came with other occupants already living here: most notably, Ralph the barn cat. Sticking with our theme of everything being more than we expect, Ralph kept things interesting by turning out to be both female and pregnant.

Kittens with mother cat

Her four kittens were a fun addition to the farm for the spring.

Kittens

Gratuitous kitten cuteness

Three went on to new homes in suburbia, but one, Easter, stayed on at the farm. Learning that I’m a cat person–as long as they stay outside–has been my most surprising lesson from year one.

Cats on the windowsill

Ralph and Easter pay a visit to the dining room window sill. This is Easter’s “meow–let me in!” face. Ralph knows better.

In addition to our feline family members, our family expanded with the addition of Wiley, our tractor. He’s been quite handy for the various jobs we’ve had to do, from mowing the grass to blowing the snow. Tractor maintenance and how to use the front end loader are lessons we’re still in the process of learning. Lesson from last weekend: a hairdryer can be used to get a tractor to start.

Kioti CS2410

Outside, we’re still learning how to manage a large property. We’ve had the paddocks and run-in shelters removed from all of the fields, added a gate to the driveway, cut down a few trees, put in a flag pole and cleaned up the property a bit. We’ve eaten apples and raspberries from our own land, and watched two hay harvests. We’ve spent hours walking the fields, admiring the pond, hiking the woods and even managed to go tobaganning on our own hill and skating on our own pond.

Walking in the hayfield

When I imagined living on a farm, I envisioned lots of friends and family around, fun parties and big gatherings. This vision has absolutely come true, whether it’s the fun days we’ve spent with nephews, the relaxing nights we’ve had with friends, or big family parties we’ve had for Christmas, Easter and just because. Most rewarding of all, though, has been all of the help our friends and family have given us to make the farm ours over the past year.
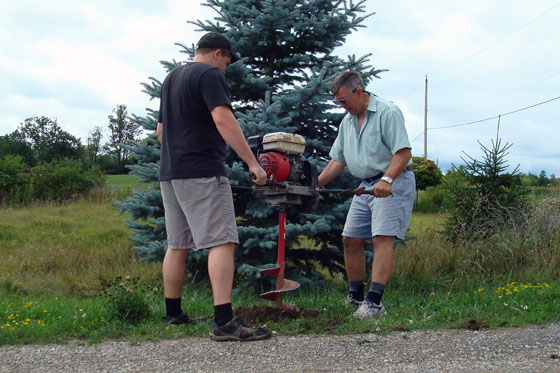
Drilling post holes with an auger

We’re still in the process of putting our own stamp on the farm. We know there are more projects and more lessons to come.

Between rural living, a farm, a large property and DIY home renovations, we’ve chosen a somewhat unique lifestyle. And it’s exactly the life for us.

The first year has been more than I ever expected. I’m excited to see what comes next.