I introduced this year’s home goals by saying, “I am really, really excited by the projects I have planned.” Mid-way through the year, I am still excited about these projects. I’m also really, really excited by how much progress I’ve made.
What a year it’s been so far!
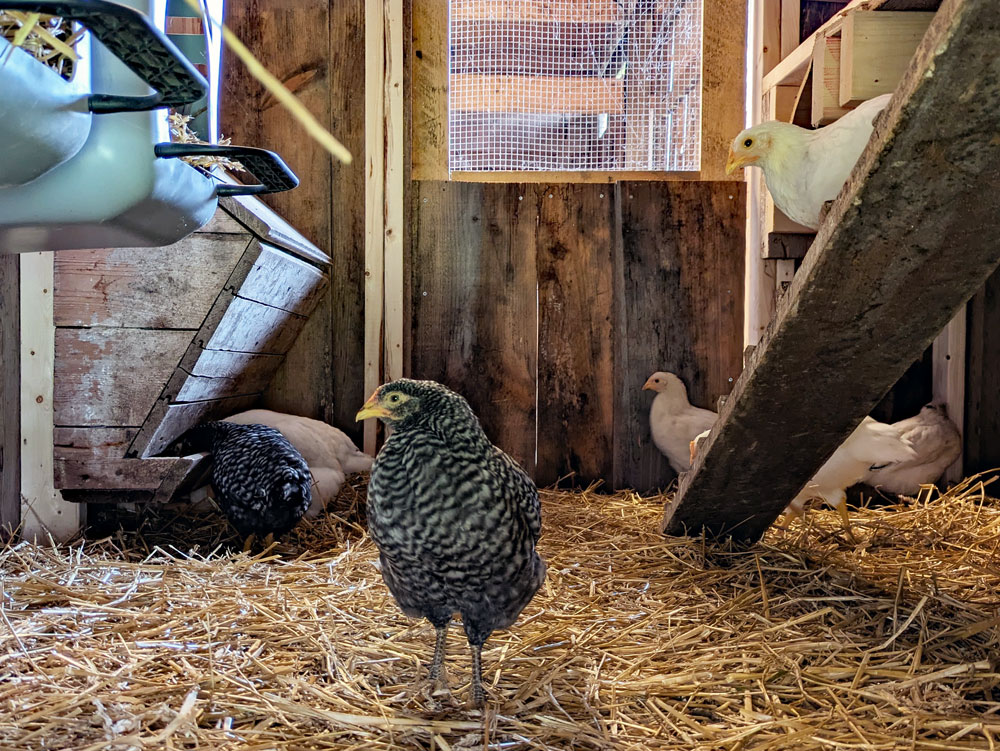
Coop
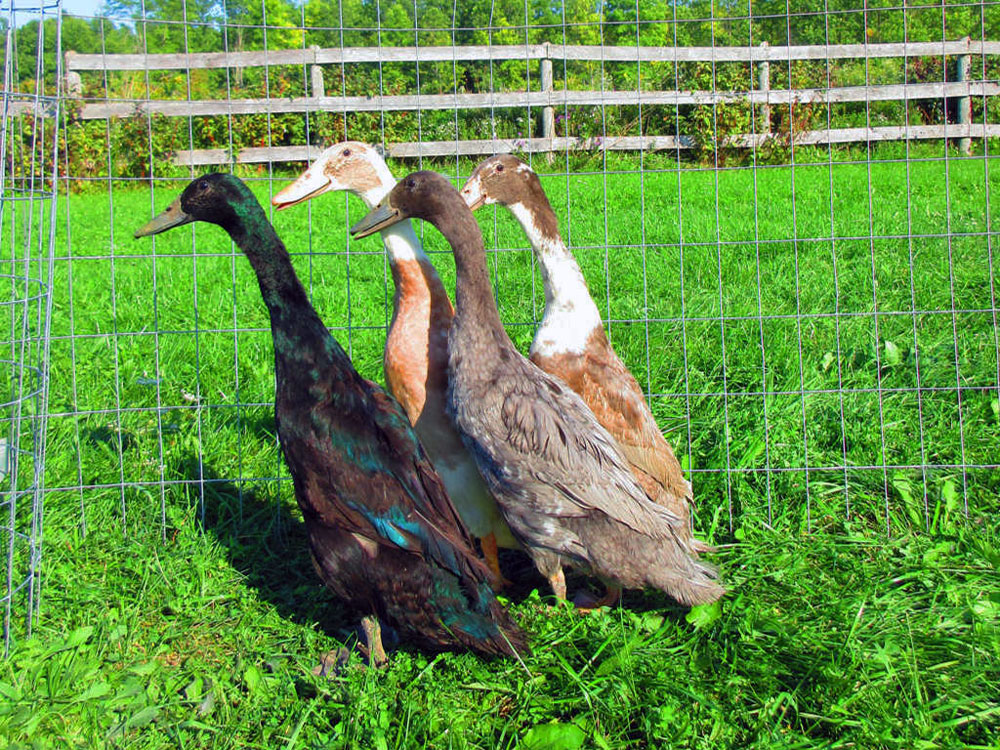
The coop is finished. The birds are in residence. It is awesome. I love having birds again. Seeing them walking around makes me happy. I am so proud of the coop and how well everything has worked out. I will likely continue to make tweaks depending on what the birds need (like repairing the turkeys’ door after they take it apart–again), but I am comfortable saying that for now, this project is done.
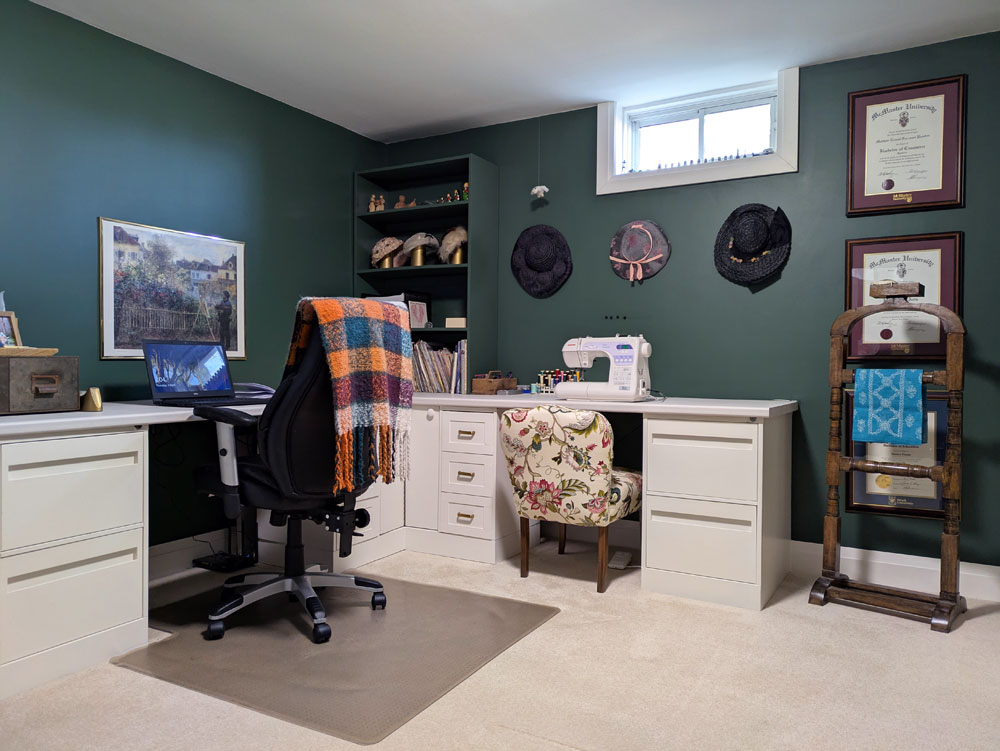
My office
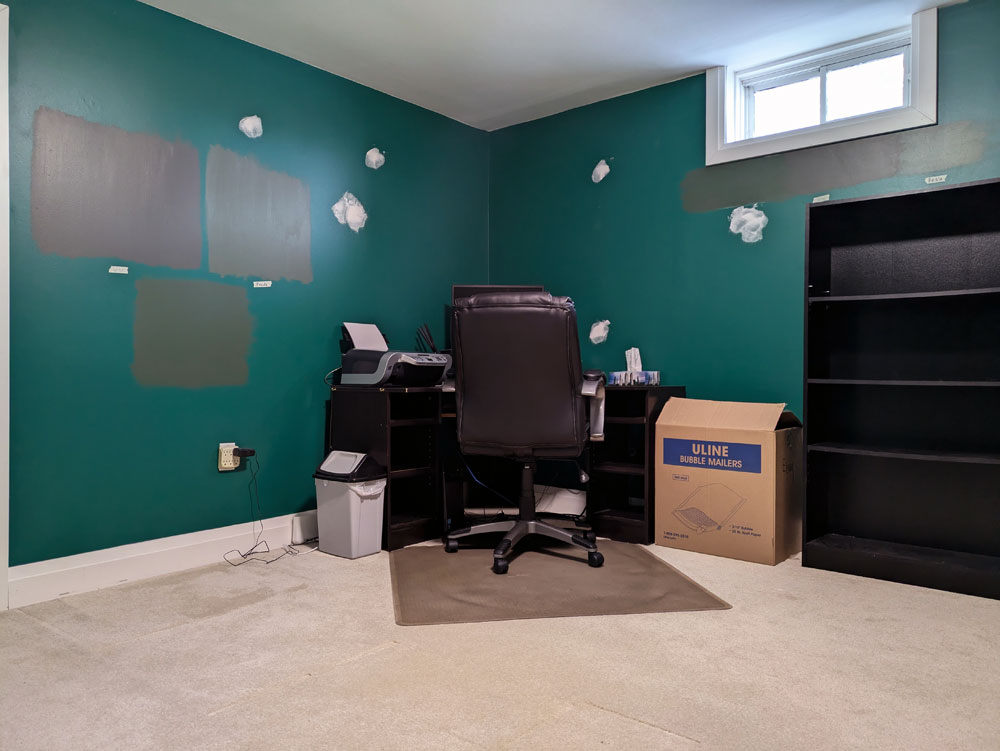
Another project that’s done? My office. Transforming, decorating and organizing this space was fun, and I love having my own working, writing, crafting, sewing, creating, whatevering space.
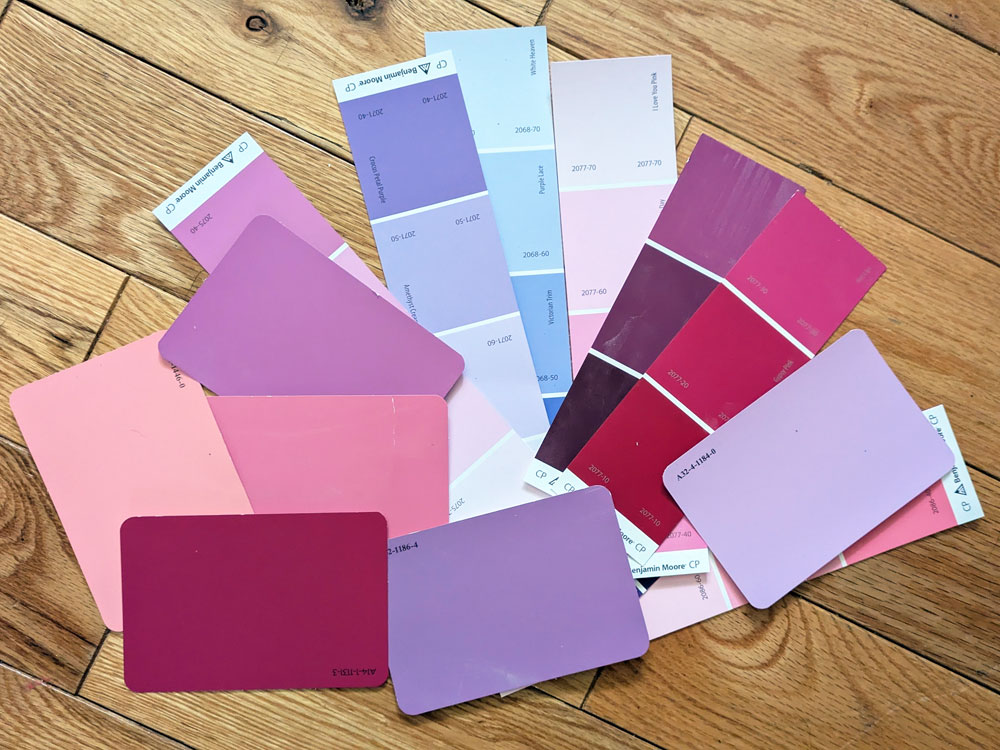
Ellie’s playroom
A dedicated play, crafting, creating space for Ellie is still on the list for this year. She’s been collecting paint chips in anticipation. Can you guess what her current favourite colours are? This room will likely be our fall project.
Main bathroom
The bathroom renovation is well underway, and what a transformation. I’ve been able to do a lot of the work myself, which feels really good. My vision for the design and function of this space is turning out beautifully. I am really happy. More updates to come.
2025 is a big year. I don’t think I’ve had this many projects on the go since early days (perhaps years) or moving to the farm. It’s been tiring, fulfilling, challenging. But mostly it’s been fun. I love working on the house and the property, making it ours and making it beautiful.
I hope I can keep up the momentum for the rest of the year.
Have you tackled any project around your house so far this year? What’s on your list for the rest of 2025?Anyone else having a big house year? What’s exciting you about your house right now?
(If you want to check out some before photos, check out this post or this one. If you want a refresher on what my plans are for this space, this post has a moodboard, floorplan and more details.)
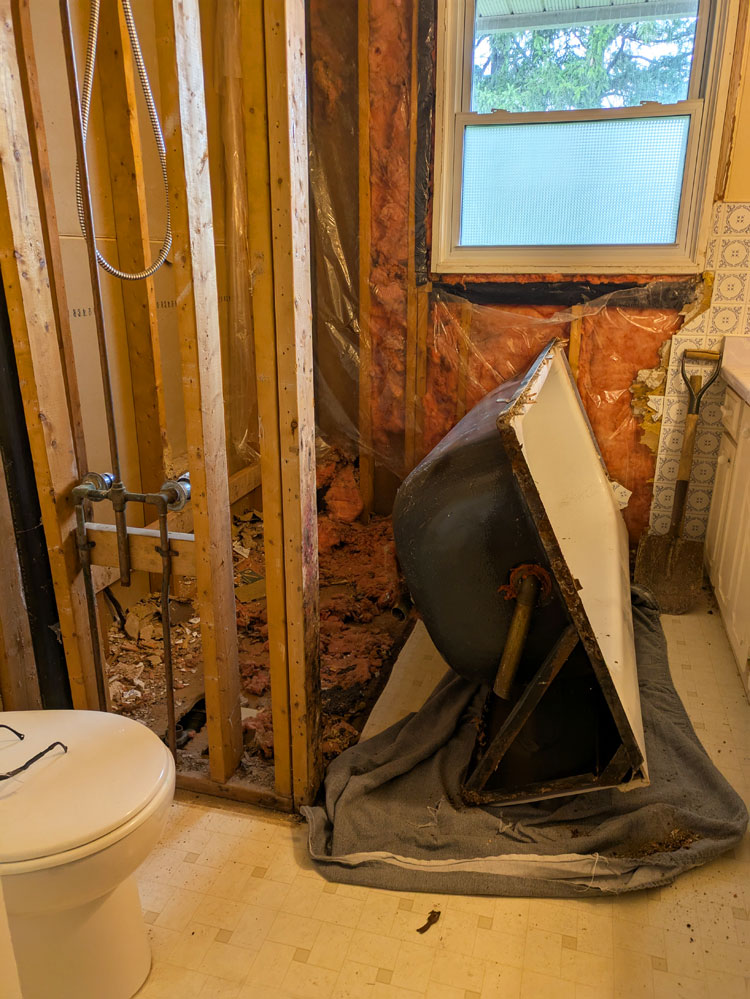
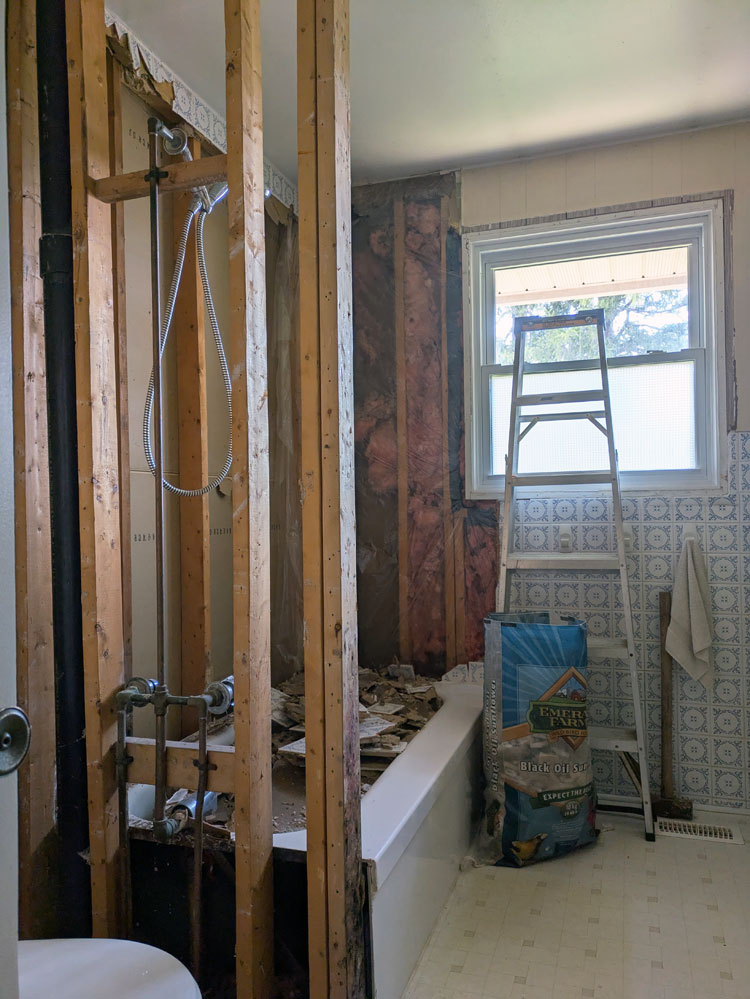
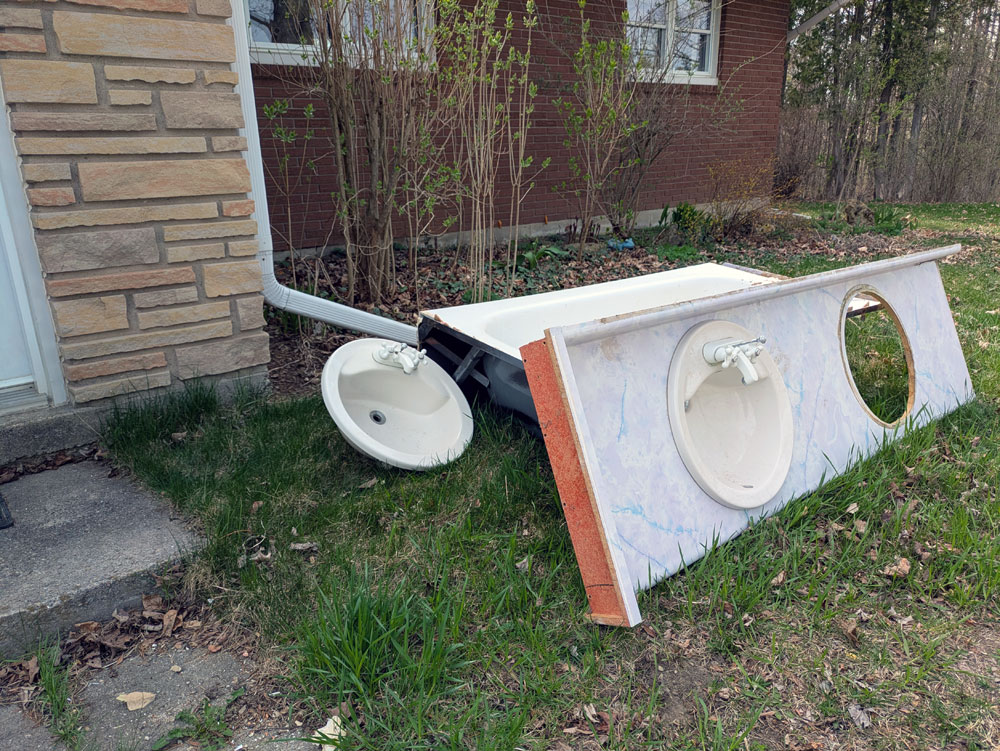
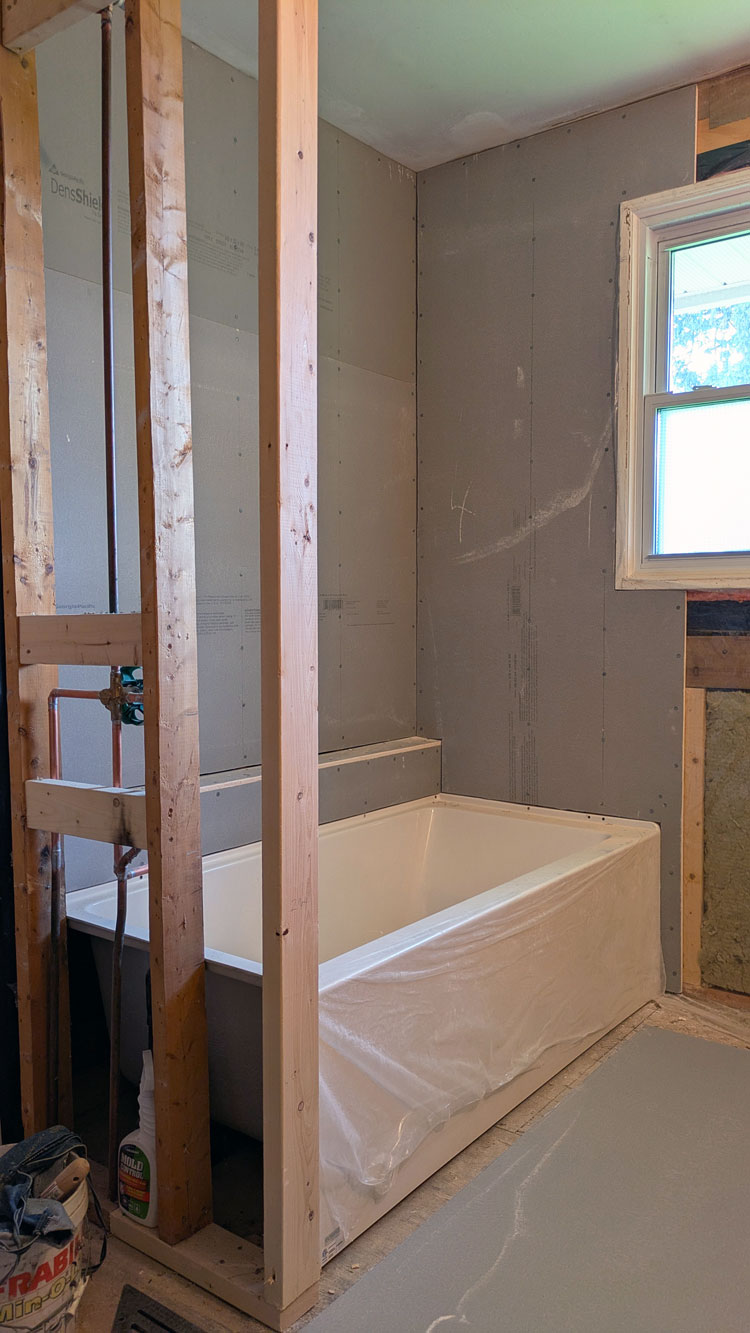
I started taking the bathroom apart at the end of April. I took down the tile and panelling. I pulled out the tubs (there were two, one layered over the other), vanity, floor and linen closet. Everything came out fairly easily, and I am really proud that I was able to do it myself.
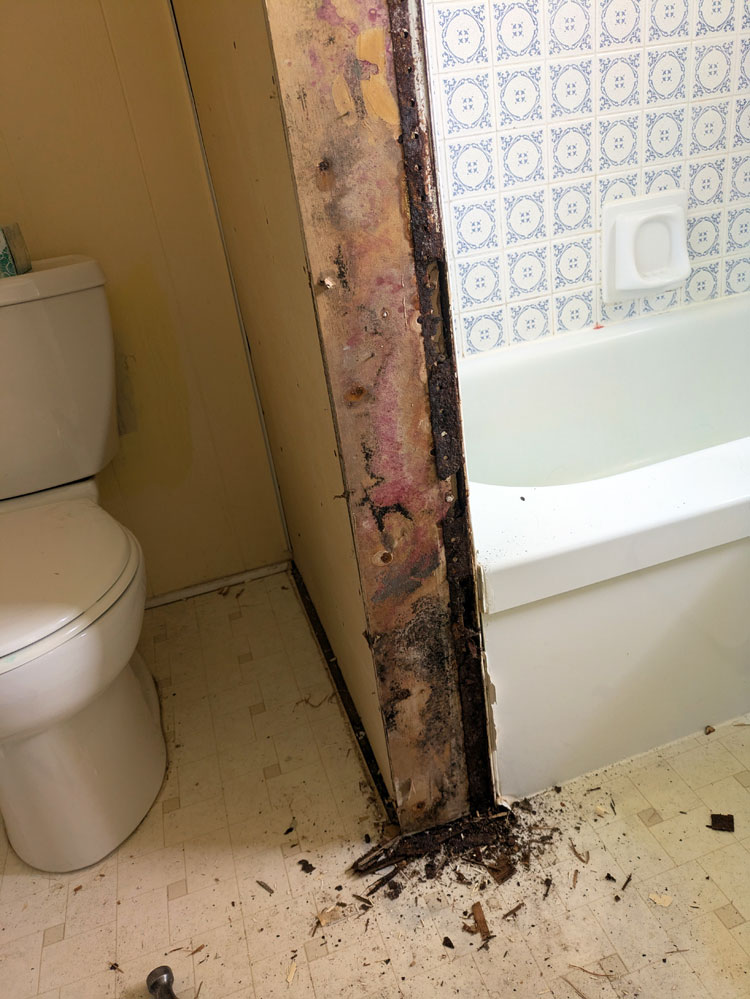
Demo is where you find all of the dirty secrets–dirty being both a literal and figurative term. I confirmed that some water had been leaking at the edge of the tub. I had expected that and the damage fortunately was very minor (one moldy stud). I discovered squirrels or other critters had set up a clubhouse under the tub at some point. There were walnut shells, bones, candies, a cigarette pack and all kinds of disgustingness under there.
Everything cleaned up and I had a blank canvas to begin to put it all back together.
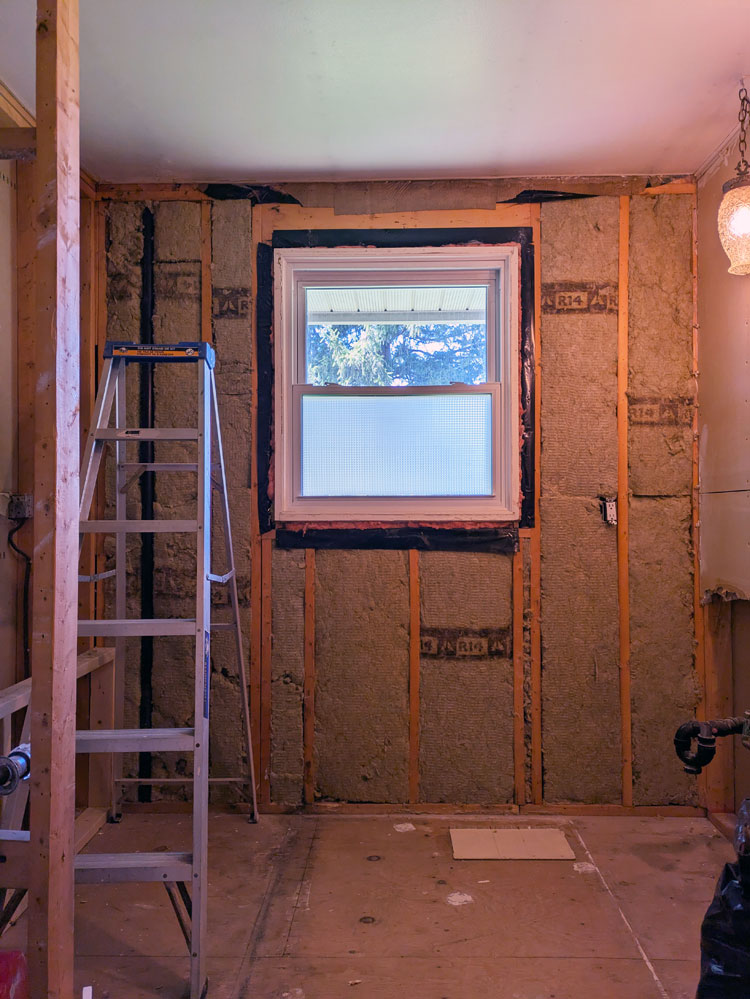
I put in new insulation and vapour barrier on the exterior wall. I adjusted the framing around the tub, as I’m adding a ledge for shampoo and soap all the way along the wall.
The plumber came and roughed in all the pipes and drains. He had to shift the taps and drain for the tub slightly, as the ledge pushes everything out a few inches. The plumbing under the sink was very tangled. Now it’s tidy and tucked between the studs. We installed the tub and removed the toilet.
I chose the deepest alcove tub I could find. I wasn’t able to make space for a longer tub, but baths should be a bit more comfortable with the new tub.
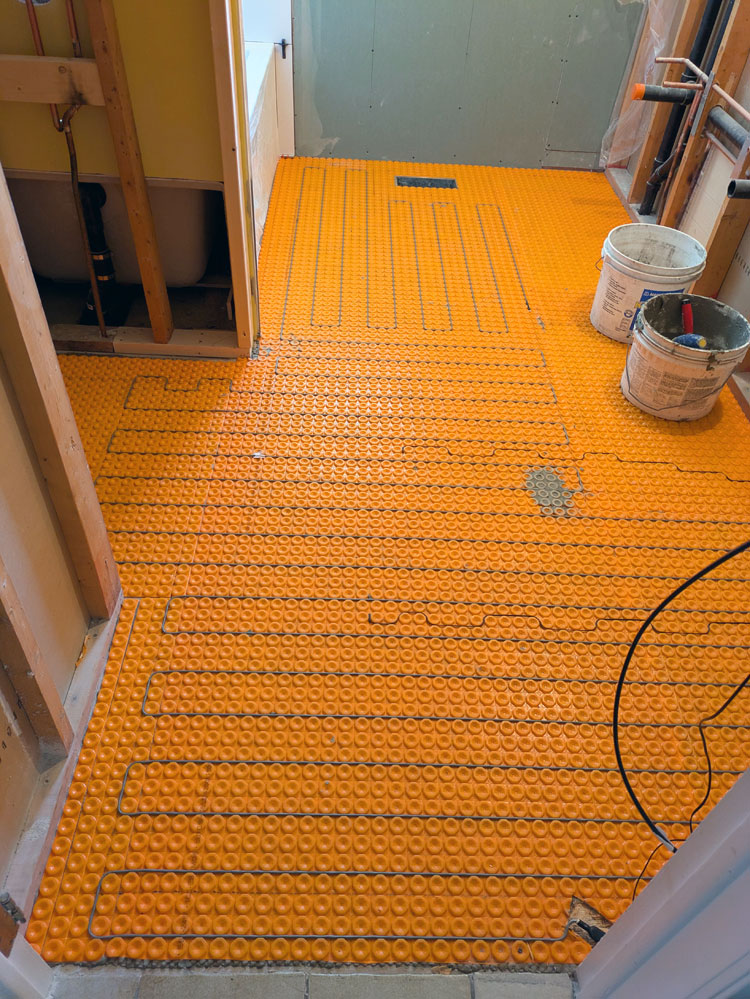
The electricians came and roughed in all our new wiring. One vanity light became two, one plug became two. They wired the floor for heat. We also got a new circuit panel, as our old one was maxed out.
Then the project came back to me for a few days. I installed tile backer and drywall.
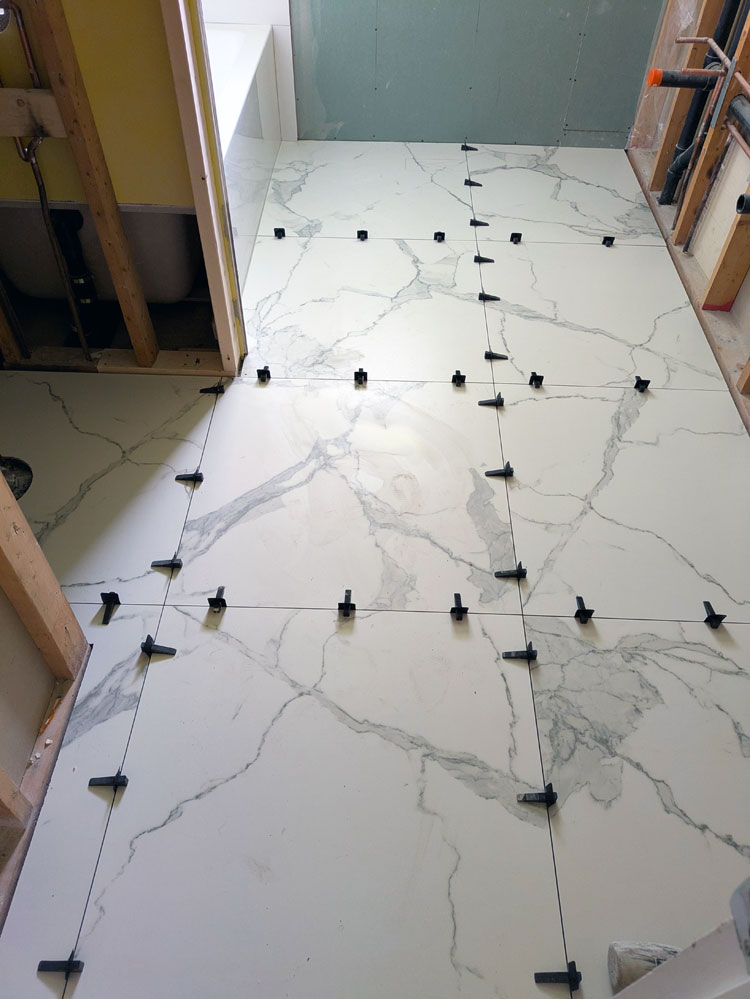
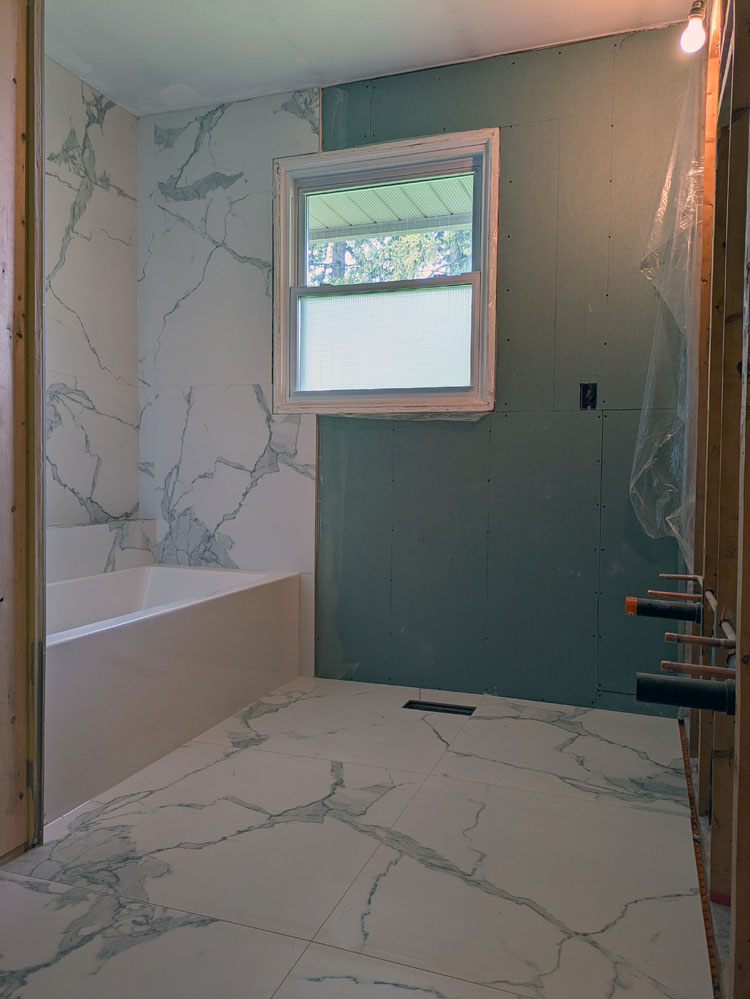
The tilers came and they brought our beautiful new tile with them. It was exciting to see the first pretty things go in the bathroom. They installed the heated floor membrane, tiled the tub walls and then the floor.
I chose a very large tile (32 inches by 32 inches) to minimize the amount of grout I have to clean. Just two tiles covered the full length of the tub. Nine tiles did the whole floor.
Then the project came back to me again for the wall paneling. I’m installing pine V-groove paneling. It’s similar to what we used in the mudroom and a big step up from the fake 1970s era paneling that was in the bathroom before.
And that’s where the project is at currently. I’m slowly working my way around the room putting up the walls.
For the past month, I’ve been trying to stay ahead of my trades and have everything they need ready to go. Now the pressure has eased a bit, and I’m working at my own pace. Though I definitely want to keep moving and complete most of the work before Ellie finishes school for the summer.
Despite the pressure–and a few disgusting moments–I’ve been having fun with the renovation. I’ve waited a long time for this project, so to finally be underway is very satisfying. It’s also fun to see the elements I’ve chosen (tile, tub, taps, vanity) arrive and (slowly) be installed. So far, I’m loving my choices and it’s so exciting to see this project coming together.
I’m documenting the bathroom reno and sharing it in a series of videos on Instagram. Follow me at juliaon129acres, and catch up on all the construction in the bathroom highlight.
For the last two and a half months, I have been breaking one of my major rules of DIY. I’ve been working on more than one project. <<Gasp>> There are no DIY police coming to arrest me and no real consequences for breaking my own rules. But the start of this year has confirmed that this is not the way I like to work. It also made me think about some of the DIY rules I follow and how I make renovating enjoyable and productive.
I’ve been a DIYer my whole life. My Dad and Mom both worked in construction and they involved my siblings and me in projects from the time we were very little. Once I got older, I worked with my Dad officially, labouring for him every summer.
Then Matt and I bought our first house. We fixed it up, sold it and bought the farm. Here we found another fixer upper, which was exactly what I wanted. Over the years, I’ve learned a lot about construction and how I like to tackle projects. So today, I’m sharing a few rules I (usually) follow to ensure DIY is successful.
Tackle one project at a time
Have you ever walked into someone’s house to find they have a project on the go over here, and oh they’re working on that over there, and yep that needs fixed over there too? With DIY, and especially with a fixer upper, it’s easy to get pulled in different directions. So many things need fixing!
Or maybe you get bored. That project that was so exciting a few weeks ago has now become a slog. Or you got stuck and weren’t sure what to do next, so you started something else.
At the start of this year, I broke my own rule. I started redoing the office downstairs while I was still working on the coop outside and I began planning the bathroom reno. I justified it that it was winter, so having an indoor and outdoor project made sense. Plus I really, really wanted the office.
But it was hard. I was thinking about three different projects, which for me meant I didn’t have a clear vision of what had to happen next for any of them. Also I was working all the time and got really, really tired. Progress slowed and I wasn’t having fun anymore. Eventually, I stepped back from the office and prioritized the coop.
DIY requires a singular focus. Pick a project, stick with it and don’t let yourself get distracted.
Have a schedule and stick to it
For most of us, DIY is something extra. We have our jobs, our families, our lives. And then we try to fit in home renovations. Having a plan of where and how you’re going to squeeze it into your schedule can help you complete your project.
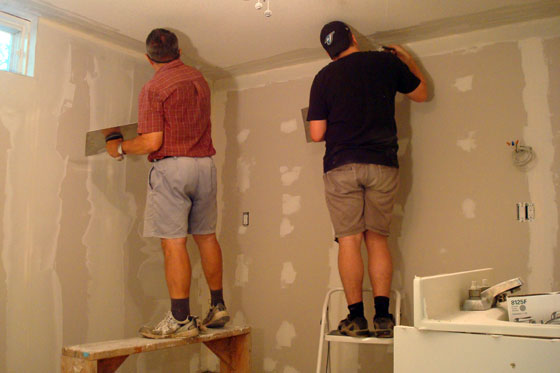
When Matt and I were drywalling the basement, we set every Wednesday night and all day Saturday as our work time. Sure most Wednesday nights we would have rather sat on the couch and watched TV, but we had a vision of that couch and TV in our beautiful finished basement, so we stuck to the plan and eventually finished the drywall.
For the coop, I committed one day a week to construction. Some weeks were very cold. Sometimes something came up and I couldn’t give it the full day. But knowing I’d made the commitment to myself got me out each week and kept progress moving.
Know your limits (but push them a little)
DIY comes in all shapes and sizes. Some projects are super simple and others are complex. Make sure the scope of the project you are tackling is (mostly) within your capabilities. If you take on something too big or too complicated, you may get stuck or frustrated or make a mistake. Certain mistakes like messing up the wiring, plumbing or structure of your house can have serious consequences.
We watch YouTube or HGTV and think renovation is no big deal. But many parts of construction require special expertise and professional training. There’s a difference between knowing something’s possible and knowing what’s possible for you to do. Be realistic what you can handle and when to call in professional help.
At the same time, DIY is a learning opportunity. Simple projects can lead to bigger things as you build your skills and confidence.
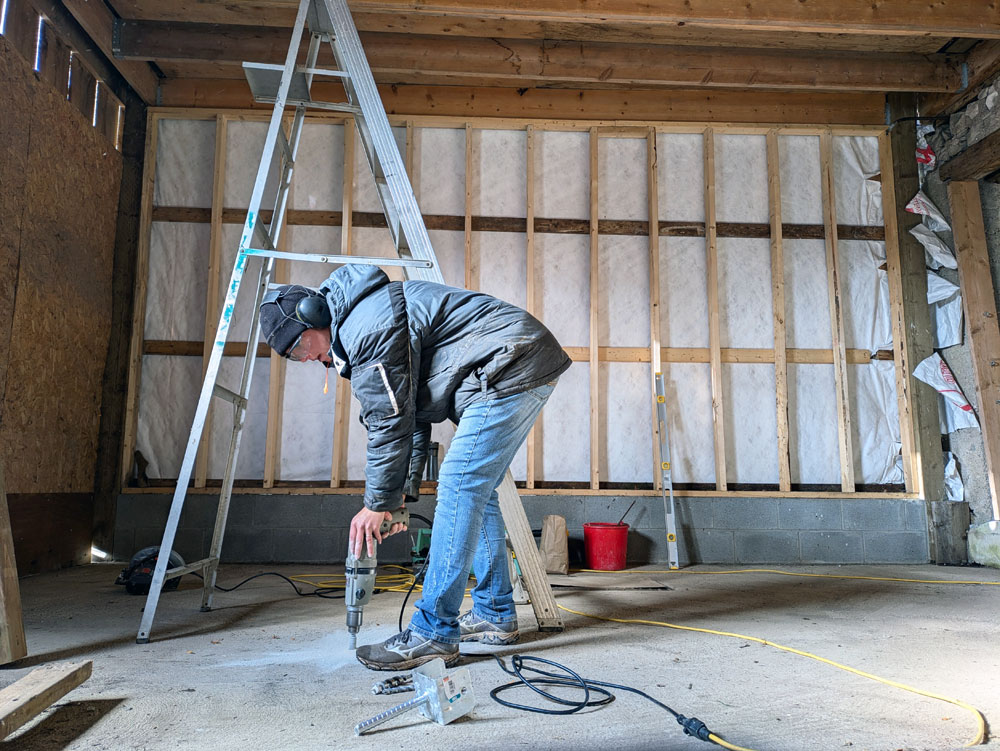
The coop has stretched me. Figuring out how to build it took me a while. Constructing the floor–with so much drilling into concrete–was a bit intimidating. It’s not something I’ve done before on my own, and I wasn’t sure I was doing it right.
I asked for advice, looked up construction standards (the building code, not YouTube, is a good source), thought about how to tackle different parts of construction and then I did it. I had a foundation from a lifetime of DIY that I could build on to accomplish that project. And I’m so proud of it. Now I have more skills and confidence to tackle something else in the future.
I think I’ve been pretty successful with DIY. I’ve saved money, grown my skills and built a really nice home for myself and Ellie. Plus, I enjoy it. For me, one of the biggest signs of success is simple. I get stuff done. Finishing a DIY project is hard. These three rules help me do it.
What do you think of my rules? Do you agree? Do you have any DIY rules you follow? Have you broken any of your own or my rules?
Renovating our main bathroom has been a long time coming. I’m really excited to finally tackle this project this year.
I am planning to do as much of the work myself as I can. I have a great plumber who worked with my Dad (and by extension me), and he’s going to be my main resource. When I called him at the start of the year to talk about the project he said, “I assume you’re going to be doing most of this yourself?” I love it when someone knows me and trusts that I’m capable.
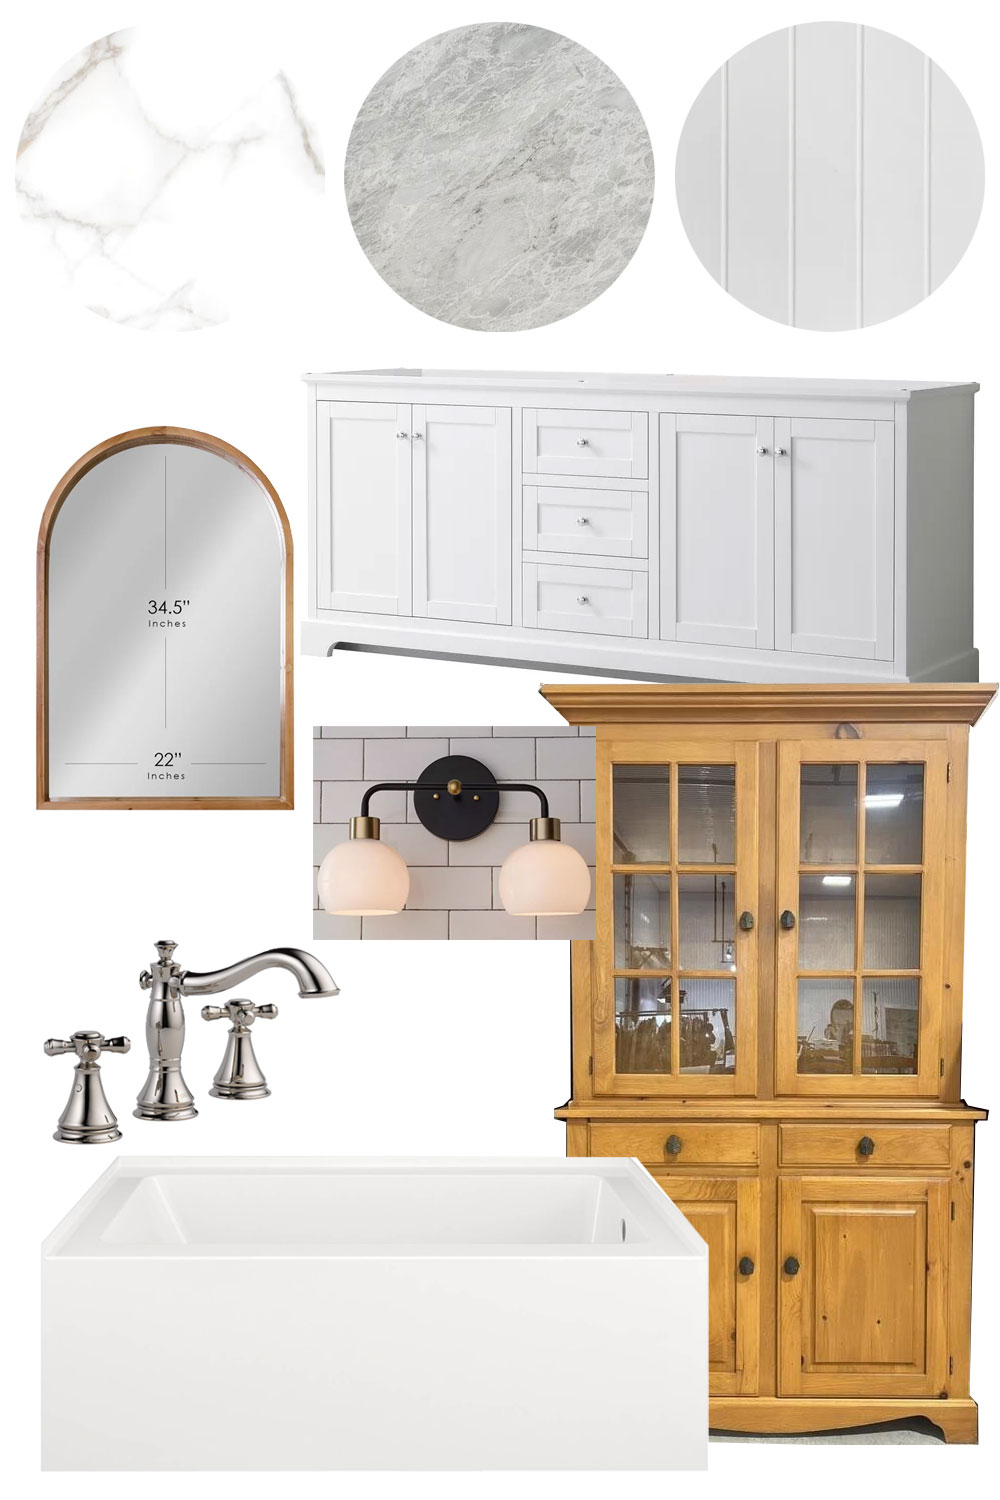
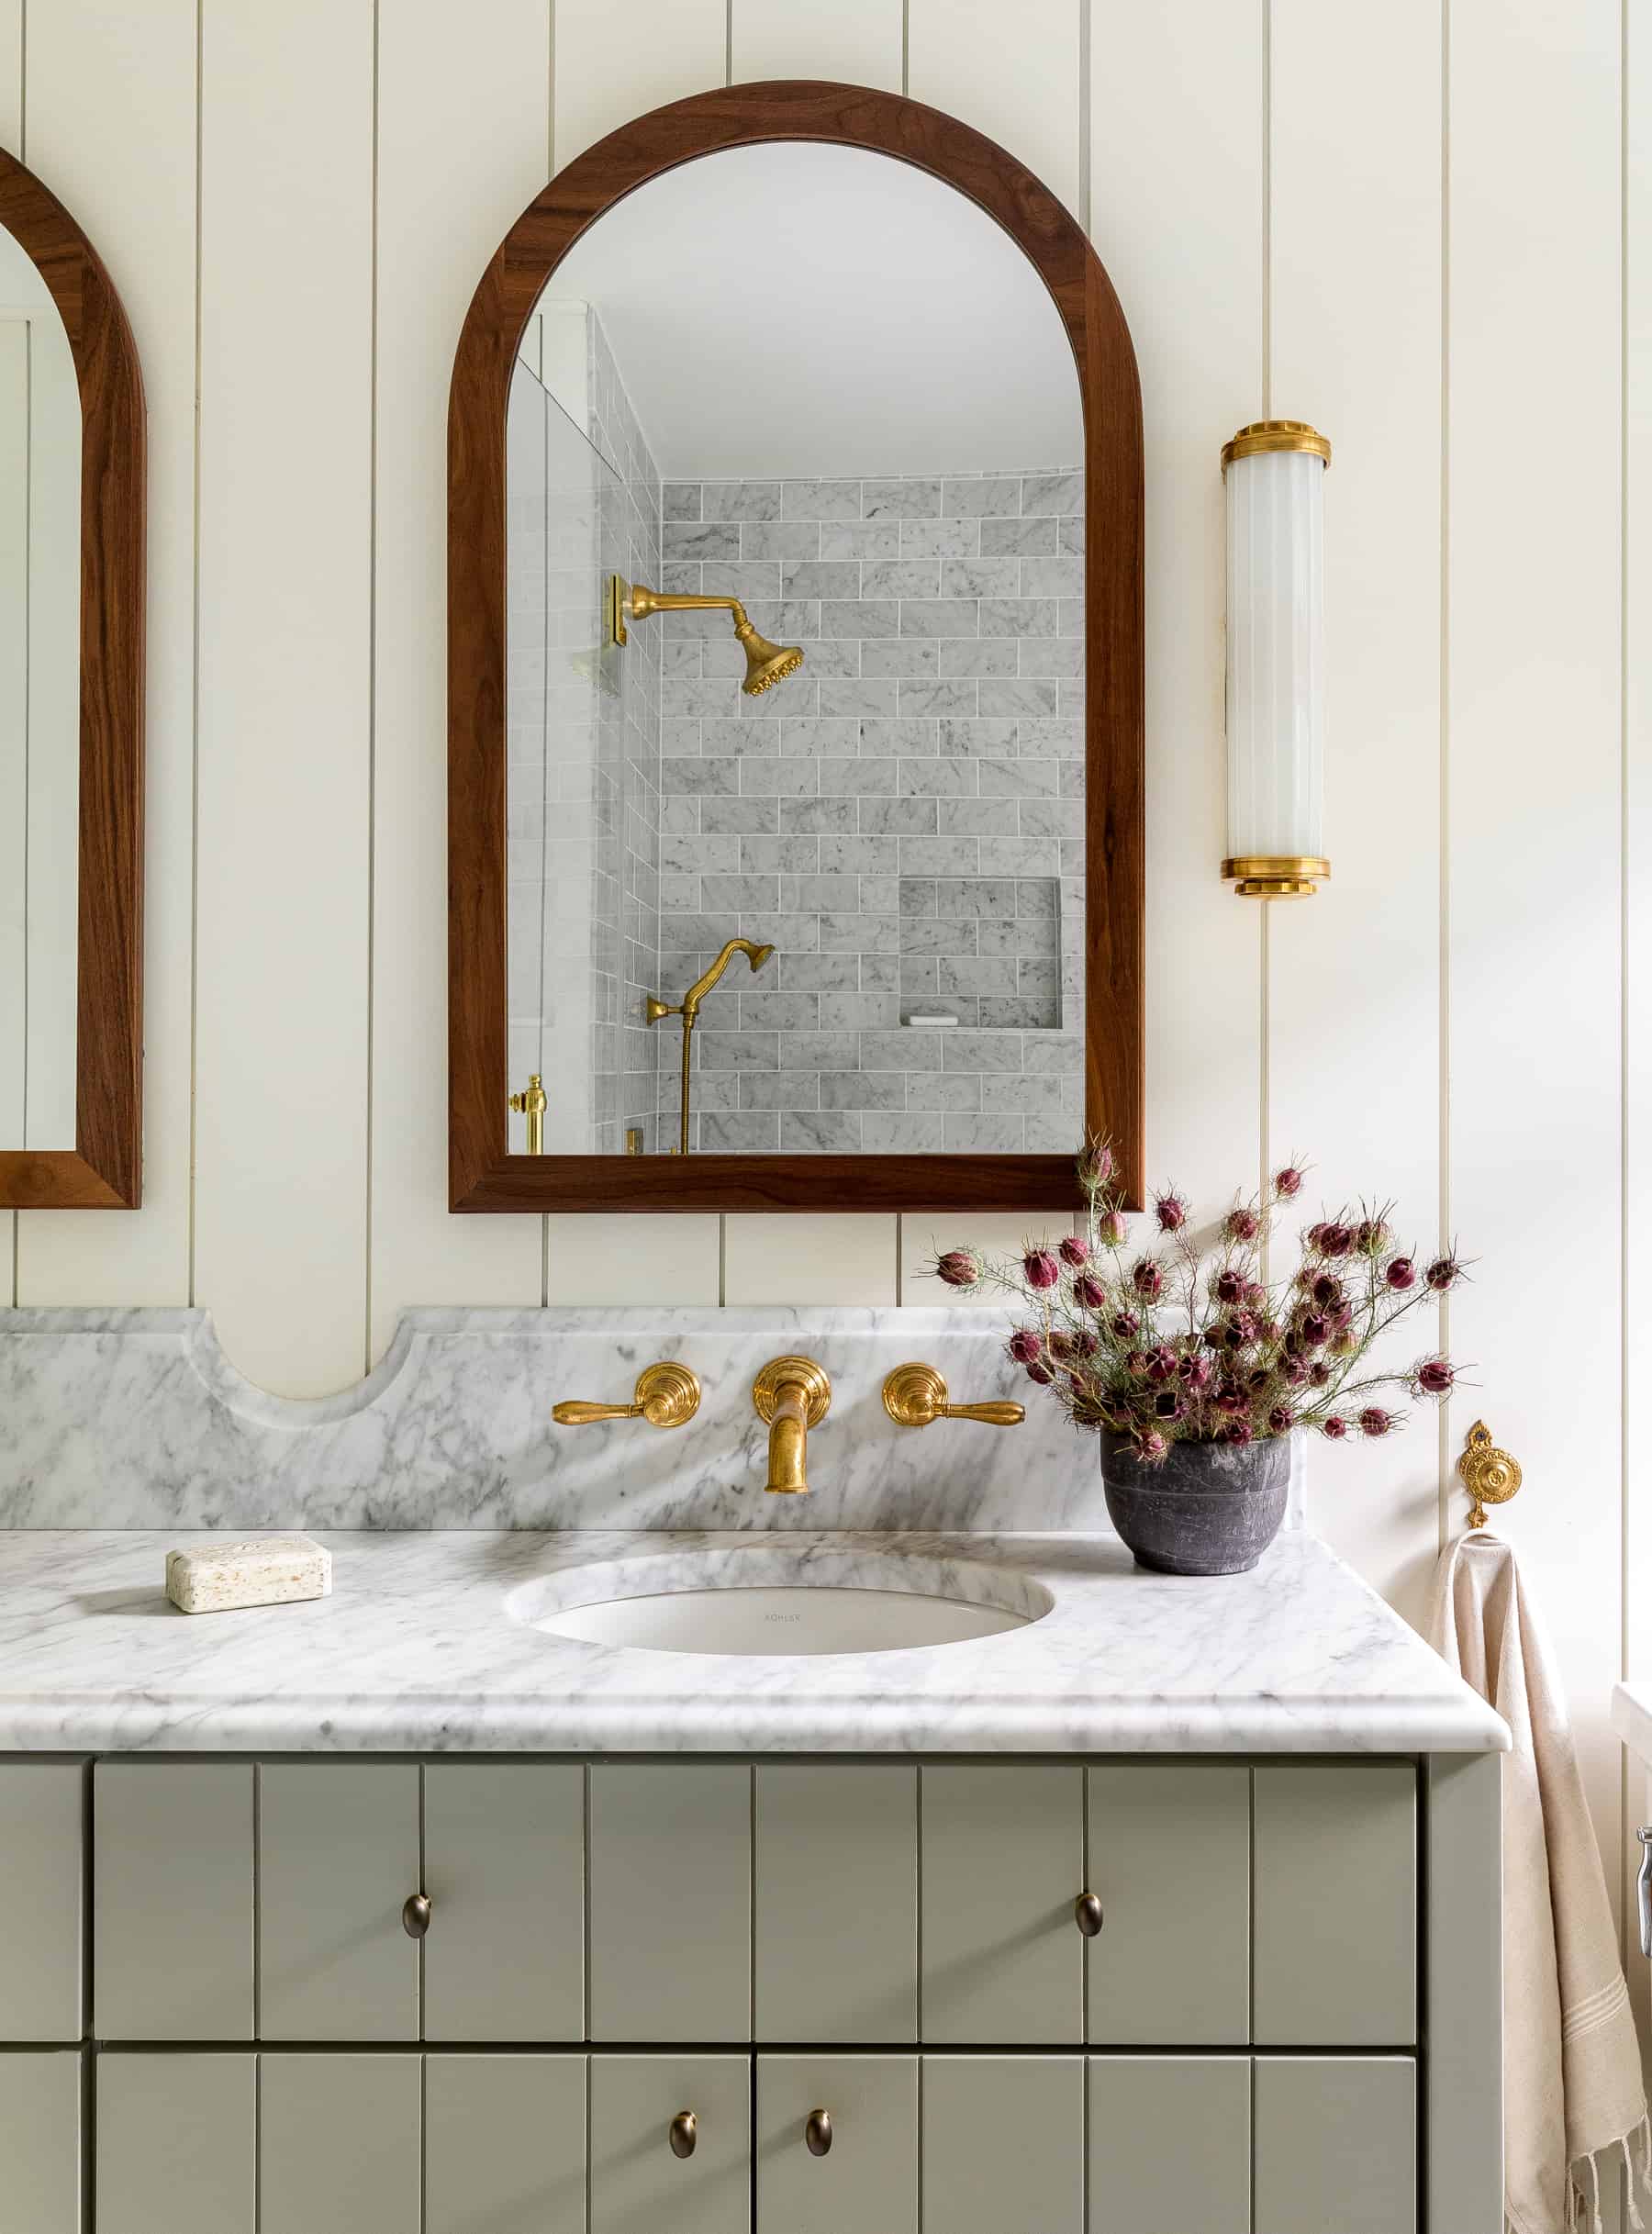
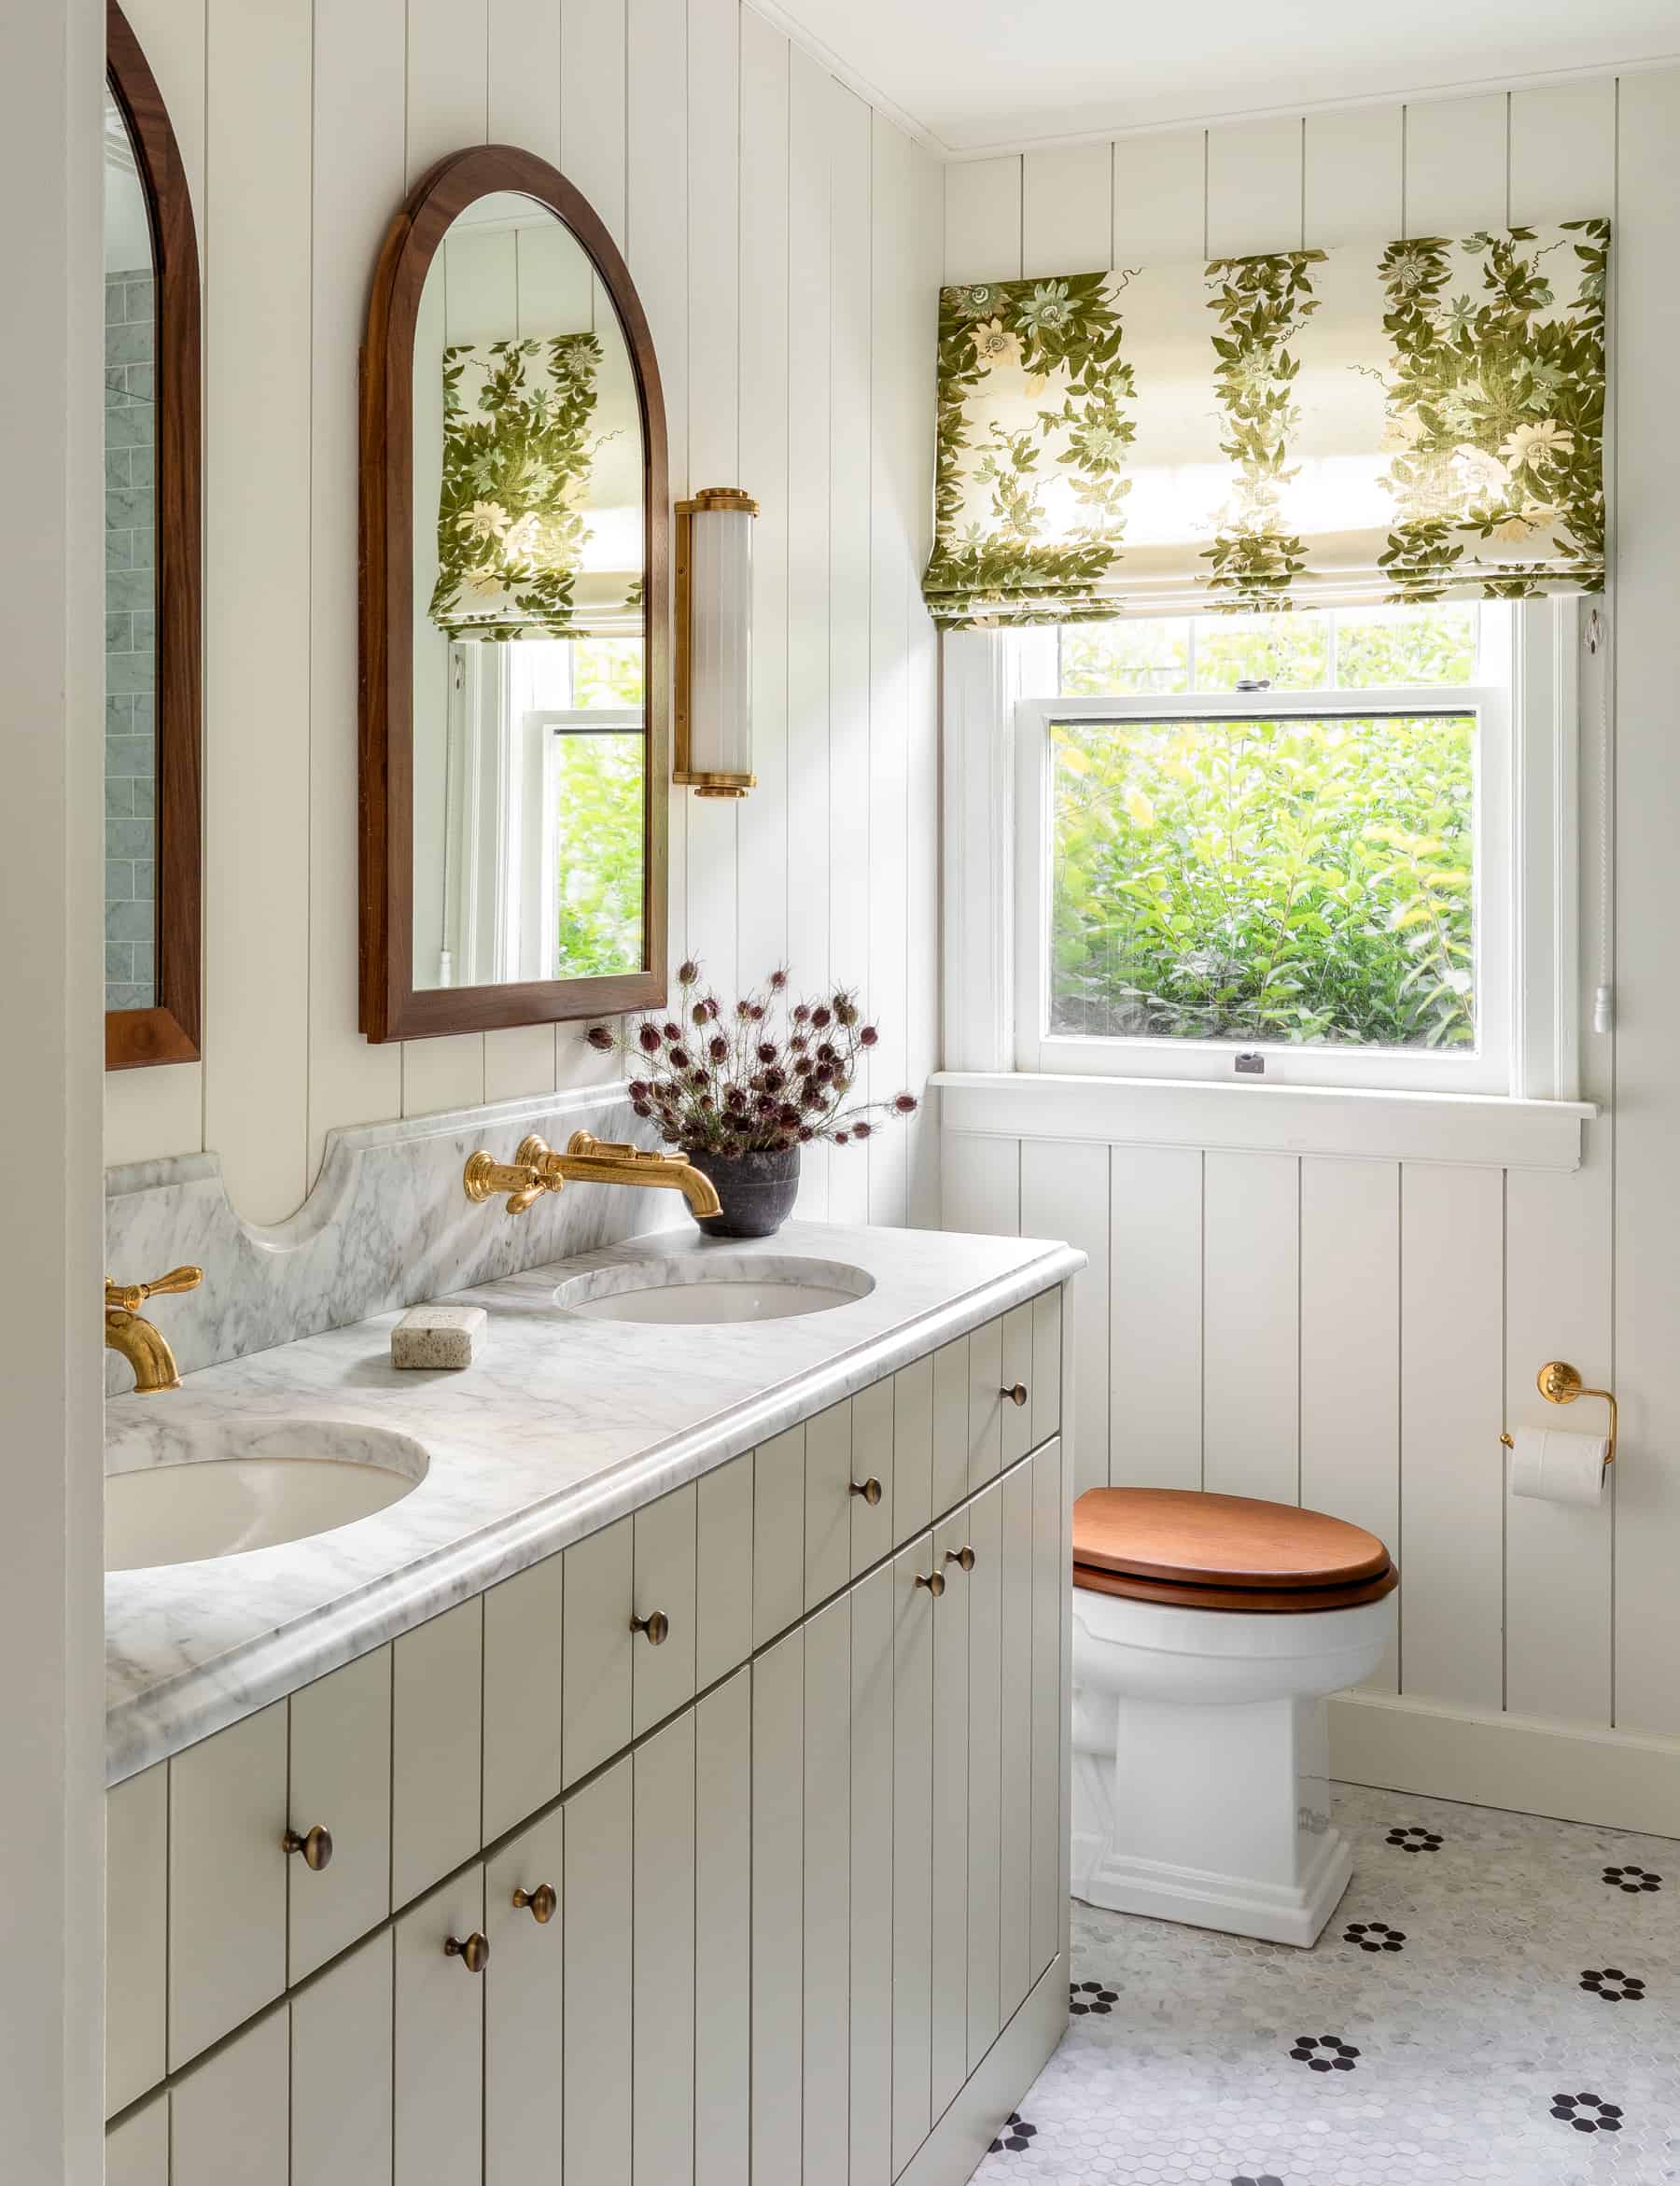
The vision is for a bright, fresh, farm bathroom. For me, this means white, wood and chrome. It means paneled walls, natural stone (no more Care Bear countertop), shaker cabinets, and cross handle faucets. Here is a moodboard of some of what’s in my mind.
This bathroom from Heidi Callier continues to inspire me. I love the edging on the countertop, the V-groove on the walls and the wood-framed arch mirrors.
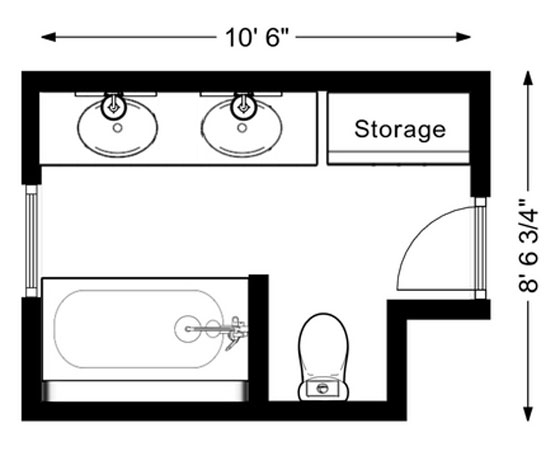
The layout of the bathroom is going to stay the same, but everything is getting a major upgrade–including insulation, electrical and storage. I’m also going to finally fix that creak in the floor in front of Ellie’s sink.
I have two months between when I finish teaching this spring and Ellie finishes school, so that will be my renovation window. My mission between now and then is to have everything ready to go. So I’m lining up my trades (I want an electrician and a tiler, along with my plumber), making all my decisions and ordering all of my materials.
I’m hoping that I can make the final result as beautiful and functional as I imagine.
Do you have any bathroom reno tips to share? What makes a farmhouse bathroom for you? Do you have a project you’ve been waiting to tackle at your house? What’s the biggest project you’re doing this year?
I am really, really excited by the projects I have planned for this year. This year will bring a lot of new and big things for us and the farm. They’re all centred around how we live, how we use the house and what we want for our lives here.
Having birds has been a goal since Matt and I were thinking of buying a farm. I made really good progress on the coop last year (updates are coming), and I’m aiming to finish it soon so we’re ready to welcome some new feathered friends this spring.
Following our big cleanout last year, Matt’s office is ready to become my office. I am excited to have my own space for working, writing, crafting, sewing, whatevering. This will be the first project of the year. (In fact, it might already be underway.)
A dedicated play, crafting, creating space for Ellie is the second step in the game of dominoes that is our whole home reorganization. After I move into my new office (and remove all of my things from Ellie’s old bedroom), setting up this room just for Ellie is next on the list.
Last year was a “get back on track” year in terms of home projects, and I feel like I did pretty well. It wasn’t always easy. It wasn’t always fun. It wasn’t always the most “bloggable” content. But I feel like I made progress, which for me is very satisfying.
Also satisfying? This annual look back at how I did on home goals 2024.
Driveway
Paving the driveway was the final step in our garage/mudroom/patio makeover. It feels like a big accomplishment to have this project completely done. The south side of our house has had a huge transformation, and I love the result. Plus, clearing the snow this winter has been much easier.
Coop
The coop ended last year in pretty good shape (I have updates to share). It’s not done, but we’re closer and getting birds this spring seems possible. I’m very proud of how my plans are coming together and that I’ve done most of the work myself.
Vegetable garden
As you saw in my Home Goals 2024 mid-year report, I decided to let the vegetable garden go last year. It was the right choice for me at the time, and looking back I don’t regret crossing it off the list.
Clean-up inside
Last year I wrote that “anything will be progress.” So, on the goal of tweaking, organizing, purging our house, I can say that I made progress. Fully finishing Ellie’s room was a big step. There’s still a lot more to do, so I feel like I’m still in the middle of a game of dominoes. Fixing one space will fix another which will lead to the space after that (which will lead us to Home Goals 2025, so stay tuned).
Clean-up outside
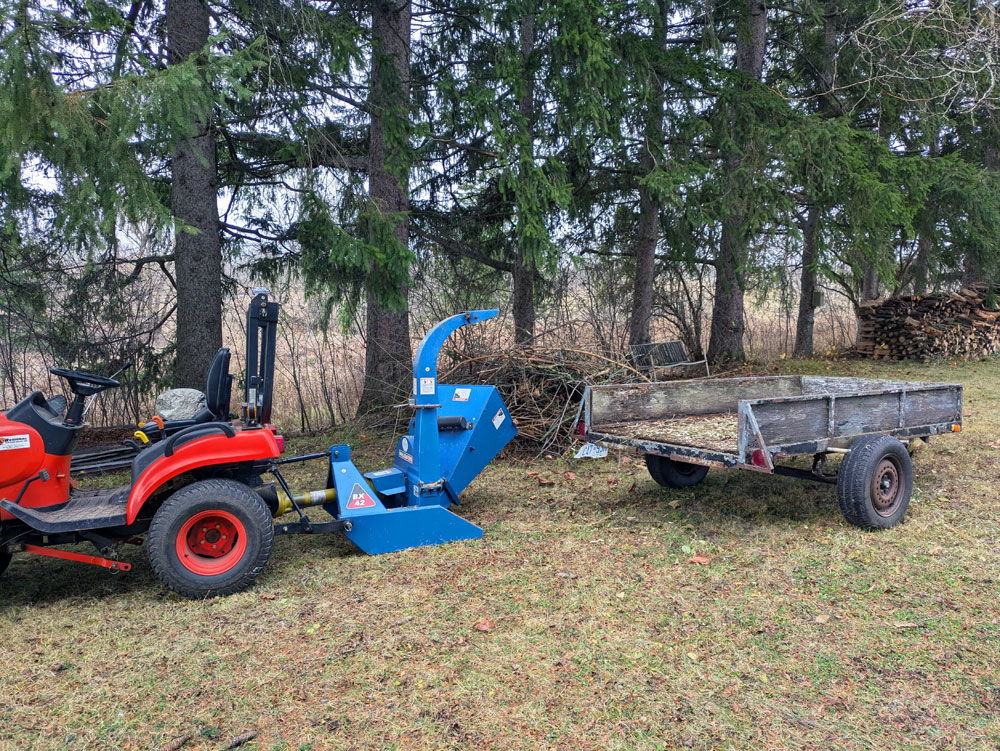
Our chipper and rotary cutter were both in action last year, and I was able to maintain all of the areas I had cleaned up previously. I also cleaned up a few new areas around the coop, so we are mowing all the way around the barn for the first time since we moved to the farm. My other big clean up, both inside and out, was a large quantity of Matt’s stuff. This project fell into the not easy, not fun and not bloggable category. But now it also falls into the done category.
Personal goals
I also had some personal goals last year that were about some of the other things that are important in my life.
Walking: 469.5km (39km per month. The same as last year and a bit shy of this year’s goal of 42km per month–though I still don’t track on-farm field walks, which I do at least once a day with Cigo)
Monkey bars: I still do them every week.
Reading: 37 books (didn’t hit my goal of 50 books)
1,000 Hours Outside: 939.5 (close, but this is a challenge that even if you lose you win)
Family albums: I completed 2020 and 2024, so that leaves 2021 and 2022 to catch up on.
Rest: Still my hardest challenge. I’m more conscious of my need to rest and I feel like I’m doing a better job of listening to my body. Though I still need to go to bed earlier.
Looking back at 2024, I’m proud of what I accomplished. Everything I did set us up for what I want to do this year, and I’m really excited for what’s ahead for 2025. Stay tuned for Home Goals 2025 coming up.
Did you have any home goals last year? How did you do on projects around your house? What was your big accomplishment for the year?
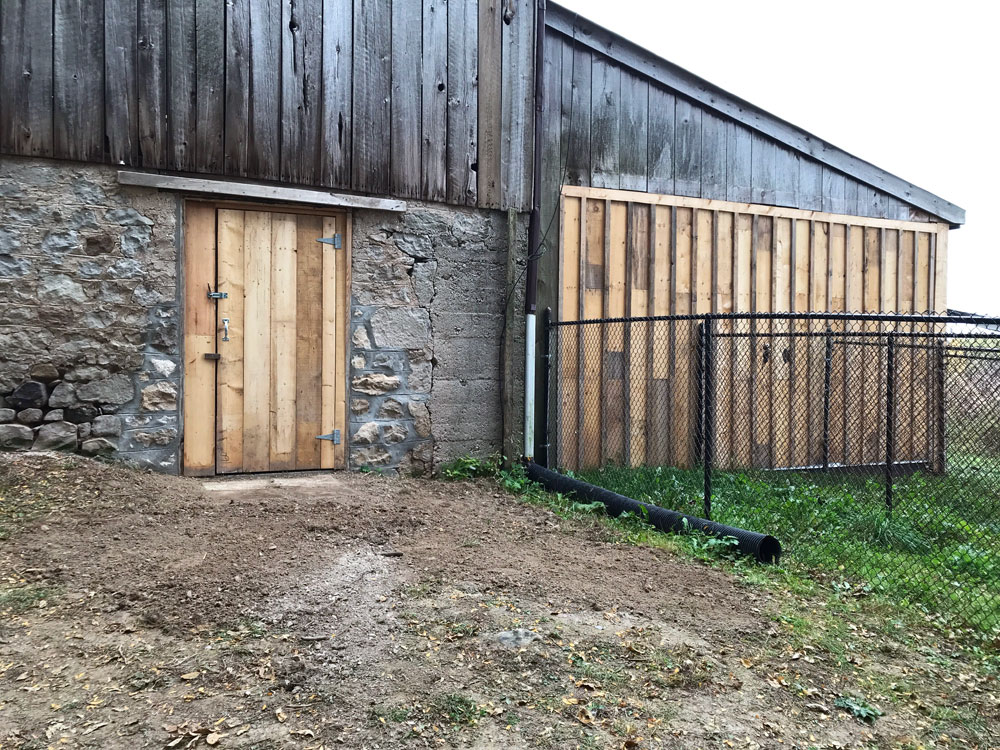
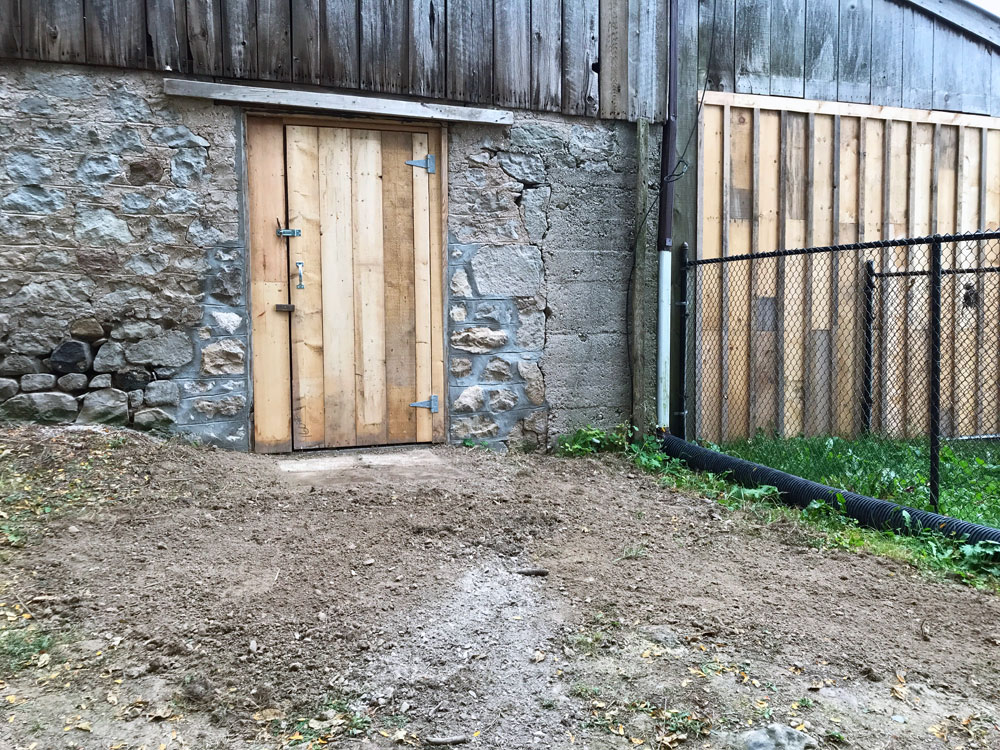
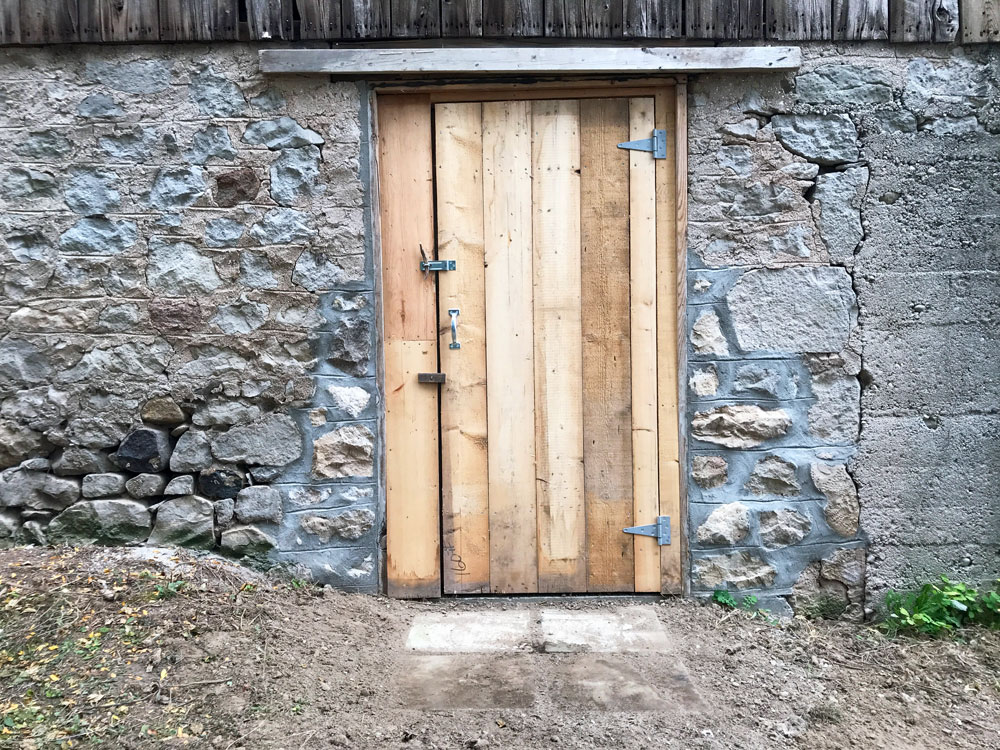
The coop has reached another milestone. It has a door.
For a reminder, this spot in the barn foundation used to be a window. Part of the wall under the window collapsed in 2018, so anticipating the coop I had our mason reconstruct the wall into a door. He tacked some plywood over the opening, and that’s how it stayed for the past 6 years. Bananas that it’s been that long.
Now that the coop is finally on track, I needed a proper door. Especially now that new coop wall is up, I don’t have an easy way to get into this part of the barn.
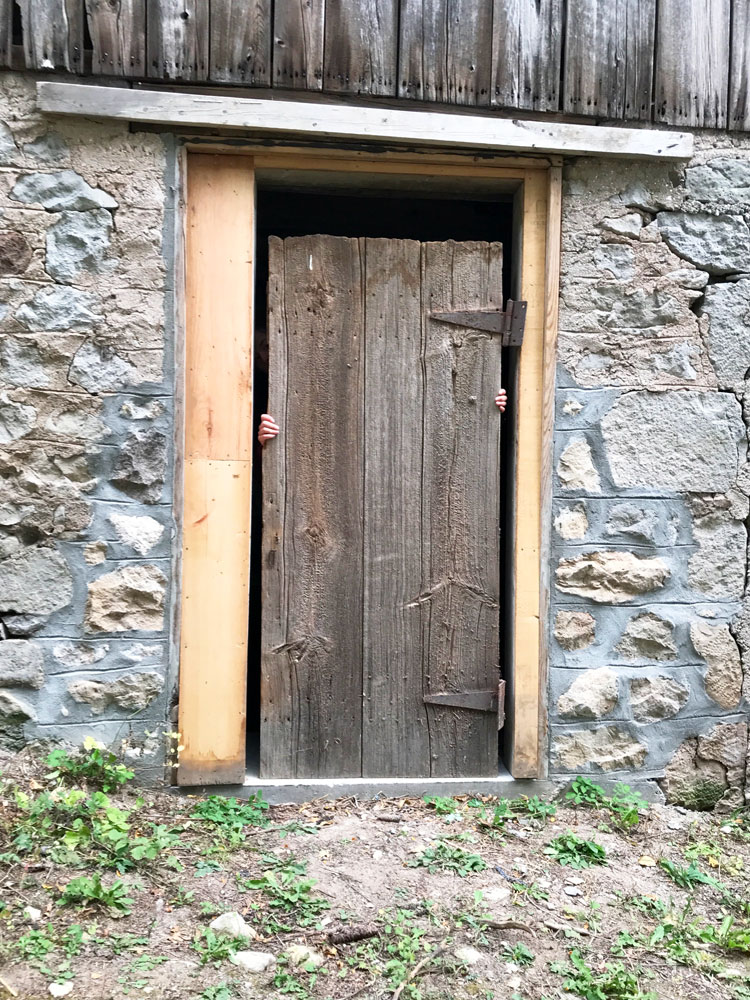
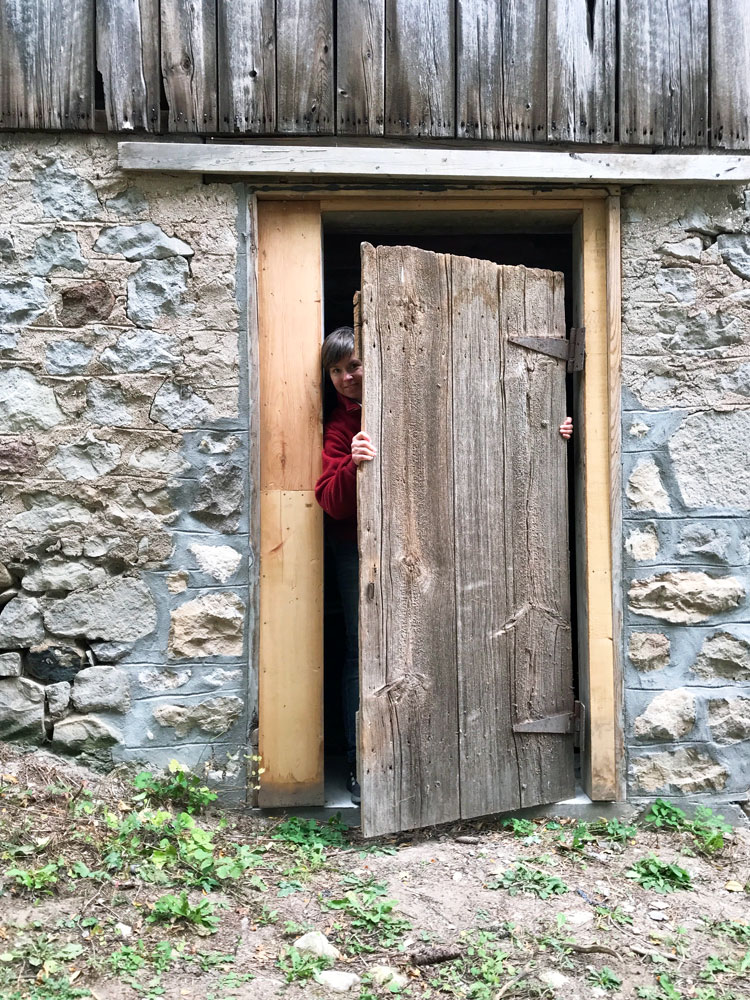
I wanted to reuse the door of the old coop. The wood is amazing. This beautiful weathered grey. And huuuuuuge boards. Just two boards make the whole door. One is about 16 inches wide. The door was close to the size we needed and relatively sturdy. Plus you know I love the symbolism of using a piece of the old coop in the new one.
But after thinking it over (and lifting it in and out of the doorway multiple times), I decided it wasn’t close or sturdy enough. A lot of the nail holes have expanded over the years, so it has a wiggle that would have needed reinforcing. I also would have had to extend the height. All of that felt like it would take away from the character of the old door–which is what I loved.
The deciding factor was the hinges. From the wear patterns on the wood, the hinges have been on there for a long time. But they were crooked, and I didn’t feel like dealing with that on top of the other issues.
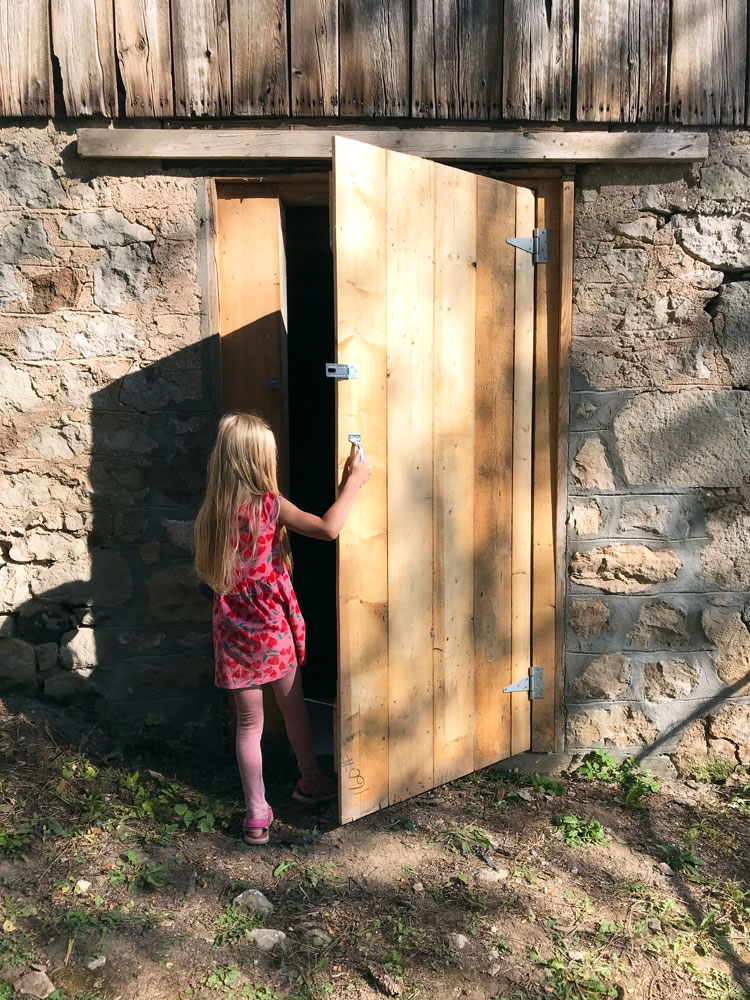
So I took some of the leftover siding and built a new door. (The old door will find a spot some day.)
I was a bit intimidated about framing the opening and building the door. Growing up with my Dad, a professional contractor, he had two types of projects that always required extra figuring: stairs and doors. So I had that in my mind as I was working.
I framed the opening and the door at the same time, so I made everything to the exact dimensions I wanted. It took me a couple of tries to figure out how I wanted to build the jamb, but now it is sturdy and plumb. I made the door bigger than the opening and then carefully cut it down–after measuring many more times than twice.
I installed the hinges so they’re square and when it came time to hang the door, everything went together smoothly.
Ellie selected the best spot for the handle and latch and she screwed them into place. Then she modeled the new door in action for photos. I’m glad I’ve been able to include her in so many parts of this project.
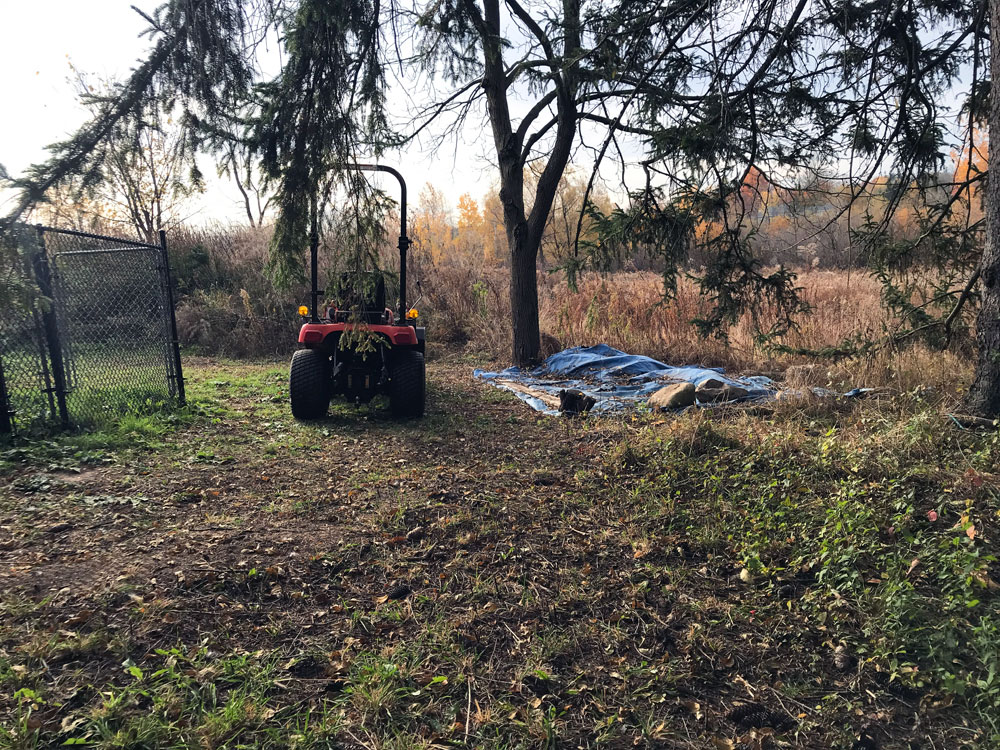
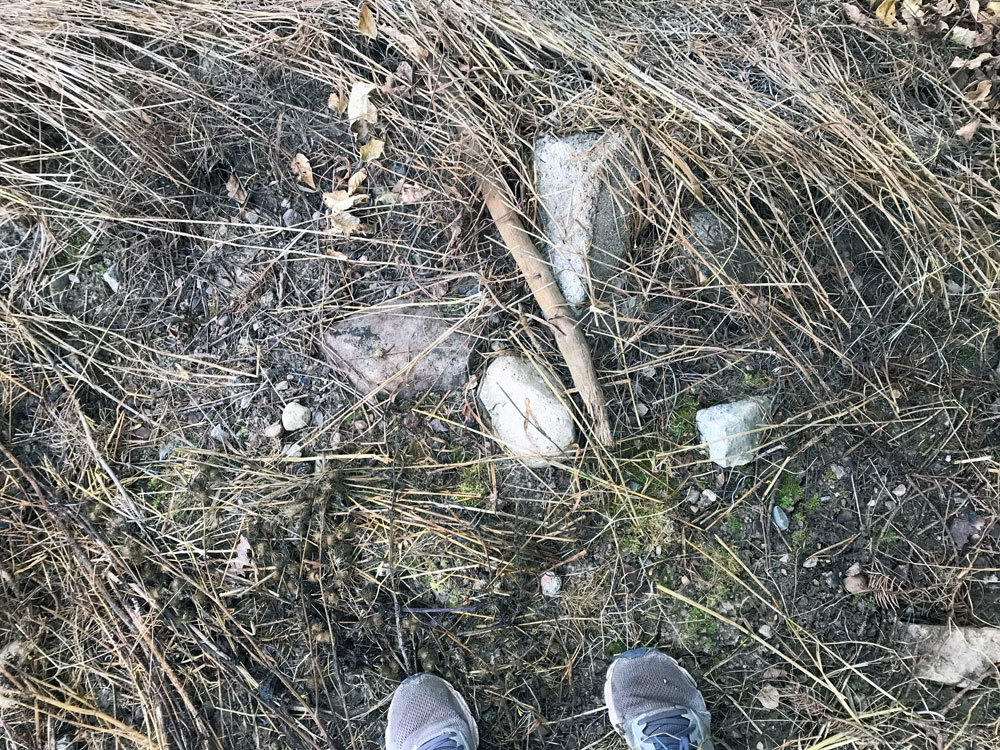
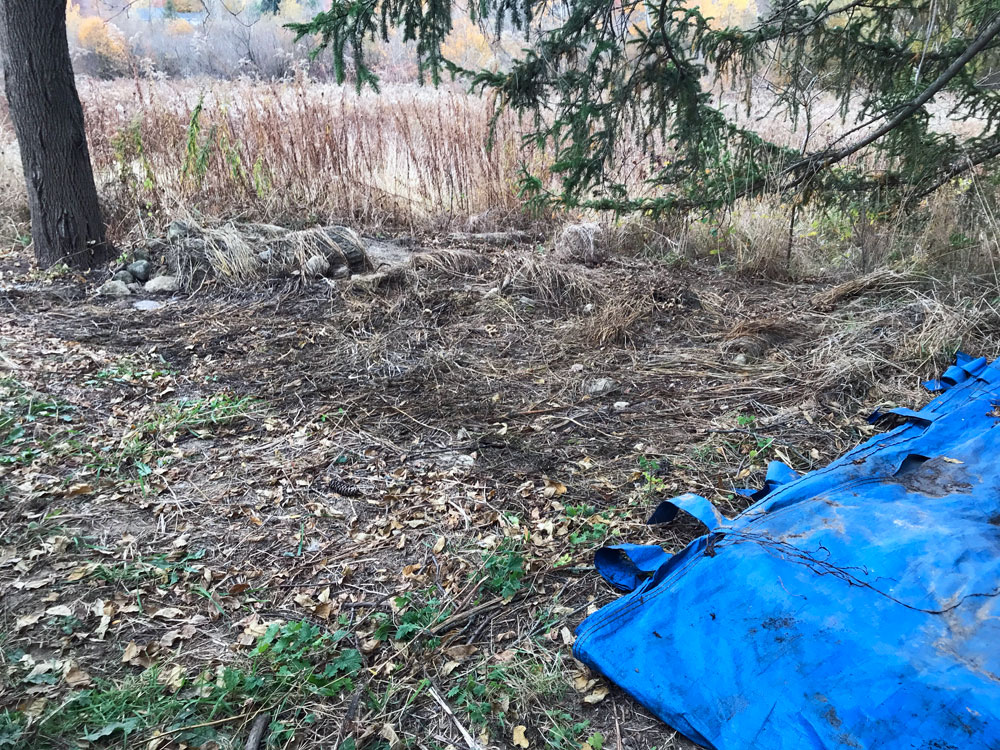
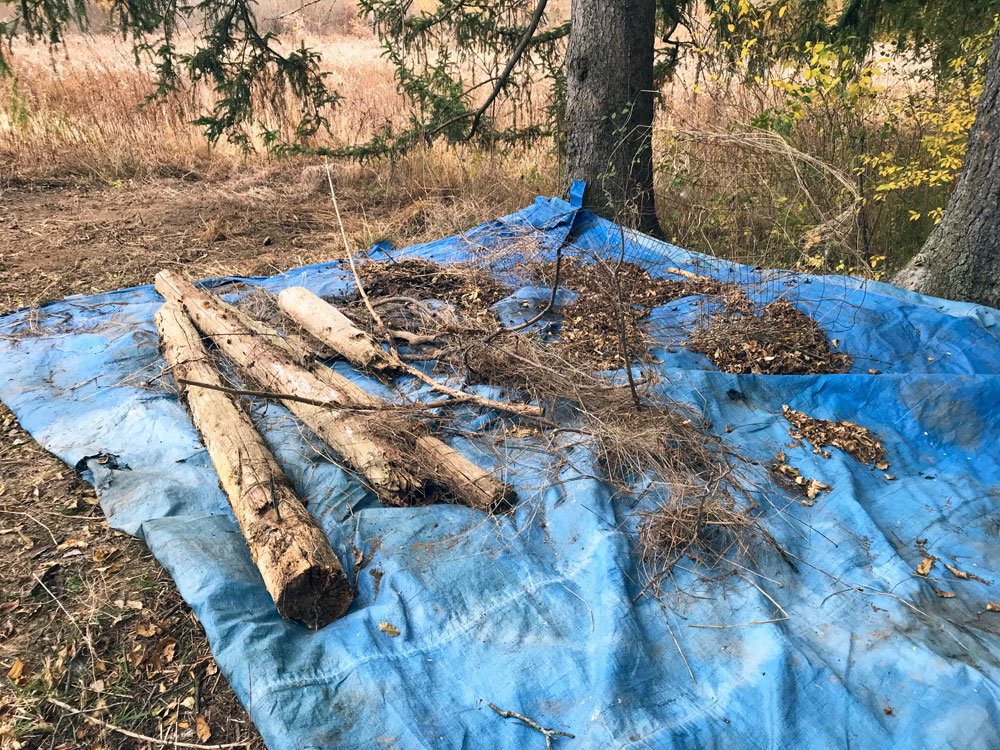
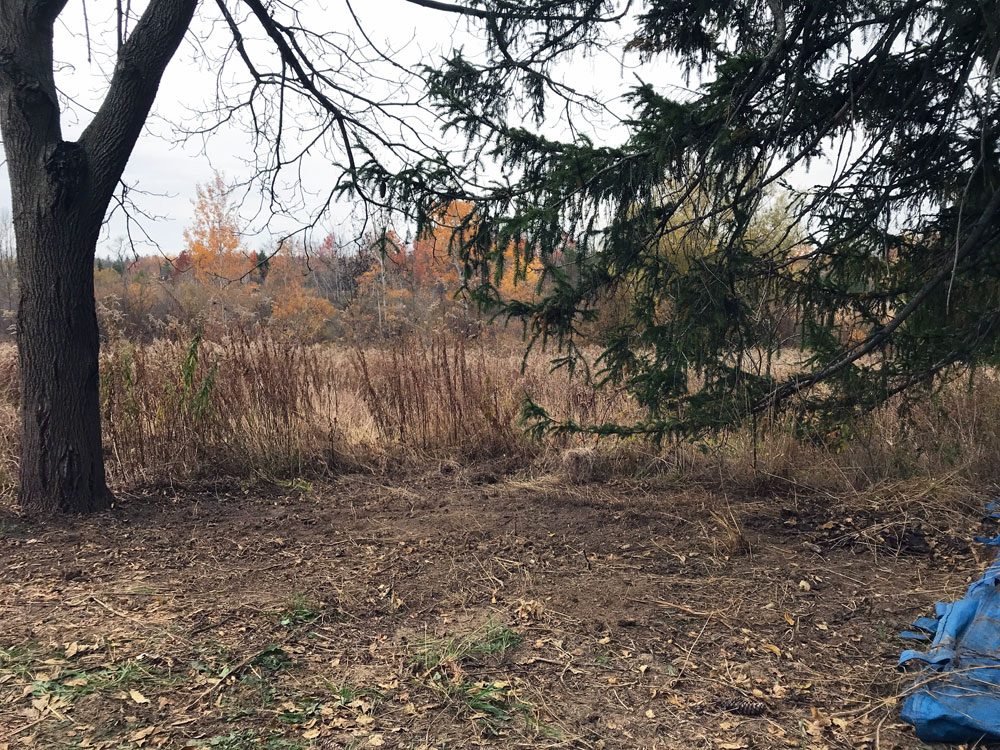
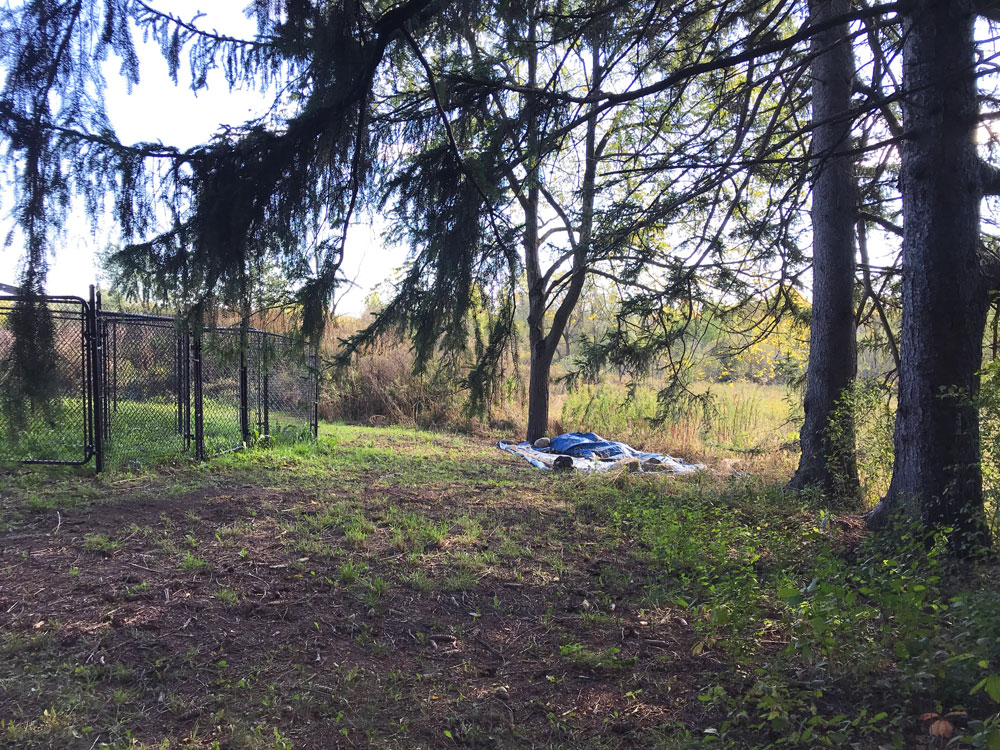
I also did a little more clean up around the outside. I had one spot covered with a tarp for most of the summer. This is my preferred method to kill the weeds and grass so that I can then see what’s lying on the ground.
As you can see below, the tarp revealed mostly rocks and sticks. But there were also 5 1/2 fence posts (one wrapped in wire), a hunk of metal and a length of wire fence. None of this I want to mow, so in a mystery area, clearing the weeds, picking up the mess and leveling the ground is my preferred technique.
I have now slid the tarp over to cover a new spot.
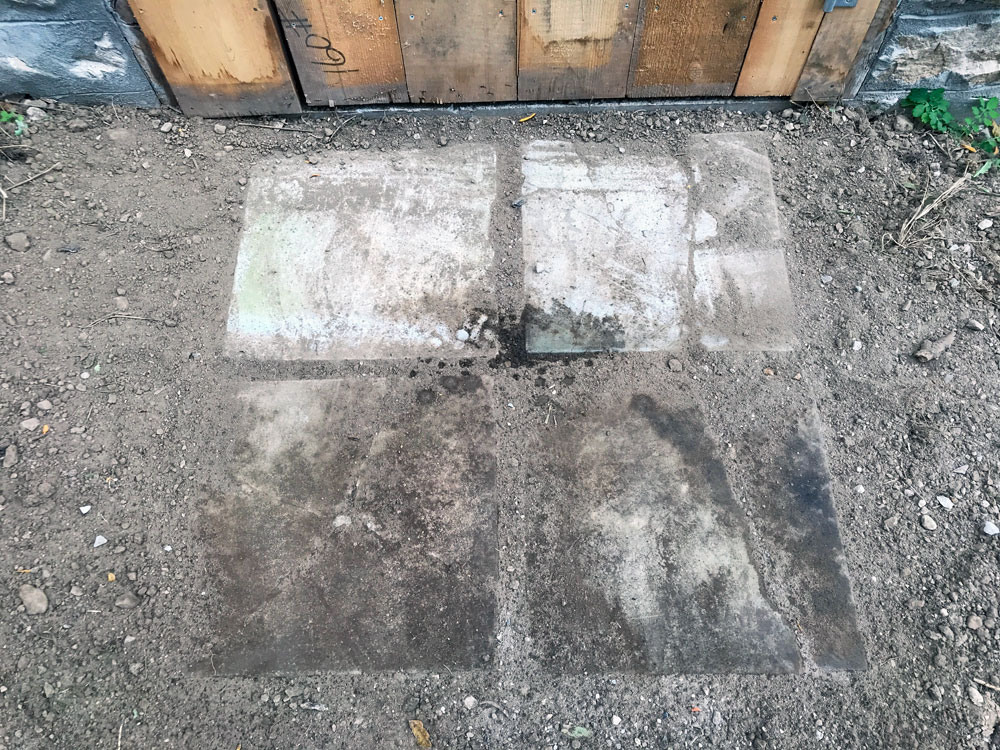
While I had my rake, shovel and tractor, I laid some patio slabs in front of the door to make a little landing area. I spread some dirt around the stones to hold them in place and even sprinkled some grass seed. I might be a little late on the seed, but I’m hoping to keep this spot from getting too muddy as I continue to work on the coop.
Every step on this project feels like another milestone and gives me more motivation to keep building. I’m very proud of the door. Proud of the coop. Proud of myself.
Have you every hung a door? How about building a door? Are there any DIY projects that intimidate you? Anyone else doing clean up around your property?
I am back with another coop update. This is becoming a monthly thing. It feels so good to be making progress.
The progress this time has been happening outside the barn.
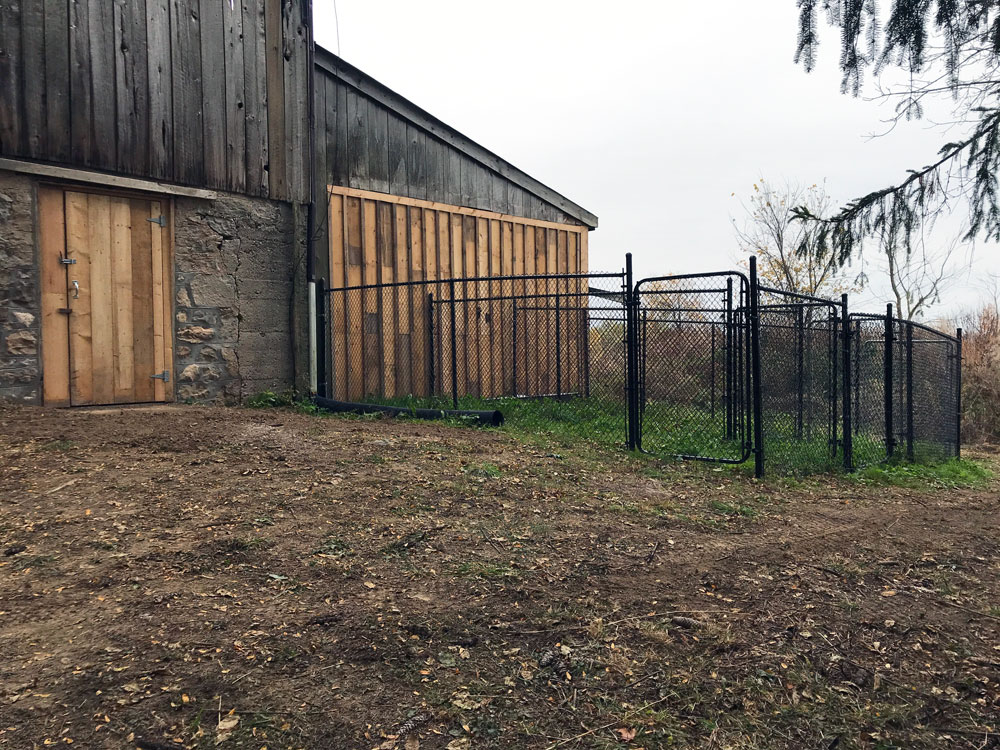
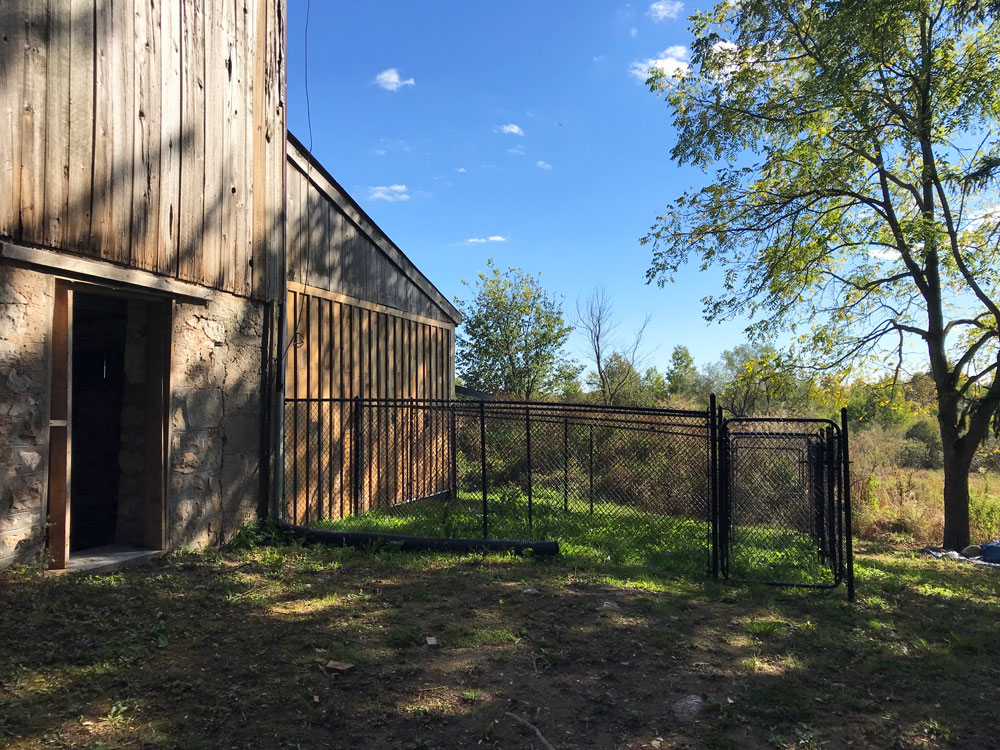
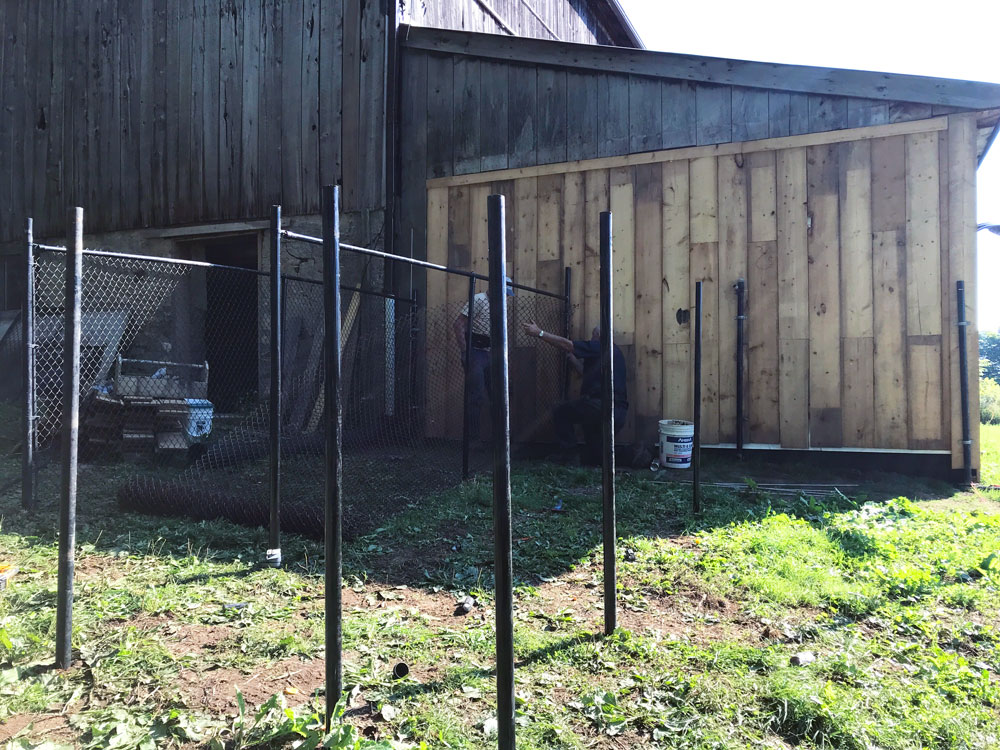
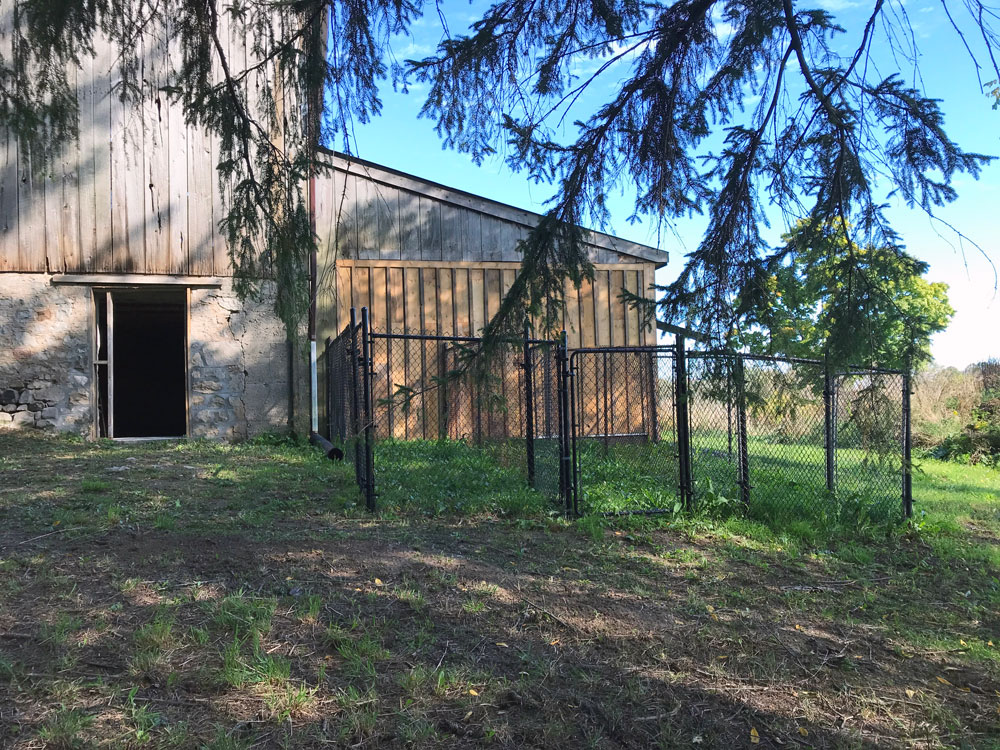
We have runs! I hired out the fencing, and I’m very glad I did. Our ground is quite stony and making sure all the posts were secure was not something I wanted to tackle myself. Plus pulling the actual fence taut did not feel like a one-woman job.
The contractor I hired was exactly the right man for the job. I had picked up some used fencing from my Mom’s neighbour, so I needed someone who was willing to deal with that. He was not only willing. He went through his own yard to see what other leftover materials he had, so he could make things as affordable as possible for us. He found most of the gates, top rails and a few other pieces, which was a huge help.
We have three runs, which will correspond with three pens inside the barn. Each run has a gate to the outside. There are also gates between each section, so I have the option of giving one group of birds double the outdoor space if the neighbouring area is vacant.
I plan to add mesh over the top and around the bottom edge, so the runs are as secure as possible.
I popped the plywood off the doorway, started to frame in the opening (it’s taken a couple of tries, and I’m not quite happy with it yet) and am working on building the door. These handprints are on the doorsill. Anyone remember when we made these? (The 2018 might give it away. I’ve obviously been planning this coop for a long time.) I love that Matt is part of it.
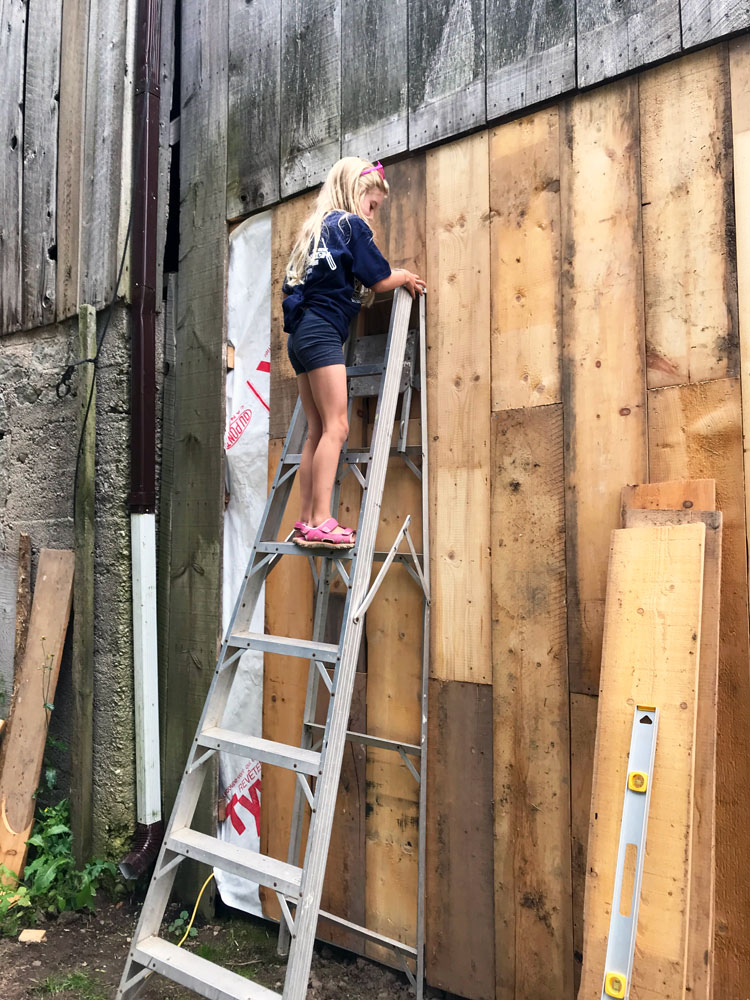
My cousin helped me move the leftover siding into the barn, and I added battens to the wood siding. This covers the gaps and eliminates the drafts.
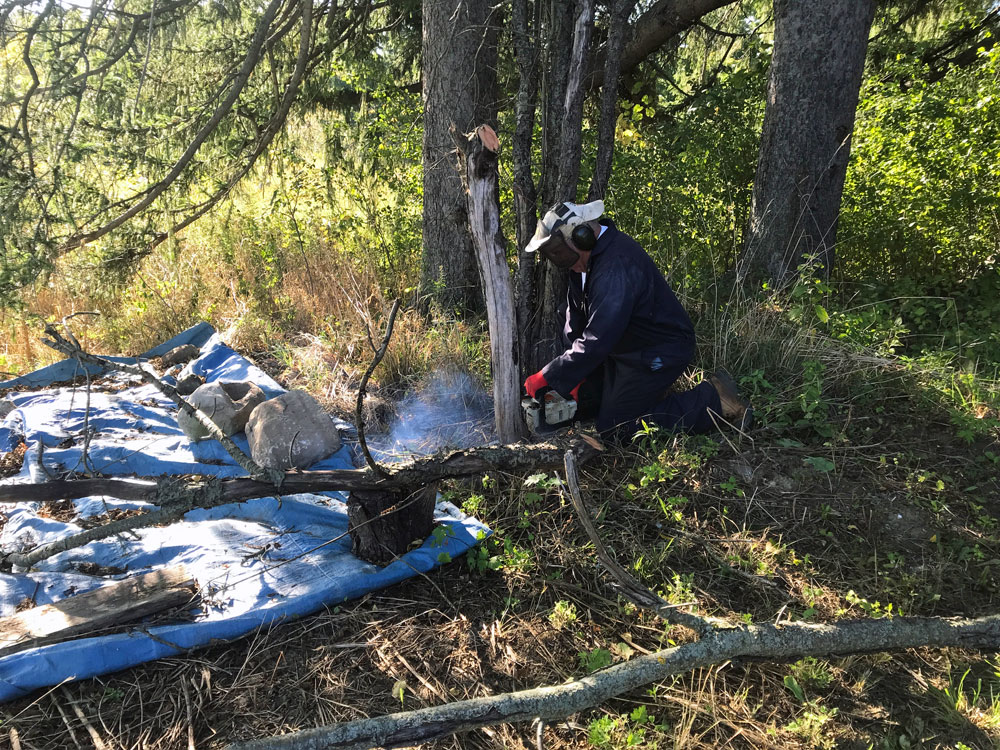
The final progress is courtesy of Matt’s Dad who came out last week and trimmed a few trees for us. There were two small dead trees between the coop and the row of pines. Getting rid of them is another step on my quest to tidy the ground around the coop and mow through here.
I will be shifting the blue tarp over and picking up the rocks and rubble that are underneath it.
Progress is happening faster now, but this coop is a journey not just of this year, but of most of my life.
I look back to 2018 when Matt’s Dad cleared the brush from this side of the barn, and I’m so grateful that he’s still hauling his chainsaws around and helping us. I think about building that doorway, mashing our hands in cement, and how Matt, Ellie and I are together still.
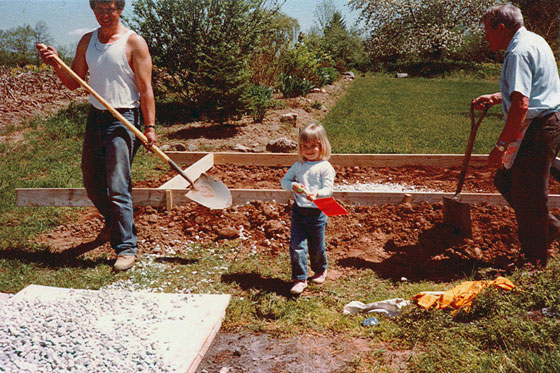
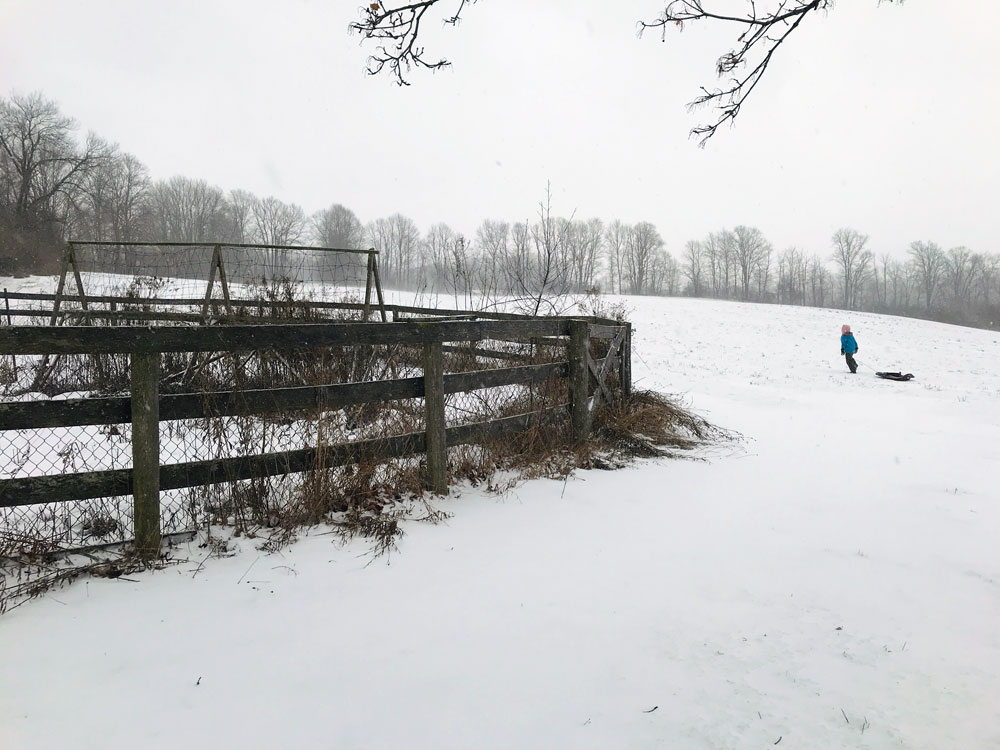
I go back to (I think) 1988 when I went on my first real job with my Dad. We installed a chainlink fence just like this one. Working with my Dad gave me the knowledge, skills and confidence to do things like build a coop (even if I didn’t feel like doing the fencing this time). Or I think of 1985 when my Dad got our first flock of chickens and gave me such memorable experiences that I now want to share with Ellie.
I love looking for the meaning within moments. This project, this place, the people. They come together in such a special way.
At the beginning of September my Mom asked me what the highlight of my summer has been. I picked three: our cottage vacation, Ellie learning to ride her bike and the coop.
Yes, the coop. Progress has been made.
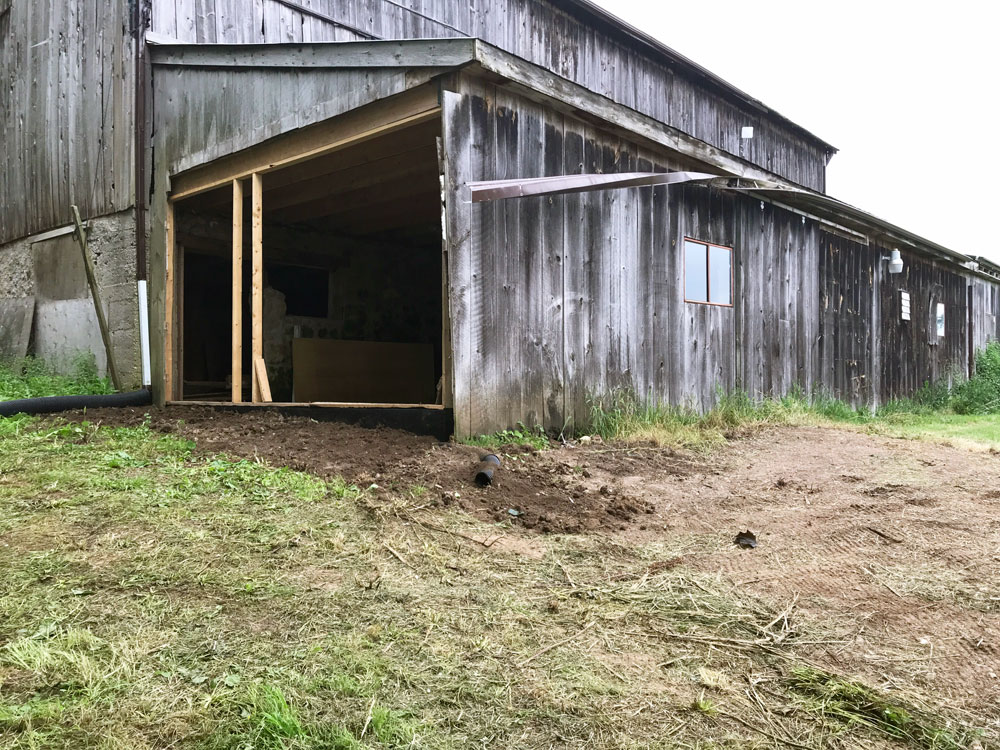
Here’s where we are at. For the first time in a year and a half we have a wall! For the first time in 13 years we can mow here!
The wall is the most noticeable change, but it’s only one.
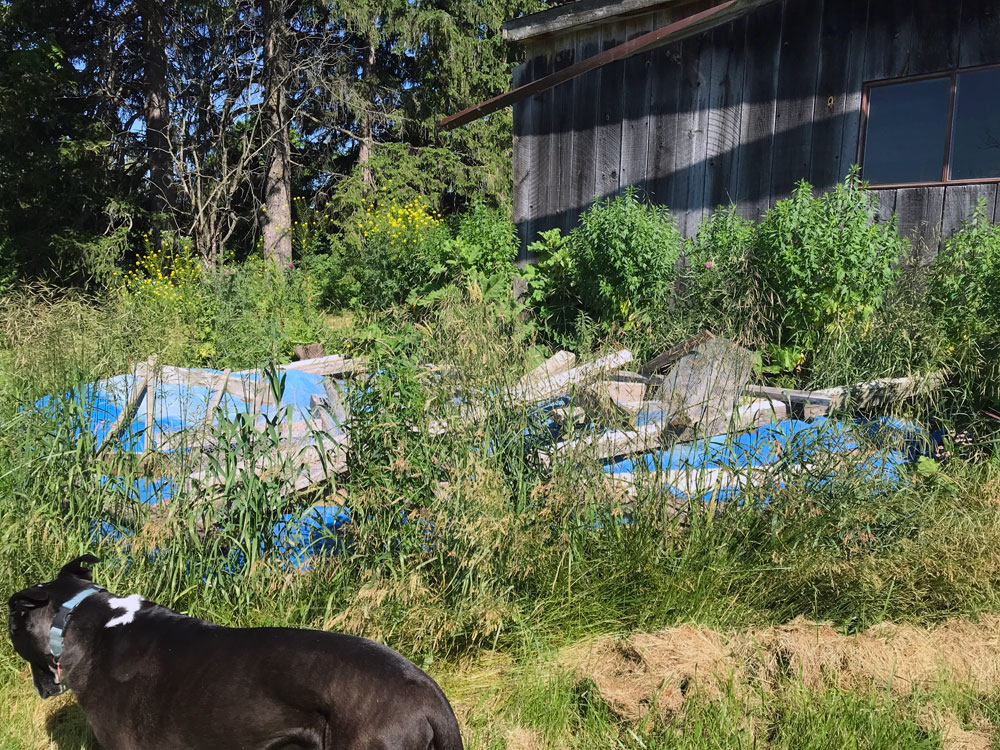
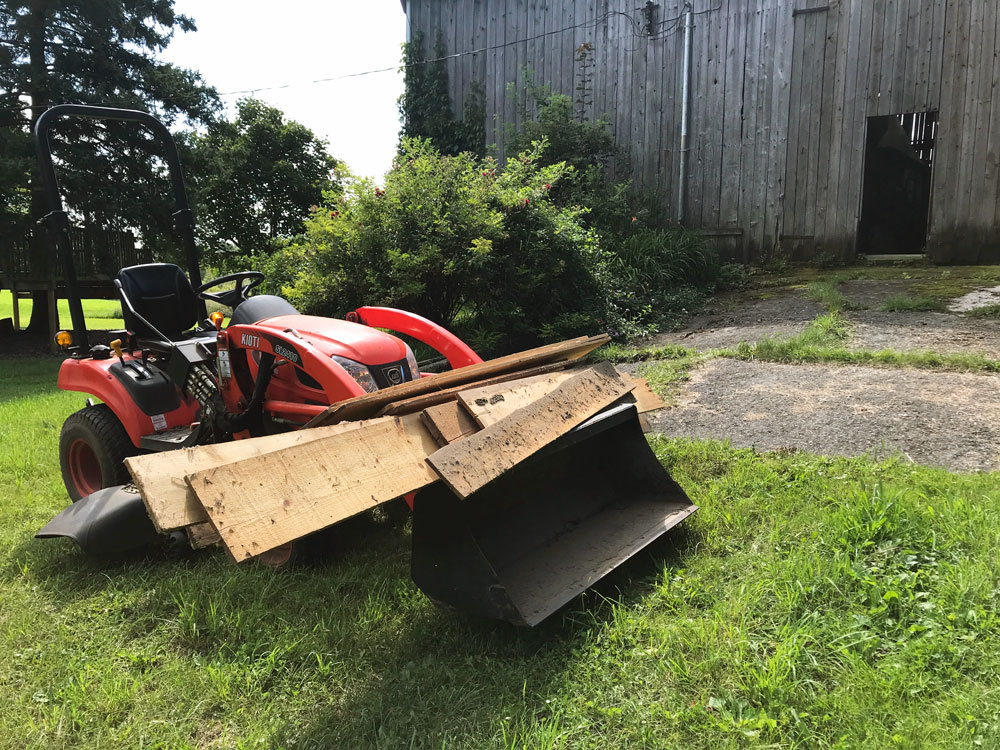
Another big task I tackled was grading the area around the coop. Behind the barn was a lumpy, bumpy mess of weeds on top of I-didn’t-know-what. I had covered it all with a tarp last fall, weighing down the tarp with a random assortment of lumber I’d saved when we demolished the old coop.
First step in cleaning up the mess was pulling all of the nails, staples, screws, mesh and chicken wire off the boards. That took a day and a bit. Once I moved all of the cleaned lumber into the barn, I could finally lift the tarp.
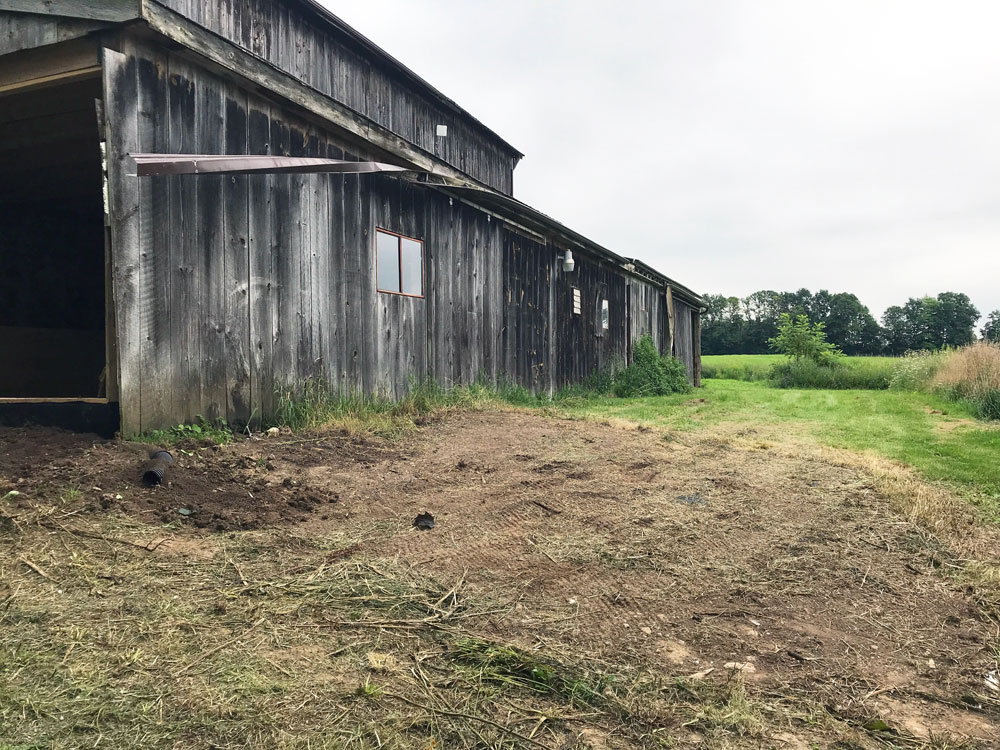
The tarp had killed the weeds so I could see what I was dealing with. The lumps and bumps turned out to be a pile of concrete rubble that someone had dumped behind the barn. They only missed the rock pile by about 10 metres. So Wiley the tractor and I got busy and picked up the rubble. Then I raked the ground to level it and seeded it.
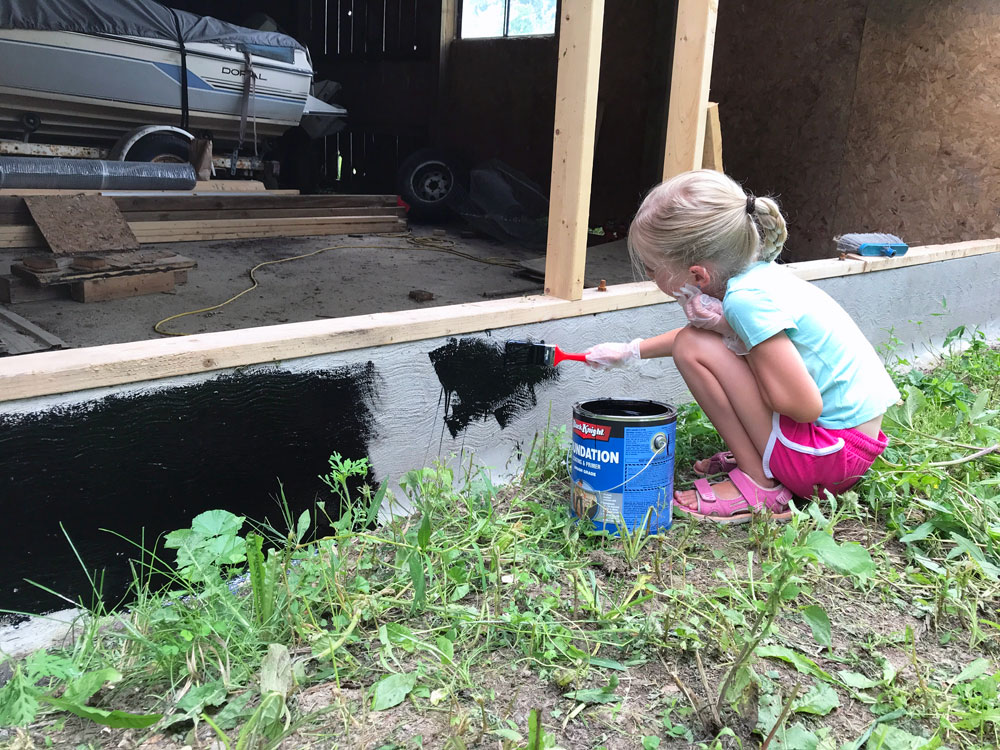
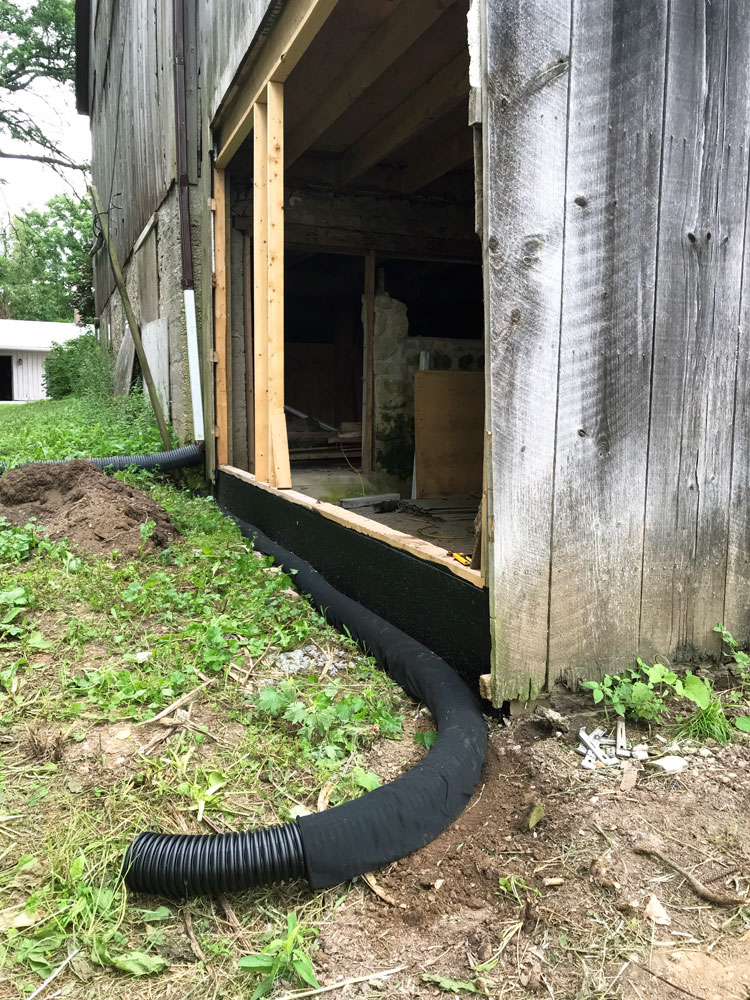
This allowed me to work my way around the side of the barn to the gaping hole where the coop was going to be. First step over here was to tar the new foundation wall we’d had built in the spring. Then I laid weeping tile along the wall and backfilled. Thanks to the barn’s newly level backyard, I could drive the tractor to the dirt pile and back without looping around the whole barn.
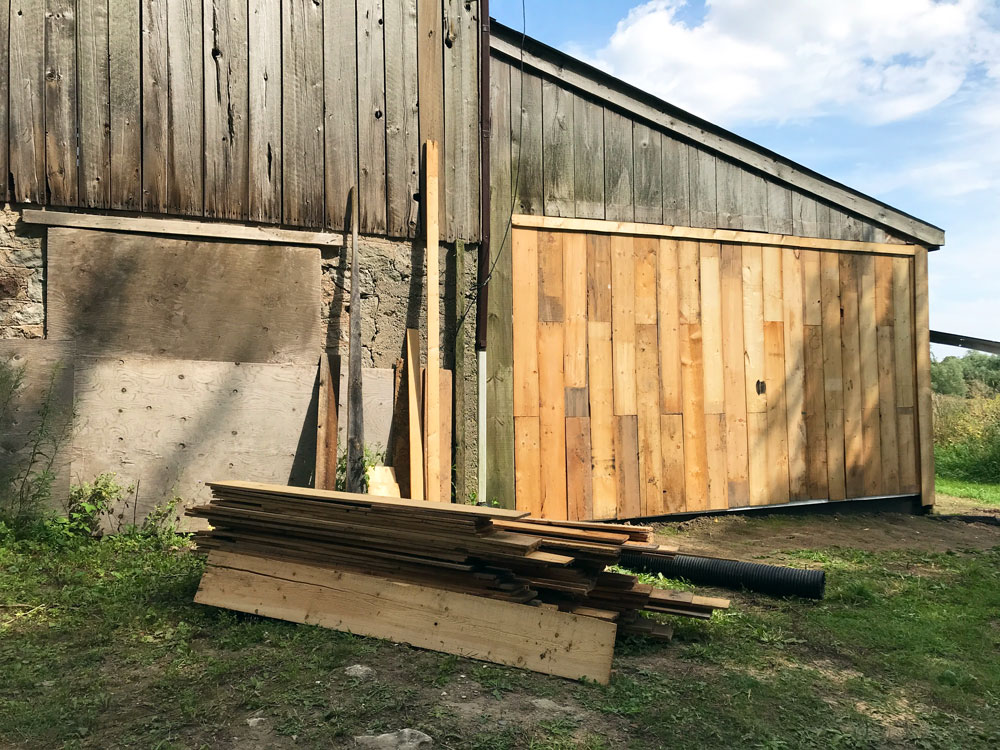
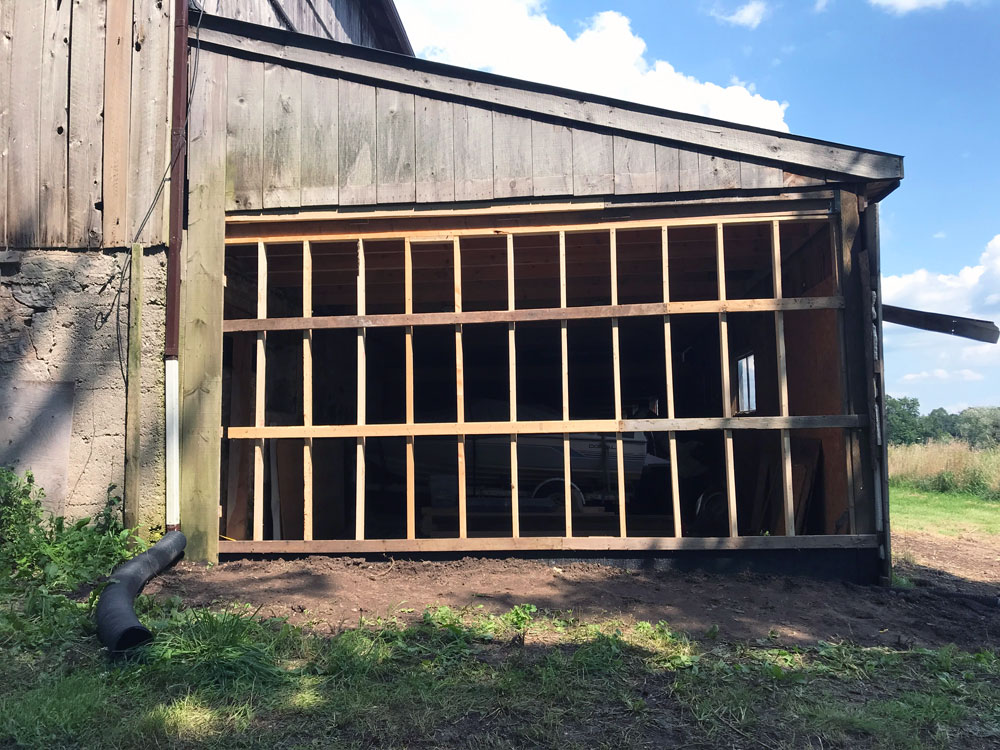
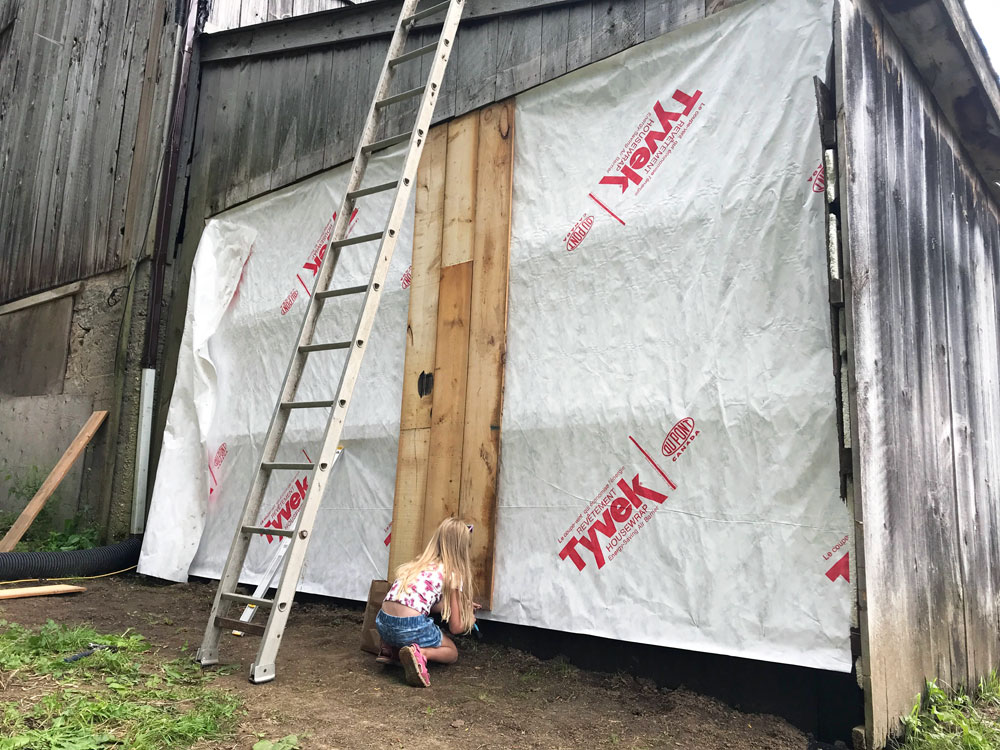
Finally I could focus on building the wall. The wall took a bit of figuring. It was a big opening and I was building it on my own. After I managed to get the top plate in place, it was smooth sailing from there. Studs went up, then backing for the siding, then house wrap, and then the siding itself.
Fortunately, past owners left us a huge stack of barn board siding, so I was able to use that. In fact, we still have a very large quantity left. I also took the opportunity to move the siding from its original storage spot on the upper level of the barn. I am trying to store all lumber in the basement of the barn, so Wiley and I went to work again and hauled all the siding around to the side of the barn, where it will be easy to carry into the basement.
With the wall (mostly) complete the barn is finally protected from the weather. I am also protected, as pretty much the rest of the coop will be inside work.
Inside work will be starting soon. First, I want to add battens to cover the gaps in the siding. Then I need a door and then I can finally start to build some pens that might someday hold some actual birds.
I also have some professional help coming to tackle some other coop/barn related projects. So more updates to come.
But today, join me in celebrating the coop, won’t you? I am super proud because not only are we making progress, but so far I’ve done it all on my own. (Although you can see Ellie’s been involved as well.) It makes me feel capable and strong to know I can do this and see this long-held dream starting to come together.
What’s been the highlight of your summer? Anyone else working on a multi-step or large project? Do you take the opportunity to tackle other jobs (like moving siding, cleaning up rubble) while you’re working on a related project?
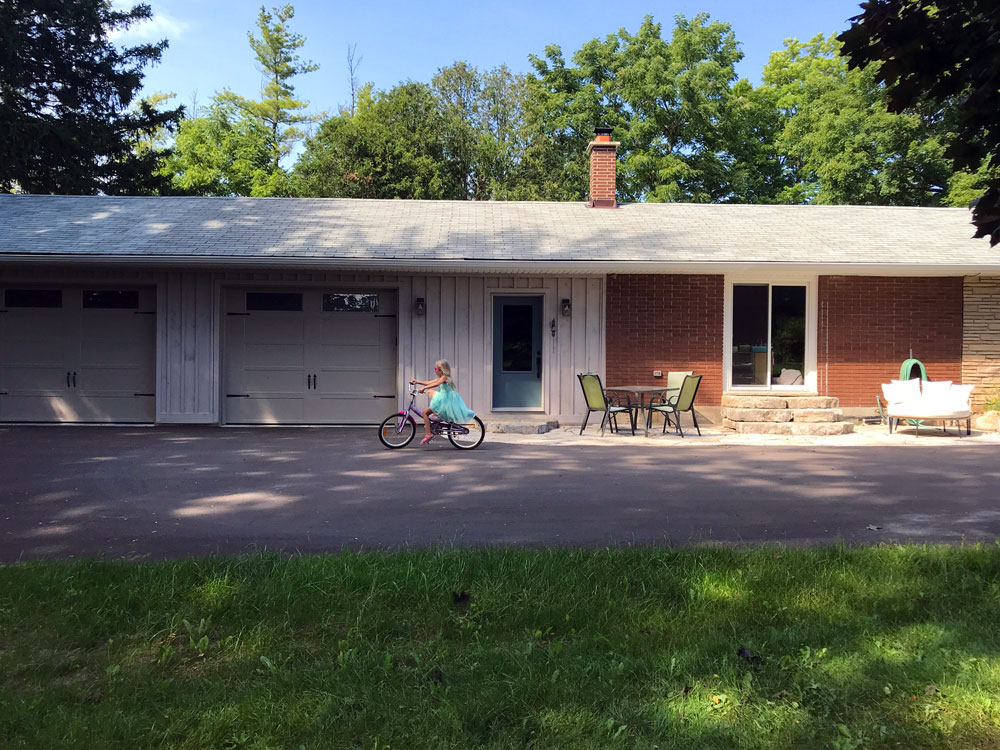
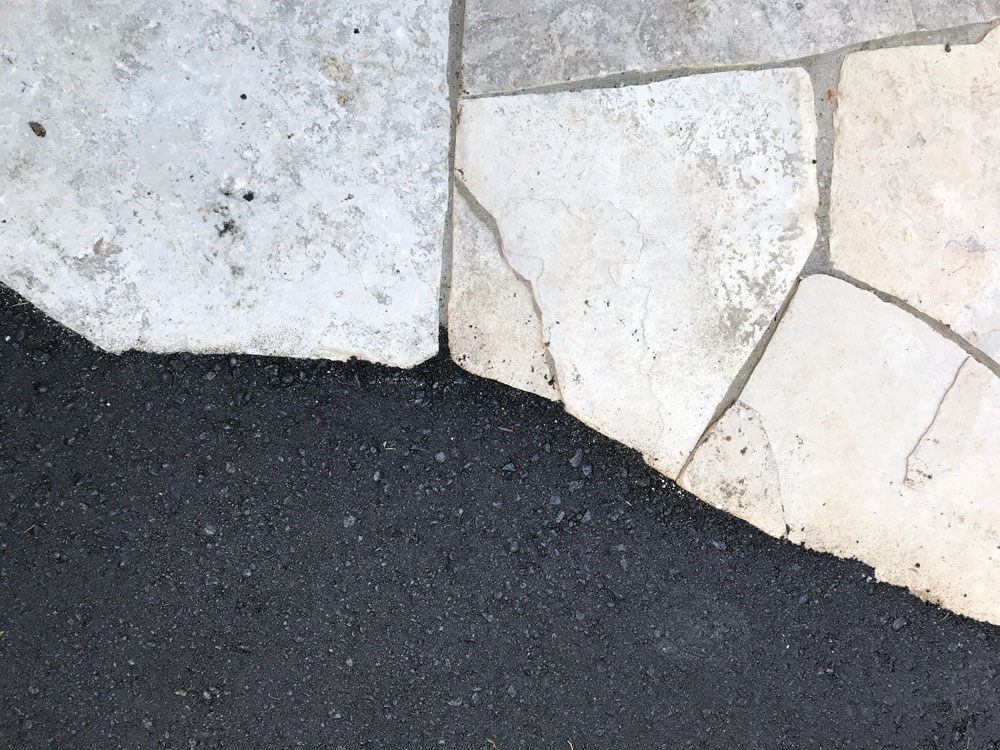
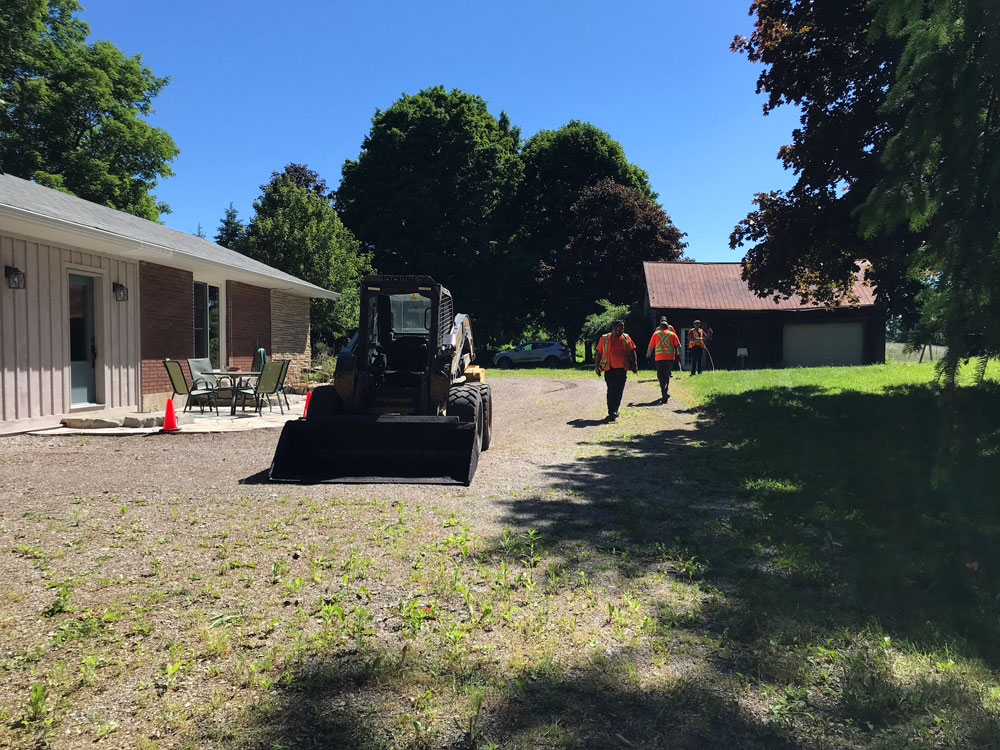
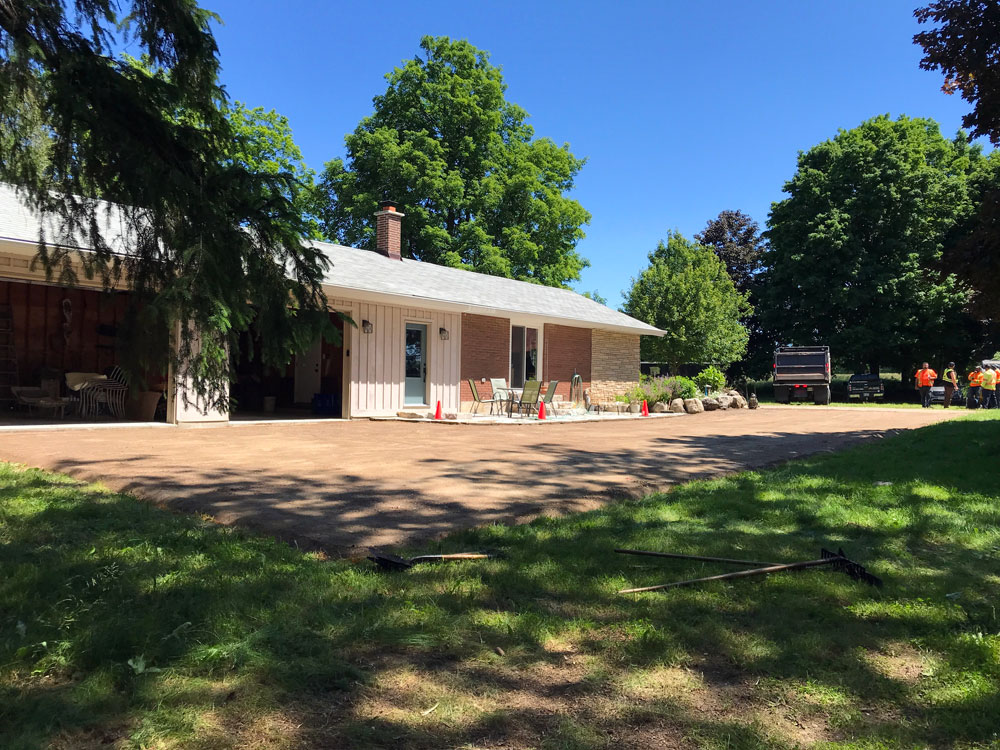
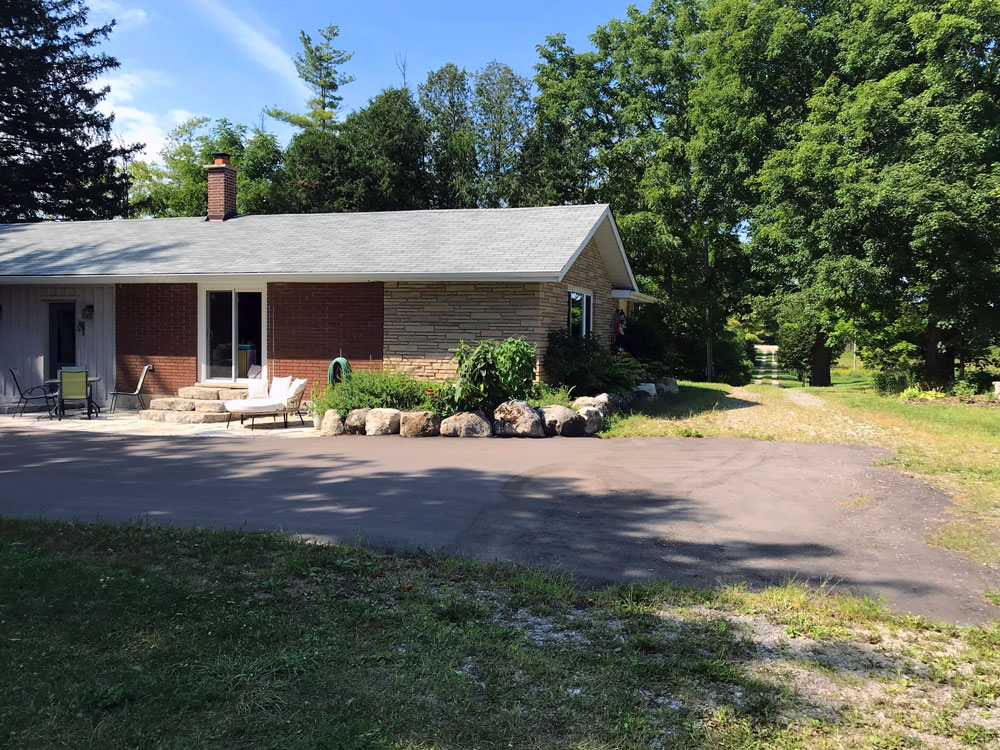
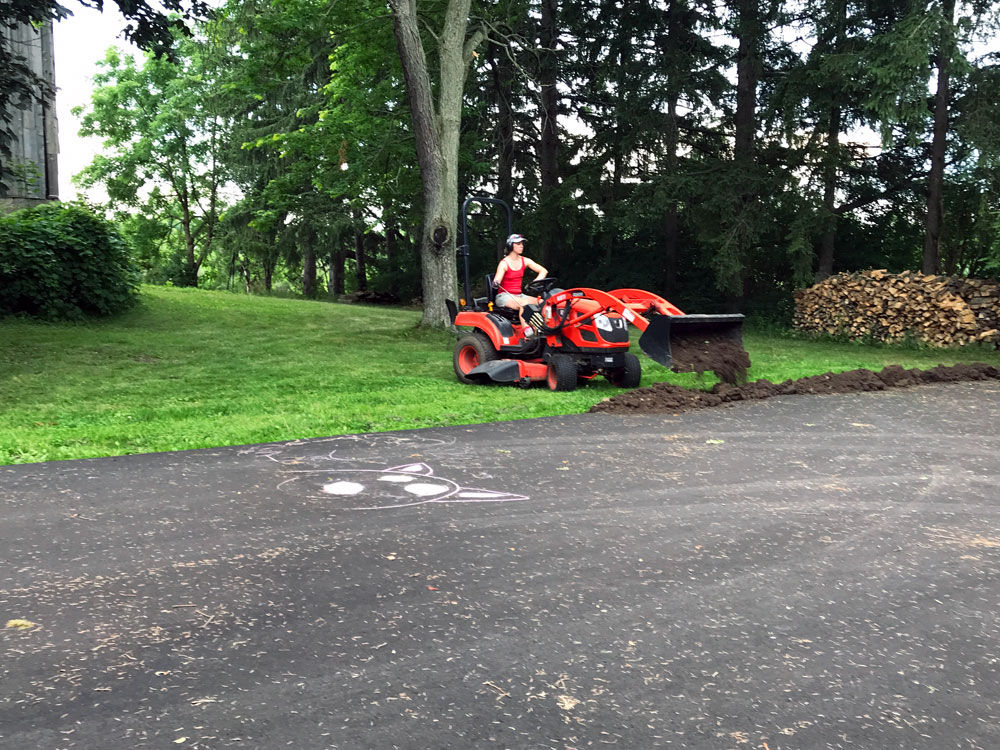
Hello. Happy September. I hope you’ve had a great summer. Our summer has been wonderful and full. I have updates to share. First up is the final part of our garage/mudroom/patio makeover: the driveway. The last step of this project is finally complete. The driveway is paved.
When I started the garage renovation in 2021, I didn’t fully consider how one project leads to another. We had a great garage and mudroom inside the house, but what about the outside? The patio finished off one section and gave us steps to the living room’s sliding glass door and the mudroom entrance. But I really wanted to pave the driveway too.
A long driveway was on my initial wishlist for the farm and I love our gravel laneway with the grassy middle, so there was no way I was touching that. But a bit of asphalt closer to the house accomplished a couple of things for us.
It made plowing and shoveling easier in the winter. Gravel is not fun to shovel, and it’s even less fun to rake out of the grass once all the snow melts.
It gave Ellie a smooth place to play. Scootering, bike riding and chalk drawing all work much better on asphalt than gravel.
It lessens, somewhat, the dirt and detritus that is tracked into the house.
It stabilized the edge of the patio.
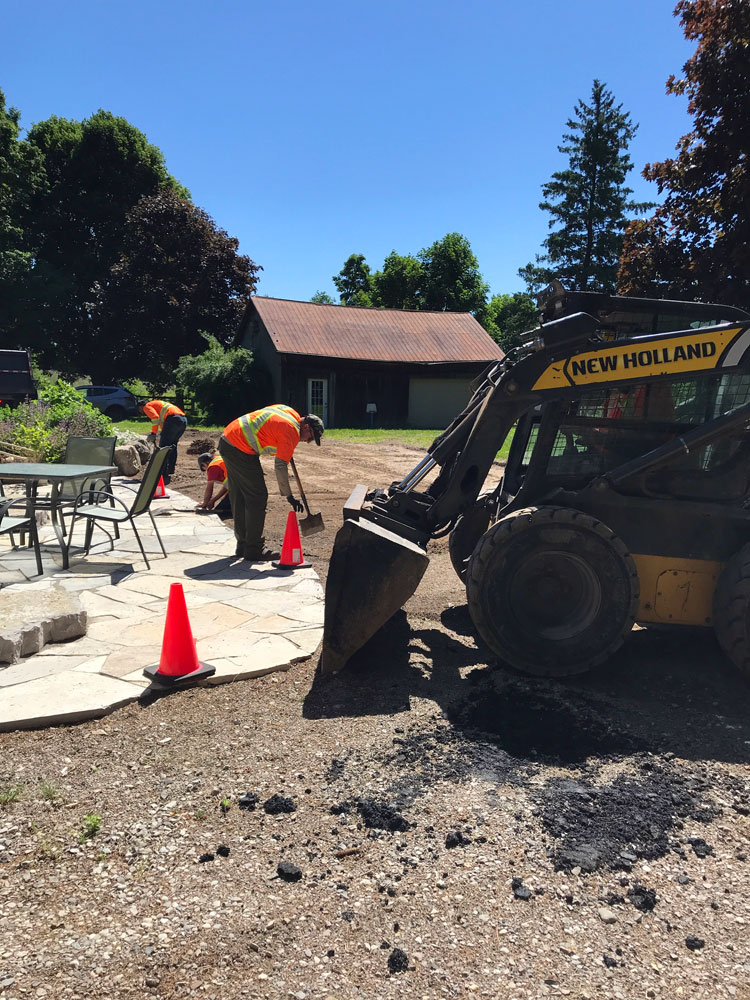
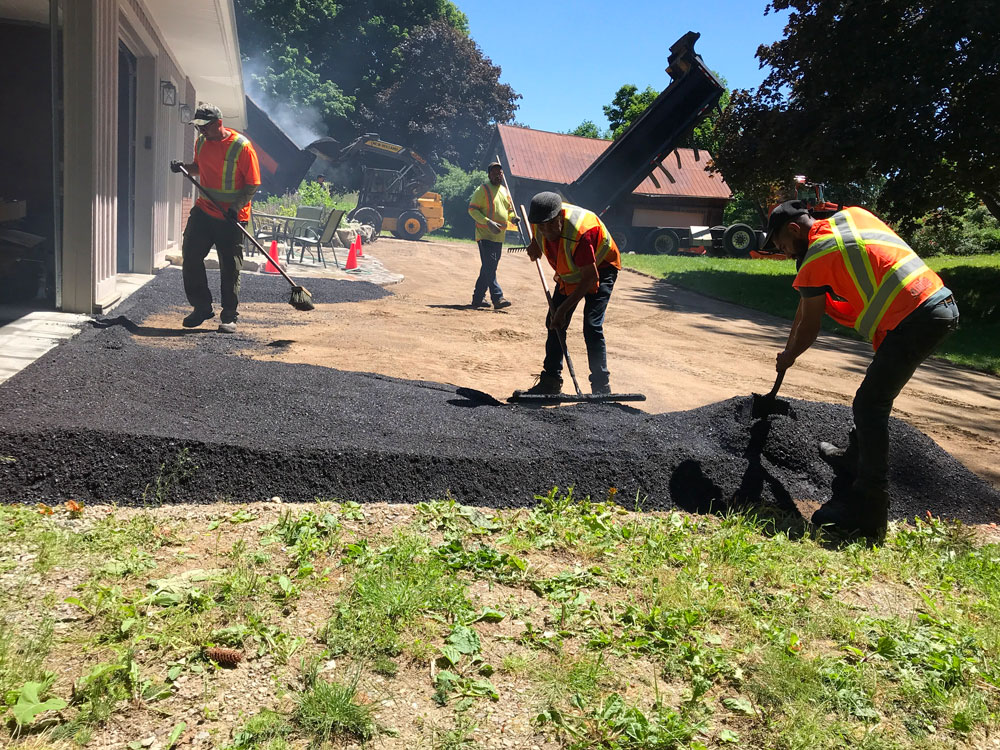
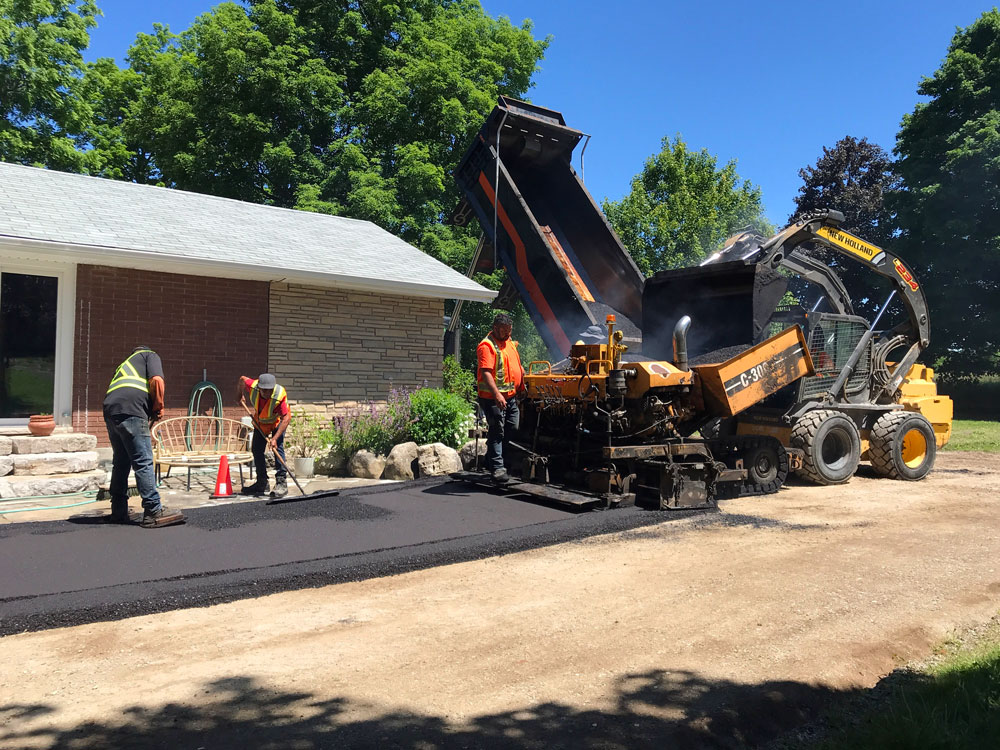
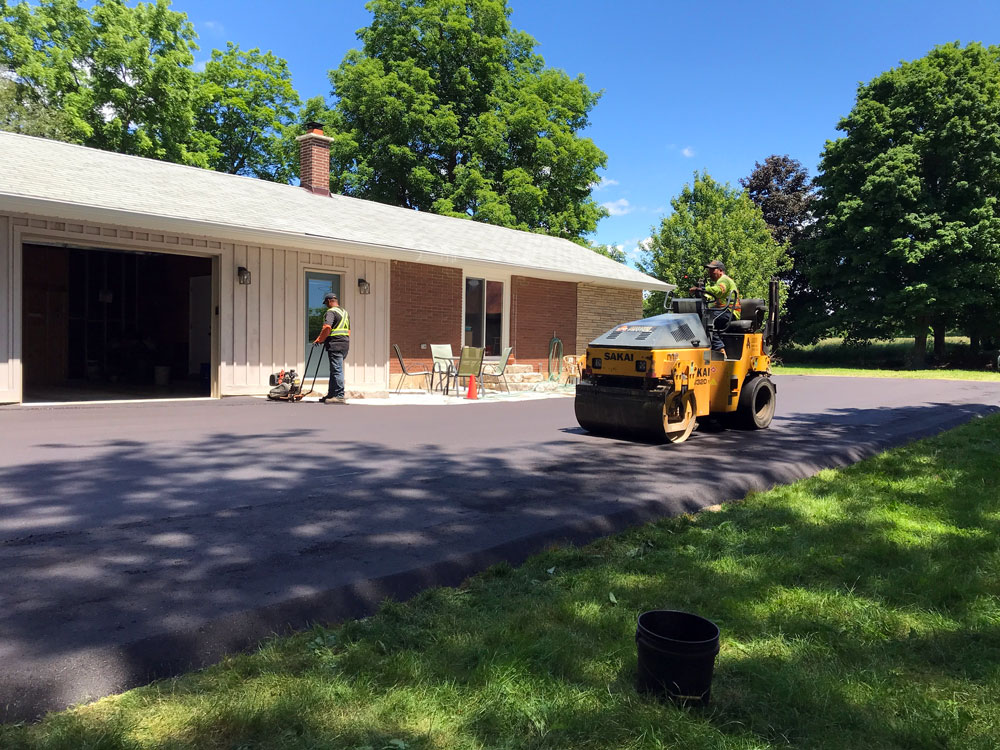
So this spring I hired some pavers (Alliance Paving for any locals). They cleaned up the gravel (so many weeds had invaded), mapped out a square driveway (the original had been dug on the fly by a skid steer with very little measurement), graded everything (more gravel on top of the 250 tonnes we added during the garage reno) and laid fresh asphalt.
I decided to pave from the spice garden to the edge of the garage. The corner where the driveway section meets the lane was a logical stopping point.
This gave us plenty of room to pull in and out of the garage. It also gives a long runway for Ellie to ride, run, roll or rain dance.
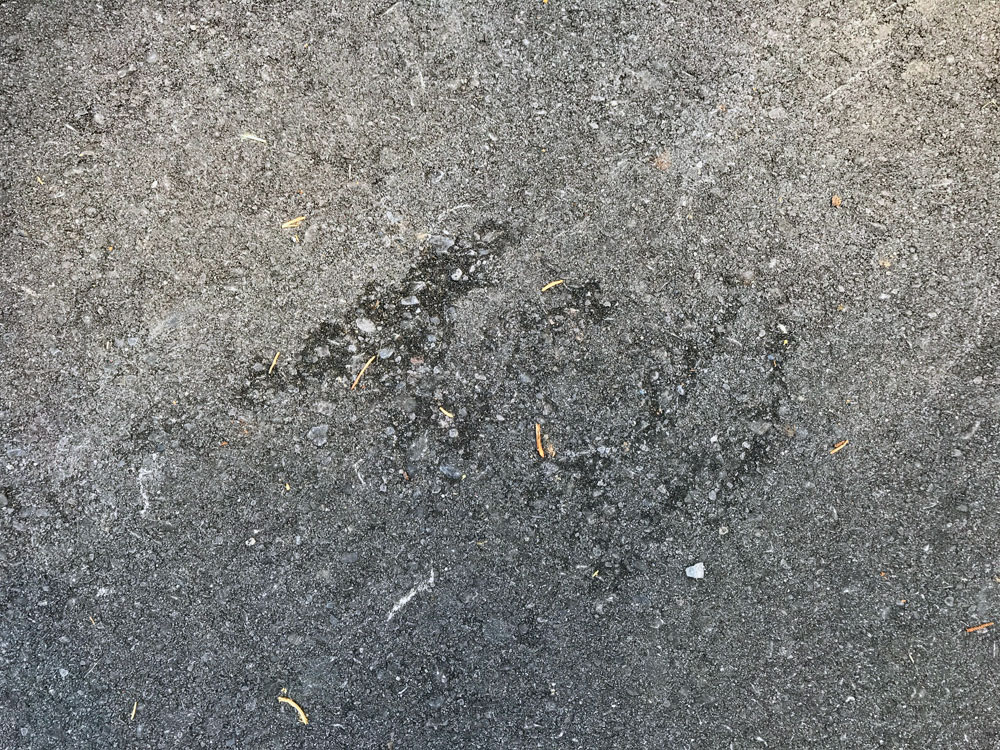
One lesson learned, we paved when the weather was very hot. We did not drive on the driveway for a full week (longer than our contractors recommended), but the asphalt still wasn’t fully set and we have some scuffs and divots in the surface already. Some are from turning the car wheels as I back out of the garage. A couple are from Ellie’s bikes. They’re minor and I’m not upset about them, but when we pave again, I’m going to wait until fall when the weather is cooler.
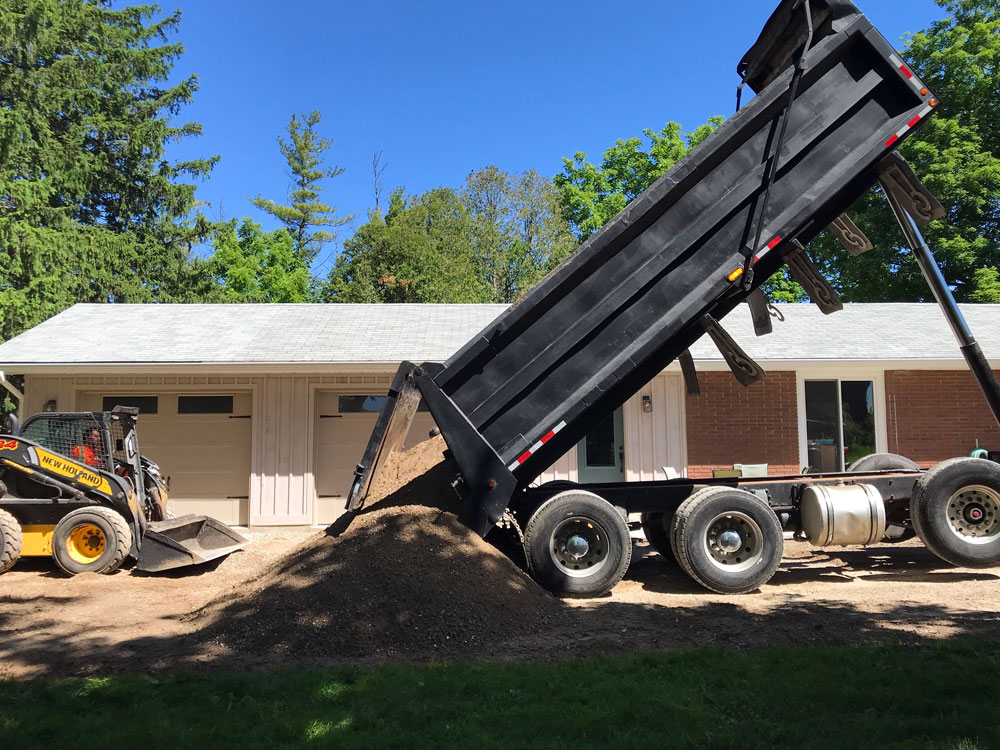
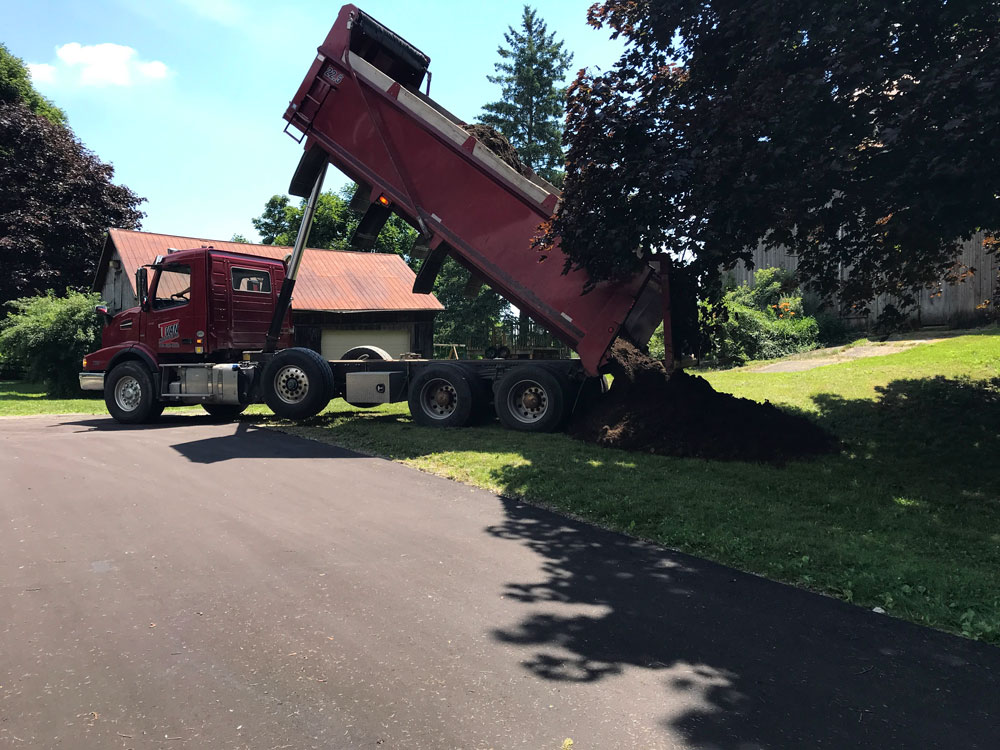
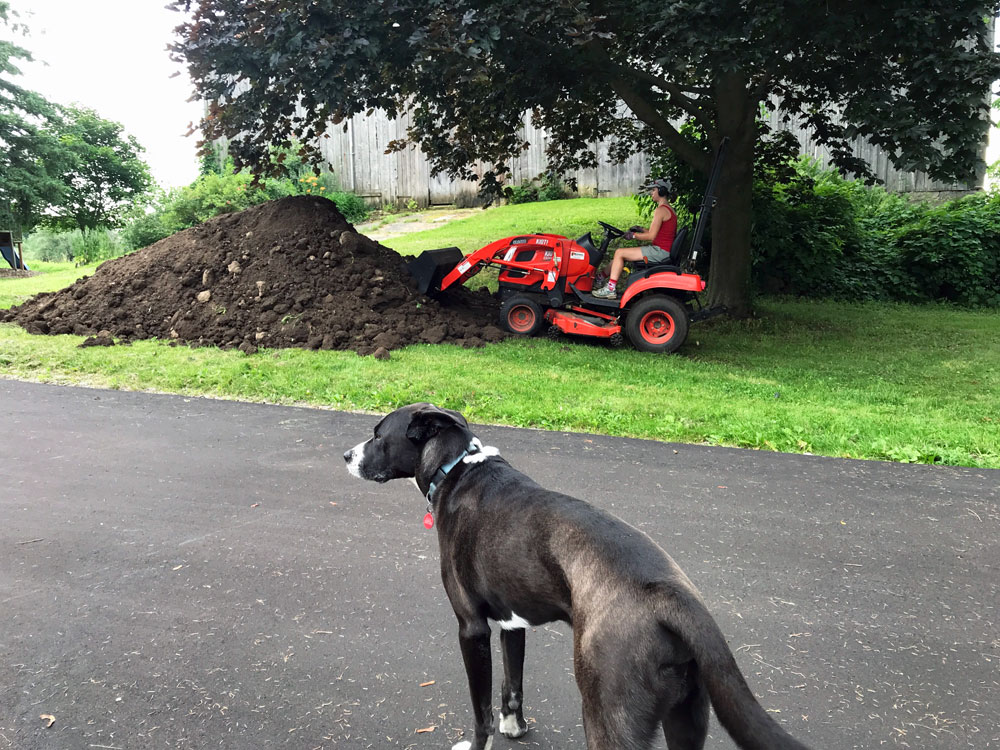
The surface of the driveway ended up several inches above the lawn, so our pavers recommended building up the dirt around the edge. Our farmer arranged for a truckload of topsoil (another dump truck, yay), and I spent a few days on the tractor spreading it around. Ellie followed behind with grass seed.
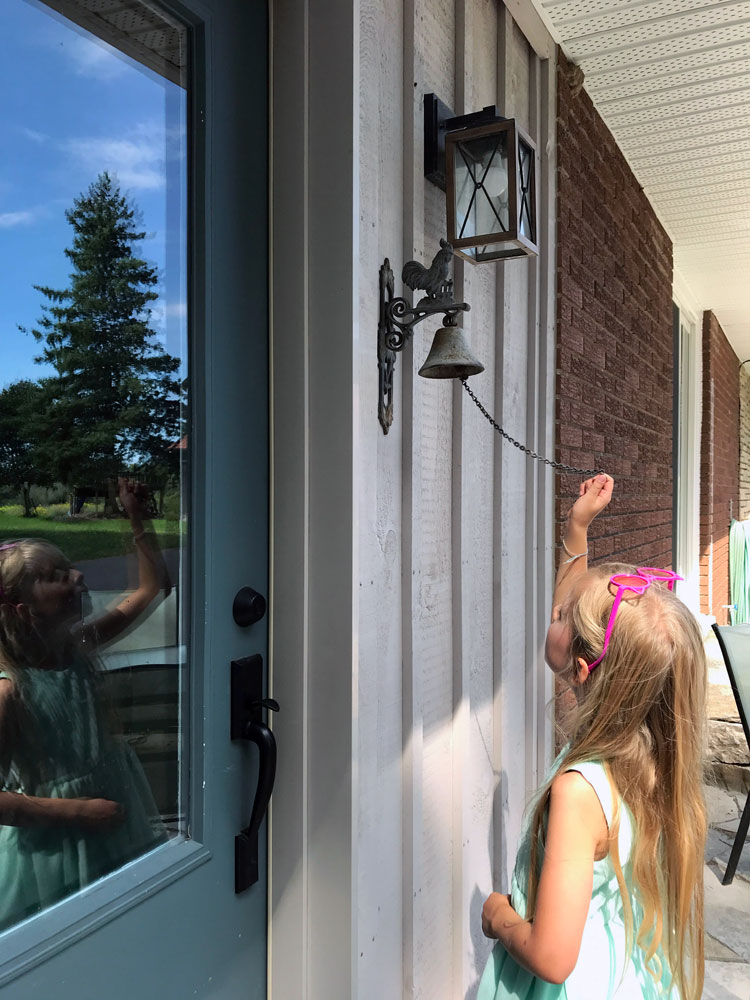
The grass has now sprouted. I added a doorbell (it used to be at the front door, but it kept falling off the stone). And this project–the whole garage/mudroom/patio/driveway renovation that we started 3 years ago–is complete.
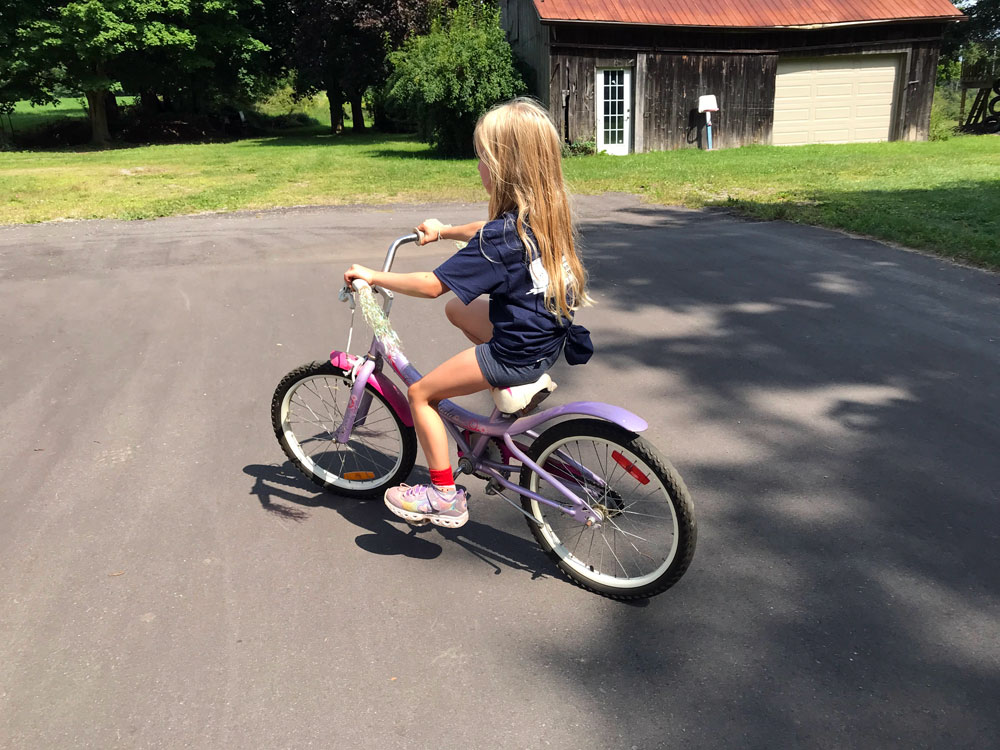
(It’s also been the site of a major milestone when Ellie learned to ride her two-wheeler this summer.)
Have you had any big projects or milestones this summer? What kind of driveway do you have? Do you have any projects that continue longer than you expect?