Garden Dueling DIY Week 2

Sarah in Illinois and I have entered into a friendly competition this spring to help us get our gardens in shape. We’re now at the conclusion of week 2 of this Dueling DIY. (Week 2 already, yipes!) Sarah is here today to share her first official update. You can check out all of the previous posts here.

Lots of rain and cool weather has continued here, and I was running out of time to work on this week’s challenge. I was getting nervous because I could just picture Julia having beautiful weather and getting ahead of me. (Ha-ha-ha. Be afraid, Sarah. Be very afraid). I was able to do a second till of the garden Tuesday before another round of rain came through, but that was as far as I had gotten.

However, the forecast called for perfect weather Sunday, and I had a list a mile long to work on. Of course at the top of the list were projects on our challenge. I can’t mark very much off of the list yet, but I sure got a great start.

The first thing I did was divide up my two big mums and spread them around the deck.

Splitting mums

I was easily able to make 7 different clumps of plants. I dug holes and planted them and watered them well.

Transplanting mums

While I was doing that, Steve changed the oil and put new blades on the mower. Then I mowed while he tilled the garden for the third time and then we decided where our “annual garden” would go.

We made a few first passes over then new garden, but I still have to make some type of borders and plant it.

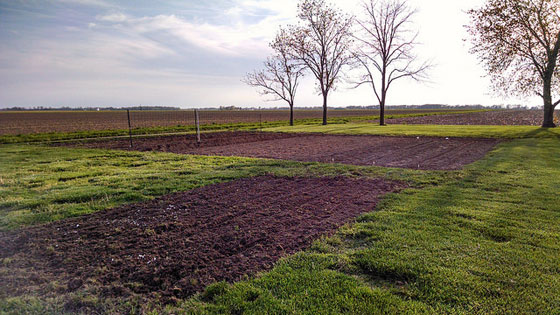
The foreground is our new bed for plants that won’t get tilled up every year such as strawberries and asparagus and in the background is our yearly vegetable garden. You can see the fencing ready for the cucumbers and sugar snap peas. And in front of it is the hill for our row of potatoes.

Tilled garden

The beautiful weather also meant it was time to bring out our deck furniture from the barn. I got everything scrubbed and hosed off. I let it all sit in the sun to dry and then we set it up on the deck. We finished our hard day of yard work with brats and shish-kabobs on the grill and ate it outside on the deck. It was a perfect end to a perfect day.

Despite all of that hard work I was only able to check one thing off of my challenge list:

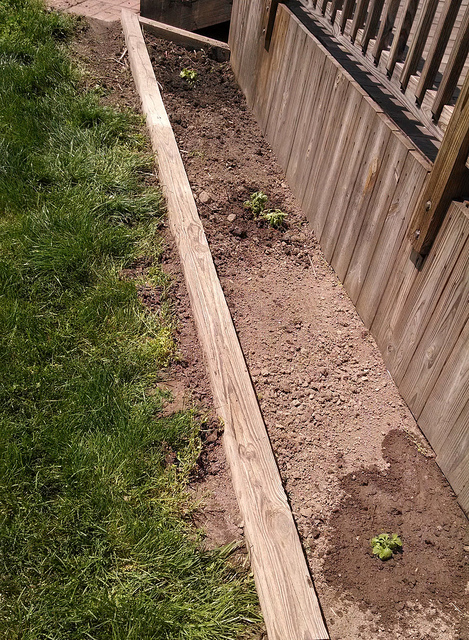
  • Make some kind of designated area (possibly raised bed) for perennial vegetables such as asparagus and strawberries.
  • Neaten, and define north flower bed and add mulch.
  • Divide mums and spread around deck
  • Make a designated gardening area complete with workbench.

It may not look like much was accomplished, but I am setting myself up for the kill! So how was your weekend, Julia?

Oooh. See how she throws in that little jab at the end? We’re pretty much tied up right now. Sarah and I have each officially crossed just one thing off our lists. However, I have big plans for both Matt and me this coming weekend. Watch out, Sarah.

Sprouts

Sarah in Illinois will be sharing her update in our Dueling DIY gardening challenge later this week. I couldn’t help sharing a small–very small–garden update of my own today.

We have sprouts!

Watermelon sprouts

Two of the seeds we planted last week have sprouted. These are sugar baby watermelons.

There are 36 little soil pellets in this container, so we have a lot more sprouts to go. And we have a long way to go until the garden is ready for these sprouts. Dueling DIY continues.

Do you have any sprouts at your house? Have you ever used pellets like this before? (This is our first time). Any watermelon growing tips?

Nesting instinct

We have a new tenant at the driveshed.

It took about a dozen false starts, but a robin has finally managed to construct a nest.

The start of birds nests at the front of the driveshed

Robin's nest

The streamers of grass waving over the door track caught the building inspector’s attention. Matt gave her a boost so that she could check the construction up close.

Ralph inspecting the birds nest

The mud wasn’t dry, but the robin got a pass nonetheless.

Robin's nest

Now she just needs to move in and start her family.

Is anyone constructing a new house where you are? Or do you have any birds sitting on nests? Who’s your building inspector?

Garden Dueling DIY Week 1

Fire in the field

In this Dueling DIY garden challenge, I am on fire. Literally.

These were my jeans at the end of Saturday.

Burned cuffs on my jeans

And this was the back of my neck at the end of the weekend. Ow-ee.

Sunburned neck

If you’re new to this Dueling DIY series, Sarah in Illinois and I are undertaking some friendly competition to help us get our gardens in shape this spring. You can check out all of the previous posts here.

Now, if you look again at that top picture and squint through the smoke, you might notice that the fire is some ways away from the garden itself–that big round thing with the fence around it.

Fire in the field

Blame it on my pyromaniac tendencies. Blame it on the other outdoor task on my 2016 Home Goals list–general property cleanup. Blame it on the first nice weather of the year. I got a little bit distracted over the weekend.

I cleared a stack of about a dozen incredibly heavy metal siding panels that had been hiding in the weeds on the south side of the garden.

Sheets of metal siding

Wiley and me moving the siding

Then I cleared the weeds themselves–using my preferred method of fire.

Burning weeds in the south field

Burning weeds in the south field

I cleared a very large pile of lumber at the edge of our centre field–and lit some of the really punky stuff on fire. (I might have a problem).

Lumber pile at the edge of the field

Field after clearing the lumber pile

I cleared a stack of old fence posts beside the driveshed.

Pile of old wood fenceposts

I’ve moved these fence posts once before, picking them up from where they were scattered around the property and tucking them behind the driveshed. I had to remind myself a couple of times that I had moved them before, and I could move them again.

Moving the fenceposts

These things were heavy. The very last one was the girth and almost the length of a telephone pole–not even close to a fence post. Example 8,694 of why I don’t need a gym membership.

Moving the fenceposts

But I digress. All of these clearing tasks do actually have something to do with the vegetable garden.

The fence posts are going to become the “curbs” around the outside of the garden and the raised beds.

Some of the lumber from the field is going to be trellises for the tomatoes and stakes to hold the curbs in place.

The metal T-posts that were mixed in with the lumber pile are going to be the trellises for the raspberries.

So my big accomplishment in this Dueling DIY is that I have amassed all of my materials. A whole lot of materials.

Materials for the garden update

My other accomplishments are on the non-heavy lifting side: I ordered seed potatoes and grape vines, and we’ve started some watermelon, tomato and pepper seeds inside.

Here’s my original to-do list that I shared last week. I can cross just one thing off.

  • Hang the gate
  • Edge the garden
  • Build raised beds around the perimeter
  • Build trellises for the raspberries, tomatoes and squashes
  • Start a few seeds indoors
  • Till in the ash, straw and manure currently spread over the garden

But here’s how I’d calculate my scorecard so far:

  • I cleared the weeds from a space roughly equal to the size of the garden. Maybe this means fewer weeds to go to seed and infiltrate the garden itself.
  • I am prepped–and stocked–in the garden materials department.
  • I moved a telephone pole all by myself–in fact the equivalent of several telephone poles if you put all of those fence posts together.
  • And I lit myself on fire.

Beat that Sarah.

Thanks to everyone who shared their garden/spring to-do lists last week. Please share your progress. How is your spring project coming? Are there any pyromaniacs out there? Who else gets distracted from the primary project? What are you working on in your garden?

Surprise pussy willow

Growing up, an elderly lady lived next door. She couldn’t take care of her gardens very well, so things ran a bit wild. At the very back of her yard at the end of one of the overgrown flowerbeds was a huge pussy willow bush.

I loved that bush and its unique fuzzy flowers. And I’ve always wanted a pussy willow of my own.

This year I think I might have one.

What looks like a pussy willow is growing in the creek alongside the driveway.

Pussy willow

Pussy willow

Pussy willow

The flowers–can I call these fuzzy things flowers?–are perhaps a bit sparser than the pussy willow of my memories, but other than that they look the same.

Anyone know if I can transplant this from the creek? I’d like to put it in one of the flowerbeds that are closer to the house.

April 2

April 2 has become my barometer of how spring is going to go.

The first year we moved to the farm, the forsythia was blooming on April 2. It hasn’t been that early since.

Each year I take a photo of the forsythia on April 2 and try to evaluate how long until we see blooms.

Given the mild winter we had this year, I’m thinking the forsythia might be close, but so far there’s no sign of the yellow blossoms.

You might recall that the past two years haven’t been great for our forsythia. The yellow blossoms have been few and far between. I gave the bushes a pretty vicious pruning last spring in the hopes that it might encourage some new growth.

We have what I think might be a few buds. And you can see where I hacked off the woody stalks.

Forsythia buds

Things were looking a little green around the farm, but then we got a dusting of snow Saturday morning.

Forsythia early spring 2016

It had mostly melted by afternoon, but then we got several inches of snow Saturday evening and more snow rolled in yesterday afternoon, so we’re back to winter now.

Forsythia bushes covered in snow

Looking at the pictures from April 2 going back to 2012, the snow rather than the forsythia tells the story of what kind of winters we’ve had.

Collage of forsythia through the years

Just a week ago, the forsythia was coated in ice, thanks to the ice storm.

Ice covered forsythia blossoms

So far, this spring has been very up and down. I’m not making any predictions of when the forsythia will actually bloom.

What’s spring been like where you are? What signs of spring are you watching for?

Icy Easter

Hello. How was your weekend? Did you have a good Easter?

Our Easter weekend ended up being extra long thanks to an ice storm that rolled through our area on Thursday. The storm closed both Matt’s and my work and turned off our electricity for 9 hours.

By Good Friday, the freezing rain had stopped, but temperatures had not risen, and a thick coating of ice covered everything.

Spring ice storm

Spring ice storm

Spring ice storm

Just days into spring, and our lilacs had their new green growth encased in ice.

Spring ice storm

The ground was covered in ice chunks from the trees and bushes.

Spring ice storm

Icicles dripped off the back of the bird feeder and at the front there was a steady queue for the only food available.

Icicles on the birdfeeder

In the garden, icicles hung from the top fence rail and the chainlink was augmented with its own icy shield.

Spring ice storm

Fortunately, we didn’t have much damage. The worst was losing just a few branches off the pine trees.

Spring ice storm

The weight of the ice is incredible. Normally, we can walk easily under these branches that are touching the ground.

Spring ice storm

Down the driveway, more branches overhung far enough that Baxter could reach them.

Spring ice storm

Temperatures finally started to rise on Saturday afternoon. Ice slid off the roofs and the cars in sheets. Slowly the branches returned to their usual heights as the trees shed their icy casings, shards shattering into the ground.

By yesterday, Easter Sunday, the farm was back to normal.

What was the weather like where you are? Did you do anything special this weekend? How did you celebrate Easter?

Sweet times on the farm

I looooove maple syrup. Growing up, every spring my parents went to a Mennonite farm and bought gallons of pure maple syrup. Then they put it into containers and froze it, so we had it for the whole year. It was always a sad day late in the winter when we ran out of syrup.

Sorry, Aunt Jemima, you’re just not for me.

You can imagine how excited I am to be making our own maple syrup this year.

We jumped right in to tapping our trees with little thought to how we’d transform the sap into syrup. A lot of what I saw online talked about evaporators or cauldrons over fires. Pretty much everything said, “Do not boil sap indoors.”

We have neither an evaporator nor a cauldron, however. Nor did we have a ton of sap, so Matt and I threw caution to the wind and decided we were going to boil our sap inside on the stove. Daring, I know.

We selected some large pots–including our big roasting pan, dumped in the sap, set the burners to high and turned on the exhaust fan to suck out the steam. And you know what? It totally worked!

Boiling sap on the stove to make maple syrup

On an average evening, we found about 12 litres of sap was a good quantity. It fit in our pots easily and didn’t fill the house with too much steam. After boiling for about 3 and a half hours, the sap had transformed into syrup.

At first we just judged by colour and flavour, but Matt progressed to measuring the temperature. He found online that 218ºF (103ºC or so) was the magic number.

Tip to anyone who wants to try making syrup indoors, we used the soup pot as a finishing pot and transferred the sap from the roasting pan into the soup pot for the last half hour of boiling

Boiling sap on the stove to make maple syrup

The ratio for sap to syrup that we found online was 40:1, and that was our experience too. 12 litres (12,000mL) of sap made about 1 1/2 cups (375mL of syrup).

This picture shows another neat thing I’ve learned about syrup. I knew it came in different grades or colours, but I thought it was just the amount of boiling time that determined what grade your syrup was. It turns out it’s early versus late in the season. The jar on the left is from our second boil, and the one on the right is our fourth. See how the colour is subtly darker in the older syrup?

Homemade maple syrup

An aside about these old Crown canning jars. How perfect is the made in Canada label?

Homemade maple syrup in a Crown canning jar made in Canada

I’m loving having maple syrup again. It’s sweetened a lovely pumpkin soup, made a beautiful golden topping on vanilla ice cream (one of my favourite ways to eat it) and of course added just what was missing to my favourite meal of the day, breakfast.

Homemade maple syrup on French toast

I’m trying to be a bit frugal and not eat it all at once. We already have two full jars in the freezer, so I’m hoping to remember my childhood and make it stretch as long as I possibly can.

Are there any other maple syrup snobs out there? Have you ever made your own syrup? Any tips to share–whether for inside or outside boiling? Do you have a favourite maple syrup recipe?

Getting sappy

We have a new project for these last few days of winter. We’re tapping our maple trees!

Tapping maple trees

I picked up a basic starter kit at the hardware store. It came with five buckets, five lids and five spiles.

Backyard maple syrup kit

Thankfully the kit also came with instructions on how to get started. We selected trees that were the right size, drilled holes, stuck the spiles in, and watched the magic happen.

Tapping maple trees

The sap started flowing as soon as we drilled the holes. Matt was impatient saying, “Stop taking pictures! We’re wasting sap!” (Picture Kermit arm flailing). The maple syrup has totally turned into Matt’s thing.

Tapping maple trees

The spiles, buckets and lids all hook together in a pretty simple system. The sap travels up the tree, into the spile and then drips into the bucket.

Tapping maple trees

Tapping maple trees

Tapping maple trees animated gif

The sap run this year hasn’t been terrific. Last week temperatures shot up, and I had high hopes for a a lot of sap. However, the temperatures were so high that even night was above freezing. Apparently cold nights are critical for sap.

However, we have had a few good days where Matt had to empty the buckets several times.

Tapping maple trees

To collect the sap, Matt takes my biggest stock pot outside and empties the buckets into the pot. Then in the house we strain the sap to get out any dirt or bugs or twigs and put it in big containers in the fridge until we’re ready to move on to the syrup stage–which I’ll talk about in my next post.

Have you ever tapped trees? Are you trying anything new this time of year? What’s your big spring project?

Irises

This is going to be our third summer on the farm. Our flower gardens are finally looking like gardens, not just random plants stuck in a big expanse of dirt.

Gardening takes work and it takes patience, but oh it pays off. It totally pays off.

The ferns that I transplanted last year have all sprouted, we’re going to have a ton of peonies, and our irises are amazing.

When I was growing up, my parents had some beautiful irises in their gardens: blue, peach and dark purple. When I was setting up the gardens here at the farm my parents were taking out the last of their irises–the purple ones–and they gave me a bunch of plants. The stalks have taken root and they’re blooming prolifically. I love the frilly showy blossoms.

Dark purple iris

Iris from above

Out on the turnaround, one particular plant has given us two-tone blossoms. Light purple on a couple of stalks and dark purple on the rest.

Light purple and dark purple irises

Close up of a purple iris

I especially like the purple veins of the buds.

Iris buds

You might recall that the farm came with a whole bunch of plants still in their nursery pots. Last year, I finally stuck them in the ground. This spring, I’ve discovered that some of them were miniature irises.

They must be happy to be out of their pots because they’re blooming like crazy.

Miniature irises

I’ve been feeling like the gardens are finally established this year. Plants are filling out and blooming. I’m focused more on maintenance rather than actually building the gardens. It’s nice to see the fruits–or the blooms–of my labour.

How is your garden growing? Do you have any irises at your house? What colour are they? Who else is an iris fan? What’s blooming at your place?