The growth of a garden

As I was putting together Friday’s post, I started looking through old photos of the turnaround garden. It was amazing to me to see how far it’s come–even though I’ve been here for all of it. I had to share it with all of you.

The turnaround started out as mountain goat territory. Rocks, mounds of dirt and weeds made a very unattractive scene right outside our front door.

Turnaround garden before

Allow me to illustrate the scale of our “mountains.” (And the pile of crap at the old firepit in the background. Ugh.)

Turnaround garden before

We did nothing to it the whole first year we lived here. Finally, in spring 2013, our farmer came by with his big tractor and flattened things out for us. Hello, Easter.

Turnaround garden before

I enriched the soil with lots and lots of manure.

Kioti CS2410 towing a trailer full of manure

And my parents helped with mixing it into the soil and picking out rocks.

Rototilling a garden

Wiley, Matt, Easter and I dug out a path across the turnaround.

Digging the pathway

Then I laid a herringbone brick path.

Herring bone brick pathway

And Baxter joined the family in time to be part of the project, helping to fill the joints with sand.

Baxter helping with the brick path

Then things got a little weedy (a lot weedy). The turnaround is huge–the size of a suburban backyard. I just couldn’t keep up with it.

Weeds on the turnaround

At the beginning of spring 2014, I had given up on half the turnaround. Matt mowed the weeds. The other half was still weedy at the beginning of May, but I went to work.

Weedy flower garden

By the end of May, the turnaround was planted (half of it, at least).

Turnaround garden in May 2014

And this year, it looks like an actual garden. (And I’m already starting to think about the other half).

Turnaround garden in July 2015

I am amazed how much the plants have filled out in just one year. Everything in the garden, including the bench, the birdbath and the brick path, came from the farm or from family (except for the plants you saw on Friday). Transplanting and splitting–and a lot of hard work–have made this huge garden come together nearly for free.

The most important element of gardening in my opinion though is patience. Gardens take time to grow. But the payoff is huge. I’m so glad that I’m able to take a look back and realize how far we’ve come.

Evolution of the turnaround flower garden

Do you keep track of your garden’s progress through the years? Who else has a garden that’s taken awhile to come together?

How I became a DIYer

Both of my parents get the credit for teaching me how to do a tonne of things and giving me the confidence to tackle things on my own. From a young age, they involved my siblings and me in whatever projects they were working on around the house.

Painting my first bedroom

When it comes to the renovation and home improvement side of my DIY personality, my biggest influence is my Dad.

My Dad grew up working alongside his father, learning the construction business first hand. They built houses, dug out basements, renovated homes.

Working with my Dad and Grandpa

My Dad, me and my grandfather

Eventually, my father decided to make construction his career, and he went to college and earned a construction technology diploma.

My Dad with his parents on graduation day

My Dad with his parents

He worked for a number of companies over the years and ultimately served as site superintendent on a number of subdivision developments, including Canada’s first metric subdivision.

Our first home was in one of the neighbourhoods he built. And the second was a custom build that my parents still live in today.

Riding the forklift with my Dad

My Dad with my younger sister and me on the forklift at our new house

In the late 1980s, my Dad was laid off. Construction jobs were scarce at that time, but with four young kids at home, he didn’t have any option. He had to work. So he started his own company. He would load up our Oldsmobile, hook the trailer on the back, and off he’d go.

At first, it was just small jobs—pour a walkway, patch a wall, put up a fence. Eventually, they became bigger—renovate a kitchen, redo a bathroom, install a deck, put on an addition, build a whole house. As he had with my grandfather, my sisters and brother and I often worked with him. I think I was probably 10 the first time I went to work with him.

Working with my Dad

My Dad, my brother, my youngest sister and me

A few years later, working construction was my full time summer job. We often got some weird looks when we first showed up at the job sites—a contractor with a young girl assistant, sometimes two—but they always changed to looks of admiration when they saw how hard we worked and how good of a job we did.

My Dad prides himself on doing a job right, and he taught us all the same. I remember how for weeks every night he studied the building code and how happy he was when he wrote the exam and became licensed. The building code still holds a place of prominence at his desk, and his license numbers were typed proudly at the top of every estimate that he wrote.

Since we became homeowners, my Dad has been invaluable to Matt and me, advising us, working with us, teaching us. We wouldn’t be able to do everything we’ve done at the farm without him.

Drilling post holes with an auger

Matt working with my Dad

Happy Father’s Day, Dad. Thank you for everything you do for us.

Simple belt storage solution

When we switched bedrooms, we switched closets too. I knew one thing I wanted to improve in the new closet was my belt storage. They’ve been tangled and tossed onto a shelf since we moved in.

belts2

When I still lived with my parents, I came up with a solution that worked very well for belts: cup hooks.

belts23

In the past, I’ve screwed the cup hooks directly into the drywall or plaster of the wall. However, this time I decided to go for something more portable so that I can move it if I ever relocate closets again. Screwing the cup hooks into a length of wood worked. Then I simply screwed the wood into the wall of the closet.

Simple belt storage solution

Super simple DIY. Super simple storage. My happiness is not commensurate with the simplicity of this project.

How do you organize your belts? Who else is a fan of cup hooks? Does organization make you happy?

How to apply preglued veneer on curved edges

More than two years ago, I wrote a tutorial on how to apply preglued veneer edging. Veneer edging covers up the raw edges of plywood and makes your piece of furniture or whatever it is you’ve made look like one solid piece of wood.

When I made the headboard for the master bedroom, I had a scenario that I’ve never dealt with before: applying the veneer to a curved edge. So today I’m posting an addition to my previous tutorial.

The same tools, techniques and principles still apply (mostly):

  1. Cut a piece of veneer slightly longer than the section of plywood that you’re covering.
  2. Line it up along one edge and apply heat and steady pressure to melt the glue.
  3. Firmly press the veneer down with a wood block (it will be too hot to touch with your hands) until the glue sets.
  4. Trim the overhang with a file.

For a convex edge (think the outside of a U), I didn’t have to do anything special. For a concave edge (think the inside of the U), I had to make a few more adjustments. On the more gentle curve, I found the very tip of my iron worked to soften the glue. I just had to work slowly, about an inch at a time.

Applying preglued veneer edging to a curve

Pressing the veneer into place as the glue dries is really, really important. On a curve, it’s particularly easy for the veneer to pull away from the plywood. A narrow pressing block or your fingers (protected with a glove or a rag)–along with patience–are essential.

For the tighter curves, I discovered why I still have a curling iron in my bathroom cupboard. The barrel was just the right size to fit into the curve at the top of the headboard. Once the adhesive was soft, I firmly pressed the veneer onto the plywood and held it in place until the glue set.

Using a curling iron to apply veneer edging

To trim the veneer, I always rely on a file. For the curved edges, I used the curved side of the file.

Curved profile on a file

Triming veneer on a curve with a file

A couple of swipes over the edge with fine sandpaper further smoothed veneer, and then it was ready for staining along with the rest of the headboard.

(And yes, the veneer takes stain and urethane and paint just like real wood).

Here’s the final product–in its impossible to photograph location in front of the window.

Applying preglued veneer edging to a curve

Anyone else have any tips for working with veneer edging? Who else has an old curling iron kicking around? Have you ever used beauty tools for DIY?


Making DIY dropcloth curtains – 8 lessons learned

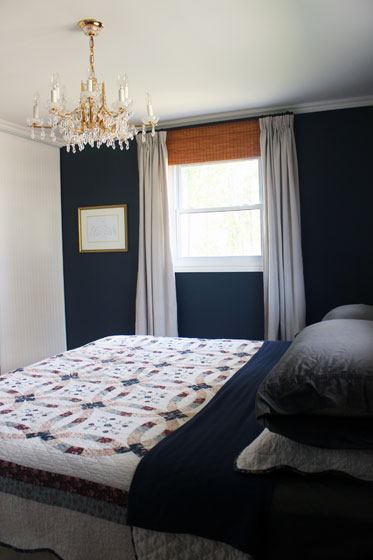
In the last post, you saw the easy layered window treatments in the master bedroom. I promised more details on the dropcloth curtains I made.

Blackout blind, bamboo blind and drop cloth curtain window treatments

There are lots of tutorials out there on how to make dropcloth curtains. So I’m not going to write one here. Plus, I totally made these up as I went along, so a tutorial doesn’t really exist. I did want to share some of the things I learned from making my DIY curtains, though.

How to make dropcloth curtains

1. Dropcloths come with seams. I assumed that my 9 by 12 foot dropcloth would be one single piece of fabric. It wasn’t. All of my dropcloths had a seam down the middle. One had a centre seam plus an additional patch along one end.

For my two widest curtain panels, I just left the seam alone. It’s a bit thicker than I would like and a wee bit puckered, but I decided I could live with it if it was hidden in the folds of the curtains.

For the other curtains, my seam ripper and I spent some quality time pulling out the stitching.

Ripping out the seam on a dropcloth

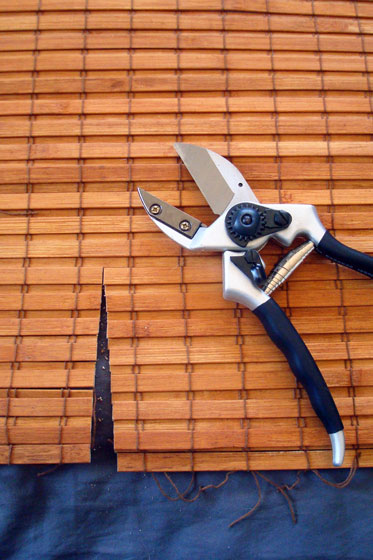
2. Dropcloths come with holes. The canvas fabric of the dropcloths is not perfect. The rustic quality of the weave and the few strands of blue and red that were here and there are some of the elements I like best about using this fabric.

However, in a couple of spots my dropcloths went beyond rustic and veered into unraveled. So if you want to make anything out of dropcloths, check them over carefully. You don’t want to end up with a hole in the middle of your project.

3. Wash and iron before you start. Pre-washing your fabric is a basic tenant of sewing. I didn’t want my curtains shrinking (not that they’re going to be washed often) after I put the effort into making them, so I washed my fabric before I started sewing.

Dropcloth fabric is heavy duty. As a result, it wrinkles easily and the creases are really difficult to remove. I found that ironing the dropcloths when they were still damp from the washer helped to remove the worst of the wrinkles.

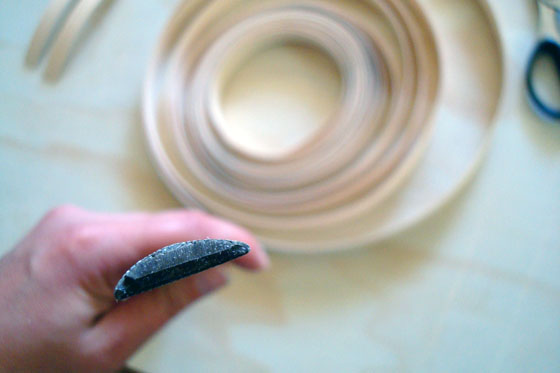
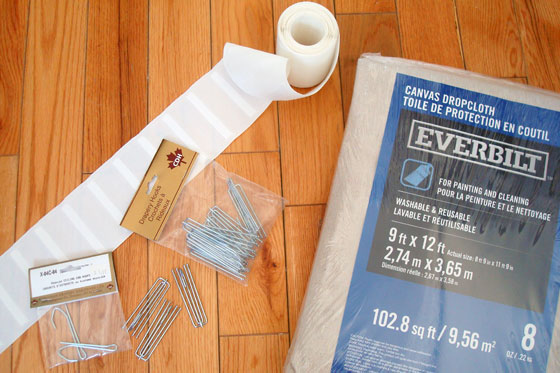
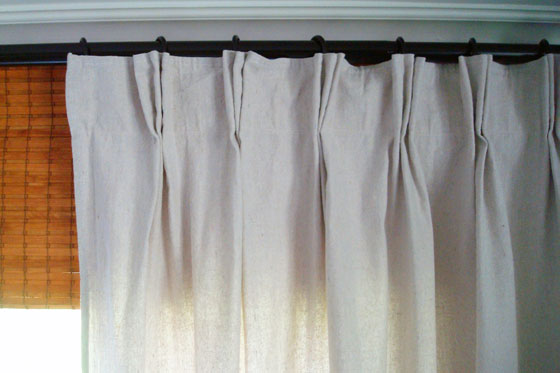
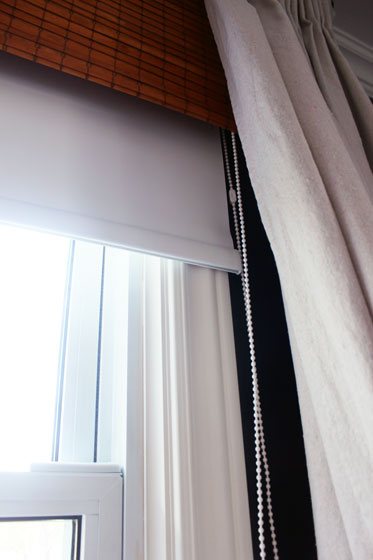
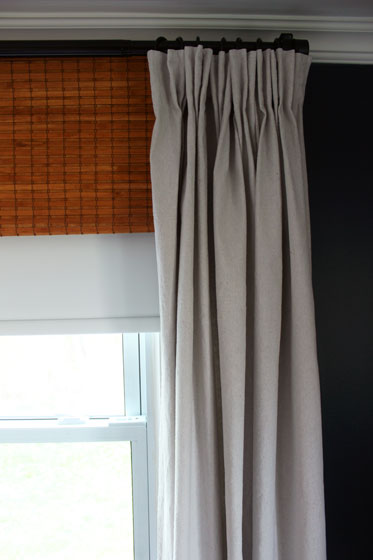
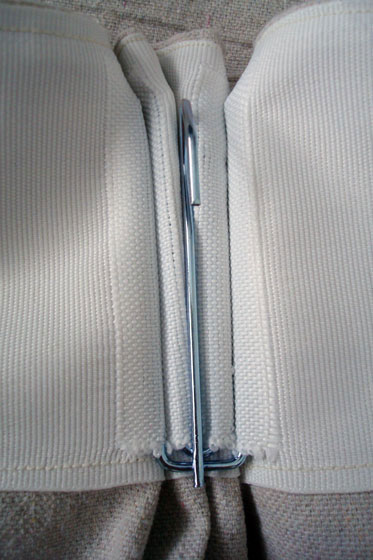
4. Use curtain tape. (Britt, this tip’s for you). From what I hear, making pinch pleat curtains is pretty tedious. Lots of measuring and calculating. A much easier solution is to use curtain tape. This is a kind of mesh fabric strip with channels on the back. You pair it with some special multi-pronged hooks, and it basically forms the pleats for you. I bought mine at a local fabric store.

The pleats are softer than they would be if you sewed them without the tape, but that was okay for my rustic fabric and my farm setting.

I sewed the tape along the edge of one of my dropcloths, put in the hooks and voilà, pinch pleat curtains.

Using curtain tape to make pinch pleat curtains

Using curtain tape to make pinch pleat curtains

Using curtain tape to make pinch pleat curtains

Pinch pleat dropcloth curtains

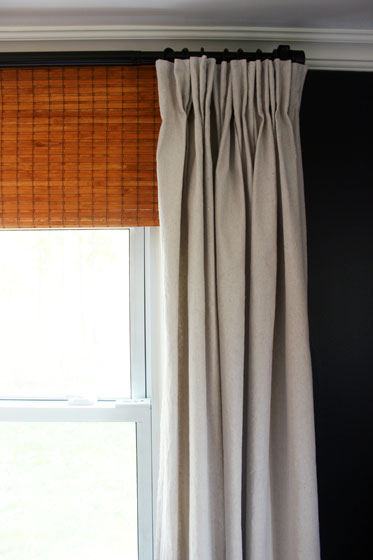
You can space your pleats as far apart or as close together as you want. I left one empty “pocket” for a space of about 6 inches between each pleat.

Pinch pleat dropcloth curtains

5. Use curtain tape to measure your curtains. Before I sewed the curtain tape onto my fabric, I formed all of my pleats until I had a strip that was as wide as I wanted my curtains to be. Then I cut the curtain tape at that length, removed the pleats and used the tape to measure the dropcloth fabric.

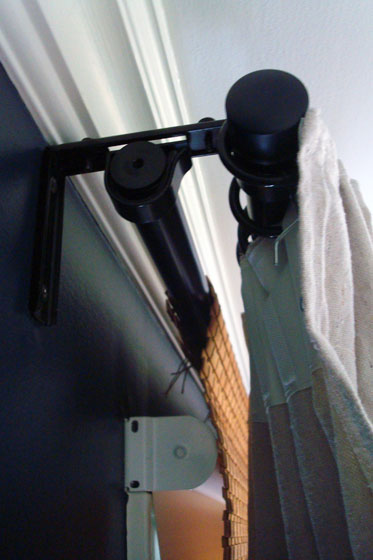
6. There are different types of hooks. The magic pleat-making hooks are very handy. They come in two different forms (there may be more, but I tried two). Whatever form you choose, the hooks hook onto the rings that go on your curtain rod. Option 1 has the hooks at the end, so the curtains hang a bit below the rings. Option 2 has the hooks in the middle, so the top of the curtain hangs up against the rings. This is the type of hook I ended up using.

There are also special non-pleating hooks (just plain single hooks) to hold up the ends of the curtains where there are no pleats.

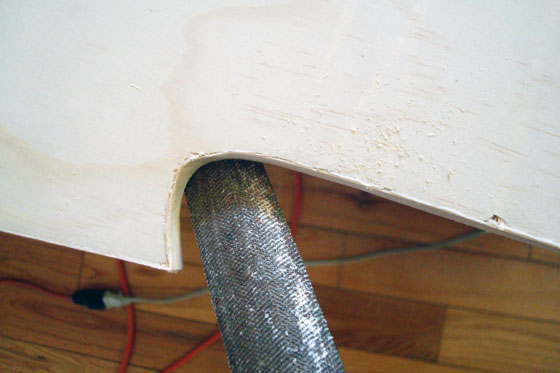
7. Take your time hemming. I wanted my curtains to just brush the floor. For my first set, I hung the curtains, found the spot where they met the floor, and then I used a ruler to measure the rest of my hem from that point. The result was curtains that were the right length at one or two spots, but for the most part they scuffed, not brushed the floor.

Curtains hitting the floor

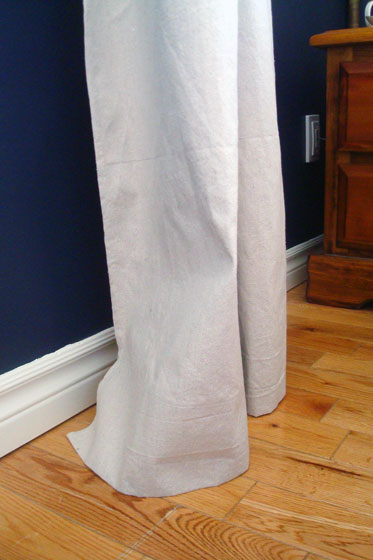
For my second set of panels and for the bed skirt that I also made out of dropcloths, I skipped the measuring tape. Instead, I used pins to mark the fabric at about 1/4 to 1/2 inch off the floor. I pinned my way across the bottom of the curtains, marking about every six inches. Then I pressed the hem using the pins as a guide. It wasn’t scientific, but it resulted in curtains that just brushed the floor.

8. You can totally do this too. Dropcloth curtains are pretty easy to make. Honestly, I found them a bit tedious. The only sewing is in straight lines. Loooooong straight lines. However, boring they may be, sewing straight lines is not difficult.

Dropcloth curtains in a navy master bedroom

Let me know if you try them yourself.

Have you ever made your own curtains? Any tips to share from your experience?

Linking up with: Happy Housie DIY Challenge Party

How to make simple layered window treatments

When I had the brainwave to move our bedroom across the hall, Matt didn’t understand why we couldn’t just stay in our current room. He went along with my plans, but he had one requirement: he wasn’t moving in until we had curtains.

Blackout blind, bamboo blind and drop cloth curtain window treatments

We haven’t had curtains on any windows in any room since we moved to the farm. With no neighbours, privacy is not a concern.

However, our new bedroom is on the east side of the house. There are fewer trees on that side, so more light comes in the windows. At night, the lights on the barn and the driveshed and even headlights from the cars on the far-away road shine into the room.

Plus, east equals sunrise. If we wanted to sleep past dawn on any summer morning, we needed curtains.

But I wanted more than just curtains. I stumbled over Kristine’s window treatments on the Painted Hive and thought her solution was ingenious. (So I really can’t take credit for this idea).

Kristine’s solution is a great mix of form and function.

Function starts with a basic blackout vinyl roller blind, which I mounted above the window casing.

Vinyl blackout blind hidden behind bamboo blinds and dropcloth curtains

Form comes next.

The blackout blind is hidden behind a bamboo blind. Or what looks like a bamboo blind.

In reality, it’s basically just a valance. I took one bamboo blind and chopped it to pieces. For the main window over the bed, I was able to use the full six foot wide blind, but I only wanted it to be about 16 inches long. To shorten it, I clipped the strings that hold the slats together and knotted the ends so that the blind didn’t fall apart. I’m not going to lie, tying hundreds of tiny strings into tight double knots was pretty tedious.

For the smaller side window, I needed a narrower blind. A set of strong pruning sheers and Matt’s strong hands clipped off the excess width. Then, I again cut the strings to give me a 16 inch length and tied another whole bunch of tiny knots.

Cutting a bamboo blind

To put bamboo blind in place, I installed a double curtain rod just below the crown molding. I chose the Räcka and Hugad from Ikea.

The bamboo panels just drape over the rear rod (I tied them in place) and hang over the top of the window. They hide the blackout blind and, because I hung them so high right under the crown molding, they make the windows look much taller.

Double curtain rod

The front rod supports the dropcloth curtains that I made. The curtains are completely functional, but we don’t need to use them, thanks to the blackout blind, so they’re mostly just for form. They do hide the edges of the two blinds and help to block light from sneaking around the sides of the window though.

I’ll be sharing more about some of the lessons I learned from making dropcloth curtains in my next post.

I used the trick of hanging the curtains so that they fall just outside the window casing. This really does make the window look bigger in my opinion.

Altogether, the blackout blind, bamboo valance, double curtain rod and full length dropcloth curtains make for stylish and functional layered window treatments.

Blackout blind, bamboo blind and drop cloth curtain window treatments

Plus there’s the added benefit of keeping Matt happy.

Happy husband. Stylish master bedroom. I’m all set.

What are your master bedroom must-haves? Are you a blackout blind-er or a up with the sunshine-er? What’s your window treatment style?

Laundry room rug – Ikea hack

Three Ikea Signe rugs made into a runner in the laundry room

I finally found a rug for the laundry room… or rather, three rugs.

It was hard to figure out the exact dimensions that would work in this room. With jig and jogs around cabinetry and laundry machines and the drying rack, the rug could only be so wide. But it was a relatively long room. Did I want the rug to go just in front of the washer and dryer? Just in front of the sink? All the way from wall to wall?

I eventually decided that it made sense to have a rug in front of the sink, the washer and the dryer.

Three Ikea Signe rugs made into a runner in the laundry room

But then came the question of material. I liked the idea of a natural jute rug, but I wasn’t confident I’d find one that met my measurements for a price I was willing to pay. I’ve seen some great antique and vintage patterned rugs on other blogs, but, again, price was a factor and availability is always challenging

Then, during an Ikea trip, I came across Signe.

It was a fairly natural tone with pops of black and red, two accents I used a bit in the laundry room.

Plus it was cheap: $2.99.

Three Ikea Signe rugs made into a runner in the laundry room

The downside was it was short. One rug was less than 3 feet long. But for $2.99, I could buy three.

At home, I laid them out in the laundry room. This just might work.

After an afternoon spent ripping off fringe and some time spent with my sewing machine, I had a runner the exact dimensions I needed–8 feet long by 22 inches wide.

I used a wide zig-zag stitch to join the rugs end-to-end, doing my best to match the stripes.

Three Ikea Signe rugs made into a runner in the laundry room

The result was the right colours, the right size and the right price. It’s a nice finishing touch in the laundry room.

Three Ikea Signe rugs made into a runner in the laundry room

Scraping a stipple ceiling

Pimples. It’s not even a nice word.

Popcorn. That’s a much nicer word.

Stippled ceilings have come to be known as popcorn ceilings. However, in my opinion, popcorn is much too nice of a word to be associated with these ugly ceilings. Not to trigger any traumatic teenage flashbacks, but stippled ceilings are closer to pimples than popcorn.

Popcorn ceiling

Step one in the master bedroom makeover was to help the ceiling grow up from its ugly adolescence into beautiful adulthood–and I couldn’t just make like a fashion magazine and airbrush.

It was gonna take muscle, and it was gonna be messy.

So, armed with an all-clear on my asbestos test, trowels, a spray bottle of water, pole sander, extra sandpaper and a dust mask, I went to work.

Tools for scraping popcorn ceiling

In the basement where we also had stipple ceiling, I actually sanded a lot of it off. This technique gave me a really nice smooth finish, even if it did generate a tonne of dust. In the bedroom, I found soaking in water and then scraping with the trowel worked best. As much as the big yellow trowel would have been faster, I liked the control of my little trowel.

It was still a lot of work. Scraping a stipple ceiling is not fun. However, fueled by ju-jubes, I got it done. (My skin may have progressed from its teenage years, but my diet has not. The orange ones are still my favourite).

Jujubs

Underneath the stipple, the drywall was smooth and painted, which leads me to ask why? Why finish a ceiling smooth, paint it and then cover it in pimples? I just don’t understand.

We all know the prep work is most important to get a good paint job. I spent more time on prep for the bedroom than I ever have before. Scraping the ceiling, scraping the caulking from between the crown molding and the ceiling (ugh), patching hundreds of little chips in the ceiling (they were just minor chips of paint, but there were truly hundreds of them), patching one bad ceiling seam and one crack in the wall, sanding and pasting over again.

Ceiling after scraping the popcorn

It took days.

Thank goodness I was off work for the Christmas break. Although it wasn’t the most restful holiday.

In the end though, my ceiling is all grown up and pimple-free. Much nicer to look at when I’m lying in bed in my new master bedroom. (Apologies for the really bad photo, but I think you can tell it’s nice and smooth. Oh, and there’s a sneak peak of the blue walls).

Finished ceiling after scraping the popcorn

Have you ever scraped a stipple ceiling? Any techniques to share? Any insights on why people stipple ceilings? And most important, what colour ju-jubes are your favourite?

Stone moving party

I was super happy when our stone supplier was able to source a single piece of stone for our hearth. No seams! Score. 🙂 However, now we’re at the point of installing the hearth. Moving a who-knows-how-heavy stone! Not so score. 😦

The stone is 10 feet long by 18 inches wide by 2 1/2 inches thick. Every time it has moved up to now has involved a forklift. However, we face two problems:

  1. We do not possess or have access to a forklift.
  2. A forklift will not fit into our house.

We are relying on people power. Pure brute strength.

I do not have good photos to illustrate the scale of this task because, you see, I really didn’t think ahead to consider the scale of this task.

So here’s the hearth at the far right peeking out from behind the skids of stone back when they were first delivered two and half weeks ago.

Stone for the fireplace

And here’s our mason sitting inside the fireplace, just to give you an idea of the size that we’re working with.

Mason building a fireplace

The plan was that Matt and I would get home from work a bit early last night and together with our contractor we’d move the hearth into place. Well, I made it home, but Matt got caught in a snowstorm and spent two hours on the road. Our mason and I tested moving the stone on our own. Not gonna happen.

New plan. The three of us would reconvene this morning at 6am before Matt left for work.

Matt and I did a test last night when he finally made it home. His verdict? “Woman, I don’t know if this is gonna happen, even with three of us.”

So we did what you always do in this situation: call Dad.

So the new, new plan is a stone moving party at our house this morning at 6am. There will be Matt’s Dad, the mason, Matt and me. Baxter will be here too, though he probably will not be very much help.

Wanna join us? It’ll be a special way to start your day. 😉

I realize most of you will be reading this after the stone moving party has ended. However, we’d still appreciate if you could send your good wishes. Heck, send levitation charms. Send muscle enhancing drugs. We’ll take all the help we can get!

Update: The stone is in place and is still in one piece. Yay! Full fireplace update to come on Monday.

My spin on a clothespin light

A lot of people had compliments for the clothespin light fixture in the laundry room.

Clothespin light in the laundry room

I can’t take credit for the idea or even the execution. I was inspired by this light from Young House Love.

I followed their tutorial pretty closely, and it was super easy. However, I did one thing differently and learned a couple of lessons along the way. I thought it might be helpful to share.

First the lessons.

I chose to do the same zigzag pattern that John and Sherry did. In their tutorial, they mention alternating squares. However, what they didn’t say is that they also skipped a row of wire between each row of pins. If you look closely at the pictures in the YHL post, you’ll be able to see the pattern. Skipping every other row gives a comfortable amount of space between the pins so that they lay at a nice angle all the way down the shade. And this makes the great pattern on the ceiling when it’s lit up.

Clothespin light fixture

And talking about laying at an angle, in the YHL post, Sherry emphasized that it’s important to have an even number of squares around the top to maintain the pattern all the way around the shade. However, she didn’t talk about how many squares there should be from top to bottom. I nearly trimmed the bottom row of mesh off my shade because I had an empty row of squares. However, if I’d done that, my bottom row of clothespins would have hung straight down while all the other ones sat at an angle. Having an extra row of wire at the bottom holds the pins on the angle. So, while you want an even number around the shade, you want an odd number from top to bottom.

Clothespin light fixture

And now for what I did differently.

My light is closer to a flush mount than the YHL pendant. I used an old single socket lamp holder that I had lying around as the actual light. You can’t get more basic than that. Or cheaper. (Or, let’s be honest, uglier).

Keyhole light fixture

It took me a little while to figure out how to attach the shade to the light. I didn’t love the cup hooks on the YHL fixture. My solution was to run two pieces of wire loosely across the top of the shade. I then looped each wire around the screws in the lamp holder. It’s pretty much invisible, unless you’re standing directly underneath the fixture looking up.

Clothespin light fixture

The YHL light used 320 pins. Mine has 288. The final dimensions are 64 squares around and 17 from top to bottom. The overall dimensions of the drum shade are 11 inches high by 14 inches in diameter.

I love that I have a light fixture made out of clothespins in the laundry room. Even better, I love how it looks. Thanks John and Sherry for the inspiration.

Have you ever made anything out of clothespins? Have you made your own light fixture?

Linking up to #DIYLightingChallenge