8 tips for building furniture out of pipe

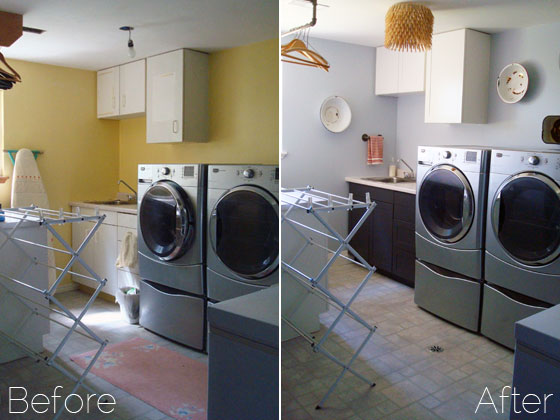
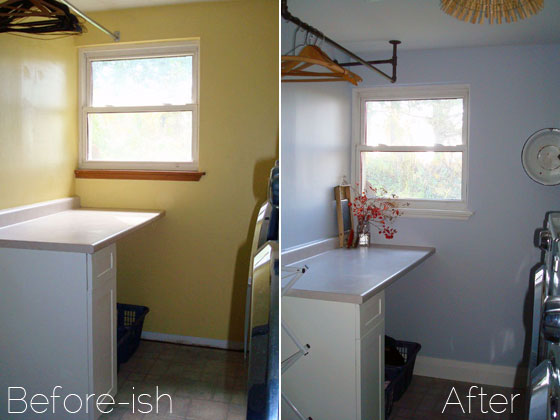
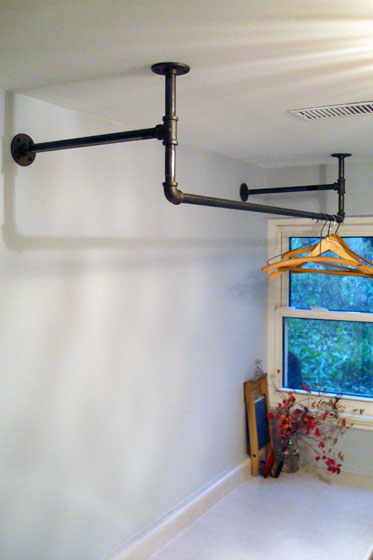
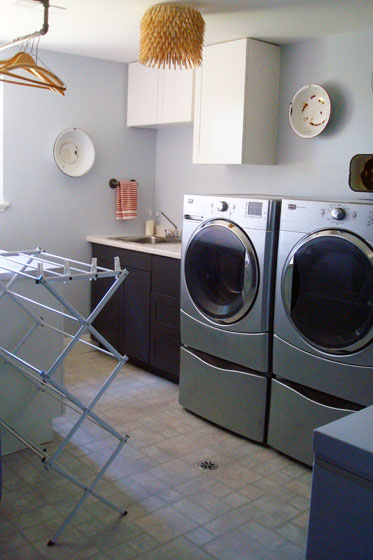
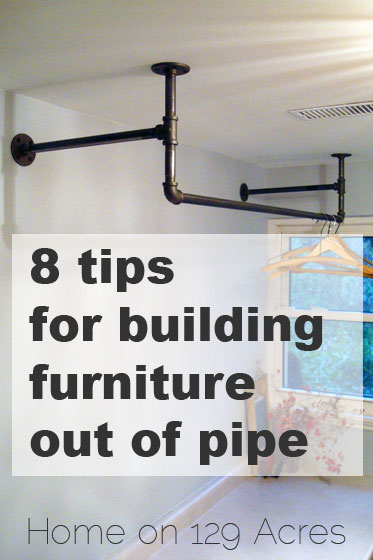
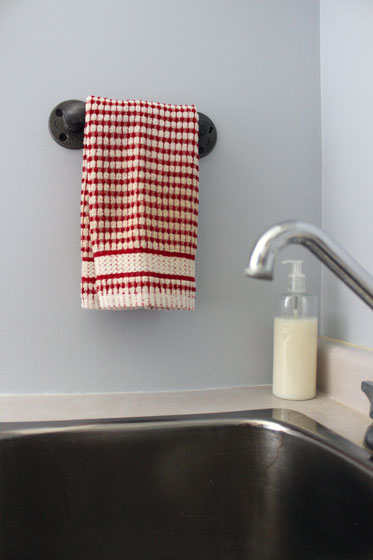
Pipe furniture is really popular these days. In the laundry room, you saw how I used pipe fittings to build the hanging rack and towel bar. Along the way, I learned a few lessons that I’m going to pass on to you.

8 tips for building furniture out of pipe

1. Pipe fittings are really easy to work with. The pieces go together very quickly. Assembling the towel bar probably took all of 10 minutes. I loved lego as a kid (who am I kidding, I still do), and this was like revisiting my childhood.

Towel rack made out of pipe fittings

2. Pipe fittings are oily. The fittings come in black or galvanized options. I chose the black because it looks more rustic to me. However, the black coating rubs off really easily.

Oil and rust rubbed off of pipe fittings

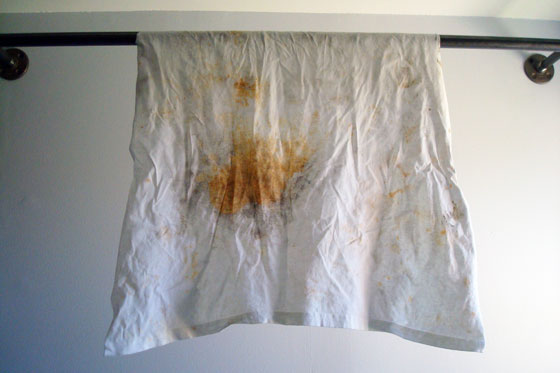
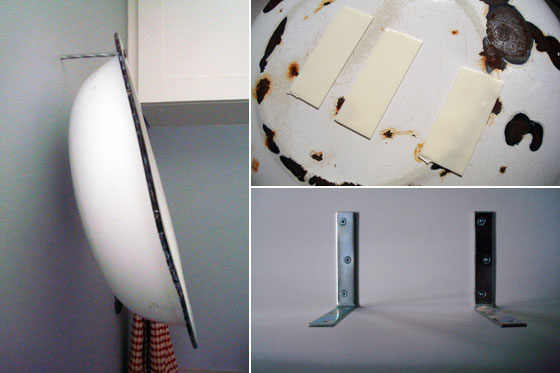
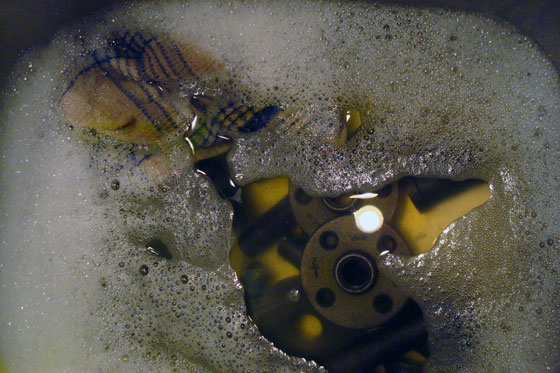
Before I could do anything with the fittings, I had to clean them. Some people online recommended degreaser, which I’m sure would have worked. I didn’t have any so I tried 2 other options: wiping them down with vinegar (didn’t really work) and washing them with dish detergent. The washing worked. I dried the pipes with a rag and let them sit for 24 hours to make sure the threads and interior of the pipes were completely dry before I did anything with them.

Washing the oil off of pipe fittings

3. Pipe fittings come in different diameters. Pay attention to what diameter you choose, because different size pieces won’t screw together without special fittings. I chose the 1/2 inch size because it was a bit cheaper than 3/4.

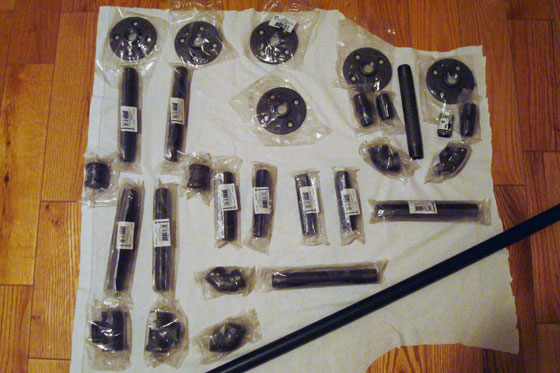
4. Pipe fittings come in different lengths and connectors. You should be able to find the pieces you need for pretty much any project…

Black pipe fittings

5. … But if you can’t, the store staff can cut the pipe too. The cutting was one of the dirtiest operations I’ve ever seen. I felt bad for making the staff person get so oily from running the cutting machine. The result though was the perfect lengths of pipe. The machine will also put threads onto your pipe.

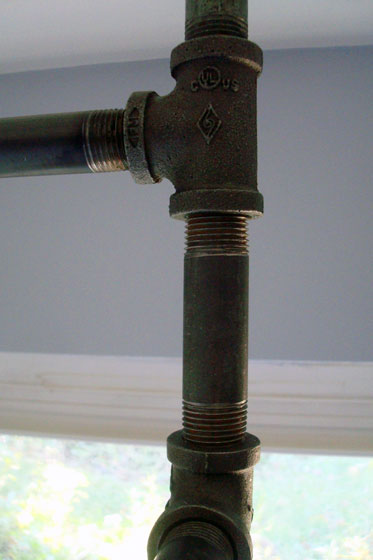
6. Pipe fittings don’t screw together fully. You’ll see the threads at each joint.

Screwing together pipe fittings

7. Drywall screws are good partners with pipe fittings. The pipe flanges attach to the walls with four screws. Since I chose black pipe, it made sense to use black screws. The coarse threads on the drywall screws dig into the wall and hold the pipe securely.

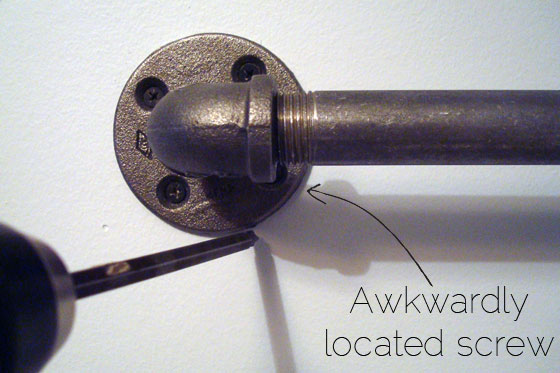
8. Attach the flanges to the wall first. Once your towel bar or hanging rack or whatever else you’re building is fully assembled, it can be hard to reach the screw holes in the flanges to attach your creation to the wall. However, attaching the flanges on their own is a piece of cake.

Tips for building furniture out of pipe

I elected not to paint my pipe fittings, although I’ve seen other projects online where people did. The finish isn’t pure black, but it’s a nice industrial dark grey–no sparkle here.

Just in case you’re interested in building your own towel bar or hanging rack, here are the pieces I used. I have to give credit for the hanging rack design to Angie over at Knick of Time. I’m not sure what pieces she used, but I think mine turned out pretty close. I spent a lot of time in the pipe fitting aisle at Home Depot. While my measurements may not be exactly the same as what you need, some of them might work for you and save you at least a bit of time.
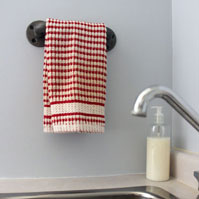
Towel bar made out of pipeTowel bar

Dimensions: 10 3/4 inches long (from the outer edge of each flange) and projects 3 inches off the wall

  • 2 flanges
  • 2 elbows
  • 2 1 1/2-inch pieces
  • 1 6-inch piece

Hanging rack

Dimensions: 50 inches long, hangs down 10 1/2 inches from the ceiling and projects 17 inches off the wall
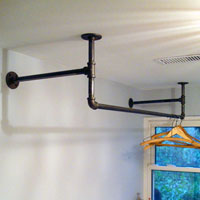
Hanging rack made out of pipe

  • 4 flanges
  • 2 elbows
  • 2 Ts
  • 2 3 1/2-inch pieces
  • 2 4-inch pieces
  • 2 15-inch pieces
  • 1 48-inch piece

And just in case laundry isn’t your thing, here are some of my other favourite pipe projects.
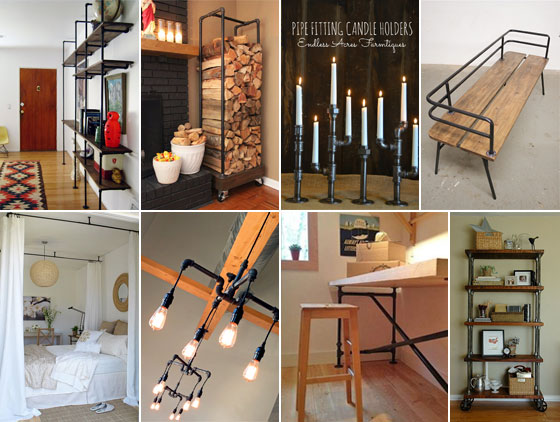
If you’ve spent any time on Pinterest, you’ve probably seen furniture, lights, shelves and numerous other things made out of pipe fittings. They add a great industrial style for a pretty reasonable price.

Have you ever made anything out of pipe? Do you have any tips to share? Anyone want to make anything out of pipe? Do you like the rustic industrial look?

Laundry room before and after

It’s time for the reveal in the One Room Challenge. Back in September, I was really excited to start making over the laundry room. At the beginning of October, I was really excited when I joined the One Room Challenge to help keep me on track. Today, you’re going to see how far the laundry room has come. (And, yes, I’m still really excited).

Laundry room before and after

Laundry room before and after

This makeover was all about simple upgrades.

I converted the cabinets to a shaker style by adding strips around the border. A black and white paint scheme freshened them the rest of the way. We’re still missing the hardware on our cabinets. They’re special orders and are taking their time coming in. So just imagine sparkly chrome knobs and cup pulls, would you? (I’ll post an update when the hardware finally arrives).

Black and white shaker cabinets in the laundry room

Fresh paint on the walls, ceiling and trim–and fresh baseboard all the way around–brought the laundry room up to the same standard as the rest of the basement.

Then it was on to a few fun projects.

A light fixture made out of clothespins.

Clothespins light fixture

Look at the great pattern it makes on the ceiling when it’s all lit up.

Clothespin light fixture

To keep the wood tone accents going, I added a few baskets to the top of the free-standing cabinet Matt and I found a few months ago. I also made a simple hook board to hang the ironing board on the side.

Ironing board hanger

To save electricity, we hang dry most of our laundry. (Yes, we’re just that green… and cheap). Only sheets, towels and dog beds get the privilege of the dryer. The white metal drying rack is a key feature of the laundry room. I made an additional hanging rack out of pipe fittings to help with the drying.

Hanging rack made out of pipe fittings

I also made a small towel bar out of some more pipe fittings.

towelbar1

The picture above also gives you a glimpse of one of the main decorations in the laundry room. When it came to art, it took me a while to figure out what I wanted to put on the walls. Then I found this little enamel pot at Value Village.

Laundry room decorations

It holds packets of washing machine cleaner, and it also reminded me that I had a small collection of enamel basins. My sisters, brother and I played with these dishes all the time at my grandparents’ cottage. When my grandmother sold the cottage, the basins were going to be thrown out. I was feeling sentimental, so I took them, although I wasn’t sure when I’d ever use them. Well, it turns out they work perfectly as decorations in the laundry room. They may have crossed over from rustic to rusty, but I still think they add a nice touch.

Enamelware basins

Hanging the basins facing out took a couple of tricks. First I needed a really long nail. I found some 5-inch spikes. The nails were too big to drive with just a hammer, so I drilled a pilot hole into the studs before I hammered in my nails. Once I hooked the basins on the nails, it turned out that their centres of gravity were a bit crooked. Some adhesive strips on the back stuck them to the wall and straightened them right up. For the rectangle basin, a couple of L brackets made a discreet and secure shelf.

Tricks to hang basins on a wall

The other item decorating the wall is also both sentimental and non-traditional art. These are the sleepers that newborn Matt wore when he came home from the hospital the first time. (I know, awwwwwwww). His Mom gave them to us years ago. Again, I had no idea what I was going to do with them. Then I realized that the red and navy stripes picked up some of the colours I was using elsewhere in the laundry room. I’ll likely end up building a proper shadow box for them, but the mini hanger works for now.

Matt's baby sleepers

On the counter under the window, I have a few appropriately laundry decorations: an old washboard from my parents and a small red toy iron that my Mom had when she was a little girl.

Laundry room accessories

It may have been a simple makeover, but the results feel dramatic to me. It’s a pretty, personal, fun and functional space.

Laundry room after

Thanks to Linda at Calling it Home for organizing the One Room Challenge. I’ve now crossed another room off my Home Goals 2014 list. Thanks to all of you reading along for all of your support and encouragement throughout. Be sure to pop by Calling it Home to see all the other rooms.

How many people dream of a pretty laundry room? Does anyone else collect enamel ware? Have you ever made anything out of clothespins or pipe fittings? Who else air dries their clothes? What’s the most unusual thing you’ve hung on a wall?

Linking to: Happy Housie Get Your DIY On: Wall Decor

One Room Challenge Week 5

We’re in the homestretch now on the One Room Challenge. Today is the second last post. Next week is reveal time. Make sure to visit Calling it Home to check out all of the great progress everyone’s made.

Fortunately, the laundry room makeover is in the homestretch too. My original project plan was to have all of the “work” done as of last weekend so that this week could be devoted to decorating.  Guess what? I’m pretty much on schedule (aside from my back-ordered cabinet hardware).

  1. Add shaker style trim to the cabinets
  2. Paint the cabinets
  3. Install doors and drawers
  4. Remove ceiling rack – By Oct. 3
  5. Patch ceiling and walls – By Oct. 3
  6. Paint ceiling – By Oct. 10
  7. Paint and install baseboard and paint window trim – By Oct. 10 Done Oct. 13
  8. Deep clean (sink, counter, floor, machines) – Oct. 13 Rescheduled to Oct. 19 26 Done Oct. 26
  9. Paint walls – By Oct. 17 Done Oct. 18
  10. Replace ivory washer outlet with white one – By Oct. 19 Done Oct. 18
  11. Level washing machine – By Oct. 19 Done Oct. 18
  12. Build and install ceiling rack – By Oct. 24
  13. Build and install towel bar – By Oct. 24 Done Oct. 25
  14. Install cabinet hardware – By Oct. 24 Rescheduled to Nov. 11
  15. Build and install light fixture – By Oct. 26 Done Oct. 25
  16. Remove non-working sprayer from the sink and plug the hole – By Oct. 26 Done Oct. 27
  17. Decorate – By Oct. 31

The laundry room is currently a mix of projects to be finished and styling that has started.

Laundry room mid-makeover

I know you can’t see very much here (I have to save some suspense for next week’s reveal), but it’s looking so good. I’m super excited.

The suggestion for this post is to talk about if our plans have changed. Mine haven’t really. In fact, I realized over the weekend how close I am to my original plans.

I’ve been thinking about this laundry room for a long time. I love Pinterest, and I’ve been pinning laundry room ideas nearly since we first moved to the farm (see my board). I knew I wanted to make a clothespin light like this one from Young House Love. I knew I wanted to replicate the rustic drying rack from Knick of Time. I made both of these, and they turned out pretty much just like my inspiration.

Although I can’t truly say “made.” The rustic drying rack is being a bit cantankerous. Today will be sixth–that’s right, 6–trip to Home Depot for pipe. The main hanging part is working, but the horizontal braces are a total Goldilocks situation–either too short or too long. I keep buying new sections of pipe, but so far I haven’t found the right fit. The plan for this afternoon is to have the staff cut me the exact length I need (fingers crossed I’ve figured out what that is).

Hanging rack made out of pipe fittings

Although I had most of the laundry room worked out in advance, I did add a few things mid-project (changing the ivory plugs for white ones and removing the sprayer from the sink). Those can’t really be called a change in plans, though.

Now I just have to stay focused on the finishing details. That means I need to stop thinking about replacing the faucet and remember that I don’t have time to sew a new cover for the ironing board. The finish line is in sight. Now is not the time for detours and add-ons.

Do yDo yDo your projects usually turn out like you envision? Are there any other Pinterest fans? Do you like last minute add-ons too? Does anyone else start styling before the reno is completely finished?

One Room Challenge Week 4

We’re heading into week 4 on the One Room Challenge. I feel like the laundry room has turned the corner. By that I mean, I’m seeing some serious progress.

One Room Challenge Linking Participant

The transformation isn’t limited to the laundry room, either. In the spare bedroom (aka the painting area), I folded up all the drop cloths, put the paint cans away and swept the floor. It’s almost ready to go back to being a bedroom. In the basement, I broke out of the laundry room and vacuumed the carpet. This may seem like a more regular chore, but it represent serious progress because vacuuming has been on hold (as if I need an excuse) until the “messy” stuff in the laundry room is all done.

In the laundry room itself, the walls are all painted and the machines are back in place. Shall we sing praises to the power of paint? There’s no decoration or accessories, but I already feel like things are starting to come together.

Laundry room in progress

Let’s take a minute and talk about laundry pedestals, okay? When we bought our new machines and chose front loaders, I knew I wanted pedestals. I hate bending over to just a few inches above the floor to do laundry. The pedestals solve that problem easily.

They do remove the ability to put a counter over the top of the machines (unless I was 10 feet tall, which I’m definitely not). I didn’t need more counter space, though, so it wasn’t a big sacrifice. The pedestals also give a lot of storage in the drawers (although to be honest I haven’t used that either).

I probably could have simply built a platform and saved us the expense of the pedestals (and they were expensive for what they are). However, I do like that we have the option of using the drawers if we want to, and I also like that they match our machines.

You might recall that I mentioned in my update two weeks ago that the washer vibrates crazily (and noisily) when it goes into the spin cycle. While we had it pulled out of the way for painting, I took the opportunity to check it over. It turns out that the bolts holding the pedestal to the machine were all loose. A few quick turns with the socket wrench tightened everything up. Now that the washer’s back in place, it’s operating much smoother and quieter. Task #11 done.

Here’s the rest of the updated to-do list. In total I was able to cross three things off this week. Let’s hear it for progress!

  1. Add shaker style trim to the cabinets
  2. Paint the cabinets
  3. Install doors and drawers
  4. Remove ceiling rack – By Oct. 3
  5. Patch ceiling and walls – By Oct. 3
  6. Paint ceiling – By Oct. 10
  7. Paint and install baseboard and paint window trim – By Oct. 10 Done Oct. 13
  8. Deep clean (sink, counter, floor, machines) – Oct. 13 Rescheduled to Oct. 19 26
  9. Paint walls – By Oct. 17 Done Oct. 18
  10. Replace ivory washer outlet with white one – By Oct. 19 Done Oct. 18
  11. Level washing machine – By Oct. 19 Done Oct. 18
  12. Build and install ceiling rack – By Oct. 24
  13. Build and install towel bar – By Oct. 24
  14. Install cabinet hardware – By Oct. 24 Rescheduled to Nov. 11
  15. Build and install light fixture – By Oct. 26
  16. Remove non-working sprayer from the sink and plug the hole – By Oct. 26
  17. Decorate – By Oct. 31

Still on tap for this week? Paint touch-ups, some minor electrical work, and starting on the ceiling rack, towel bar and light fixture.

Laundry room in progress

I like the small projects stage of the makeover. Hopefully they go smoothly and progress happens quickly.

If you’re curious to see the progress that other ORC participants have made, make sure to head over to Calling it Home.

How do you feel about laundry pedestals? Do you have a front loader or a top loader? What’s your favourite stage of a project? Painting? Small bits? Electrical?

Hand-knit felted slippers

A sure sign it’s fall for me is the return of slippers.

A sure sign I need new slippers is this picture. Shameful!

Holey slippers

My friends had tried to convince me to throw these out more than a year ago. Honestly, I completely agreed with them. The problem was I had nothing to replace my raggedy slippers.

All of this is to explain how I found myself spending time this summer sitting on a beach with knitting needles in my hands.

Knitting on the beach

Et voilà!

Hand knitted slippers before felting

Confused? Check them out after a few turns in the washing machine.

French Press Felted Slippers

Still confused?

These are French Press Felted Slippers. It’s my fifth time making these slippers. The idea is that you knit over-sized slippers out of real wool and then throw them in the washing machine in super hot water. They shrink down to the size they’re supposed to be and the material becomes stiff and fabricy.

Felting is a pretty neat process. The final product is very solid. You can even cut it and it won’t unravel like regular knitting.

However, I’m not relying on my slipper’s natural density to avoid having another holey situation. I had some leftover fake leather, so I cut some soles out of that and stitched it onto the bottom of the slippers.

Let’s try this picture again.

Leather soles sewn on knitted slippers

Much cozier without the holes.

Are there any other knitters out there? Have you ever felted anything? How about anyone else with holes in their slippers… or even your socks?

Challenges in the One Room Challenge

The recommended theme for today’s One Room Challenge update is setbacks. It turns out that this is actually a fitting topic for this point in the laundry room makeover.

Setback 1: The times in between

I’m not sure if anyone else has this problem, but this one’s a common challenge for me in DIYing. In between each stage of a project, I sometimes find it hard to change gears.

I finished painting the cabinets, but then the idea of getting the ceiling ready for painting–never mind actually painting it–was extremely challenging.

A great thing about the One Room Challenge is it helps keep me moving.

Baseboard in the laundry room

Baseboards installed. Yay!

As I posted on Friday, work kicked my butt last week. I fought back, putting in extra time and staying late at the office. Of course, this meant that I had less time at home to work on the laundry room. Which meant that I finally started painting the ceiling at 9pm the night before my scheduled deadline.

I’m sure time will be a common challenge among ORC participants. Heck, finding time is a common challenge of DIYers everywhere, I think.

However, I am very pleased to report that I’m nearly on schedule. Here’s the original plan with adjusted deadlines and a few new tasks.

  1. Add shaker style trim to the cabinets
  2. Paint the cabinets
  3. Install doors and drawers
  4. Remove ceiling rack – By Oct. 3
  5. Patch ceiling and walls – By Oct. 3
  6. Prime walls (pshaw, who needs prime?) and paint ceiling – By Oct. 10
  7. Paint and install baseboard and paint window trim – By Oct. 10 I was a bit behind schedule on install, but it’s done as of Oct. 13
  8. Deep clean (sink, counter, floor, machines) – Oct. 13 (Happy Thanksgiving Monday!) Rescheduled to Oct.19
  9. Paint walls (first coat is on, one more to go) – By Oct. 17
  10. New Replace ivory washer outlet with white one – By Oct. 19
  11. Level washing machine – By Oct. 19
  12. Build and install ceiling rack – By Oct. 24
  13. Build and install towel bar – By Oct. 24
  14. Install cabinet hardware – By Oct. 24 Rescheduled to Nov. 11 due to setback #3 (see below)
  15. Build and install light fixture – By Oct. 26
  16. New Remove non-working sprayer from the sink and plug the hole – By Oct. 26
  17. Decorate – By Oct. 31

So it might be a problem that I keep remembering new tasks to add to the list. It seems like I’m adding things as fast as I’m crossing them off. However, the progress is continuing despite a couple more setbacks.

Setback 2: Paint

The second setback isn’t really serious enough to be classified as a setback. It’s more of a lesson learned.

Painting the laundry room

When it comes to painting ceilings, I just use white primer. We had a bit of primer left in the giant pail that we used for the rest of the basement reno. To make sure the colour was absolutely consistent, I wanted to use this primer. Well, it turns out that this paint has been sitting a little too long. There were all kinds of hardened bits in it. It made painting the laundry room ceiling incredibly frustrating. I got a mostly smooth finish, but I only did one coat. I think it looks good enough. If I have to, I will strain the paint and go again.

The other lesson learned (or confirmed) when it comes to paint is that BM Wrought Iron definitely has blue undertones. I first used Wrought Iron in Matt’s windowless bathroom. There it looks pretty pure, super dark grey. In the laundry room, where there’s lots of natural light from the window, the cabinets look a bit navy blue sometimes.

For the wall colour, we walked up the paint strip and chose a much lighter tone of grey from the same slip as Wrought Iron. It’s close to Bunny Gray (read the story of our Frankencolour). We already knew that this one was slightly blue as we used it on all of the other walls throughout the basement. I had intended that the walls and the cabinets would be a purer grey, but I don’t care enough to repaint.

Plus, anything’s better than that yellow. Sing it with me people in the tune of Elton John, “Goodbye yellow gross paint.”

Setback 3: The hardware

The final setback I’ve had is the cabinet hardware. I wanted cup pulls for the drawers. I wanted them to be pretty simple without a flange or other details, and I wanted a chrome finish. I had ordered these pulls from Home Depot.

Chrome cup pull

A week or so after I placed the order, I got a call from HD that they couldn’t get anyone at the manufacturer to answer email or the phone.

I looked at other big box stores and couldn’t find what I was looking for. HD had offered me a refund, but it took me awhile to make it into the store. By the time I was standing in front of the customer service desk, the associate let me know they’d started receiving orders again from the company. If you read my post on Friday, this is when I heard, “I’ll give you the refund, but let’s try and place the order again. I won’t charge you even if it goes through.”

How awesome is that?

A few days later I came home to a message from HD. My order went through (yay!), but the pulls are on back order (boo!). They should be here by Nov. 10. That’s just nearing the end of the One Room Challenge. I think I should be able to get them on in time for the final reveal.

The moral of the story

So, setbacks aside, the challenge rolls on. The best thing about this challenge is how encouraging everyone is. It’s been amazing to connect with other bloggers and have so many new people stop by my blog and offer their comments. Seeing everyone else’s projects is also super inspiring.

Make sure you get a chance to visit Calling it Home and see all of the works in progress.

Summer project report

Take a journey with me back to February, would you?

Don’t worry. You don’t have to actually go back to the time of snow and cold and dark.

Just remember back in February when we painted the foyer, kitchen and hallway.

Hallway painted Benjamin Moore Abalone

Now let’s go back a little bit further to January when I posted my 2014 Home Goals, and I said I wasn’t going to paint the living room this year.

Well, I lied… kind of.

The kitchen, hall, foyer and living room all run together, so I planned to paint them all the same colour. Knowing that I wanted to set up my bookshelves this year, back in February Matt and I painted one wall of the living room–the wall I planned to put the bookshelves on. I figured once my shelves were set up and full of books, I wouldn’t want to take everything down again to paint behind them.

So the living room has looked a little bit like this for the past six months. Stylish, I know.

Half-painted living room

Well, the thing is, when I started the bookshelf makeover this month, I realized that if I put the shelves where I originally planned, we wouldn’t have room to walk around the couch and into the dining room. I decided to put them on the opposite wall. A wall which was unpainted. Whoopsie-doodle.

So my August project report goes something like this.

  • Put the bookshelves that had gotten damaged in the move back together.
  • Took the big fat bookshelf apart, cut it in half and rebuilt two new sets of shelves.
  • Added iron-on edging to the new shelves where I needed to.
  • Stripped the paint off the TV stand.
  • Raised the TV stand by half an inch and added trim around the bottom.
  • Painted the TV stand.
  • Realized I was going to have to paint the living room.

Here’s some evidence that I did actually do some work on the bookshelves.

Steps in my bookshelf makeover

Despite my progress, the bookshelves are kind of on hold right now. They’re all set up in the guest room ready to be painted. However, I’ve shifted my attention to the living room.

The prep process is exactly the same as what we had to go through for the hallway:

  • Pull out nails where pictures were hung.
  • Take off cover plates.
  • Sand the incredibly rough walls.
  • Patch holes and divots.
  • Wipe down the trim.
  • Paint the trim.
  • Prime the walls.
  • Paint (two coats).

The living room is both simple and complicated to paint. Complicated because it’s a vaulted ceiling that requires a big ladder to reach the top of the wall. Simple because on the two walls I’m painting, there is an archway on one and a patio door on the other. The actual wall space is minimal.

And yes, you read that correctly. I am painting only two walls. Of the four walls in the living room one is already painted (as you saw) and the other contains the fireplace. I am not painting around the fireplace until we’re done whatever we do with the fireplace.

So my August project is another bit of a fail. I did manage to get the TV stand completely finished though. I’ve put it in place, even though we’ll likely have to move it when we paint. I had to finish something this month.

TV stand before and after

What did you accomplish this month? Have you ever gotten mid-way through a project and only to find your to-do list has grown?

Taking paint off melamine

The question of the day was can I strip paint off of melamine? The answer was kind of.

This is not my favourite piece of furniture. (Not the TV. I love my TV. My problem’s with the TV stand.)

TV stand

I attempted to build it when we lived at our old house. We had gotten a new TV. We needed a TV stand. I had some white melamine left over. So I sliced it up and went to work.

Cutting went fine.

Assembling not so much.

I didn’t have the right tools or fasteners and as my rocky, shaky shelf collapsed for about the fifth time, I called my Dad.

My Dad and I knocked it together in no time, but when I painted it I ran into trouble again.

My roller was disintegrating as I painted, and I ended up with all kinds of bits stuck to my shelf. It didn’t improve with time. The dark brown paint showed dust really easily, and when I tried to wipe it down, the dust just got caught in the flecks and it looked even worse. Believe it or not, this is the bottom shelf after I’d wiped it down.

Dust stuck in bumpy paint

I decided to include the TV stand as part of my bookshelf makeover this month. I’m not planning to strip the paint off of all the bookshelves, but the finish on the TV stand was just too awful. I needed a fresh start.

I went with my usual chemical stripper, and it worked pretty well. The stripper made quick work of the paint, even though it’s a heavy-duty oil-based enamel. The stripper also took off the white coating on the melamine. I’m not too worried because I’m going to be repainting, but the finish was a little bit rough. I went over it with my sander to smooth everything out. It may not look great, but I think it’s going to be okay.

Stripping paint off melamine

This week my Dad and I are tackling the rest of the shelves. We’ll be cutting down, putting back together and adding trim. Painting will come soon after. The TV stand should be looking much better the next time you see it. Maybe I’ll even like it by that point.

Have you ever tried to take paint off of melamine? Have you ever painted melamine in the first place? It’s not that hard to do… as long as your equipment is half decent. Has anyone else run into problems with disintegrating rollers? Do you have a piece of furniture that you don’t love?

Popcorn ceiling and barn doors

So July’s project was my biggest failure yet. Remember that dirty bumpy stippled ceiling in the guest room/soon-to-be master bedroom?

Popcorn ceiling

Yeah. It’s still there.

The week that I was planning to start operation popcorn, Kate posted about removing the stipple ceiling in the flip she and her husband are working on. She mentioned doing an asbestos test before she started. Our house is built the era where asbestos might have been used, so I thought a test sounded like a good idea.

However, finding a test kit was harder than expected. It seems home tests are an American thing. I ended up finding one online. So the extent of my progress this month is a credit card charge and my Dad’s drywall sander sitting in a corner of the guest room. 😦 (Please note as well the light switches behind the door. Really convenient.)

Drywall pole sander

Wanna see some actual progress? Let’s look at some other doors instead.

Hello basement barn doors.

Basement door makeover

Here’s the before picture just for reference.

Slab doors

Yes, redoing the doors was June’s project, but the painting was left until July. It must have been something about this month because, like with the stippled ceiling, the final stages of painting and hanging the doors didn’t go smoothly.

For painting, I planned to use my Dad’s sprayer… or rather I planned to have Matt use my Dad’s sprayer. Well, the air compressor conked out, so spraying was a no go. So much for all of the time we spent tarping the driveshed.

Our mechanical difficulties are totally on me. I was the one who set up the air compressor. Earlier the same day I’d killed the push mower, so I obviously had a hex working when it came to mechanical objects.

Painting became a team effort as Matt rolled and I brushed. Soooooo sloooooow.

Painting the basement doors

Installing the doors turned out to be another headache. Only five out of the nine doors that we made over fit smoothly back in place. Somehow, two doors grew so that they were too fat for their openings. The closet door that we’d accidentally put the trim on the wrong side wouldn’t close because the trim hit the doorstop (I don’t know why I didn’t realize this would be a problem). The best one was discovering another door where I’d put the Z on the backside. No idea how I missed this.  My mistake left the completely flat slab door facing out into the room–exactly the situation I was trying to correct.

Ugh. I was very frustrated.

It took a few hours of work spread over a few days to fix my mess ups, including repainting. Double ugh.

Matt was very patient, installing and removing the doors multiple times as I tested the fit.

Finally, all of the doors fit, swung smoothly and closed properly.

I installed the old hardware that I’d ORBed, and I called this one done.

ORBed doorknobs

The Z detail is subtle–the strips are only about an eighth of an inch thick–but I think it’s a really nice touch. Our barn doors are absolutely a lot more interesting than the flat slab doors. Plus they fit really well in our farm setting.

Slab doors become barn doors

Slab doors become barn doors

Issues aside, this is a pretty easy update–and much, much more affordable than buying nine new doors. It would have been even cheaper if I hadn’t bought all new hinges. All in, this makeover cost less than $200 (although I did use glue and nails that I already had):

Panels (two sheets of hardboard cut into 6-inch strips): $18.53
Hinges (Stanley Home Designs in Egyptian bronze-I couldn’t find the exact version online, but this one is close although a little more expense): $96.39
Paint (Benjamin Moore Cloud White in the pearl finish): $59.67
Spray paint (Rustoleum Oil Rubbed Bronze): $11.28
Total: $185.87 (just over $20 per door)

Our master bedroom makeover may not have started, but our basement makeover came a lot closer to finally being finished.

Let’s just not discuss that the basement was summer 2012’s project.

Raised dog food stand

Special occasions should be marked by presents. So for Baxter’s Gotcha Day, I made him a dinner table all his own.

Dog food stand made of old barn wood

I took inspiration from the DIY Pet Food Station that Kim and Scott made for their Jack over at Yellow Brick Home. As much as I coveted the hairpin legs that they used (love the industrial-rustic mix), I didn’t find any at a price I was willing to pay. So I went to the bench I made for the mudroom and adjusted it to be doggie size.

Like with the bench, I dug into my beat-up antique lumber stash in the barn. People, these planks are absolutely amazing. Sure they weigh 3 tonnes and are covered in poop and who knows what, but they’re phenomenal. The plank I chose was too big and heavy for me to move on my own, so I lopped off a 4 foot piece with my circular saw and got to building.

I think the details on the construction are pretty self-explanatory, especially if you reference my bench plans. I used my Kreg jig to attach the legs with three screws each. In terms of finished measurements, the stand is 10 inches high, 24 inches long, and 10 inches deep. The legs are at about a 15 degree angle and are 8 1/4 inches end to end. The bowls are 7 1/2 inches in diameter.

Dog food stand made of old barn wood

Cutting the circles for the bowls was the hardest part. I drew my circles using the bowls for a template. Then I drilled a hole so that I had a spot to insert my jigsaw blade, and I cut along the line. I think I figured out why this wood is so darn heavy. It is super duper dense. My jigsaw blade broke before it was even halfway around the first cutout. Initially the cutting was so slow that I thought my blade was dull. But when I installed the new blade after my first one snapped, it still took a significant amount of force to push the jigsaw along the line ever, ever so slowly. And I had to do it twice! Darn dog needing water as well as food.

To seal and protect my dense, hard, beat-up beautiful wood, I turned to Waterlox, the same solution we used on our DIY kitchen counter. It’s food safe for humans, so it’s an appropriate finish to use on a stand whose sole purpose is to hold (dog) food. Nothing’s too good for my puppy.

Dog food stand made of old barn wood

From my past experience with the bench when it turned black because it sucked up so much stain, I knew that the wood would be thirsty, and boy was I right. It took about three coats before the finish started to build up and look shiny on the wood. Even then, there were some sections (the ones with the most worm holes) that just sucked the Waterlox right in. All in all, I did a total of 6 coats of finish.

After that, it was simply about putting the bowls in the stand and filling them up! Tip: kibble on its own isn’t very appetizing. Sweet potatoes make it much more palatable. (That is, if you’re Julia. If you’re Matt you give in to the sad eyes and put ketchup on it. Yeah, my husband and the dog are totally related.)

Dog food stand made of old barn wood

Bon appetit, Baxter. Or as Matt says, “Mangey, mangey”–as in French “mange” with an “ee” ending. (He and the dog share their own language as well as the same taste buds.)

Do your pets get presents? How do you handle pet food at your house? What’s your pet’s favourite food?