Rituals and signs of spring

Waiting for our forsythia to flower has become one of my spring rituals since moving to the farm. For the past two years, my post on April 2 has been an update of how close we are to blossoms.

Our first year, the forsythia was in full bloom at the beginning of April. Last year, we weren’t anywhere close to flowers. It would take another month before the forsythia would be out in bloom. This year, we’re even further away from the bright yellow flowers.

Forsythia bushes annual comparison

So far in 2014, spring has just been a date on a calendar. I’m eagerly awaiting its arrival and the return of my forsythia.

What signifies spring for you?

Let the sun shine

A few people guessed that last week’s Guess What? post had something to do with solar. They are absolutely right. As of Friday night, we had 24 shiny new solar panels installed on the barn roof.

Solar panels on the barn roof

We have 14 more to go before our array is complete. I’ll be posting a full project breakdown once everything is installed and wired, but I’m too excited not to share the news with you now. We’ve been waiting a long time for this day, and I’m so excited that it’s finally here.

The equipment that you saw on Friday is the inverters. The company that’s managing our install calls the inverters “the brains” of the system. Their web site explains, “Inverters… convert the DC (Direct Current) power from your panels to AC (Alternating Current) before feeding it back into the hydro grid.”

What are these?

The panel install started on Thursday. Here’s our empty barn roof on a dim grey morning.

Barn roof before solar panel install

And here’s how it looks currently, mid-way through install on a much nicer day.

Solar panel install on the barn roof

We need that sun to keep on shining. The power generation aspect is obvious, but we have a more immediate need. The panels have to be connected to a hydro pole so that our power can be sent back to the grid. The pole is 300+ feet away from the barn. We need a lot of snow and ice to melt so that the trench can be dug from the barn to the pole and we can be wired up.

Hydro pole for solar panel installation

Say it with me people. Let the sun shine!

Are there any exciting projects happening at your place this spring? Do you have any solar experience to share?

Green sleeves

The benefit of cleaning up my office is that I actually have space to work in there now. I may not be completely finished organizing the office, but I did accomplish something else.

I finally sewed something!

Green wool long sleeved collared dress Vogue 8630

This dress is my entry Julia Bobbin’s third annual Mad Men Dress Challenge.

Julia Bobbin - Mad Men Challenge III

The point of the challenge is to sew a dress inspired by Mad Men. I have to admit, I don’t watch the show, but I love the clothes that I’ve seen. I’ve had this dress cut out since November, so it was nice to finally make it up. Between cleaning up my office and Julia issuing her challenge, it was the perfect motivation.

This dress shares some style points with Joan’s chartreuse dress from season 3, episode 6, most notably the collar and the colour.

Joan's green dress

These photos (and lots of others of this outfit) from here.

Ms. Bobbin herself has sewed this dress, although she did a very true knock-off complete with a column of fabulous buttons down the back.

My dress does not have buttons, but I still feel pretty fabulous in it. My starting point was Vogue 8630. I made a few modifications, which I talk about in more detail in my review on Pattern Review.

The best feature of this dress is its wide collar. I dialed up the Mad Men style factor by adding one of my vintage brooches for these photos. I can see so many different accessories working here–I think a giant black button would be really cool.

Vogue 8630 modified collar

In the Mad Men episode, Joan’s dress ends up covered in blood. However, I will be keeping this dress far away from any farming and renovating activities that may lead to bloodshed. I think my alter ego and her day job will make good use of it and keep it nice and neat.

Check out Julia’s blog next week for all of the other fabulous entries in the Mad Men challenge.

Are there any Mad Men fans out there? How about Mad Men fashion fans?

Foyer lighting options

At the start of the week you saw my attempt at a new light fixture for the foyer.

In the comments, you agreed with my feelings that my DIY fixture wasn’t quite right for the space.

Here are two of the other lights I’m considering as replacements.

The first is this hexagonal fixture. It’s a slightly updated version of the chandelier I bought at the thrift store.

Pros:

  • The design and the shape are a bit unique. I’ve not seen many fixtures like this around.
  • It’s the right size and height for the foyer.
  • It has three bulbs, so it should cast a decent amount of light.

Cons:

  • The metal is black, and the other lights on our main floor are oil rubbed bronze. I’d rather not mix my metal tones in this space, and I don’t think this piece can be painted easily.

Here’s my second option. I’d been considering a lantern-esque fixture, and this one is an attractive option.

Pros:

  • The metal on this light is antique bronze, which is closer to the ORB of our other fixtures.
  • The lantern design feels a little bit country to me, perfect for a farm.

Cons:

  • I’m concerned this fixture might be a bit too small to carry the whole foyer.
  • With only two bulbs, it won’t shed as much light as the first fixture or my DIY option.

I have a hard time spending more than $100 on light fixtures (I know, I know, I’m super cheap), and both of these options come in right around this price point.

Let’s put it to a vote.

Please feel free to suggest another option, if you’ve seen something that you think would work better.

Does anyone else struggle with finding good lighting? How do you feel about mixing metals?

DIY light fixture (fail?)

I have another thrifted light fixture makeover for you today. Remember this beauty from my thrifting post?

1980s light fixture redo

When I was in the checkout line at Value Village, the woman ahead of me said, “What a great find! So classy!”

I said, “Oh, thank you.” In my head I was thinking, “Are you insane? This light is completely 1980s. It will look nothing like this when I’m done.”

My plan for the foyer was to replace the giant ceiling fan with a small chandelier covered by a simple drum shade.

Here was my chandelier.

1980s light fixture

Here was my drum shade.

Vintage lampshade

It was vintage lighting fest over here.

I took apart the light, took apart the shade, merged the two together and spray painted everything oil-rubbed bronze.

1980s light fixture redo

I shortened the shade and added a new fabric cover.

1980s light fixture redo

Then I installed it over the stairwell.

Crooked drum shade

Hmmm… not quite what I envisioned. As Matt said, “Woman, what were you thinking?” I stood there and laughed.

Then I got out my glue gun. A couple of daubs of glue held the shade a bit straighter.

Foyer light fixture DIY drumshade over a chandelier

I’m still not sure if this is quite what I envisioned. The inside looks a bit rough in some spots, and the ribs of the shade show through when the light is turned on.

1980s light fixture redo

Another layer of fabric on the inside might solve both of these issues, but it would also lessen the light. This light is much brighter than the ceiling fan that was there before, which I like as our foyer tends to be a bit dim.

I’m content to live with it for awhile until I make up my mind. Either way, it’s an improvement over the fan that was there when we moved in and the pigtail that we wired up when we were painting.

I’d love to hear your to opinion. Do you think this is a #DIYfail or #victory? Have you ever made over a light fixture?

Office organization progress report

Last week when I shared the progress I’ve made on my March projects, I was all about timelines and staying on schedule. This week, things ran off schedule a little bit… or the schedule got rescheduled.

I had two tasks left for the second half of the month: get my home office under control and pretty up my work office.

I made zero progress on my work office.

My excuse is that I made outstanding progress on my home office.

Remember this really embarrassing picture that I so reluctantly shared with you at the start of the month?

Messy office

Well, I don’t mind sharing it with you this time because now the view from the doorway looks like this. (And the poor quality of this photo in no way reflects the warm feelings I now have for this room. I was losing light. What can I say?)

VIew from my office doorway

Here’s the order of how I originally planned to tackle the to-dos in my office:

  • Sort and file the mountain of paperwork that’s built up on top of the filing cabinet – By March 16
  • Add organizers to the new dresser and start filling the drawers – By March 22
  • Make a bulletin board – By March 22
  • Pull together all of the forms that we need for our taxes this year – By March 30
  • Figure out how to make better use (temporarily) of the closet – By March 30
  • Unpack a few boxes, repack some of the boxes, repile the boxes – By March 30

Last weekend, I found myself more enthused about the last two items on this list than I was with some of the items higher up, so I decided to be flexible and follow my motivation.

When we moved into the house, my office became the dumping ground for things that we didn’t have a place for.  Since I didn’t have any furniture aside from a desk that was left by the past owners and a small bookshelf that Matt had from his childhood bedroom, everything was left in its packing boxes and piled against the wall. Even though it’s been two years since we moved in, everything was still piled.

After my organizing binge, I still have a pile of boxes, but it’s about half a dozen boxes less than it was before. That’s major progress for me.

Moving boxes stacked in my office

There were two things that allowed me to unpack some of my boxes:

1. Matt gave me a small cabinet that used to be in his office. Filling that cabinet with craft supplies, sewing patterns and some sewing tools meant that I could use Matt’s childhood bookshelf as an actual bookshelf. Even though this shelf is small, it holds all of my knitting and sewing books, magazines and patterns. I even have room for a bunch of decorating magazines. It’s so nice to have these accessible again.

Small bookshelf

2. In the category of making better use of the closet, I finally filled some storage caddies that had been left behind by the past owners. This seems like a really obvious solution, and you’re probably asking why I didn’t do this long ago. The simple answer is that the caddies were disgusting. Really, really dirty.

Dirty plastic storage caddy

It was easier to just tuck them away–empty–in the closet, rather than scrubbing them out. However, there comes a point when clutter is more annoying than cleaning, so I threw the caddies in the bathtub and scoured them inside and out. The result was 11 drawers for everything from yarn to fabric to wrapping supplies. Some of the drawers are still empty. Yay for room to grow!

Plastic storage caddies

I realize my office still isn’t pretty or even super functional. I have big plans to repaint, add more furniture, and style it into a really, really useful and really, really attractive space. However, there’s no timeline on when this is going to happen. In the meantime, I’m working with what I have and trying to make the space as organized and useable as I can.

The trick now is to avoid it turning back into a dumping ground.

Anyone have any tips to share on organizing a temporary space (one that you know you’re going to redo down the road)? What’s your “room of shame” (please tell me you have one)? How do you store craft supplies? Any recommendations for furniture I should look for when I redo my office?

Vintage cut glass lights

We’re all familiar with the way too common boob light. Now meet the nipple light.

(A really bad picture of a really bad fixture).

Ugly 80s light fixture

This light graced the main bathroom.

Honestly, the light fixture is the least of the problems with this bathroom, but it really bothered me. It was painted, rusted and had absolutely no personality.

Browsing Value Village one day, I found a perfect replacement.

Value Village light fixture

At first glance, you may not agree that this is the perfect light, but let me show you the other lighting in the bathroom.

Vintage cut glass pendant lights

I’m sure your first reaction is not unconditional love for these lights (mine wasn’t), but they’ve totally grown on me since we’ve been living here. Sure they’re vintage. They’re a little bit rusted in a few spots. But they have personality. The shape of the shades is pretty unique and the glass, in my opinion, is just plain pretty.

Cut glass hanging light fixture

The cut glass on my thrifted fixture was a much better match than the nipple light. What wasn’t a match was the pseudo brass base. It took me three attempts to find the right colour of spray paint. ORB was way too dark. Pewter was too bright. Rosemary (what kind of a name is that for a metallic spray paint?) turned out to be the closest. It’s a silver with some gold undertones. It’s still a bit light, but it’s close enough.

Cut glass light fixture

Here’s how the lights look all together and lit up.

Vintage cut glass light fixtures

I love the patterns the cut glass makes on the ceiling. It’s a bit of prettiness that distracts me from the rest of the ugliness in the bathroom.

Alright, let me have it. What do you think of my lights? Are you a cut glass fan or are they too vintage for you?

How to refurbish a ping pong table

It’s St. Patrick’s Day, so today’s post is all about something green. Our new(ish) ping pong table.

Refurbished pingpong table

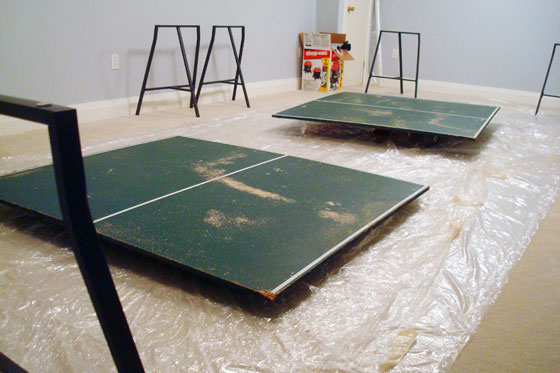
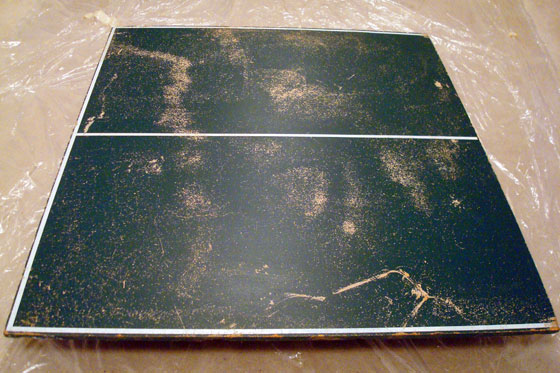
This ping pong table was a bit of an experiment. We found the top (in two pieces) in the barn when we first moved in. It was pretty dirty and had even been pooped on by the swallows that live in the barn.

I am always optimistic, so one day last summer, I dragged the two halves outside. I have no idea how I managed to move them by myself because each piece is extremely heavy. I haven’t been able to carry them on my own since. I scrubbed with a brush and sprayed with the hose until all of the poop and dirt (and a fair portion of the original green paint) washed away.

Damaged pingpong tabletop

Matt did not share my optimism that the table could be rehabilitated. That night he tucked the pieces deep into a corner of the driveshed. I have no idea how, though, because the tabletop is heavy even for him to move on his own.

Despite his lack of enthusiasm for the project, Matt did help me carry the top into the house. Then, one weekend while he was out of town, I went to work.

This project was a total experiment, and I’m sure ping pong purists out there will be horrified. But (spoiler alert) everything worked out, so I’m sharing my technique with you.

There were two big issues with the table: 1) We had no legs to go with the top. 2) The top itself was not in great shape.

The leg issue was easy to solve with six trestle style legs from Ikea (Lerberg).

Ikea Lerberg legs for a pingpong table

The top took a little more effort.

I started with a coat of fresh white paint over the lines. After sleeping on it for the night, I realized I really should have sanded the top first, so the next morning I basically started all over again. I sanded down the top, which was not an indoor task. Sanding resulted in a fine green powder over the whole room–not the best scenario with our nice light carpet. There was a defined line between where the drop cloth had protected the carpet and where the green dust had floated beyond the drop cloth’s reach. I was very glad Matt was not home to see the mess I had made.

Refurbishing an old pingpong table

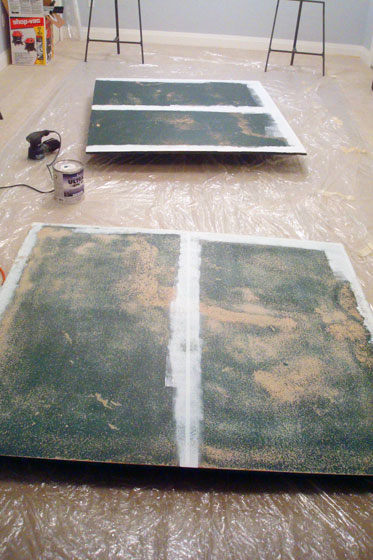
The Shop Vac erased the green mist, and I was able to get back to the painting.

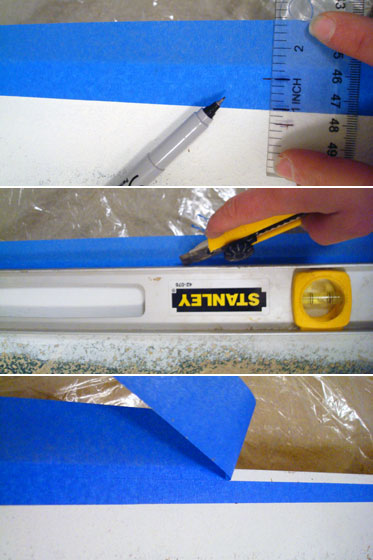
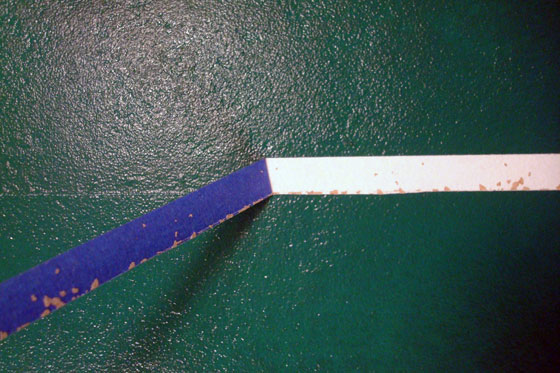
White paint went on again, and, then once it was dry, I taped off the lines. Since painter’s tape doesn’t come in ping pong line widths, I had to very carefully trim it.

Cutting painters tape to narrower width

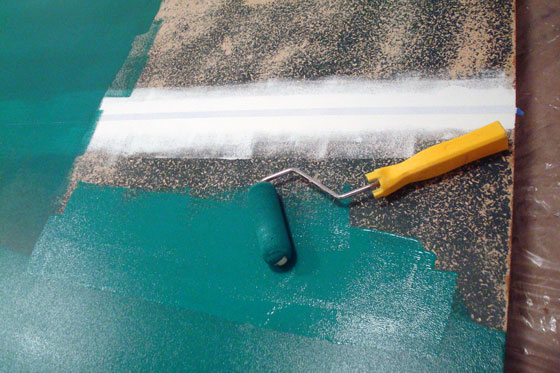
Then the tape got a quick coat of white paint to seal it, and after some drying time I moved onto the green. Since I wasn’t sure if this was actually going to work, I used some regular latex paint that we had left over from Matt’s office. It’s Manor Green from Benjamin Moore in case anyone’s interested.

Refurbishing an old pingpong table

The green took about three coats, I think. On the final coat, I carefully peeled off the tape to reveal the white lines. Some of the white flaked off (I think giving the white more time to dry, or even doing two coats would have been helpful).

Refurbishing an old pingpong table

Chips aside, the finish was a massive improvement over the table’s previous state. In fact, Matt was so impressed when he arrived home that he started to think that maybe I wasn’t entirely crazy in wanting to save the table.

So now I had a tabletop and I had table legs. How to put them together?

Refurbishing an old pingpong table

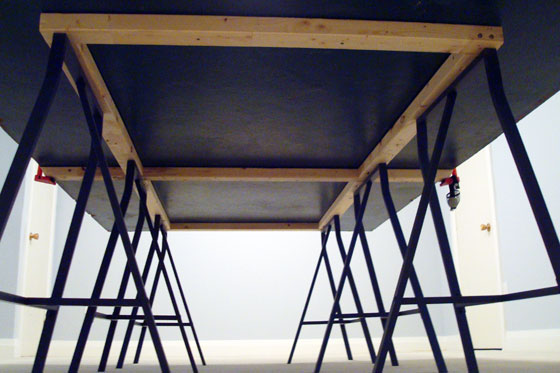
It turned out that the Lerberg legs are a bit shorter than regulation ping pong height of 30 inches–hey, I have some standards. Using a few 2x3s and my Kreg Jig I built a frame to attach to the underside of the tabletop.

Using a Kreg Jig to screw 2x3s together

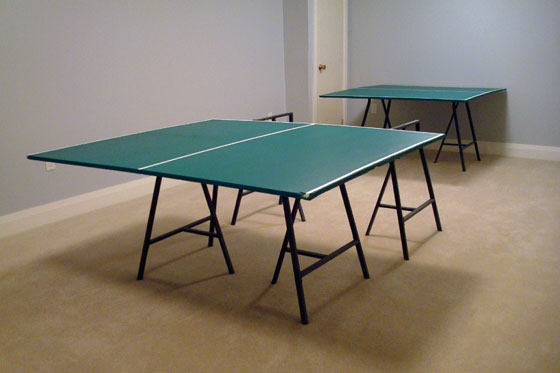
I screwed the frame to the tabletop… or at least to one half. The top ended up being too unwieldy and heavy as one big piece, so I didn’t screw everything together. We set the top on the frame and the frame on the legs, and we think each piece is heavy enough to stay in place on its own.

Frame for the underside of a pingpong table

The six Lerberg trestles mean the table is very leggy. However, we really needed the support in the middle of the table as well as at each end.

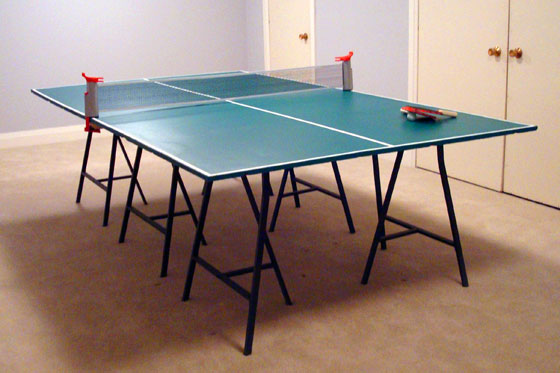
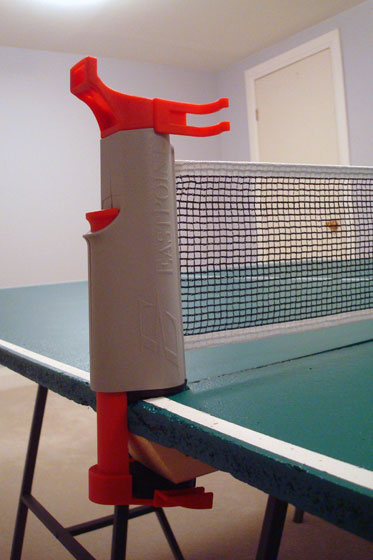
We got a very simple cheap net at Walmart. It’s called an “everywhere table tennis” from EastPoint, and we just clipped it onto the table. Again, I wasn’t sure that this refurbishment was actually going to work, so I didn’t feel the need to invest in a professional net.

Anywhere table tennis net by East Point

With the table set up, Matt broke out the paddles, tapped one of the balls across the net, and it bounced. It worked! We had a functional ping pong table.

I had no ping pong skills, but after a week of daily practice, I’ve improved a lot. I finally won a game against Matt yesterday (he also may have let me win one). My ping pong prowess aside, refurbishing the table was a definite win.

Have you ever rehabbed a piece of furniture that seemed beyond hope? Anyone have any ping pong pointers? How are you celebrating St. Patrick’s Day?

Post-vacation progress report

Ahhhh… a week’s vacation… so nice, so productive, so relaxing… so sad that it’s coming to an end. 😦

Curious exactly how productive I’ve been with my week off?

Well, I slept in everyday. I went snowshoeing twice a day until the snow melted enough that Baxter and I could safely go for a run on the road. Wow are we out of shape… although only one of us ended up with his tongue hanging out of his mouth… not mentioning any names.

Hmmm… what else? I cooked. I baked a pie for goodness sake. It’s only the second one I’ve ever made. (Pastry and I do not get along). I snacked. I read some magazines and a book. I watched movies. We visited with family and friends.

Oh, and I made some really good progress on my March projects.

The fourth item on my list, light fixtures, is completely done. (Although I’m not sure the foyer light is going to stay).

Foyer light fixture DIY drumshade over a chandelier

  • Buy a second light for the kitchen island – By March 9 Done March 9
  • Finish foyer light fixture – March 10 Done March 9
  • Install foyer light fixture – March 11 Done March 10
  • Install a new light fixture in the bathroom – By March 16 Done March 10

The first item on my list, the ping-pong table, is also completely done.

Pingpong paddle and ball on a table

  • Figure out how to configure the legs and what I need to attach them to the tabletop – By March 11 Done March 10
  • Buy lumber, screws and whatever other materials I need – By March 11 Done March 11
  • Build a frame – By March 16 Done March 11
  • Drill the legs – By March 16 Decided this wasn’t necessary
  • Attach the legs and frames and tabletop together – By March 16 The frame is attached to half the tabletop and then the whole thing is just set on the legs. Done March 11
  • Set up the net – By March 16 Done March 11
  • Practice my ping-pong skills… which currently do not exist Done everyday since March 11. And I’ve actually found a few skills… not very many, but some.

Item #2, my home office, is in progress and on schedule.

  • Sort and file the mountain of paperwork that’s built up on top of the filing cabinet – By March 16 Done March 12
  • Add organizers to the new dresser and start filling the drawers – By March 22
  • Make a bulletin board – By March 22
  • Pull together all of the forms that we need for our taxes this year – By March 30
  • Figure out how to make better use (temporarily) of the closet – By March 30
  • Unpack a few boxes, repack some of the boxes, repile the boxes – By March 30

Item #3, my work office, is not started. Wop-wop. However, I have three days until my deadline, so I should be able to return to work next week with a few pretty pieces in tow.

  • Make a bulletin board – By March 16
  • Recover the shade from my desk lamp – By March 16

Once again, setting deadlines has saved me. Heading into my holiday, I had a moment of “I don’t know where to start! How am I going to get everything done?” Then I reminded myself to check the blog and see the timelines I’d laid out.

I realize that I may seem really rigid, but I promise I did relax and have fun this vacation as well. I’m sure my approach wouldn’t work for everyone, but honestly having some kind of structure is really helpful for me.

Can you believe we’re already halfway through March? How’s the month going for you? What do you like to do when you’re on vacation?