Forsythia of ’15

It’s another disappointing year for our forsythia bushes. There are just a few yellow flowers and a lot of bare branches.

Forsythia blooms for spring 2015

Forsythia blooms for spring 2015

Forsythia blooms for spring 2015

There are a lot of buds along those branches, so I think we’ll have a bumper crop of leaves. My plan is to give the forsythia a really good haircut this weekend. I hope that will help to reset it. I’m pretty sure that forsythia set their blooms fairly early, so if I prune too late, I’ll cut off next year’s blossoms… Not that I’m too optimistic about our chances of that given our experience the last two years.

I like tracking the onset of spring by comparing our forsythia every year. The timing of this year’s blooms, such as they are, are in line with two years ago:

What’s blooming at your house? Do you have any tips for encouraging forsythia blossoms?

Black thumb

I have a bit of a gardening theme for this week’s posts.

To set the scene, let’s first establish that I am not friendly to plants.

Remember that beautiful yellow pot and the ivy I was so proud of keeping alive?

Yellow pot with ivy in it on a windowsill

Yeah, it’s not so much any more. Matt’s hear-no and speak-no monkeys are wishing they could cover their eyes like see-no.

Pot of dead ivy

Upstairs, my poor aloe has realized she’s doomed and is trying to make a run for it. Harry, the other cactus, is hanging tough… for now.

Aloe falling out of its pot

And outside, where Mother Nature is available to counteract my influence, things aren’t going much better.

I had such high hopes for my pussy willow sprouts.

Pussy willow sprouts

But over the past week, they too succumbed to my black thumb.

Dead pussy willow sprouts

So all this is to say, don’t expect too much out of this week’s gardening posts.

One Room Challenge Week 6 – Master bedroom reveal

Cross the master bedroom makeover off my Home Goals 2015 list. Thanks to the One Room Challenge, this room is D-O-N-E.

Want to catch up on how we got here? Here are all of the previous posts:

It was hard for me to stay motivated in this makeover. The ORC was the push I needed to finally finish it off. I have to admit that I’m glad the room is done. Even better, I’m glad that it’s pretty… if I do say so myself.

Navy blue and white master bedroom

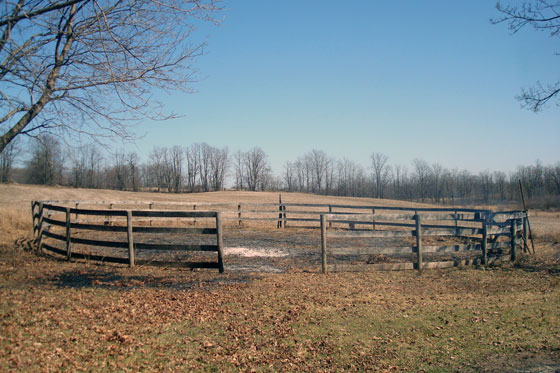
I think you’ll agree it’s definitely more stylish than where we started.

Master bedroom before and after

The best descriptors for this makeover are three words: simple, DIY and personal.

Simple

We kept things simple by working with what we already had.

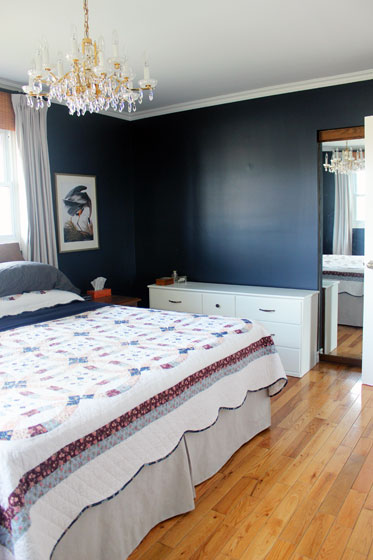
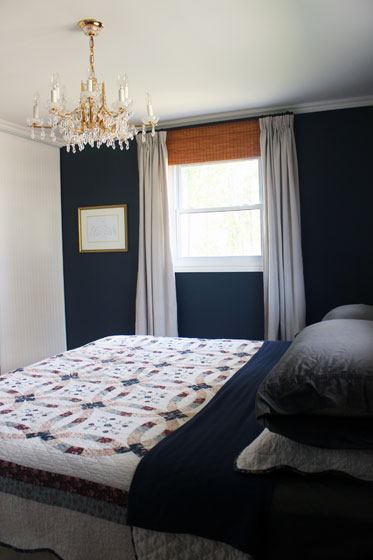
First up was fresh paint for everything: ceiling, walls, trim, the door and even the old garage sale dresser we bought when we moved into our first house. After going round and round on paint colour, I love the deep navy blue I chose for the walls (Hale Navy by Benjamin Moore).

White dresser with aged brass hardware

Paint took care of most of the transformation, but it only went so far.

For those that have been following along, you know the finish on the sliding closet doors was in pretty rough shape. I didn’t want to replace the doors though (remember, we were working with what we had), so I tried wallpaper for the first time. With a bit of help from my parents and two rolls of beadboard wallpaper, we added a nice country touch to the bedroom.

Navy and white master bedroom

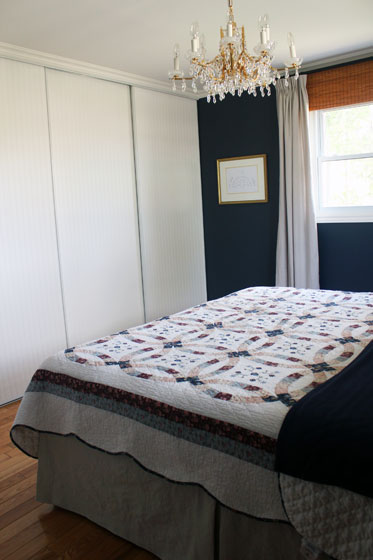
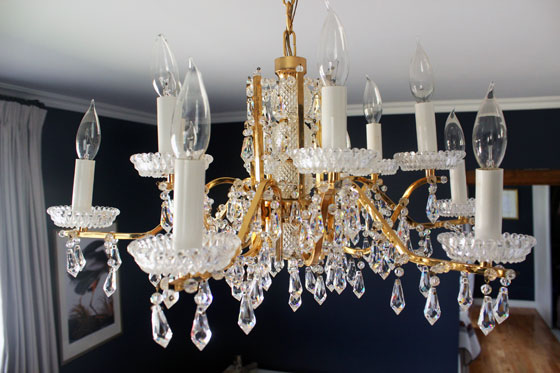
Where we didn’t go country was the lighting. Matt’s reaction when he first saw the chandelier was one word: “Liberace.”

Hello, sparkles.

Brass and crystal chandelier

Even with this light, we were still able to work with what we had (although not that awful ceiling fan, thank goodness) thanks to one of my co-workers. She invited me over to see her new (to her) house, and as we were eating dinner in the dining room she mentioned that they were going to replace the lighting. I said, “I’ll take it!” (Yes, I’m that dinner guest).

I wasn’t sure where I was going to use such a sparkly, brassy, glassy, shiny chandelier–we do live on a farm, after all–but it’s a perfect fit for this bedroom. Navy, brass, sparkle, white, wood… yes, please.

I love this view when I’m lying in bed. Also lovely is the smooth unstippled ceiling above it.

Brass and crystal chandelier

Which brings us to the DIY stage of this makeover (not that painting and lighting aren’t DIY).

DIY

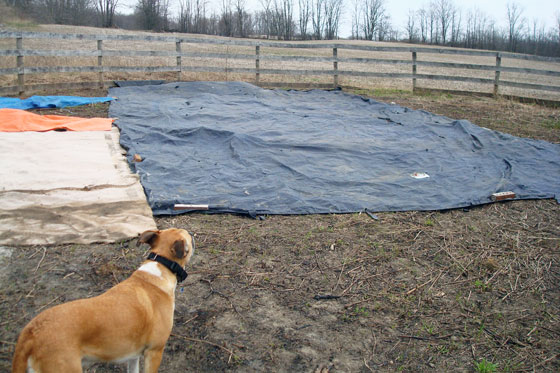
Scraping the stipple ceiling was definitely the most involved DIY in this room. The other DIYs were much easier, but, given my lack of motivation throughout this makeover, tedious.

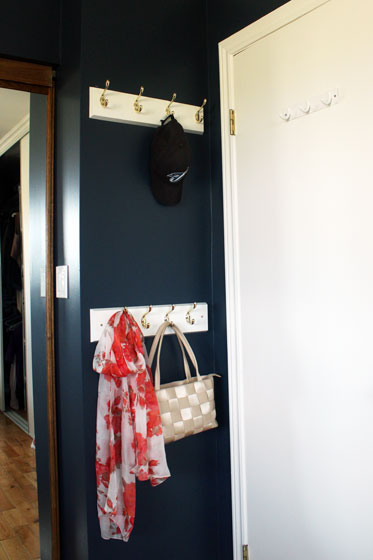
Well, not completely tedious. I knocked out a couple of hookboards really quickly. Having lots of hooks behind the door helps to corral the piles of clothes that appear so regularly in our bedroom. And if I’m being honest, these hooks are usually smothered in pyjamas and dog-walking clothes, not a pretty scarf and handbag–although Matt’s baseball cap is genuine.

Brass and white hookboards

The headboard was a difficult DIY just because I couldn’t decide what to do. Should it be upholstered? Painted? Curved? Square? It couldn’t stick up too high because it was going in front of the window. I didn’t want to spend too much money because some day post-whole house reno I hope to have a new master bedroom where I can build the wing chair style headboard of my dreams.

I finally decided on a simple wood headboard in an interesting shape. A leftover sheet of plywood and some careful cutting with my jigsaw fulfilled my vision.

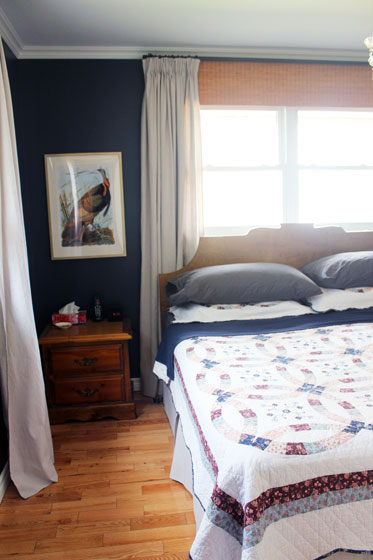
After mixing a few cans of stain together, I was able to get a finish that’s a pretty close match to the nightstands from Matt’s childhood bedroom–although I had a really hard time photographing the headboard in front of the window, so I realize it’s kind of hard to tell.

I love the accents of the warm wood against the deep blue and bright white.

Navy, wood and white master bedroom

The other DIYs in this room involved a less typical power tool–my sewing machine. Although the fabric I sewed is a DIY staple–canvas drop cloths. I love the weight and the colour of these drop cloths. I used them for both the curtains and the bedskirt, and I will definitely be using them in future projects.

The window treatments will get their own post soon. They’re super simple, yet we have everything we could ever want: blackout blinds, bamboo blinds for style and full length pinch-pleated curtains–style and function

Navy and white master bedroom

Personal

The final guiding principle of this makeover–of my overall decorating philosophy–is to make it personal.

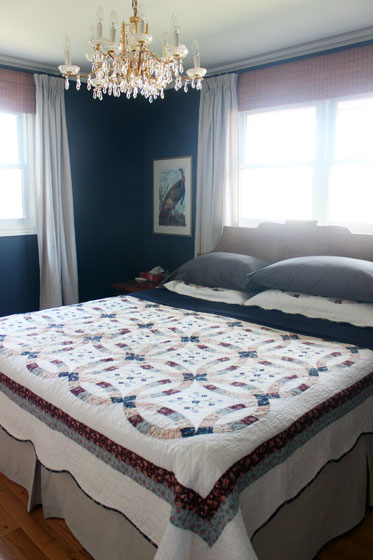
First up is the quilt on the bed. The quilt is from Walmart, but its patchwork pattern is special to me.

My grandmother was a quilter, so I’ve been exposed to this intricate handcraft my whole life. The double wedding ring pattern has been my favourite for years. I love the symbolism of having this pattern on Matt’s and my bed.

I admit, I wasn’t sure about the patterned quilt as this makeover progressed. So many rooms I see online are all about white or neutral bedding. I think that the quilt works in the room though, and it’s a lesson for me to use what I love, not what’s trendy or stylish.

Blue and white master bedroom

The other really personal element is the art that I chose.

The two pictures on either side of the bed are beautiful Audubon posters. On my side is a Great Blue Heron, an elusive bird that visits the pond occasionally. It’s always really special when I catch a glimpse of one. On Matt’s side is his favourite bird to see at the farm, the wild turkey.

Audubon prints

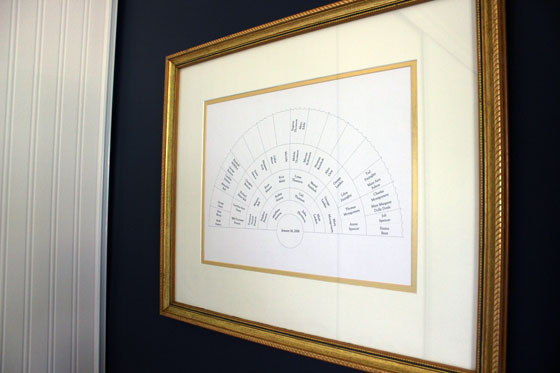
The final art can’t get much more personal, a family tree. I made each of my sisters a family tree like this when they got married with their wedding date in the middle circle. Now Matt and I have one of our own. (If you want one of your own, Martha–who else?–has a free template).

Fan family tree

So simple + DIY + personal. Plus six weeks (okay, a little bit more). Plus a whole lot of motivation from all of you reading along and all of the other participants in the One Room Challenge. Equals one beautiful master bedroom. Thanks so much for following along.

Visit Calling it Home to check out all of the other amazing reveals.

Picking up after the litterbugs

I’ve decided that smoking, drinking and littering should all be added to the list of deadly sins.

Saturday was the annual spring clean up in our area, so I headed out with a roll of garbage bags, two pairs of gloves and, of course, my usual sidekick.

Litter clean up

Most of the litter that we picked up was cigarette packages, paper coffee cups and beer cans. Given that most of the trash was thrown out of the windows of passing cars, I’m concerned that so much of it consisted of empty containers that formerly contained alcoholic beverages.

So perhaps to clarify, the deadly sin should be drinking and driving, not just drinking.

The annual litter clean up invariably leaves me feeling disgusted with humanity.

Not all of humanity, though. This year we had professional help from 1-800-Got-Junk. The team was driving around the concessions, picking up the bags that had been left on the roadside.

1-800-Got-Junk team

Baxter was also his usual helpful self. He appreciated the opportunity to spend as much time as he wanted wading in the ditch.

Baxter wading in the ditch

When he tired of getting muddy, he returned to sniffing and sunbathing.

Baxter

Here are a few highlights of this year’s clean up:

Various car parts–headlights, bumpers, hubcaps, a license plate. Our ditches are very deep, and apparently the stop sign across from the east field is invisible.

Car parts

SPB, I have your gloves… Well, two of them. The third odd one went in the trash.

Gloves

We made it approximately halfway around our 2km of roadside. The grand tally over three hours of clean-up was three bags of garbage, three bins of recycling, three hubcaps and three gloves. Oh, and those three new sins.

Have you done a spring clean-up at your house? What’s the weirdest trash you’ve ever come across? What sins would you add to the list if you could?

Solar one year later

A year ago, we flipped the switch on our solar panels and started generating electricity. I thought it might be neat to take a look back at the past year and see how our little generating station worked out.

If you want to catch up, here are all of the previous posts about Going Solar.

Just a reminder, we’re part of Ontario’s microFIT program. Under this program, we install solar panels, and then the power that we generate goes back into the provincial grid. The province pays us $0.396/kWh.

Over the past year (10 months actually, since our first payment didn’t arrive until July), we made $3,621.13. Each month the hydro company pays us for the electricity we generated two months before.

Graph showing income from solar panelsJust for comparison, we spent $2,604.35 on electricity for the same time period (including the wee bit of power it takes to run the panels). That’s a profit of just over $1,000. Yay to coming out ahead!

Our inverters tell us roughly how much we make each day. So far, our record is just over $29. Matt so badly wants to break $30.

Solar panel inverter screen

When the panels were first installed, I estimated it would take 8 1/2 years before our income equaled the investment we made in the panels. Using the numbers from the past 10 months, it looks like the payback period is about 9 years and 4 months. I’m optimistic that spring is going to be a good generating time for us, though, so I think the 8 1/2 is still achievable.

The winter was pretty dismal. There were lots of days where the income was in the single digits. The sun being in the wrong hemisphere was the biggest problem, but then there was the snow. Snow on the panels drove Matt crazy. After a couple of big storms, he climbed up on the barn roof with a broom and very gently cleared the panels.

Clearing snow off solar panels

The solar array is pretty big though, and Matt’s arms are only so long. There was one hard-packed drift that he just couldn’t reach. This thing was his nemesis.

Snow on solar panels

Eventually, with some yoga-like contortions and gentle shovel work from Matt, combined with the help of–what else?–the sun, the drift slid down the panels and off the roof in big icy sheets.

Ice sheets sliding off solar panels

Once we hit February, we started having lots of sunny days. As the sun returns to the northern hemisphere, our output has been climbing every day. Even cloudy days result in double digits.

Beyond the snow, we’ve had no issues at all. The inverters and the panels all are chugging along, the money is trickling in, and we’re doing our part to generate some clean power. We’re really happy with our decision to install the solar panels.

One Room Challenge Week 5 – Professional help

We’re heading into the homestretch on the One Room Challenge.

One Room Challenge

Next week is the big reveal of my master bedroom makeover. Here’s where we’ve come so far:

The One Room Challenge is largely about DIY. It’s not a requirement, but most of the other bloggers participating are painting, sewing, carpentering all on their own like I am.

However, last week it was time for some professional help.

One of the quirky elements of this room is that the light switch was behind the door. When we used this room as a guest room, people would always walk in and reach for the light switch. I’d have to explain that no, it’s not where you’d expect it to be. You have to reach around behind the door.

Light switches behind the door

Apparently, I didn’t mind making things inconvenient for our guests, but now that we’re the ones living in the room, I wanted the light switch where it should be.

Matt and I discussed doing this ourselves, but the electrical in this house is a bit wonky. Plus, relocating the switch would involve lots of time in the attic–and lots of time with the insulation in the attic. Not fun. We also had some other minor electrical work on our to-do list, so we decided to bundle it all together and call in a professional.

When he first saw the bedroom, our professional questioned whether there was space for a switch. There’s a very narrow wall between the door and the edge of the closet. We had no way of knowing how the studs were configured. He got out his stud finder, picked a spot, and I held my breath as he punched through the drywall.

There was a narrow cavity. It was nearly the width we needed for the box, but just a bit too narrow.

Cutting drywall for a new light switch

Fortunately, it was close enough that a quick trim with the sawzall allowed the box to fit and didn’t compromise the stud.

Tracing the wire from the junction box in the ceiling to the switch turned out to be another bit of fun. There’s a join in the wiring somewhere, but the electrician wasn’t sure where. It looks like there’s a junction box in the closet of the bedroom next door, so that’s my guess. When we do our big whole house reno, we will definitely devote a portion of the budget to fixing all of the wiring.

Our electrician couldn’t get rid of the original switch behind the door. It’s a crowded box that appears to be feeding some other areas of the house. But a blank cover on the missing switch is something I can live with.

Blank plate covering a light switch

I’m just happy that I no longer have to live with the switch behind the door… although I still reach for it when I go into the room. This new switch, on the right side of the door, with a dimmer (can I have a hooray for dimmer switches?) is so wonderful.

Bedroom light switch with a dimmer

The bedroom is coming together. All of the cosmetic updates are looking really good. However, this little functional improvement is equally awesome.

Thanks to our awesome electrician. And thanks to all of you for following along so far. Only one week to go!

To check out the other ORC participants, be sure to visit Calling it Home.

Summer family

Recently, I’ve started following a few more farm blogs. Even though we live on a farm, I am definitely not a farmer and there’s a lot that I don’t know.

One of the blogs I’ve been reading is Dinner Starts Here.

Dinner Starts Here logo

Contributors to this site are young farmers from Ontario. They write about their lives on the farm and “how they’re producing everything from berries to beef, milk and eggs to wheat, soybeans, potatoes and maple syrup.” The idea is to help people understand what goes into producing the food we eat and get to know the people who make our food.

Last week I came across a post about one of the farmer’s summer family. She wrote about the migrant workers they hire every year to work on their farm. She said, “Our guys are one of the major backbones of the business. They are vital to our operations successes – we quite literally could not exist without them.”

Migrant workers

Photo courtesy of Dinner Starts Here

I realized that after reading her post, I had some misconceptions about migrant workers, so I reached out to the Dinner Starts Here team and asked if I could share her post.

Erin gives a good explanation of the important role migrant workers play on Ontario farms, and it’s a great introduction to the people who produce the food we eat.

Contrary to why a lot of people believe farms hire migrant workers – it’s not cheaper or easier… it’s actually is a lot more expensive and a lot more work for us to hire them than it would be to hire local staff. First – we’re required (as we are required to pay all of our staff) to pay them minimum wage. Some of our guys who have been returning year after year have earned increased wages like all of our staff does when they return year after year. Then – we have to pay for housing, a portion of their utilities, and a portion of their airfare to and from Mexico. We also spend countless hours taking them shopping for anything they need – from groceries to new clothes to take home for their kid… which is a tremendous amount of work, time and effort. But in the end… for us… it’s worth it.

I encourage you to pop over to Dinner Starts Here and read the rest of the post.

Woman vs. tarp

Baxter here with a garden update for y’all.

At least that’s what Julia says we’re making. It doesn’t look like any garden I’ve seen before.

Garden after the weeds have been burned

Two weekends ago, Julia lit the “garden” on fire. I used to love that spot of the field. The long grass was super, super sniffy. But now it’s gone. And I got to say, I didn’t love the fire. First, it was very, very big. I thought it was going to reach out and singe my furs. I’m a short-haired fellow. I don’t have many furs to spare. Second, I got all tangled up in the hose which was not very comfortable. And third, smoke makes me sneeze.

I went into the garden to check it out last Saturday. It’s not as sniffy as it used to be. But it didn’t make me sneeze either. I rolled around a bit ’cause that’s what I used to like to do in the long grass. It felt different, but it was okay.

Julia was not very happy after I rolled, and she decided to cover up all the ash.

She and Matt got out the World’s Biggest Tarp. Matt probably should have stayed with her in the garden ’cause it took her a long time to get that tarp unfolded. I dunno what’s so difficult. She’s got thumbs!

Even though she used the World’s Biggest Tarp, it still wasn’t big enough for the garden. Then she decided to use the big roll of carpet she found beside the garden. It wasn’t frozen anymore–I walked all over it and sniffed to make sure–but she still had a really hard time moving it.

Julia vs. the carpet was more interesting than Julia vs. the tarp, but she didn’t make a video of that one. I was sunbathing, but I opened my eyes every so often to watch.

I got up when she went to get Wiley. I keep an eye on that tractor. It took them a couple of tries, but they finally got the carpet into the front end loader. Then Wiley carried the carpet around the fence and dumped it in the garden. He’s pretty helpful even though he doesn’t have thumbs either.

It still took Julia a long time to lay the carpet all out, but eventually it was spread out in the garden. Even though the carpet was wet and dirty and buggy and had plants growing in it, it was nicer to lay on than the pokey dry weeds.

Julia wasn’t any happier when I laid on the carpet than she was when I rolled in the ash. After my afternoon walk with Matt, he took me from the front door right into the bathtub. That was not my favourite part of the weekend. Honestly, what’s the matter with a few smudges on my furs!

The carpet and the World’s Biggest Tarp and two other little tarps still aren’t enough to cover the whole garden. Plus, some of them blew around in the wind, and we had to spread them out again the other day.

Tarps on the garden

I think we’re going to be working in the “garden” for awhile yet. Hopefully it starts to look like a garden soon.

One Room Challenge Week 4 – Update sliding closet doors with beadboard wallpaper

Progress picked up over the last week in the master bedroom makeover for the One Room Challenge. Mostly because for at least some of the time my workforce tripled.

Saturday morning, my parents showed up, wallpaper tools in hand. They were there to help me cover our severely beat up closet doors.

Here’s a summary of the projects so far in the master bedroom:

The One Room Challenge has been hugely helpful in getting this makeover moving after my motivation waned. The room is coming together. Which brings us to this week’s task: the closet doors.

The doors appear to have had a number of things taped to them in the past. When the tape was pulled off, so was the finish on the doors.

Master bedroom closet

My decorating philosophy at the farm is every room needs touch of something rustic. This bedroom is not at all rustic, but a touch of country would be appropriate.

Beadboard wallpaper would work.

I have never installed wallpaper. I’ve removed a lot of it, but never gone the opposite direction. I figured I’d need an extra pair of hands, so I decided to make sure the hands were experienced and called in my parents.

My parents measuring and cutting beadboard wallpaper

As she was brushing the paste onto the closet doors, my Mom recalled hanging grasscloth wallpaper in their first house in the late 1970s–on trend 35 years ago and on trend today.

Brushing wallpaper paste onto the closet doors

She also recalled cherry wood beadboard lining the stairwell at the farm where she spent summers when she was growing up. Doesn’t that sound beautiful? This wallpaper is not quite the same, but it’s a good shortcut in my opinion.

The wallpaper went up really quickly, especially with three of us working on it. (As you can see, Baxter was his usual helpful self). In less than two hours, the doors were all covered.

Beadboard wallpaper on sliding closet doors

Even though they were white-ish before, the wallpaper makes such a huge difference. The room looks so much fresher. And the vertical stripes make the doors look wider too in my opinion.

Beadboard wallpaper on a sliding closet door

It’s been awhile since my parents and I have worked together. It was really nice to have their help. Thanks, Mom and Dad!

I’ve been working on my own for the rest of this week, but I’ve still been productive. The headboard is almost finished–good thing because I need to get it out of the guest room so my brother-in-law can sleep there this weekend–and the electrician is here today to work on the lighting. We’re getting there!

  • Buy a new bed – Done
  • Remove popcorn ceiling – Done
  • Patch ceiling and walls – Done
  • Paint ceiling, trim, doors and walls – Done
  • Make/find window treatments – Done
  • Build hookboards for behind the door – Done
  • Paint dresser and replace hardware – Done April 6
  • DIY a headboard – By April 12 19 24
  • Refresh dinged up closet doors – By April 19 Done April 18
  • Relocate light switch – Cross your fingers that the electrician doesn’t run into any problems today
  • Replace light fixture – I’ll get the electrician to do this while he’s here
  • Come up with a jewelry storage solution – By April 26
  • Sew a bedskirt – By May 3
  • Decorate and personalize – Ordered prints April 6. I’m still waiting for them to arrive. Come on postal service!

Only two weeks to go. Visit Calling it Home and cheer on the other participants as they head into the homestretch on the One Room Challenge.

Linking up to: Happy Housie DIY Challenge Party: Patterned and Textured Projects